SEARCH FINESCALE.COM

Enter keywords or a search phrase below:

More Soldering Fun!, PzKpfw III Ausf E from 10th panzer division 1940

9646 views
38 replies
1 rating 2 rating 3 rating 4 rating 5 rating
  • Member since
    December 2007
  • From: Eagle River, WI
More Soldering Fun!, PzKpfw III Ausf E from 10th panzer division 1940
Posted by PANZERJAGER on Monday, January 5, 2009 8:41 AM

Perhaps my modeling brothers in arms can help me with some research...

I am currently sitting on 102 un-finished armor projects!!!!!!!

 My newyears resolution is to not purchase any new armor for the "Grand Stash", until I have cought up with the projects that I have unfinished.

I am trying to get the tool storage layout right on an older DML panzer III E, and the kit seams to be wrong.

any help would be GREEEEAAATTT!!!!!!!!!!!!!!

Tom F. 


After some help from Wild Bill (thanks for the refs.), I dove in with bolth feet right up to my neck!!!!!!


Progress is slow right now, (dealing with my Father in law passing and my 86 year old Grandmother with kidney failure) but here are a few picks to keep you interested...

1st. I must say the Dragon Panzer III E kit isn't!!!!

Get good refs on this build if you intend to build it.

Wrong fender layout, the instructions tell you to install the bullet splash guard for the turet ring, (don't!!!!), and so on...

O.K. I will get off of the soap box now!

So on to the good stuff;

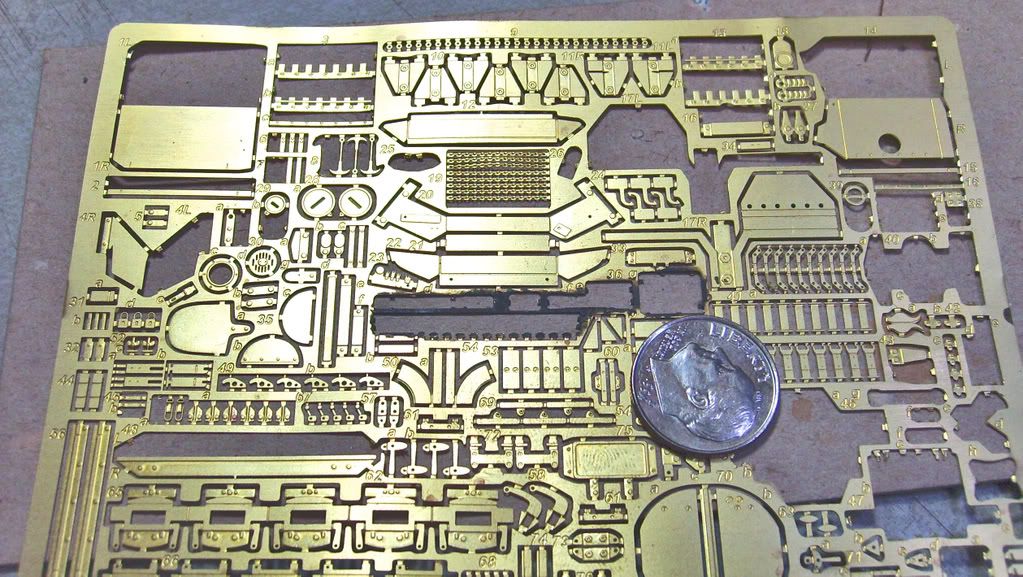
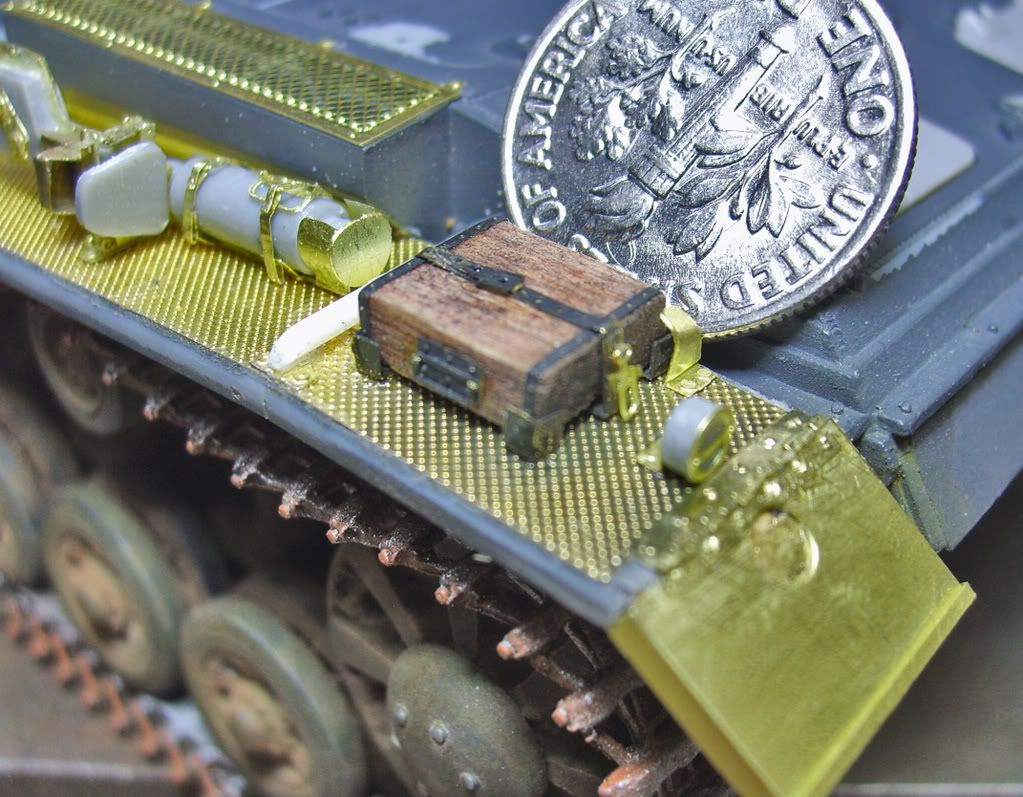
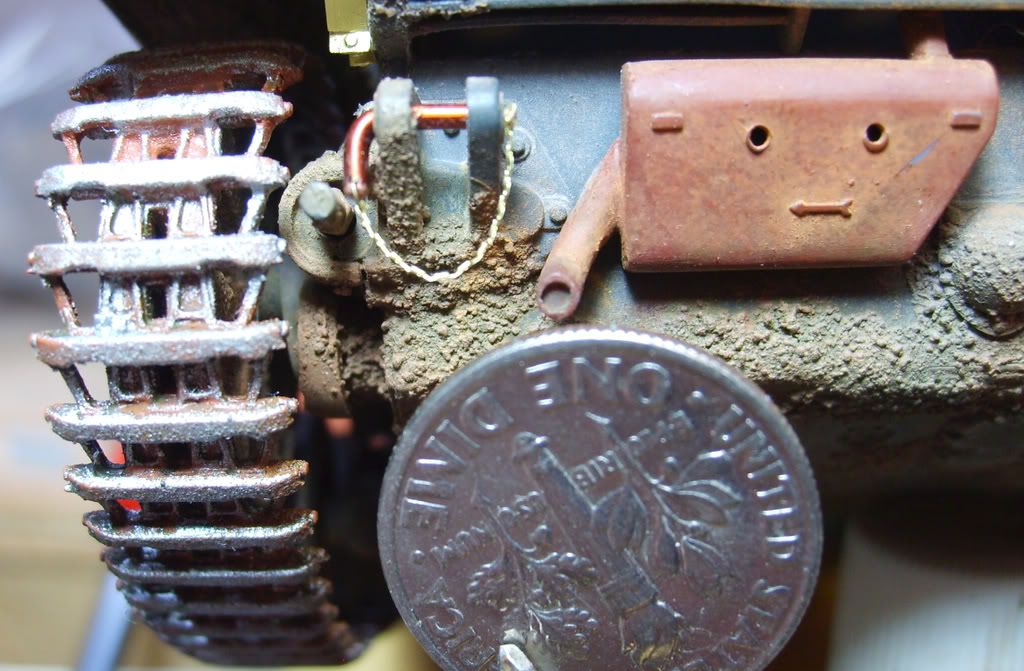
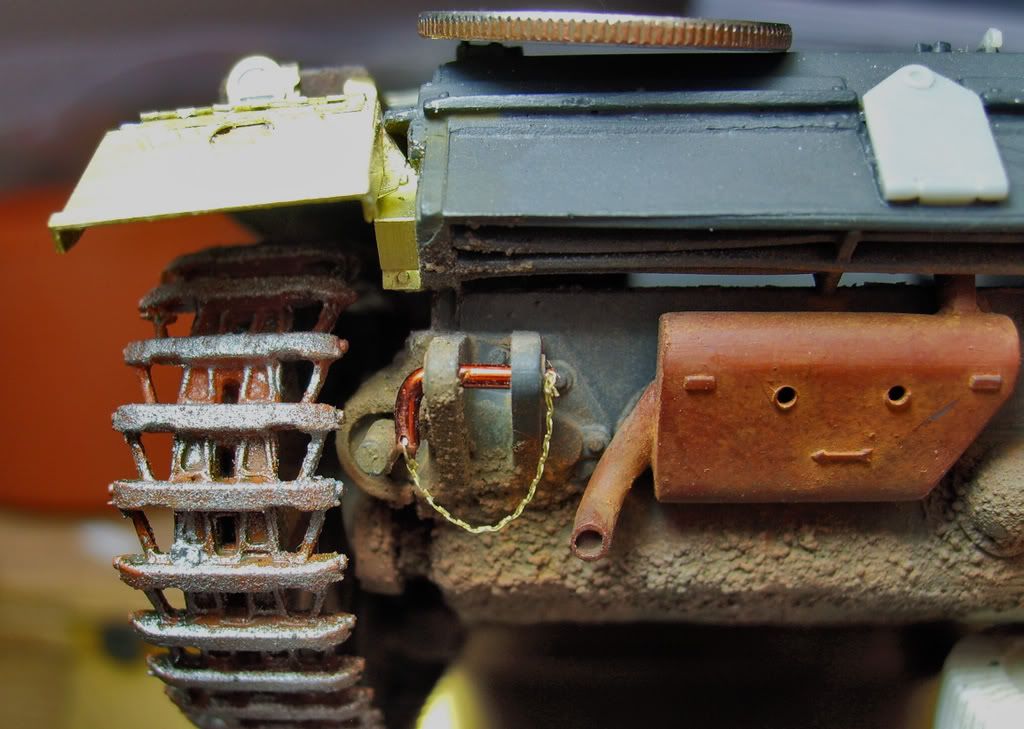
Aber Photo etch set and fenders,  rubio barel, Lionmark SS German Tool Clamps...

The stainless steel tool clamps are realy cool stuff;

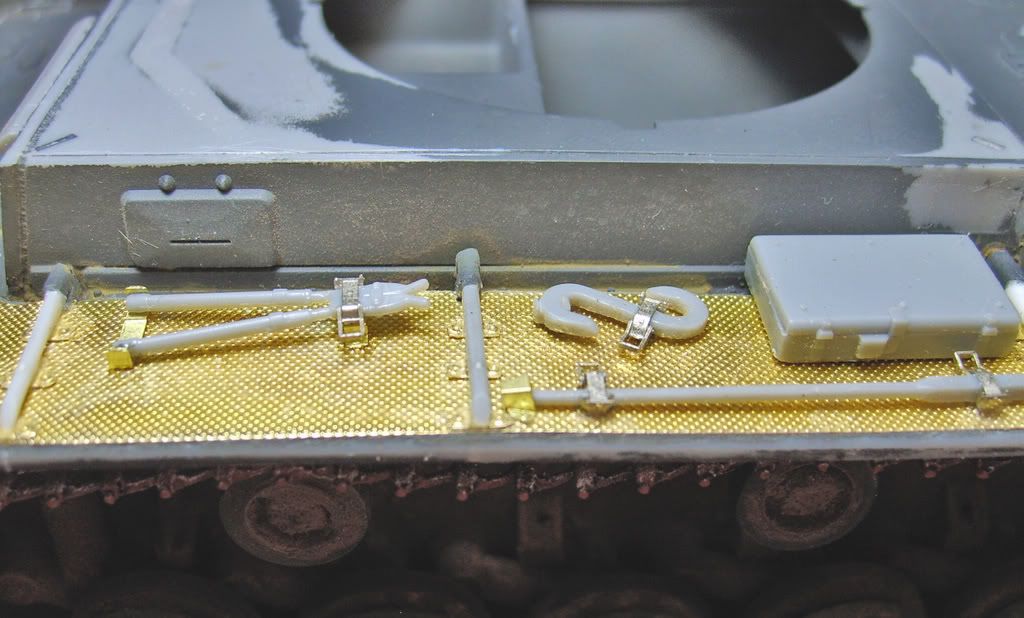
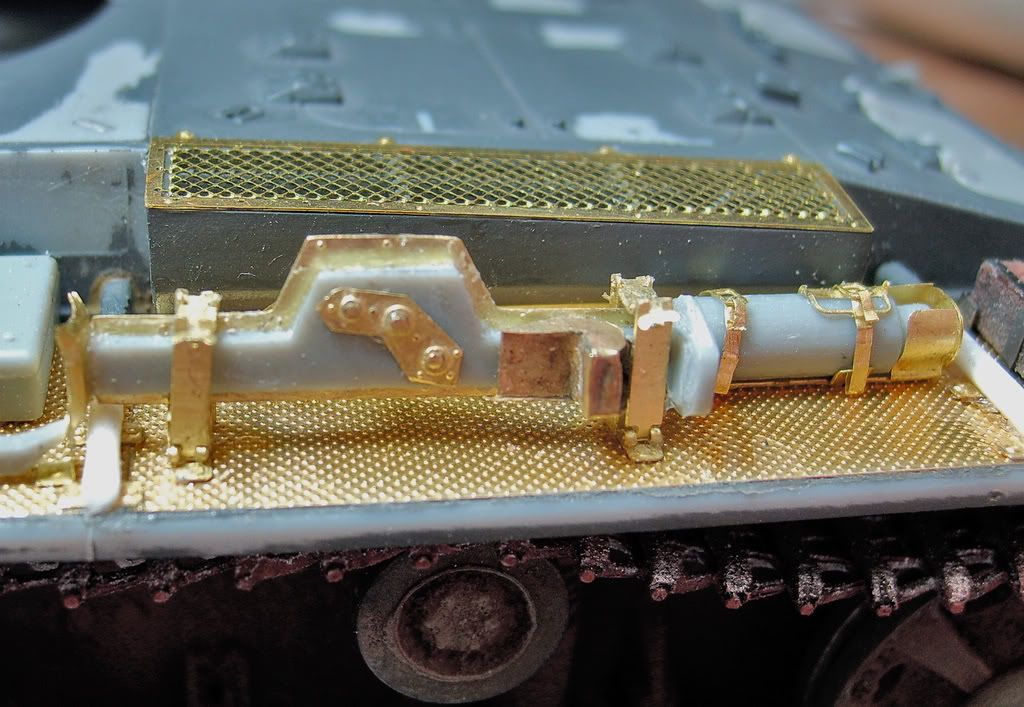
now for some scratch building;

drilled out brass wire to make conduit and home made conduit clamps;

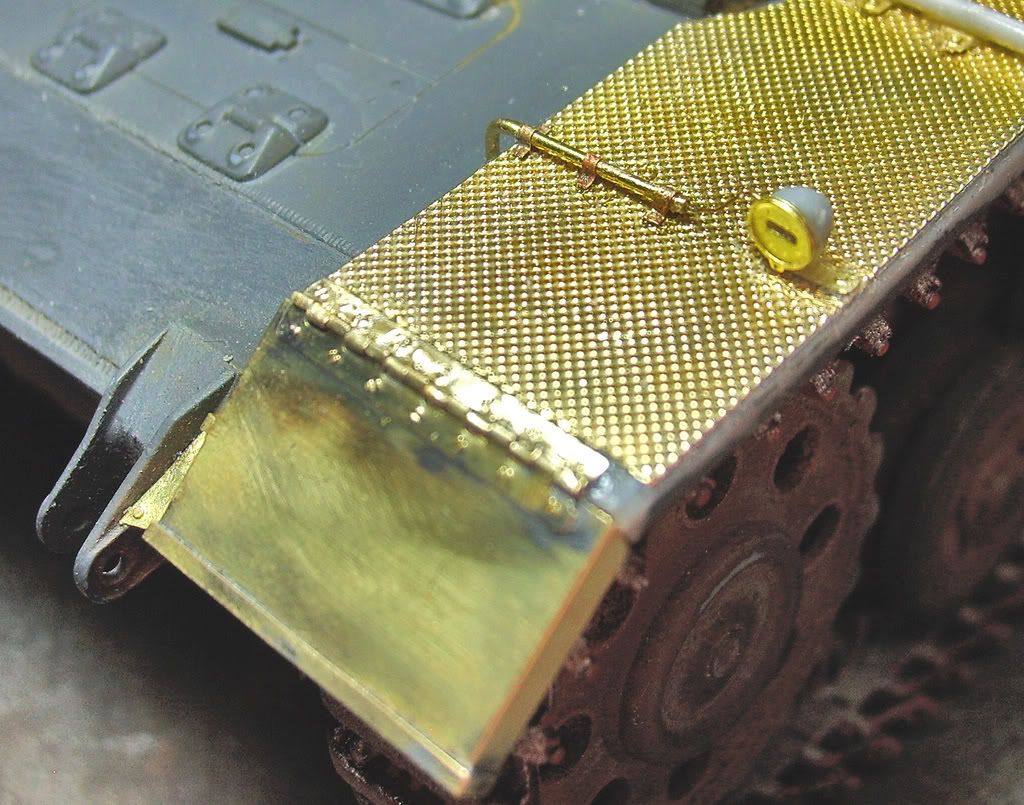
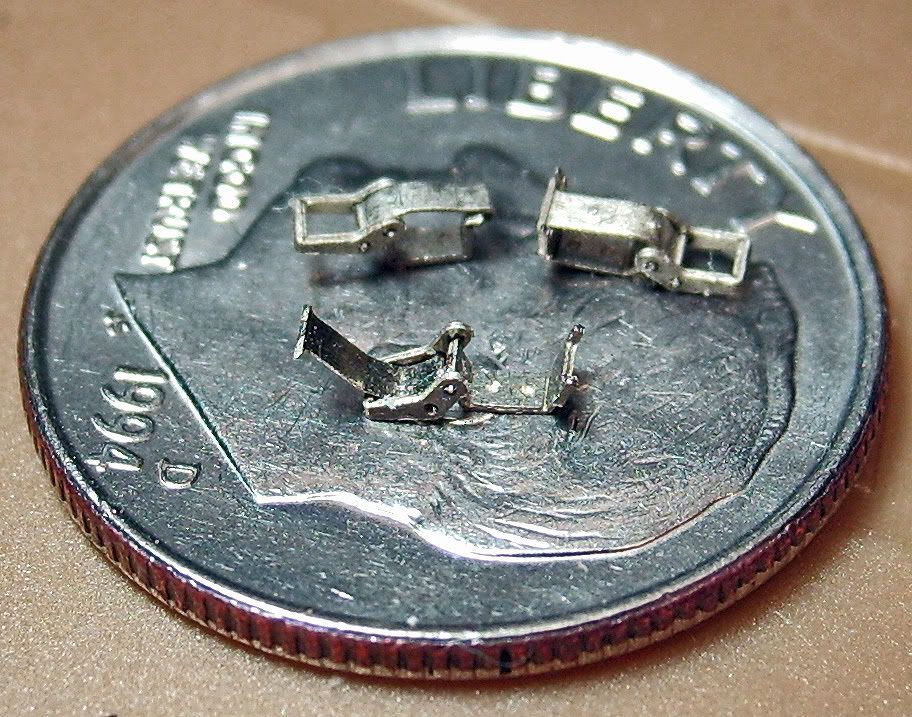
recovery shakle pins with drilled holes for fastening the retainer chain and keeper pin;

Thats all for now!

I will update as soon as I have more pics.

Tom F. (PANZERJEAGER)

 PANZERJAGER


  • Member since
    July 2004
  • From: Texas
Posted by wbill76 on Monday, January 5, 2009 1:52 PM

Photos of E's are hard to come by and specific to the 10th PzDiv 1940 is a tall order...but since your concern is really about the fender layout, perhaps this can help...it's from Achtung Panzer Vol 2 and shows the layout you would expect on an Ausf E or F. The DML kit includes a Notek light which is not necessarily an error...these were often retro-fitted to the E's although whether in place in 1940 is less likely.

  • Member since
    December 2007
  • From: Eagle River, WI
Posted by PANZERJAGER on Tuesday, January 6, 2009 5:48 AM

WOW!

Thanks Wilde Bill,

I've often wondered about the Achtung Panzer books...

I guess it is time to get some of them.

Wbill76, I noticed there is only 1 "S" hook in the illustration, is that comon?

I thought there should be 2.

I am also wondering if the 10th used those rhomboid shaped number plates in France, and where did they attatch them on their Panzer III's (seems every unit had a different idea on this).

Again, thanks for the illustration.

Tom F.

 PANZERJAGER


  • Member since
    July 2004
  • From: Texas
Posted by wbill76 on Tuesday, January 6, 2009 9:14 AM

The Achtung Panzer books are a great reference even though most of the text is in Japanese, enough is in English to make it worthwhile, especially when it comes to the small changes that appear between variants.

The 2nd "S" hook was added with the G, so just the one is correct. The DML fender layout has 2 but that's from their G kit in the same Imperial Series...they also have the jack block in the wrong position among other things. As for the rhomboid plate, I can't say for sure other than there are pics of 1940's IIIs with the plate...some had it on the hull side below the turret, others at the rear...I believe the DML kit directs for it to be placed at the rear.

  • Member since
    December 2007
  • From: Eagle River, WI
Posted by PANZERJAGER on Tuesday, January 6, 2009 9:08 PM

Wild Bill, you are the man!!!!!!!!!!!!!!!!!!!!!

Thanks for the great info.

I will have to fix that fender, then I will post some WIP pics....

I promise!

Tom F.

 PANZERJAGER


  • Member since
    December 2007
  • From: Eagle River, WI
Posted by PANZERJAGER on Wednesday, February 4, 2009 11:01 AM

Don't know why this didn't move to the top of the forum, but, here is an update.

Check out the pics in the 1st part of the post...

I wish I knew the right way to update a post, maybe some one could give a tutorial....

Tom F.

 PANZERJAGER


  • Member since
    January 2005
  • From: in the tank factory in my basement
Posted by biffa on Wednesday, February 4, 2009 12:47 PM
Awesome PE work tom looks great, as far as updating a post just post the update in a "reply" then got to the initial post click edit and update the title so folk know you have added more but leave the original posts so people can the read the build from start to finish.
Ron g.
  • Member since
    December 2007
  • From: Eagle River, WI
Posted by PANZERJAGER on Wednesday, February 4, 2009 1:17 PM

Shure appreciate the complaments and the advise!!!

Always liked your work man!!!

Tom F.

 PANZERJAGER


  • Member since
    July 2004
  • From: Texas
Posted by wbill76 on Wednesday, February 4, 2009 1:29 PM

Tom,

Adding a reply will move it to the top of the forum vs. just editing the post as Ron pointed out. It's easier for continuity's sake as well to update by adding new posts instead of editing the original one...otherwise people will likely scroll to the bottom and not see the update!

You've made some great progress on your III-E, looking very sharp on the details. Thumbs Up [tup]

  • Member since
    December 2006
  • From: t.r.f. mn.
Posted by detailfreak on Wednesday, February 4, 2009 5:56 PM
are those tool clamps pre-assembled? they look great.often i wont fiddle with the ultra tiny pe stuff because i just cant justify causing myself that much stress.lol.

[View:http://s172.photobucket.com/albums/w1/g-earl828/]  http://i158.photobucket.com/albums/t104/cycledupes/1000Roadwheels4BuildBadge.jpg

  • Member since
    January 2007
Posted by the doog on Wednesday, February 4, 2009 6:47 PM
WOW, Tom--you're not screwing around are you?! That duct for the wiring is feakin' SERIOUS! Ditto for the rest of the detail! Superb job here--I'll be watching this one!
  • Member since
    December 2007
  • From: Eagle River, WI
Posted by PANZERJAGER on Wednesday, February 4, 2009 10:21 PM

Wbill76,

Thanks for all the advise and compliments!!! "Look What You Started!!!"

Detailfreak,

Thanks for the compliments!  And those are the stainless steel tool clamps from Lion Roar Part No. LE35091, and they are the easiest ones that I have ever had to assemble!!

Doog,

WOW! what a compliment!!!!!

Thanks, I hope she paints up as nice as some of your stuff....

Thanks to all!

Tom F. (PANZERJEAGER) 

 PANZERJAGER


  • Member since
    December 2007
  • From: Eagle River, WI
Posted by PANZERJAGER on Friday, February 6, 2009 9:05 AM

UPDATE 7:00 AM 02-06-2009


Slow progress but I managed to get tha left fender finished.

On to the right fender!

I desided not to work on updating the right fender on the vehicle as I did on the left, so I tore it off!

Ya see I had intended this build to be, as we call them in our club a "slammer".

A "slammer" is a kit that you build basicly out of the box, ya know, ya "slamm it together", an easy one right!

Well, after finding out how wrong the details were, here we are...

Here ars some pics of the right rear fender extension....

Thank god for resistance soldering!!!

Tail light wiring;

Track tool box with clamps;

Another shot of the rear;

Here are the parts for the right front fender extension (tonights project)...

Sorry the pics are not as clear as they should be, I got in a hurry!

More updates soon!

Tom F. (PANZERJEAGER)


 PANZERJAGER


  • Member since
    April 2005
  • From: Piscataway, NJ!
Posted by wing_nut on Friday, February 6, 2009 9:12 AM
WOWZER!  Butt kickin' PE work.  Love all the tiny little deatils.  Nice work.

Marc  

  • Member since
    December 2007
  • From: Eagle River, WI
Posted by PANZERJAGER on Friday, February 6, 2009 9:48 AM

Thanks wing_nut!

I am trying to get this one done for a local contest in March, hope I make it in time!!!

Tom F.

 PANZERJAGER


  • Member since
    January 2007
Posted by the doog on Friday, February 6, 2009 9:51 AM
Tom, you're doing some OUTSTANDING work! Great PE work here--very neat; Keep it up; our eyes are watching! Tongue [:P]
  • Member since
    December 2007
  • From: Eagle River, WI
Posted by PANZERJAGER on Friday, February 6, 2009 9:54 AM

Thanks Doog! means alot that you guys are interested....

Tom F.

 PANZERJAGER


  • Member since
    December 2007
  • From: Eagle River, WI
Posted by PANZERJAGER on Thursday, February 12, 2009 9:37 AM

New update, 02-12-09 6:58 AM

Is it not lovely living in the north woods of Wisconsin!!!

40+ degrees F. this weekend and my under ground water pipes to my outer apartments froze!!!

There went most of my modelling time...Banged Head [banghead]

Anyhoo,

here we go:

And yes that is a real wood shovel handle turrned out of a tooth pick in a dremel tool.

Also the starting handle is also scratch built;

1) The small, drive end was turned using a #11 exacto blade as a cutter and the venerable dremel tool

2) The handle is a piece of annealed brass tube with a flange spun into it using an awl and the dremel tool

3) Lastly, the crank was drilled out with a #78 bit to accept the small turning for the drive end

Thats all for now!

Enjoy...

Tom F. (PANZERJEAGER)

 PANZERJAGER


  • Member since
    July 2004
  • From: Texas
Posted by wbill76 on Thursday, February 12, 2009 9:46 AM
Doing a great job on this one with all the very fine detail work...I was curious about the starter since it's all-brass, fabulous work there for sure in crafting your own. Thumbs Up [tup] Thumbs Up [tup]
  • Member since
    December 2007
  • From: Eagle River, WI
Posted by PANZERJAGER on Thursday, February 12, 2009 9:12 PM

 wbill76 wrote:
Doing a great job on this one with all the very fine detail work...I was curious about the starter since it's all-brass, fabulous work there for sure in crafting your own. Thumbs Up [tup] Thumbs Up [tup]

wbill76,

Thanks!  

About the starting handle, maybe I'm geting a little carried away...

Hey!, I am having a helava time with how the smoke candle rack is constructed on the back.

Got any info on that damn thing?????

Tom F.

 PANZERJAGER


  • Member since
    July 2004
  • From: Texas
Posted by wbill76 on Thursday, February 12, 2009 9:25 PM

Tom,

Don't tell me you're trying to scratchbuild one of those too? Laugh [(-D] This drawing might help at least give you the general idea. Essentially the same style of rack as that seen on the early Pz IVs, IIs, and Is.

  • Member since
    December 2007
  • From: Eagle River, WI
Posted by PANZERJAGER on Thursday, February 12, 2009 9:43 PM
 wbill76 wrote:

Tom,

Don't tell me you're trying to scratchbuild one of those too? Laugh [(-D] This drawing might help at least give you the general idea. Essentially the same style of rack as that seen on the early Pz IVs, IIs, and Is.


MAN YOU ROCK!!!!!!!!!!!!!!!!

I'm going to order that book ya got tomorrow....mmm, err, wich volume are these pics from anyhow???

And were is the best place to by it on the internet???

 PANZERJAGER


  • Member since
    December 2007
  • From: Eagle River, WI
Posted by PANZERJAGER on Thursday, February 12, 2009 9:48 PM

Oh, ya, wbill76,

I almost forgot, the rack is part of Aber's kit that I am using.

But, if it p's me off too much I may have to scratch build one...

Tom F.

 PANZERJAGER


  • Member since
    July 2004
  • From: Texas
Posted by wbill76 on Thursday, February 12, 2009 10:31 PM

This is from Achtung Panzer No. 2. RZM Imports carries the full line and is where I got mine: http://www.rzm.com/books/model/achtung.cfm

Just be warned a lot of the caption text is in Japanese with no corresponding English translation but all of the details and drawings are dual captioned and that's ultimately what matters with these anyhow IMHO.

  • Member since
    December 2007
  • From: Eagle River, WI
Posted by PANZERJAGER on Monday, March 20, 2017 2:56 PM

Rekindling this build after 8 years of struggle.

It has been 8 years cense I had put this project into a tote.

In the past 8 years my wife’s Father died, then her Sister lost the house.

My Grandmother lost her battle with kidney failure.

My Father was diagnosed with heart failure.

I was diagnosed with type 2 Diabetes, and all of the problems with that going out of control.

My Mother found out she had Pancreatic cancer, then died after a long 6 year fight, She died a year ago at Christmas.

This put me into some deep depression.

It has taken some time to get back in the swing of things.

I have posted a few things in the interim, in between some bouts with depression.

But I am planing to be on here more often now.

I am not looking for a pitty party, just putting this out for those in similar situations.

I am hoping to show that everyone can overcome all of these things and get back to the norm.

And as such I plan on finishing up the builds that I left abandoned.

So starting out slowly, here is the reopening of this build;

More tomorrow.

 PANZERJAGER


  • Member since
    September 2012
Posted by GMorrison on Monday, March 20, 2017 4:01 PM

Great to see you back. Those are really terrible things to have happen and never feel ashamed for all the prayers, thoughts and feelings that come your way.

I also send condolences to your wife. I gather she's still holding it up.

It's so hard to find modeling time anymore, so any little bit is a blessing.


One of my very favorite tamks BTW. Really will follow you here.


Bill


 Modeling is an excuse to buy books.


  • Member since
    June 2004
  • From: East Stroudsburg, PA
Posted by TigerII on Monday, March 20, 2017 4:31 PM

Really awesome PE work.

Achtung Panzer! Colonel General Heinz Guderian
  • Member since
    December 2007
  • From: Eagle River, WI
Posted by PANZERJAGER on Tuesday, March 21, 2017 9:46 AM

 PANZERJAGER


  • Member since
    November 2009
  • From: SW Virginia
Posted by Gamera on Tuesday, March 21, 2017 10:27 AM

Gee, after all that I think I'd need a hobby to keep my mind off reality. 

My thoughts and prayers, hope things turn around after all that. 

"I dream in fire but work in clay." -Arthur Machen


  • Member since
    July 2004
  • From: Sonora Desert
Posted by stikpusher on Tuesday, March 21, 2017 11:51 AM

Well I can certainly understand losing the wind in your sails for this hobby. I had similar experiences from 2011 thru the end(literally) of last year. No medical illness conditions thankfully though. And yes, the hobby muse left the building for awhile. But she does return eventually. Hopefully when we can get back to where we left off before after all the dust and debris settles. 

You have quite the project going here, and it's good to see you're back on it now! There sure is a lot of extra effort you are pouring into this Panzer. I'm looking forward to your finished build.


F is for FIRE, That burns down the whole town!

U is for URANIUM... BOMBS!

N is for NO SURVIVORS...

       - Plankton

LSM


JOIN OUR COMMUNITY!

Our community is FREE to join. To participate you must either login or register for an account.

SEARCH FORUMS
FREE NEWSLETTER
By signing up you may also receive reader surveys and occasional special offers. We do not sell, rent or trade our email lists. View our Privacy Policy.