SEARCH FINESCALE.COM

Enter keywords or a search phrase below:

Post-Flu update and FINISHED PICS page 5--NeoGrade Bergepanzer III WIP

33459 views
154 replies
1 rating 2 rating 3 rating 4 rating 5 rating
  • Member since
    November 2005
Posted by Anonymous on Tuesday, April 21, 2009 10:21 AM
Wow, doog---you are getting good with that sheet styrene!...doing that kinda scratching that quickly w/ sheet styrene would have made you a Grand Master just 15 years ago. Nice work !!! I say, leave the seat...doesn't look like it can be seen from the angles anyway...I did notice that the wood-grain on the resin parts looks a little heavy-handed....Have you considered using real wood as a replacement---basswood or balsa strips? Cool project...
  • Member since
    December 2008
  • From: Las Vegas, Nevada
Posted by model maniac 96 on Tuesday, April 21, 2009 10:23 AM
WOW! doog, this is just like your other work, amazing! this is truly wonderful, and I absolutely think that you should keep the seat!

Jim
"Veni, Vidi, Vici" Julius Caesar: I came, I saw, I conquered.
  • Member since
    April 2003
  • From: 41 Degrees 52.4 minutes North; 72 Degrees 7.3 minutes West
Posted by bbrowniii on Tuesday, April 21, 2009 10:26 AM

doog,

That is really sweet!  I really admire your courage (and credit HvH for the inspiration) to tackle that interior - although I think you coulda got away with a recliner, widescreen, and bowl o' pretzels...Evil [}:)]


'All that is necessary for the triumph of evil is for good men to do nothing' - Edmund Burke (1770 ??)


  • Member since
    July 2004
  • From: Texas
Posted by wbill76 on Tuesday, April 21, 2009 1:17 PM
I've been curious to see some of the Neograde stuff in use so will be following this one with interest. They have a pretty good line of offerings for a wide range of subjects and the Berge III ought to be just right in your hands Karl. Thumbs Up [tup]
  • Member since
    April 2008
  • From: Kristiansund, Norway
Posted by Huxy on Tuesday, April 21, 2009 1:34 PM

Looking very good so far! Love the scratchbuilding!  As for the seat, save it for another project, as I highly doubt you can even see it, without the use of hightech spy-equipment Smile,Wink, & Grin [swg]


One thing however...

 the doog wrote:

In 1944 all remaining Pz III's were ordered to be converted to Bergepanzers.


You sure about that? I doubt all Panzer III's were converted... And I don't mean that as in 3 were left original.  But here in Norway, even Panzer I tanks were left with their original MG turret till the end of the war. As I've said numerous times, Norway isn't suited for tank warfare (Todays Norwegian Royal Army got just 10 Leopards, other than that, some IFV's) and the only German tankdivision that was stationed here was the Z.B.V. 40. There were another one, but they left summer of '42.

So I'm asking, hence the Z.B.V.40 left even Panzer I's alone troughout the war, were all Panzer III's converted?  Or did these tanks in Norway get some kind of exeption?


Looking forward for more!!

-Lasse

"Every War Starts And Ends With An Invasion".

  • Member since
    July 2004
  • From: Texas
Posted by wbill76 on Tuesday, April 21, 2009 2:03 PM
Huxy, not all Pz IIIs were ordered for conversion into Berge IIIs but all Berge IIIs were built from reconditioned Pz III hulls as opposed to new vehicles. There were still Pz III gun tanks in use in Norway at the end of the war as you mention as well as others serving as Beobachtungswagens, munitionspanzers, etc. However quite a few of the older Pz III chassis were converted into Berge IIIs in 1944 and I think that's what Karl means in his post. Only 176 were built between March '44-May '45.
  • Member since
    January 2007
Posted by the doog on Tuesday, April 21, 2009 3:03 PM

Thanks, guys!

Manny-- I think I'll just go with the resin pieces--I actually like the grain on the parts. Plus, oneof them has some kind of wire/rope on it that has a certain look I like.

Thanks, too, Jim and Boyd!

Bill--they DO have soe nice stuff, huh? I am tempted by some of their other offerings as well! Thanks for stopping in! 

Huxy--Bill is correct; of course, there would be some Pz III's left "as is"--in fact, probably a mojority of them---but the order was given--not necessarily carried out in full.Thanks, Bill, for your input!

Well, I've laid down some paint inside--black, then neutral gray for an undercoat.

Then white in the panels and from the right, "top down" angle.

I tried to think of the natural light diminishing in appropriate places,and painted accordingly, eathering it to black toward the front of the hull. Honestly, most of this you'll probablynever see...Sigh [sigh]

I'll be finishing the weathering tonight, I'm sure. And adding some things like fire extingusher, and yes, the seat will stay.

Stay tuned for more! Big Smile [:D]


  • Member since
    December 2007
  • From: Bridgeview, Illinois
Posted by mg.mikael on Tuesday, April 21, 2009 5:25 PM

Great looking conversion project so far, doog, gotta love the scratch interior!Thumbs Up [tup] Dang these small companies that produce conversion and aftermarket parts seem to spring up like weeds, never heard of NeoGrade.

"A good plan executed now is better than a perfect plan next week." - George S. Patton

  Photobucket 

  • Member since
    June 2005
  • From: San Tan Valley,AZ
Posted by smokinguns3 on Tuesday, April 21, 2009 5:33 PM
looking good Karl.
Rob I think i can I think i can
  • Member since
    June 2008
  • From: Iowa
Posted by Hans von Hammer on Tuesday, April 21, 2009 5:44 PM

Outstanding idea, even if I do say so m'self, Doog.. I love the sound of scribing & snapping styrene in the mornin'... Looking forward to this one..


  • Member since
    January 2008
  • From: Bournemouth UK
Posted by Bodge on Tuesday, April 21, 2009 5:52 PM
You guys are like machines as where modelling is concerned, lookin good DoogThumbs Up [tup] .I thought i did quite a bit of modelling but you guys on the forum here are like robots. Does modelling take up all your spare time?Whistling [:-^]
  • Member since
    October 2007
  • From: N.H.
Posted by panzerguy on Tuesday, April 21, 2009 8:52 PM

      Karl nice to see some more of the work horse panzers getting built. I've got the Bergtiger E that I plan on doing soon.

   The interior really is well done its to bad so much will be hidden. Looking forward to seeing what you have in store for us in terms of cammo.

  Don't know how some of you guys can work so fastConfused [%-)]

"Happiness is a belt fed weapon"

  • Member since
    January 2006
  • From: Pineapple Country, Queensland, Australia
Posted by Wirraway on Tuesday, April 21, 2009 10:06 PM

Karl,  Inspirational stuff !!  Just Great !!

I have seen some NeoGrade stuff on e-bay, notably their IV Lang and Ferdinand 1/16 kits.  But, at $500 + its a bit out of my league.

"Growing old is inevitable; growing up is optional"

" A hobby should pass the time - not fill it"  -Norman Bates


GIF animations generator gifup.com

  • Member since
    December 2005
  • From: Syracuse, NY
Posted by lexesbenz on Wednesday, April 22, 2009 12:11 AM
Mmmm cool.
The flying hamster of doom rains coconuts on your pitiful city!!!!
  • Member since
    January 2007
Posted by the doog on Wednesday, April 22, 2009 10:01 AM

Thanks guys, to all who have taken the time to comment, and who are following this build! Big Smile [:D]

I worked on some of the weathering for the interior last night--I think I'll call this "done" and start working on the outside. Weathered with MIG oils--not much really; a lot of it was a result of the painting helping portray the look you see here.

Thanks again for looking in guys!!! 

  • Member since
    April 2008
  • From: Kristiansund, Norway
Posted by Huxy on Wednesday, April 22, 2009 10:47 AM

That is very, very nice!

Hope this model is a gift to me for letting you get to this magnificent country to play? Mischief [:-,]

"Every War Starts And Ends With An Invasion".

Dre
  • Member since
    June 2007
  • From: here, not over there
Posted by Dre on Wednesday, April 22, 2009 1:46 PM
Dood, you sir are a machine!   That interior looks as good or better than many kit-supplied stuff.  I've never seen a Bergepanzer III, so this will be interesting to see completed.
  • Member since
    May 2005
  • From: Dublin Rep Of Ireland
Posted by terry35 on Wednesday, April 22, 2009 3:35 PM

Hi, Karl, the build looks great so far. Nice bit of scratching. Should have saved quite a few bucks there.

Terry.

  • Member since
    January 2008
  • From: Bournemouth UK
Posted by Bodge on Wednesday, April 22, 2009 4:41 PM
Karl i would like you to stop now, put down your brushes and hang up your modelling skills. enough is enough, your just takin the p11s now. that is lookin far to good for the likes of me to come close to achieving. Just leave it a couple of years,No wait i will let you Know when to start again. (10 years later, oh sorry mate i forgot to tell you you can start again)Wink [;)]Whistling [:-^]
  • Member since
    May 2006
  • From: Queensbury,NY
Posted by panzer88 on Wednesday, April 22, 2009 6:35 PM
Some beautiful work here Karl. Awesome job on the scratched interior and top notch weathering the interior. You're chugging right along on these builds lately. You better get as much building done as possible because this weekend looks awesome, can I hear Brrrrappp braaappp in the woods of western NY.LOL


  • Member since
    December 2008
  • From: Goffstown, NH
Posted by New Hampshire on Wednesday, April 22, 2009 7:02 PM

For a scratchbuilt "quickie" job that thing looks amazing!  I am grabbing the popcorn and getting ready for this one.....

Brian

  • Member since
    January 2007
Posted by the doog on Wednesday, April 22, 2009 7:10 PM

Thanks again, guys!

Huxy---ha ha, sure bud....NOT! lol! Laugh [(-D] I appreciate the thought though....I think?!

Terry, thanks sincerely for the nice comments yet again!

Andy---ha ha, you crack me up! It's funny; that's the same thing I think about you when I see your 1/72 diorama over there in Dio's! Excellent work!!

David--YES!!! BRRRAAAAP!!! I really do want to get out there! I'll be looking for somewhere to rise for sure! Thanks for the kind words!

Brian, thanks for looking in and taking the time to comment! Big Smile [:D]

  • Member since
    June 2008
  • From: Iowa
Posted by Hans von Hammer on Wednesday, April 22, 2009 7:21 PM
So is this one a display model or are ya gonna "put it to work" in a dio?

  • Member since
    February 2009
  • From: mass,USA
Posted by scratchmod on Wednesday, April 22, 2009 7:47 PM

Awe scratchbuilding and painting Doog.  I can imagine how the rest will turn out. Looking forward to seeing this model progress into another masterpiece.


Rob

  • Member since
    January 2007
Posted by the doog on Wednesday, April 22, 2009 7:48 PM
 Hans von Hammer wrote:
So is this one a display model or are ya gonna "put it to work" in a dio?
Display only, Hans--got no more room for Dio's unless they're 1/72, until I get a new display bookcase and figure out what the heck to get rid of in order to fit it in my already-cramped apartment!
  • Member since
    January 2012
Posted by I make stuff on Wednesday, April 22, 2009 11:26 PM

Very nice work, Karl.  Your modest "I threw this together" belies the talent you posess.  Really, the building, and amazing painting of an area that a careful veiwer MIGHT get a decent look at, is a testament to your dedication and amazing ability.  Thank you for constantly being in sharing mode.

Really intersting subject, too.

Bill

  • Member since
    July 2003
  • From: On my kitchen counter top somewhere in North Carolina.
Posted by disastermaster on Thursday, April 23, 2009 6:03 AM

http://i10.photobucket.com/albums/a144/parisienne-moonlight/emoticon/asdcattivo.gif  Good!

Rather see 'ya building a nasty 'ol tank than a "Stooka".

http://img480.imageshack.us/img480/1662/doh4jw.gif(Oh what the heck, it's good to see you build anything!) Such astuteness. Looks like another great workout here doog.

http://www.innovationbyinstinct.com/services/hosting/clients/accountyp/status/DisasterMaster/%23t1-4.jpg

Sherman-Jumbo-1945

" I was so much older then I'm younger than that now "


  • Member since
    January 2007
Posted by the doog on Saturday, April 25, 2009 10:12 AM

Thanks Bill and Steve! Glad you guys are enjoying this build!

Well, I had a busy week, but I'm plugging away here. I have assembled much of the hull--there's no turret to speak of, of course. Did some mods here and corrections....I had a weird problem with the molding on the muffler, but fixed the flange here with some sprue. Sharp-eyed readers will also notice that I deliberately put the towing pintle on at an incorrect 90' angle, just to sharpen my corrective skills and provide a little more "interest"to the build....Whistling [:-^] (Yup, had topry this off and correct it later! Angry [:(!])

Unfortunately, (as a cost-cutting measure I'm sure) the instructions have you cut off the light bases, which leaves a horendous mar on the fenders. Ah, hell--I probably could have gotten PE fenders for it, but for now, I'll just put ye ol' venerable "Oily Rag" over the scar; this IS an engineer's vehicle, after all...

I deceided to try something different here with the lights. Figuring that maybe a tow at night would have needed more light, and the lights maybe having been uncorked, I decided to try to fill in thelights to make them look a litttle more realsitic. I bored them out with a Dremel tool..

....painted the interior Chrome Silver...

...and hit each one with a drop of epoxy.

Not a bad effort? You have to make sure that you sand away all the molded-on details if you do this--the real light "cans" were featureless, smooth, round-ish half-cups.

I had to reinforce the bottom of the box, becasue the resin molding was so thin between the boards that the boards actually started to sag from being "loose" on one end.

A bummer--one of the inner box's walls were too short--it wouldn't match up flush with the outer wall. You would be able to see the perimeter of the "toilet hole" going to the hull there under the box once assembled, so I had to lengthen it with strip. I also took the liberty of engraving "woodgrain" into the strip as well, to match it. I also had to add verious ittle spacers and whatnot to get it all to look sano.

Once assmebled, you can see that it's passable...I can always occlude this area with addeed junk inside anyway.

The box so far. I'm thinking that I might leave the box unglued, and paint it separately from the hull? Have to see how that will figure when the crane is assembled?

Sadly, you can't see Censored [censored] inside the hole, really! Sigh [sigh]

That's it so far! I don't know if I'll get much done today-it's the first day that it's above 80 degrees here and I'm going BRAPPING!!!!! 

bbrrrrRRAAAAAAAAPPPPP!!!! Big Smile [:D]Big Smile [:D]Big Smile [:D]Big Smile [:D]Big Smile [:D]


  • Member since
    December 2008
  • From: Goffstown, NH
Posted by New Hampshire on Saturday, April 25, 2009 10:25 AM

Hey Karl, looking good.

I am curious what epoxy you used for the headlight.  My next armor build will probably be the 1/35 Abrams I bought, and it comes with 2 figures that I was thinking of trying to make lenses for the goggles for.  I think boring the goggles out a little and adding some epoxy might be just the ticket.....

Brian

  • Member since
    May 2005
  • From: Dublin Rep Of Ireland
Posted by terry35 on Saturday, April 25, 2009 11:06 AM

Looking good so far Karl. Really like the lenses. Pitty about the interior visiblity, but then again theres the bonus of getting practice at a bit of scratchbuilding.

Terry.

  • Member since
    April 2008
  • From: Philadelphia PA
Posted by smeagol the vile on Saturday, April 25, 2009 12:36 PM
Karl, this is the same as ChuckW's builds.  You wont see most of the stuff he did to that helldiver, but he knows its there, same goes for you, you know that detail is there, thats all that matters


  • Member since
    July 2004
  • From: Texas
Posted by wbill76 on Saturday, April 25, 2009 1:58 PM
Coming along nicely Karl, shame about the scarring on the fenders. DML's older Pz III kits have that tendency unfortunately. I'm looking into doing the Pz III M in the near future and just added one more item to my list of needed things based on what you've encountered. Wink [;)]
  • Member since
    December 2003
  • From: Colorado
Posted by psstoff995 on Saturday, April 25, 2009 2:27 PM

WOW! Came in late, but let me say, it's really a shame that your interior got covered up, it looks amazing!!! Nice fix on the wood, you sure can scribe! Now are you sure you didn't just paint strips of the wood white to make it look like you lengthened it with styrene? haha good work on practicing your corrective skills on the tow hitch Wink [;)] I can totally picture you messing things up on purpose just to see if you could fix them later on. The best has got to keep sharp some how..

-Chris

US Army Infantryman

  • Member since
    January 2007
Posted by the doog on Monday, May 4, 2009 10:19 PM

Hey Guys---well, it's been a long road to this point. Thanks for the comments, and I'm sorry for not acknowledging them sooner; I've really been just lax from being stressed out and under pressure with all that's been happening here.

Brian, I just used regular 5-minute epoxy from a hardware store; nothing fancy! Smile [:)]

Well, here's an update. I'm about ready for paint.

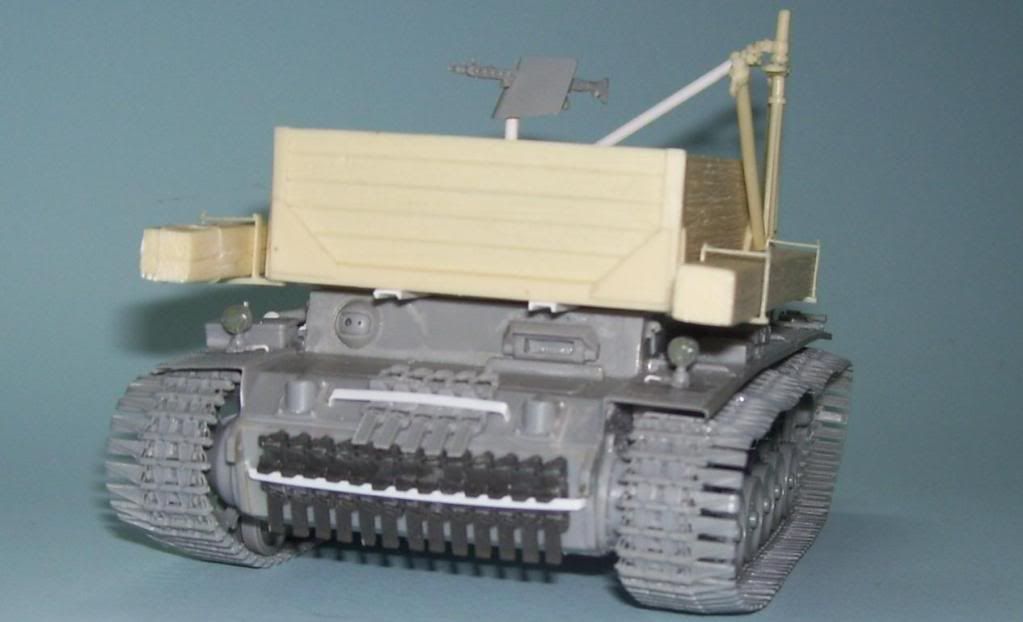
First, for those really considering this kit--there are a couple stupid mistakes that I made which you shouldn't--first, DO NOT install the spaced armor on the front hull--the box will not fit properly with it on.

2. DO NOT install the armored guards (?) over the engine screens--the crane will not fit with them installed.

I had a hell of a time figuring out the parts placement--more how to space and align the crane parts--the darned side brackets are so tight that they really almost make the placement of the crane jib impossible--anyway, I finally got it figured out. Here's a progress report so far....

Most of these vehicles are seen either with regular tracks, or "Ostketten"--which are shorter than "Winteretten". However, since theonly kit of Ostketten tracks I could find were in the $40.00 range, and resin (you know how I hate resin tracks!) I decided to use the last set of winterketten tracks that I had. There is photographic evidence--TA DA!!! Tongue [:P] What's more, is that this photo also shows that some vehicle were modified beyond "normal"--there looks to be some sort of shield or special armor--even perhaps a top and a hatch?--fitted to this vehicle?


This "customization freedom" will play into my build-philosophy for this kit! Tongue [:P]

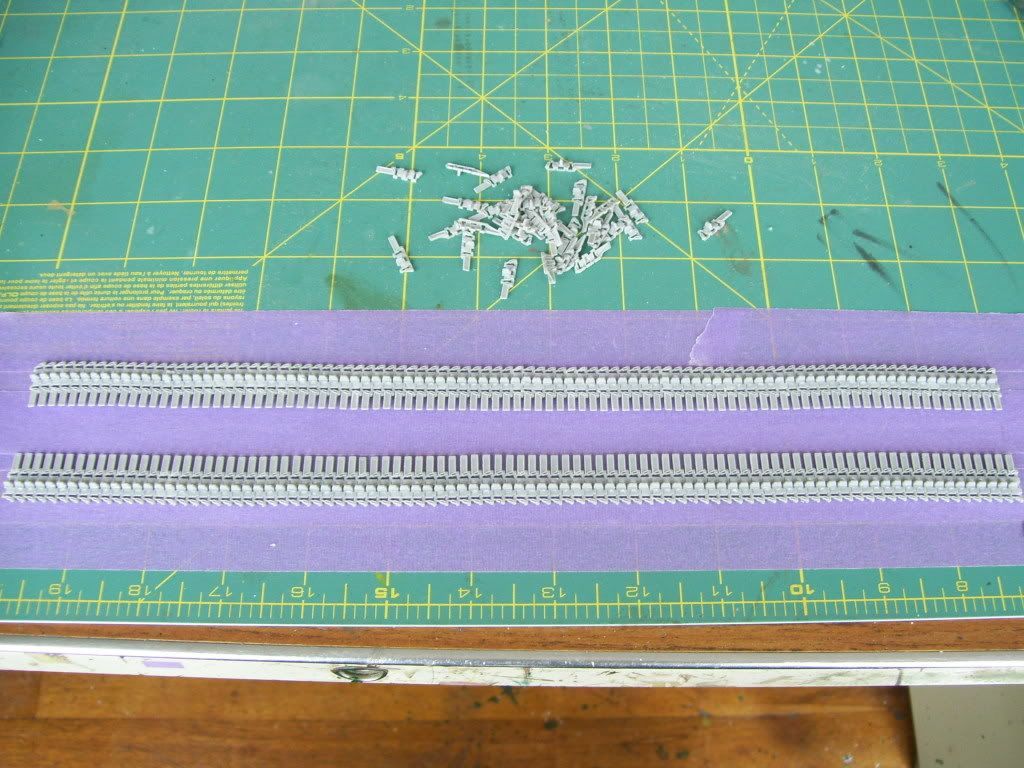
First of all--the winterketten tracks, I was disappointed to find that this set--I believe that I 'lifted" this set from the StuG IIIF kit--are completely unusable in their present state! I mean--look at the height of the dual knockout marks on this link! 


I do have to say that the separate, actual "kit" of later-released Winterketten tracks, which I used on my late Brummbar and which come in a darker gray plastic color--were not as egregiously scarred. 

After painstakingly using a flat Exacto blade to shear off each little stub, and then filing smooth the remainder, (two night's work!) I started out by assembling the tracks, as per my "doog method"--leaving off the outer return rollers, and assembling the tracks on masking tape. The winterketten are "handed" so I did two rows. Here's the link to my tracks tutorial, for anyone curious: http://www.armorama.com/modules.php?op=modload&name=Sections&file=index&req=viewarticle&artid=1737

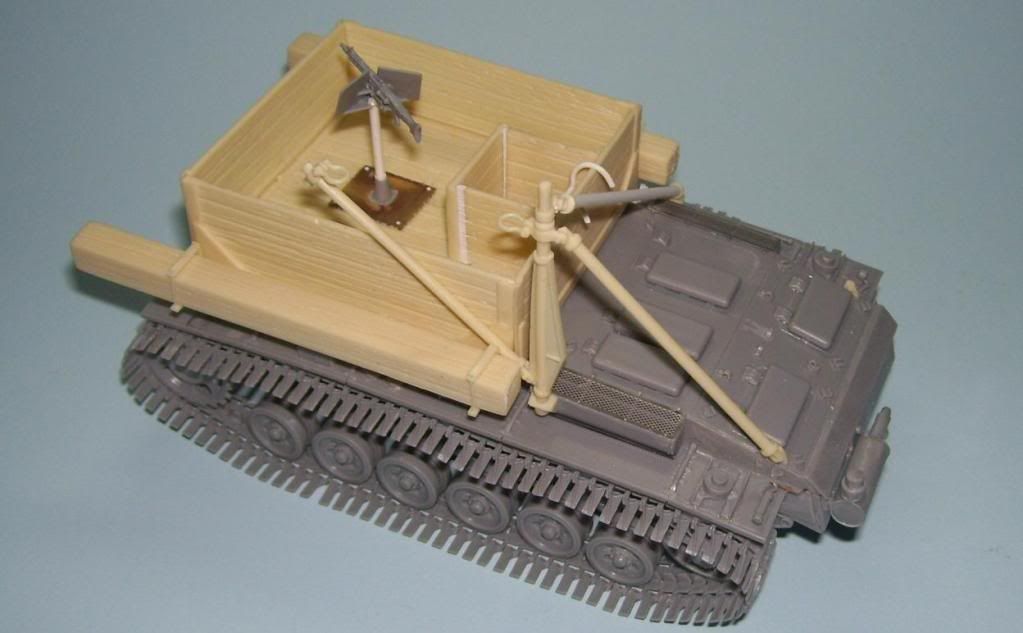
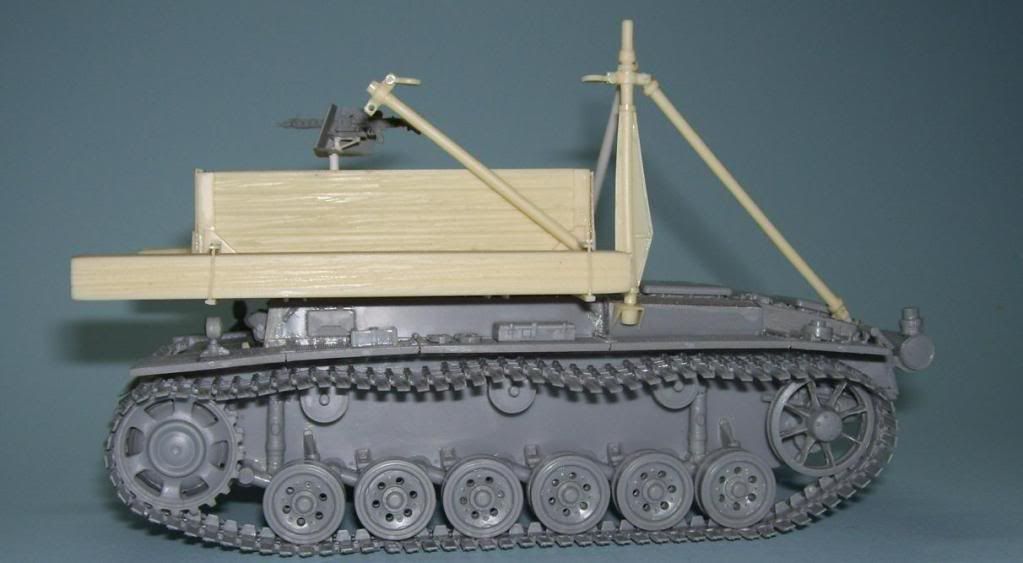
I also added some reinforcing strips to the bottom of the box--the box should not sit flush on the hull, and this is one omission of the NeoGrade kit.

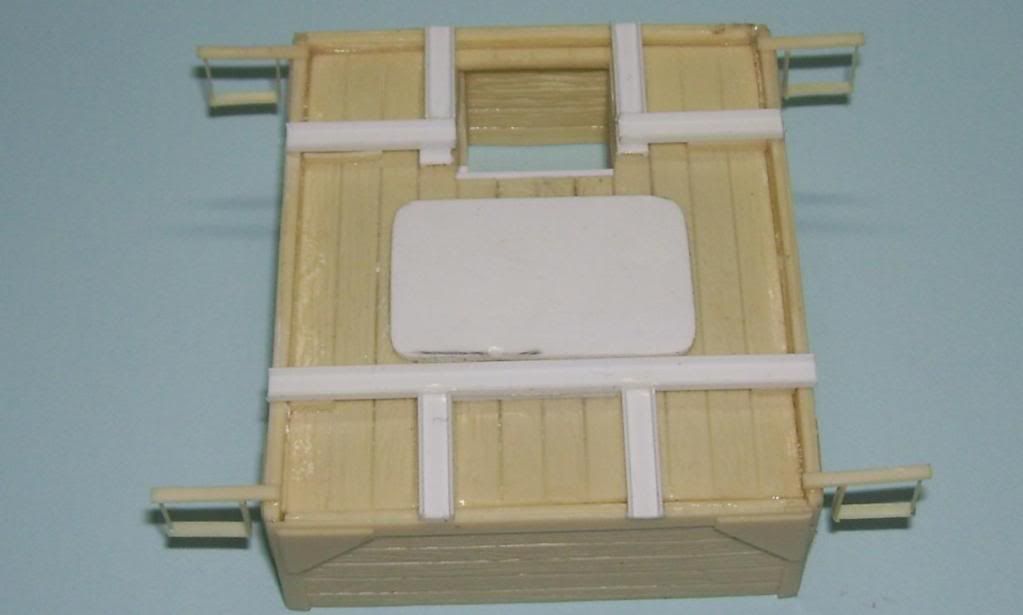
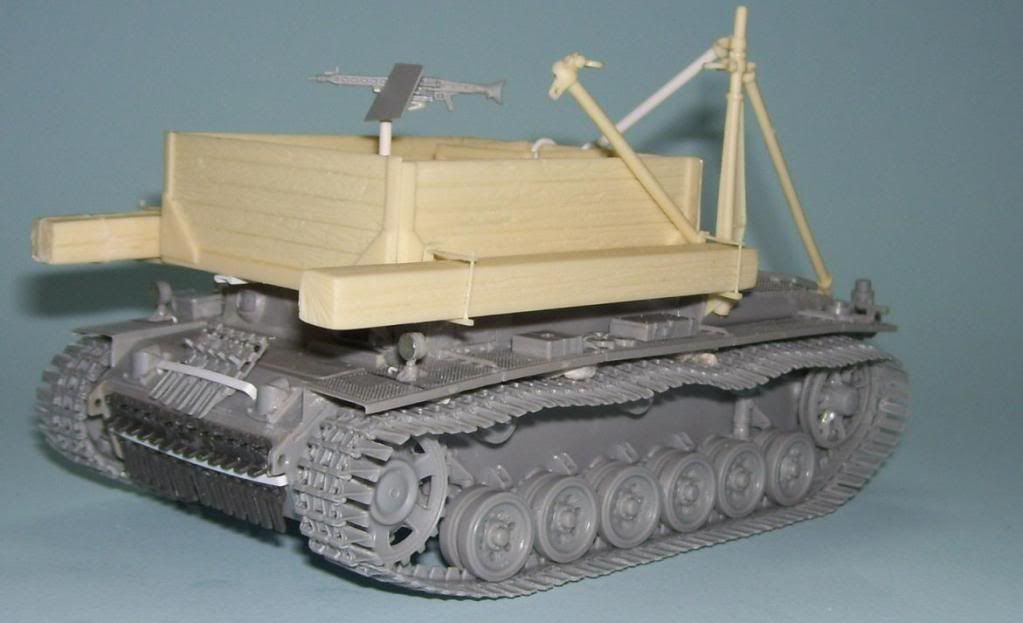
I also built a storage rack for the crane jigs, and built an extra crane jig. You also have to eliminate the radio antennae mount and channel--that little square of plastic is to replace where the mount would have been.

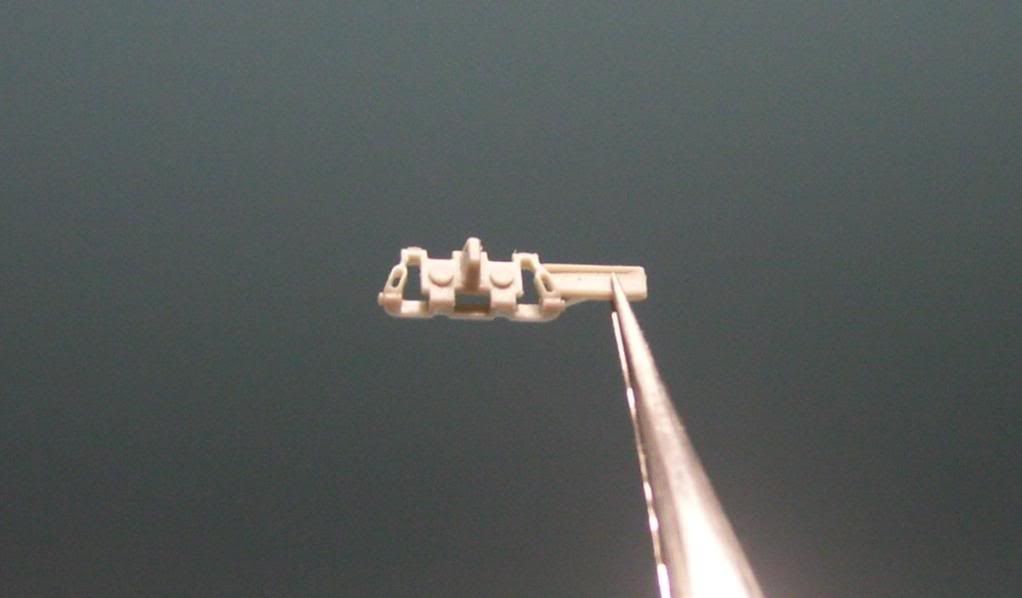
And as part of my "customization", I decided that a late-war Bergepanzer might need a bit of extra firepower (at least I would have wanted some in mine!?) so I built up this pedestal-mounted MG to put in the bed. The parts came from spare parts from the "Shwebelafette" halftrack that I finished recently.

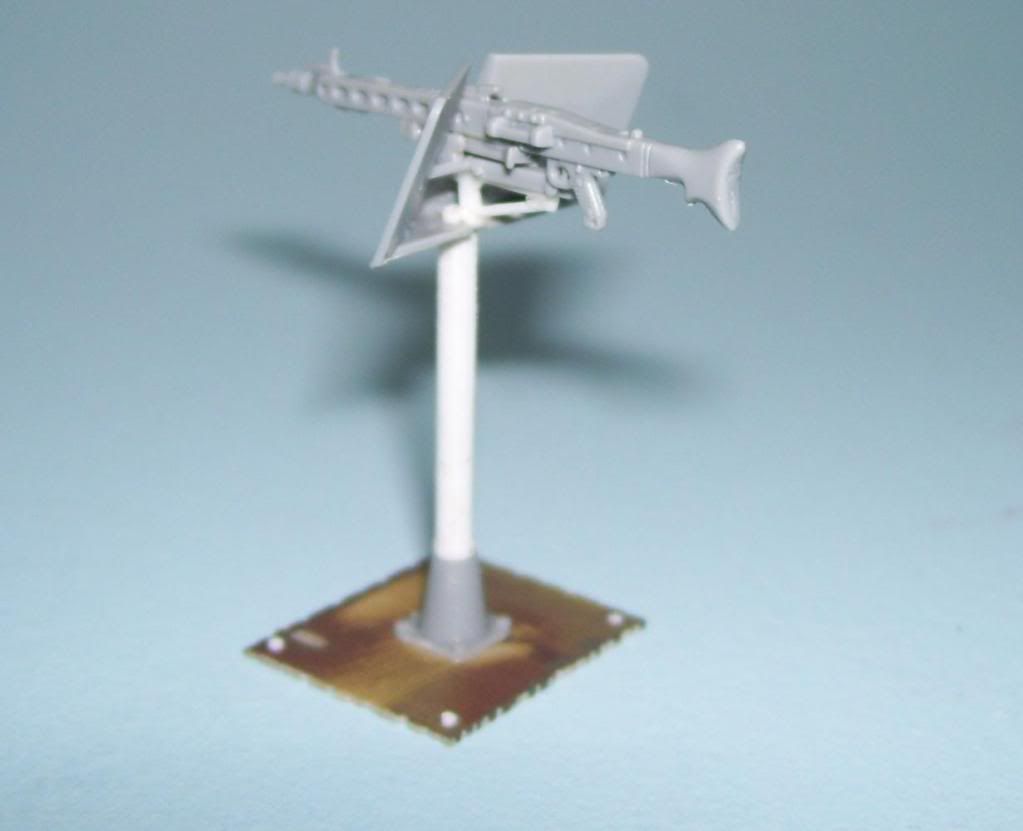
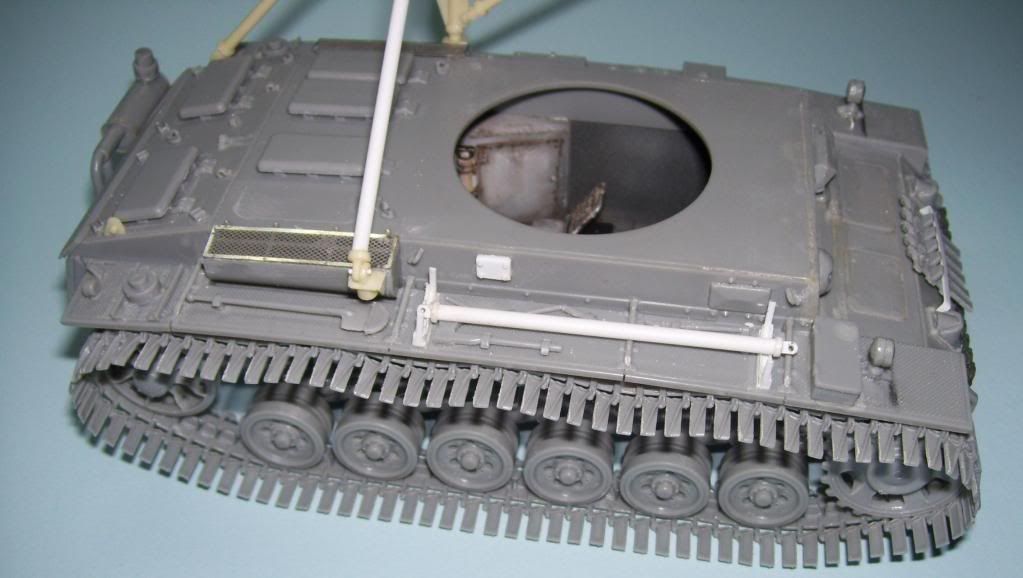
So here's what it looks like so far. The box, MG, and all the rest of the chains and tackles are not fitted yet. I'm going to paint them all separately, and put them together...

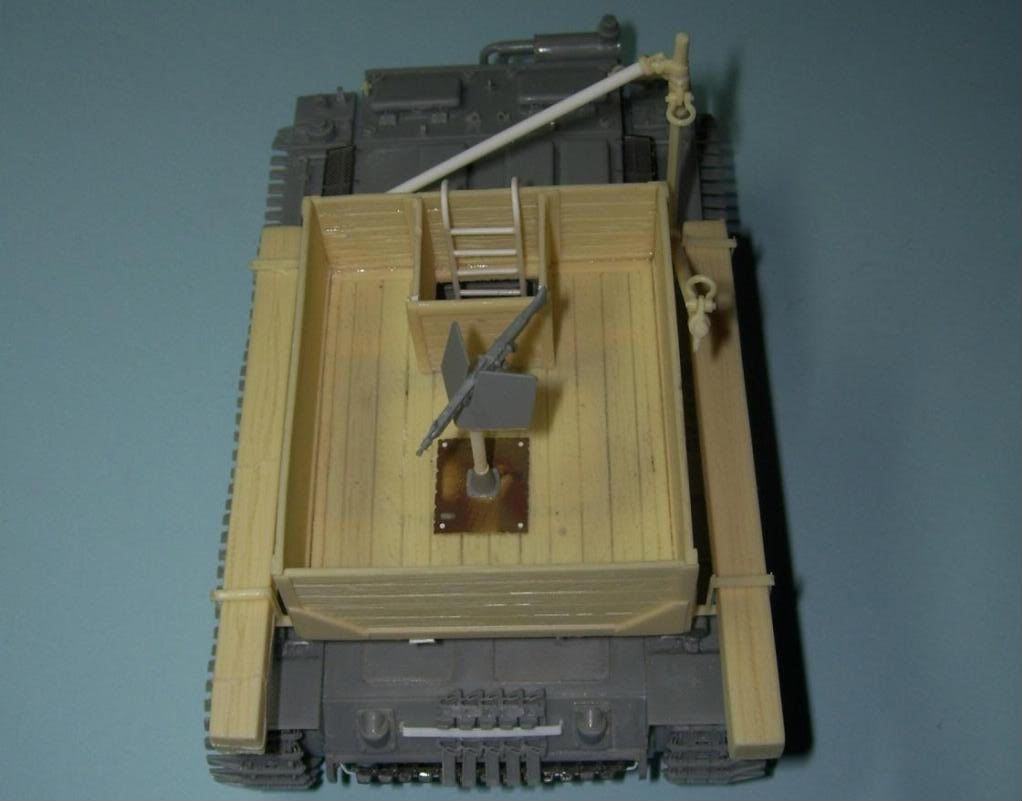
I also made a ladder for the entry hatch, and also had to lengthen the longer crane brace because it didn't reach the other mount. 

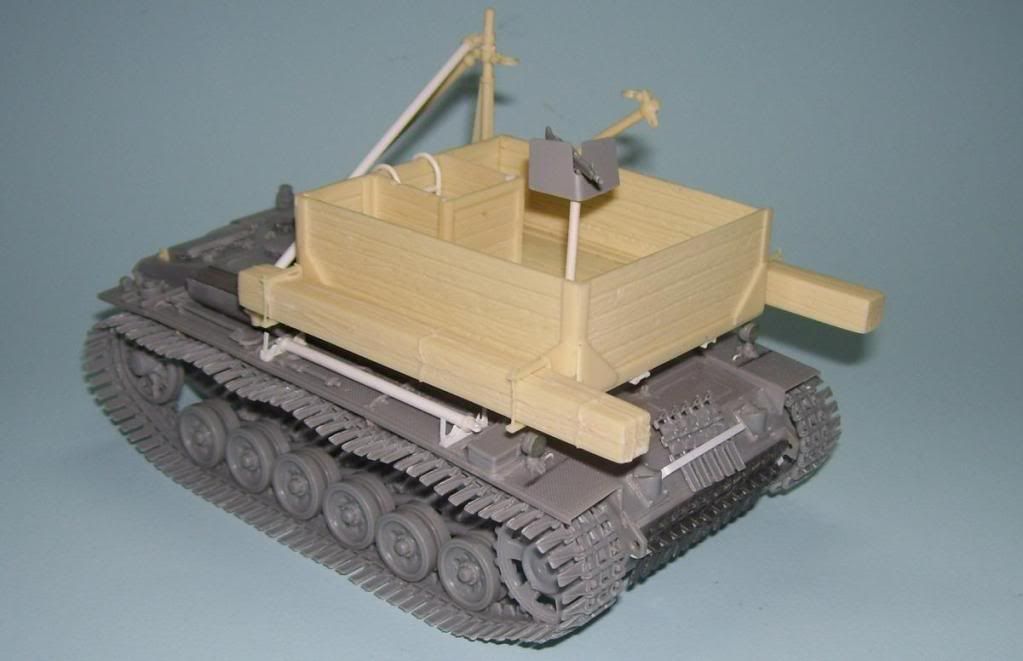
I went kinda easy on the sag--I figured that the engineers would keep it pretty tight?

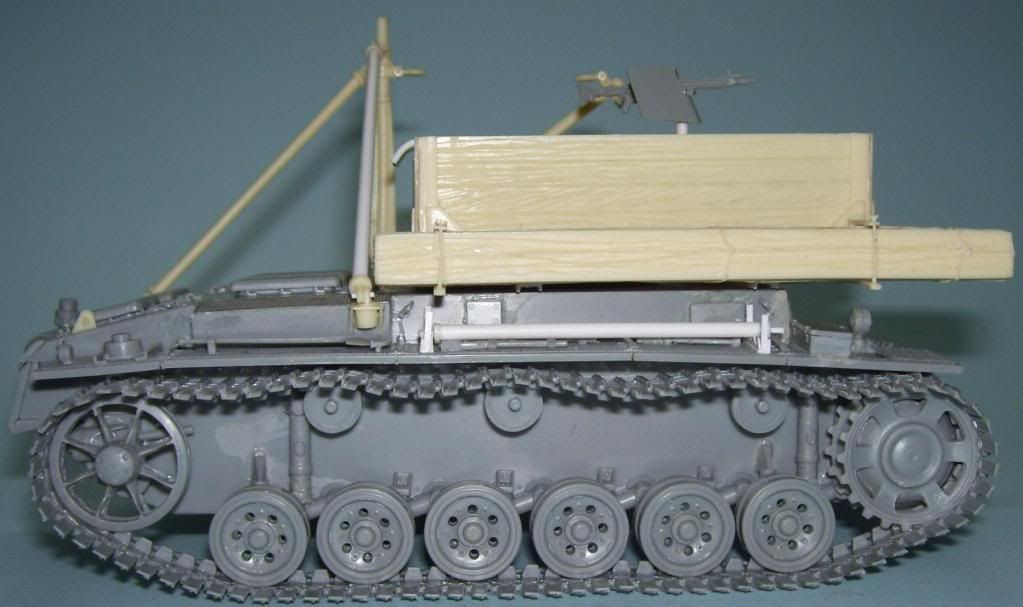
I added a pair of spare track racks and you can see the other dark-plastic winterketten links there.

So that's where I am so far. I'm going to be trying a new painting approach on this one. I'm not sure how it will work out, but it will be interesting at least. That resin "wood" will also demand a bit of innovation. I just hope that, given the crazy schedule I'm under here with teh band, that I'l be able to get it going soon?

Comments, suggestions, critiques and anything else much appreciated and welcomed! Big Smile [:D]


  • Member since
    March 2003
  • From: Rain USA, Vancouver WA
Posted by tigerman on Monday, May 4, 2009 10:50 PM
Definitely something different Karl. Some really great stuff going on here.

   http://i7.photobucket.com/albums/y269/wing_nut_5o/PANZERJAGERGB.jpg

 Eric 

  • Member since
    December 2003
  • From: Colorado
Posted by psstoff995 on Monday, May 4, 2009 10:52 PM

WOW! You have been busy- two nights on track clean up?! Shock [:O] I don't know if I coulda done it...

I really like the custom work- that pedestal MG makes perfect sense to me. That thing needs SOME kinda firepower Thumbs Up [tup]

-Chris

US Army Infantryman

  • Member since
    April 2008
  • From: Kristiansund, Norway
Posted by Huxy on Monday, May 4, 2009 11:51 PM

Looking SWEET Karl!!

But that MG seems to be pretty much in the way in the box? I would have placed it closer to the walls...

And I love Ostkettens!! Big Smile [:D]

"Every War Starts And Ends With An Invasion".

  • Member since
    December 2005
  • From: Syracuse, NY
Posted by lexesbenz on Tuesday, May 5, 2009 12:08 AM
Good...good...my apprentice, it is coming along well!!
The flying hamster of doom rains coconuts on your pitiful city!!!!
  • Member since
    January 2012
Posted by I make stuff on Tuesday, May 5, 2009 1:53 AM

Looking nice, Karl.  I can't wait to see some paint on it.  I may propose to marry it if I am quick enough on the draw.

Bill  

  • Member since
    January 2007
Painting started----NeoGrade Bergepanzer III WIP
Posted by the doog on Tuesday, May 5, 2009 8:04 AM
 Huxy wrote:

Looking SWEET Karl!!

But that MG seems to be pretty much in the way in the box? I would have placed it closer to the walls...

And I love Ostkettens!! Big Smile [:D]

Thanlks, guys!

Lasse, the thinking was, the crewman would have to be able to get around the gun and pivit it 360' to counter any threat. Wouldn't be much goood if it were only able to shoot it to the front, or left side only for instance? I tried it closer to the edges and it reallly felt weird. It felt poorly planned to be unable to get around one side of it.

In a vehicle like this, the box ws only really a traveling and storage area. Most of the working would be done "outside the box" lol. And if you look at that photo, the "lid" on top of the box wasn't exactly practical either, but told me that the crew was thinking "protection" more so than "comfort".

Thanks, Chris, tigerman, Bill and Tony, too! Bill, you may have to fight Manny, lol!

  • Member since
    April 2008
  • From: Kristiansund, Norway
Posted by Huxy on Tuesday, May 5, 2009 8:35 AM

Lasse, the thinking was, the crewman would have to be able to get around the gun and pivit it 360' to counter any threat. Wouldn't be much goood if it were only able to shoot it to the front, or left side only for instance? I tried it closer to the edges and it reallly felt weird. It felt poorly planned to be unable to get around one side of it.

In a vehicle like this, the box ws only really a traveling and storage area. Most of the working would be done "outside the box" lol. And if you look at that photo, the "lid" on top of the box wasn't exactly practical either, but told me that the crew was thinking "protection" more so than "comfort".


MMM... I see..   tought more work would be done "inside the box"..  In my recent book about the Panther, it shows defensive armaments aswell, but that is all the way in the front, and the driver and hull MG guys.. But that tank is fairly different from the Panzer III, however! Tongue [:P]

Thanks for explaining!

"Every War Starts And Ends With An Invasion".

  • Member since
    July 2004
  • From: Texas
Posted by wbill76 on Tuesday, May 5, 2009 9:45 AM
Glad to see you getting in some bench time with all the other distractions going on this time of year Karl. Making good progress with this one for sure. Thumbs Up [tup]
mmc
  • Member since
    February 2007
  • From: Newcastle upon Tyne, England
Posted by mmc on Tuesday, May 5, 2009 9:54 AM

Very nice Karl.

Always good to see something a bit different, look forward to seeing how you finish it.

Mark

  • Member since
    October 2007
  • From: N.H.
Posted by panzerguy on Tuesday, May 5, 2009 10:05 AM

    This is turning out to be one cool little project KarlCool [8D].

 So I take it since it has the ostketten tracks we may be in for some type of winter cammo?

  At first I thought the same thing as Huxy about the MG but then I figured that the crew would have made this so the pole could have been lifted out of the base if more room was needed and stored.   

"Happiness is a belt fed weapon"

  • Member since
    January 2007
Posted by the doog on Tuesday, May 5, 2009 10:49 AM

Thanks, guys--I'm just about outta here for the day, but I wanted to chime in one time before I leave for the day...

Thanks, Bill, and Mark--it's certainly crazy around here lately, with trying to get a recording finished before we leave in June, and then rehearsing for the upcoming tour. Trying to keep the bike maintained, and then having time or Jenn. I'm running ragged lately....Sigh [sigh] HopefullyI'll be able to make a good dent on finishing this before I leave?

Steve--no winter camo on this; well, maybe a little bit o' remnants? Basically I think these vehicles were outfitted with  the wider tracks for better mobility, so it's plausible that they would be seen with them year round. I'm gong to try a mulit-layered approach to painting. If it works out the way I want it to, it should be pretty cool!

Great observation on the MG post coming out of the base! That's a perfect idea that, to be honest, I didn't even think of, but why not? It certainly would make sense?! Thanks for that idea! Big Smile [:D] I won't model it any differently, but it gives a great point to justify it! 


  • Member since
    July 2004
  • From: Texas
Posted by wbill76 on Tuesday, May 5, 2009 1:31 PM

Karl,

Be careful in not confusing "Winterketten" with "Ostketten". The "winterketten" were designed to provide better traction in ice/snow as well as better general flotation on frozen ground but were generally not fitted year round. The "Ostketten" on the other hand were designed primarily to act like the Tiger tracks and lessen the ground pressure of the vehicle in muddy/soft ground conditions and so were wider as a rule without the scoop-like extensions you see on the "winterketten". The "remnants" idea should give the best of both worlds in regards to a winter finish IMHO since you've got this one fitted with the "Winterketten". Wink [;)]

  • Member since
    January 2008
  • From: Bournemouth UK
Posted by Bodge on Tuesday, May 5, 2009 1:52 PM
Lookin great Karl , and admire the amount of work you have put in. Cant wait to see it in paint.
  • Member since
    November 2006
  • From: Coastal Maine
Posted by dupes on Tuesday, May 5, 2009 2:46 PM

First off, I think you need to be commended for doing allllll of that intricate scratch work on the interior...only to have a 1/2" x 1/2" hole in the floor show it off. Now that's dedication. Make a Toast [#toast]

The rest of the build is pretty darn neat too, but that interior is killing me. Nice stuff, Doog. Thumbs Up [tup]Thumbs Up [tup]

  • Member since
    January 2008
  • From: Hickory, NC
Posted by Bushi on Tuesday, May 5, 2009 4:38 PM

Karl I just saw this today it looks fantastic, cannot wait to see it finished. I don't see how you get everything done being so busy. Keep up the excellent work all around. I will be looking forward to the finished build.Make a Toast [#toast]

Bushi

  • Member since
    October 2007
  • From: Louisville, KY
Posted by pordoi on Tuesday, May 5, 2009 5:06 PM

    Wow, I can't find the time to keep current on the ongoing builds here in Armor!  And I'm not even a rock star rehearsing for an album and tour; I don't have a motocross to maintain, and I'm married and everyone knows that a wife is easier to maintain than a girlfriend Shock [:O].  (if she reads this, I'm Dead [xx(])

 Really nice work here Doog.  I like the scratched interior and the paint work is superb.  There will always be some challenges to surmount on anything that you choose to build but it is evident that you've overcome the difficulties. This will be really nice with some paint.  Thumbs Up [tup]

 Don

  • Member since
    January 2007
Posted by the doog on Tuesday, May 5, 2009 6:15 PM

Thanks, guys--I managed to get home a little earlier than I thought, so I've started the base coat and preshading.

Bill, thanks for that info. I kinda knew that already, but I figured if it was good for that vehicle in the photo, then it would be ok for the model to wear. In any case, it's great stuff fro anyone who's following this build. I will give a very old, slight "remnant" of a whitewash scheme. The hairspray technique will be used here, of course. I got something else planned too though, in terms of HOW I'm going to paint it...Tongue [:P]

Thanks too, Andy, and dupes -- yeah, I'm kinda sick about the interior being so hidden, but what can ya do? Sigh [sigh] File it under the category of "I know it's in there"!

Thanks too, Bushi, and Don! I appreciate all you guys taking the time to comment here! Big Smile [:D]


  • Member since
    December 2005
  • From: Syracuse, NY
Posted by lexesbenz on Wednesday, May 6, 2009 12:49 AM
Karl this is going to be a fantastic kit!!
The flying hamster of doom rains coconuts on your pitiful city!!!!
  • Member since
    July 2006
  • From: New Jersey
Posted by redleg12 on Wednesday, May 6, 2009 6:03 AM

Karl - OK.....I take a couple of days off and you burp out a new WIP and now you are moving in my direction....the strange and different.

Nice build so far. Building the "different" is always a learning experience.

Rounds Complete!!

"The Moral High Ground....A Great Place to Emplace Artillery."

  • Member since
    January 2007
Posted by the doog on Thursday, May 7, 2009 10:26 PM

Thanks, Mike and Tony! I appreciate your comments! I'm working away here....Smile [:)]

I've started the painting process--it's going to be a long process with all the steps I'm planning.

I'm about halfway finished right now with just the painting. 

First, I painted the box and wood parts in Tamiya Neutral Gray...

Then I sealed it with dullcoat, and hit it with hair spray. Letting it dry for an hour, I hit it next with a coat of a dark Dark Yellow mix, into which I added Black and Earth color. I then attacked it with a short-bristled brush, to get this;

What I'm going for is a look where the "box" was built from comandeered old wood--like from a Russian farmhouse or shed--and it's that old, weathered grey look to it. I'm going to finish it as if the crew had some old paint to throw at it, but nothing too complete--it will be somewhat painted outside, but not in the interior, which will be beat-up and weathered wood.

I then sealed and sprayed it again, and then hit it with a lighter shade of Buff, which was then rubbed off in a similar manner...

One more round went down,where I hit it with a little more DY. I'm still not done with it, but that's where I am now...

The hull was painted first with a dark brown, then the dark DY coat;

...and progressively lightened in the inner panels....

and a wash of acrylic DY was laid on it to give it some variety in tint from the box....

]

The wheels and box and wood rails...

I still will be adding a beat-up camo scheme, and remnants of a whitewash coat....stay tuned!

Any comments or ideas welcomed!

  • Member since
    February 2009
  • From: mass,USA
Posted by scratchmod on Friday, May 8, 2009 5:48 AM

This is looking great Doog, I  really like the wooden box, those planks looks very real. I'll have to try your method when I get back to my Sd.Ah 116. This has been a fun build to folow, and you bet I'll stick around to see this baby finished.

Rob

  • Member since
    May 2005
  • From: Dublin Rep Of Ireland
Posted by terry35 on Friday, May 8, 2009 7:08 AM

Hi, Karl, looking good so far. I think I have some photos of these berge's from panzer wrecks, must look it up for you. I personally don't quite know what to make of the vehicle myself as I don't know too much about the subject. I'm looking forward to seeing what your going to make of it.

I'm in work at the moment, will check back at the weekend.

Terry.

  • Member since
    January 2007
Posted by the doog on Friday, May 8, 2009 10:06 AM

Thanks, Rob, and terry!

I managed to get a camo coat on it, but don't have time to post it now--I'll have more photos later. I have to seal it now and then spray it, and add a whitewash coat later.

Man, I've never used so much damned sealant and hair spray! lol!

Thanks for looking in and commenting, guys! Big Smile [:D]

  • Member since
    July 2004
  • From: Texas
Posted by wbill76 on Friday, May 8, 2009 10:06 AM

Karl,

I like the wood effects you've achieved, very nice! Just remember though from a historical accuracy perspective that these vehicles weren't "ad hoc" arrangements, they were factory-done conversions including the addition of the wooden box so you wouldn't have had the "old Russian lumber" situation occur. Wink [;)] Normally the wood box was painted and integrated right into the camo pattern given the fact that these were recovery vehicles and so would be used frequently at the front edges of combat. The two pics below are from the Trojca Pz III book and are posted for discussion purposes only to illustrate my point.

That doesn't take away from the very nice aged wood effect that you've achieved though! Thumbs Up [tup]

The second pic is a double bonus...not only a Berge III but one also outfitted with Ostketten.

  • Member since
    July 2006
  • From: New Jersey
Posted by redleg12 on Friday, May 8, 2009 10:17 AM

Karl - Nice job on the wood, love the worn effect. Vehicle looking good woth fading.

Rounds Complete!!

"The Moral High Ground....A Great Place to Emplace Artillery."

  • Member since
    December 2003
  • From: Colorado
Posted by psstoff995 on Friday, May 8, 2009 10:35 AM
Looks great- glad you're handling the resin just as nice as the plastic, why on Earth resin throws the great doog for a loop is beyond me. Especially with these results!!

-Chris

US Army Infantryman

  • Member since
    February 2008
  • From: ladner BC Canada
Posted by stick man on Friday, May 8, 2009 10:37 AM

Cool paint job Doog I like how you did the dark coulor first and than whent over it with the light coulor.

Smile [:)]

I'm 15 and I model I sk8board and I drum what could be better.
  • Member since
    March 2004
  • From: Kincheloe Michigan
Posted by Mikeym_us on Friday, May 8, 2009 10:41 AM

Manny you got to remember the during WWII pressure treated wood didn't exsist so you would get some wierd swelling of the wood which will really show the grain whenever moisture got onto the wood. So since the wood decking is exposed to the elements that would be a reasonable explanation of why the Neograde representation looks so heavy handed.

On the workbench: Dragon 1/350 scale Ticonderoga class USS BunkerHill 1/720 scale Italeri USS Harry S. Truman 1/72 scale Encore Yak-6

The 71st Tactical Fighter Squadron the only Squadron to get an Air to Air kill and an Air to Ground kill in the same week with only a F-15   http://photobucket.com/albums/v332/Mikeym_us/

  • Member since
    March 2004
  • From: Kincheloe Michigan
Posted by Mikeym_us on Friday, May 8, 2009 10:49 AM
 New Hampshire wrote:

Hey Karl, looking good.

I am curious what epoxy you used for the headlight.  My next armor build will probably be the 1/35 Abrams I bought, and it comes with 2 figures that I was thinking of trying to make lenses for the goggles for.  I think boring the goggles out a little and adding some epoxy might be just the ticket.....

Brian

Use clear acetate for the goggles Brian it is thin enough to allow you to glue it to the back of the goggles and cut it to shape while in place and you can leave it clear or tint it clear green or clear yellow as the actual lenses came in clear green and amber colors.

On the workbench: Dragon 1/350 scale Ticonderoga class USS BunkerHill 1/720 scale Italeri USS Harry S. Truman 1/72 scale Encore Yak-6

The 71st Tactical Fighter Squadron the only Squadron to get an Air to Air kill and an Air to Ground kill in the same week with only a F-15   http://photobucket.com/albums/v332/Mikeym_us/

  • Member since
    January 2007
Posted by the doog on Saturday, May 9, 2009 6:58 PM

Once again, thanks, guys, for the continued support and attention in this thread!

I managed to get some more painting done this morning--I didn't get sny photos of the camo--t's green line--but you can see it under the remnants of the whitewash here. I also have decided with Bill's advice that the box needed more DY base coat, so I sprayed a somewhat thin coat of DY (lightened of course) and weathered it a bit, scraping some of it off before applying the camo. I also scraped away some of the camo coat, making it loook old too. The green is Tamiya Field Gray.

Here's the base of the whitewash--I only wanted to leave it where the crew would have been lax in removing it--edges, mostly, and depressions in the hull.

Of course, this was done over yet another coat of hairspray, and so then the stiff brush was used to scrub away most of it.

And here's some detail shots of what I have so far...

I think that this will give me a good base from which to start weathering. I'll post up some photos as I go here...any comments on the whitewash welcomed!?

  • Member since
    August 2008
  • From: S.W. Missouri
Posted by Pvt Mutt on Saturday, May 9, 2009 7:18 PM

Hey Karl I would say the whitewash is believable,looks good from here.

Tony the Mutt

Shoot Low Boys They're Ridin Ponys

  • Member since
    December 2005
  • From: Syracuse, NY
Posted by lexesbenz on Saturday, May 9, 2009 8:45 PM
.....SPIFFY!!!
The flying hamster of doom rains coconuts on your pitiful city!!!!
  • Member since
    February 2009
  • From: mass,USA
Posted by scratchmod on Saturday, May 9, 2009 8:55 PM

Looking great. I think the camo and white wash are right on target.


Rob

  • Member since
    March 2003
  • From: El Dorado Hills, CA
Posted by IBuild148 on Saturday, May 9, 2009 9:03 PM

Doog,

As always you continue to astound and this will be another great watch and tutorial.

As for the "hole" in the floor and what is going on underneath I'll picture Fräuleins and Soldiers "gettin jiggy with it".

IBuild1/48

IBuildOne48

Teach modeling to youth!

Scalefinishes.com

http://i712.photobucket.com/albums/ww122/randysmodels/NMF%20Group%20build%20II/Group%20Badge/NMFIIGBbadgesmall.jpg


  • Member since
    July 2004
  • From: Texas
Posted by wbill76 on Saturday, May 9, 2009 9:56 PM
Looks the part to me Karl, coming along nicely and once you add in the weathering ought to look like suitable remnants in spring time! That would also be in keeping with the nice little floral print design on your chosen material for masking the interior. Wink [;)] Laugh [(-D]
  • Member since
    June 2005
  • From: San Tan Valley,AZ
Posted by smokinguns3 on Saturday, May 9, 2009 10:19 PM
comeing along nicley, Karl.
Rob I think i can I think i can
  • Member since
    July 2006
  • From: New Jersey
Posted by redleg12 on Sunday, May 10, 2009 6:07 AM

Karl - Very nice on the winter camo remnents. It looks quite good and will blend in nicely after weathering. I'm sure the smell of the hair spray always bring back memories for you Shock [:O]

Sounds like you are burning the candle at both ends.....just be careful you don't melt all your "wax"

Rounds Complete!!

"The Moral High Ground....A Great Place to Emplace Artillery."

  • Member since
    November 2006
  • From: Coastal Maine
Posted by dupes on Sunday, May 10, 2009 8:56 AM
The hairspray technique worked out very well. Looking awesome, Doog. Thumbs Up [tup]
  • Member since
    June 2006
  • From: Michigan
Posted by ps1scw on Sunday, May 10, 2009 11:05 AM
very nice project
  • Member since
    January 2008
  • From: Bournemouth UK
Posted by Bodge on Sunday, May 10, 2009 11:27 AM
Lookin good,real good.Thumbs Up [tup]
  • Member since
    July 2007
  • From: Ohio
Posted by Geist on Sunday, May 10, 2009 11:29 AM

The paint looks great DoogThumbs Up [tup]. This is one cool piece of machinery for sure. Just wait, Dragon will have one out in a few months. Dead [xx(]Tongue [:P]


Erik

On the bench: Italeri Leopard 1A2 correction build with Perfect Scale turret and Eduard PE

  • Member since
    January 2003
  • From: arizona
Posted by cthulhu77 on Sunday, May 10, 2009 11:36 AM
very fascinating build, love the approach to the weathering.
http://www.ewaldbros.com
  • Member since
    April 2005
  • From: Piscataway, NJ!
Posted by wing_nut on Sunday, May 10, 2009 12:01 PM

Outstanding doog.  Your usual high quality is still there my friend.


If oyu look at the horse drawn gun in my Club meeting score! post... that is in the background.  I was looking at the box top saying thatit look somehow familiar.

Marc  

  • Member since
    December 2008
  • From: Las Vegas, Nevada
Posted by model maniac 96 on Sunday, May 10, 2009 12:23 PM
 cthulhu77 wrote:
very fascinating build, love the approach to the weathering.


Ditto
"Veni, Vidi, Vici" Julius Caesar: I came, I saw, I conquered.
  • Member since
    April 2008
  • From: Kristiansund, Norway
Posted by Huxy on Sunday, May 10, 2009 12:33 PM
That's very, very nice! May I ask if that's the bare plastic showing underneath? Smile [:)]

"Every War Starts And Ends With An Invasion".

  • Member since
    January 2012
Posted by I make stuff on Sunday, May 10, 2009 2:31 PM

Wow, Karl, another amazing build.  I like the wood and beat up last year's whitewash.  Very cool, I can't wait to see you continue to beat her up. 

Unusual and cool, very well executed.

Bill 

  • Member since
    January 2007
Posted by the doog on Sunday, May 10, 2009 7:03 PM

Thanks, Tony, Tony, and Rob!

Ibuild48--that's a good idea--I'll have to have Manny send me over some of his Russian chicks to "party" with Hans and Franz! lol! Thanks for commenting!

Bill--thanks, man! Sharp eyes there--I forgot to take the paper towel out o fthe hull, lol!

Thanks, too, Rob and Mike! Ahhh yes.....The smell of hairspray in the morning!........boy, that's a smell I don't miss, lol! Approximately 1985...no, I won't post a better one...Shock [:O]

Thanks, too, dupes, ps1scw, Andy and Erik--Erik, you're probably right; I'll put my money on DML coming outwith one soon!

Thanks too, cthulhu, glad you like the look too! 

Marc, good score there! Thanks for the comments--I never noticed that in the box top? COOL!

Thanks too, Jim! And Bill!

Huxy--you ask the darndest questions sometimes, lol! NO, that's not the plastic! That's the color of the snow remnants!

I appreciate alll your comments, guys! I'll try to get another update up soon--I'm down with the flu today after spending the whole day at Jenn's Syracuse University graduation, so I'll be slow at the workbench, but I want to try to finish this before I leave in about a month for tour...stay tuned! Big Smile [:D]

  • Member since
    October 2007
  • From: N.H.
Posted by panzerguy on Sunday, May 10, 2009 10:10 PM

  Starting to look the part of a well-used mobile matinance vehicle there doog.Great work as always Karl

  I take it the boom will have the lifting block attached? 

 the doog wrote:

   That hair looks like it came with a warning [CAUTION:NO OPEN FLAME'S WITHIN 20 FEET]Smile,Wink, & Grin [swg]

"Happiness is a belt fed weapon"

  • Member since
    November 2005
Posted by Anonymous on Sunday, May 10, 2009 11:16 PM

LOL...talk about BIG hair...

Doog, I really like this build, although  gotta say that the paint-job isn't one of your best efforts...I would think that a lot of the residual whitewash would be left in the grooves of the wood-grain...having said that, it is still an awesome build...Those return wheels seem larger than normal??? Keep rockin,---both at the bench and on the stage, bro...

  • Member since
    July 2006
  • From: New Jersey
Posted by redleg12 on Monday, May 11, 2009 5:39 AM
 the doog wrote:

 Ahhh yes.....The smell of hairspray in the morning!........boy, that's a smell I don't miss, lol! Approximately 1985...no, I won't post a better one...Shock [:O]

I appreciate alll your comments, guys! I'll try to get another update up soon--I'm down with the flu today after spending the whole day at Jenn's Syracuse University graduation,

Karl - First, we all have some strange photos dealing with hair in our past (yep...even the redleg). Thanks for sharing. Makes me want to take out the old HS year bookShock [:O] 

Second, I hope you are feeling better. It stinks getting sick at this time of year.

Lastly, but most of all, Congrats to Jenn. Party [party]

Rounds Complete!!

"The Moral High Ground....A Great Place to Emplace Artillery."

  • Member since
    December 2003
  • From: Colorado
Posted by psstoff995 on Monday, May 11, 2009 5:46 AM

gotta say that the paint-job isn't one of your best efforts...I would think that a lot of the residual whitewash would be left in the grooves of the wood-grain...

I'm still spoiled from the German Half-Track build... with the splatter Airbrush- that was one jawdropping finish for sure

-Chris

US Army Infantryman

  • Member since
    January 2007
Posted by the doog on Monday, May 11, 2009 7:55 PM
 Mansteins revenge wrote:

Doog, I really like this build, although  gotta say that the paint-job isn't one of your best efforts...I would think that a lot of the residual whitewash would be left in the grooves of the wood-grain..

Manny, you're probably right--I think I may have rushed the camo job a bit--I think that when you see it now, it does betray a certain "rushed" look, but I guess that seeing in in my mind's eye as the finished piece, I am seeing the camo being so degraded by weathering that I didn't want it to be too eye-catching or intricate--lest I want to show it off more? But good call--it is a bit blah for now....Blush [:I]

Anyhoo.... Thanks guys, for the comments. Steve, you are correct; there will be a whole lifting thingy assembled after I get the point where the box is permanently attached. I'm leaving that until I get the weathering somewhat to where I want it.

Thanks, too, Chris and Mike! 

Here's a quick update--some weathering, in the form of a wash of MIG Beutral Brown, and WHite oil applied in the brain of the wood (as Manny has correctly observed!) 

The MG mount is just starting to be painted.

Hans and Franz and Henrich will be partying in this portable partwagen....

It's gettin there slowly.....I'm taking a multi-multi-layered, patient approach to this build, so it's got a way to go yet. I'll be trying to paint the tools and mount tonight....comments always welcomed, but I realize there's not much to comment on yet...Blush [:I]


  • Member since
    December 2003
  • From: Colorado
Posted by psstoff995 on Monday, May 11, 2009 8:15 PM
The little hint of white wash in the lines looks great, simple fix, but nice results, I think it needed that horizontal interest. As for the MG mount, did the camo hide the little bolt heads? I'm assuming they're still there, just can't see em. As long as in the end it doesn't look like sheet metal welded to wood. I don't know if that'd work Tongue [:P]

I'm sure Hans Franz and Henrich will have plenty of party supplies in there anyway.

-Chris

US Army Infantryman

  • Member since
    July 2004
  • From: Texas
Posted by wbill76 on Monday, May 11, 2009 8:18 PM
 the doog wrote:

Here's a quick update--some weathering, in the form of a wash of MIG Beutral Brown, and WHite oil applied in the brain of the wood (as Manny has correctly observed!)

I knew it! Karl's secretly a model zombie! Now he's putting oil in the brains of his kits! Propeller [8-]

I'm looking forward to seeing the next multi in the multi-multi approach for sure Karl, hope you're feeling better! Wink [;)]

  • Member since
    June 2005
  • From: San Tan Valley,AZ
Posted by smokinguns3 on Monday, May 11, 2009 10:42 PM
Looking good Karl, i really like the  the  yaw it  is turning out.
Rob I think i can I think i can
  • Member since
    October 2007
  • From: N.H.
Posted by panzerguy on Tuesday, May 12, 2009 10:07 AM

   The suggestion Manny made was a good one, defiantly looks better with the wash in the brainWhistling [:-^].

      I like the idea of using the piece of schurzen for the base plate. I take it this would have been cut with a torch? If so I think you should add some burn marks around the edges and some scuffing to represent where the crew were walking and piling cargo on top it.

   And Eva says she'd like to party with Hans and Franz


"Happiness is a belt fed weapon"

  • Member since
    January 2007
Posted by the doog on Tuesday, May 12, 2009 4:13 PM

 psstoff995 wrote:
As for the MG mount, did the camo hide the little bolt heads? I'm assuming they're still there, just can't see em. As long as in the end it doesn't look like sheet metal welded to wood. I don't know if that'd work
No, Chris; they're in there! You just can't see them in the pics! Thanks for caring enough to mention them! Smile [:)]

Bill--lol! I can't believe I didn't catch that--well, scratch that; yes, I do! I miss alot of bloopers when I'm typing fast!I'm still feeling rather like crap--I cancelled all my guitar students today, and am fearing I won't be up to moto-brapping tomorrow! Sigh [sigh]

Thanks Rob! Smile [:)]

And Steve--Eva's definitely "on the guest list", lol! The boys are ready to build some "international relationships"! lol!

Good idea on that plate--I was planning on weathering it up real good anyway. It's not ready to go in yet though--I'm still working on securing the box after making sure I have everything apinted where it will be hard to reach.

Thanks again, guys! Wink [;)]

  • Member since
    January 2008
  • From: Hickory, NC
Posted by Bushi on Tuesday, May 12, 2009 4:37 PM

Looks fantastic Karl. I had to go back and take a second look at the weathering on the lower hull to get a idea of what I would like to try on my PZ Iv for the 1000 roadwheels GB.

Again Great WorkThumbs Up [tup]

Bushi

  • Member since
    December 2003
  • From: Colorado
Posted by psstoff995 on Tuesday, May 12, 2009 4:47 PM
Thumbs Up [tup] glad to hear it- speaks to your camo technique then? lol

Sorry to hear your not back to 100% Karl

-Chris

US Army Infantryman

  • Member since
    May 2005
  • From: Dublin Rep Of Ireland
Posted by terry35 on Tuesday, May 12, 2009 4:50 PM

Hi, Karl thte build is really starting to come together. I will agree with Manny, maybe a light wash of "Off White" oil paint will give a better effect to making the white look as if it didn't wash out of corners completely.

Keep up the good work,

Terry.

  • Member since
    March 2003
  • From: El Dorado Hills, CA
Posted by IBuild148 on Tuesday, May 12, 2009 10:11 PM

Karl,

Stupendous, outrageous and bodacious!!!

I had to come up with some words that you haven't heard about your builds.

IBuild148

IBuildOne48

Teach modeling to youth!

Scalefinishes.com

http://i712.photobucket.com/albums/ww122/randysmodels/NMF%20Group%20build%20II/Group%20Badge/NMFIIGBbadgesmall.jpg


  • Member since
    January 2007
Posted by the doog on Saturday, May 23, 2009 10:41 AM

Hi Guys,

Well, I've finally got my feet under me, and had some time to get back here. I was deathly sick there for a while, and to top that off, the building next door is being rennovated into hi-end concominiums, and wired for internet, so my internet has been turned off for much of the day for some reason. A real PITA. Plus that and rehearsals for the tour, and working on my bike =  one busy doog.In this respect, I'm sorry that I didn't get to document the finishing of this build as thoroughly as I would have liked, or am used to doing. SOme days I ws just draging mysefl to the bench, to paint one tool.....I felt like Censored [censored]!!

But I have achieved my goal of finishing this one before I leave! 

Thanks to all of you who have followed and commented on this build so far, and I apologize if I've been tardy in replying. 

After the last posted photos, I really had a lot of work to do--I had to get the tracks on, and there was a bunch of little tools and mods to do. I put in a "workbench", which meant constructing a shelf, mounting it on rails and bolting it to the hull. I also constructed a fold-down foot shelf inside the entry to the hull, as I reasoned that it would be hard to operate the pedestal AA MGwithout something to stand on. You'll see all thi sin the photos.

I really wanted to busy-up this one--here's the tools and accessories all painted up.

The pulleys and jigs were quite something to put together--I had to link some of the chain.


Hans stands next to his "Spiegelwagen".

And the walk-around.


The completed crane assembly.

The exhaust was done using oils and MIG pigments.

Weathering was done with both MIG pigments, washes, and the "splatter method" used in my Hornisse build.

And the fun part--the interior...you can see the shelf I constructed.

Here's the flip-down shelf to stand on for the AA MG.

Lotsa junk under the shelf--this reminds me of under my bed....lol

Hans and Franz waitin' on the frauleins.....or a Tiger, lol. The third figure didn't make it into the scene.


Well, that's it for this build, Once again, thank you to all who have followed and commented.

I'll be leaving on tour on June 10th, and not returning until at least July 26th, so this will be the last build I have up until then....I may have one to start before then, but it'll sit until I get back. Sigh [sigh] 

Comments, questions, and critiques welcomed and appreciated, guys! Big Smile [:D]


  • Member since
    December 2003
  • From: Colorado
Posted by psstoff995 on Saturday, May 23, 2009 11:02 AM
Was wondering what happened to this one- glad you managed to finish, but more importantly glad you’re back on your feet!!

And wow... I wish my model room was as organized as the insides of your wooden box! JK, but seriously, this looks amazing, sorry it had to skip to the end, but the lack of documentation didn’t take away from the awesome finish, that’s for sure, you managed to do a lot of great scratch work and really take this custom modification to a once in a lifetime doog special edition Bergepanzer. Every mod you added made perfect sense, and even if you had to go one tool at a time, it looks like it was totally worth it, all the little guys look dead on.

Now did someone stash a hand gun in a toolbox? Or what’s that under the shelf in front of that big O2 tank?

Franz doesn’t look too hopeful on the arrival of said frauleins...

-Chris

US Army Infantryman

  • Member since
    July 2004
  • From: Texas
Posted by wbill76 on Saturday, May 23, 2009 11:12 AM

Nice to see you were able to get some work in even while sick Karl and get this one across the finish line. Excellent work on all the little details on the Berge, definitely looks like the crew has been busy with all kinds of recovery work and the little additions like the shelf and gear give it a very "lived in" feel. I do feel sorry for Hans though, he has such a dejected look about him! Thumbs Up [tup] Laugh [(-D]

  • Member since
    April 2003
  • From: 41 Degrees 52.4 minutes North; 72 Degrees 7.3 minutes West
Posted by bbrowniii on Saturday, May 23, 2009 11:16 AM
 the doog wrote:

Hans stands next to his "Spiegelwagen".

Doog,

First, a question - why's Hans so po'd?  He looks like someone peed on his streudel or something.... Laugh [(-D]

Now, the platitudes:

HOLY COW!  STUPENDOUS!  AMAZING!

Yet another great build from you Karl.  I love the cluttered look you achieved.  Looks like my garage on wheels! 

At first I was a little concerned about your placement of the MG, but the shelf you built was a great addition.

All in all, I have to say I love it.  And since I said it before Manny, can she be mine...?Whistling [:-^]

'All that is necessary for the triumph of evil is for good men to do nothing' - Edmund Burke (1770 ??)


  • Member since
    December 2007
  • From: Bridgeview, Illinois
Posted by mg.mikael on Saturday, May 23, 2009 11:23 AM
Stunning build Karl, just plain stunning!!Bow [bow] Glad to hear you pulled thorough your sickness and finished this build. Love all the little tools, objects, and etc, really gives the build that lived in feeling.Cool [8D]

"A good plan executed now is better than a perfect plan next week." - George S. Patton

  Photobucket 

  • Member since
    January 2007
Posted by the doog on Saturday, May 23, 2009 11:32 AM

Thanks, Chris! I appreciate the kind words! That "handgun" is some kind of spray-gun or something---see the cup attached to the top of it? I think it was some kind of painting thingy?

Franz is pissed cuz the fraus are late.......again.........you know how frau's can be..lol!

Bill--thanks too, for the nice compliments! Your own Pz III is putting mine to shame, with the upgrades and PE you've got, but I appreciate the sentiments! I'll be watching yours until I leave! Big Smile [:D]

Boyd--thanks too; Hans is on the lookout for those frau's, as I related to Chris. He's bumming cuz a half-hour is acceptable; an hour-tolerable, but three hours to a German landser starts to smell like a stand-up.....lol!

Thank you for the compliments! And yes; since you asked, you may drive her down the aisle--but I gotta warn you--you know how panzers feel about a Field Marshall! Wink [;)]....Laugh [(-D]

Thanks too, Michael! "Lived-in" was precisely what I was going for, so your obsevations make my day! 

Well, I'm off to rehearsal at 1:00 today---I'll be back later; thanks again all who will take the time to comment! Smile [:)]


  • Member since
    November 2005
Posted by Anonymous on Saturday, May 23, 2009 11:53 AM
 bbrowniii wrote:
 the doog wrote:

Hans stands next to his "Spiegelwagen".

Doog,

First, a question - why's Hans so po'd?  He looks like someone peed on his streudel or something.... Laugh [(-D]

Now, the platitudes:

HOLY COW!  STUPENDOUS!  AMAZING!

Yet another great build from you Karl.  I love the cluttered look you achieved.  Looks like my garage on wheels! 

At first I was a little concerned about your placement of the MG, but the shelf you built was a great addition.

All in all, I have to say I love it.  And since I said it before Manny, can she be mine...?Whistling [:-^]

Hey, hey, bbrowniii---lay of my panzer !!!   I was sniffing the grease in her axles long before you sarted lusting after her jib assembly...lol...

...nice finish on this one...the interior details are really nice and the winterketten always make a Mk III look ready for town...very nice and unique recovery panzer---you almost never see a Mk III recovery built...the dirt and grime on the lower chassis and running gear is particularly well done...

  • Member since
    February 2008
  • From: ladner BC Canada
Posted by stick man on Saturday, May 23, 2009 1:02 PM

Amazing build Doog! I realy like all the extra tools you added and the work bench was a great idea!

Smile [:)]

I'm 15 and I model I sk8board and I drum what could be better.
  • Member since
    January 2009
  • From: Everett, WA
Posted by Schnobs on Saturday, May 23, 2009 1:22 PM

Hey Karl!

Sorry to hear you were sick but I have to tell you your pic of the painted tools took my gosh dogging breath away and has become my wallpaper on my laptop!  Incredible!!!! Bow [bow]

Everytime I see one of your completed build logs I want to say this is the best yest but they are all sensational and very inspriational to me.  Thumbs Up [tup]Thumbs Up [tup]Thumbs Up [tup]Thumbs Up [tup]Thumbs Up [tup]Thumbs Up [tup]

The whole presentation is over the top Sir!

"There is a principle which is a bar against all information, which is proof against all arguments and which cannot fail to keep a man in everlasting ignorance. That principle is contempt prior to investigation." Herbert Spencer
  • Member since
    December 2003
  • From: Colorado
Posted by psstoff995 on Saturday, May 23, 2009 1:41 PM

 the doog wrote:


see the cup attached to the top of it? I think it was some kind of painting thingy?


Ah yep- see it now, so is it Hans or Franz that has a little bit of the ol' Karl Airbrush Skills in em? Laugh [(-D] They did a great work on the whitewash, too bad I never saw it at it’s prime.

Sorry to hear about the late arival of the frau's... I guess you'll have to save that 3rd figure for something else haha jk

Hope you're having fun at rehearsal, it’s been different without you updating builds during your bout with the flu, and I’m sure we’ll all suffer once more while you’re on tour, but I’m sure you’ll enjoy the trip!! Thumbs Up [tup]

-Chris

US Army Infantryman

  • Member since
    June 2006
  • From: Netherlands
Posted by Grem56 on Saturday, May 23, 2009 1:48 PM

Yet another lesson in realistic weathering Karl, really excellent !

Julian


illegal immigrants have always been a problem in the United States. Ask any Indian.....................

Italeri S-100: http://cs.finescale.com/FSMCS/forums/t/112607.aspx?PageIndex=1

Isu-152: http://cs.finescale.com/FSMCS/forums/t/116521.aspx?PageIndex=1


  • Member since
    April 2005
  • From: Piscataway, NJ!
Posted by wing_nut on Saturday, May 23, 2009 2:06 PM

Top notch stuff there doog.  All the gear inside really sets it off.  Glad you are feeling better. It wasn't Der Schwein Flu was it?Wink [;)]

Hans looks that way since he's pissed doogy gets to go on a trip and he has to stay home.

Don't forget hnas... you're there with JennTongue [:P]Wink [;)]

Marc  

  • Member since
    January 2008
  • From: Bournemouth UK
Posted by Bodge on Saturday, May 23, 2009 2:33 PM
Very nice job indeed Karl, i like all the added interest to the interior and the use of extra colour on the tool box etc   also like the figure Thumbs Up [tup] Hope your feelin better now, i had the flu earlier this year and i tell you normally i can handle it but this time it really did knock me for six so i can relate to your  condition.
  • Member since
    August 2008
  • From: S.W. Missouri
Posted by Pvt Mutt on Saturday, May 23, 2009 2:39 PM

Excellent KarlThumbs Up [tup] and have a safe and successful tour my friend.

See Ya When You Get Back                                                                                             Tony the Mutt

Shoot Low Boys They're Ridin Ponys

  • Member since
    June 2005
  • From: San Tan Valley,AZ
Posted by smokinguns3 on Saturday, May 23, 2009 2:41 PM
busy busy busy, i like it
Rob I think i can I think i can
  • Member since
    April 2003
  • From: 41 Degrees 52.4 minutes North; 72 Degrees 7.3 minutes West
Posted by bbrowniii on Saturday, May 23, 2009 3:19 PM

 Mansteins revenge wrote:

Hey, hey, bbrowniii---lay of my panzer !!!   I was sniffing the grease in her axles long before you sarted lusting after her jib assembly...lol...

Oh, but it is such a nice job assembly... grrrrrrrrrr....Blush [:I]

'All that is necessary for the triumph of evil is for good men to do nothing' - Edmund Burke (1770 ??)


  • Member since
    July 2006
  • From: New Jersey
Posted by redleg12 on Saturday, May 23, 2009 4:39 PM

Karl - The most important thing is you are feeling better. It really "inhales" when you are sick.

As for the build, fantastic. I would guess my only comment would be that any maintenance vehicle I have seen always has a good oil stain somewhere from the leaky oil can!!

The tools are great. Hanz and Franz look like maintenance people always look, the mechanic is tired and the maintenance sgt is pisssssed because here come another one!!

Love the weathering. As always, the king of the finish!!

Rounds Complete!! 

"The Moral High Ground....A Great Place to Emplace Artillery."

  • Member since
    October 2007
  • From: N.H.
Posted by panzerguy on Saturday, May 23, 2009 5:21 PM
 redleg12 wrote:

 Hanz and Franz look like maintenance people always look, the mechanic is tired and the maintenance sgt is pisssssed because here come another one!!

Sign - Ditto [#ditto]

  Good to hear your feeling better Karl.

  Nice job on the block and chain and the tools and other items in the box are just perfect. Just how one of these guys's should look after just a couple of days in the field.

"Happiness is a belt fed weapon"

  • Member since
    September 2008
  • From: North Carolina
Posted by WarHammer25 on Saturday, May 23, 2009 6:47 PM

Amazing work Karl! The weathering and finish are superb. I really like the looks of the wider snow tracks on it too. And the interior additions with all the tools and every thing look great. Makes it look like a very well used recovery vehicle. Hans and Franz look like the need some action though; whether it be a another Tiger or some frauleins. Great build!Thumbs Up [tup]Thumbs Up [tup]

The only easy day was yesterday - U.S. Navy Seals
  • Member since
    April 2008
  • From: Kristiansund, Norway
Posted by Huxy on Saturday, May 23, 2009 7:04 PM

I just returned from my bench, proud of how my current project is turning out, and how I mixed two random paints and got the exact colour I was looking for..

I saw this..


I have now quit the hobby..

Blergh..


You're the master, Karl!!!! Make a Toast [#toast]


-Lasse

"Every War Starts And Ends With An Invasion".

  • Member since
    March 2003
  • From: El Dorado Hills, CA
Posted by IBuild148 on Saturday, May 23, 2009 8:15 PM

Doog,

No apology necessary for your absence. We are all just glad you are feeling better and back.

IBuildOne48

IBuildOne48

Teach modeling to youth!

Scalefinishes.com

http://i712.photobucket.com/albums/ww122/randysmodels/NMF%20Group%20build%20II/Group%20Badge/NMFIIGBbadgesmall.jpg


  • Member since
    January 2007
Posted by the doog on Sunday, May 24, 2009 12:21 AM

WHew, what a long day!

Anyway, thanks again all you who have taken the time to comment!!!! Big Smile [:D]

Manny--somehow I think thatmy Bergy has a thing for you.....she asked me for some field-applied zimmerit, but I told her I didn't think it was exactly appropriate--but I think she was trying to catch your eye....lol! I appreciate your comments!

Thanks too, Orion, and Edmund! I'm grateful for your generous compliments! I'm honored to be on your laptop, Edmund! Blush [:I]

Thanks too, Grem56 and Marc! To tell you the truth, the tour is going to be a long one--shows on the weekends for 6 weeks, and a lot of time to waste in between. It's boring without a bike or a modeling bench, to be honest! Sigh [sigh]

Andy--sorry to hear that you got the bug too--nasty, eh, mate? Hope you're feeling top-shelf by now too! Thanks for your kind compliments! 

Thanks, Tony and Rob!! 

Mike, thanks for the laugh--I liked the line about "the mechanic is tired and the maintenance sgt is pisssssed because here come another one!!"--ha ha! That just has the ring of "Truth"! Thanks, man--hey look for those oil stains on the rear deck and the interior near the blue gas cylinders--they're in there! Big Smile [:D]

Panzerguy and warhammer--thanks too, for your comments!

Lasse--don't give up, man! lol!I appreciate your comment and humor too, friend!

Ibuild148 --thanks for your kind sentiments! I do appreciate that--as well aseveryone who has wished me well in health!

Hmm.....I want to start another build here, but I'm off in about 10 days.....what to do, what to do? 

Decisions, decisions.....Banged Head [banghead]


  • Member since
    July 2003
  • From: On my kitchen counter top somewhere in North Carolina.
Posted by disastermaster on Sunday, May 24, 2009 1:45 AM


.......So, this is what you do when you're sick?

Man, every time you build something you get better.

 I hate to say it but, http://i182.photobucket.com/albums/x147/silence-screams/Smileys/thsmiley_sick.gif"get sick more often".

http://www.innovationbyinstinct.com/services/hosting/clients/accountyp/status/DisasterMaster/%23t1-4.jpg

Sherman-Jumbo-1945

" I was so much older then I'm younger than that now "


  • Member since
    December 2005
  • From: Syracuse, NY
Posted by lexesbenz on Sunday, May 24, 2009 1:47 AM
....Wow simply stunning Karl.
The flying hamster of doom rains coconuts on your pitiful city!!!!
  • Member since
    February 2009
  • From: mass,USA
Posted by scratchmod on Sunday, May 24, 2009 8:27 AM

That looks awesome Karl. It has a used look to it and all the equipment really finishes it off. It was a joy following your build.

Rob

  • Member since
    January 2007
Posted by the doog on Sunday, May 24, 2009 9:11 AM
 disastermaster wrote:


.......So, this is what you do when you're sick?

Man, every time you build something you get better.

 I hate to say it but, http://i182.photobucket.com/albums/x147/silence-screams/Smileys/thsmiley_sick.gif"get sick more often".

http://www.innovationbyinstinct.com/services/hosting/clients/accountyp/status/DisasterMaster/%23t1-4.jpg

No, NOOOOOOO! That would be like some weird "shaman's curse" or something---to get better in my modeling only by being sick, lol! Laugh [(-D]

Steve, thanks for your sincerely nice comment! Smile [:)]

Thanks too, Tony!

And you too, Rob! And back atcha--that Abrams is one wicked-cool build as well!

  • Member since
    March 2004
  • From: Kincheloe Michigan
Posted by Mikeym_us on Sunday, May 24, 2009 9:12 AM
 the doog wrote:

Thanks, Chris! I appreciate the kind words! That "handgun" is some kind of spray-gun or something---see the cup attached to the top of it? I think it was some kind of painting thingy?

Franz is pissed cuz the fraus are late.......again.........you know how frau's can be..lol!

Bill--thanks too, for the nice compliments! Your own Pz III is putting mine to shame, with the upgrades and PE you've got, but I appreciate the sentiments! I'll be watching yours until I leave! Big Smile [:D]

Boyd--thanks too; Hans is on the lookout for those frau's, as I related to Chris. He's bumming cuz a half-hour is acceptable; an hour-tolerable, but three hours to a German landser starts to smell like a stand-up.....lol!

Thank you for the compliments! And yes; since you asked, you may drive her down the aisle--but I gotta warn you--you know how panzers feel about a Field Marshall! Wink [;)]....Laugh [(-D]

Thanks too, Michael! "Lived-in" was precisely what I was going for, so your obsevations make my day! 

Well, I'm off to rehearsal at 1:00 today---I'll be back later; thanks again all who will take the time to comment! Smile [:)]


Karl You do realize that Frau is a term that denotes a married woman right?

On the workbench: Dragon 1/350 scale Ticonderoga class USS BunkerHill 1/720 scale Italeri USS Harry S. Truman 1/72 scale Encore Yak-6

The 71st Tactical Fighter Squadron the only Squadron to get an Air to Air kill and an Air to Ground kill in the same week with only a F-15   http://photobucket.com/albums/v332/Mikeym_us/

  • Member since
    May 2006
  • From: Queensbury,NY
Posted by panzer88 on Sunday, May 24, 2009 9:13 AM
Another beauty for sure. Looks great Doog, looks like Hans and Franz got a little thirsty, only one bottle of wine/cider left. Glad that you're healthy again and good luck on the tour.


  • Member since
    March 2004
  • From: Kincheloe Michigan
Posted by Mikeym_us on Sunday, May 24, 2009 9:14 AM
 the doog wrote:

WHew, what a long day!

Anyway, thanks again all you who have taken the time to comment!!!! Big Smile [:D]

Manny--somehow I think thatmy Bergy has a thing for you.....she asked me for some field-applied zimmerit, but I told her I didn't think it was exactly appropriate--but I think she was trying to catch your eye....lol! I appreciate your comments!

Thanks too, Orion, and Edmund! I'm grateful for your generous compliments! I'm honored to be on your laptop, Edmund! Blush [:I]

Thanks too, Grem56 and Marc! To tell you the truth, the tour is going to be a long one--shows on the weekends for 6 weeks, and a lot of time to waste in between. It's boring without a bike or a modeling bench, to be honest! Sigh [sigh]

Andy--sorry to hear that you got the bug too--nasty, eh, mate? Hope you're feeling top-shelf by now too! Thanks for your kind compliments! 

Thanks, Tony and Rob!! 

Mike, thanks for the laugh--I liked the line about "the mechanic is tired and the maintenance sgt is pisssssed because here come another one!!"--ha ha! That just has the ring of "Truth"! Thanks, man--hey look for those oil stains on the rear deck and the interior near the blue gas cylinders--they're in there! Big Smile [:D]

Panzerguy and warhammer--thanks too, for your comments!

Lasse--don't give up, man! lol!I appreciate your comment and humor too, friend!

Ibuild148 --thanks for your kind sentiments! I do appreciate that--as well aseveryone who has wished me well in health!

Hmm.....I want to start another build here, but I'm off in about 10 days.....what to do, what to do? 

Decisions, decisions.....Banged Head [banghead]


Actually why not do a M1A1 tank or Dragons new M2A1 Howitzer.

On the workbench: Dragon 1/350 scale Ticonderoga class USS BunkerHill 1/720 scale Italeri USS Harry S. Truman 1/72 scale Encore Yak-6

The 71st Tactical Fighter Squadron the only Squadron to get an Air to Air kill and an Air to Ground kill in the same week with only a F-15   http://photobucket.com/albums/v332/Mikeym_us/

  • Member since
    December 2003
  • From: Colorado
Posted by psstoff995 on Sunday, May 24, 2009 11:12 AM
Shock [:O] a US build?!

-Chris

US Army Infantryman

  • Member since
    March 2004
  • From: Kincheloe Michigan
Posted by Mikeym_us on Sunday, May 24, 2009 12:09 PM

 psstoff995 wrote:
Shock [:O] a US build?!

Whats wrong with that.Tongue [:P]

I think Karl needs a change of pace and besides wouldn't you like to watch him tackle a Abrahms tank.Big Smile [:D]

On the workbench: Dragon 1/350 scale Ticonderoga class USS BunkerHill 1/720 scale Italeri USS Harry S. Truman 1/72 scale Encore Yak-6

The 71st Tactical Fighter Squadron the only Squadron to get an Air to Air kill and an Air to Ground kill in the same week with only a F-15   http://photobucket.com/albums/v332/Mikeym_us/

  • Member since
    December 2003
  • From: Colorado
Posted by psstoff995 on Sunday, May 24, 2009 12:17 PM

Well of course I would!!

haha, nothing wrong with that, just a shocking proposal, he’d have to find some Hank and Frank figures too... hmmm

-Chris

US Army Infantryman

  • Member since
    March 2004
  • From: Kincheloe Michigan
Posted by Mikeym_us on Sunday, May 24, 2009 1:10 PM

And you know he would need to trick it out too.Big Smile [:D]

On the workbench: Dragon 1/350 scale Ticonderoga class USS BunkerHill 1/720 scale Italeri USS Harry S. Truman 1/72 scale Encore Yak-6

The 71st Tactical Fighter Squadron the only Squadron to get an Air to Air kill and an Air to Ground kill in the same week with only a F-15   http://photobucket.com/albums/v332/Mikeym_us/

  • Member since
    December 2003
  • From: Colorado
Posted by psstoff995 on Sunday, May 24, 2009 1:27 PM
lol yeah that’s true. He could stick a ton of stowage in the racks, add some scratch built bullet proof glass gun shields over the gunners 7.62, maybe even add some IED damage haha

-Chris

US Army Infantryman

  • Member since
    January 2007
Posted by the doog on Sunday, May 24, 2009 6:35 PM

 psstoff995 wrote:
Shock [:O] a US build?!
Hmmmm......well, I actually do have two Abrams in my stash--one of them with the mine plow; and I have an M60A3 with an AM dozer blade too..plus, I HAVE been pondering an M48 Patton....and I've got about half a dozen Shermans....

I dunno though--I just scored a kit I've been lusting after for EVER--the Alan 88mm Waffentrager---and when I get back from tour in late July, somehow I think that that one's going to be on the bench next?

Ya never know though...? I may break out a US build one of these days....? Smile [:)]

  • Member since
    January 2007
Posted by the doog on Sunday, May 24, 2009 6:36 PM
 Mikeym_us wrote:

Karl You do realize that Frau is a term that denotes a married woman right?

Ugh! I get that confused ALL the time! It can get embarrassing when yuo're over there, in-country! Whistling [:-^]
  • Member since
    January 2007
Posted by the doog on Sunday, May 24, 2009 6:37 PM

 panzer88 wrote:
Another beauty for sure. Looks great Doog, looks like Hans and Franz got a little thirsty, only one bottle of wine/cider left. Glad that you're healthy again and good luck on the tour.
Thankl you so much., David!!

I used all of Hans and Franz's booze in the Hornisse build! lol!

  • Member since
    March 2004
  • From: Kincheloe Michigan
Posted by Mikeym_us on Sunday, May 24, 2009 6:45 PM
 the doog wrote:

 panzer88 wrote:
Another beauty for sure. Looks great Doog, looks like Hans and Franz got a little thirsty, only one bottle of wine/cider left. Glad that you're healthy again and good luck on the tour.
Thankl you so much., David!!

I used all of Hans and Franz's booze in the Hornisse build! lol!

Naw Karl I traded Hans and Franz a couple of M1 Carbines for that case of nice French wine you stashed on the Hornisse.Whistling [:-^]

On the workbench: Dragon 1/350 scale Ticonderoga class USS BunkerHill 1/720 scale Italeri USS Harry S. Truman 1/72 scale Encore Yak-6

The 71st Tactical Fighter Squadron the only Squadron to get an Air to Air kill and an Air to Ground kill in the same week with only a F-15   http://photobucket.com/albums/v332/Mikeym_us/

  • Member since
    January 2005
  • From: in the tank factory in my basement
Posted by biffa on Sunday, May 24, 2009 6:53 PM

"whatcha gonna do wit all dat junk.. all that dat junk inside dat trunk.. doogs gonna get you get you dr... nevermind heh"

awesome work doog all the extra's really gave this the look it was after it really looks ready to tackle anything that comes its way, refreshing to see a quite unusual subject as well, its what we have come to expect from you Thumbs Up [tup]


Ron g.
  • Member since
    July 2006
  • From: San Francisco Bay Area
Posted by bufflehead on Monday, May 25, 2009 1:28 AM

Um...uh...aahh....


Shock [:O] 


OK, I'm just speechless.


Wow!! [wow]       Thumbs Up [tup] Thumbs Up [tup] Thumbs Up [tup] Thumbs Up [tup]


I'll add more after I pick up my jaw from the floor!

Ernest

Last Armor Build - 1/35 Dragon M-26A1, 1/35 Emhar Mk.IV Female


Last Aircraft Builds - Hobby Boss 1/72 F4F Wildcat & FW-190A8


  • Member since
    February 2003
  • From: Thailand
Posted by Model Maniac on Monday, May 25, 2009 9:44 AM
Wonderful work, Karl! Now take it, to the limit, one more time! Not M1, not Waffentrager. You gotta do a bigger project. How about Dora 1:35? I'd love to see it! ;-)

Impressive Songs:

All 10 Playlists that I created on Youtube:

http://www.youtube.com/user/ModelManiacThailand/playlists

Pan Flute Music (300 songs) (Most Popular, over 100K views):

https://www.youtube.com/playlist?list=PLUNb2zPxGTZO7alagEPsEMzgBkWt4-vKV

El Condor Pasa (Top 50) (World's most famous and my most favorite song):

http://www.youtube.com/playlist?list=PLUNb2zPxGTZOLKHbju350mLle4HkMhsb8

  • Member since
    April 2008
  • From: Kristiansund, Norway
Posted by Huxy on Monday, May 25, 2009 5:08 PM
What about ANOTHER try at the famous STUrsKAmpflugzeug? Propeller [8-]

"Every War Starts And Ends With An Invasion".

  • Member since
    January 2007
Posted by the doog on Monday, May 25, 2009 8:12 PM

Ron, thanks a bunch! You're right--I do like to try to find something a little different to spice up my display shelves. I'm glad you enjoy the variety! Big Smile [:D]

Thank you, Ernest! I hope I wasn't responsible for any chipped teeth?! Whistling [:-^]...Wink [;)]

Thanks too, Phaisal! You know, I'm a littl ebit like in your situation, where I am running out of rom to display my models, so a huge model like the Dora, or even a 1/16 scale tank is just out of the question for now. Until I either get a new apartment, or move in with my girlfriend, Jenn! Thanks for your kind compliment!

Huxy--eventually, I'll get back to that Stuka; I need to get hungry for a change of pace again.


  • Member since
    January 2012
Posted by I make stuff on Wednesday, May 27, 2009 7:59 PM

Another stunner, Karl.  First, I hope you feel better, I didn't know you were sick, or I would have wished you a speedy recovery in a timely fashion.

I really REALLY like the RANDOM appearance of the clutter.  Not "desperately random," as it sometimes appears, ie that someone tried to make it look random, but the pattern of forced randomness is evident.  Does that even make sense?  It looks like some tired and busy guys put the stuff where it is, not like you tried to cover "x" square inches with "Y" items. 

I also like the vehicle, well off the beaten path.  I find myself looking forward to building the Panther, Tigers I and II, etc, but really keeping my eyes open for things that you really don't see every day.        

Very nice work, what's next?

Bill 


  • Member since
    February 2003
  • From: Thailand
Posted by Model Maniac on Thursday, May 28, 2009 8:51 AM
 the doog wrote:

Ron, thanks a bunch! You're right--I do like to try to find something a little different to spice up my display shelves. I'm glad you enjoy the variety! Big Smile [:D]

Thank you, Ernest! I hope I wasn't responsible for any chipped teeth?! Whistling [:-^]...Wink [;)]

Thanks too, Phaisal! You know, I'm a littl ebit like in your situation, where I am running out of rom to display my models, so a huge model like the Dora, or even a 1/16 scale tank is just out of the question for now. Until I either get a new apartment, or move in with my girlfriend, Jenn! Thanks for your kind compliment!

Huxy--eventually, I'll get back to that Stuka; I need to get hungry for a change of pace again.


You too are running out of space? Not to worry, I have a suggestion. You don't have to get a new apartment or move out anywhere. Just clear things from any wall in any of your room and have wall-based display case installed. In my case I dedicated two sides of the wall for this purpose (the other two sides are not applicable since they're sliding glassdoors). For each side of the wall I get wall-based display case measuring 3.00 m (~10') wide x 2.40 m (~8') high x 0.45m (1' 6") deep. It costed me around $450 each. Each is big enough to host hundreds of 1/35 armors and this is the optimal use of space because it's as high as the celing goes. Each sports 11 storeys including ground. Each storey is wide enough for four lanes of armors. Here's what it looks like:


Impressive Songs:

All 10 Playlists that I created on Youtube:

http://www.youtube.com/user/ModelManiacThailand/playlists

Pan Flute Music (300 songs) (Most Popular, over 100K views):

https://www.youtube.com/playlist?list=PLUNb2zPxGTZO7alagEPsEMzgBkWt4-vKV

El Condor Pasa (Top 50) (World's most famous and my most favorite song):

http://www.youtube.com/playlist?list=PLUNb2zPxGTZOLKHbju350mLle4HkMhsb8

  • Member since
    October 2004
  • From: Katy, TX
Posted by jthurston on Thursday, May 28, 2009 12:03 PM
 the doog wrote:

Heh heh...you take a mortal man...(sorry)

I've been watching this build with great interest, as I'm soon to embark upon a project that will include a bergepanzer IV conversion, and I'm learning a lot about how to do the wood (mine won't have the box, but will have a wood turret-hole cover). Anyways, as always I'm in awe. I love the cluttered appearance. I was trying to remember what it reminded me of, and then it hit me - You remember Francois Verlinden's old dios, when he used to include one of every accessory VLS made in each dio?

Anyway, keep up the inspiring work, doog! I haven't even started on my BPz-IV yet, and I'm already rummaging through my spares box for extra tools...


~J

  • Member since
    January 2007
Posted by the doog on Thursday, May 28, 2009 1:59 PM
 Citadelgrad87 wrote:

Another stunner, Karl.  First, I hope you feel better, I didn't know you were sick, or I would have wished you a speedy recovery in a timely fashion.

I really REALLY like the RANDOM appearance of the clutter.  Not "desperately random," as it sometimes appears, ie that someone tried to make it look random, but the pattern of forced randomness is evident.  Does that even make sense?  It looks like some tired and busy guys put the stuff where it is, not like you tried to cover "x" square inches with "Y" items. 

I also like the vehicle, well off the beaten path.  I find myself looking forward to building the Panther, Tigers I and II, etc, but really keeping my eyes open for things that you really don't see every day.        

Very nice work, what's next?

Bill 


Thank, sincerely, Bill! I am feeling 100%, too, thanks!!

What's next? "In the Shadow of the Scarecrow"--a SURPRISE!!!!!

Look for it over in "Figures"-- a real departure for me....

  • Member since
    January 2007
Posted by the doog on Thursday, May 28, 2009 2:02 PM
 Model Maniac wrote:

You too are running out of space? Not to worry, I have a suggestion. You don't have to get a new apartment or move out anywhere. Just clear things from any wall in any of your room and have wall-based display case installed. In my case I dedicated two sides of the wall for this purpose (the other two sides are not applicable since they're sliding glassdoors). For each side of the wall I get wall-based display case measuring 3.00 m (~10') wide x 2.40 m (~8') high x 0.45m (1' 6") deep. It costed me around $450 each. Each is big enough to host hundreds of 1/35 armors and this is the optimal use of space because it's as high as the celing goes. Each sports 11 storeys including ground. Each storey is wide enough for four lanes of armors. Here's what it looks like:


Phaisal. that's REALLY coool! I only wish I had room to do that! My apartment is a one-room, with a small bedroom and tiny kitchen. There are doors on literally EVERY wall. And free space? There IS NO "free space" at all!

But I appreciate the suggestion! Maybe when Jenn and I move in together? Smile [:)]

  • Member since
    January 2007
Posted by the doog on Thursday, May 28, 2009 2:05 PM
 jthurston wrote:

Heh heh...you take a mortal man...(sorry)

I've been watching this build with great interest, as I'm soon to embark upon a project that will include a bergepanzer IV conversion, and I'm learning a lot about how to do the wood (mine won't have the box, but will have a wood turret-hole cover). Anyways, as always I'm in awe. I love the cluttered appearance. I was trying to remember what it reminded me of, and then it hit me - You remember Francois Verlinden's old dios, when he used to include one of every accessory VLS made in each dio?

Anyway, keep up the inspiring work, doog! I haven't even started on my BPz-IV yet, and I'm already rummaging through my spares box for extra tools...


~J

Hi J Thanks so much! I'm glad you liked it--and thanks for the generous comparision with Francois! Blush [:I]

You might want to wait out that conversion and pick up the new Trmupeter or Dragon Bergepanzer that's just around the corner?

Thanks again, J!

  • Member since
    November 2006
  • From: Coastal Maine
Posted by dupes on Friday, May 29, 2009 9:08 AM
 Model Maniac wrote:

I need these! Considering finishing my basement and making it into my modeling bench/workroom/display area...that would be PERFECT. Must look into local availability.

Oh, and btw - GREAT build Doog! Make a Toast [#toast]

  • Member since
    February 2003
  • From: Thailand
Posted by Model Maniac on Tuesday, June 2, 2009 7:25 AM
 the doog wrote:

Phaisal. that's REALLY coool! I only wish I had room to do that! My apartment is a one-room, with a small bedroom and tiny kitchen. There are doors on literally EVERY wall. And free space? There IS NO "free space" at all!

But I appreciate the suggestion! Maybe when Jenn and I move in together? Smile [:)]

A one-room, with a small bedroom and tiny kitchen? Sounds like you're in Hong Kong or Tokyo, not mainland USA! Anyway, I wish you all the best and I hope you and Jenn will find a better place together soon.  


Impressive Songs:

All 10 Playlists that I created on Youtube:

http://www.youtube.com/user/ModelManiacThailand/playlists

Pan Flute Music (300 songs) (Most Popular, over 100K views):

https://www.youtube.com/playlist?list=PLUNb2zPxGTZO7alagEPsEMzgBkWt4-vKV

El Condor Pasa (Top 50) (World's most famous and my most favorite song):

http://www.youtube.com/playlist?list=PLUNb2zPxGTZOLKHbju350mLle4HkMhsb8

  • Member since
    February 2003
  • From: Thailand
Posted by Model Maniac on Tuesday, June 2, 2009 7:39 AM
 dupes wrote:
 Model Maniac wrote:

I need these! Considering finishing my basement and making it into my modeling bench/workroom/display area...that would be PERFECT. Must look into local availability.

Oh, and btw - GREAT build Doog! Make a Toast [#toast]

You're right, this is the perfect way to make use of space and it's most economical too. With this layout, you don't need side and back glasses, just the front (80x240cm - 4 sheets) and the shelves (40x150cm -20 sheets). On close look today I see that it's more crowded and that the case is long enough to host 13 tanks each lane, multiply by 4 lanes = 52 tanks per shelf, multiply by 11 shelves and you can host 572 tanks in 1/35 scale in just one side of the wall this size. So dupes, you don't need these, you need just one! ;-) 


Impressive Songs:

All 10 Playlists that I created on Youtube:

http://www.youtube.com/user/ModelManiacThailand/playlists

Pan Flute Music (300 songs) (Most Popular, over 100K views):

https://www.youtube.com/playlist?list=PLUNb2zPxGTZO7alagEPsEMzgBkWt4-vKV

El Condor Pasa (Top 50) (World's most famous and my most favorite song):

http://www.youtube.com/playlist?list=PLUNb2zPxGTZOLKHbju350mLle4HkMhsb8

  • Member since
    November 2006
  • From: Coastal Maine
Posted by dupes on Tuesday, June 2, 2009 9:44 AM
Yeah, one would probably do me for now...seriously looking in to doing this! Sweet.
  • Member since
    April 2007
  • From: Schroon Lake, NY
Posted by SMJmodeler on Tuesday, June 2, 2009 2:09 PM

doog: It just looks tiredDisapprove [V] doog...like an old mechanic who doesn't like his job anymore...is that what you had in mind?  You have outdone yourself on this one!  All the tools (the necessary evils of the job) and the equipment really add to the look, I can only imagine the time it took, but it was WELL worth it!  The road wheels, tracks and lower hull are fantastic.  An all-around "tour-de-force" of modeling techniques and execution!

I do have a couple suggestions though (what a shock, huhWink [;)]), #1-based on being used by guys with greasy hands, I suggest dry brushing some grease in multiple hand-hold locations, specifically the top wood rail.  #2- The coiled cable on the back looks too clean, IMO.  The contrast works, but it looks like it could use a dark wash or two.  Oh yeah, one more thing, it looks like you slipped a guide horn on the left side on the middle top return roller...check that!

Great job doogThumbs Up [tup]Thumbs Up [tup]!, Will she being going to Syrcon?!   

  • Member since
    March 2003
  • From: El Dorado Hills, CA
Posted by IBuild148 on Tuesday, June 2, 2009 2:34 PM

MM,

Great idea and look with the display cases. Is that $450 for materials and you did the work or did you but BUY them somewhere?

Also, what scale is that B-52?

IBuild148

IBuildOne48

Teach modeling to youth!

Scalefinishes.com

http://i712.photobucket.com/albums/ww122/randysmodels/NMF%20Group%20build%20II/Group%20Badge/NMFIIGBbadgesmall.jpg


  • Member since
    February 2003
  • From: Thailand
Posted by Model Maniac on Wednesday, June 3, 2009 3:24 AM

dupes, I let my brother contact a contractor (owner of glass hardware shop) who came to take a look at the site and my requirements (specifications). The contractor proposed a lumpsum price (materials & labor), when agreed upon he brought materials and labor and the installation began. It took only a day to install the display case on each side of the wall. $450 is Thailand price, in the US this may cost twice or thrice.

Both B-52s are standard 1/72 scale ones. You said you built 1:48?

Impressive Songs:

All 10 Playlists that I created on Youtube:

http://www.youtube.com/user/ModelManiacThailand/playlists

Pan Flute Music (300 songs) (Most Popular, over 100K views):

https://www.youtube.com/playlist?list=PLUNb2zPxGTZO7alagEPsEMzgBkWt4-vKV

El Condor Pasa (Top 50) (World's most famous and my most favorite song):

http://www.youtube.com/playlist?list=PLUNb2zPxGTZOLKHbju350mLle4HkMhsb8

  • Member since
    January 2007
Posted by the doog on Wednesday, June 3, 2009 8:50 AM

 SMJmodeler wrote:

doog: It just looks tiredDisapprove [V] doog...like an old mechanic who doesn't like his job anymore...is that what you had in mind?  You have outdone yourself on this one!  All the tools (the necessary evils of the job) and the equipment really add to the look, I can only imagine the time it took, but it was WELL worth it!  The road wheels, tracks and lower hull are fantastic.  An all-around "tour-de-force" of modeling techniques and execution!

I do have a couple suggestions though (what a shock, huhWink [;)]), #1-based on being used by guys with greasy hands, I suggest dry brushing some grease in multiple hand-hold locations, specifically the top wood rail.  #2- The coiled cable on the back looks too clean, IMO.  The contrast works, but it looks like it could use a dark wash or two.  Oh yeah, one more thing, it looks like you slipped a guide horn on the left side on the middle top return roller...check that!

Great job doogThumbs Up [tup]Thumbs Up [tup]!, Will she being going to Syrcon?!   

First, thanks, Phaisal, for your kind sentiments!


Steve-- thanks, for the kind words, and suggestions! Not sure what you saw in the guide roller? I checked all around, and it's all aligned and sano...The grease suggestion is agood one--perhaps I will add some more before I take this out to SYRCON.

If it beats yours, you have only yourself to blame! LOL! Laugh [(-D]........Wink [;)]

  • Member since
    April 2007
  • From: Schroon Lake, NY
Posted by SMJmodeler on Wednesday, June 3, 2009 10:23 AM

 the doog wrote:

First, thanks, Phaisal, for your kind sentiments!

Phaisal...huh...Confused [%-)]  Have to claim ignorance on that word...the context implies a kind word but a dictionary look-up finds no such word.  Anyway...

 the doog wrote:

...Not sure what you saw in the guide roller? I checked all around, and it's all aligned and sano...

It was probably the camera angle and/ or the overlap of the tracks.  I just thought you better double check it.

 the doog wrote:

The grease suggestion is agood one--perhaps I will add some more before I take this out to SYRCON.

If it beats yours, you have only yourself to blame! LOL! Laugh [(-D]........Wink [;)]

Hey, a real competitor likes to know he's facing his challenger when they're at full strength...a win against a team with half of the best players on the DL is a win with a "what if" question always looming in the back of the mind.

JOIN OUR COMMUNITY!

Our community is FREE to join. To participate you must either login or register for an account.

SEARCH FORUMS
FREE NEWSLETTER
By signing up you may also receive reader surveys and occasional special offers. We do not sell, rent or trade our email lists. View our Privacy Policy.