SEARCH FINESCALE.COM

Enter keywords or a search phrase below:

Sd.Kfz.7/1 2cm Flakvierling 38 WIP: Update 5/31/09 Body assembly part I

29267 views
39 replies
1 rating 2 rating 3 rating 4 rating 5 rating
  • Member since
    October 2007
  • From: Louisville, KY
Sd.Kfz.7/1 2cm Flakvierling 38 WIP: Update 5/31/09 Body assembly part I
Posted by pordoi on Sunday, May 3, 2009 11:21 AM

My first WIP contribution; the DML 6525 Sd.Kfz.7/1 2cm Flakvierling 38 auf Selbstfahrlafette Smart Kit.  I'm not the fastest builder, so anticipate that this kit may take a while to be completed.  And please feel free to comment or make suggestions as this progresses.  The kit contains a fairly complete engine, transmission, fuel tanks and winch assembly, most of which will be invisible in the final model and could be left out if desired.  To start, here's a look at the box art.


    I think that this will be an out of box build, although I may check out some aftermarket gun barrels in the near future.  Typical of many DML kits, the box is jammed full with 10 sprues, a PE sprue, single slide molded parts representing the chassis frame and fender assembly and 3 front tires molded in Dragon styrene.  Some unused space on some of the sprues suggest that other Sd.Kfz.7 variants may be coming.  Construction is carried out in 17 steps with options for installing the gun assembly in combat or travel modes.  As usual, some of the assembly steps look to be quite busy, so I guarantee that at some point I'll likely glue something on backwards and have to do a little corrective surgery.  That said, the first two steps focus on assembling the suspension and exhaust/muffler assembly and attaching these to the frame.


In step 1, the road wheel mounts and leaf springs are attached in multiple parts.  A bit suprised that some of the sprue attachment point were quite thick, especially on the leaf springs.  More noticeable here than with other DML kits that I've built recently.  The leaf springs also had mold lines that had to be scraped or sanded.  And most parts also had several knock out nubs that had to be removed.  So this step required alot of clean up work.  In the end, much of this will be hidden behind the road wheels and drive sprocket.  The front suspension is also installed here.  So far, the fit is nice although a little Mr. Surfacer 500 was used to fill some small seams around parts B51,52.  Here's a look after step 1.


Step 2 involves assembly of the muffler/exhaust and installation of some of the steering linkage.  The muffler comes in 2 halves with attached exhaust pipes.  Each half must first be threaded through a frame assembly (part B57) before the muffler is glued.  Found this out the hard way (my fault because it is shown correctly in the instructions) because you simply cannot fit the exhaust pipes in the frame correctly if you assemble the muffler first.  It was an easy fix.  The front axle assembly is comprised of 4 parts; the steering rod part B18 is fragile and care must be taken removing it from the sprue.  Both sub-assemblies are then attached to the frame from step 1.


The exhaust pipe is solid and will have to be drilled out.  Also, it looks like it might be best to give this some paint now since access will be restricted in the later stages of assembly.  Next up is the engine and transmission; done in steps 3 and 4.

 Don


  • Member since
    July 2004
  • From: Texas
Posted by wbill76 on Sunday, May 3, 2009 12:09 PM
I wondered how long it would be before someone started in on one of these. Off to a great start so far Don, looking forward to seeing this one through. Thumbs Up [tup]
  • Member since
    August 2008
  • From: S.W. Missouri
Posted by Pvt Mutt on Sunday, May 3, 2009 12:39 PM

I've got one of the Tristar 20mm ammo and accessory kits for the flak 30/38. Would I be able to use this on the DML kit?

Thanks                                                                                                                        Tony the Mutt

Shoot Low Boys They're Ridin Ponys

  • Member since
    January 2007
Posted by the doog on Sunday, May 3, 2009 12:44 PM

WOW, it's amazing to look at the underside of this and complare it to the old Tamiya kit--TONS more detail!

Should be a great WIP, Don--and I know you'll do it proud!

  • Member since
    July 2004
  • From: Texas
Posted by wbill76 on Sunday, May 3, 2009 1:07 PM
 Pvt Mutt wrote:

I've got one of the Tristar 20mm ammo and accessory kits for the flak 30/38. Would I be able to use this on the DML kit?

Thanks                                                                                                                        Tony the Mutt

Tony, you should be able to, no problem. Just be aware that some of the items in that Tristar kit are designed for the KwK 38 and so have shorter clips but otherwise a Flak 38 is a Flak 38...even in the Vierling configuration. Wink [;)]

  • Member since
    March 2004
  • From: Kincheloe Michigan
Posted by Mikeym_us on Sunday, May 3, 2009 4:15 PM
 wbill76 wrote:
 Pvt Mutt wrote:

I've got one of the Tristar 20mm ammo and accessory kits for the flak 30/38. Would I be able to use this on the DML kit?

Thanks                                                                                                                        Tony the Mutt

Tony, you should be able to, no problem. Just be aware that some of the items in that Tristar kit are designed for the KwK 38 and so have shorter clips but otherwise a Flak 38 is a Flak 38...even in the Vierling configuration. Wink [;)]

It's funny that they have the KwK38 ammo since TriStar didn't have any KwK38 equipped vehicles in their lineup. Hopefully they put the Sd.Kfz. 222 on the market they are planning.

But it is also nice that DML has the spent shell chute with the travel and firing options which Tamiya neglected.

So any idea what to paint the engine on the 7/1? DML neglected to put paint numbers on it to tell us what to do.

On the workbench: Dragon 1/350 scale Ticonderoga class USS BunkerHill 1/720 scale Italeri USS Harry S. Truman 1/72 scale Encore Yak-6

The 71st Tactical Fighter Squadron the only Squadron to get an Air to Air kill and an Air to Ground kill in the same week with only a F-15   http://photobucket.com/albums/v332/Mikeym_us/

  • Member since
    April 2008
  • From: Kristiansund, Norway
Posted by Huxy on Sunday, May 3, 2009 4:30 PM

Looking good!

But one thing I can't clearly see..  Are the sides of the suspensionbars detailed?  Looks flat?

"Every War Starts And Ends With An Invasion".

  • Member since
    July 2004
  • From: Texas
Posted by wbill76 on Sunday, May 3, 2009 4:44 PM

 Mikeym_us wrote:
So any idea what to paint the engine on the 7/1? DML neglected to put paint numbers on it to tell us what to do.

Not meaning to hijack Don's thread...but I don't think there's really any standard for engine colors in the halftracks per se. The b/w photos that I've seen show that there are different color parts of sorts in the sense that some are painted and some are left in bare steel/metal colors but that's about the extent of it. If you painted it using "normal" greasy/oily engine type colors you should be just fine from an appearance stand-point.

  • Member since
    October 2007
  • From: Louisville, KY
Posted by pordoi on Sunday, May 3, 2009 6:25 PM

wbill76:   "Not meaning to hijack Don's thread...but I don't think there's really any standard for engine colors in the halftracks per se."

   Hey Bill, don't worry about hijacking the thread. Any input that you have is appreciated, whether to me directly or to anyone else who responds.


Doog:  "... and I know you'll do it proud..."    do my best  Thumbs Up [tup]

Huxy:  Yes there is very fine detail on the sides of the suspension bars. Just doesn't show up well in the photos that I posted.

Mikeym_us:  "...what to paint the engine..."     well,  what wbill76 said...  Big Smile [:D]

 Don

  • Member since
    September 2004
  • From: Denver
Posted by tankboy51 on Sunday, May 3, 2009 7:31 PM

I got my copy last week.   Looking forward to your progress. Great build so far, and I'm hoping to be inspired by it enough to start mine in the near future. Model on!

Doug

  • Member since
    April 2005
  • From: Piscataway, NJ!
Posted by wing_nut on Monday, May 4, 2009 7:37 AM
I too was wondering who would be 1st with this one.  I'll be watching this one.

Marc  

  • Member since
    November 2005
Posted by Anonymous on Monday, May 4, 2009 7:46 AM
Sweet...I thank you for blogging this build---I'm sure everyone will be following it and hopefully we can keep you motivated !!!
  • Member since
    February 2009
  • From: mass,USA
Posted by scratchmod on Monday, May 4, 2009 8:58 AM

Cool..now we need some one to do the Trumpeter kit. I'll be watching this build too.

Rob

  • Member since
    October 2007
  • From: Louisville, KY
Posted by pordoi on Tuesday, May 5, 2009 6:37 PM

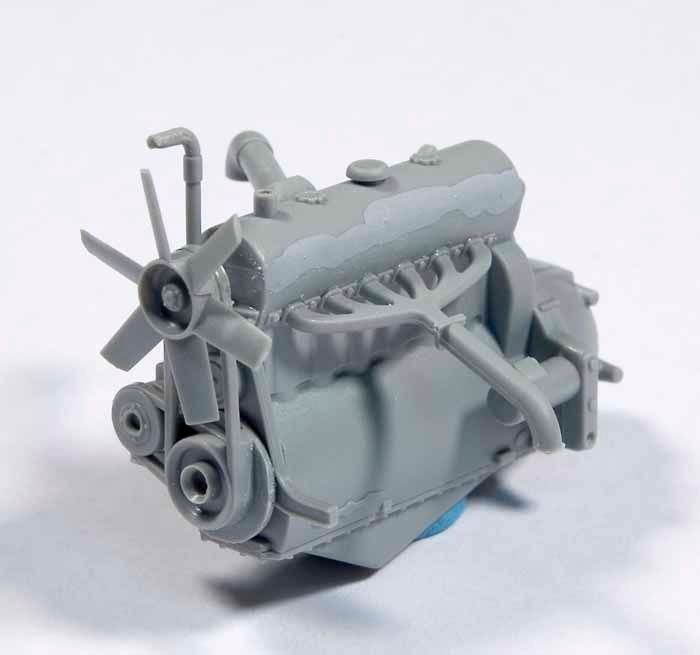
Got a little more time this evening to work at the bench and continued with the assembly of the interior components.  Steps 3 and 4 call for assembly of the Maybach engine and transmission.  The engine itself is comprised of 15 parts and builds into a nice in-line 6 cylinder powerhouse.  Use caution in removing the radiator fan from the sprue; there are numerous attachment points.  I liked the exploded side view that is included in the instructions as it shows nicely the placement of parts D47/52 abd D55.


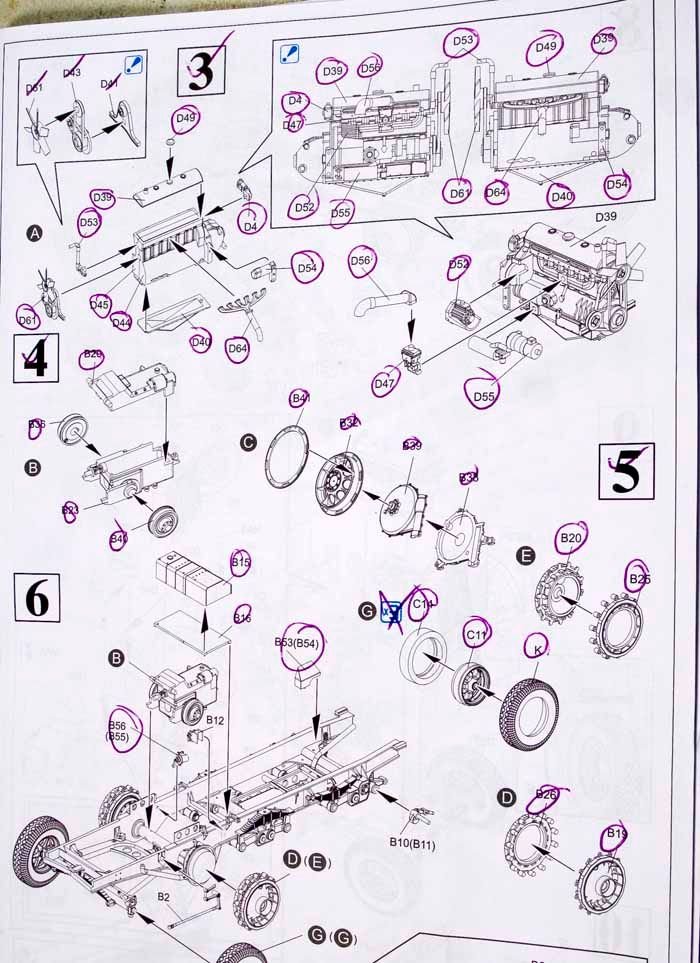
The assembled engine...


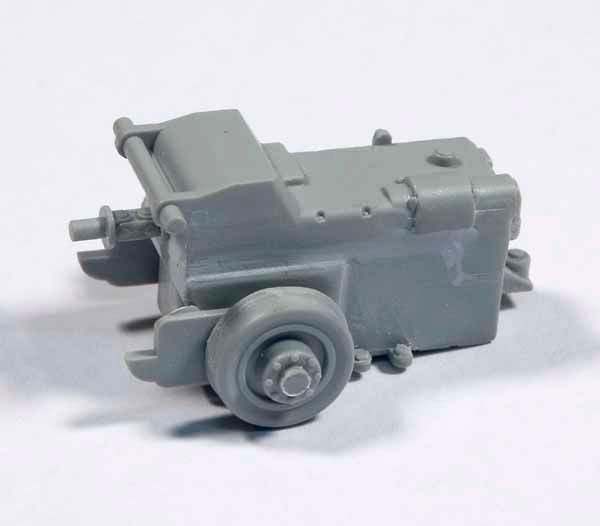
Step 4 is a simple 4 part assembly but the fit of B26 to B29 wasn't great and required some filling and sanding.


Step 5 assembles the winch.  Straightforward and without any problems. The drive sprockets were also put together here.


Step 6 adds a few components to the frame assembly, but part B54 (see photo above) was no where to be found in my kit.  It wasn't attached to the sprue and wasn't loose in the box.  Gone.  At least it's a part that will not be visible when fully assembled.

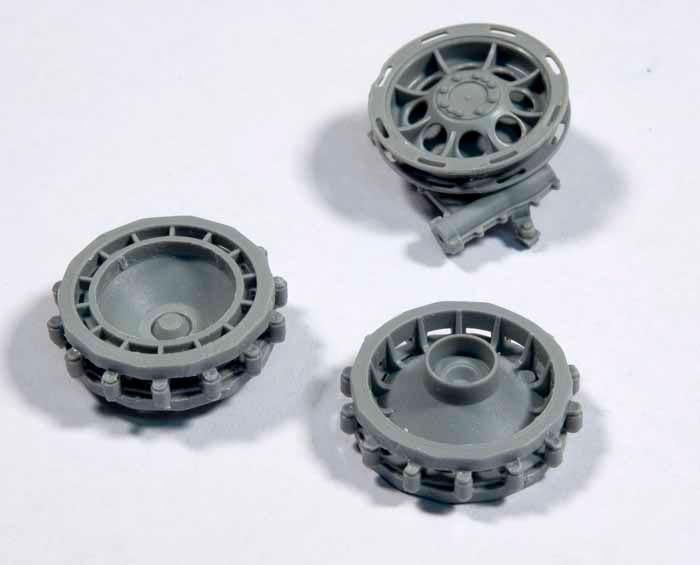
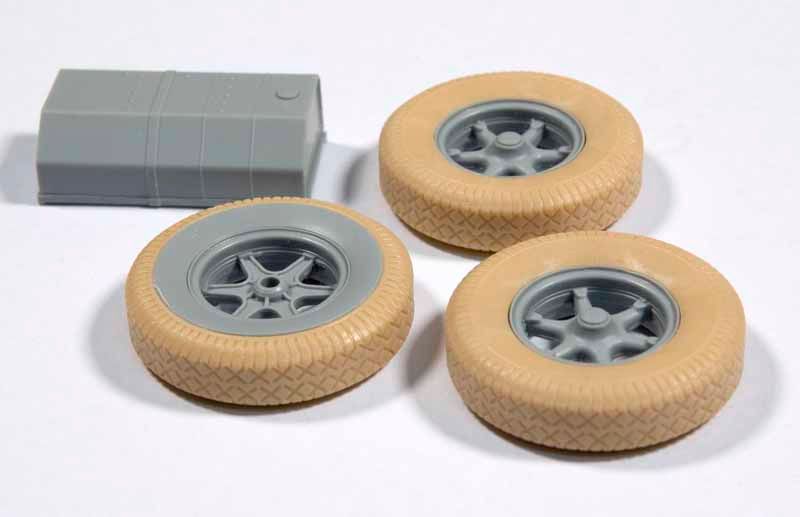
It was interesting that the tires were molded in the softer Dragon styrene.  Nice tread detail and a good fit to the hubs.   But they were mounted on a ring of the harder plastic.  Cost cutting measure? Or does the Dragon styrene need the extra support?  We'll see what kind of a seam shows on the inside of the tire surface when a coat of paint is applied.  This will be important if one wishes to mount the front wheels in a turned postion.


Lastly,  a word of caution that dry fitting is essential for proper placement of the transmission, fuel tank and winch to the frame.  The instructions simple show arrows indicating attachment points, but these are not obvious without some trial and error.  Take care to note how the transmission is positioned relative to the cross support in the frame assembly.  It is shown best in step 7, not in step 6 which directs you to add the sub-assembly.  An error here will mean that the fuel tank will not mount properly which in subsequent steps will make for an improper fit of the floor panels in step 13. 


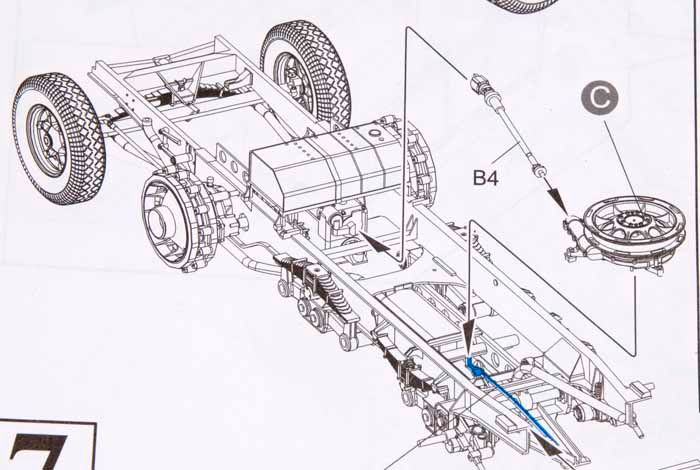
 Same is true for the winch assembly.  Dry fit and make sure that you understand how it attaches to the frame before gluing.  It's not immediately obvious from step 7 of the instructions, unless the arrow shown above is clear to you.... 

 That's all for now. Next step is to assemble the rear towing pintle assembly and glue it on.  Then, it's time to give the chassis, engine and other components some paint before moving on.  I assume that the chassis was oversprayed with panzer gray (or body color) rather than left in primer?  At least that is what I had planned.  Let me know otherwise if this was not the case.  Thanks.

 Don


  • Member since
    July 2004
  • From: Texas
Posted by wbill76 on Tuesday, May 5, 2009 9:09 PM
Coming along nicely Don, I like your "check off" system of going through the different steps. Makes for a nice safety check to be sure you don't miss any parts along the way. Thumbs Up [tup]
  • Member since
    October 2007
  • From: Louisville, KY
Posted by pordoi on Saturday, May 16, 2009 11:31 AM

I told you I'm slow.  Took only 11 days to paint and assemble the chassis.  Pretty much everything in the undercarraige is put together in step 8. 


Initially, I thought that this was alot of work for something that will not even be visible in the finished model.  But it turns out the most of the chassis will be visible if one simply turns the model over.  So it's worth the effort afterall.


All the parts were primed with a light coat of Mr. Surfacer 1200 and then given a base coat of Tamiya german gray acrylic (XF-63).  The engine, gear box, other drive train parts and winch were sprayed with Alclad II steel and then given a light uneven spray with Alclad II jet exhaust.  Everything was then given oil washes; black to highlight detail and shades of sienna to simulate dirt/rust.  Going against conventional wisdom of not doing oil washes over a laquer base, I like the way that the solvent based wash wears away some of the Alclad and gives the engine and drive train a used, weathered look.  The long term plan is to give this vehicle a winter white wash.  My first go at the hairspray technique.  So I'll have to read up on how to do it and then probably come back with a question or two to those of you who have already used hairspray (on yor models, I mean Wink [;)])


And lastly, no problems with the dreaded floating front wheels that seem to plaque the DML 251 kits. 


Tracks went together very easily and are completely workable.  Next up; step 9 which begins assembly of the  cab and gun deck. 

 Don

  • Member since
    July 2004
  • From: Texas
Posted by wbill76 on Saturday, May 16, 2009 12:10 PM
Making good progress Don! You'll have to mount this baby on a mirror-base when you're finished (either that or have it overturned in a ditch!) so that nice chassis detail can still be admired in the end. Wink [;)]
  • Member since
    March 2003
  • From: Rain USA, Vancouver WA
Posted by tigerman on Saturday, May 16, 2009 2:12 PM
Pretty sweet detail on this kit. Is that a real wire around the winch?

   http://i7.photobucket.com/albums/y269/wing_nut_5o/PANZERJAGERGB.jpg

 Eric 

  • Member since
    October 2007
  • From: Louisville, KY
Posted by pordoi on Saturday, May 16, 2009 4:27 PM

 wbill76 wrote:
You'll have to mount this baby on a mirror-base when you're finished (either that or have it overturned in a ditch!) so that nice chassis detail can still be admired in the end. Wink [;)]


  Hmmm..., that would be a challenging dio to construct.  Interesting idea!  I'll give it some thought.


Tigerman:  The cable is silk thread that I found in the jewelry section at the local Michael's.  It's used to make bead bracelets and necklaces.  Nicely woven and with a quick coat of metallic gray, it makes for a nice tow cable.  Might also use it to replace that wirey cable that DML supplies on its PzIV kits.

 Don


  • Member since
    May 2005
  • From: Dublin Rep Of Ireland
Posted by terry35 on Saturday, May 16, 2009 5:45 PM

Hi, Don, your off to a great start and I am eager to see how you progress with this build.

Good luck.

Terry.

  • Member since
    April 2008
  • From: Canadian Prairies
Posted by caSSius on Sunday, May 17, 2009 12:45 AM

Looking great Don...and although I'm anxious to see this progress, you don't have to be so hard on yourself for your "slow" progress: I have the old Tamiya rendition of the 7 that I started...uhmmmm....19 years ago. You're making great progress in my books!...Laugh [(-D]

Coincidently, it's the kit that's re-risen to the top of the stash...so as I start back into it in the coming days, I'm sure you'll be making me jealous with the quality of your kit.

Cheers

Brad

"Only those who will risk going too far can possibly find out how far one can go."

- T.S. Eliot


  • Member since
    January 2009
  • From: Everett, WA
Posted by Schnobs on Sunday, May 17, 2009 2:42 AM

Wow looking good Don!  I really like your build log style as well.


"There is a principle which is a bar against all information, which is proof against all arguments and which cannot fail to keep a man in everlasting ignorance. That principle is contempt prior to investigation." Herbert Spencer
  • Member since
    April 2005
  • From: Piscataway, NJ!
Posted by wing_nut on Sunday, May 17, 2009 5:55 AM
Looks great Don.  I really like the way the exhaust looks usingthe Alclad jet exhaust.

Marc  

  • Member since
    October 2007
  • From: Louisville, KY
Posted by pordoi on Sunday, May 17, 2009 7:29 AM

Terry35:  Welcome to the 7/1 peanut gallery!


caSSius:  Well, I may be slow but I'm pretty sure that I can finish in under 19 years... Big Smile [:D]

Schnobs:  Welcome aboard and thanks for the comments.

Marc:  Thanks for looking in.

 Don

  • Member since
    April 2007
  • From: Schroon Lake, NY
Posted by SMJmodeler on Saturday, May 23, 2009 12:57 PM

pordoi: I'm a bit pressed for time but I wanted to chime in so I can get updated as you post WIP's...I admire our work and look forward to watching this one come together.  It's especialy of interest to me because I built one not too long ago...do you recall my heavy snow winter camo' version of the old Tamiya kit? 

Nice subjectThumbs Up [tup], happy buildingBig Smile [:D]!

  • Member since
    May 2006
  • From: Queensbury,NY
Posted by panzer88 on Sunday, May 24, 2009 9:08 AM
Amazing job on painting and weathering that chassis. It looks awesome.


  • Member since
    January 2009
  • From: Australia
Posted by gingermeggs on Wednesday, May 27, 2009 11:26 PM

What a wonderfull source of information is the internet. I am so glad I found your build as I have ordered this model from Dragon USA and am awaiting its arrival.

As I am a marine builder and this is my first armour project your build will be invaluable to me.

I was wondering if maybe I was a little too ambitious with this choice but I will be pleased to learn from yours.

Regards Les 

  • Member since
    January 2007
Posted by the doog on Wednesday, May 27, 2009 11:35 PM
WOW, Don--fabulous work on that chassis! Nice painting all around!
  • Member since
    July 2003
  • From: On my kitchen counter top somewhere in North Carolina.
Posted by disastermaster on Thursday, May 28, 2009 3:38 AM


Lookin' good Don. Maybe this will motivate Bodge to finish his FAMO. I'll be tuned in to this 'un,

http://i45.photobucket.com/albums/f88/TheZMachine/Hellothere.jpg

while keepin' an eye out for Bodge too.

http://www.innovationbyinstinct.com/services/hosting/clients/accountyp/status/DisasterMaster/%23t1-4.jpg

 https://i.imgur.com/LjRRaV1.png


  • Member since
    February 2009
  • From: mass,USA
Posted by scratchmod on Thursday, May 28, 2009 5:48 AM

Sign - Ditto [#ditto] she's looking great so far, I especially like how the motor turned out. There is a lot of detail in the chassis area, so I agree with Bill, a mirror to show it off would be perfect.


Rob

JOIN OUR COMMUNITY!

Our community is FREE to join. To participate you must either login or register for an account.

SEARCH FORUMS
FREE NEWSLETTER
By signing up you may also receive reader surveys and occasional special offers. We do not sell, rent or trade our email lists. View our Privacy Policy.