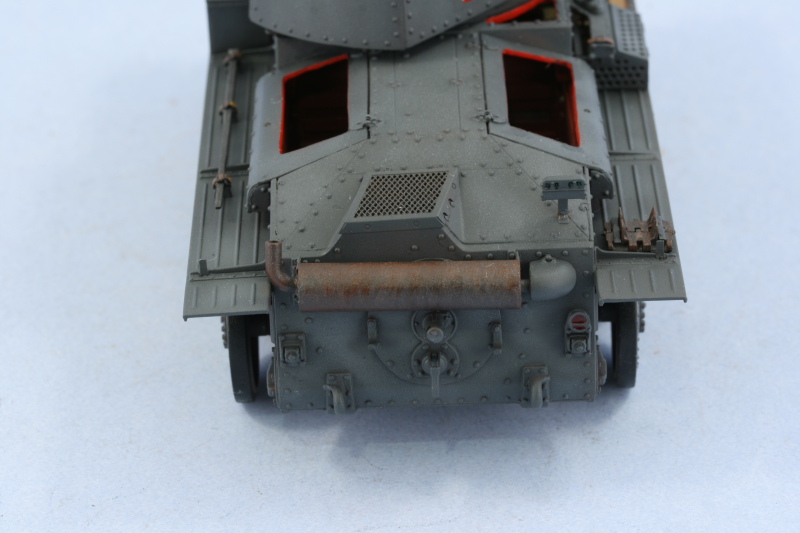
The weekend was good for spending time at the bench and I spent a lot of time on the detail side of things to wrap up some loose ends. The first order of business involved detailing and installing the crew hatches for both the hull and turret. The leather pads were base coated with Italian Dark Brown then dry brushed with a tan/yellow mix of "wood" color that I also use for tool handles. I also dry brushed some enamel Gunmetal and then dry brushed some of the Italian Dark Brown to tone down and blend in the previous efforts into a unified look. Before the front hatch could be installed, I needed to install the rubber base of the antenna mount. This was drilled out with a #72 finger drill to accept a brass antenna later on and then painted with Gunmetal and glued into position. The two hatch halves were then glued together and carefully positioned so that they were slightly bent/angled with one edge resting on the antenna base and then glued into position on their hinge points.
I also added the long pry bar for the left fender and detailed the leather straps with Italian Dark Brown and Non-buffing Metalizer for their buckles. The straps were then carefully bent to shape and the pry bar glued into position in the clamps to avoid it shifting position. I also dry brushed Steel along the rims of the road wheels to simulate their bare metal wear from contact with the track guide horns and then installed the rubber rims to the road wheels and return rollers on both sides.

Next up were the right side fender details. I detailed the jack straps the same as for the pry bar on the other side. The metal portions of the tools were base coated with Non-buffing Metalizer Gunmetal and lightly dry brushed with Steel to create their metallic finish. The wood handle on the axe and the jack block were base coated with my personal mix of "wood" color and then given a light wash of Leather. Once the wash dried, I lightly dry brushed more of the "wood" color to introduce some variation and then also applied some Burnt Umber artist pastel to wear/darken the overall appearance just a bit. The Bakelite handles on the wire cutters were painted with Italian Dark Brown and the rubber end caps with Gunmetal. The two spare track links were supplied courtesy of the MK workable track set since they already had the open holes for the missing pins front and back. The links were base coated with Non-Buffing Metalizer Gunmetal, dry brushed with a touch of Steel, then dry brushed with Rust and Burnt Umber to complete their look. The two small PE retaining straps were painted separately and carefully installed with regular glue to insure they were positioned correctly.

The rear hull also received some attention, I detailed the lenses in the Notek light with Tamiya Clear Green and those in the brake/tail light with Tamiya Clear Red.

I test fit the MK tracks along with the sprockets and idlers and needed to add another link in order to get the desired sag vs. the idler position. This brought the total # of links per track run to 93. In preparation for mounting the sprockets and idlers, both were given some bare metal wear on their teeth/rims/contact points by dry brushing Steel followed by an application of black artist pastels to tone down and blend them in with the painted surfaces.

The tracks themselves were painted next. I applied a primer coat of Flat Black by airbrush to protect the pins and joints from direct exposure to the lacquer-based Non-Buffing Metalizer Gunmetal base coat. This was also applied by air brush and dries very quickly. The tracks were then dry brushed with Steel followed by an overall wash of Burnt Umber.

The idlers were glued into the desired position and then the tracks and sprockets added. The tracks aren't yet glued down to the road wheels, that will come after the pigment weathering is applied to allow for a little flexibility.

That was the last remaining construction step so the entire vehicle received a sealing coat of Future applied by airbrush. This was allowed to dry overnight and the decals applied using Walther's Solvaset to insure they snugged down tight to the surfaces. A 2nd coat of Future was applied to seal in the decals to round things out. Because of the cutouts on the turret, only the rear received a vehicle number but I was still able to apply the 7th Pz Div markings and panzer forces rhomboid markings to the turret sides with some minor adjustments.


I head out on Tuesday for some vacation so won't get back to this one to complete the next steps for a little while but it's on track to be done before the end of the month, never fear! ![Wink [;)]](/emoticons/icon_smile_wink.gif)