SEARCH FINESCALE.COM

Enter keywords or a search phrase below:

WIP: Tamiya Willy's MB 1/35 *updated 1/13/11*

15495 views
35 replies
1 rating 2 rating 3 rating 4 rating 5 rating
  • Member since
    January 2011
  • From: Springfield, MA
WIP: Tamiya Willy's MB 1/35 *updated 1/13/11*
Posted by TigerEP1 on Friday, January 7, 2011 4:42 AM

So i have had this thing for a while now and since like armors i have never built a jeep i am kinda winging it.

I wanted to make a recon jeep that looked like its seen tons of field work, and very little maintenance  other than to keep it running etc. I am attempting a rusted frame etc and i hope that i am doing OK with it. I still have tons more to do and a ton of cleanup and i need to actually spray the body the correct color..lol


So heres what i have so far working with what limited supplies i have I know hes rough but i am hoping to make someone say oh thats nice :)


PLEASE point out anything you think needs work, tips etc. I am very nervous about screwing this up so while its fun I also want to do it justice.  

Thanks all,

Dave


On the bench:

1/35th Tamiya Willi's MB


  • Member since
    September 2007
  • From: Truro Nova Scotia, Canada
Posted by SuppressionFire on Friday, January 7, 2011 5:38 AM

Heh Dave!

The frame looks great.

I prefer to leave off tools such as shovels to install with CA glue after paint. Either way works just its easier for painting without worries of getting the main coat marred with say the wood shovel handle color.

Did Tamiya just include the oil pan to the motor? Looks like it from the bottom yet I may be wrong...

Acrylic Tamiya clear 'smoke' is excellent for oil stains as it drys with a shine. Typically around the transmission bell housing and oil drain plug. Depending on the seals at the end of the drive shafts as well.

One easy modification would be to turn the front wheel slightly and 'lower' the stance as manufactures often miss the loaded look or worn out springs.

Keep posting your Jeep!

Jason

http://i6.photobucket.com/albums/y211/razordws/GB%20Badges/WMIIIGBsmall.jpg


  • Member since
    April 2005
  • From: Piscataway, NJ!
Posted by wing_nut on Friday, January 7, 2011 5:56 AM

Hi Dave

Welcome to the forum.  Great subject not seen here often.  Actually, I don't recall seeing it at allWink

Overall looks good.  It does look like the sprue nub on the side of the hood in the 1st pic needs to be sanded and that there is a mold seam on the top of the shovel shaft.  Tough to tell on the dark plastic.  That , and I slipped on the ice and smashed myself in the face with my 14' ladder yesterday, smashed my glasses and have to wear the older backups and it's tough to tell with the dark plastic.  So if i am wrong about anything let me know.

Not being sure of your level of experience this is not meant to offend, any model that has the basic building techniques taken care of will be a winner.  these are the little things that have modelers leaving model contests with nice out of the box trophies.  One of the best things you can do is read the IPMS judging guidelines.  It will give a comprehensive list of all the "basics".  next best things after that is to hang around here a lot .

Anyway, frame looks good.  for a more beat up look maybe thin the plastic from the back and put some dents and dings in fenders.

Marc  

  • Member since
    January 2011
  • From: Springfield, MA
Posted by TigerEP1 on Friday, January 7, 2011 7:25 AM

Jason,

Thanks for the compliment and the heads up on smoke for oil stains , great idea =D. On the oilpan yes it is on there, i know its hard to see , i used to be so good at doing photos (i paint miniatures) sadly i have forgotten how...lol

How does one turn the wheels? I am gonna guess it entails dremeling or cutting a small section out of the hub ?

Lowering , heh my car is lowered...lol  Not the same with leafe spring setups, i assume its simply sanding down the mounting joints?  Ill keep posting no worries!


Marc, first off lemme say i have seen your work and wow..simply wow.

the hood you are correct altho it seems i trimmed a touch too much off..lol I have some Mr surfacer on the way =D

On the shovel i believe your accident/glasses are fooling you sir as it is smooth =D  (i truly hope your ok)

I will look into those rules and i really like the dents idea. Any other suggestions are more that welcome!

Oh i may as well tell you how i did the frame or should i add it to the first post?


On the bench:

1/35th Tamiya Willi's MB


  • Member since
    November 2005
Posted by T26E4 on Friday, January 7, 2011 7:34 AM

If you can, add hex bolt heads to where the four handles on the outside of the body attach to the body itself.  Tamiya omits some of the mounting hardware for the axe on the left side too.  Depending on how far you want to go, the kit is prime for all sorts of additional bolts and rivets.  Many online pics are extant.


I also wouldn't add too much rust to the frame.  The enamel olive drab was actually quite robust and there would only be minimal shedding of the paint.

Here's some of what I did a few years back


Roy Chow 

Join AMPS!

http://www.amps-armor.org


  • Member since
    January 2011
  • From: Springfield, MA
Posted by TigerEP1 on Friday, January 7, 2011 7:45 AM

Roy,

Thanks for the tips, they will come in very useful, altho i am not sure my sanity is ready for hex heads of that minute scale...lol


I decided to try and get a clearer pic of the frame and explain what i did so far.

So i started off with a base of citadel bestial brown and pueblo red from country colors acrylic, this made up the "rust base" i then took tamiya flat green (since i don't have my OD yet..lol and basically hastily painted it to give a worn look, then a wash of flat green/black for depth. I will add more as i go and i will correct the OD color as soon as i get my paint (later today). I will also do up the engine more, and look for things to "damage" for the wear and tear =D


Thanks,

Dave


On the bench:

1/35th Tamiya Willi's MB


  • Member since
    November 2005
Posted by T26E4 on Friday, January 7, 2011 8:09 AM

Hex bolts aren't tough at all.  I just take the appropriate sized hex rod and salami slice a bunch at a time.  For some insane reason, applying rivets and bolts to models is a very enjoyable task for me.  Maybe it's a sign that I'm truly nuts.


Roy Chow 

Join AMPS!

http://www.amps-armor.org


  • Member since
    January 2011
  • From: Springfield, MA
Posted by TigerEP1 on Friday, January 7, 2011 3:06 PM

Perhaps your both nuts and "botls" lol


ok i know its bad..lol

So good news i found out today that my grandfather had scored a mini compressor from his brother, and i think i have a single action testors AB kicking around here, i know its not great but its something to learn on =D

On the bench:

1/35th Tamiya Willi's MB


  • Member since
    January 2011
  • From: Springfield, MA
Posted by TigerEP1 on Friday, January 7, 2011 3:53 PM

Just a small update:

Started on the seats , still more to do but i am happy so far with the progress:


Thanks,

Dave

On the bench:

1/35th Tamiya Willi's MB


  • Member since
    January 2011
  • From: Springfield, MA
Posted by TigerEP1 on Saturday, January 8, 2011 10:53 AM

I joined the Weathering group build with this so its going to get messy..lol


Anywho heres a small update so far worked on he browning and the front windshield , still tons more to do. I am contemplating a scratch built footlocker type compartment in place of the rear seat,  something where they would keep a small tent, extra tools rations etc. but not sure if this would be easily accomplished.


Any ideas?

Thanks,

Dave

On the bench:

1/35th Tamiya Willi's MB


  • Member since
    January 2011
  • From: Springfield, MA
Posted by TigerEP1 on Saturday, January 8, 2011 3:25 PM

Update =)

Painted the body, and all the attachments except the tools, also detailed the engine cover, still ore to do but wanted to show ya where I am at:


Thanks,

Dave

On the bench:

1/35th Tamiya Willi's MB


  • Member since
    January 2011
  • From: Springfield, MA
Posted by TigerEP1 on Sunday, January 9, 2011 6:20 AM

Just a small quick update, i did a mock up to see where I am at and began tackling the wheels.


LOTS more to do so stay tuned =)


Thanks,

Dave

On the bench:

1/35th Tamiya Willi's MB


  • Member since
    April 2005
  • From: Piscataway, NJ!
Posted by wing_nut on Sunday, January 9, 2011 7:47 AM

Still looking good.  The seat look terrific.  Were the seat cushions leather?  If so consider a beige or light gray dry brush lightly applied to simulate wear.

The dirt on the windows is too heavy IMO.  If the window have that much then most of the front and hood etc will be that heavily covered too.  To get that high up that heavy it would likely make into the open seating area too which seems unlikely.  But even with that the window would likely be wiped down.  There would also be a smooth line form the wipers.  A tape mask would work even with a brush.

Marc  

  • Member since
    January 2011
  • From: Springfield, MA
Posted by TigerEP1 on Sunday, January 9, 2011 8:16 AM

Marc,

Thanks for the compliment on the seats! AFAIK then were canvas over padding, so i went with Khaki and a od /black wash with khaki highlights.


I have to agree on the windshield, i am attempting to remedy it atm, gonna be a bit tough. Ill have more updates soon, glad your enjoying it =D


Thanks,

Dave

On the bench:

1/35th Tamiya Willi's MB


  • Member since
    July 2004
  • From: Texas
Posted by wbill76 on Monday, January 10, 2011 1:29 PM

Certainly moved through this one pretty quick! Can't offer anything additional to what's already been suggested but can say that youv'e done a good job IMHO with it so far. Yes

  • Member since
    January 2011
  • From: Springfield, MA
Posted by TigerEP1 on Monday, January 10, 2011 3:58 PM

Ok so semi large update:

I decided that i wanted a box under the rear seat, no seeing that the rear seat was on the floor, this meant i had to modify the seat and make a box (or the appearance of one. I took a time card for a MMO i play and used it as my styrene :D i made a simple 2 piece L and then cut the rear seat, lowered the back part and attached it to the top, the front section slides into 2 grooves on either side of the rear section, its a bit crooked in the pics as its not "in" yet.

I also tackled the wheels,  added the rad/lights and added the batt,air filter etc to the engine. Still tons more to do and yes the whole thing will get a shot of dullcoat as soon as im done handling it..lol


hope you enjoy!

Thanks,

Dave

On the bench:

1/35th Tamiya Willi's MB


  • Member since
    January 2011
  • From: Springfield, MA
Posted by TigerEP1 on Tuesday, January 11, 2011 6:09 AM

Looking great Casper! Tamiya kits really do go together well =)

Ok so small update, glued the seats in painted the "box" added some weathering and added the rear tire.  Still tons more to do but it's coming along =D Sorry for the dust on the bottom of the wheels, i placed on the CD tower and there was unseen dust waiting to pounce...lol


Thanks,

Dave

On the bench:

1/35th Tamiya Willi's MB


  • Member since
    January 2007
Posted by the doog on Tuesday, January 11, 2011 7:18 AM

If you had asked me beforehand, I would've said that no, you couldn't really make a WIP about a simple Willy's jeep very interesting.

I WOULD HAVE BEEN WRONG.

This is a great little WIP, and the model is looking tremendous! I wish I had chimed in earlier and could've convinced you to do some panel-line post-shading to that hood, but it looks great as it is. The underside and weathering is coming out great too! YesBeer

  • Member since
    January 2011
  • From: Springfield, MA
Posted by TigerEP1 on Tuesday, January 11, 2011 8:16 AM

Doog,

Coming from you that is a very big compliment!

I tend to build things as I think they should look, sometimes it works other times well....not so much..lol

I appreciate the compliments and was wondering if you could explain this post shading? I don't currently have a working AB and this entire model (short of the dull coat it will receive) has been hand painted.  Can this post shading be done via brushes? is it anything like shading a miniature since i paint those too.


Thanks,

Dave

On the bench:

1/35th Tamiya Willi's MB


  • Member since
    January 2007
Posted by the doog on Tuesday, January 11, 2011 8:54 AM

Dave,

The process of "shading"--whether PRE- or POST- shading is the process by which you attempt to simulate the way that light works upon and plays over an object. It involves adding highlights/lowlights, via the airbrush.

I use a somewhat "extreme' method, where I use several shades of altered colors to make a sharp distinction between hues. I mostly do this on "green" tanks, but can also do it on German armor, albeit to a lesser degree.

Here is what my ersatz M10 Panther looked like after I shaded it:
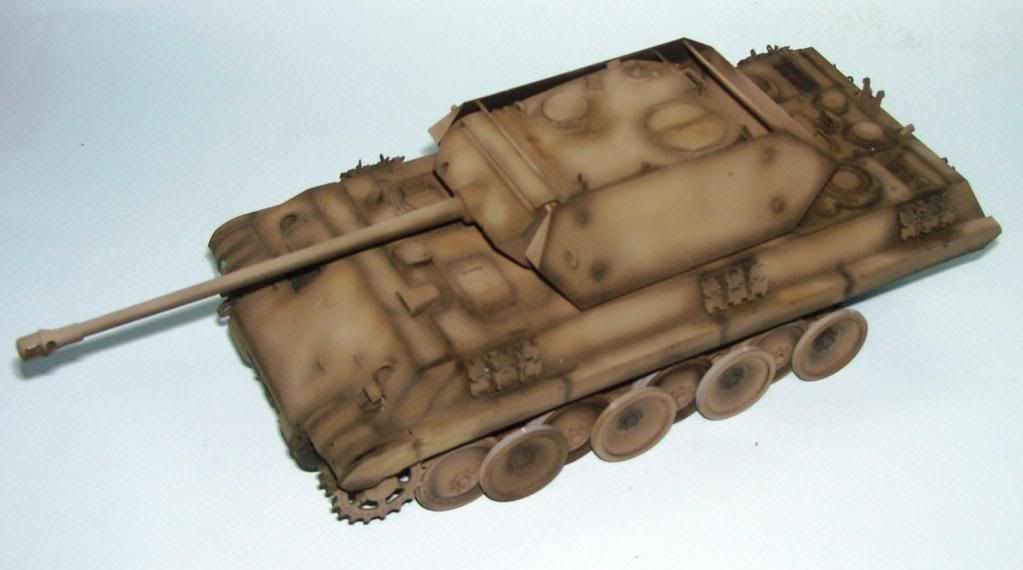
There are three or four shades od OD sprayed here. One dark base, to which Black has been added. Then a straight OD layer Then two progressively lighter coats, one lightened with Dark Yellow or Buff, and one with just straight Dark Yellow sprayed very very lightly for tinting purposes. The lighter colors are sprayed into the centers of the panels, leaving the dark to "outline" the lines of themodel, and leaving "shadow" in the creases.

It looks a bit cartoonish, does it not? However, with washes, drybrushing, filters, pigments, etc-all thetricks of weathering--it tones down into a nice finish:
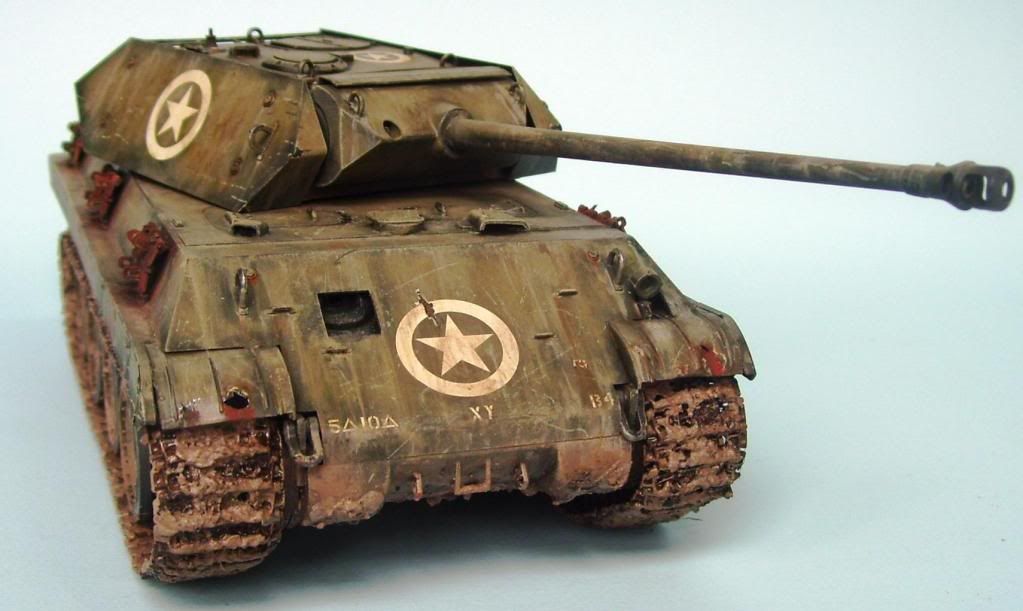
I hope this gives you an idea of the technique It's really not hard; it just takes a bit of courage and pluck. Soe guys don't like the result or the technique, but that's ok. I just posted it here to give you another point of view and possible option in your future builds! Smile

  • Member since
    January 2011
  • From: Springfield, MA
Posted by TigerEP1 on Tuesday, January 11, 2011 9:04 AM

O_O


That panther err M10  err thing came out amazing! Wow and i was all proud of my weathering..lol Man it looks real! Love the rust effects as well! We are going to have to talk!


Thanks for the tips, I am sure once i get my AB up and running and get LOTS of practice learning how to use it I will give this a go =)  For now its brushes and rattle cans for me...lol

On the bench:

1/35th Tamiya Willi's MB


  • Member since
    January 2011
  • From: Springfield, MA
Posted by TigerEP1 on Tuesday, January 11, 2011 9:28 PM

So another update, I am joined today by Mr. Steering Wheel, Mr. Side Mirror and, Mrs. Taillights Wink

Got a bit more down on the weathering front, still a ways to go on this but i am happy how its coming along.


Tank parts have not arrived yet, so this is getting all my attention.

Comments, questions, tips always welcome Smile

Thanks,

Dave

On the bench:

1/35th Tamiya Willi's MB


  • Member since
    April 2009
  • From: Carmel, IN
Posted by deafpanzer on Tuesday, January 11, 2011 10:05 PM

LOL!  I am glad you have new friends now... I'd love to meet Mrs. Taillights one day but is she really married?  Your jeep is looking great! Yes It looks better with the seats being not monotoned now...

Welcome to the forums! Big Smile

Andy

  • Member since
    April 2005
  • From: Piscataway, NJ!
Posted by wing_nut on Wednesday, January 12, 2011 8:25 AM

I'm lovin'it!  The rust is real nice.  I really like the way it looks on that pole thing on the front.  As you can see the only thing I know about jeeps is my daughter's fiancé drive an '08Wink

Marc  

  • Member since
    January 2011
  • From: Springfield, MA
Posted by TigerEP1 on Wednesday, January 12, 2011 9:25 AM

Thanks guys!

deafpanzer: i believe  she is married, but i hear its not going so good..lol

the seats still need a bit more, but agreed they got some much needed depth!


wing_nut: haha no worries i mean its not like your name is jeep_nut!

The front bar is a piece of sharpened angle iron which was attached to the bumper to cut Piano Wire  that the Germans used to behead the enemy.. gruesome but true!


Glad you all enjoyd the update, ill have more today due to the 1+ foot of snow we got Oo


On the bench:

1/35th Tamiya Willi's MB


  • Member since
    January 2011
  • From: Springfield, MA
Posted by TigerEP1 on Wednesday, January 12, 2011 7:48 PM

So i added some valve stems to the wheels, then managed to snap the angle iron off...again...lol


After i got those squared away, i began doing the pastel weathering only one color atm  but its coming along nicely ..at least to me..lol


On the bench:

1/35th Tamiya Willi's MB


  • Member since
    January 2007
Posted by the doog on Wednesday, January 12, 2011 11:04 PM

You've managed to make a small masterpiece out of a kit that could have been just another ho-hum build.I love it;  the weathering is nicely rendered, and the pastels look great on it.

A soldier standing next to it would be the topper!  Big Smile

  • Member since
    January 2011
  • From: Springfield, MA
Posted by TigerEP1 on Thursday, January 13, 2011 1:24 AM

Doog,

Thanks again!

As this is only my second (possibly 3rd its hard to keep track) armorish piece I am glad I am doing it justice.  I am trying to think if i should add more colors to the pastels, I mean i like where its at but i feel it needs more.

As for a figure i was hoping to find a pair of guys that were scouting, with binos and the like but have not had any luck yet. I also wish to order the tamiya allied vehicle accessory pack for the bags etc.

Any suggestions on the weathering or figs would be greatly appreciated =D

Thanks,

Dave

On the bench:

1/35th Tamiya Willi's MB


  • Member since
    January 2011
  • From: Springfield, MA
Posted by TigerEP1 on Thursday, January 13, 2011 5:40 AM

 Round 2 and 3 of weathering using pastels, still more to do but wanted to give some progress pics:


Enjoy!

On the bench:

1/35th Tamiya Willi's MB


  • Member since
    January 2011
  • From: Springfield, MA
Posted by TigerEP1 on Friday, January 14, 2011 5:48 PM

painted up a small toolbox i found in my spares box, i think it looks OK, painted with OD then weathered using light greens and red/brown pastels:


=)

On the bench:

1/35th Tamiya Willi's MB


JOIN OUR COMMUNITY!

Our community is FREE to join. To participate you must either login or register for an account.

SEARCH FORUMS
FREE NEWSLETTER
By signing up you may also receive reader surveys and occasional special offers. We do not sell, rent or trade our email lists. View our Privacy Policy.