I decided that I wanted to turn Revell's 1/72 T-80B into a diesel powered T-80U. Given Mikhail Baryantisky's book, Andrei Tarasenko's fine "Tank Power--Fire and
Steel" site at btvt.narod.ru , and Yuriy Pasholok's superb walk around, there's a wealth of good references available, but it's required a lot of work, and pushed me into some new realms of modeling.
Here's where I am now .
.


There are still some fine details to be added, but most of the work is done. Here's a photo prior to painting that shows many of the mods to the hull .
.
I thought
I had all the references I needed.
My first step was to get a good scale drawing. When I
laid the kit upper hull down on the drawing, it was exact in width, but about
5mm too short! Looking at the drawing
versus the kit hull, it looked like the
best place to add a 5mm plug was behind the turret, just ahead of the
last fender fuel tanks. I already knew that
the kit engine deck looked nothing like my references, so I took advantage to
lay some basic structure using plastic sheet and strip, rescribing detail in
the new fuel tanks.
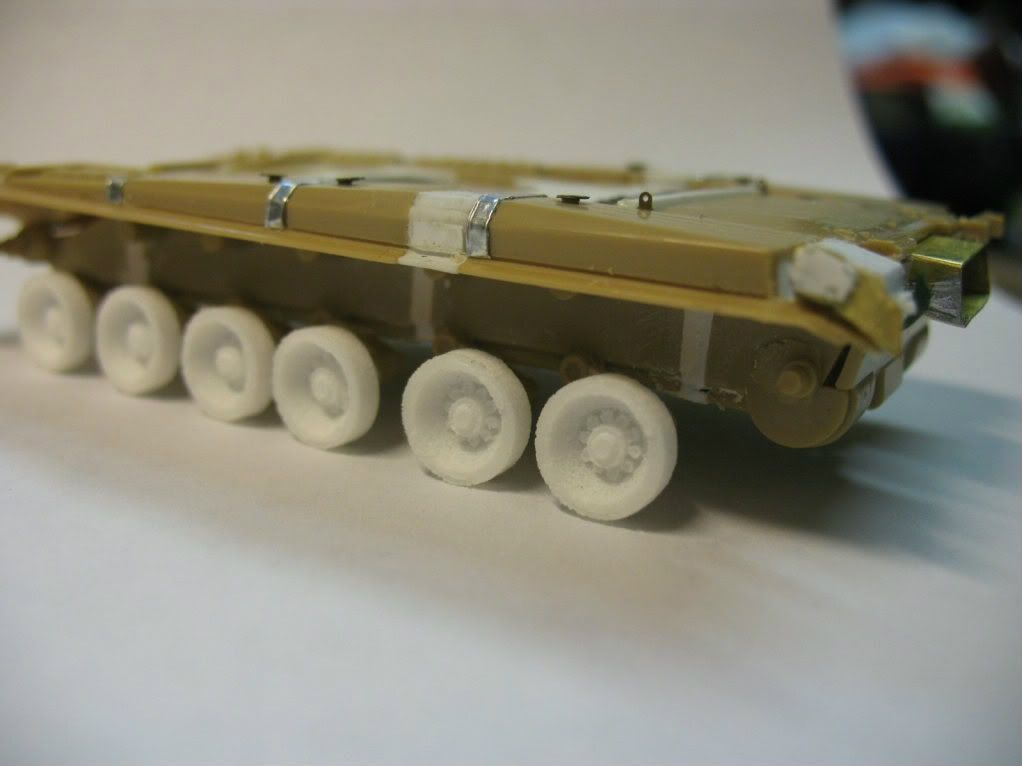
Prominent is the 5mm plug that had to be added to the hull. I found from Russian sources that the road
wheel diameter was 670 mm, so I scaled a scanned 3 view until the road wheels
were 670/72 = 9.3 mm in diameter. Laid against the scale drawing, the kit turned out to be bang on in width, but 5mm too short. I lengthened the engine deck, and then stretched the lower hull to match. I took advantage to respace the roadwheels closer to the real thing.
You can see a lot of work using brass sheet. I used some parts from the Extratech and Eduard PE sheets such as screens, fuel barrel supports, etc, but a lot is just sheet and wire work. For example, the exhaust duct is folded from brass sheet, and each turret roof active armor block is piece of sheet wth a plastic pad nuderneath and plastic rods for bolts. I soldered the turret basket , the headlight guards, the smoke grenade wiring, and the back left turret corner MG mount. I was especially proud of the APU unit I had to build on the left rear
fender-it was assembled from brass sheet and soldered, then detailed with
plastic parts.
The turret was reworked at lot at the rear with Millliput. I did it the first time by eye, then got smart and went back to Russian sources to get a drawing of the T-80U turret in
plan. I scaled this drawing so it was the same length as the turret on my
3-view, and then reputtied the turret to conform to that outline. Much better. Here are some photos of the turret at various points.

The
kit road wheels are a big disappointment, and led me into a new frontier--3d printing.
The road wheel diameter is too large, and the hub is all wrong. A friend came to the rescue on this-he has
access to a 3-d printer, which can take a computer drawing and print out an
example in plastic.(Thanks , David A.!) I modeled the wheel,
taking measurements off photographs for the proportions, then scaling the
computer model to the diameter of the scale road wheel. My friend printed them out, added sprues and actually
added rivet detail to the model that I had planned to add using plastic
stock. The process gives results that
are a bit rough compared to injection-molded parts, but on par with many
small-firm resin parts.

I used the same techniques to create the Brod-M intake cover which hangs on the turret rear. It has a tricky shape which would have been problematic to build up from plastic stock, but it was easy to model in 3d. My friend printed, and here is a closeup with detail added. You can seee the texture that 3d printing gives inthis scale. It would be really appropriate for a cast turret.

The kit gun, by my drawing is too short.
I used a turned aluminum gun from Armo, but I still chucked it in a
drill and used a file to get the bore evacuator down to the right size. The rest of the detail is photo etch. I used aluminum foil tape for the gun
mantlet cover, and added all the detail around the IR searchlight, the wiring
for the smoke dischargers, etc, out of plastic stock and brass.
The final
major element was the flexible covers across the nose and hanging down the
front of the tank. These parts are
available in the no-longer in production T-80bv kit, but I don't have that on hand.
I made these parts from Milliput, rolled between two sheets of wax paper to
the thinness of plastic sheet. As the Milliput
set up, I cut the parts along a template, bent them as necessary,
and draped them over pieces of tubing to help them hold their shape.
The tracks are another disappointment--very simplistic in shape. I'm mulling over what to do with them. I've also got some more details to add, such as the sights, fuel barrels and hoses, etc. I've already built the rather complicated MG mount.
I've been building 1/72 Soviet armor for quite a while, but I feel that with all the new techniques I've tried here, I really stretched myself--this is the best work I've done yet.