SEARCH FINESCALE.COM

Enter keywords or a search phrase below:

Dragon Vorpanzer---FINISHED PICS!

23936 views
154 replies
1 rating 2 rating 3 rating 4 rating 5 rating
  • Member since
    August 2006
  • From: Oromocto, Canada
Posted by Gun Tech on Tuesday, February 10, 2015 9:54 PM

I definitely will be along for the ride!  

I don't think I have that specific kit in the stash, but I have other Dragon Panzer IVs that were released around the same time with the same gargantuan amount of parts.  Surprise

Once I finished inspecting the kits for completeness, I had a hard time fitting everything back in the box!  lol!

Jean-Michel    "Arte et Marte"

  • Member since
    August 2005
  • From: Sydney, Australia
Posted by Phil_H on Wednesday, February 11, 2015 12:37 AM

There's almost more parts in each individual bogie unit in this kit than there are parts for the entire running gear of one of the old Tamiya IV kits.

Enjoy Smile

  • Member since
    March 2003
  • From: Rain USA, Vancouver WA
Posted by tigerman on Wednesday, February 11, 2015 1:08 AM

No thank you. I'm getting older and need simpler kits. LOL If I'm smart, I should build all my Dragon kits now while I still have some eyesight left.

   http://i7.photobucket.com/albums/y269/wing_nut_5o/PANZERJAGERGB.jpg

 Eric 

  • Member since
    October 2008
  • From: England
Posted by P mitch on Wednesday, February 11, 2015 2:40 AM

Karl

You do know that Voyager do a photo etch set as well!! I have no idea why you'd need it, unless you want full fenders, bolt on armour and many other bits.

Like a few others I have this in the stash and see it as a kit for "when I'm a better modeller".

Phil

"If anybody ever tells you anything about an aeroplane which is so bloody complicated you can't understand it, take it from me: it's all balls." R J Mitchell


  • Member since
    March 2003
  • From: Western North Carolina
Posted by Tojo72 on Wednesday, February 11, 2015 6:14 AM
Nice Karl,it is over engineered,but I found it went together pretty nicely.I had to leave off some of the microscopic PE parts,but I do look forward to your handling of this.

  • Member since
    January 2007
Posted by the doog on Wednesday, February 11, 2015 8:35 AM

Jean-Michel, cool; thanks for following along. There is also an upgunned PZIVD (?) with a KwK or something like that in it. It also has the same crazy parts count and sequences of assembly. I may take a look at that after this if I enjoy the challenge!

Phil H--you're right about that. Holy cow, the suspension alone took me at least four hours of sanding and assembling!

Tigerman, lol, believe it or not, that's one of the reasons that I've been saying to myself "Aye, while you're still young..." ha ha. I know what you mean!

Phil--this kit already has enough PE, thank you! If I'm not wrong, I think it actually has fender "ends" that you can bend and simulate damage with? Thanks for looking in!

Tojo---good to hear that it's "doable". Can you post a pic of yours for us to ogle? :)

  • Member since
    April 2006
  • From: Denver, Colorado
Posted by waynec on Wednesday, February 11, 2015 9:47 AM

tigerman

No thank you. I'm getting older and need simpler kits. LOL If I'm smart, I should build all my Dragon kits now while I still have some eyesight left.

TIGERMAN that's funny. i am 63 and got into 1/72 (One True Scale) kits last year though i still build a lot of 1/35. My eyes are weird so i have trouble using magnifiers, especially for painting so i get REALLY close. I think my detail painting is getting better as i get older; experience, patience who knows.

DOOG 1000+ pieces. my K-5 RR gun has only 1200 or so and it's a tad bigger than than your panzer.

Никто не Забыт    (No one is Forgotten)
Ничто не Забыто  (Nothing is Forgotten)


  • Member since
    September 2006
  • From: Dripping Springs, TX, USA
Posted by RBaer on Wednesday, February 11, 2015 10:18 AM

I like the look of bolted-on armor, should be a neat build.

So, high parts count in suspension pieces? Grab a Dragon newer release Sherman with HVSS, like the M4A3/105, it'll make you glad you're doing what you have in front of you now.  Stick out tongue

Apprentice rivet counter.

  • Member since
    November 2003
  • From: Nashville, TN area
Posted by bobbaily on Wednesday, February 11, 2015 11:52 AM

Will be following this one Karl....if the parts count weren't enough to scare me away, the thoughts of the Dragon instructions would.

However, knowing your skills and abilities, I'm looking forward to seeing your final results.

Bob


  • Member since
    October 2007
  • From: Louisville, KY
Posted by pordoi on Wednesday, February 11, 2015 1:26 PM

Doog,

      Does this kit carry over the option of installing individual bolts on the drive sprocket housing that was in the earlier 3in1 kits?  Talk about small parts!  I also remember that the turret hooks were multi-part assemblies.  That said, there's nothing there that is overly difficult if one studies the directions carefully beforehand and carefully plans some of the more complex build steps.  Seeing that you're already well along with the assembly of the workable drive train, the tough part is almost over...  Wink   Unless of course, you plan to assemble functional PE tool clasps...  Whistling

Don

  • Member since
    May 2009
  • From: Poland
Posted by Pawel on Wednesday, February 11, 2015 2:52 PM

Hello!

How can a punishment be so much FUN? I for myself enjoy building, especially in armour kits. But in your case I'm looking forward to the paint scheme - good luck with your build and have a nice day

Paweł

All comments and critique welcomed. Thanks for your honest opinions!

www.vietnam.net.pl

  • Member since
    December 2012
Posted by RX7850 on Wednesday, February 11, 2015 3:02 PM

That's one sweet kit. I'd love to see them downsize a kit of that magnitude for their 1/ 72 line, if that's even possible.  Good luck with the build.

  • Member since
    March 2003
  • From: Western North Carolina
Posted by Tojo72 on Wednesday, February 11, 2015 3:42 PM

the doog

Jean-Michel, cool; thanks for following along. There is also an upgunned PZIVD (?) with a KwK or something like that in it. It also has the same crazy parts count and sequences of assembly. I may take a look at that after this if I enjoy the challenge!

Phil H--you're right about that. Holy cow, the suspension alone took me at least four hours of sanding and assembling!

Tigerman, lol, believe it or not, that's one of the reasons that I've been saying to myself "Aye, while you're still young..." ha ha. I know what you mean!

Phil--this kit already has enough PE, thank you! If I'm not wrong, I think it actually has fender "ends" that you can bend and simulate damage with? Thanks for looking in!

Tojo---good to hear that it's "doable". Can you post a pic of yours for us to ogle? :)

Here it is Karl,a few mistakes on my part,but I think it came out okay.

  • Member since
    September 2012
Posted by GMorrison on Wednesday, February 11, 2015 4:02 PM

Hey Karl I'm sure you can handle it!

Do they count all those links as parts?

You know you guys swear by Dragon, and having built some other armor like older tamiya in the past, I get it.

But I recently decided to try an armor model after a long period of ships and wing things, and bought the Dragon SU-152.

What a bad experience. The moldings are really cool, the detail is great, but i'm having a heck of a time getting the parts to fit.

All the stuff that gets stuck to the hull- the holes in the hull are way too small. I finally gave up enlarging them and have been shaving the lugs off the backs of the parts and just gluing them over the holes.

Need to finish it this month for a GB but keep setting it aside.

 Modeling is an excuse to buy books.


  • Member since
    December 2002
  • From: Bury St Edmunds, Suffolk, England
Posted by Bish on Wednesday, February 11, 2015 4:22 PM

Nothing like a Dragon kit for easying the stress of life Big Smile.

Defiantly count me along for the ride, though I would deffo avoid any Voyager PE, unless you have a straight jacket handy.

I am a Norfolk man and i glory in being so


On the bench: Airfix 1/72nd Harrier GR.3/Fujimi 1/72nd Ju 87D-3

  • Member since
    January 2007
Posted by the doog on Wednesday, February 11, 2015 7:09 PM

Wayne, lol, and the funny thing is, this thing is what--1/10th the size? Man, they pack 'em in tight in this little model!

Russ, I remember when the one Sherman model came out about 10 years ago or so (maybe more?) and the tracks themselves had three or four pieces EACH. I was so annoyed, I put it in the stash and never loooked at it again until I sold it on eBay years later. Are they back to that nonsense again? sheesh!

Bob, thanks! I appreciate that vote of confidence after I screwed up that PZk70 so badly! Thanks for looking in.

Don, yes it does---it has some tiny PE bolts that you can choose to put on, but I won't use those, honestly. I can't possibly see the benefit in it, and I can't see how you could realistically round off those tiny brass discs without them winging out of the tweezers into the cornfield somewhere. lol

And yes, I do plan on trying those PE tool holders. Its my "punishment", ha ha.

Bish, this kit basically hits my "PE limit". :).

Here comes the update!

  • Member since
    January 2006
  • From: California
Posted by SprueOne on Wednesday, February 11, 2015 7:26 PM

Ok, you had me with the goodies, options and those 4-part suspension each. I'm in

Anyone with a good car don't need to be justified - Hazel Motes


Iron Rails 2015 by Wayne Cassell Weekend Madness sprueone

  • Member since
    January 2007
Posted by the doog on Wednesday, February 11, 2015 9:05 PM

Sounds good, Sprue---welcome to the ride! :)

Here's an update...I have decided to use an R&J Products "drop-in Driver's Compartment". Heck, this tank already has a turret basket, and with all those hatches that I can keep open, it seems like a cool place to use it.

It comes without driver's levers because they were different in different marks, (R&J's contention) so I'll have to do a little detailing. But all in all it will make a nice touch.

I had to do some serious Dremel work to remove the bottom plug..but it cleaned up perfectly.

The hull needs some cleaning up--I had to remove all those projections and ribs, etc....

After all the scraping and clipping an cutting, I decided to cover the whole hull side and front-bottom in .010 styrene sheet to make it "clean".

After much trail and error, fitting and sanding, I got the correct depth and width for the piece to "drop in".

Phew! The top hull fits!

Gonna have to paint this all up and maybe I may even scratchbuild the turret floor area. I mean, I almost have a full interior at this point. Shouldn't be hard to do a little more, even just a "suggestion" of what is there? I dunno; gonna have to see how much you can actually see...I"m not one to waste time justbuilding something you'll never see...

Soldiering on! Smile

  • Member since
    August 2007
  • From: back country of SO-CAL, at the birth place of Naval Aviation
Posted by DUSTER on Thursday, February 12, 2015 12:01 AM

Well good you have a quick weekender to put together.......... OH wait,  I just read the whole thread.    

This looks like a great start on a cool project 

Steve

Building the perfect model---just not quite yet  Confused

  • Member since
    December 2002
  • From: Bury St Edmunds, Suffolk, England
Posted by Bish on Thursday, February 12, 2015 12:45 AM

Never hera of R&J, but that looks a nice piece. Off to a good start.

I am a Norfolk man and i glory in being so


On the bench: Airfix 1/72nd Harrier GR.3/Fujimi 1/72nd Ju 87D-3

  • Member since
    March 2003
  • From: Rain USA, Vancouver WA
Posted by tigerman on Thursday, February 12, 2015 2:27 AM

Anthony, solid build friend. The track sag looks great.

   http://i7.photobucket.com/albums/y269/wing_nut_5o/PANZERJAGERGB.jpg

 Eric 

  • Member since
    January 2007
Posted by the doog on Thursday, February 12, 2015 7:01 AM

Tojo72

Here it is Karl,a few mistakes on my part,but I think it came out okay.

Anthony, I'm so sorry--I meant to post a separate reply about your fine model and forgot late last night. It's a really nice job! It's quite the little bulldog of a tank! Nice paint and weathering, and the figures look great sitting in the turret! Thanks for posting some pics!!! YesBeer

  • Member since
    January 2007
Posted by the doog on Thursday, February 12, 2015 7:03 AM

Bish, R&J has some really cool, affordable little pieces and some unique figure lines. Check em out!

R&J Enterprises

  • Member since
    March 2003
  • From: Western North Carolina
Posted by Tojo72 on Thursday, February 12, 2015 7:09 AM

Thank you Karl and Eric.

That interior will really spice it up as if it needed more.

  • Member since
    November 2009
  • From: SW Virginia
Posted by Gamera on Thursday, February 12, 2015 9:32 AM

Anthony: Very nice work there!

Karl: Ohhhhhhh love that 'drop-in' driver's compartment. I have one of those kits- I think it's a H model somewhere in my stash I picked up with the idea of doing a knocked-out tank like your ghost diorama. I haven't worked up the guts to tackle it though!

Funny, I think the Panzer IV may be my favorite German tank- somehow it just seems to have more 'character' to it than the Panther and Tiger.

"I dream in fire but work in clay." -Arthur Machen


  • Member since
    December 2002
  • From: Bury St Edmunds, Suffolk, England
Posted by Bish on Thursday, February 12, 2015 12:35 PM

Thanks Karl, some nice stuff they have on there.

I am a Norfolk man and i glory in being so


On the bench: Airfix 1/72nd Harrier GR.3/Fujimi 1/72nd Ju 87D-3

  • Member since
    January 2007
Posted by the doog on Friday, February 13, 2015 6:54 AM

Gamera, if the PZ IV is your favorite tank, you're surely not without a ton of options to choose from! YOu can spend a year or more building the various offerings and different marks of this model--not to mention all the sub-genres of panzerjaeger, SPG's, etc...!

I have detailed the interior a bit more. I've added driver controls, an instrument panel, pedals, and some various rods and fittings to fill up the driver's side and front area more. I'm going to get to painting this, glue it in, and then add some more details like rivets and bolts around the side of the walls.

  • Member since
    November 2009
  • From: SW Virginia
Posted by Gamera on Friday, February 13, 2015 10:07 AM

Karl: Looks great, gives a solid impression of how cramped and tight the interior of a tank is. Looking forward to seeing all that painted up.

And lol, the Panzer IV is my favorite German tank, my favorite tank is the Sherman and  I've built a half-dozen or so and haven't touched the fifty zillion different versions of it and the SPGs, TDs, etc, etc, etc based off it's chassis. No friggin' idea when I'll get to all those versions of the Panzer IV!  

"I dream in fire but work in clay." -Arthur Machen


  • Member since
    April 2006
  • From: ON, Canada
Posted by jgeratic on Friday, February 13, 2015 11:09 AM

Hi Karl - just found this thread and will be following along.  Not in my stash, but do have the earlier incantation of the 3in1  kit with all it's errors, sigh.  The Vorpanzer came out with some 40 corrections.

The suspension was designed to be workable, but I'm pretty sure I've read it's not very robust, so you are likely right to have glued it solid.  Great start, particularly the additions to the interior.

regards,

Jack

  • Member since
    January 2007
Posted by the doog on Saturday, February 14, 2015 9:12 AM

Thanks, Gamera. You could probably build for three years and you still wouldn't have all the variants completed!

Jack, sorry to hear that you have one of the old kits. I read about all the supposed "inaccuracies" of that kit. Lots of little things to be sure; I'm not sure how m any of them were "nitpicky" or not. Hmm

Personally, I have no interest in "workable" suspensions when they require such levels of complexity, but I can see where they would work of you're a diorama enthusiast.

Thanks for looking in! Smile

  • Member since
    February 2003
  • From: Thailand
Posted by Model Maniac on Monday, February 16, 2015 4:26 AM

Nice kit and conversion set, Karl! Looking forward to seeing finished product.

Impressive Songs:

All 10 Playlists that I created on Youtube:

http://www.youtube.com/user/ModelManiacThailand/playlists

Pan Flute Music (300 songs) (Most Popular, over 100K views):

https://www.youtube.com/playlist?list=PLUNb2zPxGTZO7alagEPsEMzgBkWt4-vKV

El Condor Pasa (Top 50) (World's most famous and my most favorite song):

http://www.youtube.com/playlist?list=PLUNb2zPxGTZOLKHbju350mLle4HkMhsb8

  • Member since
    December 2007
  • From: Eagle River, WI
Posted by PANZERJAGER on Monday, February 16, 2015 7:17 PM

looks interesting so far Karl, but less talk and more action man...

let's see more progress man.

Just kidding man!

 PANZERJAGER


  • Member since
    January 2007
Posted by the doog on Monday, February 16, 2015 7:47 PM

Thanks, Panzerjaeger and Phaisal!

More updates right now!! :)

  • Member since
    January 2007
Posted by the doog on Monday, February 16, 2015 8:03 PM

OK, guys--well, in between getting my stupid taxes together, I've managed to make progress on the interior---and thank dog, too, because I want to get moving on assembly, but I couldn't do that until I get the interior finished.

A word on the interior painting: a well-known internet document states that the entire lower fighting compartment area should be a gray-green color. However, in every reference photo I could find--and I scoured the internet and my decent reference library--I found that the walls and floors of the driver's compartment seemed to be that off-white color. I decided to go with that. Even if it's technically wrong, in my world, it looks like the photos that I am seeing all over the place of white walls/floors. That's good enough for me.

I mixed up that "Elfenbein" color from Tamiya White + a tiny dollop of Buff and one ant's wet-fart of Yellow.The transmission and engine is craft store acrylic Folk Art #2500 "Greenscape", with Wilder filter "Dark Blue Filter" on top, and then some lightening with the Greenscape+Tan to give depth.

I added some more bolts and detailed the front hull wall some more.

And that's it for tonight! I'll be getting back to the building as soon as I can. Thanks for looking in guys, and for following along! Big Smile

  • Member since
    December 2007
  • From: Eagle River, WI
Posted by PANZERJAGER on Monday, February 16, 2015 8:21 PM

Looks TASTY man!!!!!!!!!!!!!!!!!!!!!!!

Nice.

 PANZERJAGER


  • Member since
    December 2002
  • From: Bury St Edmunds, Suffolk, England
Posted by Bish on Monday, February 16, 2015 11:23 PM

That looks really god in there Karl.

I don't recall reading of the interiors being a grey green. Which is this internet document of which you speak.

I am a Norfolk man and i glory in being so


On the bench: Airfix 1/72nd Harrier GR.3/Fujimi 1/72nd Ju 87D-3

  • Member since
    April 2006
  • From: ON, Canada
Posted by jgeratic on Monday, February 16, 2015 11:48 PM

I'll third that, looks scrumptious!

---------------------------

Likely research from Hilary Doyle and Tom Jentz about the interior colours.  There is some description of their findings here:

http://byrden.com/panzers/Colours/index.html

regards,

Jack

  • Member since
    July 2003
  • From: On my kitchen counter top somewhere in central North Carolina.
Posted by disastermaster on Tuesday, February 17, 2015 4:09 AM

jgeratic

I'll third that, looks scrumptious!

---------------------------

I'll have to fourth that!

           http://www.sherv.net/cm/emoticons/shocked/shocked-smiley-emoticon.gif

That's the stuff I like to see.

 https://i.imgur.com/LjRRaV1.png


  • Member since
    January 2007
Posted by the doog on Tuesday, February 17, 2015 7:56 AM

Thanks, guys! I appreciate the thumbs-ups!

Bish, the document, cited in several forums and places, is HERE. It states:

   "In the lower interior of the tank, the grey-green covered just about everything. Transmission boxes and other modules, which were perhaps manufactured separately, were ordered to be delivered in grey-green. Torsion bars, levers, transmission shafts, floor panels (yes, top AND bottom surfaces) storage boxes, etc. were painted uniformly grey-green."

So that has rather confused me because it seems to say that the whole lower part of the tank was painted in that color? The part about "floor panels'...unless I'm reading it wrong...?

I've found some color photos where the transmission seemed a more bluish color, so I went with that in my tank. Smile

  • Member since
    January 2007
Posted by the doog on Tuesday, February 17, 2015 8:03 AM

jgeratic

I'll third that, looks scrumptious!

---------------------------

Likely research from Hilary Doyle and Tom Jentz about the interior colours.  There is some description of their findings here:

http://byrden.com/panzers/Colours/index.html

regards,

Jack

Oh, sorry, Jack--that's the same page I posted. Tongue Tied Thanks for posting it too though! Yes

  • Member since
    November 2009
  • From: SW Virginia
Posted by Gamera on Tuesday, February 17, 2015 8:14 AM

Dunno if it's accurate or not but everything looks really good to me!

Funny, I was looking up some stuff about the engine compartment of a Panther recently and most people said primer red but Toadman's site had a pile of photos with the interior parts the same blue-greyish colour.

"I dream in fire but work in clay." -Arthur Machen


  • Member since
    January 2007
Posted by the doog on Tuesday, February 17, 2015 8:38 AM

Gamera

Dunno if it's accurate or not but everything looks really good to me!

Funny, I was looking up some stuff about the engine compartment of a Panther recently and most people said primer red but Toadman's site had a pile of photos with the interior parts the same blue-greyish colour.

Thanks, Cliff! (? correct me if I got your name wrong...Sad)

Sheesh! I know---it can be so frustrating and confusing! There seems to be no consistent patterning with the few unrestored examples that we have left! I've spent literally days scouring everything I could to get an idea, and went with a tennuous decision that this was acceptable for what era and make I've got. I think it's a tad "blue" in the photos, but it's more "green" in real life. It should look good with the Panzer Grey exterior though.

  • Member since
    November 2009
  • From: SW Virginia
Posted by Gamera on Tuesday, February 17, 2015 9:51 AM

Hey Karl, yeah that's right, Cliff, Gamera, doesn't matter to me.

I went though about five-six sites and the photos showed the grey so that's what I went with. At least it's not as bad as early war Zero fighters- I've read about a dozen sources and no one can agree on whether they were painted light grey, light brown, light green, etc, etc, etc...  

"I dream in fire but work in clay." -Arthur Machen


  • Member since
    December 2002
  • From: Bury St Edmunds, Suffolk, England
Posted by Bish on Tuesday, February 17, 2015 12:46 PM

Thanks for those links guys, I have never come across this before. Doyle and Jentz do seem to uncovere quite a bit before unknown information about German armour, the issue with the Sd.Kfz 251/3 springs to mind. But as much as I respect there work, I do have to wonder how after 60 years they suddenly come across this info that all others have missed before. he even goes so far as to say they have only found one vehicle to have had RAL 1001 inside.

I am also a bit unnerved by there Xtracolor roundup. I like realism but I think they are being a bit to picky here.

I am a Norfolk man and i glory in being so


On the bench: Airfix 1/72nd Harrier GR.3/Fujimi 1/72nd Ju 87D-3

  • Member since
    March 2003
  • From: Western North Carolina
Posted by Tojo72 on Tuesday, February 17, 2015 1:15 PM

Very nice,that really came alive nicely.

  • Member since
    December 2012
Posted by Ixion on Wednesday, February 18, 2015 11:26 AM

While it looks pretty clean, here is a Panzer III transmission in grey-green (RAL 7009) at Panzermuseum Munster:

With the requisite grease and grime, I'd say you nailed it Karl.

  • Member since
    January 2007
Posted by the doog on Wednesday, February 18, 2015 7:03 PM

Thanks, Tojo! I appreciate it!

  • Member since
    January 2007
Posted by the doog on Wednesday, February 18, 2015 7:05 PM

Ixion

While it looks pretty clean, here is a Panzer III transmission in grey-green (RAL 7009) at Panzermuseum Munster:

With the requisite grease and grim, I'd say you nailed it Karl.

Ixion,

Thanks for that great pic--I hadn't seen that before. I appreciate it all the more because it gives me peace-of-mind to see the similarity in color...thank you!!! Yes

  • Member since
    November 2009
  • From: SW Virginia
Posted by Gamera on Wednesday, February 18, 2015 7:23 PM

Great find there Ixion, nice to have more conformation on the grey primer or paint or whatever it is.

"I dream in fire but work in clay." -Arthur Machen


  • Member since
    December 2012
Posted by Ixion on Wednesday, February 18, 2015 10:03 PM

Here is another shot of it;

It looks a bit more bluish here. RAL 7009 Grey-Green is / was a common color paint used on various industrial equipment in Germany. Railroad electrical towers, junction boxes, motors, pumps, etc., are still painted in this color, although it tends to look more greenish.

IMHO, this looks more like RAL 7031 Blaugrau (blue-grey), but theoretically it should be RAL 7009.

  • Member since
    January 2007
Posted by the doog on Thursday, February 19, 2015 6:33 AM

Cool, thanks again, Ixion!!

  • Member since
    January 2007
Posted by the doog on Saturday, February 21, 2015 1:12 PM

So, a little bit of progress here--I spent some time detailing and painting the interior of the upper hull. I had to build a framework around the driver's hatch, as quite strangely they don't provide any deail of this area at all.?!!? It's not 100% spot on correct but it looks the part. I could have added a lot more--flanges on the joints, and a strip/rail below the driver's viewing port, but it would have blocked the view of the pedals and floor area even more.

I decided to leave one maintenance hatch open just to show off a little. The assembly of the armored plates on the front was a litle complicated, but the hull is joined now.. FINALLY!

I still have quite a bit of detailing on the upper hull to do before I even tackle the interior of the turret. I think I may skip ahead a bit and save those PE tool holders for when the turret is drying..Soldiering on here... Smile

  • Member since
    January 2015
  • From: Tumwater, WA.
Posted by M. Brindos on Saturday, February 21, 2015 7:33 PM

You have me drooling here Karl. That looks so cool already. The stuff you added to the interior is just gorgeous!

- Mike Brindos "Lost Boy"

  • Member since
    October 2007
  • From: Louisville, KY
Posted by pordoi on Monday, February 23, 2015 7:47 AM

the doog

Have you considered opening up one or both of the vision ports?

the doog

... I think I may skip ahead a bit and save those PE tool holders for when the turret is drying...

Wimp...  Wink

Don

  • Member since
    November 2009
  • From: SW Virginia
Posted by Gamera on Monday, February 23, 2015 11:16 AM

She's coming along great there!

"I dream in fire but work in clay." -Arthur Machen


  • Member since
    January 2006
  • From: California
Posted by SprueOne on Wednesday, February 25, 2015 10:08 PM

a lot of interior covered up. It's what can be seen through the hatches is what counts though 

Anyone with a good car don't need to be justified - Hazel Motes


Iron Rails 2015 by Wayne Cassell Weekend Madness sprueone

  • Member since
    December 2002
  • From: Bury St Edmunds, Suffolk, England
Posted by Bish on Thursday, February 26, 2015 12:26 AM

Looking really good there Karl, some nice extra detailing.

I am a Norfolk man and i glory in being so


On the bench: Airfix 1/72nd Harrier GR.3/Fujimi 1/72nd Ju 87D-3

  • Member since
    September 2006
  • From: Dripping Springs, TX, USA
Posted by RBaer on Thursday, February 26, 2015 11:59 AM

Splendid work, Karl.

Re the Dragon Sherman bogies: newer issues have bogies that are made up of 18 parts each, IIRC,  and tedious beyond belief to assemble. The end result is "probably" worth it.  They've also gone to DS tracks with separate guide horns, not too bad, and ala your MBT70 adventure, joined in an obvious way. However, they need shortening, anyway, so I generally cut out the nasty part and re-attach them by cutting exactly in the middle of the two blocks to be joined. Works great.

Apprentice rivet counter.

  • Member since
    July 2014
  • From: Rifle, CO. USA
Posted by M1GarandFan on Thursday, February 26, 2015 1:29 PM

Please excuse my ignorance, but what are DS tracks?

  • Member since
    December 2007
  • From: Eagle River, WI
Posted by PANZERJAGER on Thursday, February 26, 2015 1:33 PM

M1GarandFan

Please excuse my ignorance, but what are DS tracks?

they are a type of 1 piece glue able vinyl track.

 PANZERJAGER


  • Member since
    July 2014
  • From: Rifle, CO. USA
Posted by M1GarandFan on Thursday, February 26, 2015 2:00 PM

Danke Schon, Mein Herr!

  • Member since
    July 2003
  • From: On my kitchen counter top somewhere in central North Carolina.
Posted by disastermaster on Thursday, February 26, 2015 2:54 PM

Following along Karl.......

    http://stkr.es/p/g6 Looking sweet!

 https://i.imgur.com/LjRRaV1.png


  • Member since
    January 2007
Posted by the doog on Tuesday, March 24, 2015 10:11 AM

FFFFFFFFFFFFinally got some work to show on this model!

In the last three weeks, I've been through a bout with food poisoning, had the flu, and--worse than that--had to endure the agony of making all these PE tool clamps. All in all, given the comparison, if I had to do it all again, I"d take either the flu or the food poisoning over re-doing the PE. Whistling

Here's an example of some of the problems I faced with this kit. See that nice, pre-formed shovel mounting there? Yeah, nice, huh? Yet totally unusable, Angry This shovel is supposed to fit UNDER the antenna trough there, in the two mounting holes. As you can see, it's literally impossible to use.

There's absolutely NO way to fit this under the trough. I checked every reference and the instructions three times, and yup, it's SUPPOSED TO fit under there. But there's just no way at all to fit it. How frustrating! I wound up making a replacement head from plastic, and just added the rear clamp--which, uh, STILL looks way out-of-scale to me. (you can see the inside rollers of the return rollers there; part of my tracks method)

I found Dragon's clamps to be extremely troublesome to build---an average of 30 minutes to do each one--some took me well over an hour to complete. The ends just don't fit into each other; the tabs are too large, and I wound up basically shaving off tabs and actually having to needle-file correct widths of other parts to try to get them assembled. The size of the clamps were also an issue--several times, I had a problem fitting the tools in them snugly. They were alternately either too large, or too small. Ugh. This honestly was NO FUN at all, and that's NOT what modeling is supposed to be about. Sad

Anyway, I got them all finished for the most part. I didn't use the fire extinguisher parts--they just looked like crap after I finished them; the plastic part looked so much better. FINALLY, it's ready for primer!

I did some battle damage with a low-heat pyrogravure that I got at AC Moore's--this is actually a "Stencil Cutter" that heats up to the perfect temp for scribing plastic. I used it to make these cool shell hits. I think they came out pretty good.

This step took me over two hours to engineer and make. All hail my perseverance and tenacity! Propeller

Well, I've got some masking to do to protect the interior paint, and then I'll shoot a coat of primer...man, I haven't done a gray tank in quite a while....should be fun! Smile

  • Member since
    September 2012
Posted by GMorrison on Tuesday, March 24, 2015 10:17 AM

RBaer

They've also gone to DS tracks with separate guide horns, not too bad, and ala your MBT70 adventure, joined in an obvious way. However, they need shortening, anyway, so I generally cut out the nasty part and re-attach them by cutting exactly in the middle of the two blocks to be joined. Works great.

That's a great tip.

Karl, this is looking really good, even without paint. Following with great interest.

 Modeling is an excuse to buy books.


  • Member since
    November 2009
  • From: SW Virginia
Posted by Gamera on Tuesday, March 24, 2015 11:48 AM

Great to see you back underway on this Karl. Sorry to hear about your illness but glad you're feeling better now. I guess at least all the PE would take your mind off feeling queasy by giving you a headache!

Still the PE looks fantastic as it should considering the work invested in it, and I love the battle damage.  

"I dream in fire but work in clay." -Arthur Machen


  • Member since
    April 2006
  • From: Denver, Colorado
Posted by waynec on Tuesday, March 24, 2015 12:02 PM

Gamera

Great to see you back underway on this Karl. Sorry to hear about your illness but glad you're feeling better now. I guess at least all the PE would take your mind off feeling queasy by giving you a headache!

Still the PE looks fantastic as it should considering the work invested in it, and I love the battle damage.  

OTHO you can legally take drugs to ease the first 2, drugs and alcohol don't work well with PE though alcohol works well with spiking RR track.

Looking good Karl and you're right, it's suppose to be fun. Sometimes i think kit designers forget that.

Никто не Забыт    (No one is Forgotten)
Ничто не Забыто  (Nothing is Forgotten)


  • Member since
    October 2007
  • From: Louisville, KY
Posted by pordoi on Tuesday, March 24, 2015 12:30 PM

Sorry to hear about your illness(es).  Been wondering where this build went to.  The PE work looks great!  All that effort, but once it's over and you see the result, the pain is forgotten.  Well, mostly...

Not only the tool clamps, but it's those friggin' PE pintle chains that always drive me up a wall.  And you did very well there. 

Also, really like the battle damage; very convincing.  Look forward to seeing it primed and painted.

Don

  • Member since
    March 2003
  • From: Western North Carolina
Posted by Tojo72 on Tuesday, March 24, 2015 12:42 PM

Fantastic work on all the details.Bring on the paint.

  • Member since
    September 2006
  • From: Dripping Springs, TX, USA
Posted by RBaer on Tuesday, March 24, 2015 1:02 PM

Gad, I hate PE.....

Karl, you're running into the same issues I had with a PE set a while ago. You'd think that somewhere, somehow, somebody would have actually built something and said: "Wait a minute, this doesn't fit, we need to fix this".  Most especially when the kit and PE are from the same manufacturer......

Or, this could also be said: "PE is from the devil", my frequent mantra......

Good looking shell hits, too.

Apprentice rivet counter.

  • Member since
    July 2003
  • From: On my kitchen counter top somewhere in central North Carolina.
Posted by disastermaster on Tuesday, March 24, 2015 11:35 PM

 Yeah, I've had a recent bout with Dragon PE http://www.aladdin.st/bilder/388-5.gif

   http://blackdesertonline.nl/Smileys/animaticons/thumbs-down-emoticon.gif None of the tool clamps had the "ears" on the base part for the outer clamp to interact with........http://i139.photobucket.com/albums/q303/EarthAngels_bucket/EA141.gif~original   heh, heh, heh,

               so, I disasterised 'em; I done it myyy way

 When the fun goes out of it, it just becomes a job. Those shell impacts are super. I think you've done a splendid job here....

                                           http://www.sherv.net/cm/emoticons/confused/being-confused-smiley-emoticon.gif

                             ....but then, is it ever any other way?

 What's sooo aggravating is that the average person will look at it - never see the beauty of all that hard PE work, and chant that feeble line.....

                                  "Oh, that's really pretty."

                                                                       http://www.missouriwhitetails.com/forums/images/smilies/lame.gif

 https://i.imgur.com/LjRRaV1.png


  • Member since
    December 2002
  • From: Bury St Edmunds, Suffolk, England
Posted by Bish on Wednesday, March 25, 2015 3:32 PM

I have not yet worked with Dragon PE clamps, and after reading that, I don't think I want to. Aber and Voyager clamps take me about 15/20mins each and I thought that was a pain.

Its looking good despite all that, I like the damage as well. That can look so wrong but you have pulled it off nicely. Going to have to try that one day.

I am a Norfolk man and i glory in being so


On the bench: Airfix 1/72nd Harrier GR.3/Fujimi 1/72nd Ju 87D-3

  • Member since
    June 2007
Posted by Labour In Vain on Thursday, March 26, 2015 3:43 PM

Good effort Karl!

The battle damage looks very convincing.

Was the issue about the position of the drive wheel corrected in this release?

As allways

Boarder

Avatar © David Byrden 2005 http://Tiger1.info/
  • Member since
    October 2007
  • From: Louisville, KY
Posted by pordoi on Thursday, March 26, 2015 5:24 PM

Labour In Vain

Was the issue about the position of the drive wheel corrected in this release?

As allways

Boarder

The Vorpanzer kit corrected many of the errors of the DML6264 PzIV ausfE kit, including the position of the drive sprocket, the size of the return rollers and many others.  This and the PzIVD Superkit are some of the best PzIV kits available, in my opinion.  But complicated builds.

Don

  • Member since
    January 2013
Posted by jibber on Friday, March 27, 2015 1:44 AM

Karl after all the blood sweat and beers, the PE really does look fantastic. I don't know about you but on PE frets that have a millions pieces, many still have a lot of parts I didn't use. After a while enough is enough and as you say it just isn't enjoyable. Besides that, it's looking fantastic and I'm a fan of working in battle damage, nice job there. So pump up the air and get that very cool tank painted up.

Terry

  • Member since
    March 2013
  • From: Puebla, Mexico
Posted by garzonh on Friday, March 27, 2015 11:48 AM

Oh my god, where have I been while tha magic of Karl is going on...oh yes...working..

That is really looking good, like the interior details, those damages to the tank look so realistic!

As for the PE, yep, been there, done that, and yes, sometimes you spent 1 or 2 hours making a single PE assembly, thats why my Hummel took me 6 months to complete since then I tried to keep away from PE....for now...

Definitely, need to keep this build on my list.

  • Member since
    January 2007
Posted by the doog on Friday, March 27, 2015 1:41 PM

Guys, thanks for all positive messages and posts!!! I'll be doing an update later tonight and responding more in -depth!!!

  • Member since
    January 2006
  • From: California
Posted by SprueOne on Saturday, March 28, 2015 3:20 PM

Nice control with that battle damage to the front. I can't wait to see how that gets/looks painted 

Anyone with a good car don't need to be justified - Hazel Motes


Iron Rails 2015 by Wayne Cassell Weekend Madness sprueone

  • Member since
    January 2007
Posted by the doog on Saturday, March 28, 2015 3:26 PM

Guys,

Once again, thanks for all of your commiseration with the Dragon PE. I appreciated knowing that I'm not the only one who has had such an unpleasant time with the PE in these kits.

Well, I've made progress on the painting. Here's the promised update!

I started off with a base coat of pure Tamiya Black. This will help give adequate shadowing to the eventual Pz Grey real coat.

The wheels got a coat of Primer Red--my own mix from Tamiya. Hull Red + Red + Red Brown, just mix til it looks right. I did this because of a famous photo of a PZ  III crossing a stream where you can clearly see the wheels are red inside. It's a pretty neat way to give a little more color to the otherwise drab tank,

After masking off the openings, I used straight Pz Grey from Tamiya, and then added about 20% Buf for a second coat of color modulation and highlighting.

The color is a little bit darker than this actually appears--I overexposed the photos to bring out the detail.

Now I painted the outside of the wheels..

Decals on...not much to do here...

And now I painted the tools, as any dust is going to fall on those and they have to be painted underneath it. Then, I patiently went around the entire tank and did pins washes in Black oil to ever line, detail, bolt, and panel line, for definition before I start adding weathering. Here's some shots of where I am now.

Tools were done with tan base coats on the wood, and then rust and Gray and Raw Umber oil paint filters for the wood color.

Details....I added some color to a couple of the handles just for breaking up the greys.

Here's the shell hits. Still have to add "burnt" black pigments to thse...

I'm almost tempted to leave this relatively clean, but I know I wouldn't be able to sleep if I did that, lol.

Next up: highlights and drybrushing, then pigments and spattering..Oh yeah--and those darned road wheels too....sigh...

Thanks for looking in, all! Smile

  • Member since
    December 2002
  • From: Bury St Edmunds, Suffolk, England
Posted by Bish on Saturday, March 28, 2015 3:58 PM

Really nice there Karl. I have still to do a Pz Grey piece, so interesting to see how you do it. Interesting titbit on the road wheels. Is it me, or is the spare wheel nearest to the camera painted red on the outside as well.

And thanks for that red primer mix.

I am a Norfolk man and i glory in being so


On the bench: Airfix 1/72nd Harrier GR.3/Fujimi 1/72nd Ju 87D-3

  • Member since
    December 2003
  • From: Colorado
Posted by psstoff995 on Saturday, March 28, 2015 4:19 PM

Beautiful work on this one so far Karl! I was upset to see you had some major roadblocks on that MBT70 build, but it's really impressive to see you bounce back so far and knock this challenging one out of the park. Definitely looking forward to seeing it weathered up to your usual standard. Happy modeling!

-Chris

US Army Infantryman

  • Member since
    October 2007
  • From: Louisville, KY
Posted by pordoi on Saturday, March 28, 2015 4:28 PM

To borrow a phrase from my daughter (high school aged):

"Too Cool For School!!"

Looking forward see what you do with weathering.

Don

  • Member since
    July 2003
  • From: On my kitchen counter top somewhere in central North Carolina.
Posted by disastermaster on Saturday, March 28, 2015 4:56 PM

Totally up to your premium standards Karl....... http://img.photobucket.com/albums/v247/Knitwit1975/Misc%20smilies/wink05.gif~original

 https://i.imgur.com/LjRRaV1.png


  • Member since
    January 2015
  • From: Tumwater, WA.
Posted by M. Brindos on Saturday, March 28, 2015 7:06 PM

Fantastic Karl! Simply fantastic! :D:D:D:D

- Mike Brindos "Lost Boy"

  • Member since
    December 2012
Posted by RX7850 on Saturday, March 28, 2015 7:08 PM

Looks perfect as is but if you must soil it...  then soil it....Smile

  • Member since
    January 2006
  • From: California
Posted by SprueOne on Sunday, March 29, 2015 12:34 PM

YES, very nicely represented. Those shell hits are looking as good as I thought they would 

Anyone with a good car don't need to be justified - Hazel Motes


Iron Rails 2015 by Wayne Cassell Weekend Madness sprueone

  • Member since
    January 2007
Posted by the doog on Sunday, March 29, 2015 8:57 PM

Thanks all, guys. I appreciate the comments and knowing that you're with me on this one! Yes

Bish, yeah, that one red wheel is going to be a "spare" road wheel. A little dash of color on the model never hurts! Smile

I'm getting on with the upper hull weathering this weekend. I decided to just try something a little different, hey why not? I decided to go with acrylic weathering just to see what I could do with it. I took 4 colors--one white, one black ,and one variation of gray and one of tan--basically everything I'd need to make variations of gray and dust over gray. This is all done with various craft store acrylic paints.

Here's what I used: I put a little of each in my palette, thinned with water...

In a bottle cap, I had some dishwater soap to use to cut the surface tension of the water--a necessary step when using water-based effects. I dipped the brush in the soap, and then into the pool of color, dab it off a bit, and added it to the model. It's REALLY thin, consistency-wise...

I keep carelessly mixing up the colors, just going with whatever comes on the brush within a range of gray-tan.

When I had a nice coat over the entire top hull and turret, I added some contrasting dark spots. I dipped an old, slayed brush in the Black soup and dabbed it almost-dry, and then just dropped it repeatedly on the model. adding faint dark spots.

I also did some more detail painting--the shell hits, and the muffler. The muffler too, was painted with regular acrylic craft paints--Raw Umber, Orange, and Pennsylvania Clay--a reddish color. Some of the shell hits were made to look "old" with rust tones; others are "fresh".

All in all, I'm pretty stoked about how this is looking so far. This is with absolutely NO oils or pigments yet. Of course, I still have to do the lower hull and tracks/wheels.  Here's some detail shots.

The same mixes were used to do some streaking down the sides of the vehicle.

When I do pigments and oil detailing, it should really make this finish "pop"! Thanks for looking in guys, and comments are always welcomed, pro or con! Big Smile

  • Member since
    December 2003
  • From: Colorado
Posted by psstoff995 on Sunday, March 29, 2015 9:43 PM

It's popping already! So I definitely cannot wait to see you continue to set the bar with the oils and pigments next. I think that light tan/dust color- watered down- really gave it a good "rained on" look, like it was real dirty and the rain just redistributed the old dust into new places. Maybe a little art imitating life after you used the water as thinner? Anyway- looks awesome, never would think you could put so much character into a single tone vehicle.

-Chris

US Army Infantryman

  • Member since
    July 2008
  • From: Vancouver, the "wet coast"
Posted by castelnuovo on Sunday, March 29, 2015 9:54 PM

This looks fantastic Doog. Could you please tell me how did you paint those handles on the tools and the wooden block so that they look like they are actually made of wood? Mine always look like they are just a solid brown piece.

Thanks...

  • Member since
    July 2003
  • From: On my kitchen counter top somewhere in central North Carolina.
Posted by disastermaster on Monday, March 30, 2015 6:38 AM

Let's see......

 One word.........

  Nine letters.........

 http://z2.ifrm.com/11551/52/0/e5006924/e5006924.gif MARVELOUS!

 https://i.imgur.com/LjRRaV1.png


  • Member since
    November 2009
  • From: SW Virginia
Posted by Gamera on Monday, March 30, 2015 7:51 AM

Yes! I really like how things are going!

"I dream in fire but work in clay." -Arthur Machen


  • Member since
    January 2007
Posted by the doog on Monday, March 30, 2015 9:26 AM

Thanks, Chris, Cliff and Steve! I appreciate your kind comments!

Castelnuovo (name???) to do the wood handles, paint the wood part a light tan. Then use raw umber oil paint to paint a wash on the "wood". The wash should be rather thick at first. Let it dry for about ten minutes, then take a clean brush that is wet with thinner and "clean" a percentage of the wash brushing in a longitudinal direction, that is, with the "grain" as you would like to see it. You can also add some orange oil paint or a "rust" color to it to vary the amount of warmth to it. You can also go back and add "grain" to it using a very fine brush.

The only thing that you have to watch is to not make the handle look "stained", like as if it's fine mahogany or something. I've seen some guys who do tools as with a deep, rich red stain, and they just don't look right. Pretty, but not really appropriate. I like to use a little bit of grey in the wood wash mix to show wear and ground-in dirt in the handle. Then I may scribe in umber "grain" with a very fine brush.

Hope this helps!

  • Member since
    December 2007
  • From: Eagle River, WI
Posted by PANZERJAGER on Monday, March 30, 2015 11:11 AM

Very interesting technique there Karl!

It is much harder to "pull off" a monotone camo job vs. a multicolor one, and make it believable.

I like were you're going with this one.

I don't know if I would do too much more to it though, you could go too far...

Congrats so far "mein freund!"

PANZERJAGER

 PANZERJAGER


  • Member since
    December 2012
Posted by RX7850 on Monday, March 30, 2015 8:21 PM

Simply perfect. Your technique brings out all the intricate details of this kit.

  • Member since
    May 2006
  • From: Queensbury,NY
Posted by panzer88 on Monday, March 30, 2015 10:00 PM

Looking totally awesome.


  • Member since
    October 2007
  • From: Louisville, KY
Posted by pordoi on Tuesday, March 31, 2015 6:57 PM

PANZERJAGER

I don't know if I would do too much more to it though, you could go too far...

Karl, for what it's worth, I agree with Panzerjager.  Looks pretty weathered as is.  Depending on what you have planned, it might be a bit too much to give this the full treatment of pigments and other weathering approaches.  What are your plans?

Don

  • Member since
    January 2007
Posted by the doog on Tuesday, March 31, 2015 7:07 PM

pordoi

PANZERJAGER

I don't know if I would do too much more to it though, you could go too far...

Karl, for what it's worth, I agree with Panzerjager.  Looks pretty weathered as is.  Depending on what you have planned, it might be a bit too much to give this the full treatment of pigments and other weathering approaches.  What are your plans?

Don

Oh ye of little faith! Big Smile lol! Don't worry, I'm not going to "ruin" it! Propeller

There are certain effects that I can't get with these acrylics. I can't get "texture" in the weathering like grainy mud or dirt. This "pre-weathering" step certainly took me a lot farther than I thought I could take it--I'm really quite thrilled with it, to be honest, but I will add some pigments to give the bottom hull some textured mud/dirt. Not a LOT, mind you. I also plan some spattering and speckling to give some very subtle spots and tones.

Also, the tracks need pigments and other treatments.Some choice oil stains and pools will be just the finishing touches to set it off. I may have an update later.. stay tuned!!! Big Smile

  • Member since
    October 2007
  • From: Louisville, KY
Posted by pordoi on Tuesday, March 31, 2015 7:33 PM

the doog

Oh ye of little faith! Big Smile lol! Don't worry, I'm not going to "ruin" it! Propeller

Smile  Ruin it?... haven't lost the faith, no way  Bow Down   Just didn't want to see this turn out to be the Panzer found buried in the woods in the coal country of Northern Pennsylvania. Big Smile  BTW, went to school at Kutztown and had many friends from St Clair and areas north...  Cool

Don

  • Member since
    January 2007
Posted by the doog on Tuesday, March 31, 2015 7:58 PM

pordoi

the doog

Oh ye of little faith! Big Smile lol! Don't worry, I'm not going to "ruin" it! Propeller

Smile  Ruin it?... haven't lost the faith, no way  Bow Down   Just didn't want to see this turn out to be the Panzer found buried in the woods in the coal country of Northern Pennsylvania. Big Smile  BTW, went to school at Kutztown and had many friends from St Clair and areas north...  Cool

Don

Don, that's so cool!!!! I dated a girl from Kutztown U once--wow, what a wild bird she was! St Clair is well known to me---I've explored it, and found the remains of St John's Eagle colliery, and found the old slope mine that served it as well as the well-known water-level drift entrance behind the Burger King! We used to do an enduro race that took us up in the coal hils there behind St Clair where there was a lot of old minng gear. We'd run up those HUGE culm piles on our dirt bikes, and bounce around on all those boulders and old coal roads..ah yes, good times they were! My sister lives down jusat past Pottsville.  Smile

  • Member since
    January 2007
Posted by the doog on Tuesday, March 31, 2015 8:55 PM

Again, thanks, all who have weighed in! I have another update, and don't worry, I"m not going to "go too far" Wink I really like the way this is coming out, and I don't want to cover it up too much.

So, last night before I went to bed, I did a quick acrylic wash of the lower hull, just slapped it on and let it dry overnight. More of that in a minute--now. I wanted to get a start on the tracks, which needed some color before I really addressed their metallic tones. I used a combination of Raw Umber,Terra Cotta, and Clay Bisque--interesting names, but really just a rust color with a darkening and/or lightening agent.The tracks have already been airbrushed a deep Brown. (darkened w/ Black)
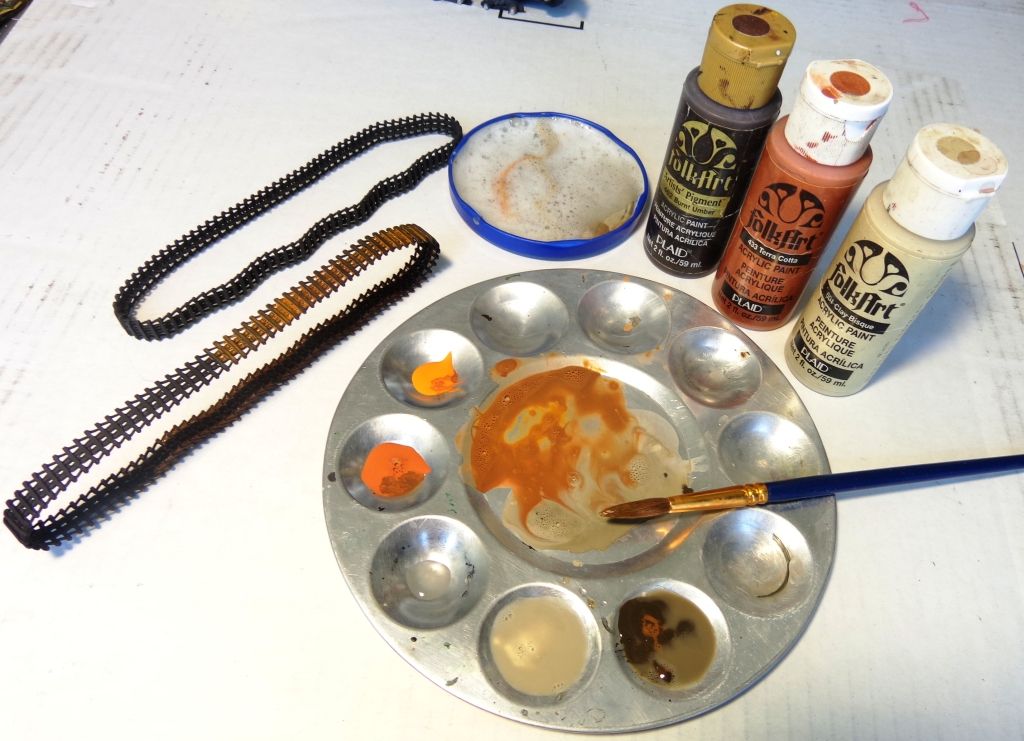
Load up the brush and slap it on. Make sure to get it in all the treads...
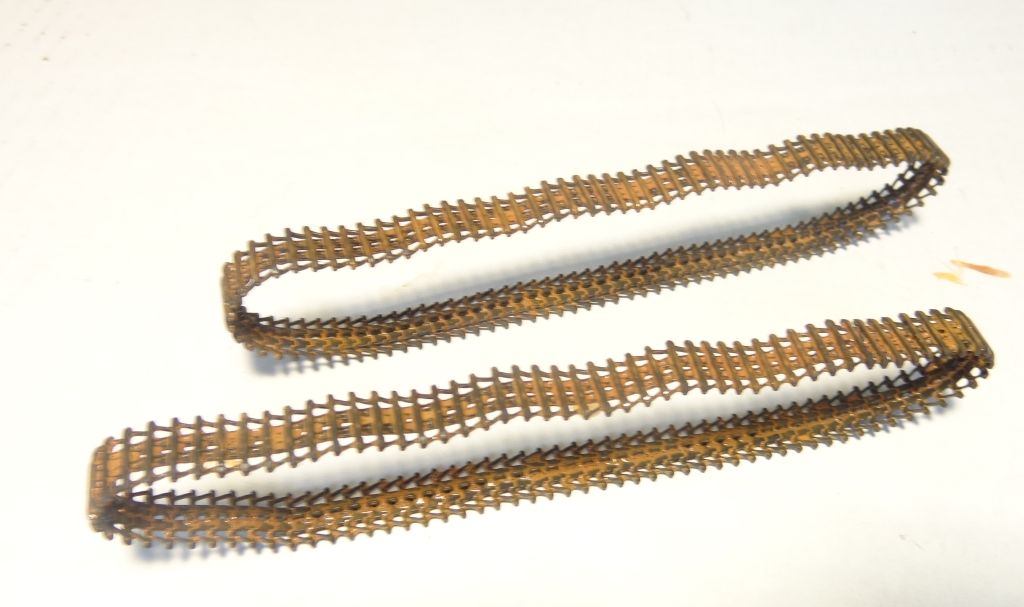
When it was wet, it had the depth I wanted, but when it dried it didn't quite stand out from the deep Brown.
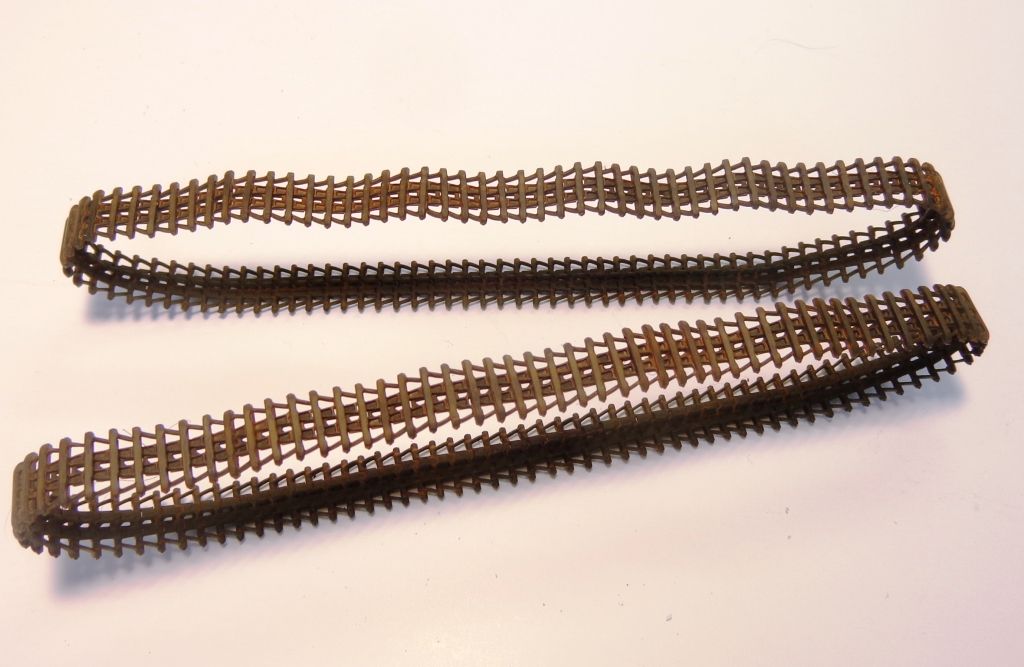
It's actually darker in real life--the camera picked out more of the rust. So I decided to add some Wilder pigments. I used Track Dark Brown, Light Rust and Red Rust, and mixed them together in a cup.

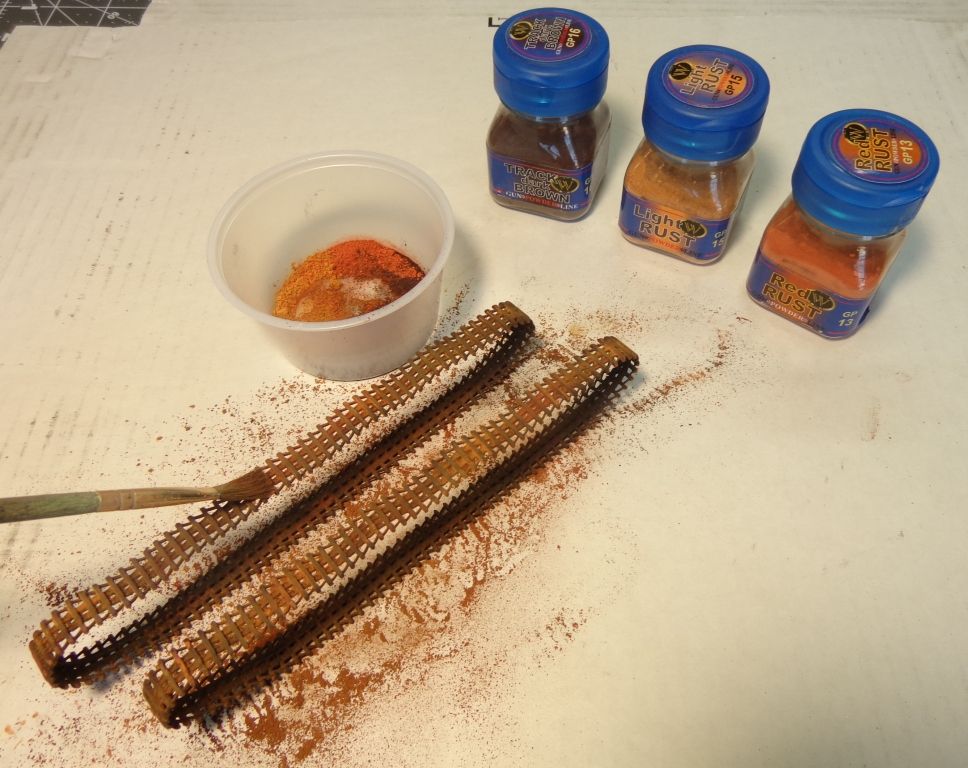
I fixed these with some sprayed-on WIlder fixer when I had covered the whole tracks, This will give some nice texture to the tracks. More on those in a future update.

I was pretty pleased for the most part with the hull wash which had dried overnight. I needed to put some more color under the fenders though, so I loaded up a large, soft brush and rather haphazardly run down some streaks of color. REMEMBER that each brush load of paint would be dipped in a pool which had some degree of soap in it to cut the surface tension--THIS IS VITAL to get proper dispersion and flow of paint.

On the one side, there were these weird little pooled "balls" of paint and I wanted to see if I could de-emphasize them and also get some bare areas in there for variety.

I used this brush...it's a short-bristled thing of my own creation.
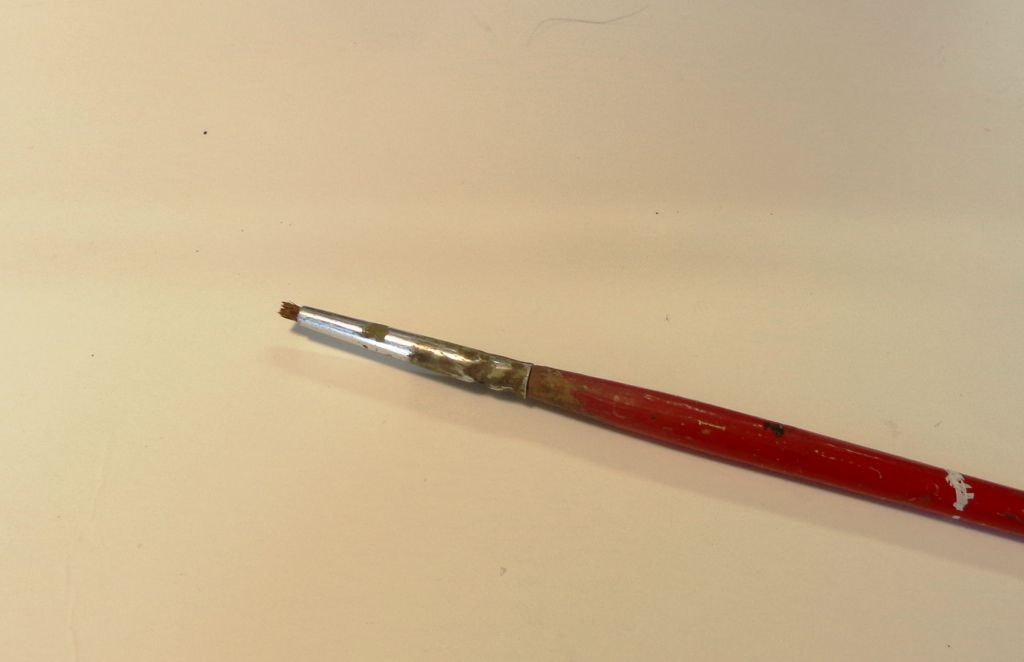
I forgot to mention last night that I found that, by wetting the brush and dabbing it in a little raw soap, I could actually scrub away the dried acrylic! This paint apparently does not exactly harden like what we would expect of regular hobby acrylics---it can be scrubbed away within a rather long time period. It takes a little effort, but it actually works!

I have also found that by simply wetting the brush and dabbing off most of the water, you can "scrub": against tide marks and sharp lines of delineation to smooth them out. Look at the before-after shots here.. I used this technique on the top hull as well. It works wonderfully.

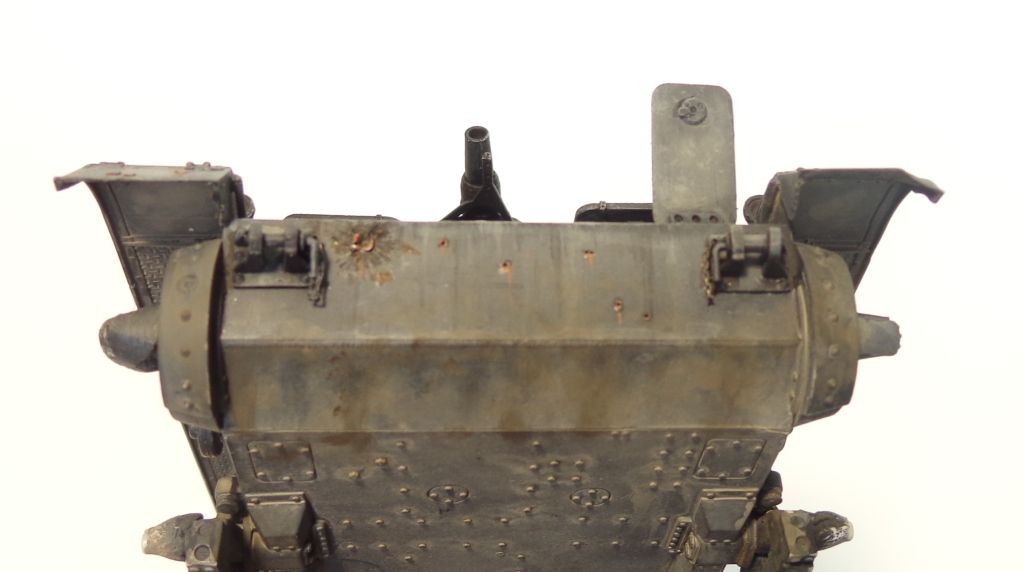
Much smoother, right? Stick out tongue

The bottom of the tank is also similarly smoothed and refined.

Here's the bottom weathering so far, without any pigments or additional washes.

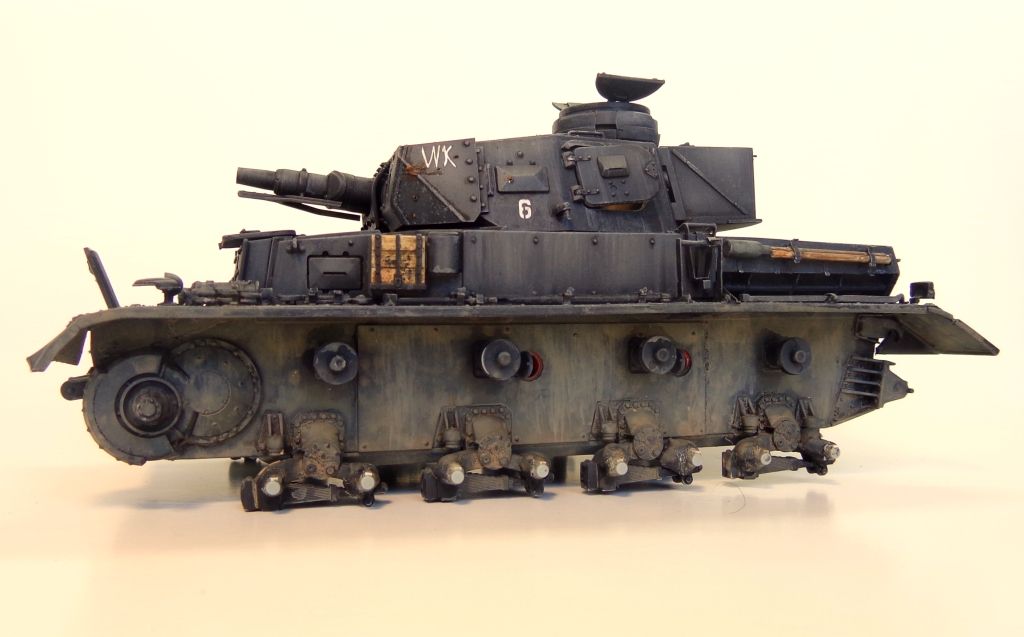
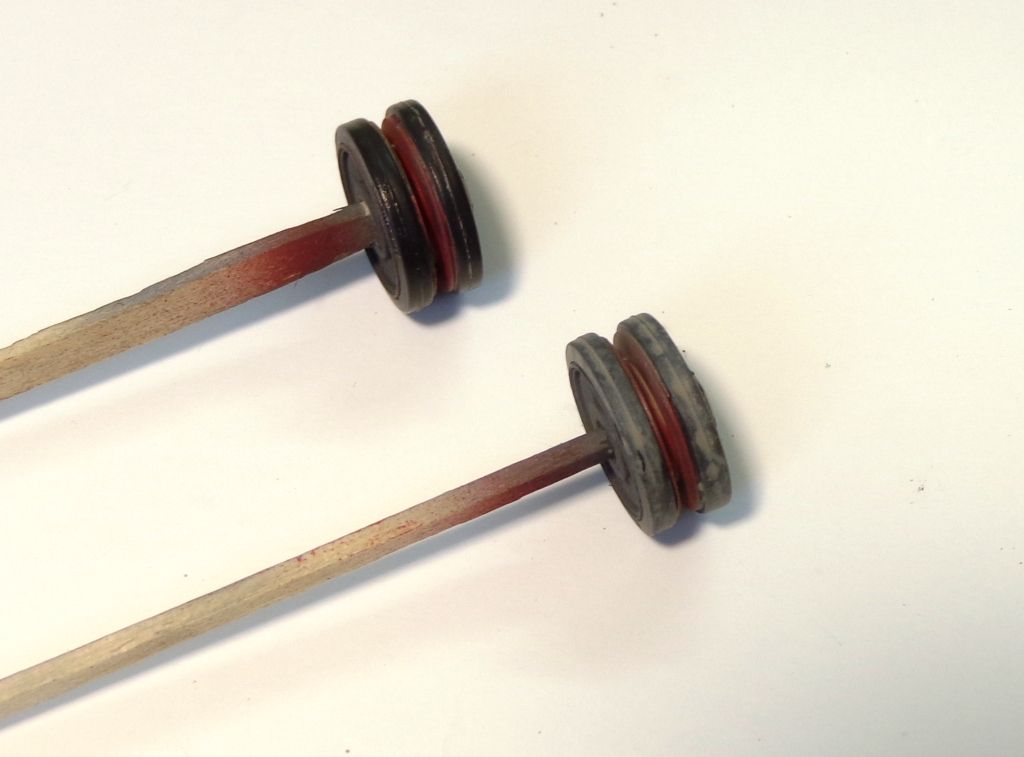
The wheels got a liberal coating of paint-gunk. They looked a little too monochromatic for me, so I wondered if they could be cleaned up a little to reflect how the rubber would have been rubber clean during contact with the wheels? And just in case you're wondering--YES, I painted each and every wheel one by one, by brush...Propeller

I tried my trick with the small brush again:

1. The wheel before...

2 Using the brush and some soapy water

3 clean it off with a paper towel

4 the original wheel and the clean one.
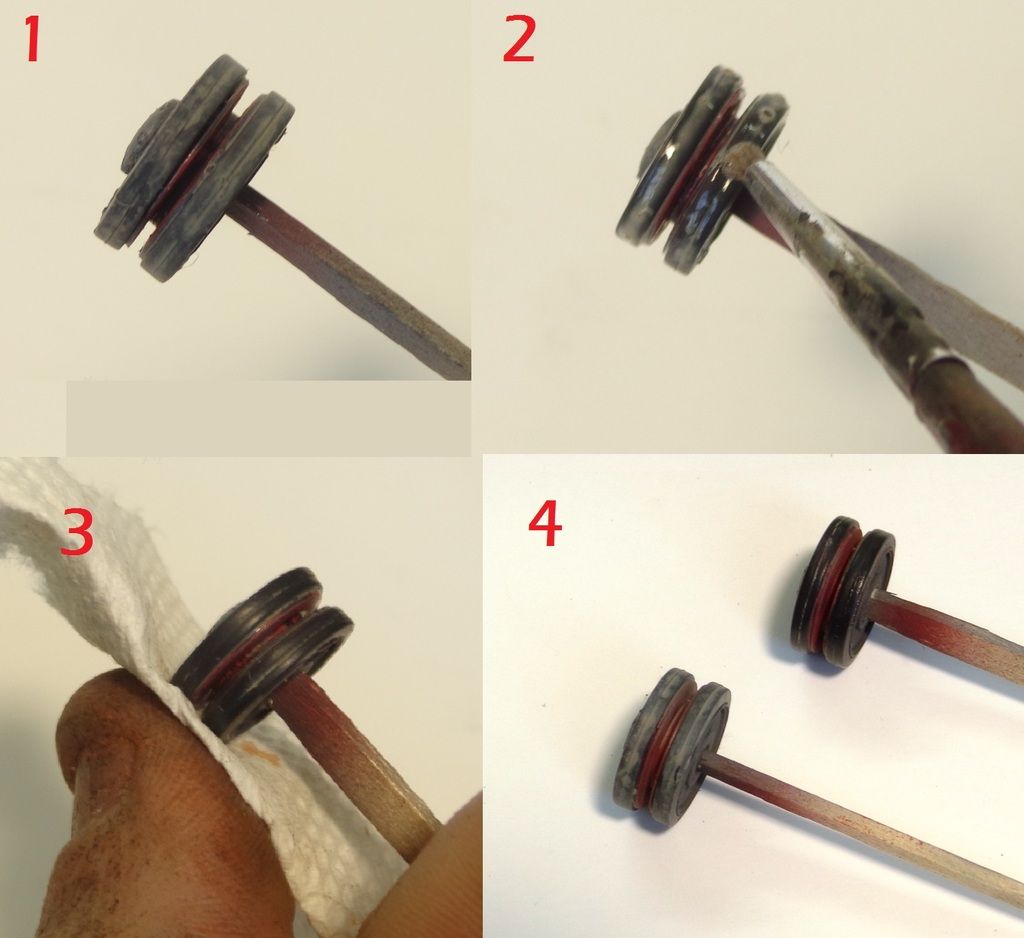
That was today's efforts...more to come, in a few days.

By the way, I contacted Plain Industries, makers of all the craft paints, and asked them what their thinner or carrier was, with the intent of being able to possibly airbrush them, since the pant itself is a little oily almost, and needs water thinning in order to best and most effectively brush paint it. I got a swift response;

                          "We do not make a thinner for our paint products. We do not recommend our paints for airbrush".

Sigh...oh well. Looks like I'm "going Frankenstein" if I want to AB these in the future!

Hope you all are enjoying the latest lab rat... Big Smile

Tags: W
  • Member since
    January 2006
  • From: California
Posted by SprueOne on Tuesday, March 31, 2015 9:27 PM

pure artistry Mr. Doog

I remember my baby sitter (at the time an older lady) would thin craft acrylics with Smirnoff .

Or maybe that was her excuse for always having a glass of it on the table while she painted ceramic figures Hmm 

Anyone with a good car don't need to be justified - Hazel Motes


Iron Rails 2015 by Wayne Cassell Weekend Madness sprueone

  • Member since
    February 2014
  • From: Michigan
Posted by silentbob33 on Wednesday, April 1, 2015 8:46 AM

That is fantastic Karl!  I think I might try the same thing with the Hellcat I'm working on.  I love the dusty look you've created.  I cant' wait to see the next installment.

On my bench: Academy 1/35 UH-60L Black Hawk

  • Member since
    February 2014
  • From: Michigan
Posted by silentbob33 on Thursday, April 2, 2015 5:27 PM

By the way, are you doing the weathering with acrylic paints on a flat or gloss surface? Sorry if that's a dumb question but I'm an armor newbie

On my bench: Academy 1/35 UH-60L Black Hawk

  • Member since
    January 2007
Posted by the doog on Thursday, April 2, 2015 8:38 PM

Thanks, guys! I should have another update over the weekend; heck, I may be finishing it by then!

SilentBob I am doing this over a semi-gloss or flat surface. NOT shiny--gloss!

  • Member since
    November 2009
  • From: SW Virginia
Posted by Gamera on Friday, April 3, 2015 10:05 AM

Karl, thanks for the commentary on how you're doing all this weathering. I'm going to have to drag out a paint mule and give it a go myself.

"I dream in fire but work in clay." -Arthur Machen


  • Member since
    December 2002
  • From: Bury St Edmunds, Suffolk, England
Posted by Bish on Friday, April 3, 2015 12:24 PM

Nice work Karl and a great tut there.

I am a Norfolk man and i glory in being so


On the bench: Airfix 1/72nd Harrier GR.3/Fujimi 1/72nd Ju 87D-3

  • Member since
    January 2007
Posted by the doog on Friday, April 3, 2015 9:21 PM

Hey Cliff, I'm happy to share! Nothing like paying back the forum that taught me to be a better modeler! Thanks to, Bish; glad you're diggin' it!

UPDATE!

I've started to add speckling and spattering. For the record, "speckling" is adding tiny dots of color--almost like pixels--to the model surface to add very subtle tonal variations to the finish. "Spattering" is to simulate mud thrown up in travel.

Here, I'm spattering the muffler and rear. I also did this around the whole suspension area. I used speckling on top of the tank, concentrating on the front hull top and rear deck.

Using Wilder rust tones to "speckle" the tracks,

Just gonna get right to the results: here's where I am so far...I think that I've added another layer to the weathering. You can still see the variation of the acrylic washes, but there's even more subtlety to the finish if you look closely.

I am pretty sure that the next update will be a "Finished" post! Stay tuned, and thanks for looking in!! Smile

  • Member since
    July 2003
  • From: On my kitchen counter top somewhere in central North Carolina.
Posted by disastermaster on Friday, April 3, 2015 10:20 PM

Okay king tut ..... http://www.smiley-lol.com/smiley/celebre/antiquite/egyptien15.gif

 Just when this gets good, it gets better.

 You really have a "good eye" for this type of thing 'ya know.

 I have a good eye too;http://thumbs.ebaystatic.com/d/l96/m/m_ZJ0d3pyvsDgd8lWrTzrpQ.jpg

unfortunately, a blind one to go along with it.


You might ought'a add a bit o' dried mud sandwiched inside those drive sprockets on front....... and don't forget to polish up those sprocket teeth.

           (dang, I gotta hop back over to the house tomorrow and do some more work on it... at least it's easter)

           I'ma     http://i92.photobucket.com/albums/l28/michael51091/bunnyhop.gif~original  hoppin'.

Save

 https://i.imgur.com/LjRRaV1.png


  • Member since
    April 2006
  • From: ON, Canada
Posted by jgeratic on Friday, April 3, 2015 10:23 PM

Karl - wow!  I tell ya, if I had no self control I would need to fetch me a drool bib - lol!

So the speckling technique is just appropriate vehicle colour(s),  but  applied in the same fashion as spattered mud by flicking a stiff brush?

regards,

Jack

  • Member since
    December 2003
  • From: Charleston, SC
Posted by sanderson_91 on Saturday, April 4, 2015 9:00 AM

Karl,

Your model is amazing!  I've been following this build closely.  I usually build aircraft, but I'm really getting the urge to start on some armor!  Thanks for sharing!!

Steve


  • Member since
    January 2007
Posted by the doog on Saturday, April 4, 2015 9:29 AM

lol, thanks Steve for the recommendations--I'm going to get to all those little details in the next "installment". I did shine up the sprocket teeth when I put the tracks on last night. Hopefully this should be finished by early next week--I've go a busy weekend here too; lots of "DYI" projects on my "Honeydo" list! lol

  • Member since
    December 2003
  • From: Colorado
Posted by psstoff995 on Saturday, April 4, 2015 9:44 AM

Wow!! Looking better and better Karl, really well done, spot on in my opinion for a vehicle that's been out in the field for months without the benefit of a wash rack. The acrylic to me is like the old, forgotten and rained on dust and mud of weeks gone by, while the splattering is the stuff they just drove through. Really shows a lot of "vehicle history" alongside the rusty old battle damage and the new, shinny silver hit.

jgeratic

So the speckling technique is just appropriate vehicle colour(s),  but  applied in the same fashion as spattered mud by flicking a stiff brush?

I had the same question, I remember a while back there was a lot of tutorials (and I think you had a few yourself) with the oil paint, polkadot turned streak approach (I'm sure that had a real name...). That involved all kinds of different, random colors, so I was wondering how exactly you went about speckling, as that technique sounds totally different.

Anyway, well done- really looking forward to the next update! YesSmile

-Chris

US Army Infantryman

  • Member since
    January 2007
Posted by the doog on Saturday, April 4, 2015 9:57 AM

jgeratic

Karl - wow!  I tell ya, if I had no self control I would need to fetch me a drool bib - lol!

So the speckling technique is just appropriate vehicle colour(s),  but  applied in the same fashion as spattered mud by flicking a stiff brush?

regards,

Jack

Jack, thanks for the kind words!' Chris, I just saw your post--thanks too, bud; I"ll try to answer both your questions...

You can use speckling in either altered base tones or in rust tones--what it does is add tiny dots -- I like to think of them as "pixels" of color to the finish. If you do it in lighter/darker base tones, it breaks up the monotone finish in a very subtle way that only gets better the closer you look at it. If you use rust tones, you get a nice weathered appearance of old chips and just plain old "age" that adds years to your finish.

Speckling is basically the same technique, but using dirt and mud tones. You have to experiment with paint thickness and viscosity though, and honestly PRACTICE because the paint will fly of differently depending on the paint's wetness, type, and brush used. Depending on the brush (bristle stiffness or not) and how much you thin the paint, you can get a dispersion tha can be large glops or a fine mist--or something in between. I ALWAYS "test" the dispersion of EACH and EVERY paint-load before turning it toward the model. Most of the times you have to thin the paint to get it to fly--but TOO thin will result in "glops". PRACTICE!!!

Chris, the "Oil Dot Method" was something pioneered by Mig. He used mostly the primary colors--red, yellow, blue--in oil "dots" that were then blended into the model finish to provide a rich color patina to the finish. The idea, as he described it,  was to impart some of the chromatic richness of the hot Spanish sun to the models. This is a different method than speckling, which I credit to Adam Wilder. Each has its own pros and cons, but they are definitely different in both application and results.Our own Bill Plunk has modified the Oil Dot method to use weathering colors and more "base" tones to good effect.

Here-- HETZER -- is the Oil Dot Method. Same thing here---PRACTICE before you apply to a real model.

Hope this helps ya, guys! Big Smile

  • Member since
    January 2006
  • From: California
Posted by SprueOne on Saturday, April 4, 2015 10:53 AM

disastermaster

Okay king tut ..... http://www.smiley-lol.com/smiley/celebre/antiquite/egyptien15.gif

        just when this gets good, it gets better. . . .

. . .

Exactly what I was thinking. Yes Thanks for describing the detailed S-B-S 

Anyone with a good car don't need to be justified - Hazel Motes


Iron Rails 2015 by Wayne Cassell Weekend Madness sprueone

  • Member since
    December 2003
  • From: Colorado
Posted by psstoff995 on Saturday, April 4, 2015 1:58 PM

Thanks a lot Karl! For both the detailed description of the different techniques and for that link to your Hetzer/Oil Dot Filter walk through. I actually picked up a Hetzer-STARR kit by Trumpeter a few weeks ago- (straight OOB build to practice working with my new Iwata double action airbrush) and I think I'm going to do a similar camo pattern to your first version (prior to the Sillyputty masking). Definitely something soft edge. So that link back to 2007 was exactly what I needed! Thanks again. Smile

-Chris

US Army Infantryman

  • Member since
    January 2015
  • From: Tumwater, WA.
Posted by M. Brindos on Saturday, April 4, 2015 2:36 PM

I'm blown away Karl. Everything you are doing is amazing and the effects are coming together in magnificent ways. I've not yet combined so many effects because I though it would get too effect heavy, but you have just showed us all that you can do it and it can work flawlessly.

Deep respect Karl. You are very, very talented and I am learning.  :D  Thank you sir.

- Mike Brindos "Lost Boy"

  • Member since
    February 2011
  • From: St louis
Posted by Raualduke on Saturday, April 4, 2015 6:03 PM

Just friggin awesome!

  • Member since
    March 2003
  • From: Western North Carolina
Posted by Tojo72 on Sunday, April 5, 2015 12:08 PM

Just fantastic looking work Karl.Looks like Michael Rinaldi's style in Tankart.

Again weathering and wear look just right.

  • Member since
    November 2007
  • From: Wisconsin Rapids, WI
Posted by moose421 on Sunday, April 5, 2015 12:45 PM

I love the effect Karl that you have achieved on this vorpanzer.

And yes I am finally back.  Just a couple year detour. Kids and RC naval combat kept my occupied for a few years.  Lost interest in my boats and kids are getting older.

Just have to finish up an aircraft then I will start on maybe another aircraft.  Then again I love my armor.

moose

  • Member since
    December 2002
  • From: Bury St Edmunds, Suffolk, England
Posted by Bish on Sunday, April 5, 2015 1:36 PM

Great work Karl, I like the look of the exhaust.

I am a Norfolk man and i glory in being so


On the bench: Airfix 1/72nd Harrier GR.3/Fujimi 1/72nd Ju 87D-3

  • Member since
    July 2004
  • From: Texas
Posted by wbill76 on Monday, April 6, 2015 2:02 PM

An impressive depth to the finish and a great SBS to go with it Karl! Beer Looking forward to seeing it come to completion. Yes

  • Member since
    July 2008
  • From: Vancouver, the "wet coast"
Posted by castelnuovo on Monday, April 6, 2015 7:22 PM

This looks super. In a real world, what would it take for a tank to look like this? Looks like somebody fired a flamethrower at it Smile

  • Member since
    January 2007
Posted by the doog on Monday, April 6, 2015 7:40 PM

Thanks, all, for the enthusiasm! I genuinely appreciate it more than you know! Sometimes, you think you're losing your touch, and it's nice to know that you can still make an impression! :) Propeller

Chris, glad that you could use the link! Hope your Hetzer is a STARR when it's finished! Toast

Mike Brindos, I'm humbled by your words; thank you so much! Smile

Thanks, SprueOne, Ruaulduke, Bill, Bish, and Castlenuovo! Beer

Welcome back Moose, and thanks for the compliments! Yes

Tojo, Mike RInaldi is one of my favorite modelers, and it's an honor to be compared to him in any manner--thank you!! Geeked

I'm working on finishing this up--the next update will be a "finished" post! Stay tuned, guys!

  • Member since
    July 2003
  • From: On my kitchen counter top somewhere in central North Carolina.
Posted by disastermaster on Tuesday, April 7, 2015 10:04 AM

We're all a waitin'....

                         https://smileyshack.files.wordpress.com/2011/01/scute_100-115.gifhttp://www.en.kolobok.us/smiles/artists/big/Connie_twiddle-thumbs.gifhttp://img.diaperswappers.com/images/smilie/foottap.gifhttp://www.en.kolobok.us/smiles/artists/big/Connie_male-snore.gifhttp://www.julien-clerc.net/forum/smileys/sablier.gif

Save

 https://i.imgur.com/LjRRaV1.png


  • Member since
    December 2007
  • From: Eagle River, WI
Posted by PANZERJAGER on Tuesday, April 7, 2015 1:49 PM

the doog

Looks pretty cool Karl.

But to my eye the rust is a little too bright.

Tone it down some and you got a winner!!!

PANZERJAGER

 PANZERJAGER


  • Member since
    January 2007
Posted by the doog on Tuesday, April 7, 2015 4:24 PM

Thanks, Panzerjaeger!

I think the bright, bright rust tone is because I took these photos with lighting, not natural light, and it brightened everything up. I doesn't look that way in real life, so bright. I understand what you mean. :)

  • Member since
    January 2007
Posted by the doog on Tuesday, April 7, 2015 4:25 PM

disastermaster

We're all a waitin'....

https://smileyshack.files.wordpress.com/2011/01/scute_100-115.gifhttp://www.en.kolobok.us/smiles/artists/big/Connie_twiddle-thumbs.gifhttp://img.diaperswappers.com/images/smilie/foottap.gifhttp://www.en.kolobok.us/smiles/artists/big/Connie_male-snore.gifhttp://www.julien-clerc.net/forum/smileys/sablier.gifhttp://forum.theplayforge.com/attachment.php?attachmentid=3906&stc=1&d=1408655579

lol, it's Han's' fault! Darned figures, sometimes they take so long to paint!

I predict tomorrow night I"ll have the finished pics! Big Smile

  • Member since
    December 2002
  • From: Bury St Edmunds, Suffolk, England
Posted by Bish on Tuesday, April 7, 2015 4:34 PM

Despite my best intentions, I always end up leaving the figures till last so everything is waiting on them. But I am sure we can all wait one more day. Wink

I am a Norfolk man and i glory in being so


On the bench: Airfix 1/72nd Harrier GR.3/Fujimi 1/72nd Ju 87D-3

  • Member since
    October 2007
  • From: Louisville, KY
Posted by pordoi on Tuesday, April 7, 2015 5:29 PM

the doog

disastermaster

We're all a waitin'....

https://smileyshack.files.wordpress.com/2011/01/scute_100-115.gifhttp://www.en.kolobok.us/smiles/artists/big/Connie_twiddle-thumbs.gifhttp://img.diaperswappers.com/images/smilie/foottap.gifhttp://www.en.kolobok.us/smiles/artists/big/Connie_male-snore.gifhttp://www.julien-clerc.net/forum/smileys/sablier.gifhttp://forum.theplayforge.com/attachment.php?attachmentid=3906&stc=1&d=1408655579

lol, it's Han's' fault! Darned figures, sometimes they take so long to paint!

Hurry along, Karl.  Or by time you finish, Hans might have gray hair and need to be re-painted... Wink

Don

  • Member since
    December 2007
  • From: Eagle River, WI
Posted by PANZERJAGER on Wednesday, April 8, 2015 9:41 AM

the doog

Thanks, Panzerjaeger!

I think the bright, bright rust tone is because I took these photos with lighting, not natural light, and it brightened everything up. I doesn't look that way in real life, so bright. I understand what you mean. :)

I get that.

Ya, it always pi** me off that after all the work you do at the bench under "full spectrum" lighting, and the model looks great.

Then you go to a show and the room is lit like a cave, and all the subtle weathering affects just go away!

That is why I started to build lighted bases for my car models, now I need to build some for my armor stuff too.

PANZERJAGER

 PANZERJAGER


  • Member since
    January 2007
Posted by the doog on Thursday, April 9, 2015 3:56 PM

OK, finished pics up!

I had a lot of last little details to do--I had to paint all the stowage that I put in the turret bin; most of which you can't see too clearly, but it makes a nice mess. and of course I had to paint the crewman.

The last "major" weathering thing I did was to ad dusty pigments to the crevices of the hull where they would have accumulated over time. I used Wilder's "Dry European Mud" for this.

After all the details had been painted, I'm calling this finished! Whew!

And the crewman...

The figure was painted wih Craft Store acrylics; just a melange of whatever colors I needed were mixed in to provide shadows and highlights.

I'm pretty pleased with how this came out. I believe that it's the first "Gray" vehicle /panzer that I've done in over 10 years? It's been a LONG time! I've always asociated the Panzer Gray scheme with "boring", small tanks, but I really enjoyed bringing this one to completion. Hey there's always the "Dicker Max" and other like it! Something tells me that I'll be doing more!

Thanks for evryone who looked in, commented, or followed! Please feel fre to leave comments, and I hope to be back soon with a new project! Toast

  • Member since
    February 2014
  • From: Michigan
Posted by silentbob33 on Thursday, April 9, 2015 4:11 PM

Looks amazing Karl! I've really enjoyed watching this come together, and I've learned a lot along the way.

On my bench: Academy 1/35 UH-60L Black Hawk

  • Member since
    December 2002
  • From: Bury St Edmunds, Suffolk, England
Posted by Bish on Thursday, April 9, 2015 4:39 PM

Another great looking build Karl. The shell hits are really well done. Good job all round.

I am a Norfolk man and i glory in being so


On the bench: Airfix 1/72nd Harrier GR.3/Fujimi 1/72nd Ju 87D-3

  • Member since
    January 2015
  • From: Tumwater, WA.
Posted by M. Brindos on Thursday, April 9, 2015 5:59 PM

Four things I love besides your absolutely brilliant weathering is the weathering inside the turret hatches that realistically portrays a lot of travel through those portals by men  wearing dirty boots, the scuffs in the paint on the back of the turret basket that suggests it had been rubbed by branches and crewmen, the actual contents of the turret basket (I've often tried to imagine what may be kept in those), and that stunning figure you painted.

That is art. it pleases my eyes in almost every way. Excellent Karl. Just excellent.

- Mike Brindos "Lost Boy"

  • Member since
    January 2007
Posted by the doog on Thursday, April 9, 2015 6:30 PM

Thanks, Bob and Bish! I sincerely appreciate your comments! Thanks for following along!

Mike, thank you for those generous comments. Very kind of you to say. Smile Thanks for calling out those details--I was hoping someone would notice all them! Beer

  • Member since
    July 2003
  • From: On my kitchen counter top somewhere in central North Carolina.
Posted by disastermaster on Thursday, April 9, 2015 6:46 PM

https://p.gr-assets.com/540x540/fit/hostedimages/1380392109/754953.gifSplendid in every way, and well worth the wait.

 http://i31.photobucket.com/albums/c393/RoseD1/A%20New%20One/sock_puppet_laughing_hg_clr.gif~originalNow, sock it up to the next level

    with a suitably detailed base/background and you

                definitely should have a possible best of show.

                   Beautifully http://www.rationalskepticism.org/images/smilies/icon_suspicious.gif rendered.

 https://i.imgur.com/LjRRaV1.png


  • Member since
    November 2009
  • From: SW Virginia
Posted by Gamera on Friday, April 10, 2015 8:39 AM

Looks awesome Karl, both the Panzer and the figure! Going to have to blow up your photos this weekend and study them to hopefully learn something!!!

"I dream in fire but work in clay." -Arthur Machen


  • Member since
    April 2006
  • From: ON, Canada
Posted by jgeratic on Friday, April 10, 2015 9:56 AM

Karl - stunningly presented, a real eye catching  representation of this workhorse of the Wehrmacht. Yes

Did you dial up the contrast of the photos to further show to full advantage the weathering techniques?

regards,

Jack

  • Member since
    March 2003
  • From: Western North Carolina
Posted by Tojo72 on Friday, April 10, 2015 10:02 AM

Another fantastic finish.Worthy of a feature article somewhere.

  • Member since
    February 2006
  • From: Boston
Posted by Wilbur Wright on Friday, April 10, 2015 10:36 AM

Very nice work Karl as usual.  You're a master at weathering.  And yes as I've found out, photographing a model with lights may make it look cleaner than it does in real life, or brighter.

I don't know if everyone truly understands the work and developed skill in painting figures, which is a discipline in itself. The figure looks terrific. The red lines on the uni, that is some skill.

I always like to build the figures with a kit if for nothing more than to show scale. I started going to the figure painting forum website a long time ago to attempt to learn from pure figure modelers. I've got a long way to go.  Good brushes is one key.

There are so many great figures available today in resin. The 3 Black Dog figures for my D9 build would cost almost as much as the kit. Figure that out! Haven't bought them.....yet.

Cheers.

  • Member since
    September 2006
  • From: Dripping Springs, TX, USA
Posted by RBaer on Friday, April 10, 2015 10:51 AM

Au usual, Karl, another stand-out.

Well done!

Apprentice rivet counter.

  • Member since
    February 2007
  • From: Brunswick, Ohio
Posted by Buckeye on Friday, April 10, 2015 11:35 AM

All I can say is that is outstanding work there.Bow Down

Mike

  • Member since
    January 2007
Posted by the doog on Friday, April 10, 2015 3:22 PM

Steve--LOVE the sock puppet! lol! How funny! Thanks for the comps! Big Smile

I would love to put this one a base, but unfortunately "space" rules my modeling world in a big way. A base would take up too much room in the display case. Unfortunately, that's my biggest consideration right now that forces my decisions about making dioramas, vignettes, etc. !/72 vignettes are fine, because they're only the size of a standard 1/35 tank, but anything more than that and it has to be a pretty radiical or imaginative idea for me to translate into a diorama.

Gamera, Tojo, Russ, and Mike, thanks all; I sincerely appreciate the kind and sincere compliments! Toast

Jack, I generally bump up the contrast and sometimes tone down the highlights, as it's really hard to get good lighting on shots without getting a "white wash" of glare or a dull gray background and limpid contrast. Mostly, I load them into Microsoft Office Picture Manager and hit "auto-correct". That actually makes your pictures look like the eye perceives them in real life. In conversations with many of the "top" modelers out there, I've learned that basically everyone does this to some degree. Otherwise your photos tend to look gray and lifeless.

Wilbur, thanks for the props on the figure, I swear that every time I start one, I feel like it's my first, and that I'm clueless as to how to bring it to life. I have anxiety about doing them half the time, but there's nothing like a figure to give a human element to the model not to mention scale. I wouldn't go starting another forum--you'd have a hard time attracting enough people to a brand new place online-better to just research and read through our own forum for figures here; truly, there's some amazing work on it. Shame about those Black Dog figures--I have found that they seem, to be very highly priced, and tend to stay away from them. Black Eye You know, if you look around, here are actually quite a lot of good figures available in plastic too. Masterbox has some amazing ones, but you have to look for them to find them. Good luck! Yes

  • Member since
    February 2010
  • From: Maine
Posted by Stage_Left on Friday, April 10, 2015 7:27 PM

Karl- simply brilliant! I love the weathering approach with acrylics Yes Beer

Dave

  • Member since
    January 2007
Posted by the doog on Sunday, April 12, 2015 8:37 AM

Thanks Dave!

Much appreciated!

  • Member since
    December 2003
  • From: Colorado
Posted by psstoff995 on Sunday, April 12, 2015 9:52 PM

Amazing work Karl, it really blows my mind to hear you say that about your figure painting. In my opinion, your figures could stand alone in a contest just like your armor. It's a shame that your display area is so limited that you can't get more of the figures and armor together with some groundwork and story telling. Looking forward to the next kit, any hints as to what's on the bench? Or did I miss the announcement somewhere?

-Chris

US Army Infantryman

  • Member since
    January 2006
  • From: California
Posted by SprueOne on Monday, April 13, 2015 8:54 PM

Nice finish, Karl. I esp like the story telling with the shell hit damage Idea Yes

Anyone with a good car don't need to be justified - Hazel Motes


Iron Rails 2015 by Wayne Cassell Weekend Madness sprueone

  • Member since
    January 2007
Posted by the doog on Tuesday, April 14, 2015 6:15 AM

Thanks, Chris! I haven' decided the next project yet--I have some traveling to do, and am just wrapping up a little project that I have delayed. I'll post pics when I"m done. Kind of a surprise. :)

Thanks, Sprue!! And thanks for following along!

  • Member since
    March 2013
  • From: Puebla, Mexico
Posted by garzonh on Friday, May 8, 2015 9:33 PM

O M G... Karl, you always create amazing builds!!

Im speechless as for the quality and realism of the model.

I would be so afraid, very afraid to be in a contest with your models....no chance at all.

Have you written any books? This is publishing  quality.

AMAZING, JUST AMAZING!!

  • Member since
    June 2015
Posted by Axeman on Thursday, June 25, 2015 11:24 PM

Karl

the more i see of your work,the more impressed i am,the tanks great,but the crew are phenomenal.....thanks for sharing your art!!!

  • Member since
    January 2007
Posted by the doog on Friday, June 26, 2015 8:07 AM

Thanks, Axeman, and Hugo--I appreciate the remarks. :)

No books yet, Hugo. Finescale owns most of my published work. YesSmile

  • Member since
    September 2006
  • From: Dripping Springs, TX, USA
Posted by RBaer on Friday, June 26, 2015 11:10 AM

Doog, I like your style.

Finestkind.

Apprentice rivet counter.

  • Member since
    January 2007
Posted by the doog on Friday, June 26, 2015 6:27 PM

RBaer

Doog, I like your style.

Finestkind.

Big Smile...YesBeer

  • Member since
    August 2005
  • From: Sydney, Australia
Posted by Phil_H on Friday, June 26, 2015 8:06 PM

How did I miss this one when it was finished?

Very nice. I like the little detail touches like the primer red on the inside faces of the roadwheels and the horizontal scratches on the turret bin.

Great work, as always. Yes

  • Member since
    January 2007
Posted by the doog on Friday, June 26, 2015 8:23 PM

Thanks so much, Phil! Much appreciated! Check out my Leopards, just finished! :)

JOIN OUR COMMUNITY!

Our community is FREE to join. To participate you must either login or register for an account.

SEARCH FORUMS
FREE NEWSLETTER
By signing up you may also receive reader surveys and occasional special offers. We do not sell, rent or trade our email lists. View our Privacy Policy.