SEARCH FINESCALE.COM

Enter keywords or a search phrase below:

M1074 PLS Conversion Complete

16850 views
54 replies
1 rating 2 rating 3 rating 4 rating 5 rating
  • Member since
    November 2009
  • From: SW Virginia
Posted by Gamera on Wednesday, November 9, 2016 7:42 AM

Gino I'll look around but maybe you could just make a mold and cast a bunch of rounds? Dunno if it helps, just throwing out ideas. 

"I dream in fire but work in clay." -Arthur Machen


  • Member since
    December 2002
  • From: Valrico, FL
Posted by HeavyArty on Monday, November 7, 2016 10:05 PM

I am building this truck as an artillery Bn supply vehicle. As such, the flatrack needs to be full of 155mm rounds. The flatrack holds 176 complete rounds (rounds, powder cans, and fuse cans) on 8-round pallets. As you can image, I need a bunch of ammo sets. Does anyone have any 155mm ammo and 8-round pallets they can spare? I'll take all you have and have lots to trade or can pay for them. Let me know what you have.

Gino P. Quintiliani - Field Artillery - The KING of BATTLE!!!

Check out my Gallery: https://app.photobucket.com/u/HeavyArty

"People sleep peaceably in their beds at night only because rough men stand ready to do violence on their behalf." -- George Orwell

  • Member since
    December 2002
  • From: Valrico, FL
Posted by HeavyArty on Sunday, November 6, 2016 4:42 PM

Thanks, yup a bit of weathering is in order.

Gino P. Quintiliani - Field Artillery - The KING of BATTLE!!!

Check out my Gallery: https://app.photobucket.com/u/HeavyArty

"People sleep peaceably in their beds at night only because rough men stand ready to do violence on their behalf." -- George Orwell

  • Member since
    November 2009
  • From: SW Virginia
Posted by Gamera on Sunday, November 6, 2016 8:08 AM

Looks great Gino, just needs a little dirt and mud in the floor to look like the real thing. Yes

"I dream in fire but work in clay." -Arthur Machen


  • Member since
    December 2002
  • From: Valrico, FL
Posted by HeavyArty on Sunday, November 6, 2016 7:03 AM

Thanks Glenn.  I am happy with it so far.

Gino P. Quintiliani - Field Artillery - The KING of BATTLE!!!

Check out my Gallery: https://app.photobucket.com/u/HeavyArty

"People sleep peaceably in their beds at night only because rough men stand ready to do violence on their behalf." -- George Orwell

  • Member since
    April 2016
  • From: N. Burbs of ChiKawgo
Posted by GlennH on Saturday, November 5, 2016 5:39 PM

Amazing work.

A number Army Viet Nam scans from hundreds yet to be done:

https://www.flickr.com/photos/southwestdreams/albums/72157621855914355

Have had the great fortune to be on every side of the howitzers.

  • Member since
    December 2002
  • From: Valrico, FL
Posted by HeavyArty on Saturday, November 5, 2016 1:39 PM

I have completed the interior painting and decals on the cab.  All the decals are from the Trumpeter M983 kit.  They are quite complete and look very good.  I replaced the kit radio with a SINCGARS ASIP, handset, and speakerbox from the now-OOP Pro Art set.  I am glad I have a few of these since no one else makes just a SINCGARS set.


Gino P. Quintiliani - Field Artillery - The KING of BATTLE!!!

Check out my Gallery: https://app.photobucket.com/u/HeavyArty

"People sleep peaceably in their beds at night only because rough men stand ready to do violence on their behalf." -- George Orwell

  • Member since
    November 2009
  • From: SW Virginia
Posted by Gamera on Saturday, October 29, 2016 8:38 AM

Thanks Gino, thankfully I don't figure I have to use many on the plane. I just want someone to fill in the areas where I sand the top and bottom of the fuselage.

"I dream in fire but work in clay." -Arthur Machen


  • Member since
    December 2002
  • From: Valrico, FL
Posted by HeavyArty on Saturday, October 29, 2016 8:04 AM

Hi Gamera - Yes, Trumpeter's newer kits are great.  They do really well on their trucks.  The Archer rivets work pretty well.  They are fragile though and I seal them with clear coat once they are set.  I would not want to do a whole fuselage of them though.

Gino P. Quintiliani - Field Artillery - The KING of BATTLE!!!

Check out my Gallery: https://app.photobucket.com/u/HeavyArty

"People sleep peaceably in their beds at night only because rough men stand ready to do violence on their behalf." -- George Orwell

  • Member since
    November 2009
  • From: SW Virginia
Posted by Gamera on Saturday, October 29, 2016 7:36 AM

She's lookin' good. I've been impressed by the more recent Trumpeter stuff I've built. 

How did those Archer rivet decals work out for you? They look pretty good. I bought some for a couple of ancient aircraft kits with about a zillion surface rivets. Guess the sensible thing would be just to sand them all off but I figured I'd just build it as is. 

"I dream in fire but work in clay." -Arthur Machen


  • Member since
    December 2002
  • From: Valrico, FL
Posted by HeavyArty on Friday, October 28, 2016 4:24 PM

I did not get a lot done over the last week or so.  Work has been hectic.  I did complete the interior.  Trumpeter did an excellent job here.  There are also a bunch of decals (placards, instruments, etc,) for the interior.  I rebuilt the rear wall sound-proofing/heat shield using A&B putty.


The door panels are fully detailed, even down to the opening for the lock striker on the side.


The seat and their bases are also nicely detailed.


I added back some rivet detail (black dots) lost when sanding the roof for the extended cab.  I used Archer rivet decals for them.


Gino P. Quintiliani - Field Artillery - The KING of BATTLE!!!

Check out my Gallery: https://app.photobucket.com/u/HeavyArty

"People sleep peaceably in their beds at night only because rough men stand ready to do violence on their behalf." -- George Orwell

  • Member since
    December 2002
  • From: Valrico, FL
Posted by HeavyArty on Monday, October 17, 2016 8:20 AM

Gamera
Looks fantastic Gino, if you weren't showing us what you're doing and the different colour of the added stuff I'd swear they were kit parts. 

Thanks Gamera.  I think that is one of the best compliments I have received.  Seamlessly integrating all the parts together is the hardest part.

Gino P. Quintiliani - Field Artillery - The KING of BATTLE!!!

Check out my Gallery: https://app.photobucket.com/u/HeavyArty

"People sleep peaceably in their beds at night only because rough men stand ready to do violence on their behalf." -- George Orwell

  • Member since
    November 2009
  • From: SW Virginia
Posted by Gamera on Monday, October 17, 2016 7:20 AM

Looks fantastic Gino, if you weren't showing us what you're doing and the different colour of the added stuff I'd swear they were kit parts. 

"I dream in fire but work in clay." -Arthur Machen


  • Member since
    December 2002
  • From: Valrico, FL
Posted by HeavyArty on Sunday, October 16, 2016 9:16 PM

Thanks Pawel.  It has been a fun build so far.  I have done a bit of work over the weekend.  I finished the cab extension and modified the front plate by closing off the grill opening, adding an opening for the blackout drive light and horn, and adding an access plate and new clevis attachment points.


I also couldn't admit defeat on the Material Handling Crane (MHC) and not make an M1074.  The M1074 w/MHC is the type used by Artillery Bns as an ammo supply vehicle and that was the type I originally wanted to build.  I took another crack at the crane and realized I had the front mudguards, fuel tank, and BII box too far forward.  Once I relocated these items back to the proper locations, I had enough room for the MHC.  Here is how it turned out.


I also set the turned wheels and added the tires.  Here it is overall at this stage.


That pretty much finishes all the M1074 PLS conversion parts.  Next up is the cab interior.  The work continues...

Gino P. Quintiliani - Field Artillery - The KING of BATTLE!!!

Check out my Gallery: https://app.photobucket.com/u/HeavyArty

"People sleep peaceably in their beds at night only because rough men stand ready to do violence on their behalf." -- George Orwell

  • Member since
    May 2009
  • From: Poland
Posted by Pawel on Sunday, October 16, 2016 1:44 PM

Hello Gino!

Somehow I missed your thursday update - and there is some great work shown there! Like I already said I like your work on the chassis very much. Some say it won't be seen much but for me it is important to be able to see those details, thay just define what the truck really is. Nice work on the cab, too - good luck with your projects and have a nice day

Paweł

All comments and critique welcomed. Thanks for your honest opinions!

www.vietnam.net.pl

  • Member since
    December 2002
  • From: Valrico, FL
Posted by HeavyArty on Sunday, October 16, 2016 8:43 AM

Another feature of the M1074/75 PLS is an extended cab for stowage of crew gear.  You can see it below in the stepped area at the rear of the cab.

The cab extension is underway.  I have added 10mm to the rear of the cab.  I think it is coming along nicely.

Gino P. Quintiliani - Field Artillery - The KING of BATTLE!!!

Check out my Gallery: https://app.photobucket.com/u/HeavyArty

"People sleep peaceably in their beds at night only because rough men stand ready to do violence on their behalf." -- George Orwell

  • Member since
    December 2002
  • From: Valrico, FL
Posted by HeavyArty on Thursday, October 13, 2016 8:53 PM

Work continues.  I have completed pretty much all the PLS conversion.  I need to start on the cab and finish it up.

I was planning on it being an M1074 with the Materiel Handling Crane (MHC) in front if the hook for the flatrack.  I have an Italeri crane, but I couldn't work out how to fit it there.  The crane mount is different, and apparently so is the crane and outriggers.  I have decided to now make it an M1075 (w/o MHC).  In place of the crane, like on the M1120, is a work platform.

Here it is.  I completed the air cleaner and hydraulic fluid tank as well as the exhaust and spare tire rack and hoist.


I also have completed the lift mechanism for the flatrack.  The rear hinge on the lift plate was a pain.  Italeri molds it as an open clip that is supposed to snap onto the hing point at the base.  The open hinge kept popping off.  I ended up cutting the open hinge off and replacing the ends with resin scraps and drilled a hole through each.  I then pinned the hinge point to make is secure and still working.  I don't know why Italeri engineered it that way, but it sucks.


Here is the fuel tank too.  It was made by using a couple end caps out of 0.040 sheet styrene and then wrapping 0.200 styrene sheet around them to form the outside.  The step on it is left over diamond plate PE.


I also added the rear steering gear and drive shaft for it. 


More work to come.

Gino P. Quintiliani - Field Artillery - The KING of BATTLE!!!

Check out my Gallery: https://app.photobucket.com/u/HeavyArty

"People sleep peaceably in their beds at night only because rough men stand ready to do violence on their behalf." -- George Orwell

  • Member since
    December 2002
  • From: Valrico, FL
Posted by HeavyArty on Monday, October 10, 2016 2:41 PM

Thanks Gamera.  I've made less progress the last couple days as life is getting in the way.  Hope to get some more done on it tonight.


Gino P. Quintiliani - Field Artillery - The KING of BATTLE!!!

Check out my Gallery: https://app.photobucket.com/u/HeavyArty

"People sleep peaceably in their beds at night only because rough men stand ready to do violence on their behalf." -- George Orwell

  • Member since
    November 2009
  • From: SW Virginia
Posted by Gamera on Monday, October 10, 2016 10:49 AM

Wow, you're making a serious dent in getting her done there Gino, nice work. Yes

"I dream in fire but work in clay." -Arthur Machen


  • Member since
    December 2002
  • From: Valrico, FL
Posted by HeavyArty on Saturday, October 8, 2016 8:16 PM

Thanks Pawel for following along.  I am really enjoying this build.  

I got some more done today.  I worked on the engine compartment.  I decided to build it closed and just use the Italeri engine blank and added an oil pan to fill the space if it is seen from the underside.  The rest of the engine is covered by panels.   I also started on the accessories mounted on the fenders. Here it is so far (the cab shell is just in place to get some sense of scale).


More to come later.

Gino P. Quintiliani - Field Artillery - The KING of BATTLE!!!

Check out my Gallery: https://app.photobucket.com/u/HeavyArty

"People sleep peaceably in their beds at night only because rough men stand ready to do violence on their behalf." -- George Orwell

  • Member since
    May 2009
  • From: Poland
Posted by Pawel on Saturday, October 8, 2016 5:45 PM

Hello Gino!

A very nice chassis! I'm glad you were able to save that middle axle!

Good luck with your build and have a nice day

Paweł

All comments and critique welcomed. Thanks for your honest opinions!

www.vietnam.net.pl

  • Member since
    December 2002
  • From: Valrico, FL
Posted by HeavyArty on Saturday, October 8, 2016 8:39 AM

One issue I found last night after I posted.  It is amazing how you always find flaws when you step away from the bench and see your own pics, for me anyways.  I felt like something was off, but couldn't put my finger on it, then I saw it.  The suspension parts (swing arms and air bags) for the third axle were on backwards!!  DOH!!!  I guess I was looking at my references wrong or something.  The pivot point should be at the front (left in previous pics) and the air bag should be to the rear.  I was able to cut it all away and swap everything around.  Here is the correct configuration.


Hopefully I will keep everything straight for the rest of the build.

Gino P. Quintiliani - Field Artillery - The KING of BATTLE!!!

Check out my Gallery: https://app.photobucket.com/u/HeavyArty

"People sleep peaceably in their beds at night only because rough men stand ready to do violence on their behalf." -- George Orwell

  • Member since
    December 2002
  • From: Valrico, FL
Posted by HeavyArty on Friday, October 7, 2016 6:42 PM

Thanks for the support guys.  I have been working on this most of the day today, gotta love 4-day weekends in the military.

I completed the frame.  


Here is the front axles.  I cut the gear reduction parts off the front differential and replaced it with a non-geared diff cover.  I also added the Real Model front air brakes.  They look very good.  Trumpeter provides the rear air brakes, but missed the front ones.  The front wheels are steerable as well.  Trumpeter did this area really well.  I am waiting to position the wheels until later when I will attach the steering arms as well.


On the rear, I scratched the mounts for the middle axle and used the swing arms from Accurate Armour.  I placed the rear axle from the kit in this position.  For the rear axle, I used the Accurate Armor axle which is steerable and does not have the gear reduction.  The rear axle also has steerable wheels which will be adjusted and set later as well.  As luck would have it, the drive shaft needed to go between the third and fourth axle is the same length as the kit driveshaft that goes from the transmission to the transfer case.  I was able to use the kit part as there is a new transmission to transfer case driveshaft in the Real Model Engine set.  


The build continues....

Gino P. Quintiliani - Field Artillery - The KING of BATTLE!!!

Check out my Gallery: https://app.photobucket.com/u/HeavyArty

"People sleep peaceably in their beds at night only because rough men stand ready to do violence on their behalf." -- George Orwell

  • Member since
    May 2009
  • From: Poland
Posted by Pawel on Friday, October 7, 2016 3:03 PM

Hello Gino!

That's just my kind of project!

It's really a good thing Trumpeter got a new HEMTT out - the old Italeri kit was a major f--up when it comes to the chassis and its accuracy.

Good luck with your build and have a nice day

Paweł

All comments and critique welcomed. Thanks for your honest opinions!

www.vietnam.net.pl

  • Member since
    November 2009
  • From: SW Virginia
Posted by Gamera on Friday, October 7, 2016 8:43 AM

Wow, a monster project for sure Gino but she's going to be a show-stopper if only for size alone when finished. 

"I dream in fire but work in clay." -Arthur Machen


  • Member since
    December 2002
  • From: Valrico, FL
M1074 PLS Conversion Complete
Posted by HeavyArty on Thursday, October 6, 2016 9:20 PM

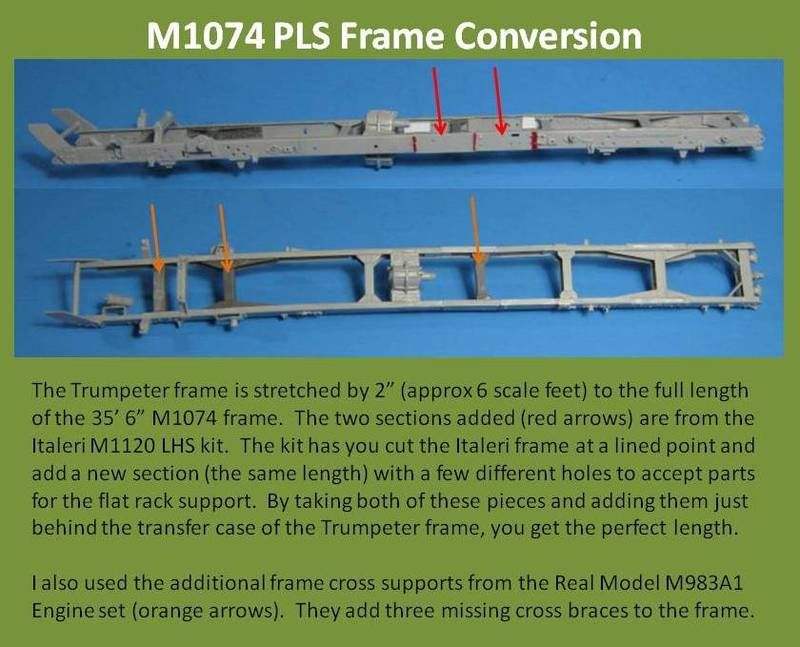
Following Michael "165thspc" Koenig's excellent M1120 LHS build at Armorama has inspired me to start a project I have been thinking about for a while.  I have begun to convert the Trumpeter M983A1 tractor and parts from the M1120 LHS into an M1074 PLS. 

I have been collecting the parts since the M1120 LHS came out late last year.  I have collected both kits, the Real Model M983 engine set, tires and wheels from the Hobby Boss M1070 HETS, and additional axle and suspension parts from Accurate Armour's M1070 HETS kit that I ordered from Accurate Armour. 

Here is what I am building, an M1074 PLS (Paletized Load System)
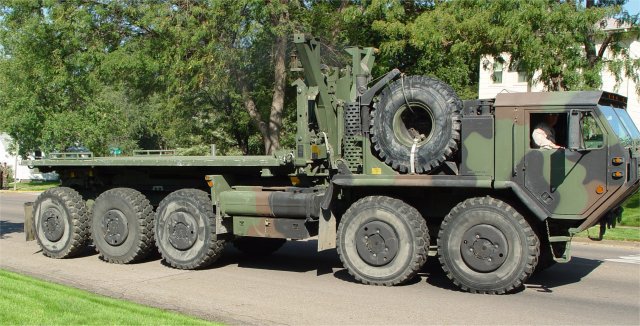

So far, I have started by lengthening the frame to the 35' 6" full length of the PLS.  I used two frame sections from the LHS kit to do it. 
  

A note on the Trumpeter kit, it is awesome.  So far, it has both front steering gear boxes and all linkages.  Also, the transfer case is angled as it should be.  Its looking good so far.

Here are the AA parts too.
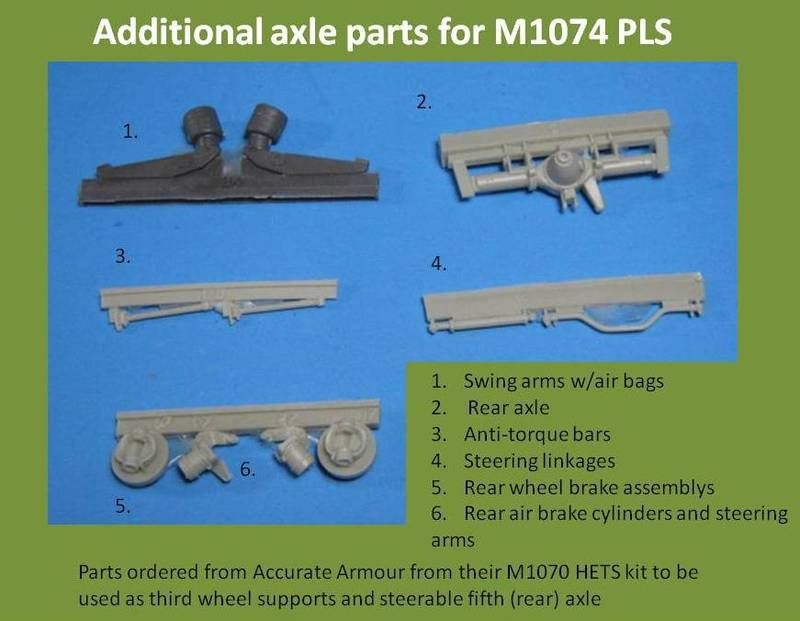


More to come later.

Gino P. Quintiliani - Field Artillery - The KING of BATTLE!!!

Check out my Gallery: https://app.photobucket.com/u/HeavyArty

"People sleep peaceably in their beds at night only because rough men stand ready to do violence on their behalf." -- George Orwell

JOIN OUR COMMUNITY!

Our community is FREE to join. To participate you must either login or register for an account.

SEARCH FORUMS
FREE NEWSLETTER
By signing up you may also receive reader surveys and occasional special offers. We do not sell, rent or trade our email lists. View our Privacy Policy.