SEARCH FINESCALE.COM

Enter keywords or a search phrase below:

Amusing Hobby 1/35th Löwe Complete page 3

6388 views
91 replies
1 rating 2 rating 3 rating 4 rating 5 rating
  • Member since
    November 2009
  • From: SW Virginia
Posted by Gamera on Friday, August 10, 2018 7:36 AM

Oh that looks sharp Bish!!! 


Does look funny in the olive instead of mustard yellow. I know that's what they were painted. Just that I'm used to the yellow or grey for German. 

"I dream in fire but work in clay." -Arthur Machen


  • Member since
    December 2002
  • From: Bury St Edmunds, Suffolk, England
Posted by Bish on Friday, August 10, 2018 7:46 AM

Cheers G. I know what you mean, i remember when i did the big E-100 jagd, that did look odd. I don't plan on doing all my Paper panzers like this, but does make a nice change and there would be a single spot of DY in sight on this one.

I am a Norfolk man and i glory in being so


On the bench: Airfix 1/72nd Harrier GR.3/Fujimi 1/72nd Ju 87D-3

  • Member since
    June 2018
Posted by TankerEasy on Monday, August 13, 2018 8:17 AM

Looking good Bish!

Millennial modeler

Air Force vet (2006-2012)

Recently completed: 1/48 Tamiya V1

On the bench: Hasegawa 1/8 Clerget 9B rotary engine, 1/35 scale Trumpeter SA-2 Guideline missle


  • Member since
    December 2002
  • From: Bury St Edmunds, Suffolk, England
Posted by Bish on Monday, August 13, 2018 8:55 AM

Thanks tanker.

I am a Norfolk man and i glory in being so


On the bench: Airfix 1/72nd Harrier GR.3/Fujimi 1/72nd Ju 87D-3

  • Member since
    July 2003
  • From: On my kitchen counter top somewhere in central North Carolina.
Posted by disastermaster on Monday, August 13, 2018 5:47 PM

  Hey Bish,

Looking real good here mate, can't wait for the icing.

 I've had this kit in the stack for about + two years now while giving some thought as to the layout of the turret.

 With such a longgg gun in such a huge caliber and no room for a counter balance and even less for recoil, the commanders hatch position (as this kit is presented) strongly suggests he would be scrambled eggs after the first volley.

 Just thought I would mention this as I'm considering relocating the commanders hatch and was interested in your input before putting the blade to the plastic.

                                        https://i.imgur.com/OTz8Cg2.gif

 https://i.imgur.com/LjRRaV1.png


  • Member since
    December 2002
  • From: Bury St Edmunds, Suffolk, England
Posted by Bish on Tuesday, August 14, 2018 2:20 AM

Thanks Steve. And yes, i agree with you about the comanders hatch. In fact, given the size of the gun, its not a very big turret. I think the loader would have a hard time moving in there with those big shells. I think had it gone to production there would have had to be a redesign, as the turret stands, there is not much room to move the cupola. Maybe somthing like a Tiger II with the cupola hanging out the side of the turret.

The model does match up with the drawings i have seen of the tank hence why i decided to leave it as is. But a relocation of the hatch would certainly be interesting to see, though i think it might involve more than filling one hole and cutting another.


I am a Norfolk man and i glory in being so


On the bench: Airfix 1/72nd Harrier GR.3/Fujimi 1/72nd Ju 87D-3

  • Member since
    November 2004
Posted by snapdragonxxx on Tuesday, August 14, 2018 6:26 PM

The 105 that was to be installed in this and would have been installed in the updated Tiger II which never happened had a re-designed breech  that was shorter. The ammunition would have been  the standard charge, but the case would have been shorter and fatter with the breech design to accomodate this.

Of course, the shell racks would be re-designed and some 60 rounds would be accomodated in hull spaces and the layout would be more or less the same as the Tiger II.

The recoil system would have been also redesigned to absorb the main gun recoil. outwardly it would look the same but would operate on a higher pressure.

In other words, the breech of this weapon would have been half as long as the normal 105, and the ammunition the same, half as long, but fatter to accomodate the standard cordite charge.

when you look at the Lowe's turret you can see where the mount fixing was right towards the front and the breech would finish just at the rear of the roof air vent. The recoil would take that back half way between the vent and the base of the commanders cupola wit hthe commanders seat actually being at the back of the cupola.

There is room... but not much for everything to fit.

This is only a paper panzer though. I would have thought that if it had have been built there would have been some turret design changes with the commanders cupola being moved back a bit or even right at the rear of the turret with the back of the turret having a slight reshape to acommodate this.


James

  • Member since
    December 2002
  • From: Bury St Edmunds, Suffolk, England
Posted by Bish on Wednesday, August 15, 2018 2:24 AM

Thats interesting james, thank you. Would have been interesting to see if that worked. By going what you said, looking at the distance from the trunnions to the roof vent, that breach would be very small. I can imagine this system, if it worked, would have had a negative effect, its not a system i have heard in use today. If you look at a tank like the Chally 2, the recoil takes the gun a long way back into the turret, so much so that when firing APDS they have to remove the BV to stop it being flattened by the breach.

But at interesting idea.

I am a Norfolk man and i glory in being so


On the bench: Airfix 1/72nd Harrier GR.3/Fujimi 1/72nd Ju 87D-3

  • Member since
    November 2004
Posted by snapdragonxxx on Wednesday, August 15, 2018 6:22 AM

If you had used the correct mantlet provided in the kit and looked at a redesigned mount where the trunions are part of the elevation system as well as a support then the whole gun with a redesigned breech and recoil system works!

Now I'd like you to use a 128mm on the version with the rear mounted turret and the mantlet for it provided in that kit (you have a choice with that kit) instead of the one provided with the metal barrel from Mr Modelbau. They do fit!

If you get the 128mm waffentrager or cruciform mount kit from Trumpeter and look how that gun is designed then, although it's a squeeze, it will fit!

 In all probability, the turret would probably be redesigned, but they did manage to get am 88mm into a small turret for the Panther with room for the recoil!

James

  • Member since
    December 2002
  • From: Bury St Edmunds, Suffolk, England
Posted by Bish on Friday, August 17, 2018 2:00 PM

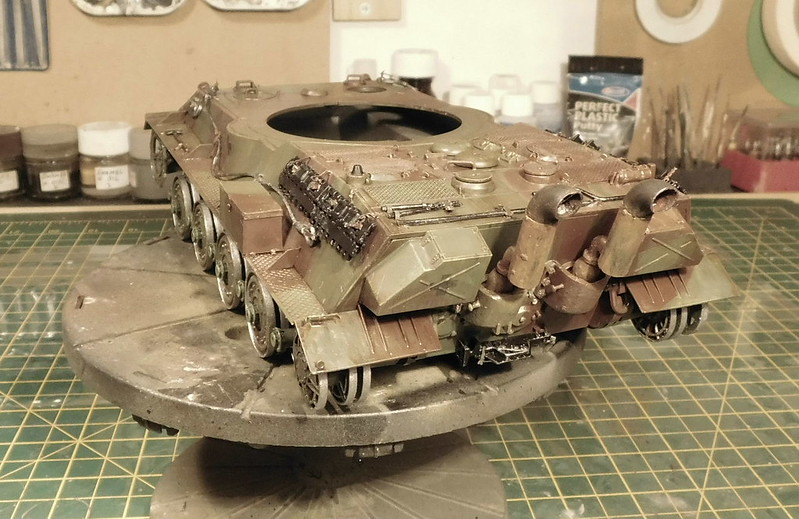
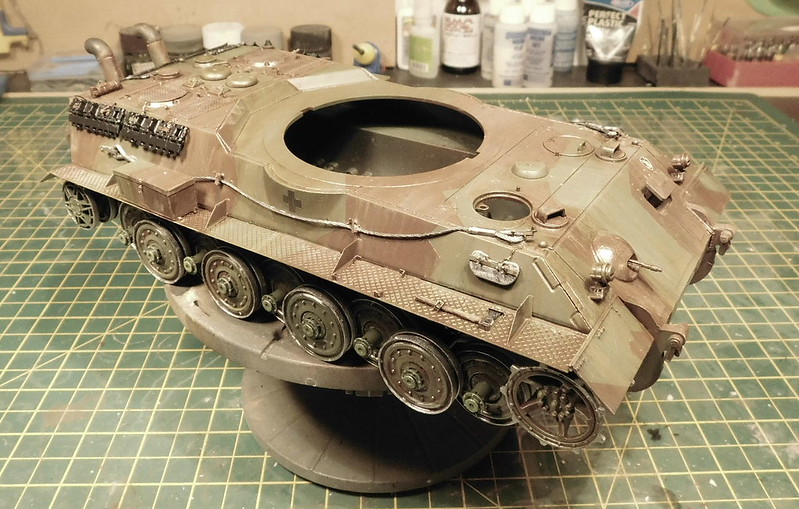
Update time again. Its progressing nicely so much that its almost ready for the final weathering and white wash. First up was to add the brown portion of the camo. I masked with tape to give a hard edged splinter type pattern.

Then the decals were added, al from the spares box. I had intendd to print my own for the 507th insignia but i found one when i was checking my spares.

And then time to start weathering. I first did some dry brushing with oils. This was followed by an overall brown wash followed by green and red brown filters all with oils. Final stage was to use some AK Dark streak effects. I was sligt experiamenting here as i did a few things different to what i usually do, but i was really pleased with the streaky finish.

I will leave that to dry for a couple of days and in the meantime i can get the tools, exhausts and tracks finished and fitted before the final earth effects, pigments and white wash. Though looking at the photo's, i will remove some of the excess at the back of the turret.

Speaking of tracks, despite the number of parts, this went together really well. They have had a primer coat on the outside, just need to do the inside before painting.

I have also made a start on the figures which are now ready for priming. 9 in all, 7 Infantry from Dragon and 2 tank crew from Miniart.

That all for now, thanks for looking and of course, all comments are welcome.


I am a Norfolk man and i glory in being so


On the bench: Airfix 1/72nd Harrier GR.3/Fujimi 1/72nd Ju 87D-3

  • Member since
    November 2009
  • From: SW Virginia
Posted by Gamera on Friday, August 17, 2018 2:05 PM

Ohhhh, love that streaking Bish. 

And cool looking collection of figures too! 

"I dream in fire but work in clay." -Arthur Machen


  • Member since
    July 2003
  • From: On my kitchen counter top somewhere in central North Carolina.
Posted by disastermaster on Friday, August 17, 2018 4:15 PM

Hey Bish,

Looking kool!

So you did the oil drybrushing after the gloss finish?

                                        https://i.imgur.com/OTz8Cg2.gif

 https://i.imgur.com/LjRRaV1.png


  • Member since
    December 2002
  • From: Bury St Edmunds, Suffolk, England
Posted by Bish on Friday, August 17, 2018 4:26 PM

Cheers guys.

DM, yes. I normaly apply it to a gloss finish when i am useing enamels, this time i applied the gloss for the decals and then did the wethering onto that. But at least this time i didn't have to worry about damaging the enamel paint.

I am a Norfolk man and i glory in being so


On the bench: Airfix 1/72nd Harrier GR.3/Fujimi 1/72nd Ju 87D-3

  • Member since
    November 2004
Posted by snapdragonxxx on Friday, August 17, 2018 7:43 PM

Looking good, Bish!

Have you used RAL 6003 and RAL 8017?

If so they don't look as dark as they should... or is it the photograph?

Amusing hobby do some really nice kits! Have you seen the E100 Waffentrager that's due out soon?


James

  • Member since
    December 2002
  • From: Bury St Edmunds, Suffolk, England
Posted by Bish on Saturday, August 18, 2018 5:47 AM

Cheers James. Yes, these are the MRP versions of it, and they do look darker in the flesh and do look a god match to my usual Xtracolour.

Ye, seen that, looks interesting, i think i will deffinetly be grabbing one of those.

I am a Norfolk man and i glory in being so


On the bench: Airfix 1/72nd Harrier GR.3/Fujimi 1/72nd Ju 87D-3

  • Member since
    November 2004
Posted by snapdragonxxx on Saturday, August 18, 2018 6:56 AM

Me too.

The Waffentrager was a tier 10 TD on world of tanks with an autoloader it could send either 5 or 4 shells (dependent on gun type) down range very quickly but had a long reload time of about 56 seconds.

Contrary to what it says on WoT about this, there was an E-100 design to mount a 128mm or 150mm AA gun on the E-100 chassis with an autoloader which was taken by the WoT designers and tinkerd with.

I loved my "Waffle" as, despite the long reload I could do some serious damage as a TD with a long hit range and stay back out of trouble and support the heavy and medium line tanks. The drawback was the very thin gun shield which could be penetraded by anything, which got you killed quickly and the long reload.

Sadly, many players complained about it, mostly from the receiving end due to the high rate of fire for the clip and the alpha damage and it was removed from game after tweaks failed to satisfy those who could not work out that the shield and the long reload time were it's weakpoints!

It's on my list and I'll be looking for it during September.

  • Member since
    May 2013
  • From: From the Mit, but live in Mason, O high ho
Posted by hogfanfs on Saturday, August 18, 2018 1:52 PM

Bish,


The splinter camo and the streaking look outstanding! And with that many figures, I'm really intrigued on how you are going to depict this diorama.

 Bruce


 On the bench:  1/48 Eduard MiG-21MF

                        1/35 Takom Merkava Mk.I


  • Member since
    December 2002
  • From: Bury St Edmunds, Suffolk, England
Posted by Bish on Monday, August 20, 2018 9:21 AM

Cheers Bruce. The dio is nothing to exciting, troops marching down either side of the track with the tank moving between them. This is really a chance to practice winter camo and terrain, somthing i have not done yet. Now the figuresd are together and i have the base underway, i will test out the postions as i may need to drop one of two of the ground troops, depends on how the spaceing looks.

I am a Norfolk man and i glory in being so


On the bench: Airfix 1/72nd Harrier GR.3/Fujimi 1/72nd Ju 87D-3

  • Member since
    August 2012
  • From: Parker City, IN.
Posted by Rambo on Monday, August 20, 2018 9:49 AM
Looking great Bish, that's alot of figures to paint

Clint

  • Member since
    December 2002
  • From: Bury St Edmunds, Suffolk, England
Posted by Bish on Monday, August 20, 2018 10:39 AM

Thanks Clint. ye, it is a few, fortunatly, most of them will be white. I think 9 is the most i have done for a dio, i think i had that many for my Pz II. So this will match that.

I am a Norfolk man and i glory in being so


On the bench: Airfix 1/72nd Harrier GR.3/Fujimi 1/72nd Ju 87D-3

  • Member since
    June 2018
Posted by TankerEasy on Tuesday, August 21, 2018 6:34 AM

paint looks steller, stoked to watch this get completed Cool

Millennial modeler

Air Force vet (2006-2012)

Recently completed: 1/48 Tamiya V1

On the bench: Hasegawa 1/8 Clerget 9B rotary engine, 1/35 scale Trumpeter SA-2 Guideline missle


  • Member since
    December 2002
  • From: Bury St Edmunds, Suffolk, England
Posted by Bish on Tuesday, August 21, 2018 9:01 AM

Cheers Tanker, still a bit more to do. I'll be mainly working on the figures this week.

I am a Norfolk man and i glory in being so


On the bench: Airfix 1/72nd Harrier GR.3/Fujimi 1/72nd Ju 87D-3

  • Member since
    March 2003
  • From: Rain USA, Vancouver WA
Posted by tigerman on Thursday, August 23, 2018 10:52 PM

Very cool Bish. Loving the build so far and I can't wait to see the figgies all painted up.

   http://i7.photobucket.com/albums/y269/wing_nut_5o/PANZERJAGERGB.jpg

 Eric 

  • Member since
    December 2002
  • From: Bury St Edmunds, Suffolk, England
Posted by Bish on Friday, August 24, 2018 7:43 AM

Thanks Eric.

I am a Norfolk man and i glory in being so


On the bench: Airfix 1/72nd Harrier GR.3/Fujimi 1/72nd Ju 87D-3

  • Member since
    December 2002
  • From: Bury St Edmunds, Suffolk, England
Posted by Bish on Friday, August 31, 2018 2:48 PM

can't believe its ben 2 weeks since i last updated, i seem to have got carried away. But i can see light at the end.

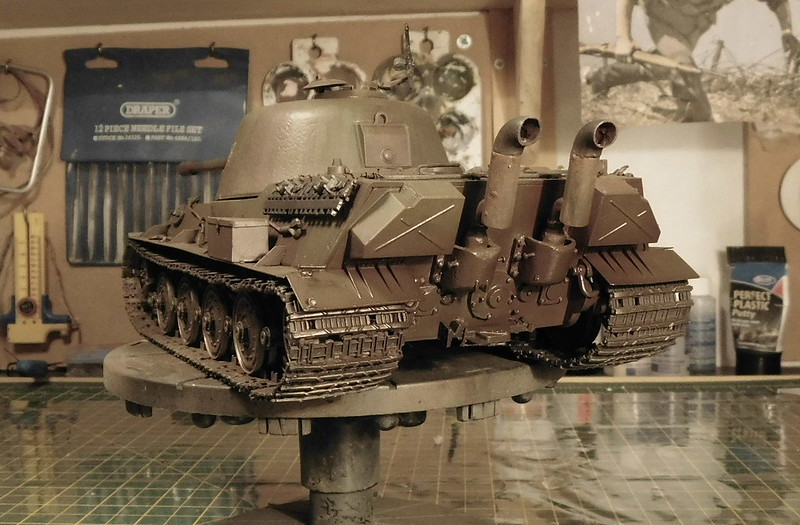
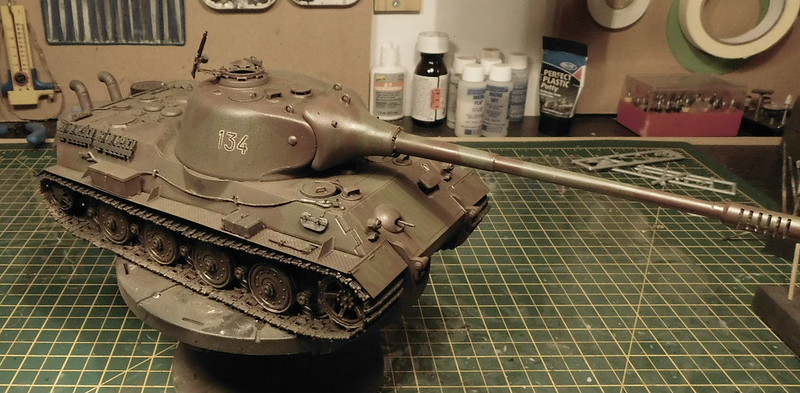
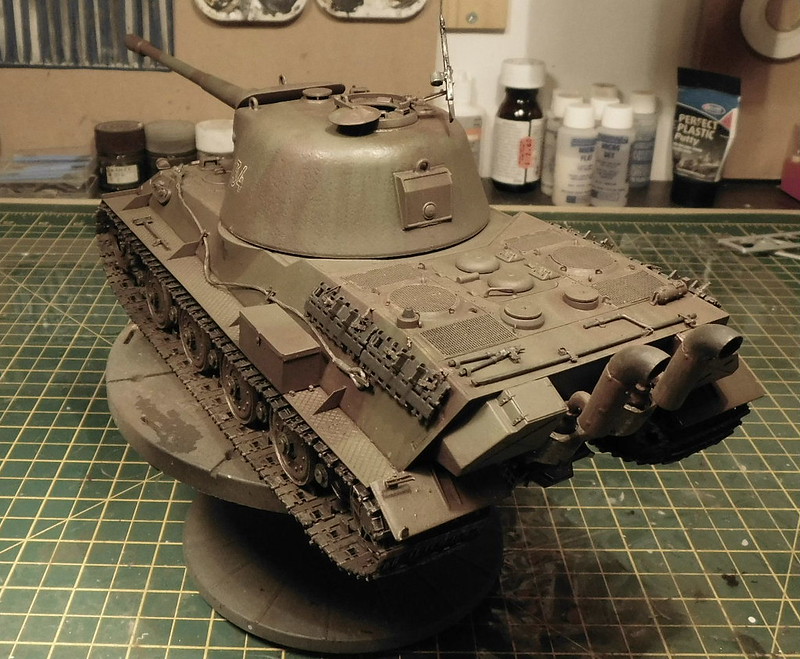
So, once the washes were dry, the tools were added, along with tyhe exhausts.
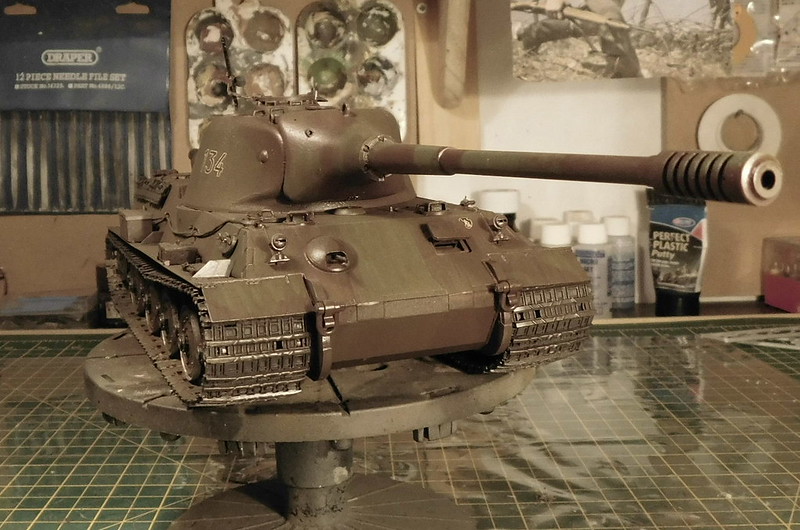
And the tracks were finished off. After the rest of the primer, i gave it a coat of NATO black followed bt dry brushing the steel and a raw umber oil wash.

Then the tracks were fited and the turret added. This last bit was a bit tricky as once slotted in place it would not turn. I could get one of the tabs pushed down far enough. But after some peseverance and removing one of the tabs, i got it in place.

With every thing in place, tonight i some AK dust and earth washes. I will let this dry for a day before adding the white wash.
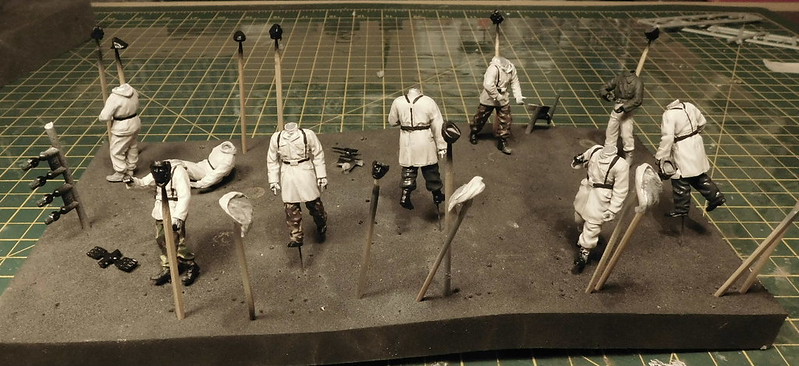
I have spent most of the last couple of weeks on the figures. For my first attempt at winter white uniforms i used an article in the Osprey manual on modelling WW2 figures which focused on German ski troops. While there is room for improvment as always, i am pretty pleased with my first go. The camo trousers are not based on any real German camo patern thoguh a couple of the co,lours are the same as i use for SS uniforms.
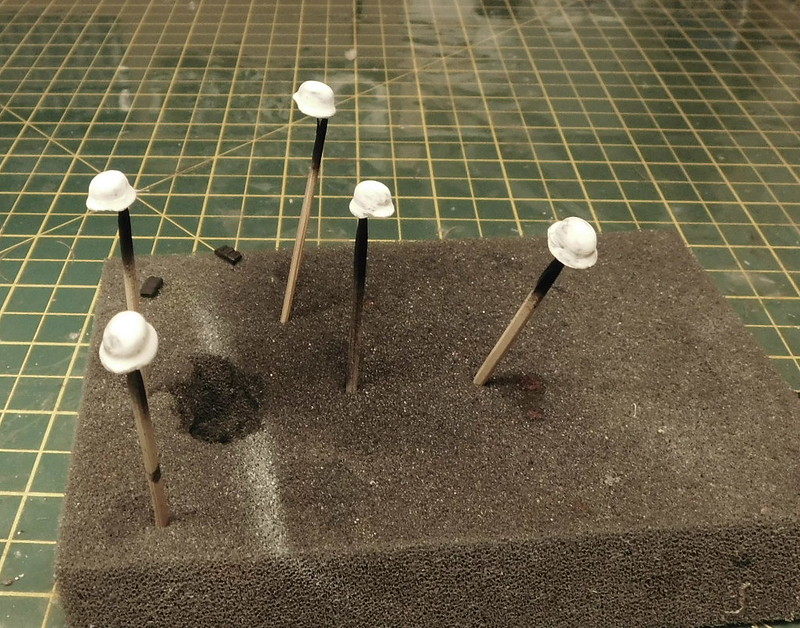
And i also wanted to try out the white wash on some of the helmits. I am useing a fairly new product from Precision Ice and Snow, a winter camo paint. This is very thin and can be built up in layers. It says it dries very fast, but after 2 hours my second coat removed much of the first so i left it over night. It did pool around the botom rim of the helmits but i like the look.
I plan on just adding 2 caots to the vehicle. I don't want a solid finish, just a partial fresh looking coat. We will see how it goes over the next couple of days.

I am a Norfolk man and i glory in being so
 

On the bench: Airfix 1/72nd Harrier GR.3/Fujimi 1/72nd Ju 87D-3

  • Member since
    August 2012
  • From: Parker City, IN.
Posted by Rambo on Friday, August 31, 2018 4:56 PM
White camo is a tuff one I have only attempted it once, looks like yours has turned out very well. I have some of that winter camo paint that came with my ice and snow set been on the fence about giving it a try so I'll be looking forward to hearing your opinion on it.

Clint

  • Member since
    December 2002
  • From: Bury St Edmunds, Suffolk, England
Posted by Bish on Friday, August 31, 2018 5:03 PM

Cheers Clint, ye i got it with the last bundle i got, it was the main reason i got it. It does seem a bit grainy. My main concern is how much it will run as it is so thin, but i think its meant to be easy to remove. I'll be sure to take pics after each coat so you can see how it builds up.

I am a Norfolk man and i glory in being so

 

On the bench: Airfix 1/72nd Harrier GR.3/Fujimi 1/72nd Ju 87D-3

  • Member since
    November 2009
  • From: SW Virginia
Posted by Gamera on Saturday, September 1, 2018 8:41 PM

The Lion is looking really sharp Bish and I love those figures! Yes

"I dream in fire but work in clay." -Arthur Machen


  • Member since
    December 2002
  • From: Bury St Edmunds, Suffolk, England
Posted by Bish on Sunday, September 2, 2018 1:22 AM

Cheers G. The white wash is now going on and i am rather liking it.

I am a Norfolk man and i glory in being so


On the bench: Airfix 1/72nd Harrier GR.3/Fujimi 1/72nd Ju 87D-3

  • Member since
    June 2018
Posted by TankerEasy on Tuesday, September 4, 2018 5:09 AM

wowzers the Lowe turned out really good Bish!

Millennial modeler

Air Force vet (2006-2012)

Recently completed: 1/48 Tamiya V1

On the bench: Hasegawa 1/8 Clerget 9B rotary engine, 1/35 scale Trumpeter SA-2 Guideline missle


JOIN OUR COMMUNITY!

Our community is FREE to join. To participate you must either login or register for an account.

SEARCH FORUMS
FREE NEWSLETTER
By signing up you may also receive reader surveys and occasional special offers. We do not sell, rent or trade our email lists. View our Privacy Policy.