SEARCH FINESCALE.COM

Enter keywords or a search phrase below:

Academy M-18, or "Peering down the rabbit hole".

3763 views
49 replies
1 rating 2 rating 3 rating 4 rating 5 rating
  • Member since
    September 2006
  • From: Dripping Springs, TX, USA
Posted by RBaer on Monday, June 24, 2019 8:39 PM

Thanks all.

I've always thought an M-18 would be a good addition to my collection, glad I'm finally going to finish this one.

Apprentice rivet counter.

  • Member since
    November 2009
  • From: SW Virginia
Posted by Gamera on Monday, June 24, 2019 8:57 AM

Looks good to me! Nice work! 

"I dream in fire but work in clay." -Arthur Machen


  • Member since
    April 2016
  • From: N. Burbs of ChiKawgo
Posted by GlennH on Sunday, June 23, 2019 7:02 PM
Looking real nice. I'm gonna follow you on Flickr so I can see the images large. There's so many pics I'd like to see on the site in larger format but their host site only seems to display the same small image.

A number Army Viet Nam scans from hundreds yet to be done:

https://www.flickr.com/photos/southwestdreams/albums/72157621855914355

Have had the great fortune to be on every side of the howitzers.

  • Member since
    February 2011
Posted by GreySnake on Sunday, June 23, 2019 6:33 PM

M18 is looking good. It's been one kit that been on my to buy list that I never seem to pick up. 

  • Member since
    September 2006
  • From: Dripping Springs, TX, USA
Posted by RBaer on Sunday, June 23, 2019 3:17 PM

Basic turret is done, OOB and ready for stowage I'm debating what to do with the spare track rack on the back, use the kit part of scratch up something using leftover Friuls.

 IMG_2374 by Russel Baer, on Flickr

 IMG_2373 by Russel Baer, on Flickr

I'll be covering all those molded-on hooks with stowage, no way I'm re-doing all of them with wire. Life's too short.

Apprentice rivet counter.

  • Member since
    September 2006
  • From: Dripping Springs, TX, USA
Posted by RBaer on Friday, June 21, 2019 4:08 PM

Hull is done, just a matter of getting the rest of the tools on and weathering the hull floor/fighting compartment. I did it dark, mostly since it's OOB and not well detailed. Then I tackled the turret. Some fit issues, mainly the breech not being in line with the gun tube if I used the mantlet cover, and I wanted to use the cover, so I did some slicing and mover the breech over. I also used a spare Sherman 76mm barrel, since the Academy part is larger in diameter the the 90mm gun tube on a Tamiya Pershing...   I'm going to use it on a what-if Sherman I'm thinking about instead.

So, pics so far:

 IMG_2372 by Russel Baer, on Flickr

 IMG_2371 by Russel Baer, on Flickr

I also noticed the kit's radio access cover was different than the pics I ahve, so I sliced it off and did one from sheet stock.

I'm traveing for work most of the next week, so I'll have plenty of time to think about this one....

Apprentice rivet counter.

  • Member since
    September 2006
  • From: Dripping Springs, TX, USA
Posted by RBaer on Tuesday, June 18, 2019 2:34 PM

The "Super Hellcat" sounds fun.....

Thanks all for posting up pics, it's a motivator.

Apprentice rivet counter.

  • Member since
    November 2009
  • From: SW Virginia
Posted by Gamera on Monday, June 17, 2019 11:53 AM

Looks good! And nice work there SP and Bob. 

My kit is the AFV Club version. Which I've heard is slightly better than the Academy one. Both are said to have issues but they both look like Hellcats to me. 


I'd like a kit of the 'Super Hellcat' like mine in World of Tanks- aka with the turret of a M36 complete with 90mm gun plonked down on the turret ring of the M18 chassis. The US Army did try it. And it did work. Though the crew was told to put the TD in neutral and let the whole thing absorb the recoil of the 90mm gun. I've read that it rolled backward a yard/metre whenever it was fired. And the crew was told not to fire with the turret deflected too far to the left or right in fear it would flip the whole thing over. 

There is a kit of the 'Super Hellcat' but seems to be kinda rare and of course one could just use the hull from the M18 with the turret of the M36 if one wants to buy two kits. 

"I dream in fire but work in clay." -Arthur Machen


  • Member since
    February 2014
  • From: Michigan
Posted by silentbob33 on Monday, June 17, 2019 9:46 AM

stikpusher

Looks good SB. And yes, the biggest weak point of Academy armor kits is the decals. I see that we both chose the same markings option... LOL!


Well, you can't go wrong with a nice pin-up Wink.  Plus I was able to find some pictures of that Hellcat fighting in Brest.  And thanks M1 Cool

I also liked the kit, I thought the detailing was pretty good and I can't remember any major fit issues.  I'm an armor novice so I really, really can't speak to the accuracy of it, but as you said Stik, it looks like a Hellcat.  I'd build another given the chance.

On my bench: Academy 1/35 UH-60L Black Hawk

  • Member since
    July 2004
  • From: Sonora Desert
Posted by stikpusher on Sunday, June 16, 2019 12:00 PM

M1GarandFan

I didn' t realize the Academy kit came with the dust cover. I guess it COULD be done better with the tissue paper/white glue route, but that's way beyond my skill level. If it isn't styrene or some PE, it won't get done on my kits. I'm  struggling with the tulle (sommerfield matting) for my Jumbo right now.

BTW, both kits that have pics posted right now look great to me.


If you can work with PE, you can work with tissue and white glue. It is easy enough to use. Probably one of the first things that I did to dress up a kit. If you don’t like how it turned out, it’s easily removed with water before painting. Tulle Sommerfield matting would be more of a challenge due to the  materials and glues needed. 

I’m not well versed on the M18, so I can’t speak to accuracy issues on the Academy kit. But I don’t remember any fit problems, and it looks like a M18 when compalerted. At least to my uneducated eye. The kit offers the option of main gun barrels with or without muzzle brake, mantlet with dust cover or bare, link and length or single piece vinyl tracks, and a decent interior for the driver’s and fighting compartments. All in all a decent kit in my experience. Certainly no dog.


F is for FIRE, That burns down the whole town!

U is for URANIUM... BOMBS!

N is for NO SURVIVORS...

       - Plankton

LSM


  • Member since
    July 2014
  • From: Rifle, CO. USA
Posted by M1GarandFan on Sunday, June 16, 2019 11:19 AM

I didn' t realize the Academy kit came with the dust cover. I guess it COULD be done better with the tissue paper/white glue route, but that's way beyond my skill level. If it isn't styrene or some PE, it won't get done on my kits. I'm  struggling with the tulle (sommerfield matting) for my Jumbo right now.

BTW, both kits that have pics posted right now look great to me.

  • Member since
    July 2004
  • From: Sonora Desert
Posted by stikpusher on Sunday, June 16, 2019 10:28 AM

Looks good SB. And yes, the biggest weak point of Academy armor kits is the decals. I see that we both chose the same markings option... LOL!


F is for FIRE, That burns down the whole town!

U is for URANIUM... BOMBS!

N is for NO SURVIVORS...

       - Plankton

LSM


  • Member since
    February 2014
  • From: Michigan
Posted by silentbob33 on Sunday, June 16, 2019 9:55 AM

I didn't have too many issues with mine either, except for the decals silvering.

 20150510_165411 by James Hicks, on Flickr

 20150510_165423 by James Hicks, on Flickr


On my bench: Academy 1/35 UH-60L Black Hawk

  • Member since
    July 2004
  • From: Sonora Desert
Posted by stikpusher on Sunday, June 16, 2019 9:43 AM

M1GarandFan

Yes, I recognize the TC. He seems to get around! Must be his twin brother in the turret of my M5.

Great job on the mantle on the M18! The only reason I've never built one is because I can't recreate the mantle cover they all used. Without it, it just doesn't look right.


LOL! Yeah, those Tamiya tankers... they are pretty versatile. The mantlet dust cover is a kit part. I think it would not be too much challenge to do one with tissue and white glue. Probably look far better with texture and more folds. And yes, a M18 does not look right without the canvas cover installed.


Here are my original photos of the build when completed... no Tamiya TC back then.


F is for FIRE, That burns down the whole town!

U is for URANIUM... BOMBS!

N is for NO SURVIVORS...

       - Plankton

LSM


  • Member since
    July 2014
  • From: Rifle, CO. USA
Posted by M1GarandFan on Sunday, June 16, 2019 9:09 AM

Yes, I recognize the TC. He seems to get around! Must be his twin brother in the turret of my M5.

Great job on the mantle on the M18! The only reason I've never built one is because I can't recreate the mantle cover they all used. Without it, it just doesn't look right.

  • Member since
    July 2004
  • From: Sonora Desert
Posted by stikpusher on Sunday, June 16, 2019 8:09 AM

RBaer

Pics? Link? I'd be interested in seeing it. I'm actually jazzed about this one, enough that I'll probably pull the Academy M-10 off the shelf of shame and finish it too, then I can do the Tamiya M-10 I bought last year and get all depressed..... or not.


Well, so far I can’t find it posted anywhere on here from when I finished it. But I did find this more recent photo from when I picked up some macro lens filters for my camera and was trying them out... the TC figure is Tamiya


F is for FIRE, That burns down the whole town!

U is for URANIUM... BOMBS!

N is for NO SURVIVORS...

       - Plankton

LSM


  • Member since
    September 2004
  • From: Denver
Posted by tankboy51 on Saturday, June 15, 2019 10:50 AM

I did mine when it first came out, 22 some years ago. Wow, it came out in 1997.   I built it OTB, won a couple of awards, then several years ago it fell off a shelf, broke, set for years busted.  Last year I repaired it, also just finished building the AFV Club version of it.  I heard later on from the others on how bad all of them are.  I ignored them.  I liked them both.  They are both nice kits for me.  ( Not a rivet counter by any means.)  Have a fun time with yours.


  • Member since
    July 2004
  • From: Sonora Desert
Posted by stikpusher on Saturday, June 15, 2019 10:24 AM

Oh I must have finished it 10 -12 years ago... I’ll see if I can dredge up the photos on Photobucket.... 


F is for FIRE, That burns down the whole town!

U is for URANIUM... BOMBS!

N is for NO SURVIVORS...

       - Plankton

LSM


  • Member since
    September 2006
  • From: Dripping Springs, TX, USA
Posted by RBaer on Saturday, June 15, 2019 10:02 AM

Pics? Link? I'd be interested in seeing it. I'm actually jazzed about this one, enough that I'll probably pull the Academy M-10 off the shelf of shame and finish it too, then I can do the Tamiya M-10 I bought last year and get all depressed..... or not.

Apprentice rivet counter.

  • Member since
    July 2004
  • From: Sonora Desert
Posted by stikpusher on Friday, June 14, 2019 8:50 PM

Well, I’m glad I didn’t read all those nasty reviews from the hexperts, because I am pretty happy with how mine built up out of the box. 

Youre off to a great start RB.


F is for FIRE, That burns down the whole town!

U is for URANIUM... BOMBS!

N is for NO SURVIVORS...

       - Plankton

LSM


  • Member since
    September 2006
  • From: Dripping Springs, TX, USA
Academy M-18, or "Peering down the rabbit hole".
Posted by RBaer on Friday, June 14, 2019 8:22 PM

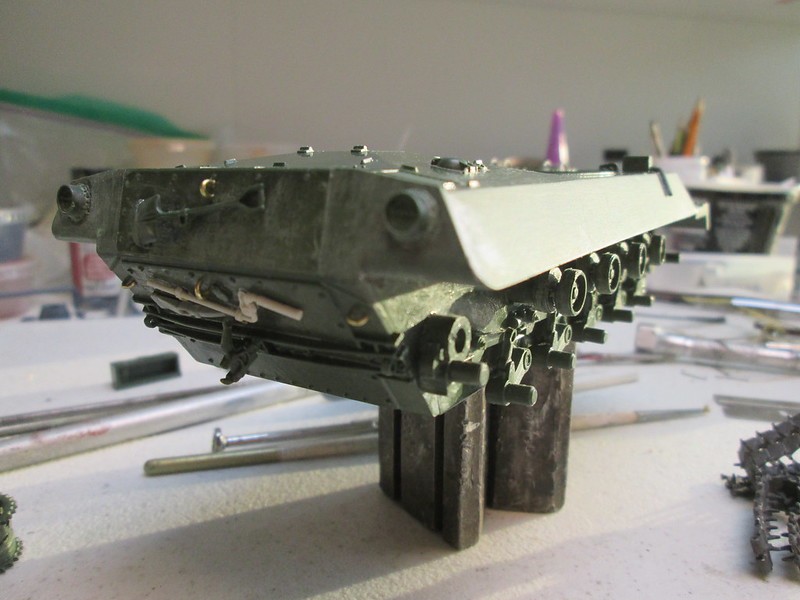
In a nut shell: Everything I've ever read concerning the inaccuracies and downfalls of this kit are true, and it's also got some serious fit issues, bad enough that shortly after getting the running gear built I shelved it, 15 years ago. Yup, 15 years. But my wife bought it for me, and I am on a sacred mission to build all the kits she bought me over the years, so I pulled it out the other day and got started. I quickly decided to build it with the hull hatches closed up, too much missing in there, and the fighting compartment dark and dirty, same reason.

Getting the hull halves to mate up was onerous, to say the least, and all the sanding and puttying at the fron meant I lost some bolt heads, replaced with sliced styrene hex rod. I also had to reshape the rear outer hull, and remove all the mollded on tool locator lines, put the lightening holes in the drive sprockets and idlers, and dig out soem scrap PE and tools. I'm going to leave all the engine cover screens as-is, not wanting to go completely down the rabbit hole.

I did assemble the Friuls years ago, and adjusted the ride height when I assembled the lower hull, so it should sit right, or at least "less wrong".

It's serious corrective surgery, but I'm actually having a good time. I must need therapy. Oh well, pics so far:

 IMG_2308 by Russel Baer, on Flickr

 IMG_2309 by Russel Baer, on Flickr

 IMG_2310 by Russel Baer, on Flickr
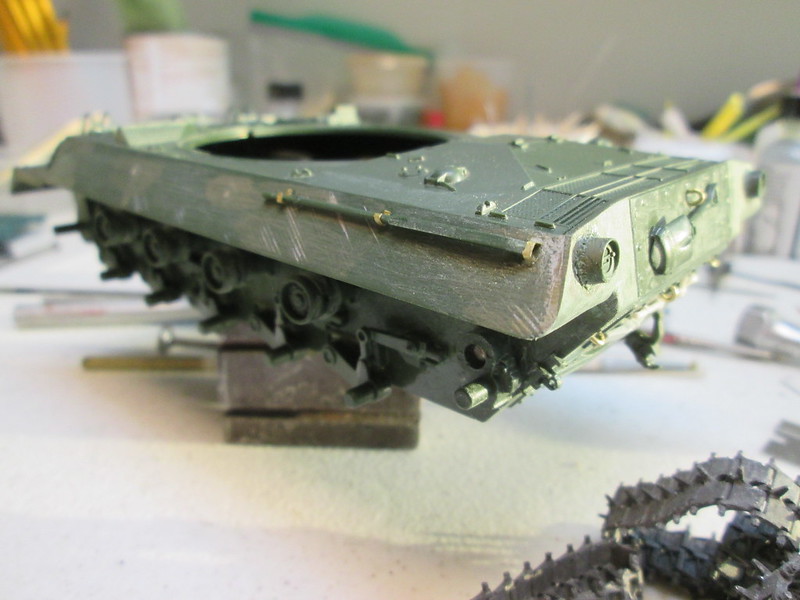
 IMG_2311 by Russel Baer, on Flickr


Apprentice rivet counter.

JOIN OUR COMMUNITY!

Our community is FREE to join. To participate you must either login or register for an account.

SEARCH FORUMS
FREE NEWSLETTER
By signing up you may also receive reader surveys and occasional special offers. We do not sell, rent or trade our email lists. View our Privacy Policy.