SEARCH FINESCALE.COM

Enter keywords or a search phrase below:

USMC M50A1 ONTOS - National Museum of the Marine Corps

14628 views
173 replies
1 rating 2 rating 3 rating 4 rating 5 rating
  • Member since
    September 2018
  • From: Vancouver, Washington USA
Posted by Sergeant on Monday, March 30, 2020 3:33 PM

stikpusher

Looks just about ready for primer and paint on the exterior. Are you going to weather and dirty up the interior?


Thank you Gamera and Carlos.

So the question is 'factory finish' or 'weathered, worn and rusted'. To make a scale model look realistic the current thinking amongst model builders is that it must have weathering. I agree with this trend and marvel at others skill in performing this process.

Personally, I like as little weathering as possible and still have the model look realistic; however, I understand the theme of a diorama or vignette may require more weathering, distress and even battle damage. I've ordered several Vallejo Wash colors to use on this model.

Harold

  • Member since
    July 2004
  • From: Sonora Desert
Posted by stikpusher on Sunday, March 29, 2020 7:42 PM

Looks just about ready for primer and paint on the exterior. Are you going to weather and dirty up the interior?


F is for FIRE, That burns down the whole town!

U is for URANIUM... BOMBS!

N is for NO SURVIVORS...

       - Plankton

LSM


  • Member since
    November 2009
  • From: SW Virginia
Posted by Gamera on Sunday, March 29, 2020 5:13 PM

Nice! Those recoiless rifles look awesome!!!

"I dream in fire but work in clay." -Arthur Machen


  • Member since
    September 2018
  • From: Vancouver, Washington USA
Posted by Sergeant on Sunday, March 29, 2020 3:52 AM

M60_ tanker

Found this on youtube. You might find it interesting.

https://youtu.be/T0t-0l0Zv0I


Thank you M60_tanker. I completed the interior painting and main weapon assembly. I have a few exterior details to finish and then it's ready for primer.

Harold

  • Member since
    October 2015
  • From: Tacoma, WA.
Posted by M60_ tanker on Friday, March 27, 2020 5:45 PM

Found this on youtube. You might find it interesting.

https://youtu.be/T0t-0l0Zv0I

Nothing is impossible as long as somebody else has to do it.

  • Member since
    September 2018
  • From: Vancouver, Washington USA
Posted by Sergeant on Wednesday, March 25, 2020 6:58 PM

Bobstamp

I served in South Vietnam from January 28 to March 5, 1966. I was a Navy hospital corpsman assigned to the Marine Corps' 3rd Battalion, 1st Marine Division. I hadn't planned on such a short tour of duty — 37 days — but in Operation Utah, a sniper shattered my right femur, a wound which gave me a free ticket home and more than 10 months in the Navy's Balboa Hospital in San Diego.

A few days after our amphibious landing in South Vietnam, I encountered an Ontos, which I had never heard of at that time. Here's a photo, taken with my Nikonos I under water/all-weather camera, which I had bought specifically for Vietnam:
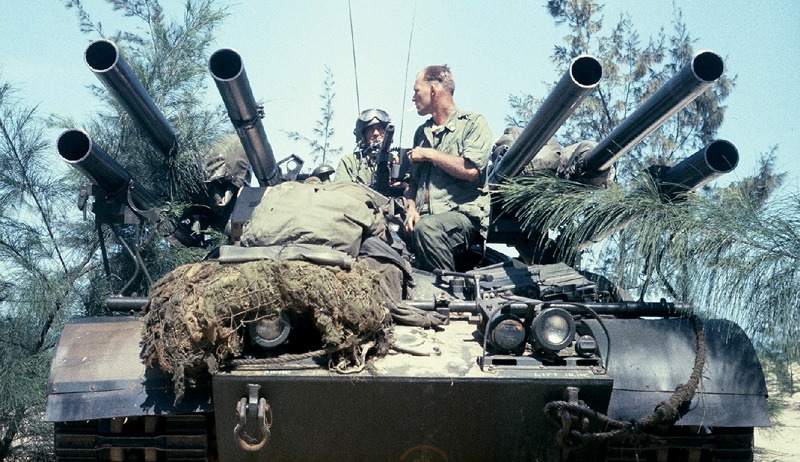
A U.S. Marine Corps Ontos in South Vietnam, January, 1966.

I talked briefly with one of the crew, probably the bare-headed guy. He told me that a day or so previously, they had fired all six of the 106mm recoilless rifles at the base of a pagoda, which promptly and not surprisingly collapsed. I guess we showed those Buddhists who was boss! 

Bob Ingraham

Vancouver


Bob, thank you for sharing your ONTOS picture and story.

Harold

  • Member since
    July 2019
  • From: Vancouver, British Columbia
Posted by Bobstamp on Wednesday, March 25, 2020 6:35 PM

I served in South Vietnam from January 28 to March 5, 1966. I was a Navy hospital corpsman assigned to the Marine Corps' 3rd Battalion, 1st Marine Division. I hadn't planned on such a short tour of duty — 37 days — but in Operation Utah, a sniper shattered my right femur, a wound which gave me a free ticket home and more than 10 months in the Navy's Balboa Hospital in San Diego.

A few days after our amphibious landing in South Vietnam, I encountered an Ontos, which I had never heard of at that time. Here's a photo, taken with my Nikonos I under water/all-weather camera, which I had bought specifically for Vietnam:

A U.S. Marine Corps Ontos in South Vietnam, January, 1966.

I talked briefly with one of the crew, probably the bare-headed guy. He told me that a day or so previously, they had fired all six of the 106mm recoilless rifles at the base of a pagoda, which promptly and not surprisingly collapsed. I guess we showed those Buddhists who was boss! 

Bob Ingraham

Vancouver

On the bench: A diorama to illustrate the crash of a Beech T-34B Mentor which I survived in 1962 (I'm using Minicraft's 1/48 model of the Mentor), and a Pegasus model of the submarine Nautilus of 20,000 Leagues Under the Seas fame. 

  • Member since
    September 2018
  • From: Vancouver, Washington USA
Posted by Sergeant on Wednesday, March 25, 2020 1:49 PM

stikpusher


Sergeant

Now the question; why in the world would someone design something for scale modelers you need X5 magnification to form? But more important why would any sane person bother to use it, myself included? Some times I think the people who design PE layout forget what happens when it's reduced to 1/35 scale. Example: if an actual gun sight is 1/2 inch high and you reduce it to 1/35 scale the sight become .0143 inches high, or <1/64".

Harold


the simple answer is... because you’re a madman... 


You're right!

  • Member since
    July 2004
  • From: Sonora Desert
Posted by stikpusher on Wednesday, March 25, 2020 1:42 PM

Sergeant

Now the question; why in the world would someone design something for scale modelers you need X5 magnification to form? But more important why would any sane person bother to use it, myself included? Some times I think the people who design PE layout forget what happens when it's reduced to 1/35 scale. Example: if an actual gun sight is 1/2 inch high and you reduce it to 1/35 scale the sight become .0143 inches high, or <1/64".

Harold


the simple answer is... because you’re a madman... 


F is for FIRE, That burns down the whole town!

U is for URANIUM... BOMBS!

N is for NO SURVIVORS...

       - Plankton

LSM


  • Member since
    September 2018
  • From: Vancouver, Washington USA
Posted by Sergeant on Wednesday, March 25, 2020 11:46 AM

Gamera

That MG looks really good! I've tried folding up those PE ammo boxes and not had much luck keeping them straight and square. And the teeny-tiny sights- WOW! 


Gamera, there is an interesting back-story regarding the tiny little sight. It is about the size of the head of a straight pin. There were two in the kit and it takes about 30 seconds to form the sight an another 60 seconds to glue it on the gun. Most of that is just opening and closing the glue bottle. But it took me three hours to find them on my work space after I dropped them. I must have drop them 17 times and finely I decided they weren't worth the effort. Then while I was taking a break I saw one and lost it again, then I found the other one. In the end I only recovered one of the two, but I got it done.

Now the question; why in the world would someone design something for scale modelers you need X5 magnification to form? But more important why would any sane person bother to use it, myself included? Some times I think the people who design PE layout forget what happens when it's reduced to 1/35 scale. Example: if an actual gun sight is 1/2 inch high and you reduce it to 1/35 scale the sight become .0143 inches high, or <1/64".

Harold

  • Member since
    November 2009
  • From: SW Virginia
Posted by Gamera on Wednesday, March 25, 2020 11:03 AM

That MG looks really good! I've tried folding up those PE ammo boxes and not had much luck keeping them straight and square. And the teeny-tiny sights- WOW! 

"I dream in fire but work in clay." -Arthur Machen


  • Member since
    September 2018
  • From: Vancouver, Washington USA
Posted by Sergeant on Tuesday, March 24, 2020 11:02 PM

Gamera

That looks really good! And I'd probably put a figure beside her to show how small the AFV is. 

The bronze mix looks good, pretty darn close to the real thing. 


Thank you Mrmike and Gamera; I like your suggestions. I started today thinking I would assemble the 106 mm recoilless rifles, but realized I needed the machine gun assembled first. Adding the Voyager PE parts to the machine gun was not as easy as I thought. I also gave the 106 mm casings a coat of 1:1 Tamiya mixed paint and they look right to me.

Harold

  • Member since
    November 2008
  • From: Far Northern CA
Posted by mrmike on Tuesday, March 24, 2020 1:31 PM

That is one fantastic interior - it's a shame to cover it over! Your post about how to display the finished model made me think about a photo of an APC I recently saw in a contest article. The upper hull appeared to be hinged on one side so the interior was totally visible. It's inspiring me to look into how to hinge one side of an Academy M113 Fitter, maybe a small wire and tube hinge like the car modellers use when they open doors and trunks.

Just a thought; your Ontos is a real work of art.

  • Member since
    November 2009
  • From: SW Virginia
Posted by Gamera on Tuesday, March 24, 2020 10:06 AM

That looks really good! And I'd probably put a figure beside her to show how small the AFV is. 

The bronze mix looks good, pretty darn close to the real thing. 

"I dream in fire but work in clay." -Arthur Machen


  • Member since
    September 2018
  • From: Vancouver, Washington USA
Posted by Sergeant on Monday, March 23, 2020 10:30 PM

stikpusher

Sorry about the color misdirect Sarge. I kinda like the 1:1 mix better, but you’re the man on scene. 


You know, I think 1:1 is better too. I have learned so much more from veteran scale modelers like you Carlos in three years than I would have in nine or ten years on my own. In this regard I think FineScale Modeling has created a valuable tool in these Forums. The forum can allows its members to increase learning exponentially and it's fun.

I remember reading an article about the effects of light on surfaces. It suggested that model paint should be a touch lighter than the actual subject we are trying to represent with our model because the model surface is so much smaller. I know there are some very excellent modelers who disagree, but in this case we have a controlled experiment. I simply paint the shells 1:1 and when the paint is dry put the upper hull on and see if it looks right. If not, I add a second coat of 1:1, or change the mix to 2:1 or 3:1 what could be easier.

Harold

  • Member since
    July 2004
  • From: Sonora Desert
Posted by stikpusher on Monday, March 23, 2020 8:37 PM

Sorry about the color misdirect Sarge. I kinda like the 1:1 mix better, but you’re the man on scene. 


F is for FIRE, That burns down the whole town!

U is for URANIUM... BOMBS!

N is for NO SURVIVORS...

       - Plankton

LSM


  • Member since
    September 2018
  • From: Vancouver, Washington USA
Posted by Sergeant on Monday, March 23, 2020 5:25 PM

Sergeant


Carlos, thank you for suggesting Tamiya Bronze. I could not find an 'old bronze' in Tamiya's acrylic paint line, but I did find Bronze X-33 which has metallic flakes in it, so I mixed it 3:1 with Tamiya Dark Copper XF-28. Please see the left spoon in the photograph below. I think the mix is near perfect match with the photograph of the shell casing above.

I also completed the turret assembly, so the next step is the assembly of 106 mm recoilless rifles and for that Voyager has supplied lightweight aluminum barrels to replace the plastic Academy barrels.

Harold

  • Member since
    September 2018
  • From: Vancouver, Washington USA
Posted by Sergeant on Sunday, March 22, 2020 11:34 PM

HeavyArty

Actually, I believe that is the kit-supplied PE muffler guard.  Academy has been stepping up their recent kits to include PE.  This one was quite good.  You can see the three-part PE muffler guard in step 7 on the instructions below.


Gino, you were right about the Academy PE fret. In my opinion it's better engineered than some of the parts in the Voyager kit. I had the Voyager headlight guards glued on before I realized they looked terrible. So, I replaced them and the rear fender brackets with Academy PE parts. Who would have guessed?

Harold

  • Member since
    September 2018
  • From: Vancouver, Washington USA
Posted by Sergeant on Sunday, March 22, 2020 10:59 PM

Thank you Gamera and Carlos. I finished painting the fire control panel guard and it's a little rough up close, but at least it looks more like the the real thing now.

I finished the upper hull assembly too and ready to start steps 9, 10 and 11 which is the turret, recoilless rifles, spotting rifles and machine gun. Below is a rear-view illustration from the ONTOS manual and a photograph of the actual rear fenders. I think Academy made the rear fenders on their model to long.

The Tamiya bronze paint I ordered for the 106 mm casings should be delivered tomorrow and once they're painted, I can glue the upper and lower hulls together.

I have not glued the hatches down yet because I'm still thinking about how to display the ONTOS when it's finished. I like the idea GMorrison and Gamera suggested of adding a couple Marines and creating a wood base with a little ground cover.

Harold

  • Member since
    July 2004
  • From: Sonora Desert
Posted by stikpusher on Saturday, March 21, 2020 1:21 PM

Ditto


F is for FIRE, That burns down the whole town!

U is for URANIUM... BOMBS!

N is for NO SURVIVORS...

       - Plankton

LSM


  • Member since
    November 2009
  • From: SW Virginia
Posted by Gamera on Saturday, March 21, 2020 12:22 PM

That looks sharp Harold, darn near the spitting image of the interior shots of the real thing!

"I dream in fire but work in clay." -Arthur Machen


  • Member since
    September 2018
  • From: Vancouver, Washington USA
Posted by Sergeant on Saturday, March 21, 2020 2:18 AM

I completed as much of the interior detail painting as I can until I receive the bronze paint for the shell casings.

The next step while I wait for the paint is to assemble the exterior photo etched parts on the front and rear upper hull.

Harold

  • Member since
    September 2018
  • From: Vancouver, Washington USA
Posted by Sergeant on Wednesday, March 18, 2020 2:50 PM

stikpusher

Sarge, the 106mm RR round casings are not made of brass, but are made of preforated steel, and instead have a lacquered or anodized coating. I only saw the 106 up close a couple of times in my career, and had no training on them whatsoever.

I almost think that the new color by Tamiya, “old bronze” might work as the casing.

this link has info on ammo

https://www.ibiblio.org/hyperwar/USA/ref/TM/pdfs/TM9-1300-204.pdf


Excellent find Carlos... I'll hold off painting the shells until I get that Tamiya old bronze paint. Thank you.

Harold


  • Member since
    November 2009
  • From: SW Virginia
Posted by Gamera on Wednesday, March 18, 2020 11:26 AM

No idea about the right colour for the casings but the interior looks great from here! 


Ben: Great job there on the monitor too!  

"I dream in fire but work in clay." -Arthur Machen


  • Member since
    September 2012
Posted by GMorrison on Wednesday, March 18, 2020 10:49 AM

DRUMS01
I am not a long time ship modeler. My only other ship build was last year, the HMS Roberts


Very nice ship model there.

I'm smiling- a ship only a Red Leg could love. Shore bombardment for Operation Torch, D-Day at Sword Beach.


 Modeling is an excuse to buy books.


  • Member since
    July 2004
  • From: Sonora Desert
Posted by stikpusher on Wednesday, March 18, 2020 9:45 AM

Sarge, the 106mm RR round casings are not made of brass, but are made of preforated steel, and instead have a lacquered or anodized coating. I only saw the 106 up close a couple of times in my career, and had no training on them whatsoever.

I almost think that the new color by Tamiya, “old bronze” might work as the casing.

this link has info on ammo

https://www.ibiblio.org/hyperwar/USA/ref/TM/pdfs/TM9-1300-204.pdf


F is for FIRE, That burns down the whole town!

U is for URANIUM... BOMBS!

N is for NO SURVIVORS...

       - Plankton

LSM


  • Member since
    September 2018
  • From: Vancouver, Washington USA
Posted by Sergeant on Tuesday, March 17, 2020 10:26 PM

I'm making progress on the interior detail painting. The instructions from Verlinden suggest adding copper wire to the fire control panel to represent the white metal guard on the front of the panel as shown below in the second photograph. I used 28-gauge copper wire. I'm not sure how realistic it looks, but after it's painted it may look better.

Next item to paint in the interior is the 106 mm shells. In the photograph below the projectile is black and the casing appears to be tarnished brass. The oxidation on brass is normal and the color I was planning to use is Vallejo Oxido Rust #71.080. The color chip below does not look like tarnished brass; however, on black rubber tracks it looks pretty good. Anyone have a better color for tarnished brass please let me know.

Harold

  • Member since
    September 2018
  • From: Vancouver, Washington USA
Posted by Sergeant on Monday, March 16, 2020 4:00 AM

That is a very nice ship model Ben. HMS Roberts was a Royal Navy monitor in the Second World War. A monitor or war ship is heavier than a destroyer but has a shallow draft that allows it to operate in rivers and was used to patrol the English Channel with destroyers during the war. The Roberts had 15-inch guns in its main turret and 13-inches of armor.

In case you haven't met, Stikpusher (Carlos) who commented on REFORGER 84 also served in the U.S. Army. I believe he is a retired law enforcement officer too. In December 2018 Carlos and I participated in a Christmas challenge and his model, a Tamiya 1/35 German Sdkfz 222 went on to win First Place in IPMS Orange County, January 2019.

IPMS: International Plastic Modeler's Society

Harold

  • Member since
    June 2018
  • From: Ohio (USA)
Posted by DRUMS01 on Sunday, March 15, 2020 11:33 PM

Actually the units I were in had those artillery pieces. I was the Fire Direction Chief that received the Foward Observers radio call, my section calculated the firing data and sent it to the guns as well as the command to fire; I did not actually serve on any artillery piece. Rather, I was in an M577 (pop top M113) Command Post beside them. 

With that said, I did have a very short moment learning how to fire othem just in case we had to perform a "Final Protective Fire" and hasty retreat (being over-run). Fortunately I never had to use those gunnery skills in duress. 

That photo of the M110's really bring back some memories. And speaking of REFORGER, I participated in several of those including 1984; most as a player, and one as an evaluator. Is that a Gamma Goat to the left, behind the soldiers? Sorry, my mind wanders....

I have the Tamiya M577, an M109 or two, and a M110 still to build myself. I was thinking of getting an M548 to be used as the ammo carrier for my M110. I beileve AFV Club made it, but it is hard to find. 

Sorry for taking this much time in your thread. Your future builds look as interesting as the current one. Good hunting for the ships. My USS Arizona is a hand full, but then again I am not a long time ship modeler. My only other ship build was last year, the HMS Roberts

Now get cracking on that ONTOS, we need more of your inspiration Big SmileYes

Ben

"Everyones the normal until you get to know them" (Unknown)

LAST COMPLETED:

1/35 Churchill Mk IV AVRE with bridge - DONE

NEXT PROJECT:

1/35 CH-54A Tarhe Helicopter


  • Member since
    July 2004
  • From: Sonora Desert
Posted by stikpusher on Sunday, March 15, 2020 11:30 PM

Hah! That photo is from REFORGER 84. I’ve seen it here and there before. I guess 5th ID Divarty sent over the M110s by ship. Most units, mine included, drew their gear from POMCUS sites. 


F is for FIRE, That burns down the whole town!

U is for URANIUM... BOMBS!

N is for NO SURVIVORS...

       - Plankton

LSM


JOIN OUR COMMUNITY!

Our community is FREE to join. To participate you must either login or register for an account.

SEARCH FORUMS
FREE NEWSLETTER
By signing up you may also receive reader surveys and occasional special offers. We do not sell, rent or trade our email lists. View our Privacy Policy.