SEARCH FINESCALE.COM

Enter keywords or a search phrase below:

M270A1 MLRS Maintenance - Done!

7599 views
44 replies
1 rating 2 rating 3 rating 4 rating 5 rating
  • Member since
    September 2018
  • From: Vancouver, Washington USA
Posted by Sergeant on Tuesday, October 6, 2020 10:04 AM

Good morning Gino. Fascinating the way you break down the components of this model. I have only recently started to learn some of your technique. One I noticed today is the way you paint the seats with shading you create what looks like real material. I love the HALON fire extinguishers. Hand painting, adding wear and weathering to the interior, engine compartment and LLM in modular approach you have much greater control over the interior detail. That makes a lot of sense. I started using your method on my M109A2.

By the way I received a second AFV Club M109A2 and M109 L23 to make an M109A1. It will also have that cool resin engine you reviewed. It may be one of the few M109A1 models ever made. When my M109's are finished I will have the first three versions in the series.

Great work on your MLRS and good lessons for interior modeling.

Harold

  • Member since
    December 2002
  • From: Valrico, FL
Posted by HeavyArty on Tuesday, October 6, 2020 8:09 AM

Thanks guys.  A mechanic is planned...eventually. 

I am still plugging away at the build.  I have completed the cab interior.  I added a few parts from the Royal Models MLRS Update set.


From it, I used the seats with seat belts; hoses and filter apparatus for the NBC system; and a few other smaller PE and resin parts.  I also added a fire extinguisher from the spares box between the seats and a HALON fire extinguisher on the left side of the front wall.  The rest is from the kit, to include all warning placards. 

Here is the completed cab interior.


Next up is the completed engine compartment with placards added and weathered.  I also added a HALON bottle on the front right as well.

Cab doors and the side engine compartment door interiors.

I have also completed the LLM (Loader/Launcher Module).  I added the internal lifting hook/hoist mechanism that attaches to the rocket pods from ones left over from a Dragon M270 kit.  For some reason, Trumpeter deleted these.  They are needed if you do not have the rocket pods uploaded.  They are hard to see, but they are in there.  Trumpeter has all the other internal parts included and nicely molded.

You can see the internal hook/hoist mechanism in this pic hanging from the cables below the booms, just above the rocket pods.  These hook onto the pods to lift them up onto the booms, then the booms retract to load them into the LLM.

The LLM overall.

Lastly, I will be adding the APU, A/C unit, and weapon mount from the Dragon M270A1 kit to make this a pretty current M270A1.  

I am planning on making it a vehicle from 6-37 FA (MLRS), 2ID in South Korea in NATO camo.  It is just about ready for paint.  More to come later.

Gino P. Quintiliani - Field Artillery - The KING of BATTLE!!!

Check out my Gallery: https://app.photobucket.com/u/HeavyArty

"People sleep peaceably in their beds at night only because rough men stand ready to do violence on their behalf." -- George Orwell

  • Member since
    February 2011
Posted by GreySnake on Saturday, October 3, 2020 7:20 AM
The work on everything in the engine compartment is very impressive.  
  • Member since
    November 2009
  • From: SW Virginia
Posted by Gamera on Thursday, October 1, 2020 11:56 AM

That looks great! 

You just need a mechanic figure!

"I dream in fire but work in clay." -Arthur Machen


  • Member since
    December 2002
  • From: Valrico, FL
Posted by HeavyArty on Thursday, October 1, 2020 7:38 AM

Hi Harold.  Yes, I have been building pretty much non-stop since I was a kid and I am pushing 50 now.  I have two older brothers who built cars and planes and of course, I wanted to do what they did.  I guess I have picked up a few things over 40 plus years of building.

Gino P. Quintiliani - Field Artillery - The KING of BATTLE!!!

Check out my Gallery: https://app.photobucket.com/u/HeavyArty

"People sleep peaceably in their beds at night only because rough men stand ready to do violence on their behalf." -- George Orwell

  • Member since
    September 2018
  • From: Vancouver, Washington USA
Posted by Sergeant on Thursday, October 1, 2020 12:48 AM

HeavyArty

Thanks guys.  I am enjoying this one.

Sarge, it is a little of both.  I do have some TM pages and other referances to fill in what I don't remember.  I do remember quite a bit since I worked with MLRS launchers off and on for about 8 years.  It is amazing what you forget thouugh.


I am alway amazed at the level of detail and customizing you do on a model. It is fun to watch you work through a project. I read some place you have been building scale models for 40-years. I believe you learn a few things in that much time. 

Harold

  • Member since
    December 2002
  • From: Valrico, FL
Posted by HeavyArty on Wednesday, September 30, 2020 6:55 AM

Thanks guys.  I am enjoying this one.

Sarge, it is a little of both.  I do have some TM pages and other referances to fill in what I don't remember.  I do remember quite a bit since I worked with MLRS launchers off and on for about 8 years.  It is amazing what you forget though.

Gino P. Quintiliani - Field Artillery - The KING of BATTLE!!!

Check out my Gallery: https://app.photobucket.com/u/HeavyArty

"People sleep peaceably in their beds at night only because rough men stand ready to do violence on their behalf." -- George Orwell

  • Member since
    September 2018
  • From: Vancouver, Washington USA
Posted by Sergeant on Tuesday, September 29, 2020 9:59 PM

HeavyArty

This is how it will look with the cab in place.

Gino, are you doing this from memory or do you have photographs and drawings to work from? Are you planning to have a technician working on the equipment?

Harold

  • Member since
    August 2020
  • From: Lakes Entrance, Victoria, Australia.
Posted by Dodgy on Tuesday, September 29, 2020 9:53 PM

Don't know a lot about modern military vehicles, but this build is looking very impresive mate.

I long to live in a world where chickens can cross the road without having their motives questioned

  • Member since
    January 2015
  • From: Tumwater, WA.
Posted by M. Brindos on Tuesday, September 29, 2020 8:20 PM

Loving it, Gino.

- Mike Brindos "Lost Boy"

  • Member since
    December 2002
  • From: Valrico, FL
Posted by HeavyArty on Tuesday, September 29, 2020 3:59 PM

Thanks GreySnake.

Work continues.  I have pretty much completed the engine compartment.  I just need to add a few decals and run a few wires here and there.  

Here is the rear engine cover with it's fan and shroud for the radiator in the center; fuel filler pipe, and air cleaner and intake hose on the right.


The lower hull with the engine, transmission, intake fan, and battery box.  If you notice, the whole shift tower is attached to the transmission and does not pivot with the cab.  There is a square cut-out in the cab floor that this fits into as it closes.  You will also see a rod and gearbox across the front of the hull.  This is the cab lift mechanism.   


With the rear engine cover in place.


This is how it will look with the cab in place.


More to come as I move on to the cab interior.

Gino P. Quintiliani - Field Artillery - The KING of BATTLE!!!

Check out my Gallery: https://app.photobucket.com/u/HeavyArty

"People sleep peaceably in their beds at night only because rough men stand ready to do violence on their behalf." -- George Orwell

  • Member since
    February 2011
Posted by GreySnake on Sunday, September 27, 2020 6:59 AM
Looking forward to seeing more progress, thanks for sharing.
  • Member since
    December 2002
  • From: Valrico, FL
Posted by HeavyArty on Friday, September 25, 2020 10:29 AM

Thanks guys.  It has been fun so far.  I hope to have some more pics of it all painted and installed soon.  

Gino P. Quintiliani - Field Artillery - The KING of BATTLE!!!

Check out my Gallery: https://app.photobucket.com/u/HeavyArty

"People sleep peaceably in their beds at night only because rough men stand ready to do violence on their behalf." -- George Orwell

  • Member since
    November 2009
  • From: SW Virginia
Posted by Gamera on Friday, September 25, 2020 7:36 AM

Oh cool, thanks Gino- neat 'under the hood' as it were demo! 

"I dream in fire but work in clay." -Arthur Machen


  • Member since
    September 2018
  • From: Vancouver, Washington USA
Posted by Sergeant on Thursday, September 24, 2020 10:43 PM

I will be following your progress on this build Gino. The cool thing about these Forum builds is they are like virtual workshops for modelers, where we get to see how and why things are done the way they are by other members.

Harold

  • Member since
    December 2002
  • From: Valrico, FL
M270A1 MLRS Maintenance - Done!
Posted by HeavyArty on Thursday, September 24, 2020 8:15 PM

My latest build is of a US Army M270A1 MLRS launcher undergoing maintenance.  

I am starting with the excellent Trumpeter 1/35 US M270/A1 model (01049).


I will be building it with the cab tilted forward showing the engine, transmission, fan, radiator, etc.  I will be adding the engine, transmission, radiator fan, and other engine compartment parts from the Meng M2A3/M3A3 Bradley interior sets.  It will look something like this.


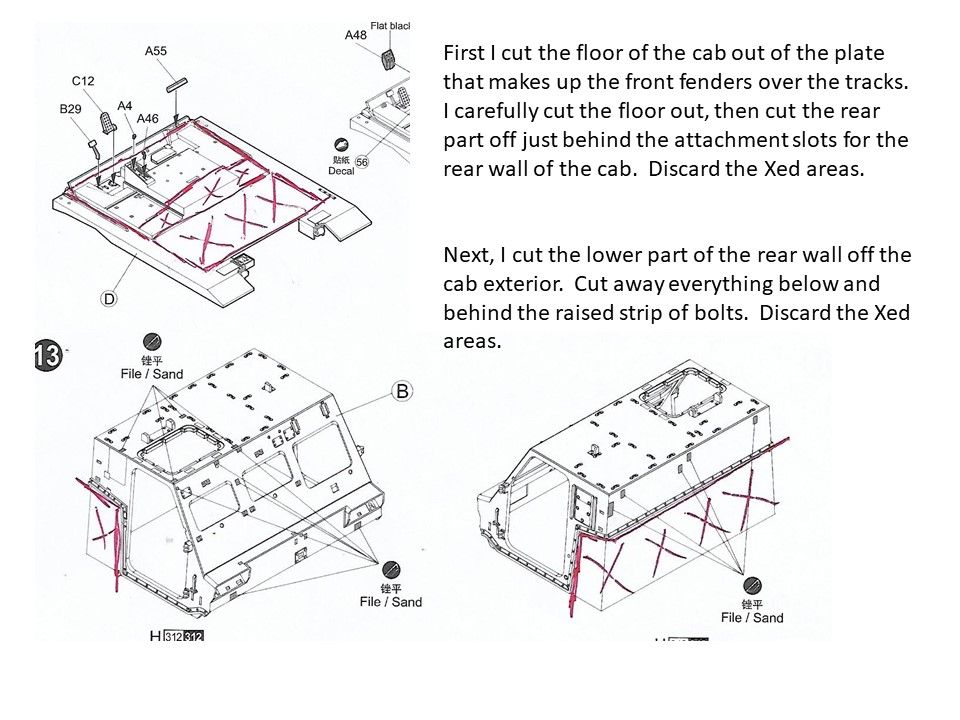
So far, I have started by cutting the floor of the cab out of the larger plate that also makes up the forward parts of the fenders that go over the tracks.  I carefully cut the floor plate out and then cut away the rear section behind the notches where the rear wall connects.  The area with red "X"s below can be discarded.  Next, I cut the rear and side walls of the cab off below the raised line with bolts.  I discarded the cut off part. 
 

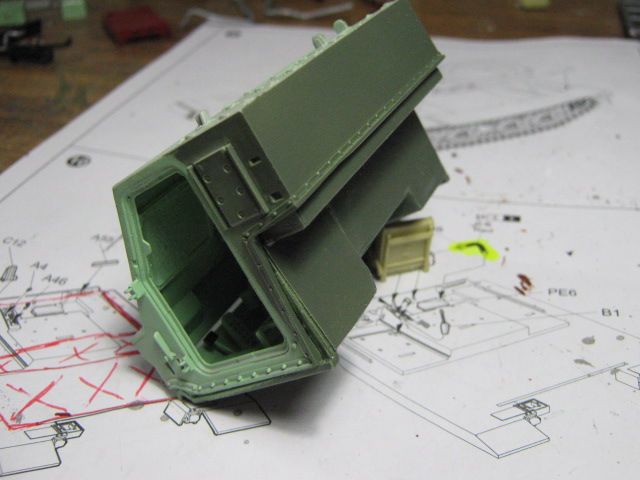
I also boxed in the back of the cab that is below the bolt line.  There is about a 1/4 inch of the back wall exposed that has to be covered up.  
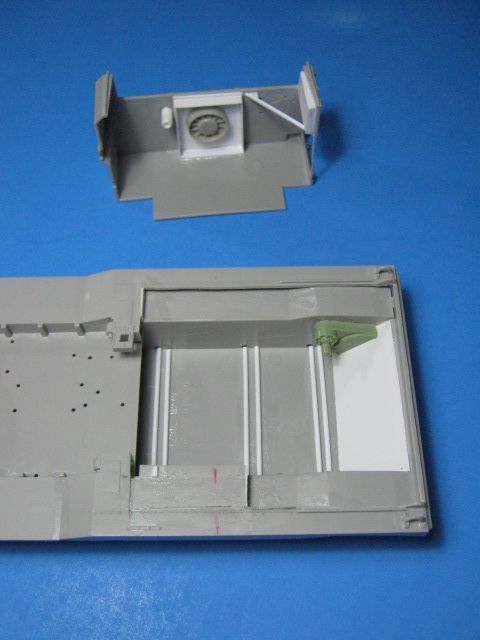
Next I prepared the hull and rear engine cover.  I added torsion bars to the hull and the Meng final drives.  I also added a boxed in fan below the air intake vent.
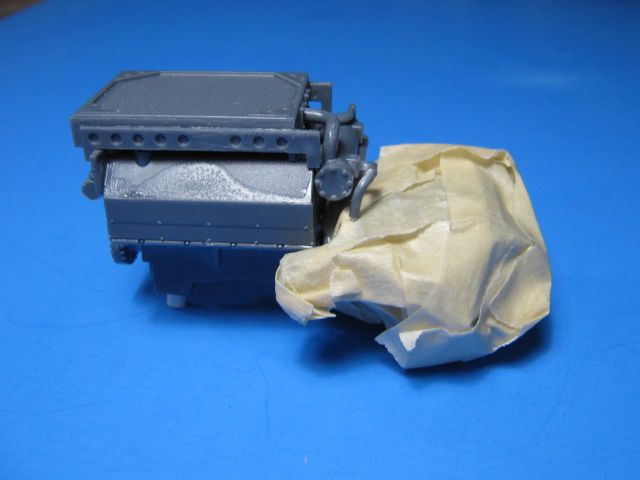
Here are the Meng engine and transmission.  I had already taped up the transmission for painting.  Surprisingly, it only took a little bit of trimming to get the Meng engine and transmission parts to fit in the Trumpeter hull.
 

Here are a few of the other parts.  There is the Meng radiator fan, a hydraulic reservoir, the air cleaner box (made from an M60 side-loading air cleaner), and the removed shift console.
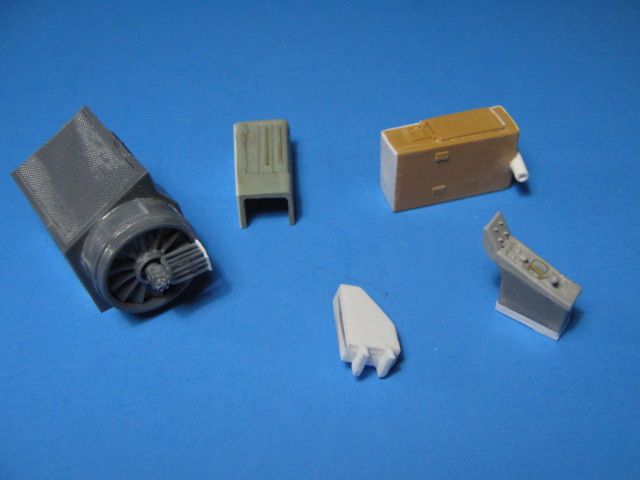
I am currently painting all the parts up and will install the engine/tranny and all the other parts soon.  More pics later.

Gino P. Quintiliani - Field Artillery - The KING of BATTLE!!!

Check out my Gallery: https://app.photobucket.com/u/HeavyArty

"People sleep peaceably in their beds at night only because rough men stand ready to do violence on their behalf." -- George Orwell

JOIN OUR COMMUNITY!

Our community is FREE to join. To participate you must either login or register for an account.

SEARCH FORUMS
FREE NEWSLETTER
By signing up you may also receive reader surveys and occasional special offers. We do not sell, rent or trade our email lists. View our Privacy Policy.