SEARCH FINESCALE.COM

Enter keywords or a search phrase below:

Tamiya's stug III B *WIP* FINISHED

12997 views
95 replies
1 rating 2 rating 3 rating 4 rating 5 rating
  • Member since
    September 2005
  • From: beacon falls , Ct.
Posted by treadwell on Tuesday, May 27, 2008 7:46 PM
heya RonSmile [:)]---another 'tour de force'---nice to see ya back ay it dudeTongue [:P]-------treadCool [8D]


  • Member since
    December 2002
  • From: Jefferson City, MO
Posted by sgtsauer on Tuesday, May 27, 2008 8:32 PM
Great job on the model so far. That looks like a beautiful kit. Too bad Tamiya didn't do an "A" model. I would love to build a kit this nice as Michael Wittman's "A" model.
  • Member since
    November 2005
Posted by Anonymous on Tuesday, May 27, 2008 10:17 PM
 sgtsauer wrote:
Great job on the model so far. That looks like a beautiful kit. Too bad Tamiya didn't do an "A" model. I would love to build a kit this nice as Michael Wittman's "A" model.
DML issued one w/ the Wittman scheme---think it is in my stash...
  • Member since
    December 2002
  • From: Jefferson City, MO
Posted by sgtsauer on Tuesday, May 27, 2008 10:29 PM
I have the DML kit in my stash but it isn't nearly as nice as the Tamiya Stug III B.
  • Member since
    July 2007
  • From: Ohio
Posted by Geist on Wednesday, May 28, 2008 5:34 AM

 sgtsauer wrote:
I have the DML kit in my stash but it isn't nearly as nice as the Tamiya Stug III B.


I built mine not to long ago. Its nice for its age. I had a lot of fun building it. 

On the bench: Italeri Leopard 1A2 correction build with Perfect Scale turret and Eduard PE

  • Member since
    April 2005
  • From: Piscataway, NJ!
Posted by wing_nut on Wednesday, May 28, 2008 6:30 AM

Like Randy Quaid says.. 

"HELLO boys, I'm Baaaack"

OK, so I didn't know you were gone... that's not the pointWink [;)]

You are back in fine style.  That's looks really sharp.  It would terrific with the dog chilling on top like in the photo.

Marc  

  • Member since
    January 2005
  • From: in the tank factory in my basement
Posted by biffa on Wednesday, May 28, 2008 2:50 PM

Geist awesome pic man i saved that one for reference thanks for posting it,

Treadster my man good to see ya bro and its good to be back at the bench Smile [:)]

as always guys your interest and comments are appreciated i have just a small update for now as most of the time is spent waiting on washes etc to dry, i did some weathering on the lower hull and running gear while the washes were drying on the upper deck, using pigments mixed with alcohol i sprayed them around the wheels and lower hull, gotta be careful with this as it looks like theres nothing there but when it dries it will be covered heh, after it dried i gave it a wash or two and this is where its at right now 

the upper hull after a few more washes the weathering is building up nicely 


Ron g.
  • Member since
    October 2007
  • From: N.H.
Posted by panzerguy on Wednesday, May 28, 2008 3:13 PM


    Ron,your stug look's awesome. Great way to start you'r "comeback".

"Happiness is a belt fed weapon"

  • Member since
    April 2007
  • From: Schroon Lake, NY
Posted by SMJmodeler on Wednesday, May 28, 2008 5:18 PM
Lookin' sweet biffa!...how many washes is that so far...seriously, how many?  I heard you do several and I know you hate the drying timeGrumpy [|(]...It's gotta be killing you!Wink [;)] 

  • Member since
    November 2005
Posted by Anonymous on Wednesday, May 28, 2008 5:20 PM

Wow...the weathering on the suspension is ultra-realistic...are you using ANY pigments for this or is it strictly washes achieving that dusty effect???


  • Member since
    January 2005
  • From: in the tank factory in my basement
Posted by biffa on Wednesday, May 28, 2008 5:28 PM
thanks guys, SMJ the upper hull now has 6/7 washes with still more to do and yup this is the slow part but not to worry this is the time i start my next build Smile [:)] i have begun  working on the old Tamiya M8 HMC and will get a WIP up soon when this one is close to the end. 
Ron g.
  • Member since
    July 2006
  • From: New Jersey
Posted by redleg12 on Wednesday, May 28, 2008 6:41 PM

Ut Oh.....the factory is back in full swing!!!

Always great to see your builds. Looking at the Tamiya M8 soon for me. I'll be interested to see yours.

Rounds Complete!!

"The Moral High Ground....A Great Place to Emplace Artillery."

  • Member since
    April 2014
Posted by Carves on Thursday, May 29, 2008 10:30 AM

Nice build so far Ron as always.

The Griffon tool clamps does look impressive doesnt it ?

---
Ben

  • Member since
    March 2003
  • From: Rain USA, Vancouver WA
Posted by tigerman on Thursday, May 29, 2008 10:40 AM
The factory is in full swing now. Thumbs Up [tup] Great subject Ron. I do love StuGs.

   http://i7.photobucket.com/albums/y269/wing_nut_5o/PANZERJAGERGB.jpg

 Eric 

  • Member since
    December 2005
  • From: Goteborg / Sverige
Posted by Svenne Duva on Thursday, May 29, 2008 10:47 AM

The results you achieve are top nudge as usual.
Mixing pigments with alcohol, is that artists pigments?

Thank you for sharing and being back, I realy missed your postings during your time off.

Svenne

sic transit gloria mundi

  • Member since
    November 2006
  • From: Coastal Maine
Posted by dupes on Thursday, May 29, 2008 3:30 PM
That top pic showing part of the undercarriage is KILLER...Sigh [sigh]
  • Member since
    January 2005
  • From: in the tank factory in my basement
Posted by biffa on Thursday, May 29, 2008 5:22 PM

Thank you all for your continued interest you have really helped me get back into the groove, Manny sorry i missed your question the undercarriage was done by spraying pigments mixed with rubbing alcohol then a couple of washes have been added since, warning spraying pigments in your AB may not be healthy for it i use a $20 junker so i dont really care Smile [:)] also practise on scrap before trying if you even care to, when wet the pigments do not show when they dry they will be everywhere and they will be fixed so no brushing them off.

Hi Svenne, its good to be back :) yes i used artist pigments see above especially the warning heh.  

more coming soon but its essentially just wash after wash after wash until i either run out of washes or it gets to where i want it whichever comes first heh.  

Ron g.
  • Member since
    November 2005
Posted by Anonymous on Thursday, May 29, 2008 5:32 PM
Wow, an old, worn out compressor, a $20 airbrush---just goes to show that you don't have to work with the top of the line stuff the get 5-star results---SWEET BUILD !!!
  • Member since
    July 2003
  • From: On my kitchen counter top somewhere in central North Carolina.
Posted by disastermaster on Friday, May 30, 2008 1:53 PM

The image “http://img480.imageshack.us/img480/1662/doh4jw.gif” cannot be displayed, because it contains errors. Spectacular build Ron! The image “http://board.freeones.com/images/smilies/hatsoff.gif” cannot be displayed, because it contains errors.That "panzer grey " looks perfect.

The image “http://e.deviantart.com/emoticons/w/weirdface.gif” cannot be displayed, because it contains errors.The only thing that looks out of aspect to me is the lack of balance between the accumulated dirt and grime on the undercarriage and the rather "clean" appearance of the upper surfaces. 

10 out of 10. 


                                            Steve
 

 https://i.imgur.com/LjRRaV1.png


  • Member since
    January 2005
  • From: in the tank factory in my basement
Posted by biffa on Friday, May 30, 2008 2:36 PM

Thanks Manny and Steve its still in progress i have done a little damage/chipping and have finished the washes now and added pigments and the upper now looks well weathered like the lower i still have a few finishing touches and it has some curing to do but i should have some pics up in the next day or two. Smile [:)] i beagn work on the M8 because of the wait between weathering applications. The biggest reason i use cheap AB's is i really cant be bothered to take good care of them and i abuse them trying new things out so if one lasts a year then its worth it heh.


Ron g.
  • Member since
    January 2007
  • From: Iowa
Posted by IA Novice on Friday, May 30, 2008 6:11 PM

This is probably a little bit of copy cat from Manny and some of the others, but I really really like the weathering of the undercariage.  I think this might be the best one I've seen - and that's comparing it to a lot of models.  It's certainly the best "dusty" version I've seen.

Great work!

The definition of insanity: doing the same thing over and over and expecting different results.
  • Member since
    January 2007
Posted by the doog on Friday, May 30, 2008 7:13 PM

Wow, awesome, Ron! You haven't missed a beat! This looks tremendous!

When are ya gonna start doing some figures? I' would love to see your models with some human perspective next to them--I would be very interested to see what you could do on a crewman?

One thing though--it does slow down the build a bit...Sigh [sigh]

Congrats on a prefect lil' StuG!

HEY STOOOOG!!  Laugh [(-D]........................Smile,Wink, & Grin [swg]

  • Member since
    April 2008
  • From: Commonwealth of Virginia
Posted by USArmyFAO on Friday, May 30, 2008 7:54 PM
Pretty new on here, but after viewing this build I must say the speed and fidelity that you work with is not only amazing, but also inspiring - I have combed through this post for some great Armor building tips (mainly a aircraft modeler here) and started a T-34.  I must say again, your work looks fantastic.

Cheers, Matt

"If we increase the size of the penguin until it is the same height as the man and then compare the relative brain size, we now find that the penguin's brain is still smaller. But, and this is the point, it is larger than it *was*."

  • Member since
    January 2005
  • From: in the tank factory in my basement
Posted by biffa on Saturday, May 31, 2008 12:50 AM

Once again i want to thank everyone kind comments this has been a real fun build for me, Hi Doog to be honest i have tried a fig or two but i just cant get them to a level that they simply dont fit with the way i finish my models im pretty much with Bill on this one where i build my models to be stand alone vehicles and as you said they do take precious build time Smile [:)] thanks for checking this out .

Hi Matt, glad you enjoyed tagging along and i appreciate the comments, there are some fine modelers on this forum and there are things we can all learn from each other one of my favourite things is checking out other folks build ups.

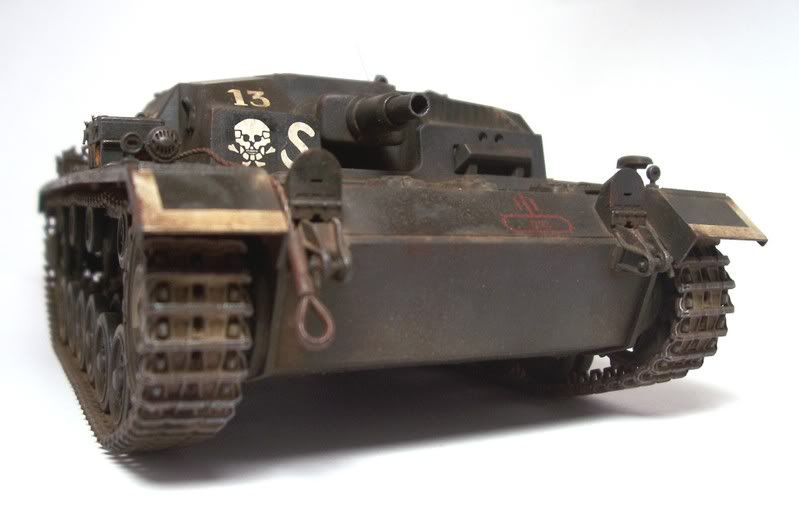
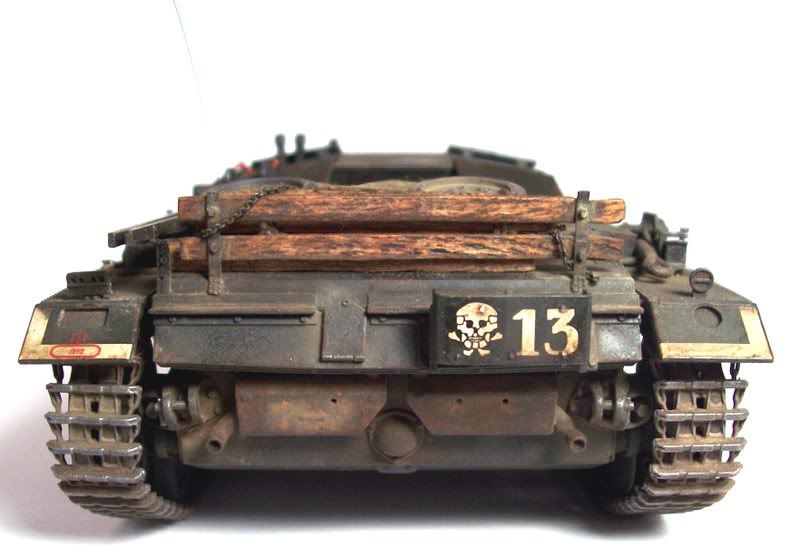
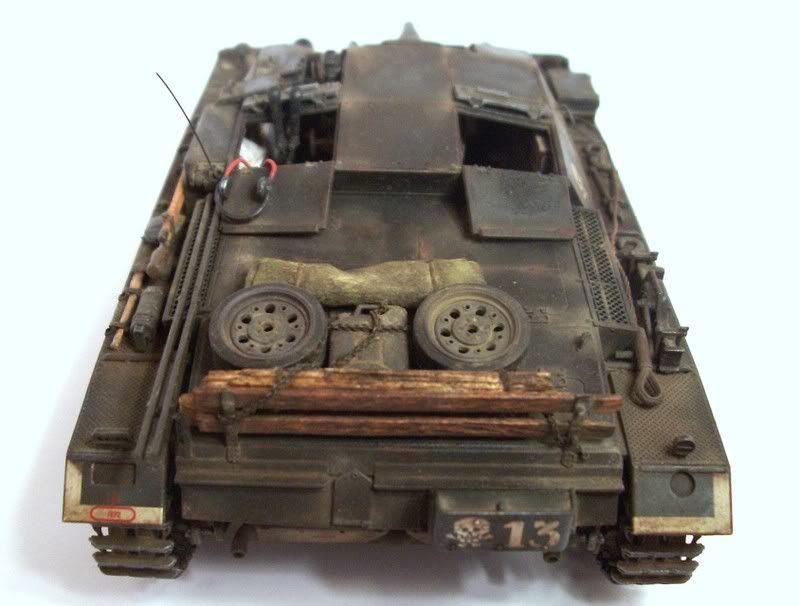
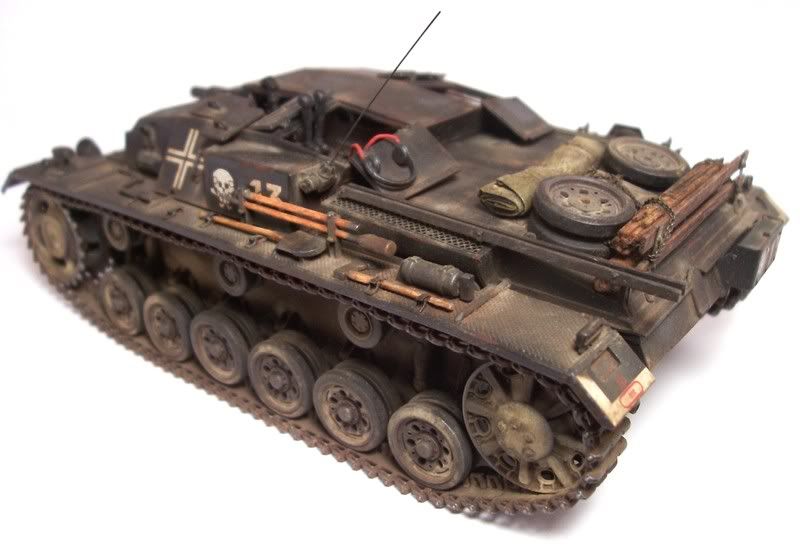
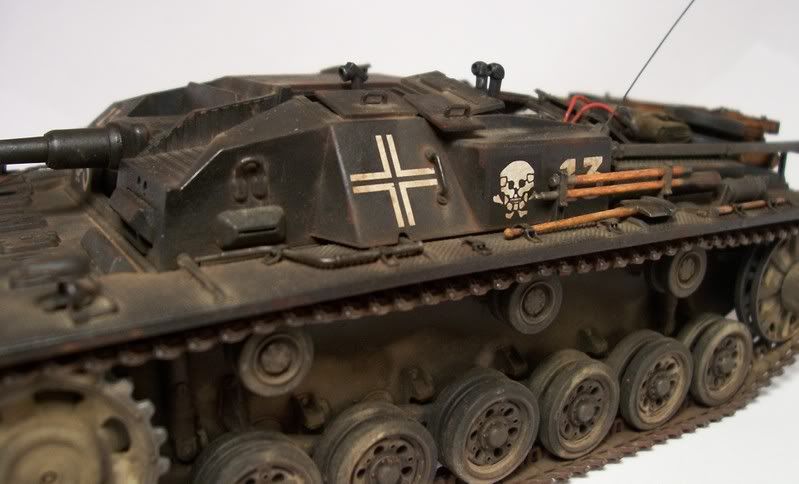
Well folks here it is the finished model, after many more washes of different mixes of van dyke brown and raw sienna oil paints i was happy with the acumilation of dirt and grime i then did a little chipping using dark brown acrylic paint applied with a fine brush after which i did a little bit of spot washing on the chips themselves with a slight rusty colour and van dyke brown to blend them in, then finally i added some pigments here and there and did a slight drybrush with steel.

The stowage is just placed for now i may change it around after everythings cured properly. 
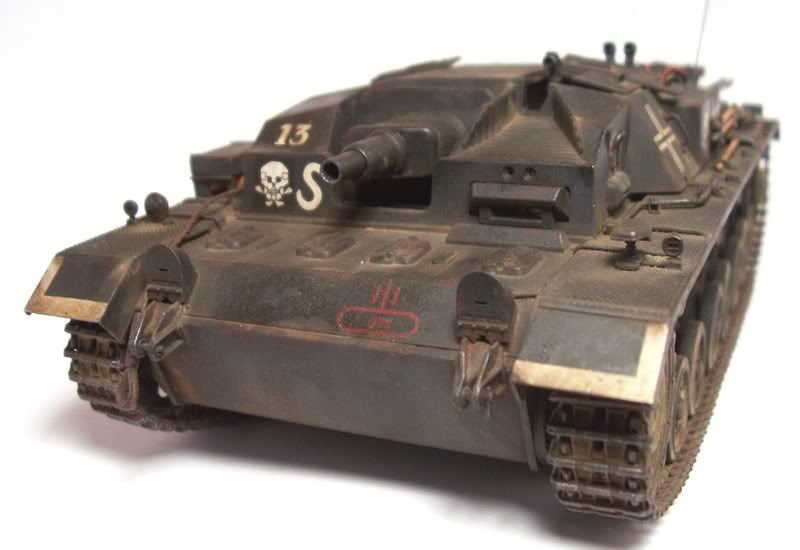
all comments and questions are welcome, hope you like . 

Ron g.
  • Member since
    July 2003
  • From: Perth, Western Australia
Posted by madmike on Saturday, May 31, 2008 2:27 AM

Now that is a fantastic build! If you do not mind me asking, what colours did you use for the accumlated dust? The overall effect is very realistic.

Cheers

Mike

"I do not feel obliged to believe that the same God who has endowed us with sense, reason, and intellect has intended us to forgo their use." - Galileo Galilei
  • Member since
    April 2007
  • From: Schroon Lake, NY
Posted by SMJmodeler on Saturday, May 31, 2008 7:29 AM
biffa: Beautiful piece of work there Ron!!!...I'm speechless.  Thanks for the detailed summary of the steps along the way too.  I tried your van dyke oils technique and I like the results...if you don't mind I'll try your MULTIPLE layering of washes technique too, the results you achieve are superbThumbs Up [tup]!...those side view shots are especially greatBow [bow]!!!  Nice comebackMake a Toast [#toast]...small suggestion, you might want to add a bit of black pastels to that barrelWink [;)]. 

  • Member since
    February 2007
  • From: Bournemouth UK
Posted by Luftwoller on Saturday, May 31, 2008 7:45 AM

Very nice indeed, Ron. You chose the right color in the end. That German grey looks awesome with the layered washes/pigments. Top marx fella. I love it.

...Guy

..'Your an embarrassment to the human genus, makes me ashamed to call myself Homo'.
  • Member since
    November 2005
Posted by Anonymous on Saturday, May 31, 2008 9:15 AM
Outstanding model...great exercise on how to achieve a realistic panzer grey finish w/ dust...the rear stowage rack is the perfect "personlized" touch...
  • Member since
    August 2005
  • From: Sydney, Australia
Posted by Phil_H on Saturday, May 31, 2008 10:06 AM
Very nice Ron, I can almost smell the exhaust fumes and oily dust... Bow [bow]
  • Member since
    July 2003
  • From: On my kitchen counter top somewhere in central North Carolina.
Posted by disastermaster on Saturday, May 31, 2008 10:36 AM

This is just excellent. The image “http://e.deviantart.com/emoticons/c/clap.gif” cannot be displayed, because it contains errors. Everything ties in now.

...... The image “http://e.deviantart.com/emoticons/p/plotting.gif” cannot be displayed, because it contains errors. Not to be a partypooper, the only thing I detect is the third roadwheel from the front on the port side. It appears to be "floating" just a wee bit.

Wonderful.

                                Steve
 

 https://i.imgur.com/LjRRaV1.png


JOIN OUR COMMUNITY!

Our community is FREE to join. To participate you must either login or register for an account.

SEARCH FORUMS
FREE NEWSLETTER
By signing up you may also receive reader surveys and occasional special offers. We do not sell, rent or trade our email lists. View our Privacy Policy.