SEARCH FINESCALE.COM

Enter keywords or a search phrase below:

Tamiya's stug III B *WIP* FINISHED

12996 views
95 replies
1 rating 2 rating 3 rating 4 rating 5 rating
  • Member since
    January 2005
  • From: in the tank factory in my basement
Posted by biffa on Friday, May 23, 2008 3:48 PM
Thanks Dupes, much appreciated, its been a great "getting back into the swing of it" build so far.
Ron g.
  • Member since
    November 2006
  • From: Coastal Maine
Posted by dupes on Friday, May 23, 2008 3:41 PM

Biffa - love those older builds. Don't think I've seen those before.  Thumbs Up [tup]

Looking forward to more progress on this monster!!! 

  • Member since
    January 2005
  • From: in the tank factory in my basement
Posted by biffa on Friday, May 23, 2008 3:39 PM

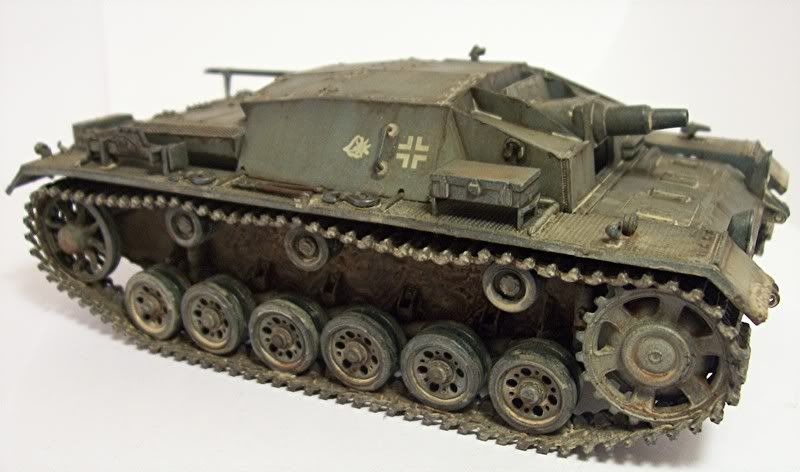
Interesting conversation guys and one that gets raised often, personally speaking i believe that it is hard to prove what is the right or wrong shade/colour given timeframes and the conditions vehicles were exposed to, also i do think colours would vary depending on their source and application, so that said i tend to try different looks on my builds depending on what i think will look cool and not worry so much about is thought to be correct but still an interesting debate nonetheless,

here is the stug III C/D i did with a blueish tinted grey
here is a PZ II i did with the more black shade
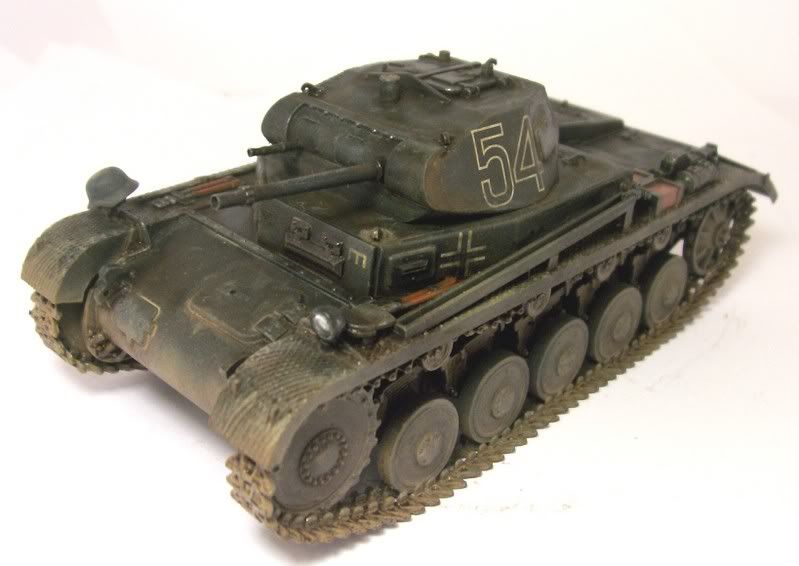
with this one im not decided yet but might try the more black shade just to be different from the earlier stug i did.

A big update soon as the build is almost finished just a few small bits to add and thanks again everyone for the comments.  

Hi Doog, yup that was definatly one of those "what was i thinking" moments lol and definatly proves the benefits of posting ones progress so it got caught before the wheels and tracks had been added.  

Ron g.
  • Member since
    November 2005
Posted by Anonymous on Friday, May 23, 2008 2:36 PM
 wbill76 wrote:

 tigerman wrote:
I thought the blue was more myth than fact. I always thought it to be dark-grey or thought I heard it so.

Color period photos suggest it's a dark grey, no blue tint, so dark that it's almost black depending on the quality of the photo.

On the second photo, realize that the panzer crewman uniforms themselves are black in terms of the shade/contrast similarity.

I wouldn't rely too heavily on color period pics for shading...In fact, that top pic is one of those often cited as one of the unique color schemes found during 1942 (refer back to the "Shades of '42..." thread...If you look closely there also appears to be an overspray on it...as far as the DAK pic, the harsh lighting probably makes the tank appear darker than it actually is...Also, there was recently the whole debate as to how accurate early color photography was in reproducing colors...

I'll try to post some pics of the "Leningrad StuG" tonight which shows the blue tint...

  • Member since
    July 2004
  • From: Texas
Posted by wbill76 on Friday, May 23, 2008 2:31 PM

 tigerman wrote:
I thought the blue was more myth than fact. I always thought it to be dark-grey or thought I heard it so.

Color period photos suggest it's a dark grey, no blue tint, so dark that it's almost black depending on the quality of the photo. Vehicle color on subjects recovered from bogs or lakes is somewhat suspect given the influence of chemicals or minerals in the water/sediment depending on the location and paint. Not uncommon for a bleaching effect to occur under various conditions.

On the second photo, realize that the panzer crewman uniforms themselves are black in terms of the shade/contrast similarity.

  • Member since
    January 2007
Posted by the doog on Friday, May 23, 2008 12:47 AM

Glad you got the info about the suspension in time to save this baby, Ron! When I was just reading through it here, I went "Whoa!" when I saw the first pics! Good thing that you got straightened out with it! (PHEW!)

Looking good so far! 

  • Member since
    March 2003
  • From: Rain USA, Vancouver WA
Posted by tigerman on Thursday, May 22, 2008 11:06 PM
I thought the blue was more myth than fact. I always thought it to be dark-grey or thought I heard it so.

   http://i7.photobucket.com/albums/y269/wing_nut_5o/PANZERJAGERGB.jpg

 Eric 

  • Member since
    November 2005
Posted by Anonymous on Wednesday, May 21, 2008 11:14 PM
 dood_dood wrote:

I think we share a common strategy.  When I'm a little rusty, or just tired from a few complex builds in a row, I've been going to the new Tamiya stuff to recharge my batteries.  No headaches, quick build-up, yada yada.

When I built this beauty, I really liked the blue tinted gray on the box art.  I tried to duplicate with 50% Tamiya Field Blue and 40% Dark Gray, 10% flat white mix.  I liked the shade so much, I've used it on several other panzers, but it looks best on my stug III B.  Good luck with yours, its a good kit, and builds pretty fast too.

There has always been interesting discussion about what shade panzer grey actually was...many modelers are now favoring a warmer shade with a hint of red-brown in the grey...in the past a cooler shade was in vogue (almost a bluish tint)...one of my refs shows a B pulled out of a lake near Leningrad several years ago and the color of the grey was VERY bluish...
  • Member since
    July 2004
  • From: Texas
Posted by wbill76 on Wednesday, May 21, 2008 10:28 PM
Moving right along Ron, the magic tracks look right at home. Thumbs Up [tup]
  • Member since
    January 2005
  • From: Las Vegas
Posted by dood_dood on Wednesday, May 21, 2008 10:25 PM

I think we share a common strategy.  When I'm a little rusty, or just tired from a few complex builds in a row, I've been going to the new Tamiya stuff to recharge my batteries.  No headaches, quick build-up, yada yada.

When I built this beauty, I really liked the blue tinted gray on the box art.  I tried to duplicate with 50% Tamiya Field Blue and 40% Dark Gray, 10% flat white mix.  I liked the shade so much, I've used it on several other panzers, but it looks best on my stug III B.  Good luck with yours, its a good kit, and builds pretty fast too.

  • Member since
    May 2007
Posted by Specter on Wednesday, May 21, 2008 3:38 PM
everything is looking great so far Biffa. Thumbs Up [tup]
Seth
  • Member since
    September 2007
  • From: Relocating
Posted by Mobious on Tuesday, May 20, 2008 4:58 PM
 Nice save! Are the tracks the new ones from the DML PzIII N kit? They look great.

"It's a problem of applied physics" Roy Brown

  • Member since
    January 2005
  • From: in the tank factory in my basement
Posted by biffa on Tuesday, May 20, 2008 2:54 PM

thanks fella's, Manny i agree about the magic tracks i love them, it took me all of about 30 minutes per side to get these on normally having to cut then and clean them up its 4 times that which leaves more time to build other stuff, and they fit the Tamiya sprocket just a tad snug i may sand the sprocket a little before painting because after paint they could be tight but all said it was a painless experience :)

Moved on a little.

i got the right hand tracks on and began the interior

at this point i attached the upper hull to test for fit and it is perfect i will leave it taped on for now but everything will be disassembles for painting

Ron g.
  • Member since
    September 2006
  • From: Dripping Springs, TX, USA
Posted by RBaer on Tuesday, May 20, 2008 11:41 AM
I'm not much of a German armor builder but I'm following this one......btw, even to me, there's nothing quite so "tank-like" as the Mk III and IV running gear.

Apprentice rivet counter.

  • Member since
    March 2003
  • From: Rain USA, Vancouver WA
Posted by tigerman on Monday, May 19, 2008 11:35 PM

Whew! Great save. I'm glad to see you back at the bench my friend. Cool [8D]

   http://i7.photobucket.com/albums/y269/wing_nut_5o/PANZERJAGERGB.jpg

 Eric 

  • Member since
    July 2004
  • From: Texas
Posted by wbill76 on Monday, May 19, 2008 10:33 PM
Glad you were able to reposition them Ron. Thumbs Up [tup]
  • Member since
    November 2005
Posted by Anonymous on Monday, May 19, 2008 10:16 PM

Oh yeah! Nice save on the StuG!

I wonder why DML doesn't sell their Magic Tracks as a separate item (talk about giving MK a run for their money)? Looks like they fit the StuG just fine...looking good so far.

  • Member since
    January 2005
  • From: in the tank factory in my basement
Posted by biffa on Monday, May 19, 2008 9:41 PM

Good catch Eric not sure what i was thinking but im sure glad you were on the ball, and after some tugging, pulling, pushing, bending and welding all is well once more, thank you and the gang for getting me back on the straight and narrow heh,

Ben i built the Dragon stug III C/D which might be the one your thinking of these two are very similar and i love the squat look they have, (not quite as squat as i almost had) i have already used the griffon tool clasps on other models i just showed a unopen pack for the pics, i must say i really like them they are much easier to use and i got mine from luckymodel and concidering how many you get in a pack they are very cheap i will show some closeups when i get the that stage so you can see.     

After getting the suspension arms fixed i added the wheels and sprockets etc, them began on the tracks.


Ron g.
  • Member since
    July 2003
  • From: On my kitchen counter top somewhere in central North Carolina.
Posted by disastermaster on Monday, May 19, 2008 9:37 PM

...maybe some liquid cement will soften the joints enough to reposition them???

The image “http://www.mfbb.net/reaper/images/smiles/tlab06.gif” cannot be displayed, because it contains errors. That would be the way to go.

Otherwise, a really The image “http://camou.net/udg/smilie/e021.gif” cannot be displayed, because it contains errors. ruff and jarring ride. 

 https://i.imgur.com/LjRRaV1.png


  • Member since
    September 2007
  • From: Relocating
Posted by Mobious on Monday, May 19, 2008 9:00 PM
 tigerman wrote:
That's interesting about the arms being level. I had to check my Tamiya Pz III L and they are definitely not level. I know it's a later variant, but I wonder.
There's an eye for detail. I never even seen that one and I built the DML kit a couple of months ago. 

"It's a problem of applied physics" Roy Brown

  • Member since
    November 2005
Posted by Anonymous on Monday, May 19, 2008 6:27 PM
I agree about the arms...I have thhis kit in the stash and I'm thinking that the "workable" torsion bars may come into play here by adding some spring/tension to the arms and would have "forced" them down if used...maybe some liquid cement will soften the joins enough to reposition them???
  • Member since
    March 2003
  • From: Rain USA, Vancouver WA
Posted by tigerman on Monday, May 19, 2008 5:55 PM
 wbill76 wrote:

 tigerman wrote:
That's interesting about the arms being level. I had to check my Tamiya Pz III L and they are definitely not level. I know it's a later variant, but I wonder.

Ron,

Tigerman's on to something here. The suspension arms shouldn't sit level, they should be at an angle, regardless of III chassis variant. It should look something like this:

I don't know if you can correct it or not, but the way you've got them mounted has the suspension fully compressed with the suspension arms up against the bump stops on every station.

Thanks for concurring to my concern. I hope Ron can fix them.

   http://i7.photobucket.com/albums/y269/wing_nut_5o/PANZERJAGERGB.jpg

 Eric 

  • Member since
    December 2006
  • From: t.r.f. mn.
Posted by detailfreak on Monday, May 19, 2008 5:53 PM
i just looked under my old tamiya g and the arms are at the downward angle as mentioned by tigerman and wbill76.perhaps a shell hole and charred remains could explain away the softened suspension?Mischief [:-,]please keep us updated as i too am very interested in this kit.

[View:http://s172.photobucket.com/albums/w1/g-earl828/]  http://i158.photobucket.com/albums/t104/cycledupes/1000Roadwheels4BuildBadge.jpg

  • Member since
    July 2004
  • From: Texas
Posted by wbill76 on Monday, May 19, 2008 1:11 PM

 tigerman wrote:
That's interesting about the arms being level. I had to check my Tamiya Pz III L and they are definitely not level. I know it's a later variant, but I wonder.

Ron,

Tigerman's on to something here. The suspension arms shouldn't sit level, they should be at an angle, regardless of III chassis variant. It should look something like this:

I don't know if you can correct it or not, but the way you've got them mounted has the suspension fully compressed with the suspension arms up against the bump stops on every station.

  • Member since
    September 2007
  • From: Relocating
Posted by Mobious on Monday, May 19, 2008 3:51 AM
 The Griffon clasps are IMHO great. Keep us posted on your progress, and don't forget the pics.

"It's a problem of applied physics" Roy Brown

  • Member since
    February 2008
  • From: ladner BC Canada
Posted by stick man on Sunday, May 18, 2008 11:07 PM
Hay GRREEAAT work so far i'll be waching this build as that kit has been calling me every time I go to the LHSSmile [:)].
I'm 15 and I model I sk8board and I drum what could be better.
  • Member since
    March 2003
  • From: Rain USA, Vancouver WA
Posted by tigerman on Sunday, May 18, 2008 11:06 PM
That's interesting about the arms being level. I had to check my Tamiya Pz III L and they are definitely not level. I know it's a later variant, but I wonder.

   http://i7.photobucket.com/albums/y269/wing_nut_5o/PANZERJAGERGB.jpg

 Eric 

  • Member since
    April 2014
Posted by Carves on Sunday, May 18, 2008 10:46 PM

Glad to see you back to the bench Ron.

I thought you build already that Tamiya Stug ?

Can you let us know how is that Griffon German tool handle works for you ?

---
Ben

  • Member since
    January 2005
  • From: in the tank factory in my basement
Posted by biffa on Sunday, May 18, 2008 10:28 PM

Hi Guys, another update and i have to say this is a very nice kit and i couldnt have picked a better one to get back into the swing of things with.

ps1, Bill is dead on about the tracks and it is a pity that dragon dont sell these they would be a winner in my books.

step 2, this consists of the suspension arms and can be built as "workable" but i have decided to fix mine in place, a beautiful fit all round.

step 3, attaching the rear plate, track tensioners and the rest of the suspension.

A few pics of what it looks like this far.

Thanks for checking it out and commenting.

Ron g.
  • Member since
    July 2004
  • From: Texas
Posted by wbill76 on Sunday, May 18, 2008 9:30 PM

Off to a good start Ron! Thumbs Up [tup]

ps1,

DML doesn't sell their Magic Tracks separately, Ron must've sourced them from someone else or used them from a DML kit that had the kit-supplied tracks replaced.

JOIN OUR COMMUNITY!

Our community is FREE to join. To participate you must either login or register for an account.

SEARCH FORUMS
FREE NEWSLETTER
By signing up you may also receive reader surveys and occasional special offers. We do not sell, rent or trade our email lists. View our Privacy Policy.