SEARCH FINESCALE.COM

Enter keywords or a search phrase below:

1966 Beetle Rallye Car

8258 views
69 replies
1 rating 2 rating 3 rating 4 rating 5 rating
  • Member since
    April 2003
  • From: USA
Posted by keavdog on Saturday, February 26, 2022 6:53 PM

Looks sharp!

Thanks,

John

  • Member since
    February 2022
Posted by TechEd29 on Wednesday, March 2, 2022 4:33 PM

keavdog
Looks sharp!

Thanks, John.

I've been under the weather lately, so no major progress to speak of.

Between sniffles and a runny nose I worked on some piddly details.

I finalized the period-correct license plates for front and rear.

Before primer and paint, I had filled-in the holes for the European license plate bracket. As I wanted to mount a Canadian bracket/plate with a very slight stand-off from the lid, I made a correct-sized bracket with a mounting pin.

The front plate will be mounted to the auxiliary light mount with an angle bracket:

I also painted some styrene rod stock for the bumper overrider brackets that Tamiya chose not to include:

I'm unable to print white on clear decals with my inkjet for the driver and navigator names on the rear quarter windows. Resorting to two custom made decals makes little sense, so I opted to render the names on a gradient panel that includes the EMPI logo. It's printed on gloss white sticker paper:

Take two aspirins and call me in the morning... Sleep

More to come.


  • Member since
    February 2022
Posted by TechEd29 on Saturday, March 12, 2022 4:56 PM

Progress has been stalled due to a "honey-do" home improvement project that I could no longer keep on the back-burner.

Just as well becasue I'm waiting for more of the Sea Blue paint from PaintScratch.com... I forgot that the tail light housings needed to be painted body colour, and what little I had leftover had hardnened in the bottom of the bottle.

My old-fart shaky hands are essentially useless for any fine detail painting, so I had to come up with a solution for the chrome trim on the tailights. A test of applying some flattened .010 rod stock seemed to work. I'm hoping to airbrush chrome silver on the rod before mounting:

Rendering the body side mouldings nicely falls into the same detail painting shortcoming I have. As the top and bottom edges of the body side mouldings as cast by Tamiya are not very well defined for a crisp relief (I tried, and failed), I'm gonna test the same procedure as with the tailights by using pre-painted .040 half round stock which will go on top of the side moulding locations that I've already sanded flat. Fingers crossed.

More to come.

  • Member since
    February 2022
Posted by TechEd29 on Saturday, March 12, 2022 9:00 PM

Making the front turn signal housing gaskets from scrap .015 sheet. The gaskets will be airbrushed semigloss black to resemble the rubbers... that all 1:1 VW Beetle restoration enthusiasts know will have craked and disintegrated over time:

Similar gaskets for the rear tail light housings are up next.

More to come.

  • Member since
    April 2003
  • From: USA
Posted by keavdog on Saturday, March 12, 2022 10:27 PM

Great details!

Thanks,

John

  • Member since
    February 2022
Posted by TechEd29 on Thursday, March 17, 2022 9:34 PM

"Honey-do" projects around the house means that only a few hours can be devoted on the Beetle before bedtime, so progress is at a crawl lately.

This coming weekend will also be a wash, what with friends and ex-colleauges coming over for the start of the 2022 F1 "porpoising" season Wink, and IMSA running at Sebring.... GO! #9 Pfaff Porsche 911 GT3R!!!Big Smile. The Sebring venue will bring back memories of crewing on various Canadian Porsche teams many eons ago.

Update: Test fitting a gasket for its tailight housing:

The additional Sea Blue paint I needed for the tailight housings came today... v/tempting to do a late-nighter.

One of my goals with the body was to render the chrome/silver finish on the body side mouldings as sharply as possible. As I mentioned earlier, I'll be applying .040" half-round rod to those locations. I've not settled on what finish to apply, so I prepared a few test spoons with the rod. I got some practice at masking them, and finally airbrushed Testors silver as well as Molotow chrome. The goal here is to see how they compare after applying various kinds of gloss clear, like Tamiya X22, Future etc..

Thing is... the plating on the actual side mouldings of a 64 Beetle was never the super bright chrome found on American makes in the 60s. It was more like polished aluminum, so it'll be interesting to see how much the bright shine on the Molotow dulls after applying a clear coat (might not be as bad as some say if a dull aluminum look is desired. I might just break down and buy the Alclad II stuff If I'm not happy.

More to come.

  • Member since
    February 2022
Posted by TechEd29 on Thursday, March 31, 2022 3:03 PM

The old saying that, sooner or later "we all turn into our parents" has come true for me in more ways than one. For a few months now, the tremors and arthritis I seem to have inherited from my father have made any detail work on the Rallye Beetle a real struggle. Some days good and some bad... current Michigan weather isn't helping.

FWIW, following are two short updates. For fun, and motivation on my part, I've included some pictures of the chassis showing some of the detail work before I restarted the project last month.

Pre-paint mockup of the mudflap brackets to make sure they're square:

Resonably happy with how the chrome trim on the taillight housings laid down. Now I'll have to pray for a good day to mask off and get some Molotow on:

Misc. chassis:

One will never see the teeny brake lines, clutch cable and starter wire with the body on... but as I never got to build and race the real car as a snotty-nosed teenager (I eventually did get to build and compete in my Datsun 510SSS), I made sure to fit them on this one.Geeked 

More to come.

  • Member since
    February 2022
Posted by TechEd29 on Thursday, March 31, 2022 3:25 PM

Yup... mudflaps look square to me, and (what was worrying me) they actually fit inside the fenders!:

Not sure I'll keep the oval tip on the Bursch exhaust. It'll be easy to try just a big twin pipe arangement instead at the same location... maybe I'll take a poll.

More to come.

  • Member since
    February 2022
Posted by TechEd29 on Monday, April 4, 2022 8:08 PM

The weather/temperatures up in this neck o' the north woods keeps me out of the garage for my clear coat airbrushing tests, so I'm stuck with chasing build details.

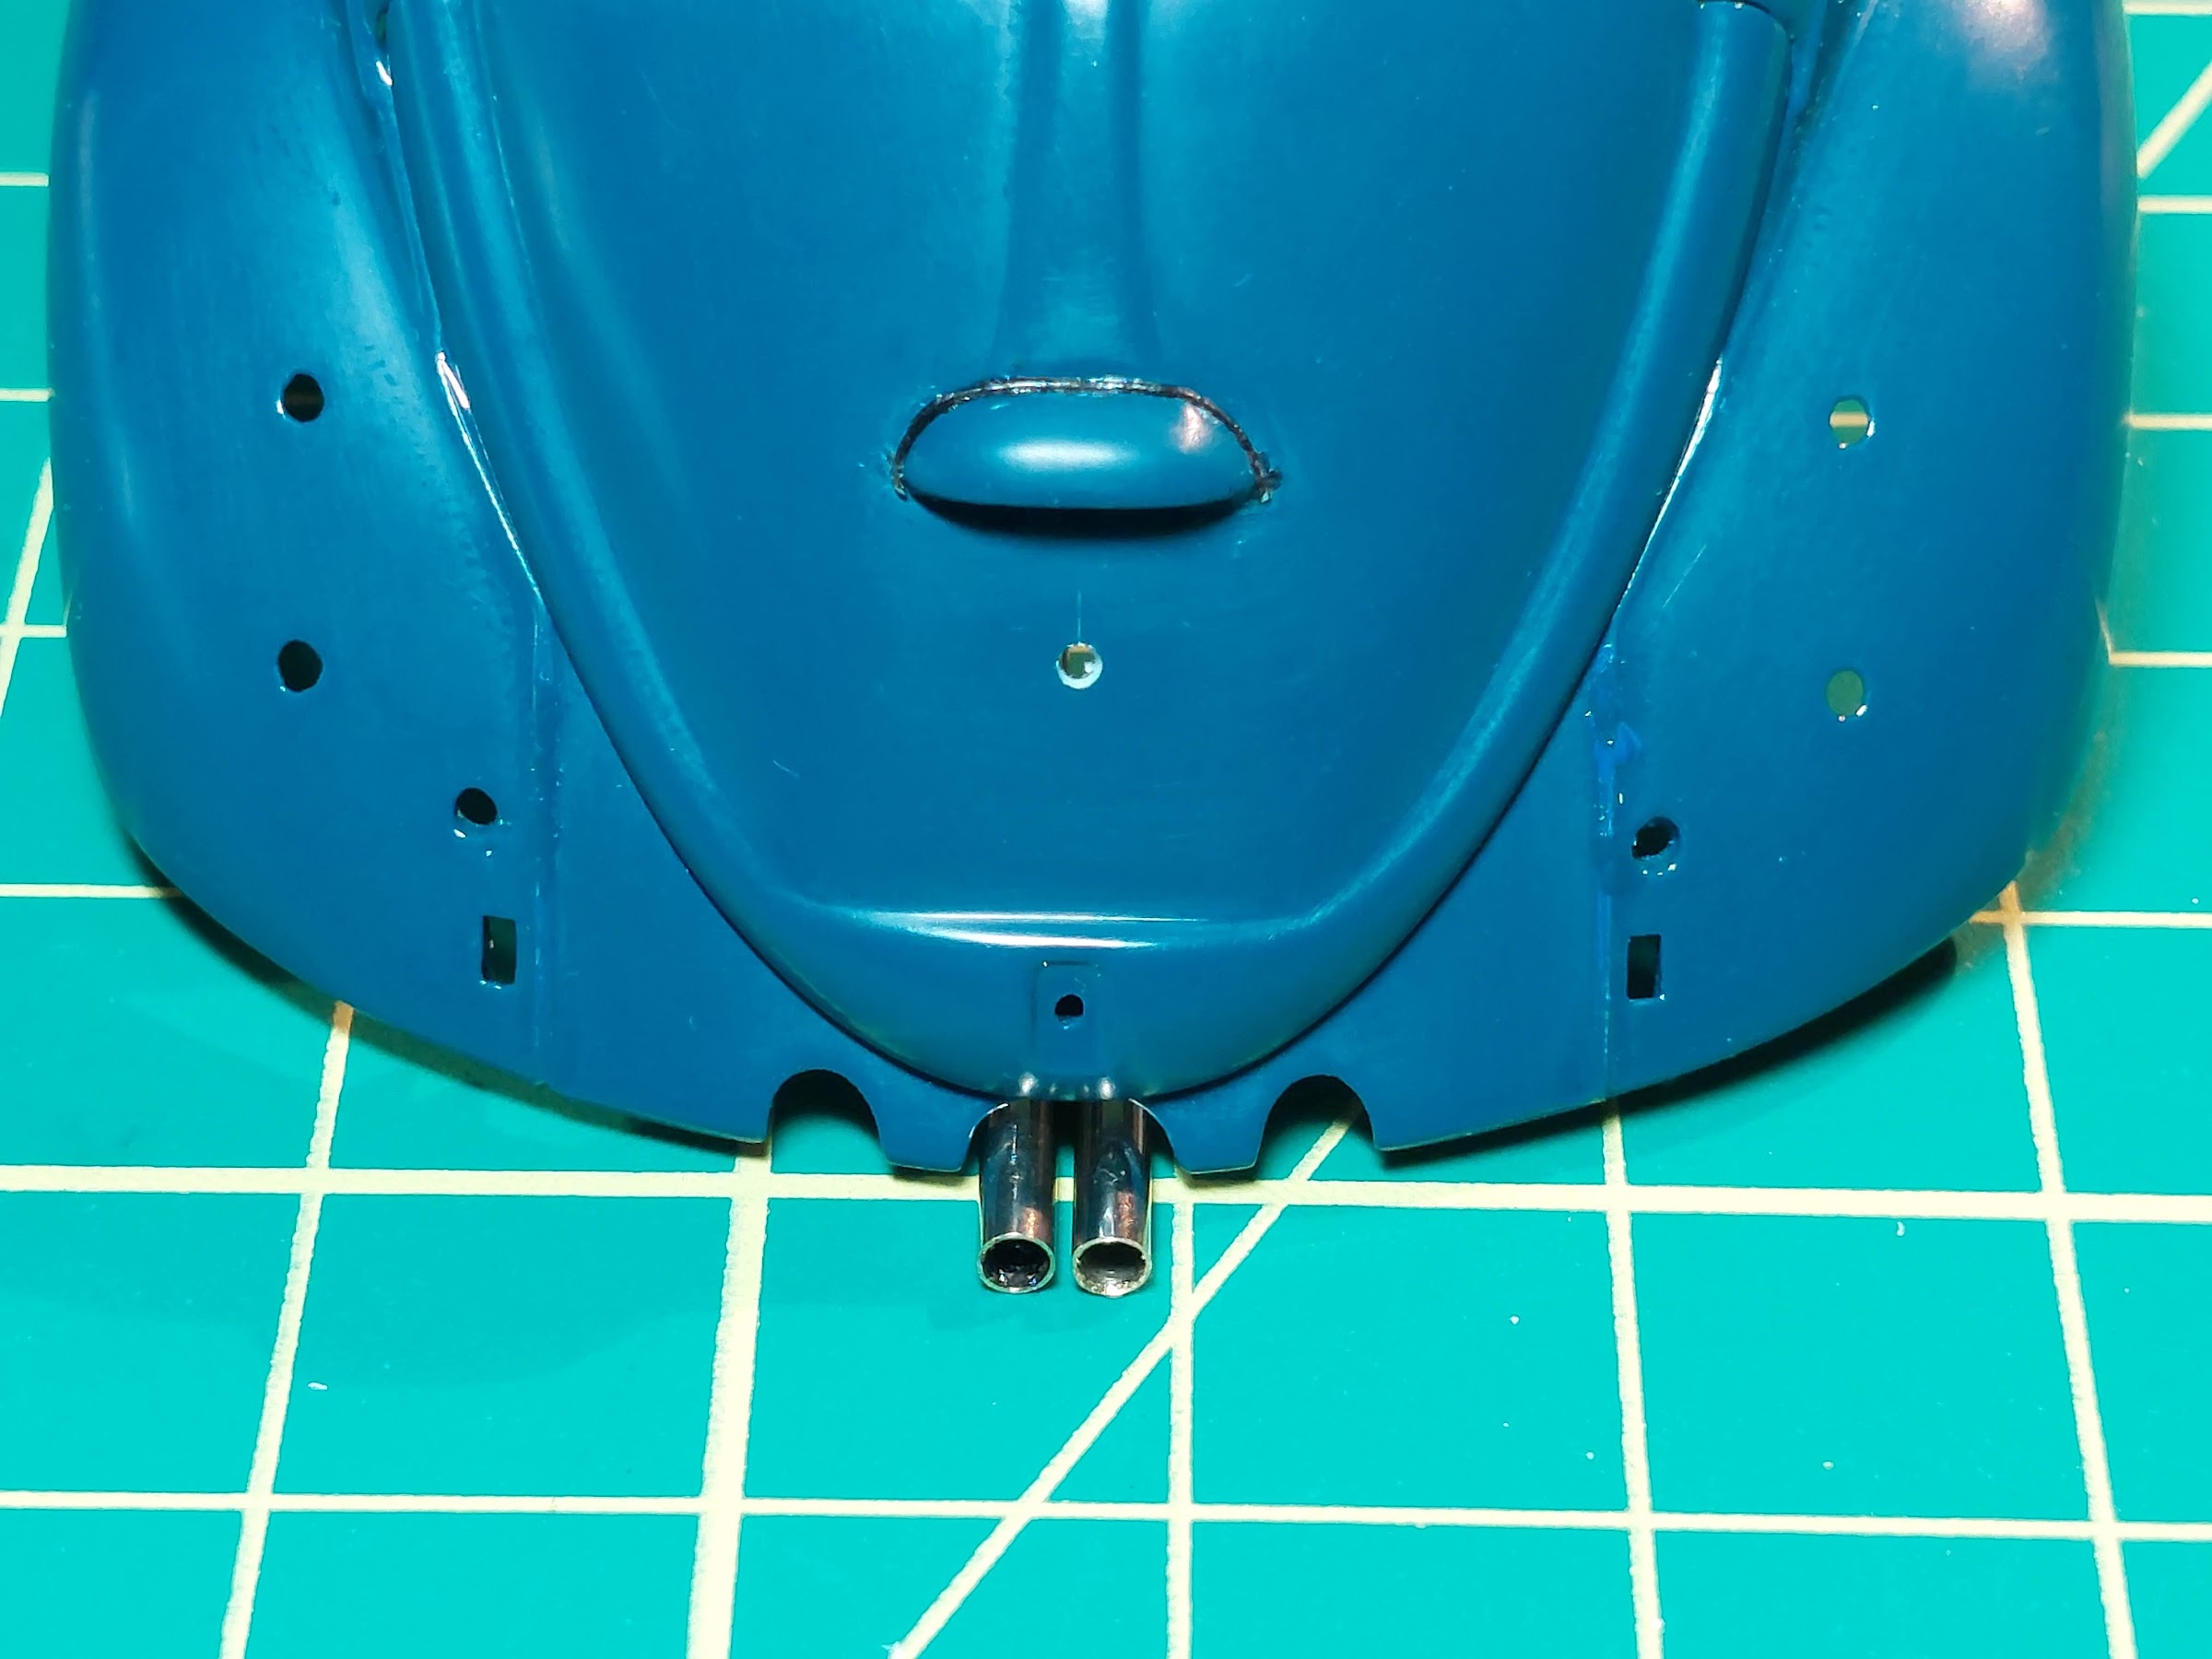
Seemed like a good idea at the time... the oval Busrch exhaust tip got under my skin somehow, especially when I measured it and upconverted it to 1:1 size; seems too large to "be real", so I'm persuing a twin tip arragement instead.

Background: When I was seventeen I bought and installed an EMPI glasspack muffler on my original 64 Beetle. I was in the process with the rear end jacked up in the driveway when my Dad came home from work, and boy did I get a scolding! I was convinced that it added 20 HP... at least it sounded like it did, and it made my girfriend giggle whenver I stood on the gas.

So, here are my WIP mockups of a center twin tip glasspack version:

The size of exhaust tips to use and still stay within "real scale" is of concern. I'm using brass(?) material from old ballpoint pens. The larger ones upconvert to 3" OD in the real world. That's still a bit big, but look great. The smaller ones upconvert to 2.2" OD, and are closer to being realistic. Decisions, decisions...

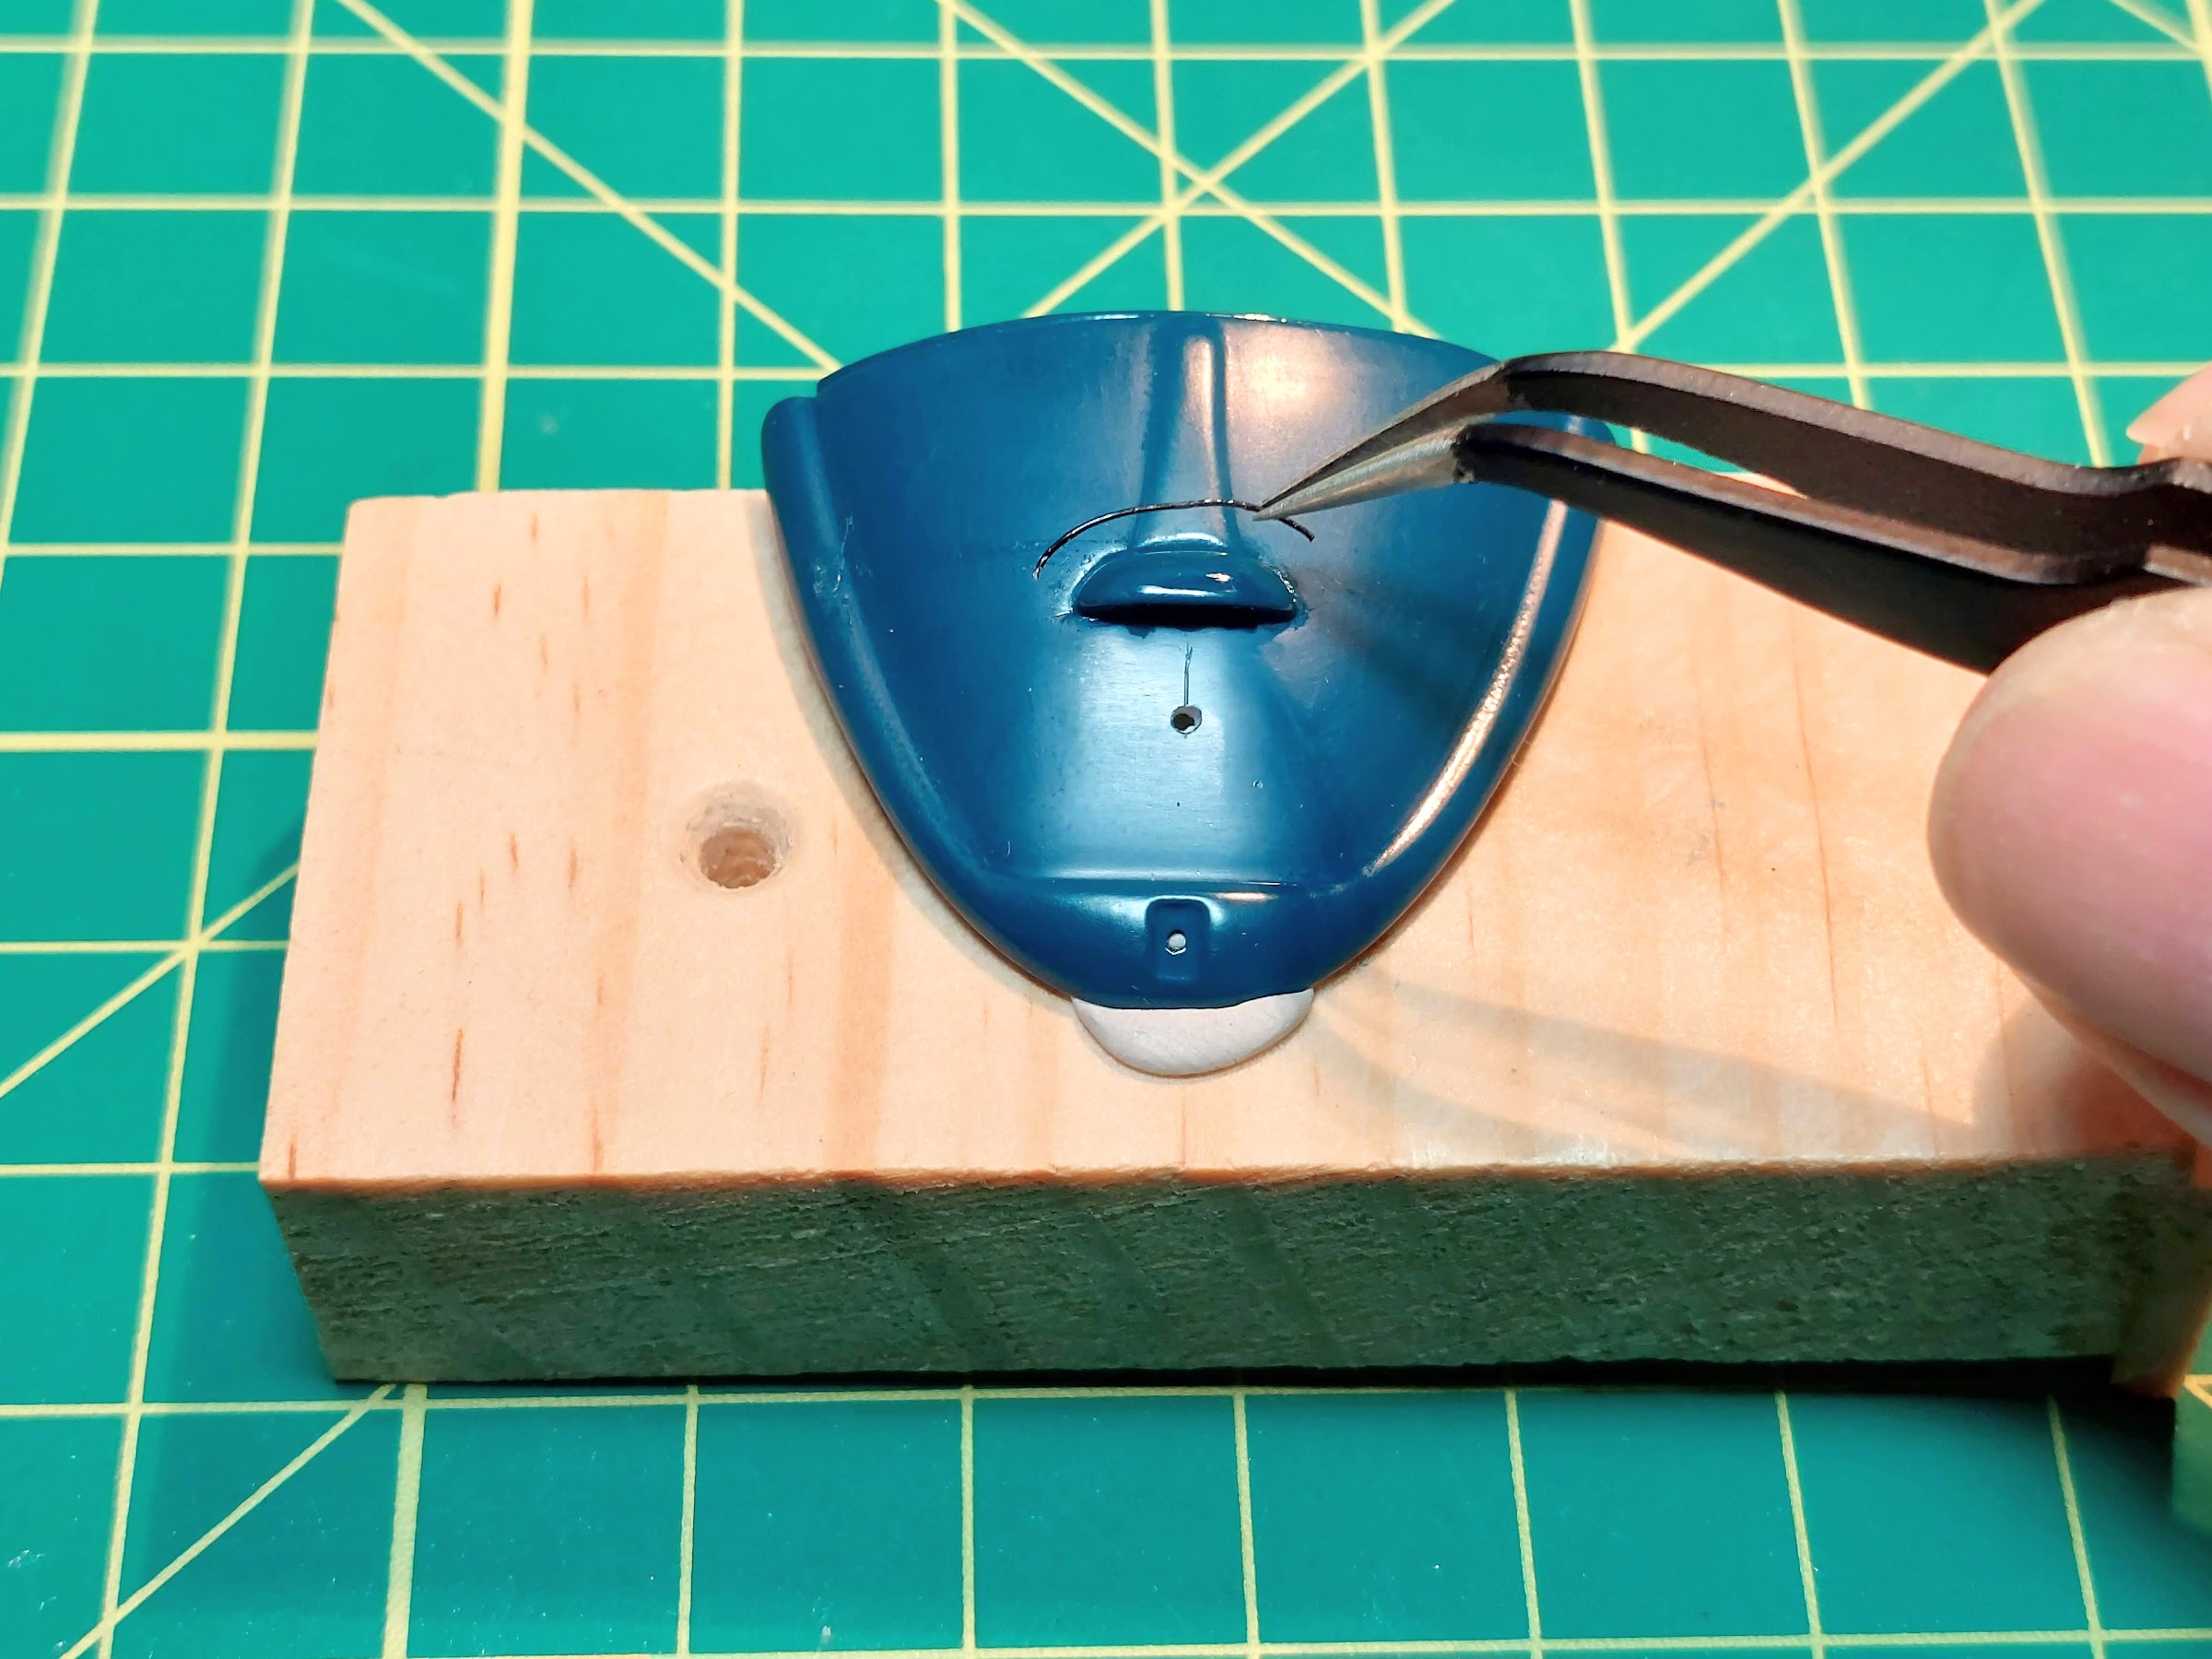
The rear license plate light enclosure needed a gasket:      

Mudflaps finished:

As a starving dealer auto tech in the early 70's, I had to scrounge every penny in order to compete in my Datsun 510SSS rally car. My meager budget for consumables often meant accepting discarded gravel tires from the big budget teams. I'd often regroove a decent set of cast-off gravel tires for use as snows, so regrooving the stock Tamiya Beetle tires into gravel tires is a wierd deja-vu moment for me:

More to come.

  • Member since
    April 2003
  • From: USA
Posted by keavdog on Monday, April 4, 2022 10:32 PM

Great details.  License plate gasket?!  Wow.  Funny I don't recal seeing mudflaps on the bugs.

Thanks,

John

  • Member since
    February 2022
Posted by TechEd29 on Tuesday, April 5, 2022 10:56 AM

keavdog
Great details.  License plate gasket?!  Wow.  Funny I don't recal seeing mudflaps on the bugs.


Thanks, John.

Mudflaps for Beetles were a popular dealer-installed accessory at the Canadian dealer where I worked... I did tons of them during PDIs.

They are also a necessity on a rally car. They minimize the muck that builds up on the rear end, especially on the tail lights, and deflect gravel away from the inner fender by the rear fascia.

Case in point: During one of my rainy night time events in northern Ontario (on logging trails up near Pembroke), the Ontario Provincial Police (OPP) were monitoring the rally cars on public road transit stages; checking speeds with radar, safety equipment etc. Several of the newbie competitors that did not run flaps got dinged for "non-visible" tail lights due to mud buildup... embarrassing.

  • Member since
    March 2012
  • From: Corpus Christi, Tx
Posted by mustang1989 on Wednesday, April 6, 2022 7:13 AM

Such great attention to detail and the paint work on that car body is just all that AND a whole bag of party mix.

Exceptional work.


 Forum | Modelers Social Club Forum (proboards.com) 

  • Member since
    February 2022
Posted by TechEd29 on Wednesday, April 6, 2022 9:38 PM

mustang1989
Such great attention to detail and the paint work on that car body is just all that AND a whole bag of party mix.

Exceptional work.

Thanks, Joe.

I'll admit that I'm slowly losing my patience in terms of wanting it all finished. There's still a long way to go, and summer camping trips are around the corner.

Though, I am enjoying all of the deja vu moments of remembering working on these cars as a dealer tech in the 70s.

Cheers,

Juergen

  • Member since
    February 2022
Posted by TechEd29 on Wednesday, April 6, 2022 10:02 PM

Two hours work = +20 horsepower!

Drilling for aluminum pins to help with gluing alignment to the heat exchangers:

Gluing the little pipe clamps required some gymnasitics:

Start 'er up!!

The rear bumper bracket depth that Tamiya had in mind was way too far out, so I tighten them in to scale depth. I needed this to get an accurate length on the tail pipes from the glasspack (7.5" - 0.3215" for 1/24):

Interestingly, the larger pipes slide right over the smaller ones and look killer, if not exactly practical... becasue they'll take some low end HP out of the stock motor Wink

An odd thing happened though. When I went to accellerate, a bunch of blue ink came spewing out of the tailpipes... oh, wait.

More to come.

  • Member since
    February 2022
Posted by TechEd29 on Sunday, April 10, 2022 10:39 PM

Here's what I worked on, off and on, over the weekend.

During the last year of owning my 64 Beetle, I saved up and bought a Talbot Berlin racing mirror, like this one:

It made the car at least, another 20 MPH faster... really Cool

To stay true to the personal nature of the build, I'm fabricating one for the Rallye Beetle... as close as I can, anyway:

The passenger side mirror that came with the Tamiya kit seems to have enough radius on the backside to use as the swivel part of the mirror. It'll go on the flat end of the bullet:

Got a couple more gravel tires grooved. Counted thirty strokes of the file for each groove...whew. Also cut shallow reliefs at the "bottom" of each tire to simulate the weight of the car on the tires when they're mounted:

Mockup test bending the front sway bar that Tamiya did not include. I'ts 0.8mm aluminum rod.

More to come.

  • Member since
    March 2012
  • From: Corpus Christi, Tx
Posted by mustang1989 on Tuesday, April 12, 2022 1:44 PM

Not a single detail forgotten here. Love the exhaust too btw.


 Forum | Modelers Social Club Forum (proboards.com) 

  • Member since
    February 2022
Posted by TechEd29 on Thursday, April 14, 2022 3:50 PM

mustang1989
Not a single detail forgotten here. Love the exhaust too btw.

Thanks!

Sweating the details drives me nuts sometimes... but it's so satisfying when they turn out better than expected.

J.

  • Member since
    February 2022
Posted by TechEd29 on Thursday, April 14, 2022 4:37 PM

Front Sway Bar WIP:

Made the rubber bushings for the clamp mounts to the lower control arms.

Trial fit for gluing:

Sidebar: The photo above reveals one of the unfortunate results of mounting the axle beam higher on the frame head in order to acheive a realistic front fender gap (Tamiya OOB was too high). The top of the axle beam mounts now fouled the bottom of the luggage compartment module above, preventing that modules proper installation on the chassis. I had to remove some material from the beam etc. to get everything to fit.

Talbot Berlin Race Mirror WIP:

After taking a closer look at the back radius of the Tamiya passenger mirror I planned to use as the swivel section on the mirror housing, I decided it was too thin. As such, I'm making one that's closer to scale by "turning" one out of 1.5mm styrene. Found out that I have to wait longer for the spindle glue to dry... started to wobble when it got warm Embarrassed

More to come.

  • Member since
    February 2022
Posted by TechEd29 on Thursday, April 14, 2022 11:25 PM

Glad I chose to turn the swivel portion of the mirror out of thicker material... turned out okay.

After final sanding and separating from the spindle, it'll be ready for brushing on the Molotow chrome (ref. test piece). My experience has been that the Molotow takes a long time to dry before safe handling, so I'll likely leave this step until close to the end of the build.

More to come.

  • Member since
    February 2022
Posted by TechEd29 on Sunday, April 17, 2022 10:48 PM

Progress, millimetre by millimetre, and an idea sucessfully tested.

Fabbed front sway bar mounted, clamps painted:

The simulated rubber gaskets under front turn signal housings turned out okay. The assemblies will be glued from inside the fenders via the pins:

Mockup:

As usual, I got an additional kit as insurance for goof-ups. But in this case it also served as a proof of concept test for the chrome mouldings.

As stated earlier, I was not pleased with how the chrome mouldings were rendered on the body, and how difficult it would be (for me with my tremors) to finish them sharply, even with masking becasue the raised profile of the mouldings on the body was really shallow in spots. I had some half round .040 rod that is v/close to scale for the mouldings on a 66, but the gluing process of a moulding already finished with Molotow chrome on the painted body would be just as much a challenge as masking etc.... so I'm gonna try to install them just as they would be on 1:1 car, with pins. I'll cut the mouldings to length and use .025" styrene rod for pins that will be glued from inside the body. The goal is sharp visible edge. Here's my proof of concept test outcome:

More to come.

  • Member since
    April 2003
  • From: USA
Posted by keavdog on Sunday, April 17, 2022 11:00 PM

That will work!  Great idea!

Thanks,

John

  • Member since
    February 2022
Posted by TechEd29 on Thursday, May 12, 2022 3:54 PM

After several failed test attempts at tape masking the thin moulding strips on the rear tailight assemblies for Molotow chrome application, I reverted to using thinned Elmers white glue much as I did to mask the front VW emblem on my Pinball Van (build thread here: https://cs.finescale.com/fsm/modeling_subjects/f/4/t/190133.aspx).

I first applied two tape strip "handles" and then brushed on the thinned Elmers on either side of the strip. After three hours, I brushed on the Molotow:

Using the handles helped immensely with removing the Elmers mask. I then hand-painted the housings with the Sea Blue body colour:

Not perfect, but I'm still pleased given how hard it is for me to build and paint with my hand tremors. I'll fit the gaskets underneath the housings prior to installing on the rear fenders... body still needs to be clear coated first.

More to come.


  • Member since
    August 2021
Posted by lurch on Thursday, May 12, 2022 8:32 PM

Your attention to detail is outstanding. You are doing a fantastic job on this build. 

  • Member since
    January 2015
Posted by TheMongoose on Saturday, May 14, 2022 8:10 AM

Super build techniques buried all throughout this thread! It'd been awhile since i stopped by. Enjoyed the read and the policia stories over coffee this morning. Awesome work!

In the pattern: Scale Shipyard's 1/48 Balao Class Sub! leaning out the list...NOT! Ha, added to it again - Viper MkVii, 1/32 THUD & F-15J plus a weekend madness build!

  • Member since
    March 2012
  • From: Corpus Christi, Tx
Posted by mustang1989 on Saturday, May 14, 2022 10:57 AM

TechEd29


mustang1989
Not a single detail forgotten here. Love the exhaust too btw.


Thanks!

Sweating the details drives me nuts sometimes... but it's so satisfying when they turn out better than expected.

J.


Right on brother. I'm just like you in that mindset. Progress is looking stellar


 Forum | Modelers Social Club Forum (proboards.com) 

  • Member since
    February 2022
Posted by TechEd29 on Monday, May 16, 2022 2:54 PM

Thanks for the kind words everyone! Big Smile This definitely helps in keeping me motivated on this marathon build.

The body colour test spoon I had airbrushed two months ago with Future/Pledge revealed miniscule spiderwebbing under direct lighting, so I opted to use Tamiya X22 instead... but, it gave me a fright when I airbrushed it to the engine cover: As it was drying, a wierd yellow and white haze surfaced, and then completely disapated. What the heck was that?

I finally finished the engine cover module: Clear coated with Tamiya X22, installed a license plate light in the hollowed out housing, fitted the license plate and release lever. I also applied decals to simulate the air cooling vents as would be used on a convertible (a popular performance mod for Beetle sedans back in the day). The difference in colour from sunlight to interior lighting is remarkable:

I practiced my chrome moulding idea/method by applying the .040" half round to the running boards with pins. Primarily I wanted to note if the process had any pitfalls or could be tweaked before I proceed to apply them on the body.

I first drilled holes in the r/boards and inserted short sections of .025" rod, making sure they were somewhat loose. I used these to mark and then glue the pins to the half round "mouldings":

I secured the pins with dumdum to keep the mouldings standing-off from the r/boards, and then applied the Molotow. After 48 hours I pulled the mouldings tight using the pins and glued them from behind:

Result:

More to come.

  • Member since
    April 2003
  • From: USA
Posted by keavdog on Monday, May 16, 2022 11:29 PM

Great technique!

Thanks,

John

  • Member since
    October 2019
  • From: New Braunfels, Texas
Posted by Tanker-Builder on Tuesday, May 17, 2022 8:59 AM

Hello!

     Who in the heck do you think you are, Ferdinand Porsche? That has got to be an example of getting in the " Groove" and doing it awesomely Right! I totally dig what you are up to!!

  • Member since
    February 2022
Posted by TechEd29 on Sunday, May 22, 2022 5:53 PM

Recently overheard on the Rallye Beetle's Driver - Navigator intercom:

Navigator: "Does it seem to you that there's more wind noise than usual?"

Driver: "Nevermind that, the body just flew off!!!!!" Wink

With warmer temps up here, I'm itching to finally get the clearcoat on the body. So I stopped procrasitnating and tackled the mouldings today. Here's the process. I first flattened the poorly-rendered OOB mouldings so that they measured a tick under .040" and were better to see for drilling. I then marked and drilled the .025" pin locations with the body secured in scratchbuilt cradle. I test fitted the pins to make sure that drilled holes were square. I laid the mouldings on top of the pins to mark the gluing locations... I cupped out small reliefs on the backside of the mouldings for better purchase of the CA. I fitted the assemblies and tested the "draw" on the pins to see if any of the holes needed to be reamed a bit laterally (only two needed touchup).

I'll experiment with airbrushing the Molotow before installation. If not, after clearcoating the body I'll fit them standing off like I did on the running boards, and brush paint.

The moulding pin alignments on the front and rear quarter panel downward curved sections might need to be tweaked, but so far so good. The next time I'll opt for an AlcladII chrome finish as it seemes to be safer to handle after application.

I'll totally believe you if you call me crazy.

More to come.

  • Member since
    August 2021
Posted by lurch on Monday, May 23, 2022 8:51 PM

Teched where is 'up here'? I am from northwestern wisc. 

JOIN OUR COMMUNITY!

Our community is FREE to join. To participate you must either login or register for an account.

SEARCH FORUMS
FREE NEWSLETTER
By signing up you may also receive reader surveys and occasional special offers. We do not sell, rent or trade our email lists. View our Privacy Policy.