SEARCH FINESCALE.COM

Enter keywords or a search phrase below:

Model T 1913 Speedster WIP ( Done 4/30/22)

13489 views
192 replies
1 rating 2 rating 3 rating 4 rating 5 rating
  • Member since
    July 2014
  • From: Franklin Wi
Posted by Bakster on Wednesday, March 16, 2022 9:58 AM

keavdog

Imagine your average driver today being responsible for adjusting their timing in the cockpit of their car Surprise


Lol! That cracks me up. What a vision that is. But hey, they might be so busy with that they wont have time to text and drive. Could be a plus. 

  • Member since
    July 2014
  • From: Franklin Wi
Posted by Bakster on Wednesday, March 16, 2022 10:01 AM

Egads, Dave. The stone age of autos.

  • Member since
    October 2019
  • From: New Braunfels, Texas
Posted by Tanker-Builder on Wednesday, March 16, 2022 12:11 PM

Aha!

        The reason for the four wires coming from the Firewall? Four small Plug-Centric Coils. The unified coil had not been applied to the early cars till 1920. The early cars had you set the Coils and the Timing from the passenger compartment. Why, you even got a feeler guage for the coil contacts! 

  • Member since
    April 2003
  • From: USA
Posted by keavdog on Wednesday, March 16, 2022 12:14 PM

And now we're back to coil on plug ignition.  Guess they had it right to begin with.

Thanks,

John

  • Member since
    July 2014
  • From: Franklin Wi
Posted by Bakster on Wednesday, March 16, 2022 1:08 PM

keavdog

And now we're back to coil on plug ignition.  Guess they had it right to begin with.


Lol

  • Member since
    July 2014
  • From: Franklin Wi
Posted by Bakster on Wednesday, March 16, 2022 1:12 PM

Tanker-Builder
Why, you even got a feeler guage for the coil contacts! 

Too funny. Did they provide a person to help push when all else fails? Lol.

Ah-- the good old days. I still love the car though. It is the dawn of automobiles; I love it.

  • Member since
    July 2012
  • From: Douglas AZ
Posted by littletimmy on Wednesday, March 16, 2022 1:48 PM

If I reach back in my mind , ( through the "Mist of time" )  I seem to recall that there was a lever on the steering wheel that adjusted/ advanced the spark.


 Dont worry about the thumbprint, paint it Rust , and call it "Battle Damage"

  • Member since
    July 2014
  • From: Franklin Wi
Posted by Bakster on Wednesday, March 16, 2022 2:03 PM

littletimmy

If I reach back in my mind , ( through the "Mist of time" )  I seem to recall that there was a lever on the steering wheel that adjusted/ advanced the spark.


Yeah if you read the manual that Rich linked to, they talk about that. It is a hoot.

  • Member since
    March 2022
  • From: Twin cities, MN
Posted by missileman2000 on Wednesday, March 16, 2022 3:59 PM

keavdog

Imagine your average driver today being responsible for adjusting their timing in the cockpit of their car Surprise


Wasn't the timing the way you adjusted speed?  I've heard that the throttle was basically a run-idle setting, almost like a switch.  On some cars of that era you also had a mixture control.

BTW, planning to do another speedster, as a racing car.  Will lower the seats and move them back a bit (and tank too), and lower the steering column.  Also add some speed stuff to the engine.  Especially after the end of the war the speed equipment industry virtually exploded.  I also have a model T kit with a Fronty engine that I will do as a dirt oval racing car, with scratch body.  The modified speedsters led to the full racing dirt cars.


  • Member since
    July 2014
  • From: Franklin Wi
Posted by Bakster on Wednesday, March 16, 2022 5:54 PM

Well-- like I said, my wiring is crude. That said -- as I progressed through this build, I grew to like them.

I was not interested in ordering modern looking plug wires and knowing I'd need to attach them to the firewall, I wanted something that I can fix a shape to them for easy gluing later.

My first go was with trying craft wire. The wire is pliable, it held the shape I set them at, and I had various gauges in stock. The problem? The wire did not stick well to the sparkplugs, and I was using CA even. Any slight adjusting that I did make them pop off. A few times of this and I knew-- I need to use something else before I make a mess of things. 

I thought, what sticks better than plastic to plastic. So, back to the Evergreen round stock. I think it is the .020 size. Bingo. They held perfectly and I could bend them to the shape I wanted.

Below: I mocked up the assemblies using tape so that I can form, cut, and attach the wires as I want them. 

Below: Wires are painted with Tamiya Rubber Black. The connection points are painted with Alcad Copper to simulate copper wires or terminals.

Below: The other side of the engine. Notice the arrow in the image. This pipe leads to the radiator. Unless I missed something, the model does not connect or even meet up with the radiator. It just hangs out there not connecting to anything. I could not leave it that way, so I made the rounded fitting out of sprue.

I could not find any images that show a clear concept of how the radiator ported up to the hose, so, I winged it. I thought that anything will look better than having a fitting going to nowhere. What turned out amazing is that a few weeks after I did that, I found a video where some guys were testing a 1:1 engine. The fitting I made looked pert near exactly like what was showing on their radiator. I don't think I could have guessed it better. Just a fun fact of the build.


End of update.


  • Member since
    July 2014
  • From: Franklin Wi
Posted by Bakster on Thursday, March 17, 2022 8:14 PM

Below:  Painted with MM Wood.

Below: I am no expert at simulating wood but here is what I tried. Using the stiff bristled brush shown, I brushed on Folk Art Raw Sienna to simulate wood grain. I tried to be mindful of not loading the brush with too much paint, being mindful of not applying too much pressure, and to always keep the grain flowing in consistent directions. 


Below: I brushed on a thin coat of Pledge FloorCare Finish. It gave me a slight sheen that I was looking for while locking in the paint.


End of update

  • Member since
    July 2014
  • From: Franklin Wi
Posted by Bakster on Friday, March 18, 2022 10:17 PM

Primed with Mr Finishing Surface Prime (White). It is my first time using this product and I like it. It sprayed and sanded well. I purchased this based on recommendations here on the forum, and it suited my wish not having to decant Tamiya. The product comes in good sized jars too.

So-- after the paint cured, I gave the model a light sanding. I did notice some sand pebble effect in areas specific to the inner corners of the fenders and where they meet the step rail. I think that this is the nature of the beast. I think even my beloved Tamiya Surface Primer would struggle with those areas too. 

I sprayed the model with MR Color 6. My first trying this brand, also a recommendation here, and again, the paint performed well. I was able to draw out a nice gloss finish. 


Major masking job and I feared it would be. I like the clean finish that airbrushing produces and it's why I go to these lengths. However-- hoping for an easier way, I purchased some paint pens thinking just maybe... I could draw a good line along those raised edges. I practiced on scrap, and I quickly found out, no way... jose. The issue? There is no control of the paint flow; the paint comes out too heavy.

I am glad I tested it first because it would have ruined the work already in place. What a bummer. And honesty, with how they performed, I can't even see a use for them. But that is me-- I am picky dude about such things.

The other thing I see people using is colored markers. I will one day explore that option before throwing in the towel. Maybe their felt tipped ink flows in a more controlled way.

If you guys have any tried-and-true methods-- I am all ears.

Anyway--I scrapped the idea and settled in for several hours of masking.

And that is it for tonights episode.

  • Member since
    November 2018
Posted by oldermodelguy on Saturday, March 19, 2022 6:42 AM

When I first tested Mr Primer Surfacer thinned with Mr Leveling thinner I found it to go down silky smooth.

When I had to stripe my 1/16 1911 Mercer I primed with light grey, sprayed with my Badger .25 in very close for minimum over spray Model Master Classic black in the areas to be striped. Then taped the stipes and reprimed the minimal over spray and shot the yellow in Model Master Chrome Yellow. This was a few years ago now but to this day still haven't assembled the kit. I've set it aside for a season while I work on a few other things. Anyway, all the paint work is complete and it looks very nice. I'll get back to it one day.

What paint are you using for your colors ?

  • Member since
    April 2003
  • From: USA
Posted by keavdog on Saturday, March 19, 2022 7:29 AM

That seems like a lot less work OMG.  Really like that green!

Thanks,

John

  • Member since
    November 2018
Posted by oldermodelguy on Saturday, March 19, 2022 9:53 AM

keavdog

That seems like a lot less work OMG.  Really like that green!


Being 1/16 finding tape was no problem though.

  • Member since
    July 2014
  • From: Franklin Wi
Posted by Bakster on Saturday, March 19, 2022 11:08 AM

keavdog

That seems like a lot less work OMG.  Really like that green!


  Maybe a little overkill on my part, maybe.  All too often I have found paint creepage in and under areas I would not expect. So, I go the extra mile. The worst part in masking this are the tight curves in the corners. I had to make curved masks off the model. I don't attempt trimming tape over something that is painted, it will show.

Yeah it is a nice green. I was originally planning to do a two tone as depicted in the model art but when I received the two colors, the light paint ws so darn close to the darker that it was not worth effort. This is an example of why I hate ordering colors off the net. Though the web picture looks perfect--what you get is not always what you expect.

Thanks for following and posting. More to come.

  • Member since
    July 2014
  • From: Franklin Wi
Posted by Bakster on Saturday, March 19, 2022 11:26 AM

oldermodelguy
When I first tested Mr Primer Surfacer thinned with Mr Leveling thinner I found it to go down silky smooth.

I used the same thinner. It sprayed well. Maybe I needed to thin it slightly more.

oldermodelguy
Anyway, all the paint work is complete and it looks very nice. I'll get back to it one day.

  Please do. I would love to see pictures of your work too!

oldermodelguy
What paint are you using for your colors ?

The green is Mr Color #6. The brass is Alclad Brass. In coming posts you will see that I painted the seats using MRP black. That paint sprays awesome straight from the bottle. Good coverage maintaining excellent detail. So to utilize that wonder well--a person needs to make sure the plastic/primer is baby smooth or defects will be apparent. If you have a good base-- the paint is amazing and it's scale is fantastic. I can see that for military models it being the bomb. 

  • Member since
    July 2014
  • From: Franklin Wi
Posted by Bakster on Saturday, March 19, 2022 11:41 AM

Speaking of tape, I tried Tamiyas 1mil. I have to say it worked well for curves. And for tighter curves where the tape is still too wide to bend-- I cut it down the middle. I am leaning towards preferring Tamiya over vinyl. It has the right tack and it's super easy to trim. I find vinyl not as easy to trim, it has an almost too strong tack, and often, the edges are not that clean. I often find burrs in the tape edge. In short --Tamiya is easier to work with.  But that is just my opinion, of course.

  • Member since
    July 2014
  • From: Franklin Wi
Posted by Bakster on Saturday, March 19, 2022 2:49 PM

And todays update, The Unmasking.

End of update

  • Member since
    April 2003
  • From: USA
Posted by keavdog on Saturday, March 19, 2022 3:00 PM

Gotta be happy with that!  Looks great.

Thanks,

John

  • Member since
    July 2014
  • From: Franklin Wi
Posted by Bakster on Saturday, March 19, 2022 3:19 PM

keavdog

Gotta be happy with that!  Looks great.


Overall, yes. I could have done a little better job with the primer sanding. I got lazy. It's not perfect but considering my first car in decades,  I am happy with it.


Thanks John!

  • Member since
    August 2007
  • From: back country of SO-CAL, at the birth place of Naval Aviation
Posted by DUSTER on Saturday, March 19, 2022 10:40 PM

I'm happy with it too. If you're looking for a second opinion.  Looks every bit  like a classic. 

Steve

Building the perfect model---just not quite yet  Confused

  • Member since
    July 2014
  • From: Franklin Wi
Posted by Bakster on Sunday, March 20, 2022 1:14 AM

DUSTER

I'm happy with it too. If you're looking for a second opinion.  Looks every bit  like a classic. 


Hey thanks, Duster!

  • Member since
    November 2018
Posted by oldermodelguy on Sunday, March 20, 2022 6:48 AM

Bakster


keavdog

Gotta be happy with that!  Looks great.


Overall, yes. I could have done a little better job with the primer sanding. I got lazy. It's not perfect but considering my first car in decades,  I am happy with it.


Thanks John!


Of course you have the first hand view of it at home but here on screen it looks great ! That's a mighty fine line to carry all the way around those fenders too. 1/16 scale makes a big difference there.


  • Member since
    October 2019
  • From: New Braunfels, Texas
Posted by Tanker-Builder on Sunday, March 20, 2022 7:42 AM

Hi Bakster!

     Actually no. What you did was find the farmer who had just unhitched his horse from the Twelve -Bottom Disc/And offered to pay for a tow to Bubba's Service station if Bubba's was close enough. Or to his farmyard where he had a couple of cannisters of what passed for gaoline back then. A little stronger than the car stuff.

    Tractors were notoriously cantankerous and used more refined fuel. But it cost more than a bale of hay back then! But, then you were the center of attention in a spiffy motor Carriage with that amazing paint and that Engine! What was the world coming to? 

  • Member since
    October 2019
  • From: New Braunfels, Texas
Posted by Tanker-Builder on Sunday, March 20, 2022 7:46 AM

Oh Boy! You nailed that paint for sure!

  • Member since
    July 2014
  • From: Franklin Wi
Posted by Bakster on Sunday, March 20, 2022 9:29 AM

[quote user="oldermodelguy"


Of course you have the first hand view of it at home but here on screen it looks great ! That's a mighty fine line to carry all the way around those fenders too. 1/16 scale makes a big difference there.

[/quote] Thanks, Dave!

  • Member since
    July 2014
  • From: Franklin Wi
Posted by Bakster on Sunday, March 20, 2022 9:31 AM

Tanker-Builder

Hi Bakster!

     Actually no. What you did was find the farmer who had just unhitched his horse from the Twelve -Bottom Disc/And offered to pay for a tow to Bubba's Service station if Bubba's was close enough. Or to his farmyard where he had a couple of cannisters of what passed for gaoline back then. A little stronger than the car stuff.

    Tractors were notoriously cantankerous and used more refined fuel. But it cost more than a bale of hay back then! But, then you were the center of attention in a spiffy motor Carriage with that amazing paint and that Engine! What was the world coming to? 


Lol. You know, when I posted the pics of the motor, I thought about adding an oil puddle under the engine. Stick out tongue

  • Member since
    July 2014
  • From: Franklin Wi
Posted by Bakster on Sunday, March 20, 2022 9:34 AM

Tanker-Builder

Oh Boy! You nailed that paint for sure!


Thanks TB. Good to hear.

  • Member since
    July 2014
  • From: Franklin Wi
Posted by Bakster on Sunday, March 20, 2022 11:00 AM

Bouncing around a bit-- here is what I have worked on the last few days. I am quickly coming to the point in this build where my updates are real time and where I am at in the build.

So -- more masking. Because of how I painted these--I probably made my mask job more difficult. Maybe if I painted the wood spokes first it would have been easier to mask. But--I didn't, so I must work with it. Oh-- I suppose I could hand paint it but I am not a fan of my hand painting. 

I purchased this punch set for this purpose. In the end-- I am so glad I did, and I wish I had it years ago. It is so handy for making circular masks. And I love the little cutting matt they send with it. I use it to cut all my tape.

I cut the punched mask in half, then tape the half circles around the base of the wood spoke.

Filler mask is added between the spokes and liquid mask applied over it to secure the tape and to fill any gaps.

Notice the center hub masks. Because the hub has a low profile, I needed a stronger tape to hold it in place. In comes the vinyl tape. It was perfect for this. Then I cut circular masks for the centers and filled them with liquid mask for good measure. Why make circular masks for the center? I try to minimize liquid mask getting on paint. I have found certain liquid masks can affect paint finishes. Anyway--the vinyl still has its purpose in my processes. They are ready for paint.

Oh-- because my VMS Liquid Mask dried out, I had bought what the local hobby store had. They had Vallejo's version and I have to say that I like it. It is watery, giving you the opportunity to push the rubber around before it sets. VMS was the same way and that is what I liked about it. The sales guy said people like it for masking canopies too. I have not tried that, so I can't speak to that. I always prefer tape when it comes to canopies, but he said people can make this stuff work.  FYI.
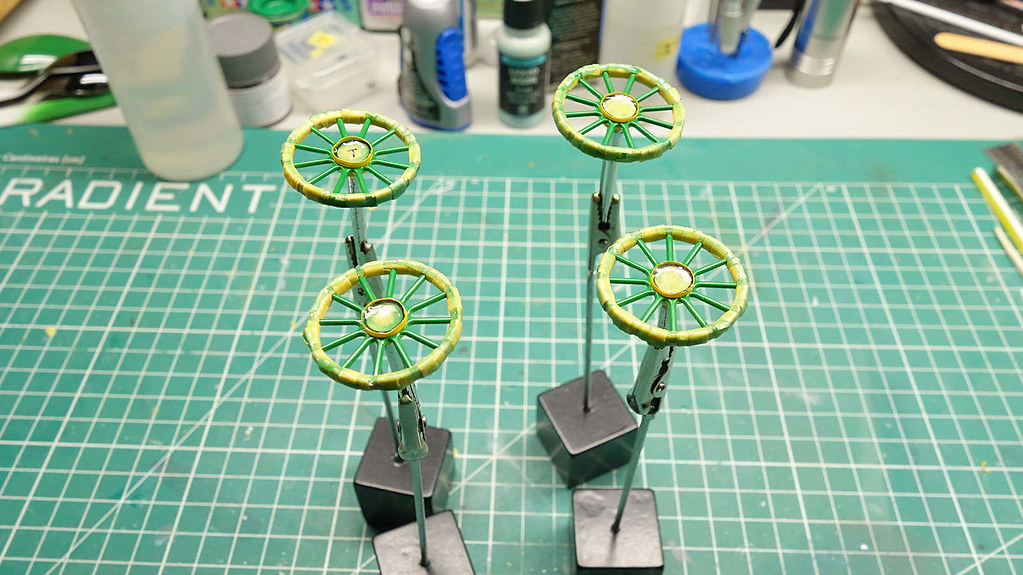
And to the paint. Ugh. Once again, I reach for what I was limited to buy in the local HS. They had the Ochre I needed but in Revell Acrylic. I have written about Revells Acrylic paint before. It is awful in an airbrush. Tip dry is horrendous. I had to wipe the tip every two or three sprays. The tip is a mess just after one spray. Terrible. I used their thinner and I tried various mixtures. I got a little improvement but still-- terrible tip dry. I won't be buying their paint again...if I can help it.

In spite of all that-- I managed to lay a good spray without any major disasters.
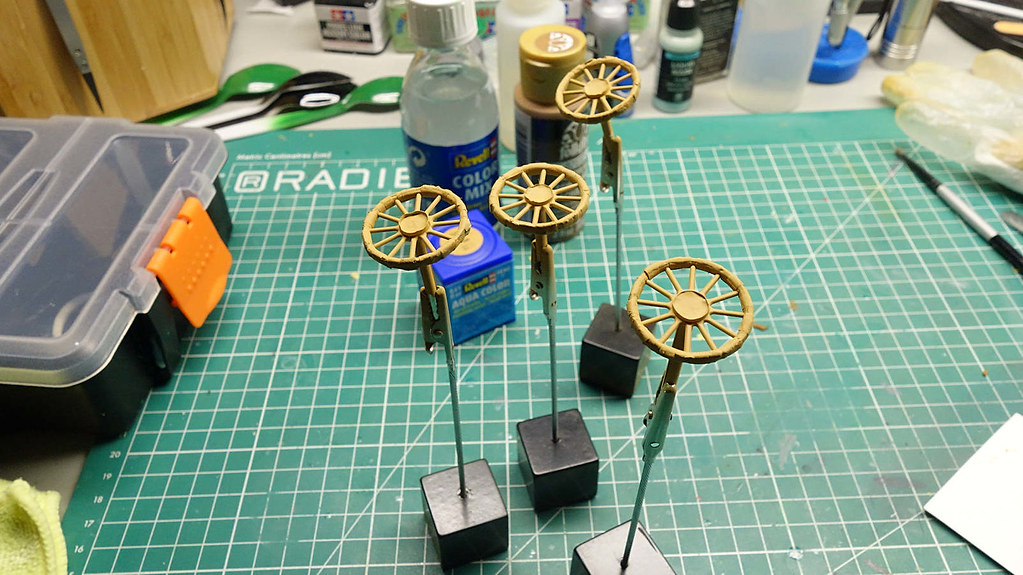
Demasked, the rubber is not attached. After paint I dry brushed FolkArt Raw Sienna. The dry brushing really pulls things together.
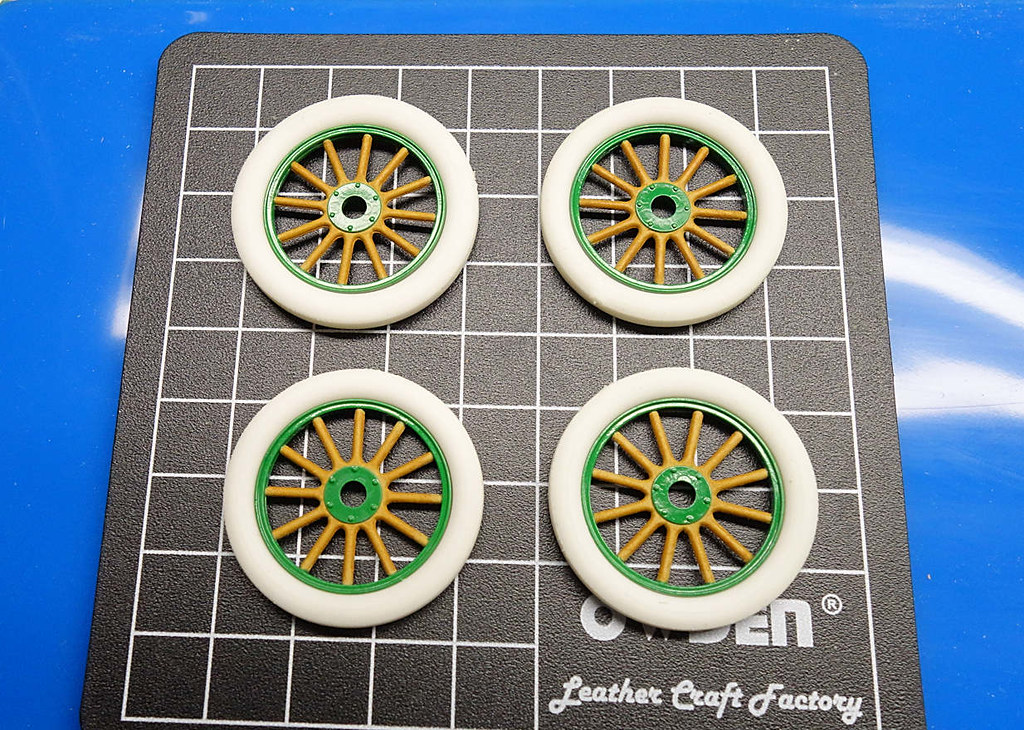
And that is my update for today. Cheers.

JOIN OUR COMMUNITY!

Our community is FREE to join. To participate you must either login or register for an account.

SEARCH FORUMS
FREE NEWSLETTER
By signing up you may also receive reader surveys and occasional special offers. We do not sell, rent or trade our email lists. View our Privacy Policy.