SEARCH FINESCALE.COM

Enter keywords or a search phrase below:

Model T 1913 Speedster WIP ( Done 4/30/22)

13491 views
192 replies
1 rating 2 rating 3 rating 4 rating 5 rating
  • Member since
    July 2014
  • From: Franklin Wi
Posted by Bakster on Thursday, March 31, 2022 10:33 AM

Greg

Still watching......


Glad to hear, Greggie. Yes

  • Member since
    July 2014
  • From: Franklin Wi
Posted by Bakster on Thursday, March 31, 2022 10:32 AM

Dodgy

Your builds are always educational Bakko and I am thoroughly enjoing this one. The suggestions being put forward are fascinating, and again it's a case of ideas/techniques that can be applied across all genres. Keep it up old mate!.


Thanks for enjoying and following, Ferg. Yes. And thanks to all that have contributed to this thread with their good ideas.

I will do my best to keep on!

  • Member since
    March 2012
  • From: Corpus Christi, Tx
Posted by mustang1989 on Wednesday, March 30, 2022 12:35 PM

Trial and error are to me the fun part of model building. If every one went together flawlessly there'd be no challenge in it. There's something to be said for building a great model such as this one and looking back on all the obstacles that are overcome to get such a great result. You're doin' good Steve. Lookin' forward to more brother.


 Forum | Modelers Social Club Forum (proboards.com) 

  • Member since
    May 2013
  • From: Indiana, USA
Posted by Greg on Wednesday, March 30, 2022 9:34 AM

Still watching......

You never do anything half-a........er, half-baked. That's for sure.

  • Member since
    August 2020
  • From: Lakes Entrance, Victoria, Australia.
Posted by Dodgy on Wednesday, March 30, 2022 4:19 AM

Your builds are always educational Bakko and I am thoroughly enjoing this one. The suggestions being put forward are fascinating, and again it's a case of ideas/techniques that can be applied across all genres. Keep it up old mate!.

I long to live in a world where chickens can cross the road without having their motives questioned

  • Member since
    July 2014
  • From: Franklin Wi
Posted by Bakster on Tuesday, March 29, 2022 9:06 PM

I tried Daves method and in principle it worked well! The black paint came off the emblem, no problem, and it did so cleanly. The methodology works! The problem? A good portion of gold came off too. Now, it becomes a question of which came first, the chicken or the egg. 

I tried two stores and I could not find glycerin. The heck with it, I tried Vaseline.

Did the Vaseline eat through the Testers Gloss Coat? Did the black lacquer eat through? Would the outcome be different if I use an black acrylic paint? Would the outcome be different if I used gold lacquer for the base and not the ink? Would the outcome be different if I used glycerin instead of Vaseline? 

Too many questions, and if I get stuck on this muddle anymore than I already have, the project moves forward on borrowed time. I must press on.

Even after losing the gold I was able to apply gold ink to an acceptable level. So, for now, the ink is how I will go. BUT, in my mind, Daves idea worked well, and I will experiment more on that down the road. I can see that process being a useful tool. Btw. As to brush painting a gloss over the gold ink, it occurred to me that Pledge/Future should work, and it did. It did not mess up the ink.

So, that will be how I go with this. It is time to clean up the part, hopefully, one last time, and start over. 


  • Member since
    July 2014
  • From: Franklin Wi
Posted by Bakster on Tuesday, March 29, 2022 8:30 PM

mustang1989


Your attention to detail is gonna pay off BIG time as this thing nears the finish line.


Hey Joe, I hope so. Thanks, and thanks TB as well.

  • Member since
    March 2012
  • From: Corpus Christi, Tx
Posted by mustang1989 on Tuesday, March 29, 2022 11:30 AM

This looking really good so far Steve. Most paints, I've found, will take a slight misting of clear and after the mist coat has dried then light gloss coats until the desired gloss is acheived. I took a chance a couple of times but this method has never failed me yet. 

Your attention to detail is gonna pay off BIG time as this thing nears the finish line.


 Forum | Modelers Social Club Forum (proboards.com) 

  • Member since
    October 2019
  • From: New Braunfels, Texas
Posted by Tanker-Builder on Monday, March 28, 2022 4:37 PM

Kool!

  • Member since
    July 2014
  • From: Franklin Wi
Posted by Bakster on Monday, March 28, 2022 2:57 PM

lurch

Looking great.


Thank you, Lurch.

  • Member since
    August 2021
Posted by lurch on Sunday, March 27, 2022 10:19 PM

Looking great.

  • Member since
    July 2014
  • From: Franklin Wi
Posted by Bakster on Sunday, March 27, 2022 3:53 PM

Bakster


oldermodelguy

I don't know this will work with alclad but I would try spraying everything the metal color. Coat the Ford letters with glycerin, paint the flat black. And wipe away the glycerin.Hopefully the metal color will stay on the letters. The good news is with black you don't need to have ten coats. I've used glycerin as a mask in the past. Also vasoline, though that was on chrome.

You could also do basically the same as above but brush in the black. You just need the right brush.


Hey Dave, that is an interesting idea. That would solve a lot of the problems I am facing. I will have to test it to make sure it doesn't affect the paint. 

You guys are bringing good ideas to light.


I may have found a simple path through the emblem issue. 

Below: The emblem was painted using a gold Sharpie marker. The simplicity of it is a cool thing. And, amazingly, the color match to Alcad is darn close.

The trick in keeping the finish consistent is to use the side of the marker, not the tip.  Also-- it is important to not lift up on the marker until you cover the entire surface. I found that when you lift and start it creates a dimple. It is best to drag the marker around until you get the coverage. I learned this through repeated tries. Once I learned this,it was so easy.

The ink can handle a coat of lacquer clear but it must be through an airbrush. No issues. It does not work well trying to brush paint the clear. The ink falls apart.

This looks like the path I will go but-- as long as I am here-- I will try Daves method using glycerin. I am interested to see how well that will work. 

BTW. This marker would have worked fantastic on the raised fender markings. Only, that is true to a point. The molding flattens out as you near the step. At that point, it becomes more of a freehand thing and that is where it would have gone south on me. The other thing is that clearance for the marker becomes an issue. So-- long story short--the way I did it was the best way for me. But--take out the two issues-- the marker would have been perfect.

Below: I have been working on the lanterns as well. I decided to diverge from how the kit has them. They have the sides of the lantern with clear glass, F1. Or, at least I think they want it clear on the sides. Not sure. They have a frame like it would be. The picture on the  box does not show them mounted, so that was no help.
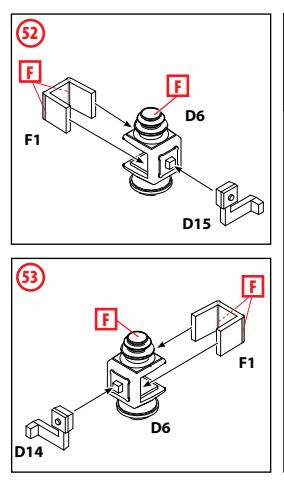
I am going with how this car has them. For the most part they are brass enclosures with the only opening being on it's front face.

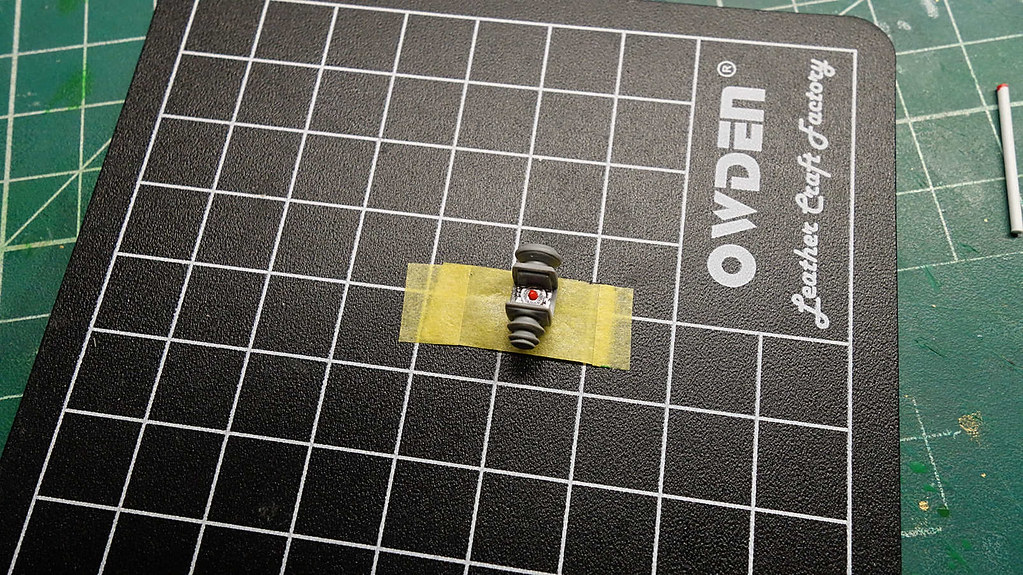
Below:

1. Bare metal foil is used for the backdrop.

2. The circular reflector is a rhinestone I purchased from Michaels and that I mounted in reverse. The back side of them have a polished and reflective backing to them.

3. The red bulb is Evergreen rod cut to a short piece and shaped to a rounded edge. The piece painted with craft paint. 

I am further along on these than this, but I have not imaged them yet. Still more work to do before being able to paint them. Basically, the clear parts are mounted, and I am filling gaps and such.
End of update. 

  • Member since
    July 2014
  • From: Franklin Wi
Posted by Bakster on Saturday, March 26, 2022 5:29 PM

Greg

This post is several days late, but that pinstripe job (masking, etc) looks pretty awesome from where I sit.

And those tires and rims are a knockout. Yes

Now, back to enjoy more of page 3.....


Thanks Greg....

  • Member since
    July 2014
  • From: Franklin Wi
Posted by Bakster on Saturday, March 26, 2022 5:29 PM

oldermodelguy

I don't know this will work with alclad but I would try spraying everything the metal color. Coat the Ford letters with glycerin, paint the flat black. And wipe away the glycerin.Hopefully the metal color will stay on the letters. The good news is with black you don't need to have ten coats. I've used glycerin as a mask in the past. Also vasoline, though that was on chrome.

You could also do basically the same as above but brush in the black. You just need the right brush.


Hey Dave, that is an interesting idea. That would solve a lot of the problems I am facing. I will have to test it to make sure it doesn't affect the paint. 

You guys are bringing good ideas to light.

  • Member since
    November 2018
Posted by oldermodelguy on Saturday, March 26, 2022 1:36 PM

I don't know this will work with alclad but I would try spraying everything the metal color. Coat the Ford letters with glycerin, paint the flat black. And wipe away the glycerin.Hopefully the metal color will stay on the letters. The good news is with black you don't need to have ten coats. I've used glycerin as a mask in the past. Also vasoline, though that was on chrome.

You could also do basically the same as above but brush in the black. You just need the right brush.

  • Member since
    May 2013
  • From: Indiana, USA
Posted by Greg on Saturday, March 26, 2022 1:23 PM

This post is several days late, but that pinstripe job (masking, etc) looks pretty awesome from where I sit.

And those tires and rims are a knockout. Yes

Now, back to enjoy more of page 3.....


  • Member since
    July 2014
  • From: Franklin Wi
Posted by Bakster on Saturday, March 26, 2022 12:05 PM

mustang1989


missileman2000

Here is a method I have tried with raised letters.  I cut a little rectangle of cardboard a bit bigger than the logo.  Uncoated cardboard usually works better than the plastic coated stuff.  Glue a short stick of wood or plastic to make a handle so you can work with it.  Brush some paint out on another piece of coated plastic leaving a continuous layer of paint.  Dip the face of the cardboard into the paint layer (depth of paint layer somewhat important).  Now press the wet face of the cardboard against the lettering, keeping it exactly parallel to surface.


That sounds bad A$$! I may give that a shot too Don!! Thanks for the tip.


Sorry to hear that you're having the issues that you are with the liquid mask Steve. I've used that stuff with the same results as you and got rid of it because of those issues.


I was hoping but this seals it's fate for me.

  • Member since
    March 2012
  • From: Corpus Christi, Tx
Posted by mustang1989 on Saturday, March 26, 2022 7:46 AM

missileman2000

Here is a method I have tried with raised letters.  I cut a little rectangle of cardboard a bit bigger than the logo.  Uncoated cardboard usually works better than the plastic coated stuff.  Glue a short stick of wood or plastic to make a handle so you can work with it.  Brush some paint out on another piece of coated plastic leaving a continuous layer of paint.  Dip the face of the cardboard into the paint layer (depth of paint layer somewhat important).  Now press the wet face of the cardboard against the lettering, keeping it exactly parallel to surface.


That sounds bad A$$! I may give that a shot too Don!! Thanks for the tip.


Sorry to hear that you're having the issues that you are with the liquid mask Steve. I've used that stuff with the same results as you and got rid of it because of those issues.


 Forum | Modelers Social Club Forum (proboards.com) 

  • Member since
    July 2014
  • From: Franklin Wi
Posted by Bakster on Friday, March 25, 2022 8:00 PM

missileman2000

Here is a method I have tried with raised letters.  I cut a little rectangle of cardboard a bit bigger than the logo.  Uncoated cardboard usually works better than the plastic coated stuff.  Glue a short stick of wood or plastic to make a handle so you can work with it.  Brush some paint out on another piece of coated plastic leaving a continuous layer of paint.  Dip the face of the cardboard into the paint layer (depth of paint layer somewhat important).  Now press the wet face of the cardboard against the lettering, keeping it exactly parallel to surface.


Hey Don, good thought. Basically, you are talking about pad printing. In this case, pad painting. If I can't get my other options to work I will test this.

Thanks for the suggestion! Good idea...

  • Member since
    March 2022
  • From: Twin cities, MN
Posted by missileman2000 on Friday, March 25, 2022 1:46 PM

Here is a method I have tried with raised letters.  I cut a little rectangle of cardboard a bit bigger than the logo.  Uncoated cardboard usually works better than the plastic coated stuff.  Glue a short stick of wood or plastic to make a handle so you can work with it.  Brush some paint out on another piece of coated plastic leaving a continuous layer of paint.  Dip the face of the cardboard into the paint layer (depth of paint layer somewhat important).  Now press the wet face of the cardboard against the lettering, keeping it exactly parallel to surface.

  • Member since
    July 2014
  • From: Franklin Wi
Posted by Bakster on Friday, March 25, 2022 10:31 AM

Bakster

Say Duster--  Thanks for your input and the link too. I will consider it. Before I go down the leafing trail, I will try liquid mask. With some luck and by using a sewing needle, I might be able to position masking material into most of the nooks and crannies. It does not hurt to try, and it is easy enough to remove.

I will let you know how it comes out. 

Thanks again!


Steve


 With great intrepidation I moved forward using liquid mask. The result is a good news bad news thing. The sewing needle worked very well moving LM into all the nooks and crannies. I got the logo masked nicely. That is the good news part. The bad news comes after demasking.  As I feared--jagged edges as you pull the masking off. It looked like hell. It's a complete do-over. A few hours soak in Testors ELO and I had the piece at reset to start again. 

So, now, I am racking my brain how to get the look I am after. I did some research into Dusters gold leafing idea. In the videos I have found, their finish is rather gnarly. I think this is mainly because of how they applied the underlying glue layer. If there are any brush strokes at all, that will project through in the leaf. I'd have to experiment with it. Duster--if you have your ears on-- have you tried this?

Then, I found something called Rub N' Buff. It's paste that you apply and then buff. I have my doubts about this because, again, the finish is so so. Coverage seems spotty and you can't apply a clear over it. 

I am currently making masks using rubber mold compound. Not sure this will get me closer to the goal, but it shows a little promise. It behaves different than LM, so a BIG maybe. I have a few other ideas in the chamber, but I am not hitting the target just yet. 

So... while I work on that, I am also working on the lanterns. I will be doing some custom work on those. More on that later and I hope to have an update later this weekend.

A comment about liquid mask. I mentioned my concern how it might affect the underlying paint layer. Though, I had not seen evidence of that on the radiator, I did have issues on other parts. The difference seems to be that radiator had a lacquer sealant applied, the other parts did not. So, on the unsealed parts, the LM removed paint as I pulled it off. I am very disappointed in LM.  What I think is important is either you need to seal the paint, or, as soon as you mask it, you need to paint and remove it. I had the LM on for about 24 hours and that seems to be the problem. The stuff etches into the paint. I ended up having to touch up areas with a paint brush. Fortunately, the pieces are in inconspicuous areas. My two cents.


  • Member since
    July 2014
  • From: Franklin Wi
Posted by Bakster on Friday, March 25, 2022 9:36 AM

knox

I don’t know anything about cars, so it’s best to stay silent, but I am enjoying following along. Thanks for posting. 


Greetings Knox! Thanks for following along; I appreciate your interest in this project! More to come...


  • Member since
    February 2011
Posted by knox on Thursday, March 24, 2022 10:42 AM

I don’t know anything about cars, so it’s best to stay silent, but I am enjoying following along. Thanks for posting. 


  • Member since
    August 2020
  • From: Lakes Entrance, Victoria, Australia.
Posted by Dodgy on Wednesday, March 23, 2022 4:49 PM

Thanks for the advice Bakko, I'll keep that in mind.

Cheers

Ferg

I long to live in a world where chickens can cross the road without having their motives questioned

  • Member since
    March 2012
  • From: Corpus Christi, Tx
Posted by mustang1989 on Wednesday, March 23, 2022 5:27 AM

Those are definitely the kind of kits to learn that kind of stuff on. If anything goes wrong at least there's not a whole lot of time invested in the build. Will be looking forward to that one.


 Forum | Modelers Social Club Forum (proboards.com) 

  • Member since
    July 2014
  • From: Franklin Wi
Posted by Bakster on Tuesday, March 22, 2022 10:59 PM

mustang1989


Bakster

PS Ferg: If you want to start small in the auto world, you could get something like this. I purchased this several weeks back and when I get back to building the Bullion Express, I might work on this in tandem. The beauty of this kit is, no detailed engine, no interior. The windows are blacked out and all you have to worry about is good plastic prep, good decaling, and good paint. In the end, a cool looking car and it advances your car finish skills.


 Excellent choice!!! 


Yeah I want to start on it now! Lol. So on this slammer I plan to do a clear coat followed by a full sanding and polishing gig. I want that kit to sparkle.

  • Member since
    July 2014
  • From: Franklin Wi
Posted by Bakster on Tuesday, March 22, 2022 10:56 PM

"Hey man.....inquiring minds wanna know."

I hear ya...

  • Member since
    March 2012
  • From: Corpus Christi, Tx
Posted by mustang1989 on Tuesday, March 22, 2022 10:49 PM

Bakster


mustang1989

I just knew there had to be a thread on this bad boy and whadday know.......here it is. Gonna be going back through this to get me a good look at what's been going on.


Hey Joe, you are the person that motivated me to start this thread. Wink


Hey man.....inquiring minds wanna know. 


 Forum | Modelers Social Club Forum (proboards.com) 

  • Member since
    March 2012
  • From: Corpus Christi, Tx
Posted by mustang1989 on Tuesday, March 22, 2022 10:47 PM

Bakster

PS Ferg: If you want to start small in the auto world, you could get something like this. I purchased this several weeks back and when I get back to building the Bullion Express, I might work on this in tandem. The beauty of this kit is, no detailed engine, no interior. The windows are blacked out and all you have to worry about is good plastic prep, good decaling, and good paint. In the end, a cool looking car and it advances your car finish skills.


 Excellent choice!!! 


 Forum | Modelers Social Club Forum (proboards.com) 

  • Member since
    July 2014
  • From: Franklin Wi
Posted by Bakster on Tuesday, March 22, 2022 10:40 PM

PS Ferg: If you want to start small in the auto world, you could get something like this. I purchased this several weeks back and when I get back to building the Bullion Express, I might work on this in tandem. The beauty of this kit is, no detailed engine, no interior. The windows are blacked out and all you have to worry about is good plastic prep, good decaling, and good paint. In the end, a cool looking car and it advances your car finish skills.


JOIN OUR COMMUNITY!

Our community is FREE to join. To participate you must either login or register for an account.

SEARCH FORUMS
FREE NEWSLETTER
By signing up you may also receive reader surveys and occasional special offers. We do not sell, rent or trade our email lists. View our Privacy Policy.