SEARCH FINESCALE.COM

Enter keywords or a search phrase below:

Pegasus Hobbies Nautilus (Completed)

32735 views
649 replies
1 rating 2 rating 3 rating 4 rating 5 rating
  • Member since
    November 2005
  • From: Formerly Bryan, now Arlington, Texas
Posted by CapnMac82 on Wednesday, July 20, 2022 2:25 PM

Gamera
Captain: Hope you get some rain.

No such luck, sadly.

Last rain was the 1.26" in the first week of June.

There's a threat of thunderstorms tonight and tomorrow.  But, it's just threats.

Some major fires in the region out towards Possum Kindgdom Lake, too.  As in thousands of acres.

Rain is much needed, SPCA is running out of flea powder for the fish . . . Smile

  • Member since
    July 2014
  • From: Franklin Wi
Posted by Bakster on Tuesday, July 19, 2022 9:47 PM

In a review of this model I read that the masks are not that great. They are correct. The majority of them are oversized and require trimming. I believe there are aftermarket masks that one can buy. I may regret it but I will push through using these.

One more main window to mask and if the mood strikes me, the two gator eyes at the bridge. But those are for another night.


  • Member since
    July 2014
  • From: Franklin Wi
Posted by Bakster on Tuesday, July 19, 2022 10:12 AM

Hey All-- I just want to make an observation about the paint used. 

For the most part, I used Tamiya's LP series lacquer followed by a topcoat of MRP clear. The parlor assembly got a TON of manhandling. From fitting LEDS, soldering, to especially when I was fitting the assembly into the hull.  And most of the time, I did this with no gloves.

I have to say that I am pleased with its durability. Many times the hull slipped as I was test fitting and not once did I see scuff marks, scrapes, or loss of paint. The finish remained pristine. I am guessing the clear offered the most protection since that is the topcoat. Truly, I am amazed. Even finger oils did not melt the clear as I have seen happen with other clears, especially acrylics. This stuff is durable. 

The other part of this is that the AB is so easy to clean. I flip the AB upside down, squirt thinner into the neck of the AB, spray into a paper towel until clear. I have pulled the needle to check it but most often I don't even need to wipe it of any residuals. This is far from the case with acrylics. 

One other thing. Properly thinned, the LP series brush paints nicely. I needed to touch up some areas that masking covered. I was able to do that and you cannot tell that I did. It is smooth with no visible tonal alteration. 

What a breath of fresh air. I can focus on building, not fighting paint. This is how it should be.

Just my two cents.


  • Member since
    July 2014
  • From: Franklin Wi
Posted by Bakster on Tuesday, July 19, 2022 8:44 AM

PhoenixG
All the attention to detail you've put into the parlor/study means I have high expectations for how great the hull is going to look. 

We shall see. I still have that pesky squid to contend with. Could go either way. Wink


  • Member since
    October 2021
Posted by PhoenixG on Tuesday, July 19, 2022 3:24 AM

Wow...

I'll say it again.

Wow...

All the attention to detail you've put into the parlor/study means I have high expectations for how great the hull is going to look.  Wink Stick out tongue

Can't wait to see where you take this model next!

On the Bench:

Bandai 1/72 Defender Destroid

  • Member since
    July 2014
  • From: Franklin Wi
Posted by Bakster on Monday, July 18, 2022 8:29 PM

gully-washer today. 


This kind of gully washer? 


I know... bad joke. Timmy is MIA sooo, what ta do. Wink

  • Member since
    November 2009
  • From: SW Virginia
Posted by Gamera on Monday, July 18, 2022 8:05 PM

She's coming along great Bakster! Yes

Captain: Hope you get some rain. We got a gully-washer today. 

"I dream in fire but work in clay." -Arthur Machen


  • Member since
    July 2014
  • From: Franklin Wi
Posted by Bakster on Monday, July 18, 2022 7:40 PM

The sides of the hull are glued in. It went well but I had to do a section at a time. The parlor assembly caused a slight fit issue. I had to glue and hold until it locked in. Then I'd moved further down the line and did that all over again. I think my modifications to the opening caused a little bit of a raised area. I was not about to change that because I wanted a tight light blocking fit. Anyhow, not a big deal and they are installed.

The bottom of the hull had locating posts for the parlor to mount to. I noticed that the center post had a hole clear through to the bottom. Simply for its ease, I chose that post to exit my wiring. I also cut a hole in the side of that post so that I can feed through more wires as I progress.

I sprayed the window work that I did with some of the same color paint I used on the flooring. That will be the transition point from the interior to the exterior. Beyond that it will be hull color.

At this point I think I will mask and paint the windows. I am glad the kit comes with masks. Indifferent


  • Member since
    July 2014
  • From: Franklin Wi
Posted by Bakster on Monday, July 18, 2022 7:15 PM

going along in leaps and bounds steve . looking good mate .


Thanks, Steve

  • Member since
    July 2013
Posted by steve5 on Monday, July 18, 2022 5:22 PM

going along in leaps and bounds steve . looking good mate .

where abouts are you capn , that looked like an australian summer weather map .


  • Member since
    July 2014
  • From: Franklin Wi
Posted by Bakster on Monday, July 18, 2022 11:59 AM

Tanker-Builder
But wasn't the opening for this on the Harper Goff design, much like a camera Iris?

You may be right but I am not sure. I seem to recall seeing something along those lines.


Tanker-Builder
You are getting me to liking this enough to pull the trigger on buying this kit.

Yea! Welcome to the club. Nemo will be pleased to hear this. Surprise

Tanker-Builder
Could I have fun detailing it. I guess that's why I have so many models unbuilt, I got carried away by detailing, say just the engine room or something like that.

No doubt about it. I think this kit is worth pulling the trigger on. It seems designed well and the creative potential is huge. There are a ton of things a person can do with it and much that I probably won't do. I have a limit to my madness!  LOL. 

Tanker-Builder
I am sitting here being mesmerized by your unbelievable work. Keep on, Please?

That is a HUGE compliment. THANK YOU. And no worries. Barring any disasters-- I will see this through to the end. The project is going swimmingly and I am enjoying it too much to scuttle. 


  • Member since
    October 2019
  • From: New Braunfels, Texas
Posted by Tanker-Builder on Monday, July 18, 2022 10:35 AM

Hi.

      I seem to remember, Maybe I am wrong, But wasn't the opening for this on the Harper Goff design, much like a camera Iris? Either way, You are getting me to liking this enough to pull the trigger on buying this kit. Oh boy! Could I have fun detailing it. I guess that's why I have so many models unbuilt, I got carried away by detailing, say just the engine room or something like that. I am sitting here being mesmerized by your unbelievable work. Keep on, Please?

  • Member since
    July 2014
  • From: Franklin Wi
Posted by Bakster on Monday, July 18, 2022 9:41 AM

Cat is melting from Capns heat.

  • Member since
    November 2005
  • From: Formerly Bryan, now Arlington, Texas
Posted by CapnMac82 on Sunday, July 17, 2022 12:21 PM
  • Member since
    July 2014
  • From: Franklin Wi
Posted by Bakster on Saturday, July 16, 2022 10:46 PM

Just more of the journey...

I made the white pieces to do two things: They block gaping holes into the interior giving the piece a more cohesive look. And secondly, it will block any light leaks from the interior.

I also started to paint light blocking.

Next up will be to establish an exit point for the wiring and then to secure the parlor assembly. After that, probably attach the side walls of the hull.


  • Member since
    July 2014
  • From: Franklin Wi
Posted by Bakster on Saturday, July 16, 2022 2:06 PM

What is this "rainy weather" you speak of? 

I take it you have not seen rain in awhile. Indifferent

I'd be inclined to use some 0.5mm magnets (although having to cringe through every revolution of the drill bit in the clear part would probably not me good for my blood pressure).

A nice idea indeed. They fit so nicely on their own I don't expect them to fall out unless I give the thing a good jarring. I will take my chances verses the blood pressure thing. Huh?

Btw. I did enjoy the new Top Gun movie. Yes a bit over the top in terms of only in the movies, but I still enjoyed it.

  • Member since
    July 2014
  • From: Franklin Wi
Posted by Bakster on Saturday, July 16, 2022 1:52 PM

"Ohhhhhhhh, that looks awesome Bakster! Reminds me of a steampunk TiE fighter!"


Maybe I should get a Darth Vader figure for the parlor. Stick out tongue

  • Member since
    November 2005
  • From: Formerly Bryan, now Arlington, Texas
Posted by CapnMac82 on Saturday, July 16, 2022 11:33 AM

Bakster
rainy weather


What is this "rainy weather" you speak of? Smile

For the glazing, I'd be inclined to use some 0.5mm magnets (although having to cringe through every revolution of the drill bit in the clear part would probably not me good for my blood pressure).

  • Member since
    November 2009
  • From: SW Virginia
Posted by Gamera on Friday, July 15, 2022 3:16 PM

Ohhhhhhhh, that looks awesome Bakster! Reminds me of a steampunk TiE fighter!

Interesting on how the digital camera shifts the colours around, I'd never have noticed if you hadn't pointed it out.

"I dream in fire but work in clay." -Arthur Machen


  • Member since
    July 2014
  • From: Franklin Wi
Posted by Bakster on Friday, July 15, 2022 1:59 PM

What does a day off and rainy weather = ?

Answer = Time at the bench. 

I decided to take a break from lighting.  

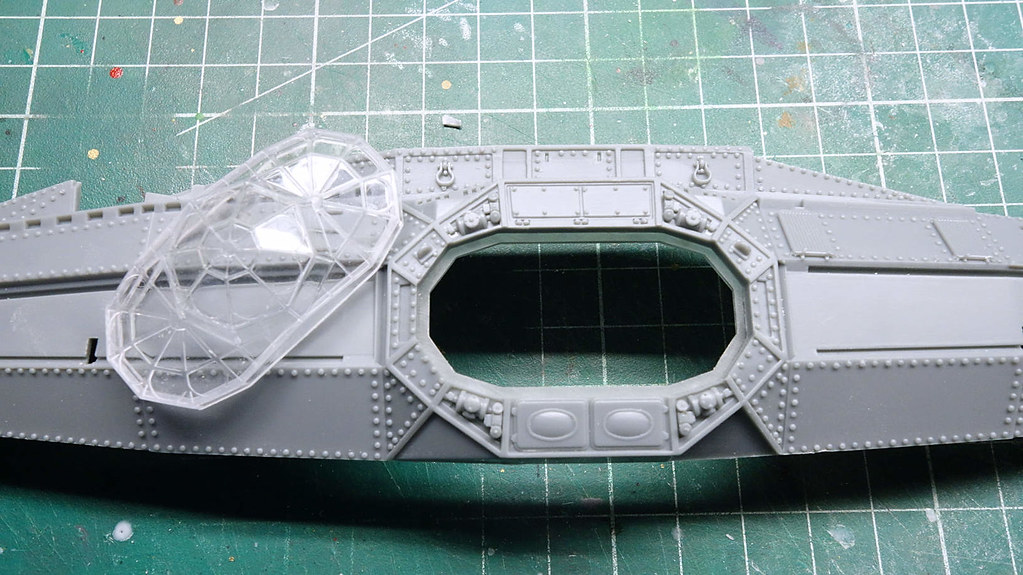
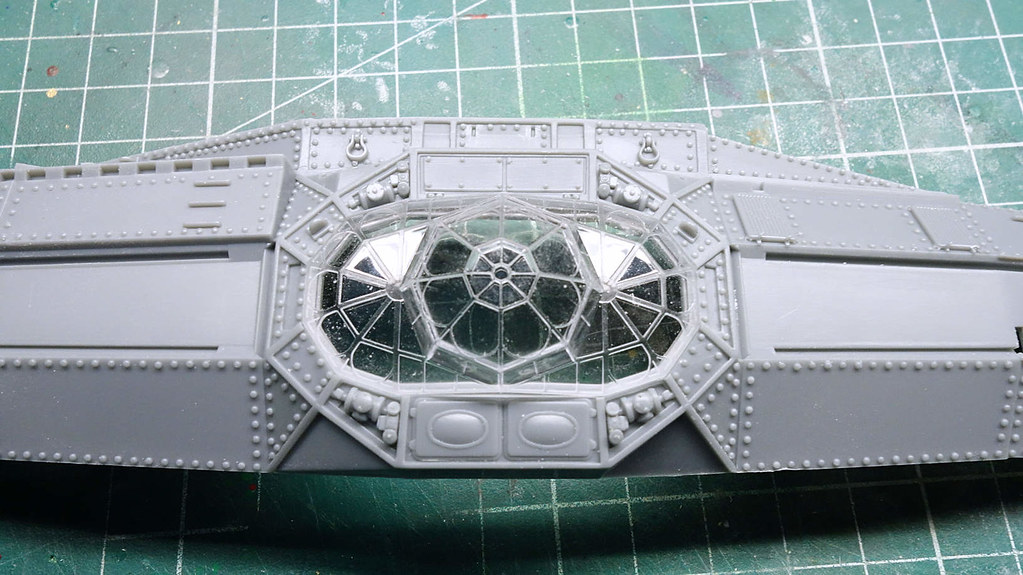
Below: As I have already mentioned I am making the windows removeable. The window assembly is designed to be mounted to the hull from the back side. That flange must go...
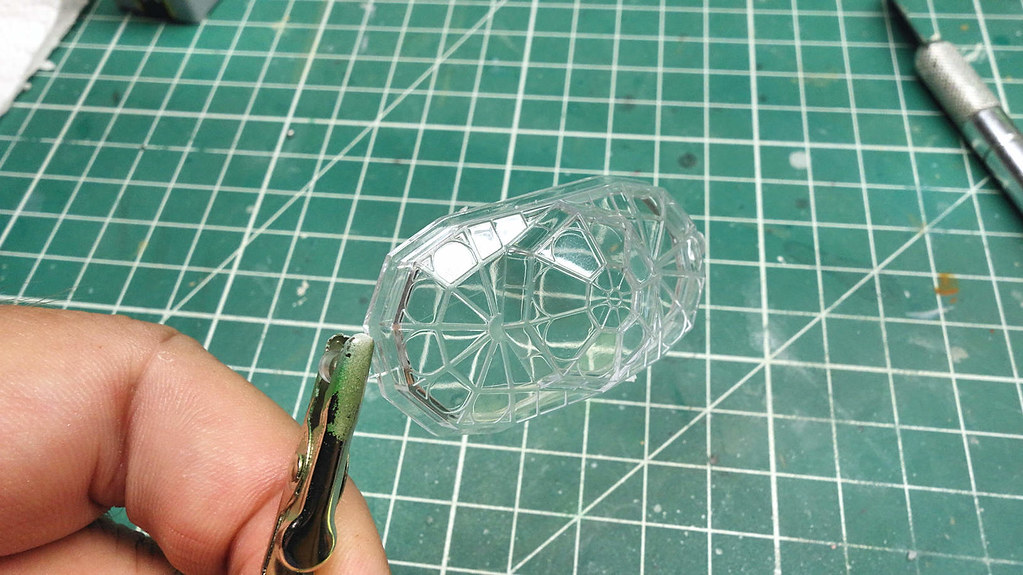
Using a razor saw and the flange as a guide to ride against I carefully cut through the plastic.
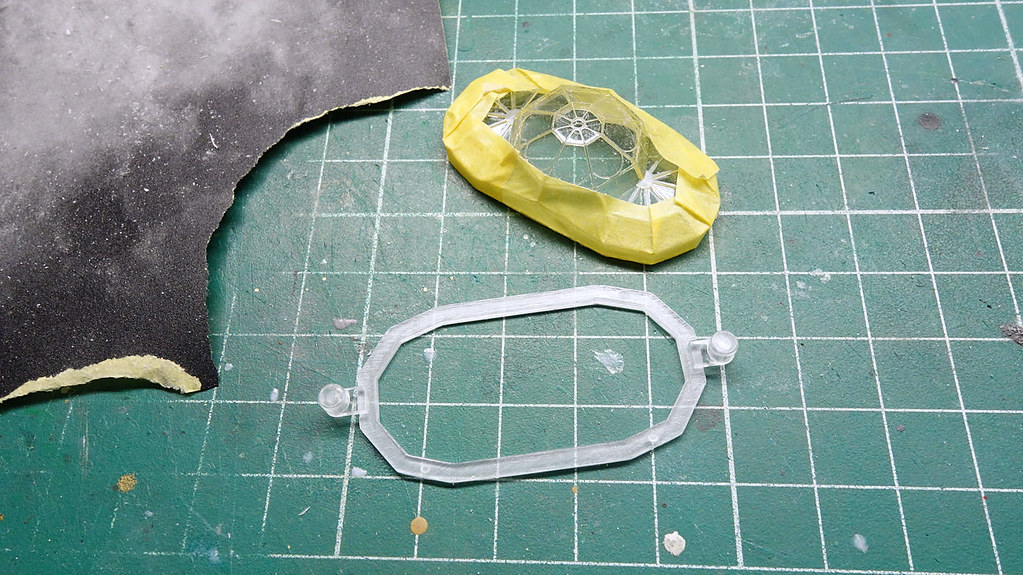
I am still using the flange only it is detached from the main window. The flange acts as a spacer and it maintains the integrity of the design. 
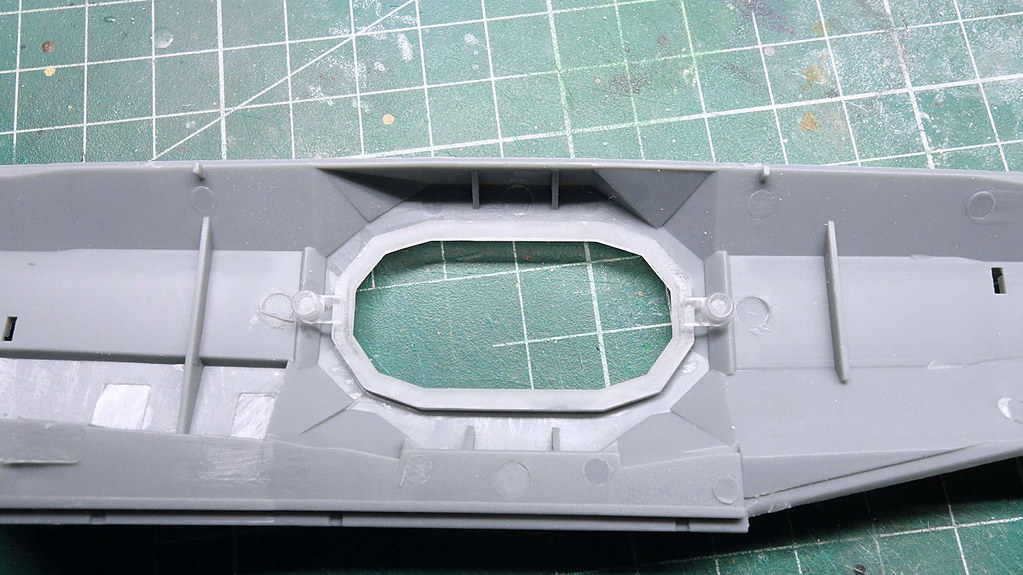
Below: The window fits into the recess perfectly. Basically, it is press fit. In its current state and without paint it slides in easily. I imagine it will tighten up when  paint is applied. As is-- it's perfect. With paint--hopefully-- not too tight. If the latter-- some light sanding.
And as a sidenote: I know most of you know this and or have other ways to go about things but, for any new people-- this may be helpful. 

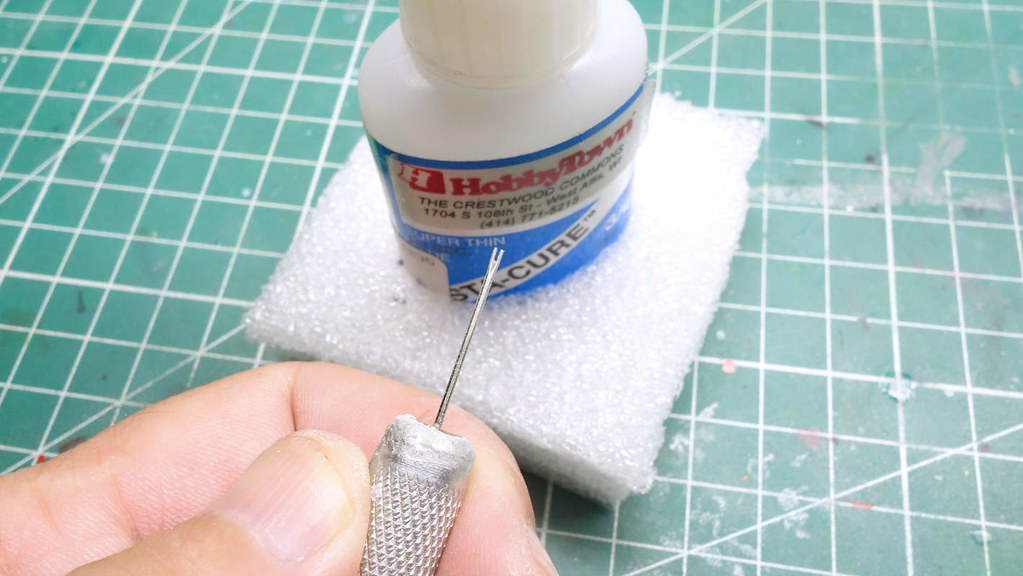
I reach for this simple tool a lot. Basically, it is a sewing needle lopped off at the eye. It is used as an applicator for CA. What I love about it is you get consistent and small amounts of CA. I unscrew the bottle cap, tilt the bottle, and insert the needle into the CA. If by chance you get too much you can wick some off with a paper towel. In short-- you get small and precise amounts. I use this not only for applying parts but also for applying small amounts as filler. 

Secondly, I found another use for the tool. It works great for applying small amounts of liquid mask.
Anyhow-- since I am off work today-- I think I will try seeing the new Top Gun movie.

It's good to be off from work. Surprise


  • Member since
    July 2014
  • From: Franklin Wi
Posted by Bakster on Thursday, July 14, 2022 5:02 PM

CapnMac82
The Easy Button hack was funny "We need Cat Food!"

I didn't watch that until you mentioned it. Funny.

CapnMac82
Turns out the DCC railroading bunch have taken to using stock replacement "iPhone" speakers as a less-expensive alternative.   iPhone parts are a hassle for DCC as that runs off of 12VDC; the iPhone runs native on 3VDC.   Still looks to be something to tuck into bases, rather than models.  Which clearly suggests using an IR motion sensor as a switch.

Thanks for that. MRR guys rule!  That is my two cents on that. Stick out tongue

CapnMac82
(Wonder if the them song to 20k leagues under the sea is "public domain" . . . )

In this day and age-- there probably is. 

  • Member since
    November 2005
  • From: Formerly Bryan, now Arlington, Texas
Posted by CapnMac82 on Thursday, July 14, 2022 12:21 PM

Bakster

The Easy Button hack was funny "We need Cat Food!"
 
Turns out the DCC railroading bunch have taken to using stock replacement "iPhone" speakers as a less-expensive alternative.
 
iPhone parts are a hassle for DCC as that runs off of 12VDC; the iPhone runs native on 3VDC.
 
Still looks to be something to tuck into bases, rather than models.  Which clearly suggests using an IR motion sensor as a switch.  (Wonder if the them song to 20k leagues under the sea is "public domain" Smile . . . )
  • Member since
    July 2014
  • From: Franklin Wi
Posted by Bakster on Thursday, July 14, 2022 9:10 AM

PhoenixG
Spectacular work with the lighting.   It's the right balance of brightness and coverage.

Hey thanks, PG. I appreciate the feedback!

PhoenixG
As for the blue cast to the pictures.  My imagination sees this,


PhoenixG
How close it?

Your imagination does have it less blue but there is a shift to yellow. To the eye as not seen through my camera, the LEDs give a very clean white light. That is not to say that I don't like what you are seeing. You are seeing a nice warm light and I like that too!

I have been thinking on this and I think at some point I will try imaging the model in RAW format. The problem as I see it is that the camera is doing what cameras do. They capture the data, disassemble the image, and then reassemble the data into jpeg format in a way the software thinks we want to see it. This is where errors occur. RAW keeps the data in its pristine form. You then must rely on computer software to do what the camera is doing and sometimes, computer software does a better job. Along with that--in RAW format-- you have much more control over what and how things get changed. I will try it at some point.

Below is a glaring example of the problem. This image is from my Model T build. Look at the seatbacks in relation to the car body. Look at how the color shifted. Those seatbacks are the exact same color as the body but in the image--the camera shifted it to a darker green. I was stunned at this. I didn't notice what happened until I posted it on my T thread.

You can see that is happened in this image too.


But in this image-- it looks fine.


I think that this is most to do with LED lighting. I doubt this would happen with natural lighting. With the T-- I used my hanging bench light that is LED. It is daylight balanced but it's LED, and there is something about it that seems to fool cameras.

And that is a whole lot of stuff about cameras. Tongue Tied


  • Member since
    October 2021
Posted by PhoenixG on Wednesday, July 13, 2022 9:43 PM

Spectacular work with the lighting.   It's the right balance of brightness and coverage.

As for the blue cast to the pictures.  My imagination sees this,

nb

nb2

How close it?

On the Bench:

Bandai 1/72 Defender Destroid

  • Member since
    July 2014
  • From: Franklin Wi
Posted by Bakster on Wednesday, July 13, 2022 9:14 PM

Ok. Hopefully, these are the last images of this assembly until the end of the build.

Again-- the camera is creating a bluish cast that is not there. So, you need to imagine these without all that blue.

Below. I tried to capture a little light from the engine room and you can see some green. But-- the light changes so fast it's hard to capture. Maybe at the end of the build I will make a Gif showing the transitions.


  • Member since
    July 2014
  • From: Franklin Wi
Posted by Bakster on Wednesday, July 13, 2022 7:43 PM

  • Member since
    July 2014
  • From: Franklin Wi
Posted by Bakster on Wednesday, July 13, 2022 7:13 PM

Gamera

Now I'm wondering with the cool blinky lights you could rig Nemo up a disco ball... Stick out tongue 

That's funny, Gam! Stick out tongue

  • Member since
    July 2014
  • From: Franklin Wi
Posted by Bakster on Wednesday, July 13, 2022 7:10 PM

"That's a spiffy effect, a few dozen notions occurred to be for use of that LED. 

Not least of which was the front nacele for spaceship Enterprise, for people building the larger version and not wanted to use the radial AM array."


That is a great idea. They wouldn't rotate but I think they would look cool!


"Just a toe-dip in "sugar cube" speakers

https://www.youtube.com/watch?v=YXnF5Qgygug"

Thanks for the link too. That speaker should be a good one to use!

I did some research on recordable audio devices and some of this is coming back to me from previous review. I am using a 9 volt supply and that sort of pigeonholes me. Most use USB voltage and or 3 volt. I don't want to get into using two supplies. I did find one or two 9 volt systems but they look iffy in terms of quality. So, I am feeling a little skeptical right now about adding audio to this. More research needs to be done though.


  • Member since
    November 2009
  • From: SW Virginia
Posted by Gamera on Wednesday, July 13, 2022 6:26 PM

Yeah that's awesome! 

Now I'm wondering with the cool blinky lights you could rig Nemo up a disco ball... Stick out tongue

"I dream in fire but work in clay." -Arthur Machen


  • Member since
    November 2005
  • From: Formerly Bryan, now Arlington, Texas
Posted by CapnMac82 on Wednesday, July 13, 2022 12:48 PM

Bakster
Finally, found it. Took me 20 minutes. Sheesh. https://youtu.be/5w9qxZCvZW8

That's a spiffy effect, a few dozen notions occurred to be for use of that LED. 

Not least of which was the front nacele for spaceship Enterprise, for people building the larger version and not wanted to use the radial AM array.

Just a toe-dip in "sugar cube" speakers

https://www.youtube.com/watch?v=YXnF5Qgygug

JOIN OUR COMMUNITY!

Our community is FREE to join. To participate you must either login or register for an account.

SEARCH FORUMS
FREE NEWSLETTER
By signing up you may also receive reader surveys and occasional special offers. We do not sell, rent or trade our email lists. View our Privacy Policy.