SEARCH FINESCALE.COM

Enter keywords or a search phrase below:

Pegasus Hobbies Nautilus (Completed)

32735 views
649 replies
1 rating 2 rating 3 rating 4 rating 5 rating
  • Member since
    July 2014
  • From: Franklin Wi
Posted by Bakster on Wednesday, July 13, 2022 8:34 AM

DUSTER

Gee when I started reading this I couldn’t even spell LED, now I know how to add wires and a battery to ‘em.

 Is this not the modeling equivalent to a cold beer on a scorching hot day?               Soo Goood!
 

Hey, Duster!  I think you need some pretzels with that beer. I will get you some! Wink

Thanks my, Friend. I am glad you are not finding my LED detail too mundane. I know for some it may be. 

Btw.  That Beer looks good. I am having lunch with coworkers today. Something tells me a beer may be in the offing. 

Thanks for posting!

  • Member since
    August 2007
  • From: back country of SO-CAL, at the birth place of Naval Aviation
Posted by DUSTER on Wednesday, July 13, 2022 12:49 AM

Gee when I started reading this I couldn’t even spell LED, now I know how to add wires and a battery to ‘em.

 Is this not the modeling equivalent to a cold beer on a scorching hot day?               Soo Goood!

Steve

Building the perfect model---just not quite yet  Confused

  • Member since
    July 2014
  • From: Franklin Wi
Posted by Bakster on Tuesday, July 12, 2022 11:02 PM

Ok the LEDs are secured. I applied small amounts of CA to secure them.

I will image the interior for you in the next day or two. 


  • Member since
    July 2014
  • From: Franklin Wi
Posted by Bakster on Tuesday, July 12, 2022 10:39 AM

I worked on making the LED lead wires. This part of the build is what scares me. There are a lot of things that can go wrong if a person doesn't think things through, and even then, you can get bit. My experience wiring and running LED wiring is limited. I know enough to be dangerous, but basically, I am learning as I go. 

I am using magnet wire. I like the wire because it is flexible, and it holds a shape to how you want it. Also, I like it for its low overall diameter. I'd say, the latter is the biggest plus. You can easily bury it in an assembly. The wire has a varnish insulation that is thin leading to its low OD. Standard insulated wire eats up real-estate with its larger OD, and typically, it won't hold its shape well. Telephone wire might be the exception. The downside to magnet wire is it is fragile at the solder joint. It breaks easily if you are not careful. And that is the fear. Once I get everything mounted, there is little going back. If there is a failure, depending on where and at what stage in the build, it might be unfixable. It's use is not unprecedented for models. I have seen other model builders use it for the same reasons I noted. So, enough said about the wire.

Not completely trusting my electonic circuit knowledge, I decided to attach the leads to a proto board and let the LEDs burn in for several hours. If there is a failure, I want to know now, and not when I have them glued and the model closed up. Thus far, they are working fine.

Don't let all the wires scare you. Some of that is not actually used in my testing. I had some on the board from a previous project and I didn't remove them. Also, I should add, you can buy LEDs prewired with the resistors and or, you can get a special resister module if preferred. Many ways to skin a cat, as they say. Point is, don't let this rats nest scare anyone from lighting their own model.


  • Member since
    July 2014
  • From: Franklin Wi
Posted by Bakster on Tuesday, July 12, 2022 9:38 AM

Gamera

That's awesome Bakster, don't see yourself short- that's amazing work! Yes


Thanks, Gam. It's a fine line. The second a person says, hey-- I am doing good!  It's about then disaster strikes indicating, you ain't all that! Wink But THANKS to you and all that commented. It is good to hear and I do take your comments to heart! I truly do.


  • Member since
    July 2014
  • From: Franklin Wi
Posted by Bakster on Tuesday, July 12, 2022 9:30 AM

Back to the bench
The color pallette on your interior really sets the mood perfectly and your cast crystal was just the touch needed to top it all off. REALLY like your lighting approach and your scratched can lights are a great idea that has many applications.

Thanks, Gil. Probably something I should point out is this. I have the LEDs so they don't extend beyond the tubing. You can adjust that depth thus creating different lighting effects. 

Back to the bench
You have probably seen these, they have been getting a lot of coverage the last several months and I think that Aaron and Tim may have actually done a video about them as well. I thought they were really clever and can see them being quite useful to the scale model community. I am seeing them showing up on Amazon now as well. https://www.youtube.com/watch?v=QL7bwm_FqlA

I had seen that but I completely forgot about that technology. Thanks for the refresher on that.  I have to give that more thought for the future!

Back to the bench
Really enjoying your build

I am glad. That helps me push on because I often ask myself-- why are you doing this? LOL. Yes

  • Member since
    July 2014
  • From: Franklin Wi
Posted by Bakster on Tuesday, July 12, 2022 9:20 AM

Tanker-Builder

Oh Boy!

 This is gettin "Verry" interesting. Your lighting effects are going to be "Viciously Delicious"!


Thanks TB...

  • Member since
    November 2009
  • From: SW Virginia
Posted by Gamera on Monday, July 11, 2022 8:43 PM

That's awesome Bakster, don't see yourself short- that's amazing work! Yes

"I dream in fire but work in clay." -Arthur Machen


  • Member since
    July 2009
  • From: North Carolina
Posted by Back to the bench on Monday, July 11, 2022 11:28 AM

Bakster

Well... the main light box did not work out as planned. Facing two LEDs towards each other did not produce enough ambient light. I should have known this. LEDs don't behave the same way as incandescent bulbs; LEDs focus their light from the front.

But-- no worries. This snafu led me to something much much better. Ultimately--the shotgun approach is replaced with strategically placed light cans. I positioned LEDs exactly where I want the light painted.

So-- I placed one light over the organ, two over the couch (one on each side), one over the crystal globe, and one over the writing desk. All the main elements are illuminated producing a very nice effect. For the couch, I positioned the lights at angles for better coverage. Otherwise, the ceiling frame was in the way causing shadows.

Notes:

1. I am using 3mm cool light LEDs for the main parlor. I tried warm white, and I didn't like it. It was too yellow and to my eye--it muddied the details.

2. I used Evergreen tubing to help secure the LEDs, but also to help focus the light. 

3. I might still use the light box I made. It might be good for light blocking. Time will tell on that.

4. For the engine room I used a 5mm fast changing RGB LED. The LED cycles colors.
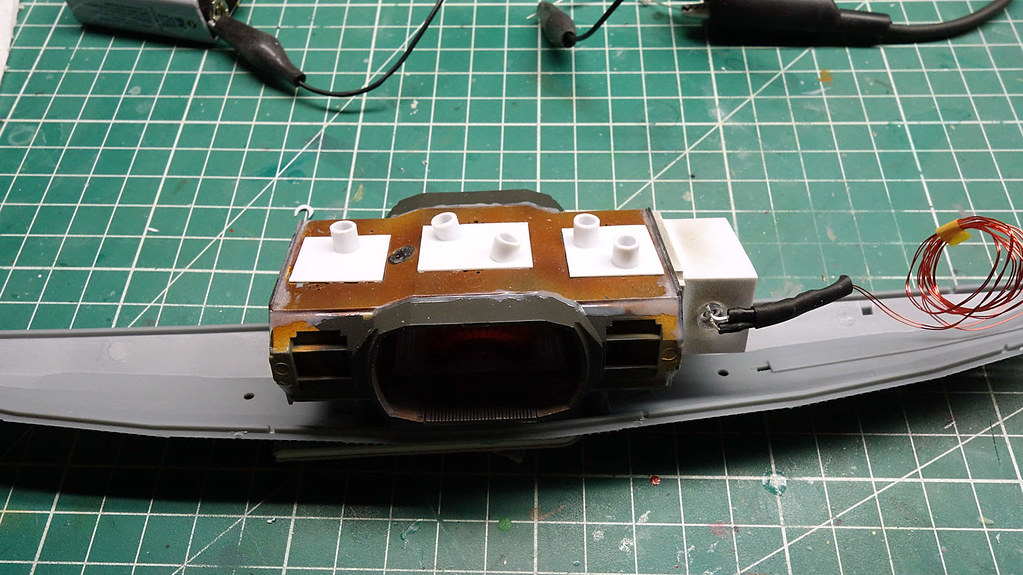
 

Below is an example of one LED. I still have to wire the other LEDS.

Btw. The engine room LED/assembly turned out great! I used the same tubing to focus light and you can clearly see the changing colors. Somewhere down the road I will try imaging all this so you can see. 

I need to finish wiring the LEDs and from there I might start work on the main windows. Or, I might address the exterior lighting adjacent to the main windows.

Later.


Holy barnacles captain, I have been away playing with the grandkids for a bit and you have accomplished a ton!

The color pallette on your interior really sets the mood perfectly and your cast crystal was just the touch needed to top it all off.

REALLY like your lighting approach and your scratched can lights are a great idea that has many applications.

You have probably seen these, they have been getting a lot of coverage the last several months and I think that Aaron and Tim may have actually done a video about them as well. I thought they were really clever and can see them being quite useful to the scale model community. I am seeing them showing up on Amazon now as well.

https://www.youtube.com/watch?v=QL7bwm_FqlA

Really enjoying your buildYes


Gil

  • Member since
    October 2019
  • From: New Braunfels, Texas
Posted by Tanker-Builder on Monday, July 11, 2022 7:43 AM

Oh Boy!

 This is gettin "Verry" interesting. Your lighting effects are going to be "Viciously Delicious"!

  • Member since
    July 2014
  • From: Franklin Wi
Posted by Bakster on Sunday, July 10, 2022 8:08 PM

Greg

You are becoming the master of model lighting, Steve.

Bow Down


Thanks, Greg. I call it luck.

  • Member since
    May 2013
  • From: Indiana, USA
Posted by Greg on Sunday, July 10, 2022 3:46 PM

You are becoming the master of model lighting, Steve.

Bow Down

  • Member since
    July 2014
  • From: Franklin Wi
Posted by Bakster on Sunday, July 10, 2022 2:57 PM

Finally, found it. Took me 20 minutes. Sheesh.

https://youtu.be/5w9qxZCvZW8


  • Member since
    July 2014
  • From: Franklin Wi
Posted by Bakster on Sunday, July 10, 2022 2:42 PM

Which suggests using 3-4 multi-color LEDs and wiring them so that they "fire" out of sequence to each other with different colors.  Which might want a mirror to reflect the light in the desired direction.


Yeah a person could do that. I went the easy way. I can't find the link right now but it's the same color changing LED I used on the power plant in my BootHill build.


That blue-white LED over the organ is just right per that photo.  It has the "arc light" look of studio lighting, which gives a "movie set piece" look.

Thanks.  And btw. That is what I am talking about. To the human eye the light does not look that blue, if at all. The camera sees it that way. I had to PP the image and push the color temp to the warm side in order to tone it down some. It is still way off but it is what it is. I hate that about LEDs; impossible to photograph correctly.

The next question will be if micro speakers are wanted to play organ notes Smile

You crack me up, Capn. You keep after me to do that. The Seaview, the Icarus, the Johnny-quest Dragonfly, and now the Nautilus. Lol. But do you know what? I might consider it with this build. There is lots of room in the innards to mount a board, and it would be a cool thing to do. Maybe I could even capture some dialog of Nemo barking orders during the squid attack. 

  • Member since
    November 2005
  • From: Formerly Bryan, now Arlington, Texas
Posted by CapnMac82 on Sunday, July 10, 2022 1:29 PM

Bakster
4. For the engine room I used a 5mm fast changing RGB LED. The LED cycles colors.

Yeah, I was pondering how to get the "swirly" light colors fr the engine room, which Disney would have used a rack of overlapping "color wheels" in the studio.

Which suggests using 3-4 multi-color LEDs and wiring them so that they "fire" out of sequence to each other with different colors.  Which might want a mirror to reflect the light in the desired direction.


That blue-white LED over the organ is just right per that photo.  It has the "arc light" look of studio lighting, which gives a "movie set piece" look.


The next question will be if micro speakers are wanted to play organ notes Smile

  • Member since
    July 2014
  • From: Franklin Wi
Posted by Bakster on Sunday, July 10, 2022 12:15 PM

Well... the main light box did not work out as planned. Facing two LEDs towards each other did not produce enough ambient light. I should have known this. LEDs don't behave the same way as incandescent bulbs; LEDs focus their light from the front.

But-- no worries. This snafu led me to something much much better. Ultimately--the shotgun approach is replaced with strategically placed light cans. I positioned LEDs exactly where I want the light painted.

So-- I placed one light over the organ, two over the couch (one on each side), one over the crystal globe, and one over the writing desk. All the main elements are illuminated producing a very nice effect. For the couch, I positioned the lights at angles for better coverage. Otherwise, the ceiling frame was in the way causing shadows.

Notes:

1. I am using 3mm cool light LEDs for the main parlor. I tried warm white, and I didn't like it. It was too yellow and to my eye--it muddied the details.

2. I used Evergreen tubing to help secure the LEDs, but also to help focus the light. 

3. I might still use the light box I made. It might be good for light blocking. Time will tell on that.

4. For the engine room I used a 5mm fast changing RGB LED. The LED cycles colors.


Below is an example of one LED. I still have to wire the other LEDS.

Btw. The engine room LED/assembly turned out great! I used the same tubing to focus light and you can clearly see the changing colors. Somewhere down the road I will try imaging all this so you can see. 

I need to finish wiring the LEDs and from there I might start work on the main windows. Or, I might address the exterior lighting adjacent to the main windows.

Later.


  • Member since
    October 2019
  • From: New Braunfels, Texas
Posted by Tanker-Builder on Saturday, July 9, 2022 3:50 PM

Cap'n Mac!

     I guess that's why one of my hobbies years ago WAS salvaging, rebuilding and restoring Old Wood Boats! For Myself and others. Just something about the Smell of Marine Grade Cedar and Teak, not to mention White Oak and Silver Pine. I cannot, for the life of me, Figure how those Poo B#$%@&#s forward of the mast survived the life they did. Maybe that is why so many were hard Drinking old men by thirty.

      The smell of the woods and the old style varnish you had to make of cakes you bought at the Chandlery, definitely led one to daydream sometimes. Oh, and Yes, The vessel would definitely talk to you.Thing is Ya better Listen too!

  • Member since
    July 2014
  • From: Franklin Wi
Posted by Bakster on Saturday, July 9, 2022 12:46 PM

I made another light box. This will mount behind the opened door that I fabricated. When viewed from one side of the assembly, you can see through that door some. The opening leads to the engine room and so the multicolor Led will give the look of some sort of power plant. Also, I wanted to add a little detail, thus the copper piping. You'll get a sence of structure verses a blank wall. 


That is where I am today. I am waiting for the Leds to arrive. Once I get those I can start testing things for light balance and such.

Later.

  • Member since
    July 2014
  • From: Franklin Wi
Posted by Bakster on Thursday, July 7, 2022 4:42 PM

PhoenixG

The interior is a beautiful looking build and as many have commented before, the crystal compliments the study perfectly. 

The story is a wonderfully crafted flight of fancy.  The tale is something you might discover find while perusing museum displays with their brass plaques and velvet ropes.


You sir... are too kind. Thank you!

  • Member since
    October 2021
Posted by PhoenixG on Thursday, July 7, 2022 11:07 AM

The interior is a beautiful looking build and as many have commented before, the crystal compliments the study perfectly. 

The story is a wonderfully crafted flight of fancy.  The tale is something you might discover find while perusing museum displays with their brass plaques and velvet ropes.

On the Bench:

Bandai 1/72 Defender Destroid

  • Member since
    May 2013
  • From: Indiana, USA
Posted by Greg on Thursday, July 7, 2022 9:05 AM

Gamera
Captain: Great photo of the Seaview!!!

I was going to post the same. There's something about that image, it's mezmorizing.

  • Member since
    July 2014
  • From: Franklin Wi
Posted by Bakster on Wednesday, July 6, 2022 7:34 PM

CapnMac82

Keeps building up quite nicely.  Globe turned outstanding, and it's fitting up nicely.

Lots of cool "living history" places to visit.  Put Mystic Seaport on your list.

Well, dang it, my f/b feed popped up a photo of SeaView.


Thanks, Capn.  And that is a hoot about Seaview. Once again, going full circle!

Now there is a thought. In a battle between Seaview and the Nautilus... who'd win? I kind of think Seaview with all the modern armament. But then again... Nemo is a sneaky sort. 

  • Member since
    November 2009
  • From: SW Virginia
Posted by Gamera on Wednesday, July 6, 2022 7:30 PM

Bakster: Looks good, you're making great progress! 

Captain: Great photo of the Seaview!!! 

TB: You're an everflowing fount of ideas! Always love your comments. 

"I dream in fire but work in clay." -Arthur Machen


  • Member since
    November 2005
  • From: Formerly Bryan, now Arlington, Texas
Posted by CapnMac82 on Wednesday, July 6, 2022 1:59 PM

Keeps building up quite nicely.  Globe turned outstanding, and it's fitting up nicely.

Lots of cool "living history" places to visit.  Put Mystic Seaport on your list.

Well, dang it, my f/b feed popped up a photo of SeaView.

  • Member since
    July 2014
  • From: Franklin Wi
Posted by Bakster on Tuesday, July 5, 2022 4:51 PM

Speaking of lighting... I worked on the light box today. I made the box by using Evergreen styrene sheets that were then cut to size.

The plan is to cut holes at the ends and mount one each 5mm led. They will face each other. The hope is their light will bounce around inside the box and then down into the parlor via the openings in the ceiling. I am mounting them that way to avoid making visual hotspots.

I will start there and see how it goes. If I must add additional leds, I will.

I don't have the leds I want, so I had to order them. They ship quickly, and I would expect them maybe by the weekend. There are other things I can work on until then.


  • Member since
    July 2014
  • From: Franklin Wi
Posted by Bakster on Tuesday, July 5, 2022 4:28 PM

I do hope you've figgered out the Lighting. Wouldn't want to miss all that in the dark now, would we? If'n youse don't light it, I will be very dissappointed in ya!

Oh for sure. I would not go through all this work and not light the beast.

Interesting thoughts about the bubblers, TB.


You are making me want one, you realize that don't you?


Just do it...

  • Member since
    July 2014
  • From: Franklin Wi
Posted by Bakster on Tuesday, July 5, 2022 4:25 PM

Tanker-Builder

When I did it!

        The resin was gently poured over the Windshield in a very thin layer. The W.D. 40 had been applied then carefully and lightly wiped away leaving a slippery surface. So I thought to myself,"Ah, What the hell, Let's see if thiss'll work!" Just another crazy experiment of mine!

        I was looking at a German aircraft kit, Well, my parts box of given parts. I have the Nose Glass from two, Bombers I think. Multiple panes in a gem surface type shape.Perfect for a steam Punk what If design?


Sounds good TB.

  • Member since
    October 2019
  • From: New Braunfels, Texas
Posted by Tanker-Builder on Tuesday, July 5, 2022 3:49 PM

When I did it!

        The resin was gently poured over the Windshield in a very thin layer. The W.D. 40 had been applied then carefully and lightly wiped away leaving a slippery surface. So I thought to myself,"Ah, What the hell, Let's see if thiss'll work!" Just another crazy experiment of mine!

        I was looking at a German aircraft kit, Well, my parts box of given parts. I have the Nose Glass from two, Bombers I think. Multiple panes in a gem surface type shape.Perfect for a steam Punk what If design?

  • Member since
    October 2019
  • From: New Braunfels, Texas
Posted by Tanker-Builder on Tuesday, July 5, 2022 3:13 PM

That Unit!

       Sorry, Gotta break Your heart! Nah, Just kidding! It does look like it could be used in a SteamPunk Airship too! Awesome progress here. Even though it isn't The Disney/Harper Goff design, You are making me want one, you realize that don't you?

       Yer makin it so gorgeous, I do hope you've figgered out the Lighting. Wouldn't want to miss all that in the dark now, would we? If'n youse don't light it, I will be very dissappointed in ya! Just think. A fully lighted 20,000 Leagues Under the Sea Lighted and Bubbles escaping, Subarine (misspelt intentionally!) within a Tropical Fish Acquarium! And NO, NOT,with the genetically altered Glowing Fish either! You could even have the Squid suspended within the scene like it's starting the chase! With flexible tentacles too! LOL!LOL!LOL!

      I would actually try that. I did the Aurora,"Black Falcon" Pirate Ship in my Fish Tank, Long before they marketed it as a bubbler! As a matter of fact I bought one just to check it out. It was created from the Black Falcon Molds. Every single part of the kit was interchangeable with the Bubbler! In the Bigger tank-100gallon. I had two kits as "Shipwreck Bubblers".The Heller La Gliore and the Heller Trireme model " In the other 100 gal tank I had an old Steam "Tramp" and a W.W.2 Cruiser wreck bubblers!

      My Missus got bit by By the idea, and created her own 50 gal. Tank With the Dio of a more historical Atlantis. We often had many fish in our tanks that were offered by the Zoo. We helped keep them supplied with The States wild natural fishes for Breeding( We returned them to where we caught them,) and they would "Pay" us with tropical fishes that closing Restaurants and Offices would give up!  

  • Member since
    July 2014
  • From: Franklin Wi
Posted by Bakster on Monday, July 4, 2022 6:39 PM

I started mixing Apoxie Sculpt when it hit me. Why the effort to stuff putty into joins? It is more work than it's worth. It would be much easier to fill the gaps using sprue-goo. So, that is what I did. Eventually, I will paint the outer shell in black for light blocking.

Anyhow, a mundane correction.

JOIN OUR COMMUNITY!

Our community is FREE to join. To participate you must either login or register for an account.

SEARCH FORUMS
FREE NEWSLETTER
By signing up you may also receive reader surveys and occasional special offers. We do not sell, rent or trade our email lists. View our Privacy Policy.