SEARCH FINESCALE.COM

Enter keywords or a search phrase below:

Regarding T2 tankers

67840 views
183 replies
1 rating 2 rating 3 rating 4 rating 5 rating
  • Member since
    December 2002
Posted by rayers on Monday, March 2, 2009 7:51 PM

You guys are killin' me. For a long time I have considered doing a build of the Revell T-2 as my dad's ship, the USS Aucilla (AO-56) but couldn't find any good pictures of her and was uncertain how to jumboize the T-2 kit into a T3-S2-A1. The I found this thread and was getting excited about finding pics on the German website, but before I can check it out the site is gone.

Any ideas on how I should go forward? Should I get T3 plans? I would be doing Aucilla in her Korean War fit (although she was cruising in the Med when my dad was aboard as the captain's yeoman). Do you know if she had that great big truss/kingpost across the beam aft that I have seen in pics of other postwar AO's? My dad also claims that Aucilla had a helicopter pad amidships but I'm guessing it was a marcano deck that didn't have deck cargo on it. I'm also wondering about armament -- dad says the only thing he remembers is the 5-inch on the stern, no other heavy or light AA at all.

  • Member since
    April 2005
Posted by ddp59 on Monday, March 2, 2009 8:37 PM

look in this link http://www.navsource.org/ under Auxiliary and Service Force Ships under Fleet Replenishment Ships (AE-AF-AKE-AO) in Fleet Oilers (AO)

http://www.aukevisser.nl/t2tanker/id81.htm

  • Member since
    March 2004
  • From: Kincheloe Michigan
Posted by Mikeym_us on Monday, March 2, 2009 8:57 PM
 ddp59 wrote:

look in this link http://www.navsource.org/ under Auxiliary and Service Force Ships under Fleet Replenishment Ships (AE-AF-AKE-AO) in Fleet Oilers (AO)

http://www.aukevisser.nl/t2tanker/id81.htm

http://www.aukevisser.nl/t2tanker/id162.htm

This ship ID is AO-71 I see her all the time at work. I work at the Soo Locks and she usually comes in once a week during shipping season. She used to be called the Middleton and is now the American Victory.

http://www.aukevisser.nl/t2tanker/id623.htm

I also see AO-68 alot during shipping season at the Locks as well.

Though one time we actually had the Bounty (yes the actual Mutiny on the Bounty movie ship that Mel Gibson was on)go through and I actually saw it.

On the workbench: Dragon 1/350 scale Ticonderoga class USS BunkerHill 1/720 scale Italeri USS Harry S. Truman 1/72 scale Encore Yak-6

The 71st Tactical Fighter Squadron the only Squadron to get an Air to Air kill and an Air to Ground kill in the same week with only a F-15   http://photobucket.com/albums/v332/Mikeym_us/

  • Member since
    March 2007
  • From: Carmel, CA
Posted by bondoman on Monday, March 2, 2009 10:05 PM

I ordered the T3- (both tanker and AO) plans today, and while I can't go making people copies, I'll give a full report when I receive them as I have the T2 already. They're cheap- $10 to $15 each and you only need one per type.

BTW the Esso Glasgow has disappeared from Revell's catalogue and the online stores, so now would be a good time to grab one if you see one. I just did off eBay.

  • Member since
    November 2005
Posted by Anonymous on Friday, March 6, 2009 7:54 AM

It always happens...I use all of my torpedoes on coastal steamers and small merchants, and then on the way home I run into T-2 and T-3 tankers...last night, I had one "eel" left and slammed it into the side of a T-2...didn't sink...I then pumped about 20 88mm shells into her...nothing...all I had left were 40 star shells...what the heck?...used those...she kept steaming along at 5 kts...had to watch her get away...

Oh well, such is the life of a U-boat Capatain...

  • Member since
    December 2002
Posted by rayers on Friday, March 6, 2009 1:02 PM

DDP, I've seen those Navsource pictures before and all but the undated one (in the camo scheme) are about 10 years later than the period I want to model (1954). There are two big booms aft that are in the 60s pictures, and the bridge structure is different from the undated camo photo to the 60s photos. I'm hoping there are 50s-era photos out there somewhere.

I'll be interested in hearing how the T3 plans are so that I can figure out whether lengthening a T2 kit is worthwhile.

  • Member since
    April 2005
Posted by ddp59 on Friday, March 6, 2009 9:43 PM
did you checkout my other link?
  • Member since
    November 2005
Posted by Anonymous on Saturday, March 7, 2009 11:24 AM
Got into a convoy last night...sank 2 T-3 tankers...those bastards are hard to bring down...one took 3 eels and stayed afloat for 2 hours...I hid under her as she lay dead in the water so the escorts couldn't get at me...they finally left, I scooted out from under her and she broke her back and sank...I shiver at the thought of what would have happened had I not moved my boat in time...won the oak leaves to my KC for that...
  • Member since
    June 2008
Posted by lewbud on Saturday, March 7, 2009 10:33 PM

Manny,

Either you made Brest in record time, and got fitted out in record time as well; or someone found a milk cow for undersea replenishment.  Either that or you really need to lay off the schnapps. 

Buddy- Those who say there are no stupid questions have never worked in customer service.

  • Member since
    March 2007
  • From: Carmel, CA
Posted by bondoman on Saturday, March 7, 2009 11:38 PM

I've finished the grunt work, shaving off the cast railings. The trick is to leave the last part to the sanding stick. I've cut them off horizontally, otherwise the decks are too narrow. There's the bottom bar left on the edge, but it sands off ok. Away with all the Aztec steps. I was going to hold out to post pictures after the next step-sand, prime sand prime. But I wanted to post a pic because I'm really excited- the model got to that point where it jumps out as a realistic representation of what you've stared at in 100's of photos. The trick was the remodeling of the bulwarks at the islands- where the putty is. I also took a tip from Fred and glued a piece of stretched sprue up/down the stern and filled in from each side to give her a more sharp stern.

The kit walkways across the decks are useless, but will be easy to scratch. I am not going to try to add detail to the deck piping, except that I'm going to add valve wheels, and I have a trick. Think model railroading- my true hobby passion.

As for the engine room skylight, I sanded off the big ridge down the middle and am going to try to find a pic, but the end result will be a series of flaps with little ports in each, I think.

  • Member since
    March 2007
  • From: Carmel, CA
Posted by bondoman on Saturday, March 7, 2009 11:59 PM
 Surface_Line wrote:

Well, my day job is in Information Technology...


S/L thanks so much for the link. I've used it to make a decision about two important items. More later...
  • Member since
    December 2005
  • From: Seattle, Colorado
Posted by onyxman on Sunday, March 8, 2009 9:44 AM

Good progress Bill!  On the two kits I have done I dealt with the rail removal differently, and I think you have the better solution. I took off the rails by scoring along the inside with a blade, then just snapping them off. Easy! But as you point out, that makes the decks too narrow, so I had to set them down into the hull instead of on top. That makes a problem with all the superstructures being a little too low because of the unique design that cuts the bulkeads in half.

Fred

  • Member since
    March 2004
  • From: Kincheloe Michigan
Posted by Mikeym_us on Sunday, March 8, 2009 9:51 AM
 bondoman wrote:

I've finished the grunt work, shaving off the cast railings. The trick is to leave the last part to the sanding stick. I've cut them off horizontally, otherwise the decks are too narrow. There's the bottom bar left on the edge, but it sands off ok. Away with all the Aztec steps. I was going to hold out to post pictures after the next step-sand, prime sand prime. But I wanted to post a pic because I'm really excited- the model got to that point where it jumps out as a realistic representation of what you've stared at in 100's of photos. The trick was the remodeling of the bulwarks at the islands- where the putty is. I also took a tip from Fred and glued a piece of stretched sprue up/down the stern and filled in from each side to give her a more sharp stern.

The kit walkways across the decks are useless, but will be easy to scratch. I am not going to try to add detail to the deck piping, except that I'm going to add valve wheels, and I have a trick. Think model railroading- my true hobby passion.

As for the engine room skylight, I sanded off the big ridge down the middle and am going to try to find a pic, but the end result will be a series of flaps with little ports in each, I think.

I'm planning the exact same thing but keeping the ridge and only doing 3 flaps per side and using clear acetate for the flaps and TMW portals as well to try and replicate a A2 style greenhouse. Just too much surgery for a A1 type which was longer. BTW the T3 you plan on doing are you going to do another one as a converted Bulk freighter like MV American Victory?

On the workbench: Dragon 1/350 scale Ticonderoga class USS BunkerHill 1/720 scale Italeri USS Harry S. Truman 1/72 scale Encore Yak-6

The 71st Tactical Fighter Squadron the only Squadron to get an Air to Air kill and an Air to Ground kill in the same week with only a F-15   http://photobucket.com/albums/v332/Mikeym_us/

  • Member since
    March 2007
  • From: Carmel, CA
Posted by bondoman on Sunday, March 8, 2009 4:07 PM

If you have any pics of the skylight on a T2 that'd be very helpful to me. My drawing doesn't show it at all.

The T3 is going to be a Fleet Oiler, and I think I'll have her ride a little lighter just for variety.

  • Member since
    November 2005
Posted by Anonymous on Sunday, March 8, 2009 4:22 PM
Hurry!!! Build, build, build---I'm needing some more fat tankers for targets...hee hee hee...
  • Member since
    March 2007
  • From: Carmel, CA
Posted by bondoman on Monday, March 9, 2009 11:07 PM

Woohoo my Glasgow came today. Also ordered up two tins each of 5L and 5O, plus two frets of railings from White Ensign. Kind of a splurge but it'll get me through these two. Flat black I've got. The Measure 32 with pattern is going to be awesome I hope on the T3 AO.

Jeeze I am going to miss Tom, a lot, and I'd hope that his products are available, but I have the feeling they won't be. I have a fret of his 1/400 sailors, and was planning to get some 1/72 Lewis guns.

Just waiting for those plans from the Smithsonian. ordered both the T3 and T3-AO.

  • Member since
    December 2002
Posted by rayers on Tuesday, March 10, 2009 12:00 AM
ddp, tonight I did check out your other link. I was surprised because there are some new pictures up on Navsource I hadn't seen before, especially the 1957 "All Hands" photo that was almost certainly taken when my dad was aboard. I wish it was larger and better quality. I need to do some research on when Aucilla's refit was done because there was a definite change in the aft kingpost/boom arrangement between the 50s and the 60s. Dad's memories were clearly wrong about the armament because she still had most, if not all, of her guns well into the 60s (cut him some slack; he was a yeoman, not a gunners mate!)
  • Member since
    June 2008
Posted by lewbud on Tuesday, March 10, 2009 12:00 AM

Manstein,

I know I kidded you about it earlier, but seriously what game are you playing?  It sounds like you're having a whole lot of fun.

Buddy- Those who say there are no stupid questions have never worked in customer service.

  • Member since
    November 2005
Posted by Anonymous on Thursday, March 12, 2009 11:29 AM
 lewbud wrote:

Manstein,

I know I kidded you about it earlier, but seriously what game are you playing?  It sounds like you're having a whole lot of fun.

SILENT HUNTER III
  • Member since
    December 2005
  • From: Seattle, Colorado
Posted by onyxman on Thursday, March 12, 2009 4:23 PM

I just sent an email to Frank Gerhardt, the owner of that US Maritime Commission website. I dug up his address from an old correspondence we had. He used a couple of my pictures.

Anyway, if he responds, maybe he can give an idea if that site will be renewed somewhere else.

Fred

  • Member since
    March 2007
  • From: Carmel, CA
Posted by bondoman on Thursday, March 12, 2009 4:51 PM
That would be super. I've spent a little time looking around for a new link, and couldn't find one so far. I did find a few things in the National Archive, but no new photos. Good luck.
  • Member since
    March 2004
  • From: Kincheloe Michigan
Posted by Mikeym_us on Thursday, March 12, 2009 5:08 PM
 bondoman wrote:

If you have any pics of the skylight on a T2 that'd be very helpful to me. My drawing doesn't show it at all.

The T3 is going to be a Fleet Oiler, and I think I'll have her ride a little lighter just for variety.

With the pic that Onyxman posted I couldn't honestly tell if that was a T2A0 or T2A1 or T2A2. But since the T2A2 had a 10000 SHP motor instead of the 8500 SHP motor of the T2A0 and T2A1 I think it would be safe to assume that the skylight would have been bigger or smaller depending on the size of the engine.

On the workbench: Dragon 1/350 scale Ticonderoga class USS BunkerHill 1/720 scale Italeri USS Harry S. Truman 1/72 scale Encore Yak-6

The 71st Tactical Fighter Squadron the only Squadron to get an Air to Air kill and an Air to Ground kill in the same week with only a F-15   http://photobucket.com/albums/v332/Mikeym_us/

  • Member since
    December 2003
  • From: Colorado
Posted by psstoff995 on Thursday, March 12, 2009 5:48 PM

bondoman- nice work on the Tanker, how much of this is scratch and what parts are still Revell's at this point? Had to skim through the last coupla pages as I joined in late but kept getting caught on on Capt. Manny's great ocean ventures! Laugh [(-D]

I was disapointed to see the ref. website go down, so I have no idea what was being discussed earlier, hope you guys can find a new one.

-Chris

US Army Infantryman

  • Member since
    December 2005
  • From: Seattle, Colorado
Posted by onyxman on Thursday, March 12, 2009 9:10 PM

If I recall correctly, the pic I posted a link to was from the list of ships labeled simply "T-2", so I can't say if it was the same as on a T2-S-A2, or a T-3. 

Fred

  • Member since
    November 2005
Posted by Anonymous on Thursday, March 12, 2009 9:21 PM
 onyxman wrote:

If I recall correctly, the pic I posted a link to was from the list of ships labeled simply "T-2", so I can't say if it was the same as on a T2-S-A2, or a T-3. 

Fred

Ran into two T-3 tankers tonight in trail...they were going at a good clip: 10 knots...took a total of 8 fish to bring em both down...I missed with three because I fired too far out and they zigged...they were both flying American flags...
  • Member since
    March 2007
  • From: Carmel, CA
Posted by bondoman on Thursday, March 12, 2009 9:48 PM
 psstoff995 wrote:

bondoman- nice work on the Tanker, how much of this is scratch and what parts are still Revell's at this point? Had to skim through the last coupla pages as I joined in late but kept getting caught on on Capt. Manny's great ocean ventures! Laugh [(-D]

I was disapointed to see the ref. website go down, so I have no idea what was being discussed earlier, hope you guys can find a new one.

Two parts- first I cut the hull down to a freeboard of 15 feet from the 24 or so Revell gave us. Second, I cut out the somewhat curved fillets at the front, front/rear and rear of the stern structure, bridge structure and forecastle, and replaced them with much larger styrene inserts cut from patterns taken from the drawing. I'm in possession of a fresh hull for the next ship and will post a pic side/side once I get the T2 hull primed and sanded (almost there). Also reduced the size of the bulwark at the peak, and "sharpened the stern. It's too bad the www went down because there was a really nice pic of Oklawaha that gave a good idea of the stern.
  • Member since
    December 2003
  • From: Colorado
Posted by psstoff995 on Thursday, March 12, 2009 11:46 PM
Thanks for catching me up, looks real nice so far! Looking forward to the primer- might unify everything a little better for me.

-Chris

US Army Infantryman

  • Member since
    December 2005
  • From: Seattle, Colorado
Posted by onyxman on Friday, March 13, 2009 1:05 AM

Good news! I have had an email from Frank and his site will be up eventually with a new host. It really would be a tragedy if all that info became lost.

Fred

  • Member since
    April 2005
Posted by ddp59 on Friday, March 13, 2009 12:16 PM
post a link if he sends you 1.
  • Member since
    December 2005
  • From: Seattle, Colorado
Posted by onyxman on Friday, March 13, 2009 4:50 PM

I will certainly do that. In fact i'll go back and edit all my links so they work.

Meanwhile, take a look at this:
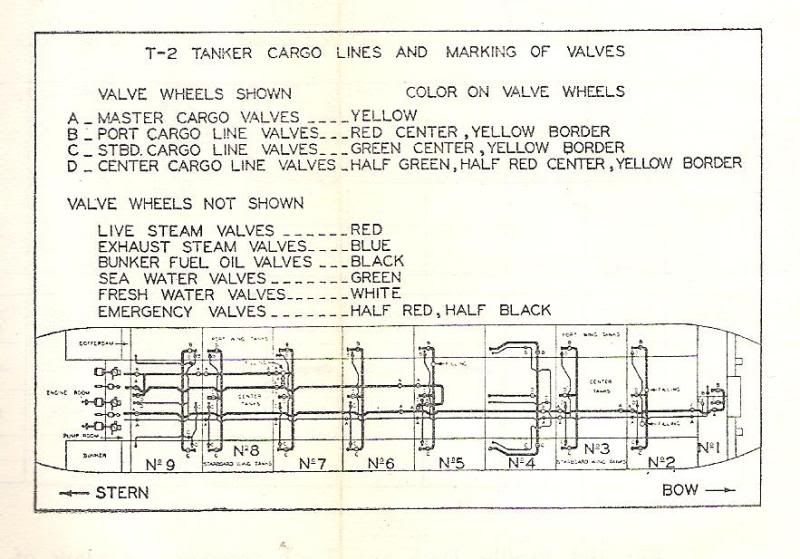
Altough this purports to be a key to valve wheel colors, I think the piping shown is actually at the bottom of the tank, not on the deck. Note that the tanks go all the way from bow to stern, which means the midship bridge superstructure sits over cargo tanks, between #4 and #5 tanks.


I have been looking at the kit's piping, trying to make sense of it. As far as I can tell, the location of the round ullage trunks, which act as hatches for the oil tanks, is pretty accurate. Near each of those should be two valves, one for the main cargo line and one for the smaller 'stripping' line. Sure enough, Revell has studs to represent those valve stems. The actual valves are way down in the bottom of the tank, so the hand wheels on deck are connected by VERY long stems.

The actual piping on the kit makes less sense to me, unless it represents not cargo feeds, but vents. As oil goes in, air has to have a path out. If that's the case the pipes should connect to the vents up along the masts. I don't know if they do, since I only have salvaged deck pieces available here that i didn't use on my Houston build.

JOIN OUR COMMUNITY!

Our community is FREE to join. To participate you must either login or register for an account.

SEARCH FORUMS
FREE NEWSLETTER
By signing up you may also receive reader surveys and occasional special offers. We do not sell, rent or trade our email lists. View our Privacy Policy.