SEARCH FINESCALE.COM

Enter keywords or a search phrase below:

Revell 1:83 Mayflower

51338 views
601 replies
1 rating 2 rating 3 rating 4 rating 5 rating
  • Member since
    April 2016
  • From: Russia, St.Peterburg
Posted by kirill4 on Tuesday, November 1, 2016 1:23 AM

Good day Steve,

This , Plaid /Folk Art N0 817(this No only) acts like kind of ... stain... with aging and wooden effect at same time... I think it will not mask the weathering You did already , but did it more natural appereance /boost effect ... before You will use it on the model, first better try somewhere on piece of plastic... as You know, in the begining ,I try to use dry pastels...it works also ,may be with similar effect,but more complicate in use...than later on I accidentally found this medium , and say - Yes! that what I need! :)))

nice wooden color(like mast on the replica picture You posted recently) , which I like very much , results in combination of :

1. 1st,basic layer -"sand "or "light grey" of any acrylic paint which better to apply by air brush - this should be totaly cover plastic origin

2. Plaid/Folk Arts caramel(Terre de sienne naturel*Caramelo) paint No 452 - this you better apply by artist brush ,apply smal portion slightly deluted with water...in this stage paint could remain partialy transparent , do not need to try to cover surface totaly and mask complitely basic layer...each next layer need to be applied after drying of previous one- smth.abt 20 min...

3.than ,better next day , I used to apply this Plaid/Folk Arts medium No 817 for creating "wooden" effect - this medium also need to be applyed by artist brush mixed in small portion with water...first I used to dip brush in water ,than dip brush in medium No 817, than apply on surface which I want to be "woodened"... depth of the wooden effect will vary depending on medium No 817 concentration...if you didn't like result, medium could be easily removed by wet (water)brush before it became dry(approx 10-20 min) and process could be repeated...

Plaid have other aging medium ,like natural brown etc. ... but for me, the best was this , No817...(in combination with Caramel 452 as primary(second) layer as I told above)

All the best!

Kirill

ps 

Plaid have color "wrought iron" - nice looks on surface! can use for painting"metal" parts on your model.


  • Member since
    July 2014
  • From: Franklin Wi
Posted by Bakster on Tuesday, November 1, 2016 11:03 AM

Good day Kirill,

in the words of my Bakster vernacular, Darn it!

I wish that I had known about your process three months ago. I surely would have experimented with it, but by starting with a much lighter base coat. I am very concerned to try it now because currently, I feel, the hull is as about as dark as I want to push it. The pictures that I posted can be deceiving. They were taken with direct natural light, and that brightened up the model. If you move the model to the interior of a room, away from the light, it darkens considerably. The images of the bulkheads and transom are probably over exposed, along with the colors being off. (My camera issues.) So, they look too light in the images, and very lacking. Too the human eye, they look much better. None the less, they can still use a little more color magic, like with what you are talking about.

I WILL order the stain and experiment with my test piece. At the very least, I should be able to use it on the masts, spars, rigging, and miscellaneous. 

I really really appreciate you sharing your process. I am sure that others here are interested as well! This forum needs more of this, the sharing of detailed processes. It helps everyone advance in the art.

Thank you...

Steve


  • Member since
    July 2014
  • From: Franklin Wi
Posted by Bakster on Tuesday, November 1, 2016 12:04 PM

Here is a small update. By my choice there will not be a lot of flair on this build, and what I show here is one of the few things that I am allotting to it. I hand painted the design on this beakhead rail in varying degrees of coverage. The idea here was to simulate some aging through a loss of color. Afterwards, I added a weak oil wash to dirty it down some, and to filter it.


  • Member since
    July 2014
  • From: Franklin Wi
Posted by Bakster on Wednesday, November 16, 2016 5:14 PM

Good folks, I am still here, currently in the process of weathering the gun ports. As usual, it's a time of trying different things. I hope to post some images in a week or so.

In the meantime, though, I'd like some input. Soon I will paint the waterline coating. In the book, The Neophyte Ship Modelers Jackstay, it is recommended that a pencil be propped on something with the tip at the height of the waterline, then the ship or pencil be pulled along the hull creating the demarcating line for painting. I'm going from memory here, so it's not verbatim. I don't think that I will draw a line on the hull, but I will use the tip as a guide on where to place the masking tape. What do you think?

I have two questions:

1. Below is an image that shows where that waterline might be located. Does this seem reasonable to assume that this is a good place to start?

2. If you have any other advice to accomplish this, let me know.


Thanks, in advance.


Steve


  • Member since
    September 2012
Posted by GMorrison on Wednesday, November 16, 2016 11:24 PM

I'd propose an alternative. The replica, which was built under the guidance of Alan Villiers, has a different paint line.

That ship currently has the white coating up to the underside of the lower wale stem to stern. It looks great, that's what I would do.

 Modeling is an excuse to buy books.


  • Member since
    July 2014
  • From: Franklin Wi
Posted by Bakster on Thursday, November 17, 2016 9:11 AM

Say GM, thanks for the input. I will consider it.

Here are a few more options.


This one has a two tone scheme going on. Unless this is a case of them stripping the coating and it appears as such. Somewhere in my archive of images I have an example of this though. The coating is black or brown, and above it to the wale is white.

In this example, they used a black coating. I have been leaning towards black, and like this, but its not set in stone yet.

Updated 11/17 4:11: Removed 1 image because it is the same image as below, only in reverse. I didn't notice that when I captured them off the Internet.


  • Member since
    September 2005
  • From: Groton, CT
Posted by warshipguy on Friday, November 18, 2016 5:53 AM

I agree with GM's comment.  I recently saw the Mayflower undergoing a refit in Mystic.  The paint is carried from the keel to the lower wale.  I also like the current appearance of the ship's colors. The Mayflower I am building for my oldest grandson is painted the current way; my plan is to give it to him on Thanksgiving.

Bill 

  • Member since
    July 2014
  • From: Franklin Wi
Posted by Bakster on Friday, November 18, 2016 9:24 AM

Hey Bill, thanks for chiming in, and I appreciate your input. That is really cool that you are building one for your grandson. That is a seriously awesome, Thanksgiving gift. You must be almost done if you are planning to present it to him on Thanksgiving,  We would love to see an image of it, no pressure though.


  • Member since
    July 2014
  • From: Franklin Wi
Posted by Bakster on Monday, November 28, 2016 8:57 PM

What I have been up to:

I made a fateful decision to scale down the mottle effect. It was a little too strong for my taste. I accomplished this by overlaying a thin mixture of brown via airbrushing. This meant that I had to respray the links as well. What a pain.

Overall, I am happy with it, though the image below doesn't translate very well... same old story.

Secondly, I weathered the gunport lids by using the hairspray technique:

1. The process started with the base color of brown.

2. The lids are masked.

3. Hairspray is airbrushed on.

4. The top color is airbrushed on.

5. The ports are dampened.

6. I carefully worked the paint off using a stiff brush, and a pointy hobby stick.

It took some practice for sure. In the image you can see the effect on only one of the gunport lids. The glare from the light kills the others in this image.


Below: Here is how I tackled the hinges. After trial and error, I found it worked best to use tape as much as possible, and then use Silly Putty for the curved areas. It worked out well.

Don't let the black hinges in this photo confuse you. The final layer of color had to be applied over the color I used for the gunport lids. You can't see it well in the image, but the top portions of the hinges are still in the base color of brown. In order to have the gunport lids and hinges stand out from each other, I used a different shade of black for each, the hinges being more of a flat. 

Below: You can see my attempt at weathering the gunports. Secondly, you can see how the hinges came out. Lastly, you can see how the mottle is pushed back into the model.

  • Member since
    July 2014
  • From: Franklin Wi
Posted by Bakster on Saturday, December 10, 2016 6:23 PM

A Mayflower blooms

Using Silly Putty I masked and painted the flower in successive layers. I applied a little aging by using the hair spray technique followed by an oil wash to dirty down the pristine paint.  


  • Member since
    July 2013
Posted by steve5 on Saturday, December 10, 2016 10:55 PM

very nice steve


  • Member since
    July 2014
  • From: Franklin Wi
Posted by Bakster on Sunday, December 11, 2016 9:06 AM

Thanks for commenting, Steve.

  • Member since
    July 2014
  • From: Franklin Wi
Posted by Bakster on Friday, December 16, 2016 10:42 AM

A few weeks back I had asked if anyone had a better idea on how to establish the coating/waterline.

A magnified look at this reveals that this line continues on, arching across the side of the hull, and aligning itself perfectly with the waterline image that I pasted a few weeks back. In short, Revell has already marked it onto the hull.


  • Member since
    May 2013
  • From: Indiana, USA
Posted by Greg on Saturday, December 17, 2016 10:05 AM

Checking in to see what's up with Steve and the Mayflower.

Good to see you still plugging away. Some nice masking and detail painting going on. The flower on the rear (stern?) surely looks neat.

  • Member since
    July 2014
  • From: Franklin Wi
Posted by Bakster on Friday, December 23, 2016 8:12 PM

Greg--thanks for stopping in, and for your encouraging comments. It is always great to hear from you.

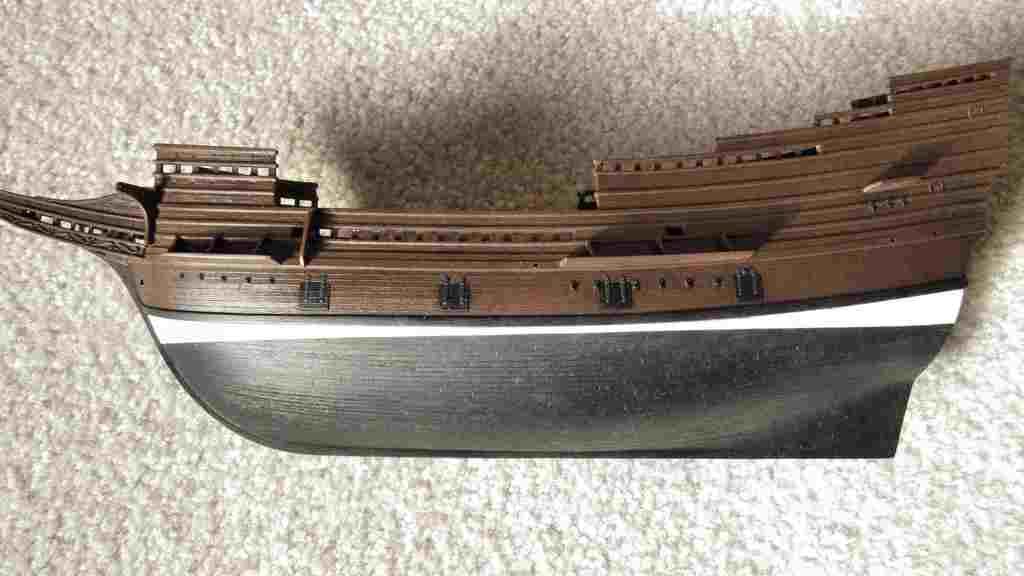
Here is where I am on this. The lower wale and waterline are now painted.  Like with the rest of the hull thus far, I have attempted to add some aging. I used the salt technique on the waterline coating and I used the hair spray technique on the lower wale. Good or bad, hey, I am trying.

I have posted several angles of the project because glare really washes out some of the subtle aging effects.  


  • Member since
    July 2013
Posted by steve5 on Friday, December 23, 2016 10:33 PM

that made a nice difference to the ship steve


  • Member since
    July 2014
  • From: Franklin Wi
Posted by Bakster on Saturday, December 24, 2016 11:12 AM

Steve, I agree, and it is starting to look like a ship. It has been a long time coming. 

Next up: I will paint the gap between the waterline and the lower wale. I am thinking in a white. I should have that done in the next few days.

Thanks for staying in touch. I will need everyones help when I start the rigging. That is still a ways off, but it is far closer than ever before. 


  • Member since
    July 2014
  • From: Franklin Wi
Posted by Bakster on Saturday, January 14, 2017 1:29 PM


The gap is filled in.
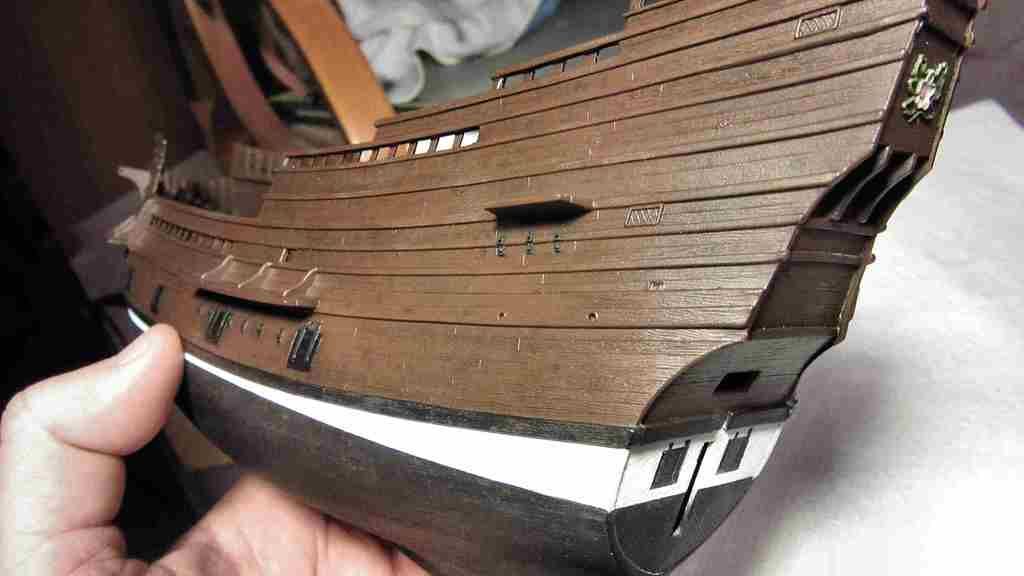


Below: A close-up of the paint. The craggily appearance is somewhat of a happy accident. I did the salt technique as I have used it before, but never has this happened. I can think of one possible explanation. I might have added too much Tamiya Flat Base to the Tamiya flat white.

Why add flat to flat? I have found that Tamiya flat paints are not flat enough for my taste, so I add more of their flattening agent. When I mixed this paint batch I remember thinking, dang, I poured a bit too much of the flat base. Maybe it was a combination of that, the salt, and a heavier coat of paint. I had to go heavier on the paint with it being a white.

The photo does not show the subtle discolorations that I created by doing the salt technique. The camera just can't seem to image it.

I have found Mayflower replica photos on the net showing similar weathering, if not worse. In the end, I am ok with how the process turned out.
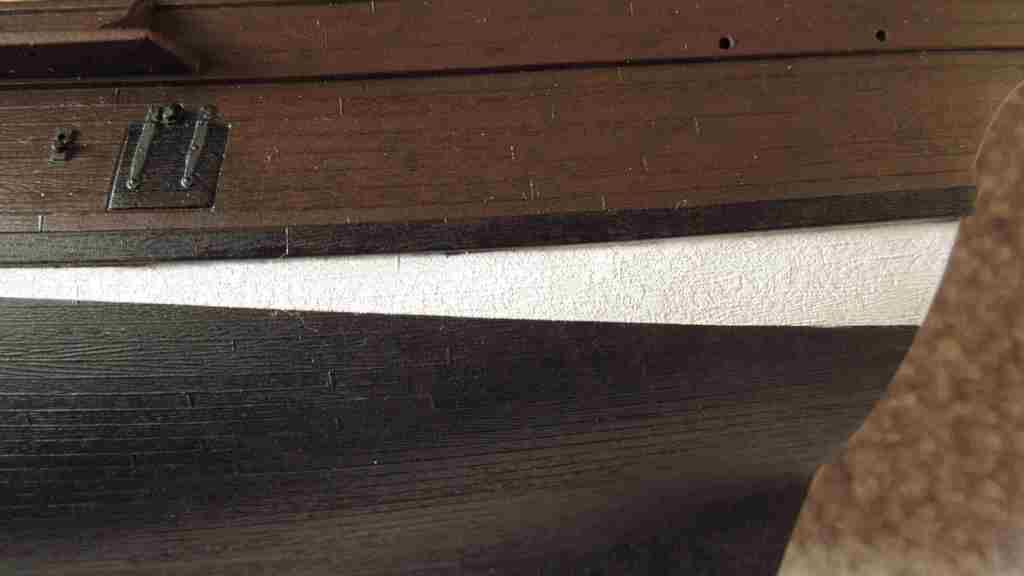
 

Below: A washed out view, but it gives you the idea of how the white looks next to the wale and waterline. I might dirty-down the white some with a very very weak oil wash.  I am on the fence about that. TBD.
 

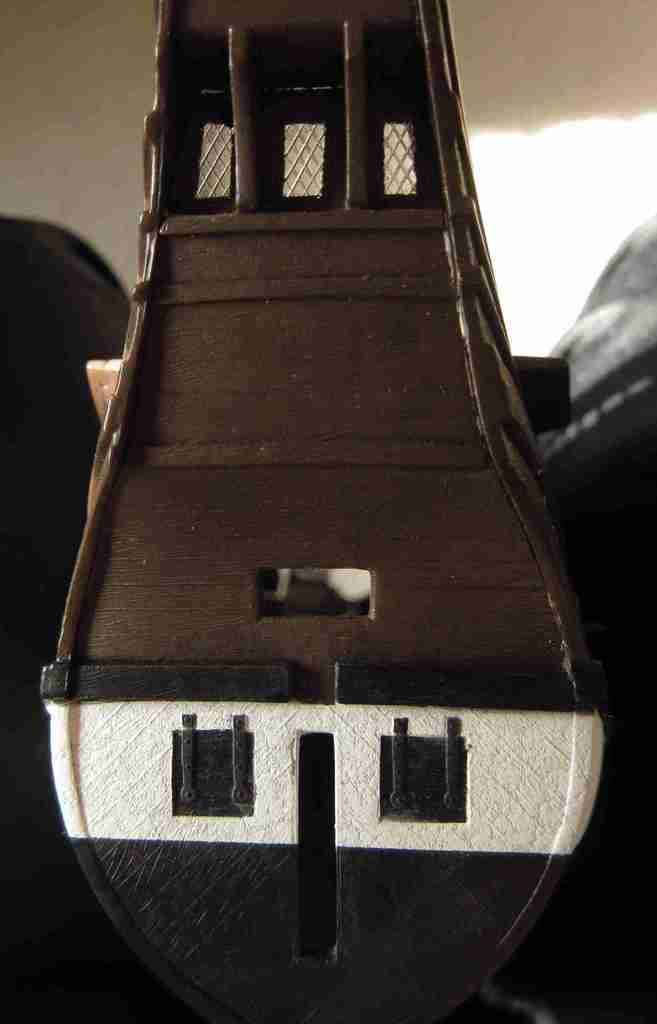
Below: A very distorted view of the transom. The camera's Macro setting can really distort lines, and in this case, it really does. None the less, the main purpose of this photo was to talk about the windows. As you can see, I have unmasked them.

Some of you recall that I used Bare Metal Foil to mask the windows. I had some concerns. I have not worked with BMF before, and I wondered how the foil would hold up to staying on the model for months on end, while I worked out the various painting processes.

I think that it did Ok. I did get some paint-wicking underneath the foil, but I kind of expected that. The raised latticework of the windows makes it almost impossible to get a mask to completely seal flat, especially at this scale. What might have helped in all this is if I could have laid a lighter coat of paint to seal the edges first, followed by a heavier coat for coverage. Those recesses are pretty dang small, and it was hard to get the paint-spray in there. So, I had to get in close, and that lead to heavier coverage.

I suppose in hindsight, I could have painted the window assembly prior to install. That would have given me much more AB control. Unfortunately, I did not have a grip on the paint/weathering process to think that far ahead. I think the latter is the best option.

One last comment about the BMF. It did not come up off the windows too well. I hoped that it would pull off in larger pieces, but this was not the case. It pretty much broke off in flakes making it somewhat of a pain to remove. I suspect this happened because of the long duration that it was in place.
  • Member since
    July 2013
Posted by steve5 on Saturday, January 14, 2017 1:37 PM

I like that steve , for what it's worth I would be on the side of a very weak wash , to keep with the aging effect you are after ,

 steve


  • Member since
    July 2014
  • From: Franklin Wi
Posted by Bakster on Saturday, January 14, 2017 1:42 PM

Steve, thanks for your input.  That is the way I am leaning as well. It would help balance the aging, as you mentioned.

  • Member since
    September 2016
  • From: north Baltimore City, Maryland
Posted by baltosale on Wednesday, February 1, 2017 12:58 AM

Bakster - I just came across this wip build.  It is the best tutorial I have ever seen - and god knows I need them - I love the ships and there is a lot here to apply in other builds.  Don't stop.  Carry on.  I got a lot of learnin' to do.   Excellent work and excellent documentation.   js

  • Member since
    July 2014
  • From: Franklin Wi
Posted by Bakster on Wednesday, February 1, 2017 11:37 AM

baltosale
Bakster - I just came across this wip build. It is the best tutorial I have ever seen - and god knows I need them - I love the ships and there is a lot here to apply in other builds. Don't stop. Carry on. I got a lot of learnin' to do. Excellent work and excellent documentation. js

Hey there JS, I really appreciate what you wrote. I am determined to finish this build, but sometimes, it gets to be a slog. In reading that you are getting some value from what I am doing, it gives me another weapon in my arsenal to keep pushing on.

Speaking of a slog: A few weeks back I had slipped on some ice sending me down hard, and square on my back. As of now it looks like the damage is a severely sprained back. I am doing much better though, and I even started working on this build again.

I am currently working on painting other sections of the hull. More specifically, I am working on all the masking. I hate masking! I guess that I picked the wrong build for that then.  Tongue Tied

Once when I get the outer hull all painted, I can move towards installing the lower deadeyes and chains. That will be a nice change of pace, and I am looking forward to it. After that, the main deck can go in, and that will be a milestone for me. I can then begin looking towards building up all the bulkheads.

Thanks again, JS!


Steve


  • Member since
    July 2014
  • From: Franklin Wi
Posted by Bakster on Monday, February 13, 2017 10:10 PM

Not much to show here but I am nearing the final stages of this phase of masking. I still have major areas to cover from just above the lower wale down, the beak head, and some areas of the transom. All those will be covered with plastic wrap to reduce all the taping time. Anyway, you can see what I am going after in terms of paint.

It kind of looks like overkill with the tape doesn't it.  I tell ya though. It is crazy how paint sneaks into any open void. Even when I am careful I have found overspray that worked in under some tape that lifted up ever so slightly. For me, this is a lesson in measure twice, cut once.

With luck, I might be able to spray by this weekend. There will be weathering involved again, so that is a several step process that can span several days. I may not actually pull the tape off until later next week. Speaking of that--the sooner the better. I hate leaving tape on too long for risk of pulling up some paint. I am not too concerned about the Tamiya tape, but I have already seen the problem happen using the thin vinyl tape. I use the tape mostly along long sections that need a nice clean edge and where there are curves to deal with. The tape tends to be tackier, and just maybe, the adhesive is chemically reacting with the various paints and processes that I am doing. So far though, it was nothing that a little touchup paint couldn't fix. Fingers are crossed.

I have one last comment about the tape that I have been using. In previous masking jobs I have posted images where I have used combinations of both Tamiya and Blue Painters Tape. The reason for the blue tape was because it is cheap, low tack, and I could get more coverage with it having a larger width. I delegated it to non-critical areas though. My experience with the tape has been disappointing. I have found that the blue tape tends to curl up over time creating areas where overspray can get in. Too often I found myself pressing the tape down to try and get it to stick. For me, it is not worth the hassle. I will stick with Tamiya as much as possible; it is predictable and reliable.

THE END


  • Member since
    July 2010
  • From: Tempe AZ
Posted by docidle on Monday, February 13, 2017 10:35 PM

Steve,

Your Mayflower is looking awesome! I'm trying to play catch up here. I'll send you an email soon to catch up with you.

Steve


  • Member since
    July 2014
  • From: Franklin Wi
Posted by Bakster on Tuesday, February 14, 2017 8:49 AM

docidle
Steve, Your Mayflower is looking awesome! I'm trying to play catch up here. I'll send you an email soon to catch up with you. Steve


Holy cats, Steve! What a great surprise to hear from you! Yes, please write me when you can, and thanks about the build too!


Steve

  • Member since
    December 2015
  • From: providence ,r.i.
Posted by templar1099 on Tuesday, February 14, 2017 9:52 AM

Man, this is coming along beautifully,and I've got a bunch of notes. Agree wholeheartedly with your opinion on blue painters tape, I've recently picked up some artists' tape and so far so good. Keep it coming.

"le plaisir delicieux et toujours nouveau d'une occupation inutile"

  • Member since
    July 2014
  • From: Franklin Wi
Posted by Bakster on Tuesday, February 14, 2017 5:25 PM

Say Templar--thanks for the positive feedback. Also, thanks for mentioning the artists tape. If there is a particular type/brand that you use, please let us know. I'm always looking for new stuff to try.


  • Member since
    July 2014
  • From: Franklin Wi
Posted by Bakster on Sunday, February 26, 2017 2:30 PM

Hours of masking, minutes of painting, an hour of weathering, followed by a half hour of demasking. This hobby is a real time suck. Oops

Ya have to love the hobby or it's a killer. Fortunately for me, I like it enough to get through it. But, probably not enough that I don't not complain about it. Big Smile

Well, here is how the beast is looking. Kind of ugly, but I work hard to make it so.


The ship is telling me that I am not done with the hull yet. There are square panels on the beakhead that are screaming for some color. So, what the ship wants, the ship gets. When that is done, I can start on the chains. Hallelujah to that. 


  • Member since
    July 2014
  • From: Franklin Wi
Posted by Bakster on Tuesday, March 7, 2017 10:50 PM

The beakhead panels are done. I created the color by mixing Tamiya Red with a small amount of Tamiya black. This created a deeper and darker color of red. The color straight from the bottle looked too toyish to me. However, I may still slightly mute what I did by adding a wash. It is a little too hot for my taste. I should also mention that the camera is shifting the color to an orange. The actual color is more of a maroon.  

As far as I am concerned, the major painting on the hull is done. Tweaks here and there are sure to follow. But for now, I am moving towards sorting out the chainplates.  


I mentioned in another post that the thin vinyl tape had removed some paint. I have found further evidence of that when I did the previous masking/painting. Though, it is nothing that a little touchup paint can't fix. By the way. The tape in question was invaluable when I taped up the beakhead. It is excellent for jobs that have raised areas because it contours so nicely, and it sticks!


Lastly, for those like me that are still learning...here is a little tip. There are tons of things that can happen where touchup paint may be needed. In many cases, I am creating custom color mixtures, and this is not something that I will want to try and replicate later. Speaking from experience, you won't get an exact match, and it will surely show.

Early on with this build I started collecting samples for the just in case scenario. Sure enough, it has paid off. It has happened that I needed to use them. The beauty of using the original mixtures is that it is a perfect match. If you are careful with the coverage, you will not be able to tell the difference when you are done.

I bought a bunch of small plastic bottles from a surplus store at .45ea. When I am done with a paint session, I pour what is left into a bottle, and then store it away. Do yourself a favor though and label the bottle. I was not that smart about it. A few times I am looking at them and thinking, what was this for? Doh!


  • Member since
    July 2014
  • From: Franklin Wi
Posted by Bakster on Saturday, March 11, 2017 1:40 PM

Today, my plan was to sort out the strops for the lower deadeyes, but that came to a screeching halt. It didn't take me long to realize that I have some serious work to do on the deadeyes. There is considerable slag to remove, and the grooves where the strops will sit are pretty plugged up in some areas. The flat sides seem pretty course too. I will need to file that smoother. On a few, I will need to ream some holes because they are nearly plugged up. I can't expect it to be easy can I. Son of a .... biscuit. The good news is that this metal is very soft, and it's easy to work with.

Preliminarily, the plan is to create the strops out of copper wire. Unfortunately, I have found that the wire that I have is either too big, or too small. I will have to order some. 

All is not lost though. At least now, I do have a little better idea of what needs to be done.

Does anyone have any advice on these before I jump into cleaning them up? Call it lazy, or that I am trying to save some time... When it comes time to paint, unless someone tells me that I better do it, I want to avoid messing with any sort of primer coat. The paint that I will be using is acrylic. Any tips that you have that may save me a headache, would be appreciated. 

Thanks.


JOIN OUR COMMUNITY!

Our community is FREE to join. To participate you must either login or register for an account.

SEARCH FORUMS
FREE NEWSLETTER
By signing up you may also receive reader surveys and occasional special offers. We do not sell, rent or trade our email lists. View our Privacy Policy.