SEARCH FINESCALE.COM

Enter keywords or a search phrase below:

Building from scratch my 1/280 Clipper Great Republic

9319 views
141 replies
1 rating 2 rating 3 rating 4 rating 5 rating
  • Member since
    December 2012
Posted by rwiederrich on Tuesday, August 2, 2016 7:42 PM

Then I cut out the bulkheads " target="">

  • Member since
    December 2012
Posted by rwiederrich on Tuesday, August 2, 2016 7:43 PM

Mounted them on the keel whaich I cut/made from a tree I fell in the yard. " target="">

  • Member since
    December 2012
Posted by rwiederrich on Tuesday, August 2, 2016 7:44 PM

Another of all the bulkheads in place. " target="">

  • Member since
    December 2012
Posted by rwiederrich on Tuesday, August 2, 2016 7:45 PM

I then reinforced with spacers. And built the stren. " target="">

  • Member since
    December 2012
Posted by rwiederrich on Tuesday, August 2, 2016 7:46 PM

Next I covered the chamfered deck with 1/16 plank. " target="">

  • Member since
    December 2012
Posted by rwiederrich on Tuesday, August 2, 2016 7:47 PM

Then I began to plank with the same 2" x 1/16 soft pine sheets " target="">

  • Member since
    December 2012
Posted by rwiederrich on Tuesday, August 2, 2016 7:49 PM

Then sanded and filled in the sections " target="">  " target="">

  • Member since
    December 2012
Posted by rwiederrich on Tuesday, August 2, 2016 7:50 PM

Sanded and filled smooth " target="">  " target="">

  • Member since
    December 2012
Posted by rwiederrich on Tuesday, August 2, 2016 7:52 PM

Then added the deck and planksheer and rail base " target="">  " target="">

  • Member since
    December 2012
Posted by rwiederrich on Tuesday, August 2, 2016 7:53 PM

Next..I stained the deck and painted the hull " target="">

  • Member since
    December 2012
Posted by rwiederrich on Tuesday, August 2, 2016 7:56 PM

I made a press to impress or imboss individual copper plates and their nail impressions onto 5mm copper tape.  I then applied this to the hull. " target="">  " target="">  " target="">

  • Member since
    December 2012
Posted by rwiederrich on Tuesday, August 2, 2016 7:58 PM

I had to have a mount to display the model so I built this unique maple raw live edge base suspended from a maple base I cut and milled from the same feld tree. " target="">

  • Member since
    December 2012
Posted by rwiederrich on Tuesday, August 2, 2016 8:00 PM

I didn't favor the bright copper....so to mimic muntz metal that has weathered in salt water...I painted the copper lightly with metallic paint.  It represents brownish/bronzy muntz metal...I think " target="">  " target="">

  • Member since
    December 2012
Posted by rwiederrich on Tuesday, August 2, 2016 8:03 PM

Currently the hull is resting on wood blocks...but will be cradled between small foam disketts.  (Like my model of the Glory of the Seas)

Next will be fashioning the dedyes and chainplates on the channels.

Rob(I built the hull in 2 days and coppered it in about the same)Stick out tongue

  • Member since
    December 2012
Posted by rwiederrich on Tuesday, August 2, 2016 8:12 PM

A unique thing about the design of the Great Republic is she had no bullwarks.  She had a spar deck that was flush with the side of her hull.  She had turned oak Stanchions for an entire rail that went around her entire deck. " target="">

  • Member since
    December 2012
Posted by rwiederrich on Tuesday, August 2, 2016 8:19 PM

From another angle... " target="">

  • Member since
    July 2013
Posted by steve5 on Wednesday, August 3, 2016 12:26 AM

very nice indeed rwiederrich , love watching wooden builds , can't wait for more

steve5


  • Member since
    June 2014
  • From: New Braunfels , Texas
Posted by Tanker - Builder on Wednesday, August 3, 2016 7:34 AM

Well ;

   To say this is nice , is and would be an understatement . You , Sir , are doing one fine job . Now in all fairness if you are this good , when are you going to start the " Star of India " ?  T.B.

  • Member since
    September 2005
  • From: Groton, CT
Posted by warshipguy on Wednesday, August 3, 2016 5:32 PM

Or, the Star of Alaska, aka Balclutha?

Bill

  • Member since
    September 2012
Posted by GMorrison on Wednesday, August 3, 2016 5:35 PM

I know that one!

 Modeling is an excuse to buy books.


  • Member since
    September 2005
  • From: Groton, CT
Posted by warshipguy on Wednesday, August 3, 2016 6:46 PM

G.M.,

When my two children were in Elementary School in Vallejo, the school put together a two-day program where the children acted as crew on the Balclutha. They stood watches and went about routine shipboard work while participating in a two week maritime history of San Francisco in their school.  I volunteered as a safety watch onboard and supervised several watch sections for them.  It was a great program, and I hope that Bay Area schools still have these programs.

By the Way, I have since preferred to call that ship by her original name, Star of Alaska.

Bill

  • Member since
    December 2012
Posted by rwiederrich on Wednesday, August 3, 2016 10:11 PM

Thanks T.B.  While I was building the Glory of the Seas and Donald McKay..I was planning the Great Republic.....I hope to incorporate similar deck furniture from the Revell CS model into the GR.  CS's winches are similar.

Hatch covers and kitbashed items will be used if at all possible.


Rob

  • Member since
    March 2012
  • From: Marysville, WA
Posted by David_K on Sunday, August 14, 2016 11:10 AM

Wow, Rob!

Don't know how I missed this thread until now....very cool project, man!

Dave

        _~
     _~ )_)_~
     )_))_))_)
     _!__!__!_         
     (_D_P_K_)
   ~~~~~~~~~~~~~
    ~~~~~~~~~~~

Current Project:  Imai/ERTL Spanish Galleon #2

Recently Finished: Revell 1/96 Cutty Sark

Next Up:  ???


  • Member since
    December 2012
Posted by rwiederrich on Sunday, August 14, 2016 6:11 PM

Thanks Dave.  I figured I needed to scratch built the Great Republic...since ther are no models of her in production.

Here are some images of the chainplates and channels being worked., " target="">  " target="">  " target="">  " target="">

  • Member since
    December 2012
Posted by rwiederrich on Sunday, August 14, 2016 6:22 PM

Inventing and making the machine to press my 5mm x 9mm copper plates using copper tape was a fun project.

  • Member since
    December 2012
Posted by rwiederrich on Sunday, August 14, 2016 6:30 PM

Here is an image of some tape sectiones impressed with the plate impressions...ready to be placed on the model " target="">

Here is a sample plate of the plates after they received thier dusting of metalic paint to make them look more like weathered muntz metal.

 " target="">

  • Member since
    December 2012
Posted by rwiederrich on Sunday, August 14, 2016 6:40 PM

I used a clothes roller and mesh wire, also sheet rock sanding mesh(not shown).

I pressed the copper tape under the wire mesh and also under a strip of sheet rock sanding mesh(not shown).... Rolling the items impressed the plate lines and the many nail imprints on each plate..... " target="">  " target="">  " target="">  " target="">

There was no way I was going to hand lay 1600 indiviual plates...and take weeks of tedious work........

I coppered the entire hull in about 2 hours(not to include the metallic painting)

Rob

  • Member since
    July 2013
Posted by steve5 on Sunday, August 14, 2016 9:47 PM

this build is real fun to watch rob , your a clever man .

steve


  • Member since
    December 2012
Posted by rwiederrich on Monday, August 15, 2016 8:17 AM

Thanks Steve......I hope to finish off the port side chainplates this evening (3 left)..then begin building the rudder and coppering and mounting it.

After all this exterior work is done...I'll focus on the deck details..probably catheads...then that extensive railing.

Rob(Any word on the package I sent?)

  • Member since
    July 2013
Posted by steve5 on Monday, August 15, 2016 9:38 PM

not yet rob , I'll let you as soon as it does mate .

steve


  • Member since
    September 2005
  • From: Groton, CT
Posted by warshipguy on Tuesday, August 16, 2016 6:25 PM

Rob,

I continue to be amazed by your ideas annnd the quality of your work!  Your technique for the copper plating is brilliant!

Bill

  • Member since
    December 2012
Posted by rwiederrich on Wednesday, August 17, 2016 2:02 PM

Here is an image of the freshly pressed tape plates with a sample of the mesh used to imprint the nail impressions " target="">

And one with the mesh in place on the wire grid in the roller..... " target="">

  • Member since
    December 2012
Posted by rwiederrich on Wednesday, August 17, 2016 2:35 PM

I truly appreciate the kind words.  Yeah, I think out of the box, a lot...because...well...I'm just not a purist.  I can't imagine hand laying 1600 5mmx9mm plates one by oneHuh?.  Like I have made known openly on many occasions.  I will use whateve technique and whatever material to achieve my goals.  And in most cases, I'll re-engineer other peoples manufactured stuff for my own purposes.  Cuz once there is paint applied you will never know if its wood, plastic, metal, paper, or wax.Whistling

Again...thanks for the kind compliment.

Rob

  • Member since
    December 2012
Posted by rwiederrich on Friday, August 26, 2016 8:08 AM

I tinkered on the GR yesterday and I finished up the rudder.

Rob " target="">  " target="">  " target="">  " target="">

  • Member since
    July 2013
Posted by steve5 on Friday, August 26, 2016 4:22 PM

this is a really nice build rob , did you make those hinge's or buy them ? . love your work station too mate ,

steve


  • Member since
    December 2012
Posted by rwiederrich on Friday, August 26, 2016 7:03 PM

Thanks Steve.  I made all the parts and the rivets are drops of hard dental wax.

Working on the deck houses...five to make.


Rob

  • Member since
    December 2012
Posted by rwiederrich on Monday, October 3, 2016 10:12 AM

Finally finished the bathroom remodel...now I can get to spending time on the Great Republic..AGAIN.

I spent some time making the two forward deck houses.  the hard part was the windows and the raised panneling.  I experimented with many approaches and after many trials and redo's.......I finally settled on a process.  Here are some images and a penny for scale.  At this scale..detail can be straining.  The GR had a steam engine used for cargo and yard work...this was housed in the second house...you can see the pullies extending outside the house on the aft section.  forward cabin has 4 doors and windows and the aft has 6 doors 6 windows and a large 3 pannel acces door to the rear. " target="">  " target="">  " target="">  " target="">  " target="">

  • Member since
    December 2012
Posted by rwiederrich on Monday, October 3, 2016 10:15 AM

The houses will not be glued down yet....I still need to install the perimeter rail and I will need as much room and flexability to do so.

Rob

  • Member since
    July 2013
Posted by steve5 on Monday, October 3, 2016 9:54 PM

really nice work rob , can't wait for the next installment .


  • Member since
    September 2005
  • From: Groton, CT
Posted by warshipguy on Tuesday, October 4, 2016 5:45 AM

Rob

Beautiful work!

Bill

  • Member since
    September 2005
  • From: Groton, CT
Posted by warshipguy on Tuesday, October 18, 2016 1:08 PM

Rob,

I was wondering about you yesterday!  Your Great Republic looks marvelous!

Bill

  • Member since
    December 2012
Posted by rwiederrich on Wednesday, October 19, 2016 2:55 PM

Thanks for thinkin of me.   I still have the knightsheads to finish and the forward fife rail.

Once the anchors are lashed down and one is hung from the cathead....I'll finish up the deck houses.  I stopped that process to finish things up forward and work aft.

Stem to stern is a good working method....keeps me on track.  Instead of skipping around the deck.

Rob

  • Member since
    December 2012
Posted by rwiederrich on Thursday, October 20, 2016 2:35 PM

I'm sicker then a skunk today so I will be brief.  I finished up the knightshead.

Going to bed..see everyone later.


Rob " target="">  " target="">  " target="">

  • Member since
    July 2013
Posted by steve5 on Thursday, October 20, 2016 2:51 PM

beautiful as ususal rob , hope you better soon , just getting over the flu myself .


  • Member since
    December 2003
  • From: 37deg 40.13' N 95deg 29.10'W
Posted by scottrc on Tuesday, November 1, 2016 3:50 PM

Rob, your scale and accuracy is looking fantastic.  

  • Member since
    September 2005
  • From: Groton, CT
Posted by warshipguy on Wednesday, November 2, 2016 7:30 AM

Rob,

Get well soon!

Bill

  • Member since
    December 2012
Posted by rwiederrich on Saturday, November 5, 2016 6:51 PM

Well I spent some time on the forward fife rail today.

 " target="">  " target="">  " target="">  " target=""> Rob

  • Member since
    September 2005
  • From: Groton, CT
Posted by warshipguy on Sunday, November 6, 2016 9:08 AM

Beautiful!  I would love to learn to scratchbuild ship models.

Bill

  • Member since
    July 2013
Posted by steve5 on Sunday, November 6, 2016 4:12 PM

Im like bill . Would love to learn how . Really enjoying this build rob


  • Member since
    December 2010
  • From: Salem, Oregon
Posted by 1943Mike on Sunday, November 6, 2016 10:49 PM

Rob,

Not only am I enjoying seeing you do something I know I can't do, I derive inspiration just from looking at your work!

I recall how much you helped me when I was struggling to build my Cutty Sark. You, I believe, were on your umteenth buld of Revel's CS at the time. Believe it or not, it was your building of your CS at that time that kept me going in this delightful hobby. I'll always be grateful to you for that.

Back to your Great Republic, it's coming along nicely - to say the least. I am a little confused about the length of your model. If, as you've said, it's 1/280 scale, then it should be 14 5/16" in length (The Great Republic was 334' in length which is 4008" which divided by 280 = 14.31"). Somehow the pictures you're posting make it seem larger. But, I guess, that's just because I don't really have a reference in your images to really perceive it's dimensions. How long is your model?


Mike

"Le temps est un grand maître, mais malheureusement, il tue tous ses élèves."

Hector Berlioz

  • Member since
    December 2012
Posted by rwiederrich on Monday, November 7, 2016 9:25 AM

Thanks Mike for the very fine comments, and I'm so glad I was some inspiration to you....that is any modelers true intent.  To influence others in a possitive way.

I'm sorry..the model is 3/32"=1ft...  It was expalined to me that was 1/280th.  could I be incorrect in this?

Thanks again for your fine comments.

And yes those are extra 1/96 CS parts.


Rob

  • Member since
    December 2012
Posted by rwiederrich on Monday, November 7, 2016 10:28 AM

Well Bill and Steve..just keep following this log and from beginning to end you can see the process.  The biggest hurdel is getting over the notion of begining...and the notion you can.  Most scale modelers already have most of the tools required.  You may need to buy or build a table saw to cut your miniature lumber...or even buy from model expo or other outfits the scale lumber precut.  Get a set of plans and begin.  You could use a band saw or sacrole saw to aid in cutting out the bulkheads or ribs and other small woodworking items.

I use scale parts to use use as models to make my metal parts...or I use premade metal parts that are in scale if at all possible.

Many here on these pages rig their scale models as a scratch builder would..forgoing the plastic deadeyes and such.  So...see....much of what plastic scale modelers already do is performed on scratch built models.

Good luck and if I can be of any assistance..just let me know.


Rob

  • Member since
    December 2010
  • From: Salem, Oregon
Posted by 1943Mike on Monday, November 7, 2016 11:15 AM

Rob,

Here's my probably way off base guess as to the scale of your scratch built Great Republic:

A) You show a Black & Decker workmate hobbycrafter in one of your pictures holding up the model. The B & D devise has an 8" work space on top (based on what I could find online). Measuring on my monitor - which is not the most accurate way of doing things but for this purpose it'll do - it looks like your model is a little more than three times the 8" on which it's resting. That would make it about 28" (+/-) from stem to stern. If that is at all accurate, then your scale is not 1/280 but much closer to 1/140.

Would you indulge my curiousity and measure the length of your model? Again, my guess is a little over 2 feet and possibly as much as 30".


Mike

"Le temps est un grand maître, mais malheureusement, il tue tous ses élèves."

Hector Berlioz

  • Member since
    December 2012
Posted by rwiederrich on Monday, November 7, 2016 12:18 PM

From work....

There are 10.75 scale feet per inch and the Great Republic was 325 ft long.  Divide that by 10.75= 30.95"model length.  Still not sure of the ratiod scale.

So let me quess....30 divided by 12=2.5.  Divide 325 by 2.5=130.  So the GR is in a scale of 1/130th?

Rob

  • Member since
    December 2010
  • From: Salem, Oregon
Posted by 1943Mike on Monday, November 7, 2016 2:01 PM

Rob,

When you get home from work please measure the overall length of your model as she sits.

From Wikipedia the overall length of the Great Republic was 334'. The length "on deck" was 325' - see here:

http://www.loc.gov/pictures/item/90716149/.

Her overall length (presumably including bow sprit and whatever may have extended abaft the stern) was 400'. See here:

https://en.wikipedia.org/wiki/Great_Republic

Not that any of this matters in viewing your wonderful work on this project, I just thought that the scale you mentioned earlier must have been off based on what I was seeing in your posts.

My guess on the length of your model as it now stands is around 30" which would make it, based only on the measurement from stem to stern (which is, of course, longer than the deck measurement) a scale of around 1/135 (+/-). In any case it's going to be a very impressive model indeed. It'll also be big enough to allow you to rig her without using ultra powerful magnifying lenses Big Smile

Mike

"Le temps est un grand maître, mais malheureusement, il tue tous ses élèves."

Hector Berlioz

  • Member since
    December 2012
Posted by rwiederrich on Monday, November 7, 2016 4:55 PM

Ooops...I made an error after revisiting my dimentions.  GR was 335ft not 325 as I  previously erroniously entered.  Making my hull roughly 31" in length(I'm not home but I am building her to a scale plan and it is 3/32"=1ft.

I now see I will have to amend my post to reflect the actual scale.

Thanks for pointing out the error.

Rob

  • Member since
    December 2012
Posted by rwiederrich on Monday, November 14, 2016 8:11 AM

Workied on a few hatches and the bell today.

I'm working aft.  the main cabin is next.  Here are a few images of my progress.

Rob " target="">  " target="">  " target="">  " target="">

  • Member since
    September 2005
  • From: Groton, CT
Posted by warshipguy on Monday, November 14, 2016 8:13 AM

Rob,

Beautiful work, as always!

Bill

  • Member since
    July 2013
Posted by steve5 on Monday, November 14, 2016 2:07 PM

love this build , that bell is just awesome .


  • Member since
    December 2010
  • From: Salem, Oregon
Posted by 1943Mike on Monday, November 14, 2016 3:28 PM

What Bill said +1.


Mike

"Le temps est un grand maître, mais malheureusement, il tue tous ses élèves."

Hector Berlioz

  • Member since
    December 2012
Posted by rwiederrich on Wednesday, November 30, 2016 8:54 AM

Time spent on the GR is limited, but I did fashion the 30ft eagle that rests on the stern.

Rob " target="">  " target="">  " target="">  " target="">

  • Member since
    July 2013
Posted by steve5 on Wednesday, November 30, 2016 1:34 PM

your amazing rob .


  • Member since
    December 2012
Posted by rwiederrich on Wednesday, November 30, 2016 1:50 PM

Well I don't know about that Steve...however I appreciate the fine remarks.

Being the scrounger that I am...it just took some time and a lot of searching to find the right eagle pin to take its place on the Great Republics stern.

Lots of mods and alterations to the piece...but it worked out well and I feel it's a  agreat representation of the 30ft spread wing eagle that was on the GR's stern.  Plus it has the American crest in the eagles clutches as was the original.

I painted the crest and then weathered the entire ornament.

I could have carved one...but the time and energy that was required just didn't work for me...plus I was certain I could re-engineer what I could find.

Now...on the look-out for the scale eagle's head for the figurhead.  I'll carve that one if need be.

Rob

  • Member since
    September 2005
  • From: Groton, CT
Posted by warshipguy on Thursday, December 1, 2016 7:58 AM

Rob,

I can't wait to see you tackle the Flying Cloud I sent you!  Your skills should do it justice.

Bill

  • Member since
    December 2012
Posted by rwiederrich on Sunday, December 4, 2016 8:00 PM

Thanks Bill...I suspect hat might be some time..since I have 3 other incomplete vessels on the ways in front of her.  " target=""> ........I do appreciate your overwhelming generosity.

I did spend an hour this evening working on the largest of the GR deck houses.

Rob " target="">  " target="">  " target="">

  • Member since
    December 2012
Posted by rwiederrich on Tuesday, December 13, 2016 8:39 AM

Spent about an hour last night building the main fife rail.  I had just painted the pumps and had not installed them for the image.

Man I feel as if I'm building small pieces at a time.  slow going for sure.

It's looks obvious that the aft house is next.  I almost started it last night..but I was called away.  I'll finish the aft cabin and the helm together next.

Rob " target="">  " target="">

  • Member since
    June 2014
  • From: New Braunfels , Texas
Posted by Tanker - Builder on Tuesday, December 13, 2016 8:54 AM

Aha!;

  You now know what modeling in 1/96 is like . Especially on a warship . Every time you turn around another part of the ship needs doing , just like another kit too !

   I must say though , by taking your time she's looking sweet !  T.B.

  • Member since
    December 2006
  • From: Jerome, Idaho, U.S.A.
Posted by crackers on Tuesday, December 13, 2016 10:02 AM

Model of the GREAT REPUBLIC clipper scratch build really impressive and worthy of continued observation.

Happy modeling  Crackers    Big Smile

Anthony V. Santos

  • Member since
    December 2012
Posted by rwiederrich on Tuesday, December 13, 2016 11:35 AM

 I APPRECIATE THE FINE COMMENTS.

I recall..it only took me 3 months to build my award winning 1/96 CS in drydock for rudder repairs diarama.  Now that is building at a fevered pase.  I miss those days.

I simply need to reorganize and rethink my building paradime.

Rob

  • Member since
    December 2012
Posted by rwiederrich on Tuesday, December 13, 2016 11:36 AM

Thanks Crakers.....I'll be at it till she is finished.  Sooner then later I pray.

Rob

  • Member since
    September 2005
  • From: Groton, CT
Posted by warshipguy on Friday, December 16, 2016 6:39 PM

Rob,

I just received my copy of the Winter 2016 Nautical Research Journal.  It contains a nice article titled Restoration of Great Republic: A Brief Account of the History and Restoration of this Ship Model  by Carla Z. Hinkle.  If you are interested, I will send you a copy or the article.

Bill

  • Member since
    December 2012
Posted by rwiederrich on Saturday, December 17, 2016 12:24 AM

Please do if you can...I'd appreciate that for sure.

Rob

  • Member since
    September 2005
  • From: Groton, CT
Posted by warshipguy on Sunday, December 18, 2016 11:21 AM

Rob,

Please send me your email address to:   bmorri6409@sbcglobal.net.  I am having difficulties opening my Messages on the FSM website.

Bill

  • Member since
    December 2012
Posted by rwiederrich on Monday, December 19, 2016 1:20 PM

Did a bit of work today...added the name board...the pump to the main fife rail and the addition of the mizzen fife rail. " target="">  " target="">  " target="">  " target="">  " target="">  " target="">  " target="">  " target="">

And some generic images.

 " target="">  " target="">  " target="">

  • Member since
    December 2012
Posted by rwiederrich on Monday, December 19, 2016 1:34 PM

Sorry about the cluttery mess about the project.  She is resting on her display base..resting on the Workmate.  I wanted a bit more height.


Putting doors and the pannels on the aft cabin and the helm. I'll finish them both at the same time..then the domed sky light.

I prefer scratch built scale models way more then plastic these days.  Short of my Seawitch and Swordfish 1/96 scale plastic kits...I won't be schedualing to build anymore plastic kits...I'm feelin.

Fair winds and following seas.

Rob

  • Member since
    December 2012
Posted by rwiederrich on Monday, December 26, 2016 6:58 PM
  • Member since
    December 2006
  • From: Jerome, Idaho, U.S.A.
Posted by crackers on Monday, December 26, 2016 9:57 PM

Really impressive modeling work. Love the detail.

Happy modeling   Crackers  Wink

Anthony V. Santos

  • Member since
    December 2012
Posted by rwiederrich on Wednesday, December 28, 2016 8:47 AM

Thanks Crackers....

I have been scratch building clippers for over 40 years and it remains the same....I supose I have refined my scrounging skills and ability to see what I need in the most common item..or even in complex engeneered things as well.  Like I have said before;  I will use anything and any material I can get my hands on to build my clippers.  I'm not after the building purists ideals....I'm after the end result.

Again...thank you for your fine comments.

Rob

  • Member since
    December 2006
  • From: Jerome, Idaho, U.S.A.
Posted by crackers on Wednesday, December 28, 2016 9:29 AM

I have plans for several clipper ships. At my age, I have sincere doubts I will ever scratch build all of them.

Happy Modeling  Crackers   Embarrassed

Anthony V. Santos

  • Member since
    September 2005
  • From: Groton, CT
Posted by warshipguy on Thursday, December 29, 2016 8:01 AM

Rob,

I never received your email address. Please send it to bmorri6409@sbcglobal.net and I will send the article.

Your Great Republic continues to amaze me!

Bill

  • Member since
    June 2014
  • From: New Braunfels , Texas
Posted by Tanker - Builder on Thursday, December 29, 2016 8:12 AM

I'm Sorry ;

   I got to looking closely at the Eagle . You know , that reminds me of two eagles ( mine were smaller ) that I put on my R.C.Tug stack . I got mine from a small Budweiser sign ! Beautiful job on that one though . I can't give you enough Kudos for this build . It's coming along swimmingly . T.B.

  • Member since
    June 2014
  • From: New Braunfels , Texas
Posted by Tanker - Builder on Thursday, December 29, 2016 8:14 AM

I have to open my big mouth again .

    The very idea of using a variety of materials , I am sure , Just makes some folks tremble with fear . You are obviously not to be deterred .Very nice cabin work ! T.B.

  • Member since
    December 2012
Posted by rwiederrich on Thursday, December 29, 2016 9:49 AM

Thanks T.B.  I have boxes of ship parts from old kits that I can draw from as well as material from my wood shop and my machine shop.  I collect all manner of metal for building my Telescopes and such.....as well as loads of wood from my wood shop that I cut to scale and use.

Not to mention whenever I go out to pawn shops or second hand stores or garage sales, I'm always looking for items that can be re-engineered for my purposes.

Over the years(Beginning with my first large scale scratch built clipper...Cutty Sark(1973)....) I have honed certain skills..namely the ability to see into something and envision what it needs to be, and developing the dextral skills to accomplish it.

Owning a Dental laboratory and being a skilled machinist..I have drawn from these disciplines, material and knowledge.    I believe the greatest contributer is the ability to adapt any medium that is usable.

I'll include an image of one of many telescopes I built.  I built the vaulted cieling roll off roof observatory to house it as well.

Any...I try to inject into my model ship building attributes learned from my other hobbies and interests.

I hope this explaines my methods a bit more.

Thanks for all your fine comments.

Rob " target="">

  • Member since
    September 2005
  • From: Groton, CT
Posted by warshipguy on Thursday, December 29, 2016 9:36 PM

Rob,

I don't know if you saw my post from this morning, but I never received your email address. Please send it to bmorri6409@sbcglobal.net and I will send the article.

Your Great Republic continues to amaze me!

Bill

  • Member since
    December 2012
Posted by rwiederrich on Friday, December 30, 2016 11:00 AM

Took care of it.......


Rob

  • Member since
    December 2012
Posted by rwiederrich on Tuesday, January 3, 2017 8:41 PM

Finished up the sky light and some extra details on the aft cabin. " target="">  " target="">  " target="">  " target="">

  • Member since
    July 2013
Posted by steve5 on Tuesday, January 3, 2017 9:04 PM

gee !, I'm enjoying this build rob . love seeing stuff being created .


  • Member since
    December 2012
Posted by rwiederrich on Wednesday, January 4, 2017 10:43 AM

Thanks Steve.  I love building all the deck furniture from scratch...or with some aid of predesigned items.

I'll get the crab winches finished up and then the rail.  I'm not looking forward to the rail..because it is the outline of the vessels lines and if I screw that up the lines will look wonkie.  So a true straight rail is a must.

I'm planning out the built masts and how I will turn them right now.  I think I'll have to adapt my wood lathe to hold a chuck to hold the mast for this process.

Rob(fine scale modeler)

  • Member since
    December 2010
  • From: Salem, Oregon
Posted by 1943Mike on Wednesday, January 4, 2017 1:18 PM

Rob,

Does your refractor suffer from much chromatic aberration

What power is it? What's the focal length?

Sorry for the OT questions


Mike

"Le temps est un grand maître, mais malheureusement, il tue tous ses élèves."

Hector Berlioz

  • Member since
    December 2012
Posted by rwiederrich on Thursday, January 5, 2017 7:20 AM

10" f/15   It was at the limit for the aperature....not very noticable in my view, however it is present.  Here is a 3 second exposure image I took of Jupiter with it.   I'm not so picky since I use this particular scope for planets, nebulae and double star study.

Rob " target="">

  • Member since
    December 2012
Posted by rwiederrich on Friday, January 6, 2017 10:53 AM

Worked on the fore deck rail and the bowsprit. " target="">  " target="">  " target="">  " target="">  " target="">

  • Member since
    December 2012
Posted by rwiederrich on Friday, January 6, 2017 12:39 PM

I placed the model in its permanent display space and looked for and issue of space...looks good.

Rob " target="">  " target="">  " target="">

  • Member since
    December 2012
Posted by rwiederrich on Saturday, January 7, 2017 11:13 AM
  • Member since
    December 2006
  • From: Jerome, Idaho, U.S.A.
Posted by crackers on Saturday, January 7, 2017 12:54 PM

Truly, a museum quality masterpiece. Excellent workmanship.

Happy modeling    Crackers    Big Smile

Anthony V. Santos

  • Member since
    September 2005
  • From: Groton, CT
Posted by warshipguy on Saturday, January 7, 2017 1:49 PM

Stunning, Sir! Simply stunning!

Bill

  • Member since
    December 2012
Posted by rwiederrich on Saturday, January 7, 2017 7:52 PM

Thanks friends......Wink

Rob

  • Member since
    December 2012
Posted by rwiederrich on Monday, January 9, 2017 5:50 PM

Worked on the rail today...almost finished,,just the stern ledt. " target="">  " target="">  " target="">  " target="">

  • Member since
    December 2012
Posted by rwiederrich on Monday, January 9, 2017 5:51 PM

I also added the jib boom to the bowsprit. " target="">

  • Member since
    December 2012
Posted by rwiederrich on Tuesday, January 10, 2017 2:55 PM
  • Member since
    December 2012
Posted by rwiederrich on Tuesday, January 10, 2017 2:56 PM

Now I am going to put my hand at carving the eagle head figurhead.......


Rob

  • Member since
    December 2012
Posted by rwiederrich on Tuesday, January 10, 2017 6:42 PM
  • Member since
    July 2013
Posted by steve5 on Tuesday, January 10, 2017 8:44 PM

your good rob , just loving this .


  • Member since
    December 2012
Posted by rwiederrich on Thursday, January 12, 2017 9:10 AM

Thanks Steve...I have to make some slight mods and touch ups to the figurehead attachment... it turned out better then I had hoped.

Now, I have to make the 6 crab winches...and then on to the mast builds.

Rob

  • Member since
    December 2012
Posted by rwiederrich on Tuesday, January 24, 2017 9:17 PM

Mounted the crab winches on deck. " target="">  " target="">  " target="">  " target="">

  • Member since
    July 2013
Posted by steve5 on Tuesday, January 24, 2017 11:57 PM

really beautiful work rob , can't wait to see more


  • Member since
    September 2005
  • From: Groton, CT
Posted by warshipguy on Thursday, January 26, 2017 8:31 AM

Rob,

Extraordinary work! You continue to amaze!

Bill

  • Member since
    December 2006
  • From: Jerome, Idaho, U.S.A.
Posted by crackers on Thursday, January 26, 2017 8:34 AM

Outstanding work. Will continue to follow your progress.

Happy modeling   Crackers    Smile

Anthony V. Santos

  • Member since
    December 2012
Posted by rwiederrich on Friday, February 3, 2017 11:00 PM

I spent some time working on the GR...I finished turning the mast ans temporarily set them.. " target="">

  • Member since
    December 2012
Posted by rwiederrich on Friday, February 3, 2017 11:02 PM

Then I cut them down to scale and banded them.... " target="">  " target="">

And afixed the chafing board

  • Member since
    December 2012
Posted by rwiederrich on Friday, February 3, 2017 11:06 PM

I then painted them.  I will build the tops seporately, then mount the mast, set the mast gaskets and fix the fife rail..before attaching the tops to each mast.

The McKay mast will be varnished not painted. " target="">  " target="">

  • Member since
    December 2012
Posted by rwiederrich on Friday, February 10, 2017 7:30 PM

I have not spent as much time on the GR as I would like too...since I'm working 12 hour days on back shift....but....

I did get the first cheeks mounted and some eyebolts on the foremast done...plus I worked off site to make the hundreds of eyebolts needed for the ship.  Here are some new pics. " target="">  " target="">  " target="">  " target="">  " target="">  " target="">  " target="">

  • Member since
    July 2013
Posted by steve5 on Friday, February 10, 2017 7:38 PM

very nice rob


  • Member since
    December 2012
Posted by rwiederrich on Friday, February 10, 2017 7:52 PM

I finally located an image of the GR that represents(for the most part), what she looked like when she sailed down from Boston to NY.  Many representations show her with 6 sails per mast...but these representations are of her after her rebuild.  She actually carried more canvas when she was only sporting 5 sails per mast....since she had the largest yards(main was 120ft) ever placed on a sailing vessel....thus by sheer size, she carried several hundred more yards of canvas with her larger pre-fire rig.

This is the configuration I will model.

 " target="">

Plus her masts were 20ft shorter after her rebuild then in her original form.

Here is an image of her after the fire.  You can see the dimentional differences. " target="">

Rob


  • Member since
    December 2012
Posted by rwiederrich on Saturday, February 11, 2017 6:07 PM

I spent about 40 minutes on the GR before I left for work.

I set up the plans and cut all the frames...I assembled the foremast top....

Now 2 more to go...here are some pix.


Rob " target="">  " target="">

  • Member since
    December 2012
Posted by rwiederrich on Saturday, February 11, 2017 6:10 PM

I then assembled the top.  It will be painted prior to install on the mast head.

Rob " target="">  " target="">  " target="">  " target="">

  • Member since
    December 2012
Posted by rwiederrich on Saturday, February 11, 2017 6:11 PM

Dry run on the mast.

Rob " target="">  " target="">  " target="">

  • Member since
    August 2014
  • From: Willamette Valley, Oregon
Posted by goldhammer on Saturday, February 11, 2017 6:31 PM

Not being into sail, your skills and patience are amazing. I can just shake my head in awe and know that I'll never live long enough to come anywhere near that level.

I absolutely love the visualization and thought on the base for her.  That is just gorgous.

A true work of art in progress.

  • Member since
    March 2005
Posted by philo426 on Saturday, February 11, 2017 7:07 PM

Agreed this is one epic build and the cantilevered display board is pretty unique also.

  • Member since
    December 2012
Posted by rwiederrich on Saturday, February 11, 2017 7:39 PM

Thanks you very much Goldhammer.  I never really thought of myself as an exceptional builder.....more of a throw it together kinda guy.  I have(IMV) limited patience when it comes to repetition.  If I can devise a way to make things move along faster and utalize trickary.....I'm your man.

I am always looking for a unique way to display my models...theme that tells a story...or at least depicts a factual event in the life of the vessel.  In the case of the Great Republic..she burned to the water line before she even set sail on her maiden voyage...so depicting her as a burned out hulk...probably wouldn't be the effect one is looking for.

Here are 3 other examples of unique displays I built for other ships.

The Ferriera(aka Cutty Sark) " target="">

The Cutty Sark rudder repair " target="">

And the clipper Donald McKay " target="">

  • Member since
    March 2005
Posted by philo426 on Sunday, February 12, 2017 12:47 PM

I really like the top picture.How did you construct the water base I want to do the same for my Vernon?

  • Member since
    December 2012
Posted by rwiederrich on Sunday, February 12, 2017 3:13 PM
  • Member since
    September 2005
  • From: Groton, CT
Posted by warshipguy on Sunday, February 12, 2017 3:45 PM

Exquisite!

Bill

  • Member since
    March 2005
Posted by philo426 on Sunday, February 12, 2017 4:53 PM

Thanks! I was thinking of using rippled plastic shower glass and painting greens and blues underneath it.Much to consider and it really adds visual interest. 

  • Member since
    December 2012
Posted by rwiederrich on Sunday, February 12, 2017 7:41 PM

I was looking for a three dimentional look...the depth of the resin over the plexi with color within and underneath really made it pop.

Rob

  • Member since
    December 2012
Posted by rwiederrich on Sunday, February 12, 2017 7:54 PM

It's all ab out depth of field and 3-D effect.

See the anchor..it's above and below the waterline...so is the mooring pontoon/

I even added a supply boat unloading a barrel...the bottom of the boat is visible underneath as well.  

 " target="">   " target="">

  • Member since
    July 2013
Posted by steve5 on Sunday, February 12, 2017 8:30 PM

i'm with gold hammer , no way I could come close to that skill level , just love watching you work my friend .

steve


  • Member since
    March 2005
Posted by philo426 on Sunday, February 12, 2017 10:23 PM

Yes awesome work for sure!

  • Member since
    December 2012
Posted by rwiederrich on Monday, February 13, 2017 12:50 PM

Thanks Steve and Philo...I appreciate that very much.

Now back to the Great Republic...I finished up the lower masts and the spanker mast.

I have to now tackle the deadeyes and the futtock shrouds..I also tung oild the spanker and the jib boom.

 " target="">   " target="">    " target="">   " target="">   " target="">  

  • Member since
    December 2012
Posted by rwiederrich on Monday, February 13, 2017 6:16 PM

Today I had an hour or so...so I fabricated the futtock shrouds for the masts....There are a plethora of ways one could go about doing this....I kept it simple and will be adding my deadeyes to them later...the same way I did the main deadeyes on the channels.

 " target="">   " target="">   " target="">   " target="">  

  • Member since
    December 2012
Posted by rwiederrich on Friday, February 17, 2017 7:40 PM

I've built so many sailing ships over the years and have built them with furled sails with sails and with no sails.  My last big ship (Glory of the Seas) is without sails and my Cutty Sark is without sails.

Well the Great Republic is the biggest and most expansive clipper I have built thus far and I feel sails are appropriate...since she was the largest wooden clipper ever built. 

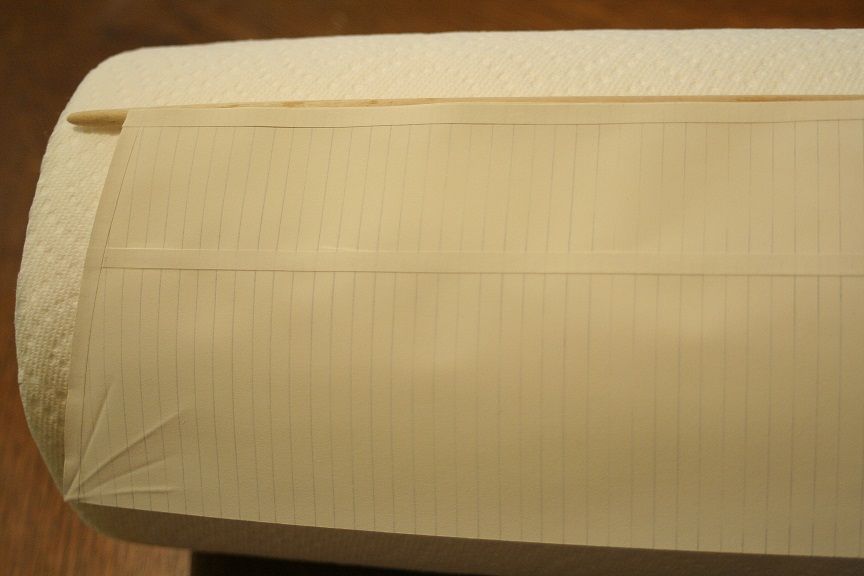
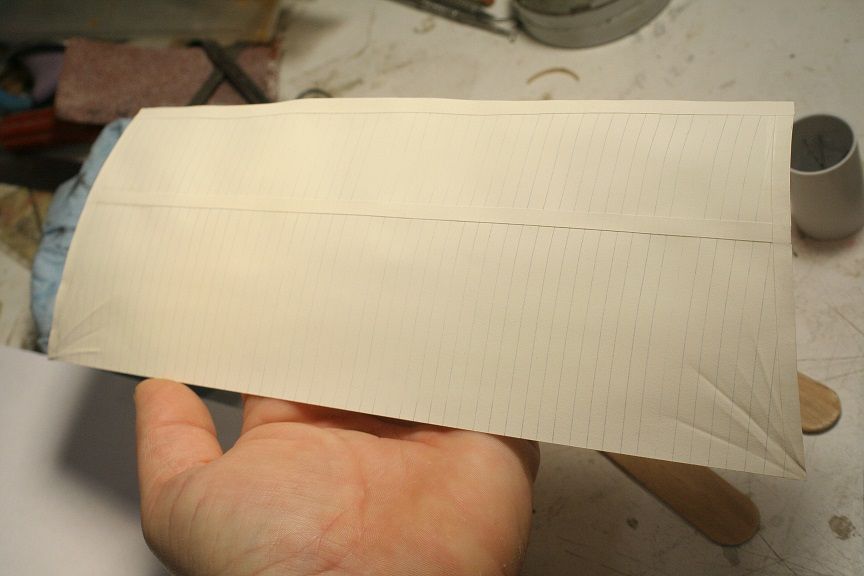
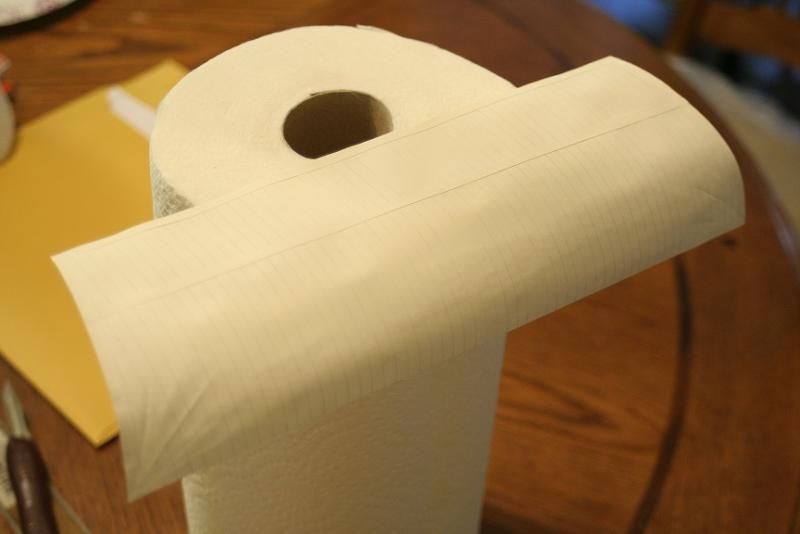
she was enormous...so she needs saild...but not just any sails.....clean, sharp, accurate sails are what's called for.  Well I've opted out of using cloth..since the scale problem will only make the model look clumsy.  I considered silkspan..but this is still too translucent for me.  So I'm going with plain paper(again).

Like anything I do I try a test bed to test techniques..methods...and asthetics.

So the other day I fabricated a master sheet that I duplicated(both sides) that will represent the 2ft panels that will represent the entire sail.

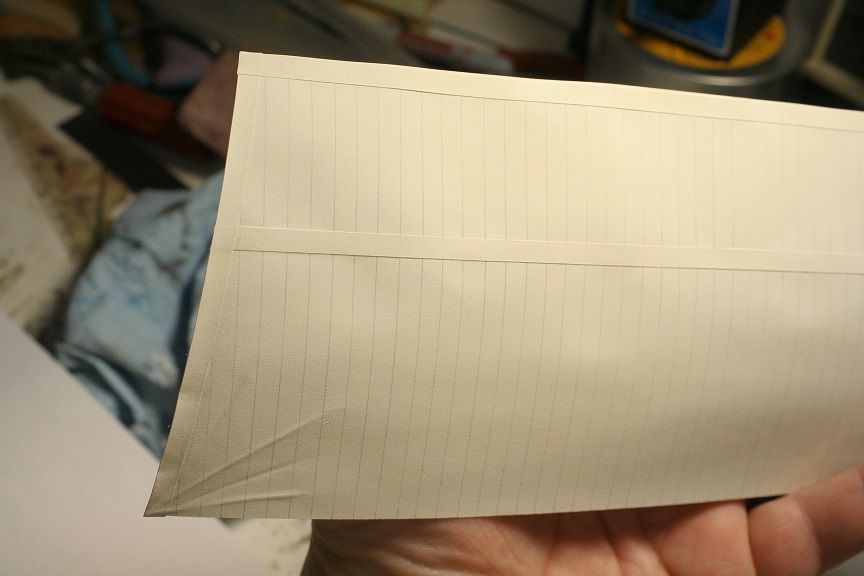
Today, I cut out a test sail and trimmed its outer(Leach lining) and top(Head lining) edges with a 2ft panel and I laid the reef band mid sail. In some cases a foot band will be installed as well.

I did not add the the reef points to the reef band at this time..since the test was about over-all appearance not function.

After the sail was constructed I then gave it an entire dusting of muslin tan paint   to simulate the tan/orange look of faily knew sails(Previously I mentiond about weathering the sails with India ink/alcohol...but upon further reflection and the over all newness of the model itself.....new sails was an accurate choice.

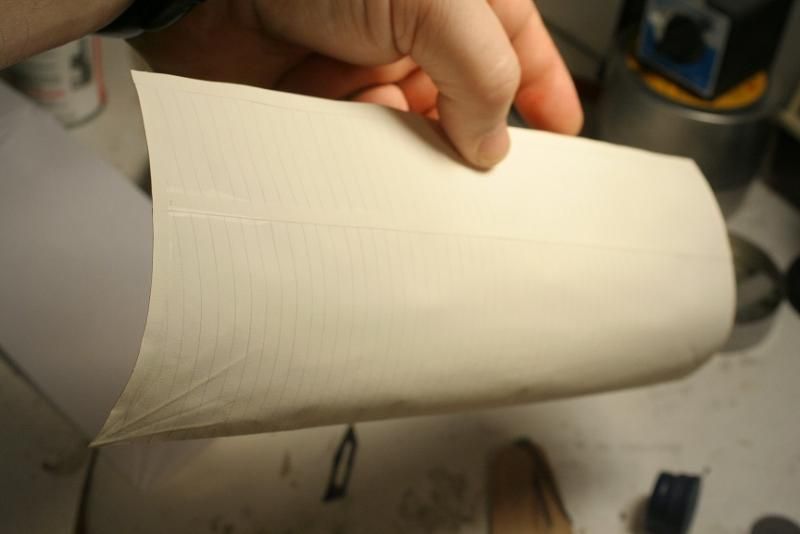
I finished off the course connections at the lower edges of the sail with some stretch and wrinkle folds...simulating the streching of the sail inflated with wind.

I think I hit the kackpot with this technique and it didn't take long..about 30 minutes.  Prior to painting I used one of my wife's fondant(Cake making tool) ball rollers to roll the  stretched roll to the foot of the sail.  With some fine tuning I think this is the clean look I was after.

Rob " target="">   " target="">   " target="">   " target="">   " target="">  
  • Member since
    December 2012
Posted by rwiederrich on Friday, February 17, 2017 7:44 PM

I'm looking for a soft full sail..not too stressed or too limp.

Kinda like this(with out the stunsails)

Rob " target="">


Thanks for looking in.

  • Member since
    July 2013
Posted by steve5 on Friday, February 17, 2017 10:18 PM

can't wait to see this through rob , it should look incredible , I put a link for my soleil royal for you under your request . but I'm sure you'll do a far superior job . I went for that old lived in look LOL .


  • Member since
    December 2012
Posted by rwiederrich on Saturday, February 18, 2017 12:16 AM

Nah..nah..Steve..you don't give yourself enough credit...your sails are made very well and are quite convincing and detailed.


I too will really detail the sails out with all the leach, bunt and reef tackle.

I've done sails before..but this time round am going the full Montey.

Scale also has something to do with...so some mods will have to be made.

I have a long way to go before sails..but planning helps a lot.

Rob

  • Member since
    July 2013
Posted by steve5 on Saturday, February 18, 2017 3:24 AM

cheer's mate , that's alway's been my bug bear , too impatient .

steve


  • Member since
    March 2012
  • From: Marysville, WA
Posted by David_K on Sunday, February 19, 2017 11:17 AM

Incredible work, Rob!  The paper sails are sure to look great!  I really ike the creases at the corners, very cool!

And the water diorama you described for that previous build....I remember seeing it in person at your place...it looks like REAL water.  As always, I am impressed.

Dave

        _~
     _~ )_)_~
     )_))_))_)
     _!__!__!_         
     (_D_P_K_)
   ~~~~~~~~~~~~~
    ~~~~~~~~~~~

Current Project:  Imai/ERTL Spanish Galleon #2

Recently Finished: Revell 1/96 Cutty Sark

Next Up:  ???


  • Member since
    December 2012
Posted by rwiederrich on Sunday, February 19, 2017 7:21 PM

Thanks Dave.  I feel the sails will be a fantastic addition..since they will be fully detailed to scale.  I think 25+ sails on this build will be spectacular IMV.

Last time I finished a build with a full set of sails was over 25 years ago.

Rob

  • Member since
    December 2012
Posted by rwiederrich on Tuesday, March 21, 2017 8:19 PM

I got to spend a couple of hours working on the GReat Republic today and I finished the masts.  Here are some pics.

Rob " target="">

 " target="">

 " target="">
 " target="">
 " target="">

Rob

  • Member since
    September 2005
  • From: Groton, CT
Posted by warshipguy on Wednesday, March 22, 2017 5:52 AM

Nice!  It's great to see you back!

Bill

  • Member since
    December 2012
Posted by rwiederrich on Wednesday, March 22, 2017 4:41 PM

Life has changed and I can't work on my ships as often as I did.

Thanks.

Rob

JOIN OUR COMMUNITY!

Our community is FREE to join. To participate you must either login or register for an account.

SEARCH FORUMS
FREE NEWSLETTER
By signing up you may also receive reader surveys and occasional special offers. We do not sell, rent or trade our email lists. View our Privacy Policy.