SEARCH FINESCALE.COM

Enter keywords or a search phrase below:

1/96 Cutty Sark WIP (Revell H-399)

29807 views
293 replies
1 rating 2 rating 3 rating 4 rating 5 rating
  • Member since
    October 2016
  • From: Louisiana Gulf South
Posted by Mrchntmarine on Thursday, August 29, 2019 2:54 PM

Very nice indeed!  Tks for the time to post.....

Keep on modeling!

All the best,

William

  • Member since
    March 2012
  • From: Marysville, WA
Posted by David_K on Thursday, August 29, 2019 10:13 AM

At Last!

'Tis Done!

One and a half years later, I finished the Cutty Sark this week...

Here are some pics:

 20190824_145135 by Dave Kump, on Flickr

 20190824_145144 by Dave Kump, on Flickr

 20190824_145152 by Dave Kump, on Flickr

 20190824_145210 by Dave Kump, on Flickr

 20190824_145221 by Dave Kump, on Flickr

I really had a fun time with this build, learned some new stuff, and I'm feeling pretty good about it!

The display case is ready, too, and I'll probably get it mounted and on display today...I'll take some more pics of up close areas for detail.

Thanks to everyone for their encouragement, support, and advice during this project...I know I haven't been as *regular* of a contributor lately, but I hope to be on the forum more often once the Summer passes and I have more leisure time around the house.

Not sure where I'll tack for my next build, but I have a couple ooptions in mind:

I recently picked up a Midwest Products Sakonnet Daysailer wooden ship kit at a swap meet, it looks very simple, so I might give that a whirl as my first all-wood kit.

Or, I just happened to get an alert from Ebay this morning about a listing for an Imai Spanish Galleon....I've built one before (probably my 3rd ship model?) and I've learned much since then, so I'm going to build another one soon, with a few new techniques (maybe not as elaborate and mindblowingly-detailed as Kirril's!!! lol)....anyway, the Spanish Galleon was only 30 bucks on ebay (which is unheard of), but the hull halves have been glued together....for that price, I figured I could manage the hull assembly and it wouldn't cause me too much trouble, so I bought it. 

Anyway, that's where I'm at....I'd like to express my admiration for all the great work I've seen on various threads among the forum, very impressive stuff!

Thanks for tuning in,

Dave

        _~
     _~ )_)_~
     )_))_))_)
     _!__!__!_         
     (_D_P_K_)
   ~~~~~~~~~~~~~
    ~~~~~~~~~~~

Current Project:  Imai/ERTL Spanish Galleon #2

Recently Finished: Revell 1/96 Cutty Sark

Next Up:  ???


  • Member since
    March 2012
  • From: Marysville, WA
Posted by David_K on Wednesday, July 24, 2019 5:17 PM

Thanks for checking in, guys!

You nailed it, Rob....so busy with a bunch of house projects, it's been slow-going on the modeling bench.  But I think I'm pretty much done with the projects and now I can enjoy some vacay and leisure time!!  Yay!

I have made progress since my last update.  All the sails are now in place, and most of the rigging is done.  All that remains are the braces...saved the best for last.  I'm also already beginning work on the display case for it.

Maybe I mentioned it before, but I sorta regret (just kinda) not putting in the stay sails....I still think it looks good as-is, but for a clipper, the staysails and even the studding sails would have added a certain amount of fullness.  Anywho, I'm not planning to go back and put them in now, so this is where we ended up!

Here's a few pics.

 20190724_145446 by Dave Kump, on Flickr

 20190724_145437 by Dave Kump, on Flickr

Once the braces are on, it should have a more balanced look, and I'll get some better quality photos with good lighting and angles....she really does look impressive up close.

Here's a snap of the base for the case.  Got the molding installed, and I'm probably gonna rip down some pine planks into 3/4" square strips tonight so I can start building the frames and stanchions.  This will be my 3rd case, I'm getting pretty good at it by now!

 20190720_142928 by Dave Kump, on Flickr


Thanks again for bumping the thread, with any luck I'll have the model finished by Labor Day, and of course I'll have some pics to share.

Enjoy the summer!!

Dave

        _~
     _~ )_)_~
     )_))_))_)
     _!__!__!_         
     (_D_P_K_)
   ~~~~~~~~~~~~~
    ~~~~~~~~~~~

Current Project:  Imai/ERTL Spanish Galleon #2

Recently Finished: Revell 1/96 Cutty Sark

Next Up:  ???


  • Member since
    August 2015
  • From: the redlands Fl
Posted by crown r n7 on Wednesday, July 24, 2019 10:04 AM

nice rigging ,a beautiful model.


 Nick.

  • Member since
    December 2012
Posted by rwiederrich on Wednesday, July 24, 2019 7:32 AM

Dave....haven't heard from you in a couple of months...it can only be assumed you are engulffed in many summer home projects.

Just wondering were you are on the CS and if you had progressed much.

Have a warm and safe summer.

Rob

  • Member since
    September 2012
Posted by GMorrison on Tuesday, May 7, 2019 8:19 AM

rwiederrich


GMorrison

Caldercraft sells 0.10 mm natural line. I buy mine through Jotika online.

http://www.jotika-ltd.com/Pages/1024768/Fittings/82010.htm

I don't mean to undermine Syren as they have a great product, but the smallest line they sell is 0.20 mm (0.008 in).


GMorrison...is the line fuzz free?  They provide no images..so, I'm not good at using mind reading.

Rob


It is very smooth, almost shiny. I don't consider Syren entirely fuzz free either, but it is very good looking.

 Modeling is an excuse to buy books.


  • Member since
    September 2005
  • From: Groton, CT
Posted by warshipguy on Tuesday, May 7, 2019 8:06 AM

Rob,

I'll send you all that I have.  Please send me your address.

Bill

  • Member since
    December 2012
Posted by rwiederrich on Tuesday, May 7, 2019 7:23 AM

GMorrison

Caldercraft sells 0.10 mm natural line. I buy mine through Jotika online.

http://www.jotika-ltd.com/Pages/1024768/Fittings/82010.htm

I don't mean to undermine Syren as they have a great product, but the smallest line they sell is 0.20 mm (0.008 in).


GMorrison...is the line fuzz free?  They provide no images..so, I'm not good at using mind reading.

Rob

  • Member since
    September 2012
Posted by GMorrison on Monday, May 6, 2019 2:47 PM

Caldercraft sells 0.10 mm natural line. I buy mine through Jotika online.

http://www.jotika-ltd.com/Pages/1024768/Fittings/82010.htm

I don't mean to undermine Syren as they have a great product, but the smallest line they sell is 0.20 mm (0.008 in).


 Modeling is an excuse to buy books.


  • Member since
    November 2018
Posted by oldermodelguy on Monday, May 6, 2019 2:39 PM

I just want to say the ship looks awesome to me !

  • Member since
    December 2012
Posted by rwiederrich on Monday, May 6, 2019 12:57 PM

Bill...I'm looking for the smallest spooled tan thread...generally there is 3 sizes of tan and black and a roll of black thread and tan thread.  I keep coming across the small spool of line that is greenish in color (NO GOOD).

I just need the small tan thread...if you have some of that I'll gladly trade you for a coil of the smallest line I have from Syren... I believe it is .008 original tan.  What Dave suggested...it is still too large for my needs.

Rob

  • Member since
    September 2005
  • From: Groton, CT
Posted by warshipguy on Monday, May 6, 2019 11:01 AM

Rob,

I have extra line from the CS kit.  What do you need?

Bill

  • Member since
    December 2012
Posted by rwiederrich on Monday, May 6, 2019 7:43 AM

Thanks for the info Dave....I'll check their sizes out, but I think I already have some of their small stuff.

I too haven't spent much time on my build...  building a shed and finishing up the deck portion of my 30X6 front porch...too many summer jobs right now...myself.

Have a great week and hope to see more from you soon...

Also Dave...do you use the line that comes with your Cutty Sark model?

If not...do you think I can get some from you? I'll trade you several coils I have of the Syran original tan.


Rob

  • Member since
    March 2012
  • From: Marysville, WA
Posted by David_K on Saturday, May 4, 2019 8:44 AM

Bill, Rob, and Jim-

Thanks for your kind words of support!

Indeed, it takes a lot of rigging line to build a ship, even with the somewhat simplified rigging I'm performing.  Syren provides the best miniature rope I've seen, and though it can get expensive throughout the course of a build, I usually order in small batches so it doesn't hurt so much at once!

Rob, the line I'm using for reeving through blocks on this kit is Syren's original tan .008 (.2 mm)

I believe it's the thinnest line they offer.  It's also the only size available that will reeve through the very small 1/8" (3mm) blocks I'm using, and only after I dip the last 1/4" of line in CA to stiffen it so it will go through the block.

Syren line is used *almost entirely* on all of my builds now, but I do use sewing thread for a few applications.  Ratlines, for example...I used Gutermann 1001 (CA 02776) black thread.  With a little beeswax on it, it performs great for ratlines and tying off stropped blocks.  Gutermann also has other colors, and I often use a tan color for ratlines on other ships.  It's available at local sewing and craft stores.

I think your paper sails look really good, too!

Wish I could say I've got some modeling on my to-do list for the weekend, but it's unlikely...Gardening, oil changes, and some fence rebuilding are in my future!  Maybe I'll get a handful of blocks tied this evening :)

Have a great weekend, you guys!

Dave


        _~
     _~ )_)_~
     )_))_))_)
     _!__!__!_         
     (_D_P_K_)
   ~~~~~~~~~~~~~
    ~~~~~~~~~~~

Current Project:  Imai/ERTL Spanish Galleon #2

Recently Finished: Revell 1/96 Cutty Sark

Next Up:  ???


  • Member since
    September 2005
  • From: Groton, CT
Posted by warshipguy on Saturday, May 4, 2019 7:40 AM

Outstanding job, David!  Also, I really like Rob's paper stays'ls.

Bill

  • Member since
    December 2012
Posted by rwiederrich on Friday, May 3, 2019 12:44 PM

First off Dave..so good to hear from you....glad you are moving along in so many ways.

Second, what size of line are you ordering?  I need some line as thin as sewing thread, but NOT thread. Maybe Syren has it.

Thirdly, stay sails on static models always hang and without the force of the wind to elevate them and fill them, they can look limp and as you pointed out, *sag* the stay.

I tackled this problem with my paper sails and I think I achieved a reasonably convincing look with my stay and jib sails.  You are nearly at the same stage I am on my build.

Here are a couple of pics.


https://i1070.photobucket.com/albums/u488/rwiederpsihxbnpvv.jpg.html]rich/IMG_8824_JPG_ad484009eed31a13f4cc418d54225795_zpsihxbnpvv.jpg[/IMG]

  • Member since
    July 2014
  • From: Philadelphia Pa
Posted by Nino on Friday, May 3, 2019 10:41 AM

David_K

"...

Hard to believe I'm this far along, and I still need to order another 80 feet of line for the mizzen rigging and braces...I should check my order history with Syren, but a quick estimation is that I've already bought over 300 feet of line for this project....keeping in mind that several inches are trimmed off the ends of a belayed line...but still!  It's a lot of line!

Already looking at materials for the display case to build for it....now, if I can just find a place in the house where my wife will let me display it! lol

The remainder of this project will consist of largely the same steps I've performed for the first two masts....stropping blocks, tying the blocks to the yards (and sail corners, for clews), pre-rigging lines to the sails and yards for sheets, lifts, halyards, clews, etc., bending the sails to the yards, and then installing the yards/sails, and belaying the lines...I have considered documenting my process for these steps, but they're not very exciting, and I'm quite sure my method falls short of some of the meticulous artistry I've seen elsewhere on the forum.

Anyway, yes I'm indeed still working on the Cutty Sark, albeit slowly...and I've been lurking among the forum, admiring some of the sweet projects in motion....really good stuff!

...

Dave


  I am proud to be #12,700 for your Views total.  This is another magnificent looking model you have underway.

Dave, that is a lot of Syren Line.  You should be a candidate for a discount.

And Slowly or not you provide Instruction and Entertainment at the same time.,Thanks.

    Great Work Dave!

            Jim.


  • Member since
    March 2012
  • From: Marysville, WA
Posted by David_K on Thursday, May 2, 2019 6:02 PM

LOL

No need for concern, Rob, though I appreciate the sentiment.

It's true, I've been remiss with regard to this build.  Just returned from a vacation in Wyoming, and other hobbies/duties/entertainments have kept me distracted.

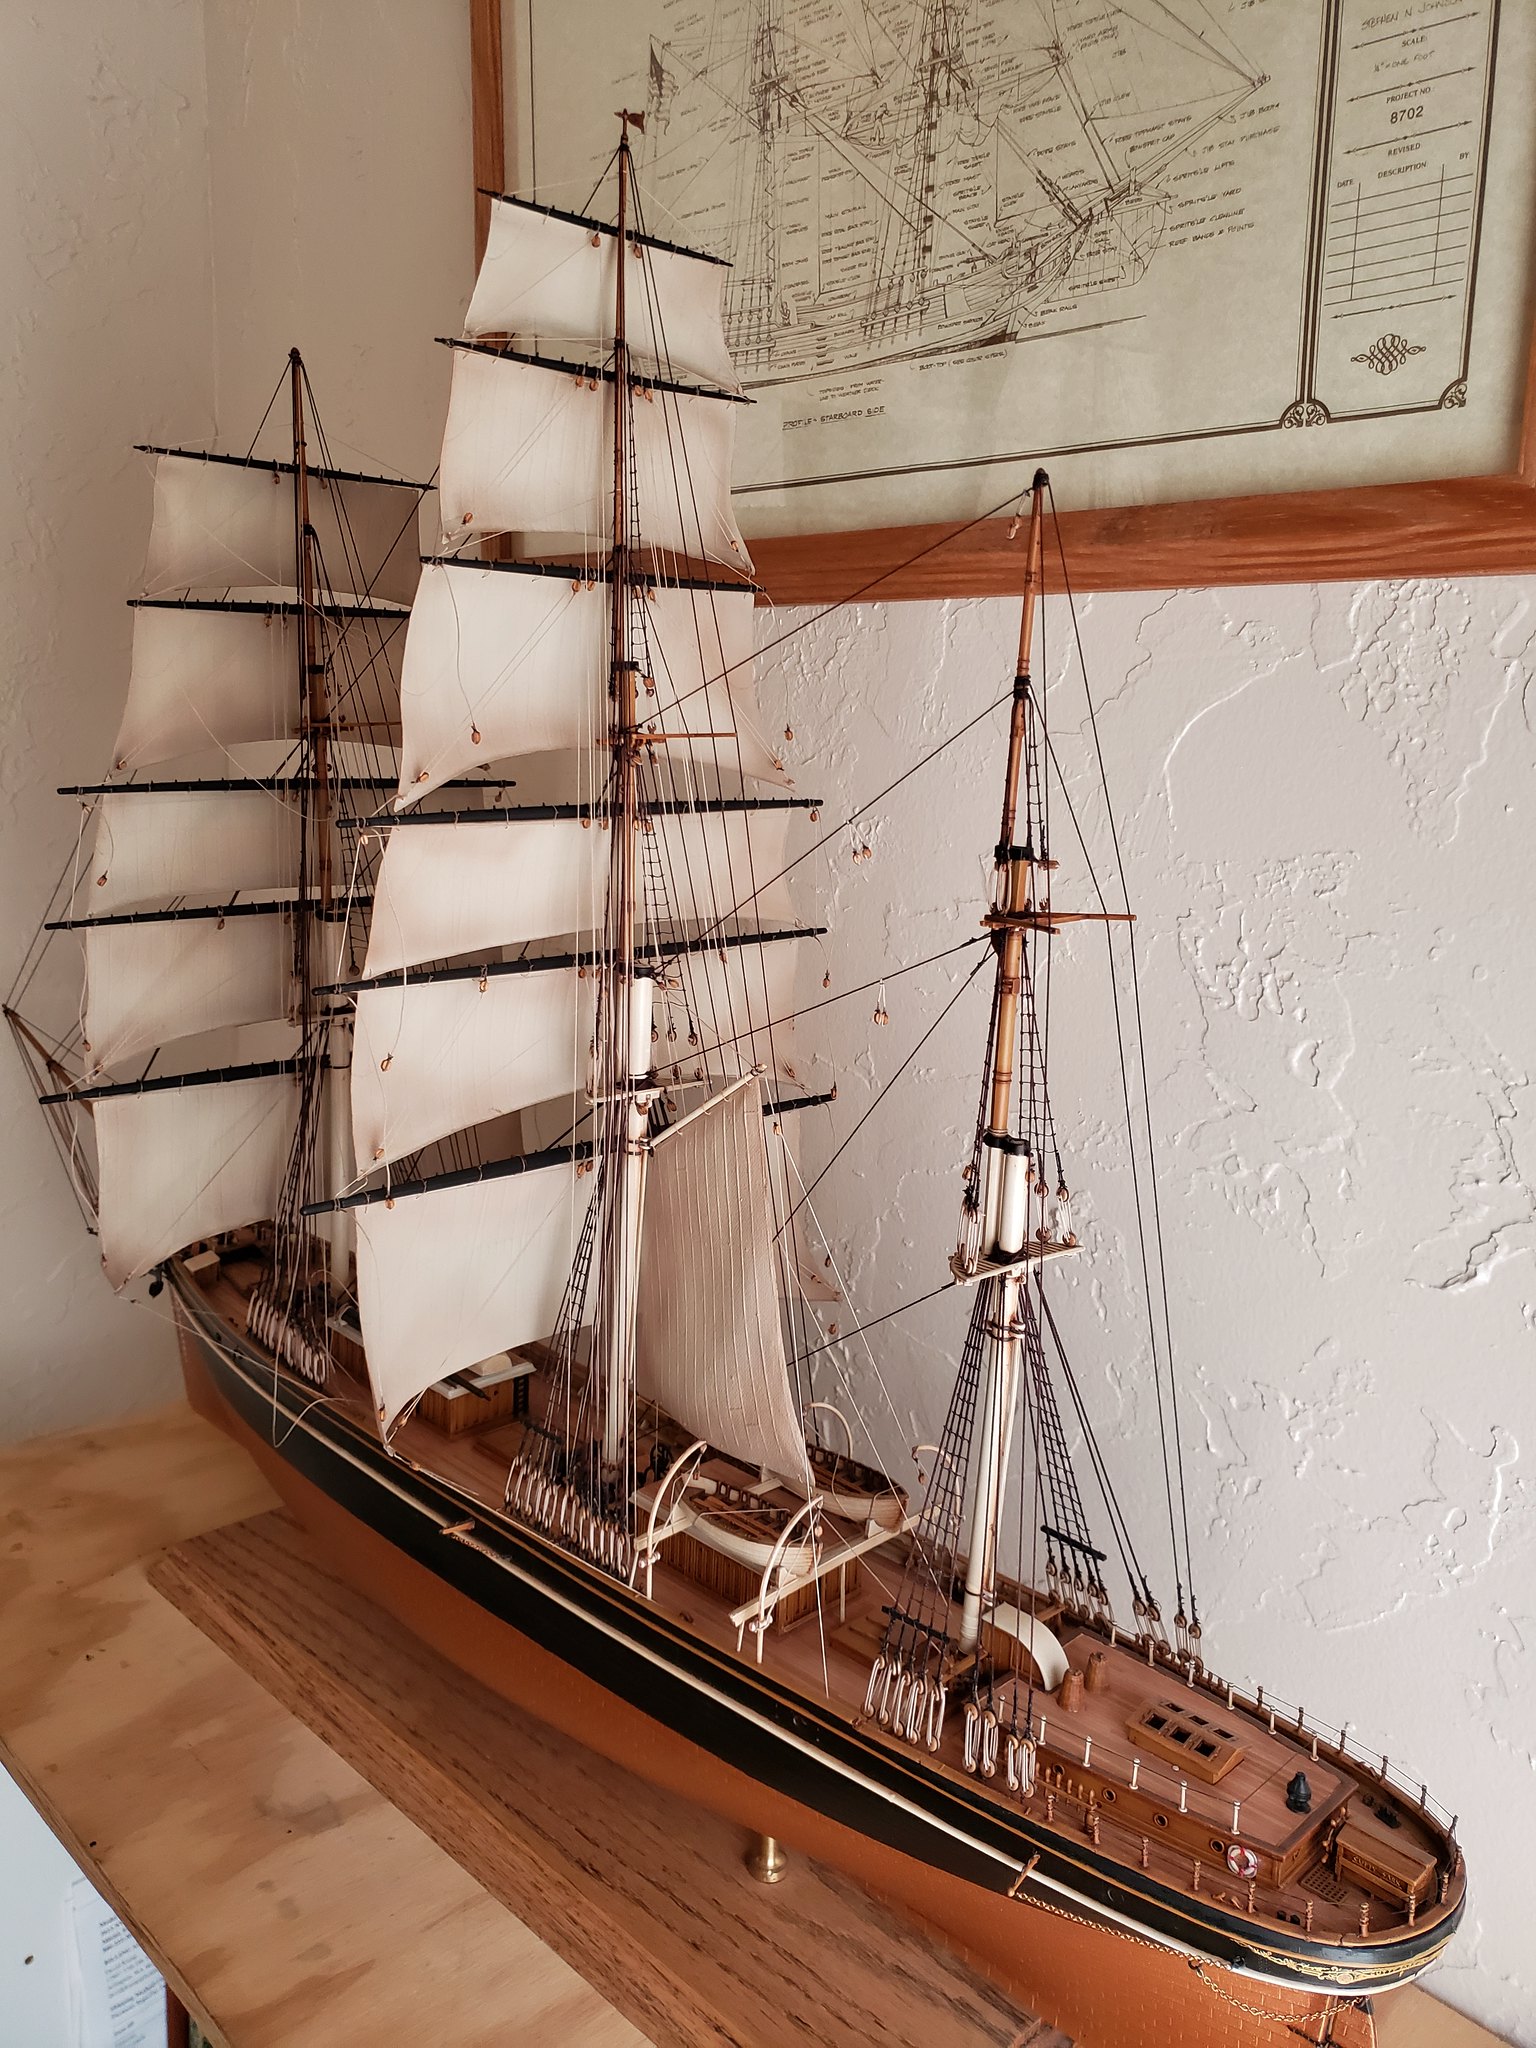
I have sandbagged a little on my progress...at this time, I have all the fore and mainmast sails installed (except for the brace lines), and I've gotten the mizzen and mizzen lower top sail pre-rigged. Here are a couple pictures as proof I've actually touched her in the past month!

 20190502_153612 by Dave Kump, on Flickr

 20190502_153629 by Dave Kump, on Flickr

All in all, it's coming along nicely.  I decided early on that I would not install fore-and-aft staysails, with the logic that they would A)obscure much of the deck detail and rigging; and B) cause sag in the stays that I didn't want to deal with.

Now I wonder if the ship as a whole will look okay without them...as the main mast sails went on, I started to notice the *empty* area between the masts...oh, well...

Hard to believe I'm this far along, and I still need to order another 80 feet of line for the mizzen rigging and braces...I should check my order history with Syren, but a quick estimation is that I've already bought over 300 feet of line for this project....keeping in mind that several inches are trimmed off the ends of a belayed line...but still!  It's a lot of line!

Already looking at materials for the display case to build for it....now, if I can just find a place in the house where my wife will let me display it! lol

The remainder of this project will consist of largely the same steps I've performed for the first two masts....stropping blocks, tying the blocks to the yards (and sail corners, for clews), pre-rigging lines to the sails and yards for sheets, lifts, halyards, clews, etc., bending the sails to the yards, and then installing the yards/sails, and belaying the lines...I have considered documenting my process for these steps, but they're not very exciting, and I'm quite sure my method falls short of some of the meticulous artistry I've seen elsewhere on the forum.

Anyway, yes I'm indeed still working on the Cutty Sark, albeit slowly...and I've been lurking among the forum, admiring some of the sweet projects in motion....really good stuff!

I'll be sure to post some more as I near completion of this kit, and perhaps I'll document the building of the dispaly case, as well?  I think I may have shared some pics while I built the case for the Soleil Royal, but maybe not.

Thanks for checking in, Rob, I hope things are well!

Dave


        _~
     _~ )_)_~
     )_))_))_)
     _!__!__!_         
     (_D_P_K_)
   ~~~~~~~~~~~~~
    ~~~~~~~~~~~

Current Project:  Imai/ERTL Spanish Galleon #2

Recently Finished: Revell 1/96 Cutty Sark

Next Up:  ???


  • Member since
    December 2012
Posted by rwiederrich on Thursday, May 2, 2019 7:38 AM

Well...I've become worried...either Dave is so procupied with digging the pool in his back yard....or he wants to spring the finished build on us and he is taking this last month to finish her up.

No updates in over a month...I can hardly stand it.  What's up Dave...are you all right?


Rob(Concerned)

  • Member since
    May 2017
  • From: Asheville, NC
Posted by LIVIT on Thursday, March 7, 2019 9:53 AM

Beautiful build bud !

  • Member since
    December 2012
Posted by rwiederrich on Tuesday, March 5, 2019 7:53 AM

Great job Steve.  Revell made a mistake making the main courses too short by about an inch.  Not sure why they did that.  Your treatment of the sails is wonderful.  Will you be adding the buntlines and their blocks to the sails?

She will look magnificent when fully canvased....

Great job for sure.

Rob

  • Member since
    March 2012
  • From: Marysville, WA
Posted by David_K on Monday, March 4, 2019 5:26 PM

Thanks, as always, for the words of encouragement, guys!  I'm sure if it wasn't for the community and support on this forum, I would likely never have learned so much, nor given as much effort to the hobby...

Welp, I got the last of the foremast sails rigged up...everything but the braces (learned a long time ago they should be saved for the last touch!)

I didn't end up making any corrections to the topgallant sail...those of you who know me might not be surprised that I *let it slide*, but I wonder if it will nag me in the future! lol

Here's some pictures....again, the lighting gives a false look to the whole thing, and my phone camera seems to try auto-adjusting something, so that the pictures seem to all come out differently...but anyway, here's the basic idea:

 20190304_150022 by Dave Kump, on Flickr

 20190304_150055 by Dave Kump, on Flickr

 20190304_150216 by Dave Kump, on Flickr

 20190304_150229 by Dave Kump, on Flickr

The third image actually has a pretty close representation of the color....

I'm pretty happy with it so far...now it'll be a bit while I pre-rig and bend the sails for the mainmast, all 7 of them (including the Spencer, a type of sail I've never rigged)...

Maybe I'll post a few WIP pics of my process for setting up the sails...

Anyway, thanks for looking, I hope you enjoy it!
Dave

        _~
     _~ )_)_~
     )_))_))_)
     _!__!__!_         
     (_D_P_K_)
   ~~~~~~~~~~~~~
    ~~~~~~~~~~~

Current Project:  Imai/ERTL Spanish Galleon #2

Recently Finished: Revell 1/96 Cutty Sark

Next Up:  ???


  • Member since
    January 2012
  • From: Atlanta Metro, Georgia
Posted by fright on Tuesday, February 26, 2019 8:31 AM

Your work that you have done on this vessel is very nice indeed. I am always in awe of the craftsmanship and time taken to create such wonderful treasures such as yours. Congratulations!

Robert O

  • Member since
    December 2012
Posted by rwiederrich on Tuesday, February 26, 2019 8:18 AM

Yes Dave I've noticed that too on several of my own builds.  My solution was to trim the sail to fit within the sheet sheaves of the yard...making it slightly more angular, but bearly noticable.

Making sure the clue ends up right over the sheet sheave(Or close by) of the lower yard was always my concern.

You're doing a great job....learning as you go is fun...ain't it?

Rob

  • Member since
    March 2018
  • From: Chicago suburbs
Posted by Luvspinball on Monday, February 25, 2019 9:20 AM

Could you carefully trim back the sail to give you the room you need?  Not sure how detailed the vacuform sail is, and whether that would be obvious or not.  If others have that problem, shouldn't that mold be corrected?

Other option is to make a new yardarm of the proper length for the sail, which is obviously a lot more work, but might be more satisfying in the end.  Bummer to find something like that this far into the build.  Knowing the quality of your work, you will undoubtedly find a more than satisfactory solution.  Good luck.

Bob

Bob Frysztak

Luvspinball

Current builds:  Revell 1/96 USS Constitution with extensive scratch building

  • Member since
    March 2009
  • From: brisbane australia
Posted by surfsup on Monday, February 25, 2019 7:31 AM

Really liking the work you are doing.....Cheers Mark

If i was your wife, i'd poison your tea! If Iwas your husband, I would drink it! WINSTON CHURCHILL

  • Member since
    March 2012
  • From: Marysville, WA
Posted by David_K on Saturday, February 23, 2019 5:45 PM

Here's something interesting...

I was rigging up the topgallant sail and yard for the foremast (happened to be the last sail of the foremast, since I rigged the royal as a mockup earlier in the build), and I noticed the yard isn't wide enough.  It barely extends past the width of the sail, leaving maybe 1/8" on each side. {couple pics}

 20190223_151652 by Dave Kump, on Flickr

 20190223_151815 by Dave Kump, on Flickr

The first pic shows the fore tgall yard and sail (part 25 & sail 13, respectively)

You can see the yard is just barely wider than the sail, even the holes at the yardarm (for the downhaul of the royal) are within the tgall sail, and the braces will barely fit at the end.

The second pic shows the fore (course) sail and yard...clearly, the yard extends 3/4" beyond the width of the sail on both sides, with plenty of room for the braces, lifts, and downhaul lines.  That pic is typical of *most* of the sails and yards on the model.

The exceptions are the Fore Topgallant, and the Main Topgallant....it's worth noting that the part # for both *narrow* yards in the kit is 25.  Luckily, I have a second kit for spare parts, and I was able to find and identify both #25 yards from the spare.  They are indeed very *simililar* to each other, being identical in length and other respects, the only difference being a minor variation in the holes at the yardarms for downhaul reaving.  Still weird for two parts (on two different sprues) to be given identical part #s, yet have slight differences.

Also, the Main Topgallant sail (sail 19) is the same width as the Fore Topgallant, so it also has the same issue of being basically as wide as the yard itself.

I wonder if anyone else has noticed this issue (Rob W. probably has more experience with this kit than anyone else I know)...and I wonder if there's any logic to explain it?  I mean, I can make it work, but it seems odd.

As a precaution, I went through all the yards and sails from the spare kit, too, to make sure I didn't have any parts mixed up (it happens)....but no, there's no other combination of yards and sails that comes even remotely close to being confused....which also means I can't substitute any other kit yards for a more reasonable fit.

Not a biggie, but it did get me scratching my head, and I figured I would share it, in case anyone else has noticed it before, or so anyone building this kit in the future can keep an eye on it.

Thanks!
Dave

        _~
     _~ )_)_~
     )_))_))_)
     _!__!__!_         
     (_D_P_K_)
   ~~~~~~~~~~~~~
    ~~~~~~~~~~~

Current Project:  Imai/ERTL Spanish Galleon #2

Recently Finished: Revell 1/96 Cutty Sark

Next Up:  ???


  • Member since
    March 2012
  • From: Marysville, WA
Posted by David_K on Saturday, February 23, 2019 9:08 AM

Thanks, Steve!

I'm working on setting up the last fore sail/yard this weekend.  Once I have that one done, I'll go through and run all the lines ane belay everything.  After I have the foremast rigged, that will be a good time for me to get some better pictures to share...I'll make sure I've got some decent light and we can see the overall sail effect.

Have a great weekend!

Dave

        _~
     _~ )_)_~
     )_))_))_)
     _!__!__!_         
     (_D_P_K_)
   ~~~~~~~~~~~~~
    ~~~~~~~~~~~

Current Project:  Imai/ERTL Spanish Galleon #2

Recently Finished: Revell 1/96 Cutty Sark

Next Up:  ???


  • Member since
    July 2010
  • From: Tempe AZ
Posted by docidle on Friday, February 22, 2019 11:12 PM

Dave,

Dang, repeat, DANG! I think you’re the only one I know who can pull off using the kit sails and make them look awesome. I would love to see see them in better light, but they are weathered beautifully.

Steve


  • Member since
    December 2010
  • From: Salem, Oregon
Posted by 1943Mike on Tuesday, February 19, 2019 8:44 PM

Dave,

That's exactly what I wanted to know!! Thanks so much!

Mike

"Le temps est un grand maître, mais malheureusement, il tue tous ses élèves."

Hector Berlioz

JOIN OUR COMMUNITY!

Our community is FREE to join. To participate you must either login or register for an account.

SEARCH FORUMS
FREE NEWSLETTER
By signing up you may also receive reader surveys and occasional special offers. We do not sell, rent or trade our email lists. View our Privacy Policy.