SEARCH FINESCALE.COM

Enter keywords or a search phrase below:

Trumpeter USS North Carolina 1/350

10307 views
74 replies
1 rating 2 rating 3 rating 4 rating 5 rating
  • Member since
    December 2010
  • From: Salem, Oregon
Posted by 1943Mike on Sunday, May 27, 2018 10:50 PM

"But with world war 2 vessels, rigging isn't as huge, right?   But basically, just like a plane or tank, but more planning?"

Correct.

Mike

"Le temps est un grand maître, mais malheureusement, il tue tous ses élèves."

Hector Berlioz

  • Member since
    June 2014
  • From: New Braunfels , Texas
Posted by Tanker - Builder on Monday, May 28, 2018 7:21 AM

Wear ?

   I don't have any problems with what you did here . Why are you worrying about it ? Remember , between seawater and foot traffic the blue didn't hold up well !

 Looks okay to me .  T.B.

  • Member since
    March 2004
  • From: Kincheloe Michigan
Posted by Mikeym_us on Monday, May 28, 2018 11:30 AM


Lifecolor does make a weathering system for the ships hull and the wood deck. And from what I've seen of it demonstrated on YouTube it works great.

Tanker - Builder

Wear ?

   I don't have any problems with what you did here . Why are you worrying about it ? Remember , between seawater and foot traffic the blue didn't hold up well !

 Looks okay to me .  T.B.


On the workbench: Dragon 1/350 scale Ticonderoga class USS BunkerHill 1/720 scale Italeri USS Harry S. Truman 1/72 scale Encore Yak-6

The 71st Tactical Fighter Squadron the only Squadron to get an Air to Air kill and an Air to Ground kill in the same week with only a F-15   http://photobucket.com/albums/v332/Mikeym_us/

  • Member since
    June 2014
  • From: New Braunfels , Texas
Posted by Tanker - Builder on Sunday, June 3, 2018 5:55 AM

Mikeym_us ;

 I guess it's is really a matter of choice here . You see , I did a destroyer in Blue .The 1/350 U.S.S.England . Great little model . Did the decks " Deck Blue" and the Hull etc in "Sea Blue" .Took a while to find the ship on a blue tabletop .

 Ain't never going to do that again . I learned a valuable lesson . Always tint your colors for scale effect . In other words the smaller it is , the lighter the paint needs to be . So , the " disappearing " U.S.S.England " won't happen again in my yard !

  • Member since
    August 2017
Posted by laskdjn on Wednesday, June 6, 2018 7:07 PM

So I'm almost done with the lower hull and I just started the main guns and the 5 inch guns and I thought of two questions.

1) how wide should I make the black stripe between the red and the camo?  I know it varies based on contour, but at the bow of the ship where it's nearly vertical, how wide? 


B)  do the shields for the 40mm guns that come with the eduard kit fit in the little circular cupolas on the deck or do I not use them in lieu of the photo etch? 

  • Member since
    December 2010
  • From: Salem, Oregon
Posted by 1943Mike on Wednesday, June 6, 2018 10:40 PM

I can't answer the question regarding the 40's in the Eduard "kit", but you may get some idea regarding the boot stripe from this video:

https://www.youtube.com/watch?v=36P1rV3pDf8

Mike

"Le temps est un grand maître, mais malheureusement, il tue tous ses élèves."

Hector Berlioz

  • Member since
    August 2017
Posted by laskdjn on Thursday, June 7, 2018 9:29 AM

From that first shot in that video, it seems like the boot stripe is only like 2 feet wide or less, probably less, when looking directly at it from amidship.  Hard to judge dimension from it.

  • Member since
    November 2005
  • From: Formerly Bryan, now Arlington, Texas
Posted by CapnMac82 on Thursday, June 7, 2018 8:05 PM

laskdjn
how wide should I make the black stripe

The USN term-of-art is "boot topping."  That stripe is to help hide the gunk that washes up to a ship in port and sticks to the side.

In general (very general) USN peacetime boot topping is between 2 and 4 feet wide (scaled to the size of the ship) equally on either side of the design waterline.  Wartime boot-topping expands to 6 to 8 feet wide to accomodate the much wider range of draft change (durin ga shore bombardment, you might well fire off all but a few dozen round of your ammunition, and burn most of your fuel, and eat almost all the stores, making the ship hundred, even thousands of tons lighter).  Also, during wartime, you are more likely to be in scummier harbors, too.

There are exceptions to this, naturally.

The boot topping on USS Wisconsin docked as a museum in Norfolk is around 8-10 feet wide, with 6 or 8 feet out of the water as she presently rides.


Hull numbers are, in peacetime, also scaled to the ship, the shhadowed numbers being from 72 to 120 inches tall.  Wartime hull numbers are unshadowed and 24" tall, period, and the ship's name on the stern painted oer as well.

  • Member since
    December 2010
  • From: Salem, Oregon
Posted by 1943Mike on Thursday, June 7, 2018 8:35 PM

laskdjn,

Go with what CapnMac82 suggests. I just paint them as closely to whatever picture I can find either in a book on on the Internet. The good captain obviously has a lot more nautical knowledge than I have and, if I were you, I'd defer to his numbers.

Mike

"Le temps est un grand maître, mais malheureusement, il tue tous ses élèves."

Hector Berlioz

  • Member since
    August 2017
Posted by laskdjn on Friday, June 8, 2018 9:00 AM

Excellent information, thank you.  So I can use 6mm tamiya tape as a mask for the stripe and call it a day as 6mm scales to about 7 feet in 1/350 scale.


I think for the 40mm guns, I'll just build one up and try it and see if it fits.  I don't see why it shouldn't, but who knows, I've seen wierder things in my life.

  • Member since
    September 2012
Posted by GMorrison on Friday, June 8, 2018 9:40 AM

May I suggest a different approach?

As was explained, the topping boundaries are at least in theory a given vertical dimension above and below the waterline.

Which means that the true length measured on the surface increases as the slope of the surface increases from vertical.

This becomes very noticeable at the parts of the hull with any flare. If one uses a constant width of tape centered on the waterline, the boot topping will appear to dive under the stern.

There are numerous ways to mark the waterline, and complicating factors. But for a model of a battleship, the goal is to get the boot topping level with the base, the table top and the rest of the world around it.

Mark the top of the boot all the way around. In some places it may be easier to make a series of dashes rather than a line.

Mask above it. Then mask the bottom. Along the sides it can just be scaled at 6 feet or whatever you choose.

At the bow I pick a start point at the very prow and then eyeball it back to the line on the side.

At the stern I flip the hull upside down, and create the mask with lots of small pieces of tape. Again, go with your eye.

 Modeling is an excuse to buy books.


  • Member since
    August 2017
Posted by laskdjn on Friday, June 8, 2018 9:57 AM

GMorrison

may I suggest a different approach?

As was explained, the topping boundaries are at least in theory a given vertical dimension above and below the waterline.

Which means that the true length measured on the surface increases as the slope of the surface increases from vertical.

This becomes very noticeable at the parts of the hull with any flare. If one uses a constant width of tape centered on the waterline, the boot topping will appear to dive under the stern.


Right, it looks like a straight line, but it's not due to the contour of the hull. 

  • Member since
    August 2017
Posted by laskdjn on Sunday, June 10, 2018 6:30 PM

Do photo etch rails go on before or after painting the dazzle camo? 

  • Member since
    November 2005
  • From: Formerly Bryan, now Arlington, Texas
Posted by CapnMac82 on Sunday, June 10, 2018 7:14 PM

Our man GM speaks wisely, and from considerable experience.

Waterline marking (or, in this case, boot topping top & bottom demarkaction) is a topic  of many how-to's and tips-n-tricks articles.

Most come down to finding a scribing tool (carbide scribe, mechanical pencil, pen, what have you) and getting it to a defined level in relationship to the model.

This is where a scaleable set of drawings is very handy.

It's also very handy to have a working base that a person can shim with washers and the like, to get the hull to match the profile drawings.  However, a foot or two of drag (having the after portion of the keel lower than the foreward) is pretty infinitesemal at 1/350 scale.  So a person cannot be faulted (generally) for using the bottom flat of the hull.

Then, it's really just a matter of a flat surface, then a stack of flat stock or shims that elevates the chosen scribe to the first elevation desired.

Classic method involves a machinist's square and a clamp to afix the scribe to same.  Trace the low line first, then adjust and do the upper.  Mask, then paint.

For battleships with a counter-style stern, like that seen on the Dakotas and later classes, that boot topping will have a specific vertical height, but will be considerable wider due to the angle of the stern.  This is also seen on large amphibious ships, too.

  • Member since
    July 2014
Posted by modelcrazy on Sunday, June 10, 2018 8:19 PM

laskdjn

Do photo etch rails go on before or after painting the dazzle camo? 


That's personal preference but I like to install railings on the superstructure first before paint. The hull railings tend to break off too easily while handling but I do pre-paint the rails on the tree with the base color before installation. Ship railings are usually a single color as most, as far as I know, are cable and/or chain and are removable. You wouldn't see a color distinction at range anyway.

I could be wrong on this. most of the guys watching will know better that me.

Steve

Building a kit from your stash is like cutting a head off a Hydra, two more take it's place.


http://www.spamodeler.com/forum/

  • Member since
    August 2017
Posted by laskdjn on Sunday, June 10, 2018 8:42 PM

modelcrazy


laskdjn

Do photo etch rails go on before or after painting the dazzle camo? 


That's personal preference but I like to install railings on the superstructure first before paint. The hull railings tend to break off too easily while handling but I do pre-paint the rails on the tree with the base color before installation. Ship railings are usually a single color as most, as far as I know, are cable and/or chain and are removable. You wouldn't see a color distinction at range anyway.

I could be wrong on this. most of the guys watching will know better that me.


How do you mask behind the railing in the super structure? 

  • Member since
    July 2014
Posted by modelcrazy on Sunday, June 10, 2018 9:30 PM

I the case of complex camo schemes, like the Carrol, I mask and paint the superstructure first then add the railing. Personally, I like to complete the subassemblies prior to attaching them to the deck, but that's me.

Steve

Building a kit from your stash is like cutting a head off a Hydra, two more take it's place.


http://www.spamodeler.com/forum/

  • Member since
    August 2017
Posted by laskdjn on Sunday, June 10, 2018 11:03 PM

modelcrazy

I the case of complex camo schemes, like the Carrol, I mask and paint the superstructure first then add the railing. Personally, I like to complete the subassemblies prior to attaching them to the deck, but that's me.


I'm doing the same, I plan on breaking up the super structure into the fore, mid and aft sections, then also painting the guns and the hull separately.


I started putting railing on, then I started thinking about painting and the follow on process, hence why I asked the question.

  • Member since
    August 2017
Posted by laskdjn on Tuesday, June 12, 2018 11:36 PM

Where can I find information on proper rigging?  What lines go from where to where? 

  • Member since
    July 2014
Posted by modelcrazy on Wednesday, June 13, 2018 1:03 AM

laskdjn

Where can I find information on proper rigging?  What lines go from where to where? 


Ships and electronics were constantly changing or modified in the field for in drydock. One picture or reference will not be the same as another. While the LF long wire antennas (for low frequency Morris) or HF antennas for radios stayed pretty much the same, flag lanyards were constantly being broken, replaced, moved, omitted or added. One reference will not show the same as another.You have basicity 3 different lines.
Stays, which are used to stabilize the mast/yard etc. and don’t change position very often.
Antennas, Long Wire low frequency LF for coded transmissions, and HF high frequency shorter, usually whip antennas for radio use. These will also stay around as long as the radios have not been changed too much.
And finally the lanyards, which are used for flags and pennants. Now remember, while the ship in in port the Colors fly at the stern staff and the union jack at the bow staff, once all the lines are released from the dock and the ship is under her own power, the union jack is hauled done and stowed and the Colors are hauled down from the stern and a smaller ensign is raised on the top mast. The other lanyards, usually white rope, will have the pennants hauled up and down to spell out some alien tonuge that only signalmen and quartermasters can understand


So now that I have completely discouraged you, Wink this is what I and most other ship builders do. Look for images of say, the NC or her sisters and try to find pictures of her mast, or at least a picture you can expand. I will start to look for something that goes with my time frame I.E. pre-refit 1943, but usually end up downloading anything I can find to get a full picture of what I'm working with. Once I have all my references in front of me I start at the top and work down. Once done, it looks like a reasonable facsimile of the actual thing. That's the best advice I can give. And don't worry, There isn't a person on the forum that can tell if you are wrong (Well maybe one or two but they won't say that you messed up, non of us know for sure Propeller


Some examples of my past ships, I hope these help

1/350 Academy Indianapolis 

Trunpeter 1/350 USS Prinz Eugen


Steve

Building a kit from your stash is like cutting a head off a Hydra, two more take it's place.


http://www.spamodeler.com/forum/

  • Member since
    August 2017
Posted by laskdjn on Wednesday, June 13, 2018 8:49 AM

modelcrazy


laskdjn

Where can I find information on proper rigging?  What lines go from where to where? 


Ships and electronics were constantly changing or modified in the field for in drydock. One picture or reference will not be the same as another. While the LF long wire antennas (for low frequency Morris) or HF antennas for radios stayed pretty much the same, flag lanyards were constantly being broken, replaced, moved, omitted or added. One reference will not show the same as another.You have basicity 3 different lines.
Stays, which are used to stabilize the mast/yard etc. and don’t change position very often.
Antennas, Long Wire low frequency LF for coded transmissions, and HF high frequency shorter, usually whip antennas for radio use. These will also stay around as long as the radios have not been changed too much.
And finally the lanyards, which are used for flags and pennants. Now remember, while the ship in in port the Colors fly at the stern staff and the union jack at the bow staff, once all the lines are released from the dock and the ship is under her own power, the union jack is hauled done and stowed and the Colors are hauled down from the stern and a smaller ensign is raised on the top mast. The other lanyards, usually white rope, will have the pennants hauled up and down to spell out some alien tonuge that only signalmen and quartermasters can understand


So now that I have completely discouraged you, Wink this is what I and most other ship builders do. Look for images of say, the NC or her sisters and try to find pictures of her mast, or at least a picture you can expand. I will start to look for something that goes with my time frame I.E. pre-refit 1943, but usually end up downloading anything I can find to get a full picture of what I'm working with. Once I have all my references in front of me I start at the top and work down. Once done, it looks like a reasonable facsimile of the actual thing. That's the best advice I can give. And don't worry, There isn't a person on the forum that can tell if you are wrong (Well maybe one or two but they won't say that you messed up, non of us know for sure Propeller

Thank you for the detailed explanation.  That explains a lot.  So basically, I can rig her up any way that looks even reasonably plausible based on old pictures and I'll be good.

  • Member since
    December 2003
  • From: 37deg 40.13' N 95deg 29.10'W
Posted by scottrc on Wednesday, June 13, 2018 10:51 AM

The more I have started rigging 1/700 ships, the less complex and daunting rigging the Cuttysark and Constitution looked.  With a sailing ship, every line has a mechanical function that that requires A=B+C and everything seems to logically fall into place, on a steel ship, most of the lines, in exeption of the hallards for signaling, are for mast bracing or for electronics, not my forte'. 

Thanks Steve for the detailed explaination.

Scott

  • Member since
    July 2014
Posted by modelcrazy on Wednesday, June 13, 2018 2:38 PM

laskdjn
Thank you for the detailed explanation.  That explains a lot.  So basically, I can rig her up any way that looks even reasonably plausible based on old pictures and I'll be good.

Finally a short answer. Yes.

Steve

Building a kit from your stash is like cutting a head off a Hydra, two more take it's place.


http://www.spamodeler.com/forum/

  • Member since
    July 2015
Posted by JOSEPH E NIMEE on Wednesday, June 13, 2018 7:28 PM

"i would check on wood decking, it changes everything."

ONLY if you WANT natual wood finish, but if you plan to paint the deck in deck blue, or ocean gray or blue, etc... as most of WWII ships were painted, then it makes no difference and aftermark deck is a waste of money. 

If you are building the ship as it appears now, in 2018 in Willmington, NC, than yeah a natual wood deck would be fine... but if you are building it as a WWII ship the deck is actually painted Dark Sea Blue and Ocean Gray in what is called "Measure 32 or 18D" scheme depending what year. https://www.ibiblio.org/hyperwar/OnlineLibrary/photos/sh-co-mk/camouflg/usn-wwii/3--bb3.htm

StrikeEagle15

  • Member since
    September 2012
Posted by GMorrison on Wednesday, June 13, 2018 7:52 PM

On the subject of lay out of boot toppings and draft marks...

Extra points for reading the name of the ship.

 Modeling is an excuse to buy books.


  • Member since
    August 2017
Posted by laskdjn on Thursday, June 14, 2018 8:35 AM

GMorrison

On the subject of lay out of boot toppings and draft marks...


Extra points for reading the name of the ship.


I'm gonna go with Russian Words I Can't Read for 800, Alex.

  • Member since
    March 2012
  • From: Louisville, KY
Posted by Builder 2010 on Friday, June 15, 2018 6:27 PM

I used Laser Decks wood decking for my Tamiya Missouri. I did not want to paint them deck blue. If I did, I wouldn't have used them. Instead, I picked a date where the decks were natural wood, but all the other armanment/radars were pretty much in WW2 condition. That particular date was between Sept and Oct 1945 after the Surrender on the way to Pearl when the sailors scraped the blue paint off the decks. The deck blue continued on all the non-wood horizontal surfaces.
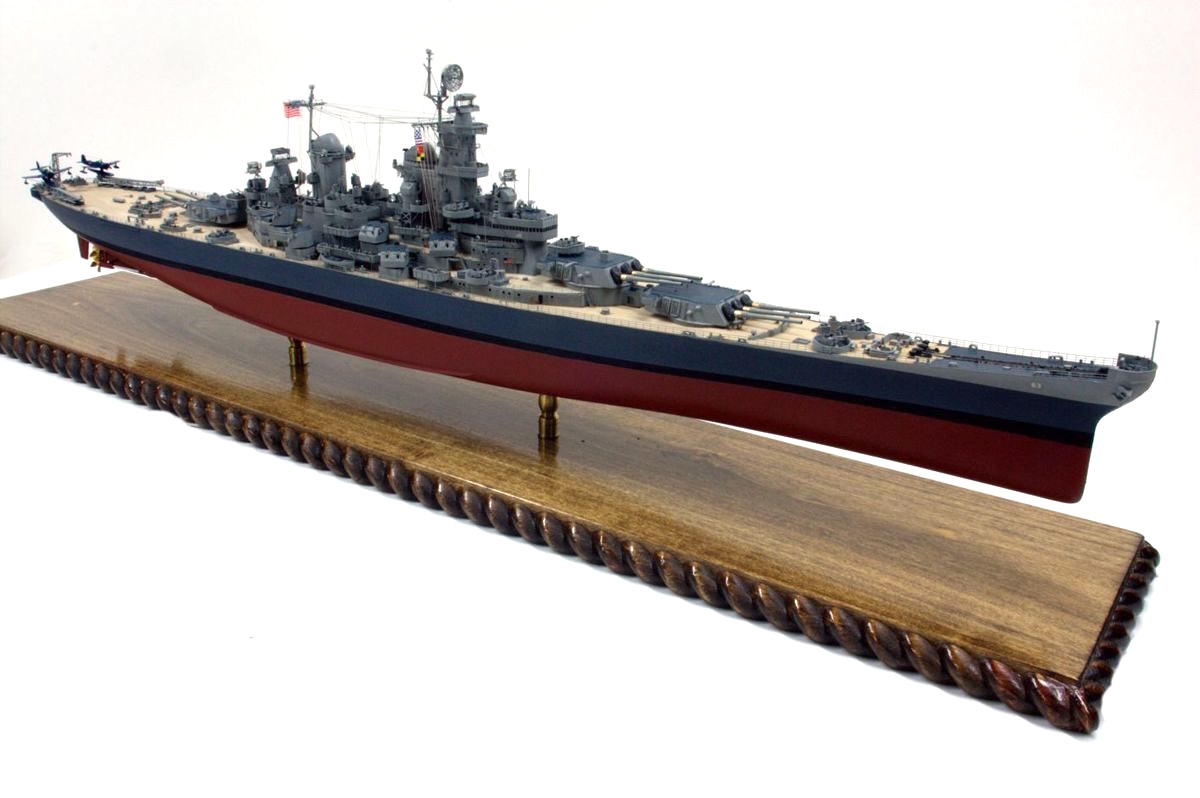
The model uses mostly Eduard PE, but a word of warning. Eduard's PE is very accurate and the bend points are etched so it can only bend there. The normal thickness is 0.010", but is reduced to 0.005" at the etched bend points. Because of this, it breaks very, very easily. I had some of the more curvy pieces fall apart into three pieces making installation a total nightmare. It's also a bit brittle being half-hard brass. You can reduce the breakage by annealing it. You anneal it by heating with a torch until it briefly turns red. A word of caution, the annealed brass PE is very soft and defoms very easily. It's the reason they don't use the soft stuff to begin with.

Tom's Model Works does not etch the bends, but in their case some of the etching cross-sections are so fine as to be unusable. I recently (Wednesday) finished a Trumpeter Essex and used Gold Medal Models PE and was generally satisfied with it, but Eduards inclined ladders are more detailed. Tom's inclined ladders expect you to bend the steps (another nightmare...at least for me). I've used some Alliance Model Works products, but being Chinese, it's hard to get customer service if you have a problem. Both Eduard and GMM, their customer support is terrific!

There are other PE companies on the Market now including Fly Hawk and others which are producing very complex sets of PE for battleships. They are expensive and I have no experience with them. There is also a new product on the market that you should consider: 3D printed 20mm guns which are pristine, delicate and pretty accurate. They already have thin splinter shields and shoulder rests and will save you hours of screwing around with brass details too small to handle.

I've started using gel CA to hold PE. It seems counter-intuitive, but it gives you more working time, stays put, and lets you use very small droplets... in other words, it gives you control that thin CA doesn't. You can then harden it with a tooth pick dipped in accelerator.

For long railings, I use small pieces of Tamiya 4mm masking tape and tape the railng to the hull in enough spots to stabilize it. In this case I do use thin CA applied very sparingly on either side of the masked areas, but NOT touching the tape. You don't want to glue the tape to the ship! After I've tacked the railing and it's nice and straight, I start removing the tape and glue each area that's now exposed. In this way you get a nice railing and don't drive yourself crazy.

I used MicroMark Pressure Sensitive Adhesive (PSA) to hold the wood decks, but it did occassionally let go and I had to inject more strong cements to keep it down. Gluing wood to styrene is not an ideal situation.

I've developed ways to solder all my PE antennas to mast and have even resorted to making all the masts and yards out of soldered brass. I do not expect most modelers to go this route. I'm good at soldering and have some pretty sophisticated equipment with which to do it. It does make very stable assemblies which hold up nicely for a long time.

There are lots of other details you can add to a battleship that really set it off. Most overhanging gun tubs have poles supporting them. These can be made with 0.021" brass wire. Masts are often stayed with guy wires. I did these using High-E guitar strings held iwith J-B Weld epoxy. Don't cut guitar strings with your sprue cutting flush cutters. It's hard than the pliers and will leave little half circles on both blades ruining the pliers. You need a plier that has a hardened cutter designed for this use. I did find that my Channel Lock needle nose pliers that have a cutter are hard enough to cut hardened piano wire.
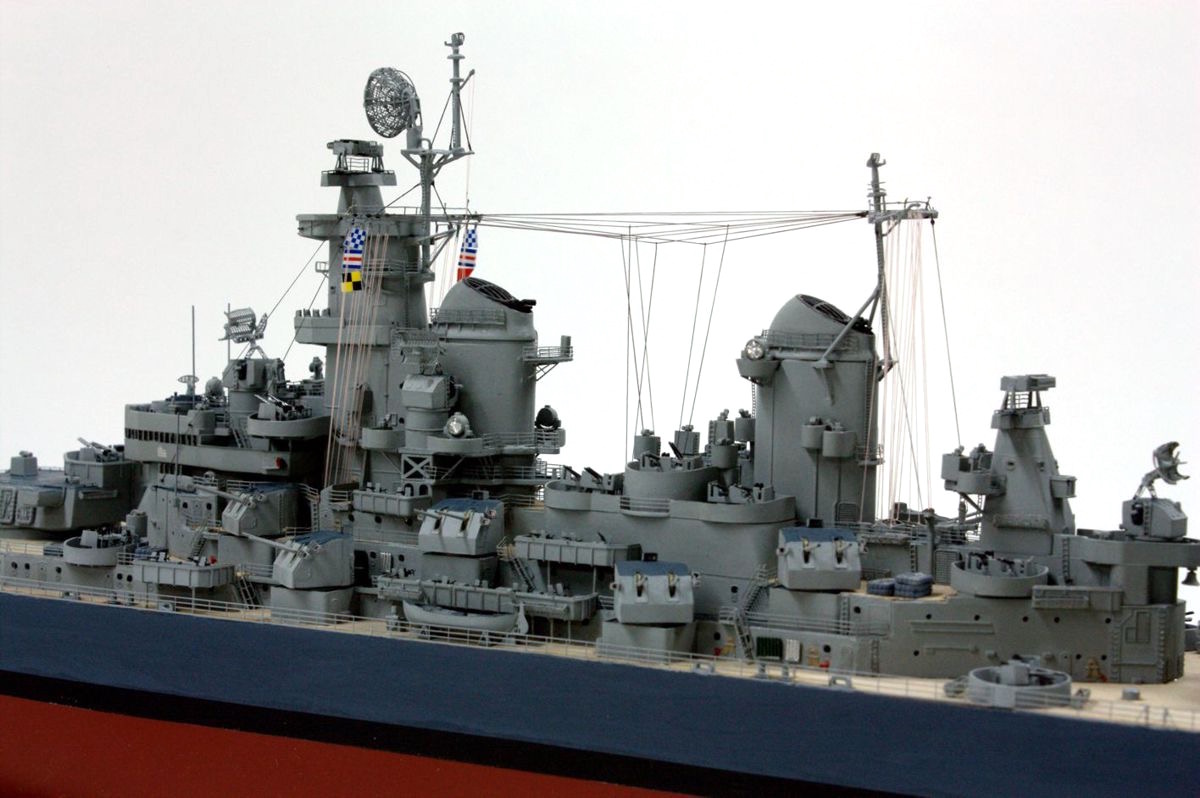
All rigging is done with fine-gauge E-Z Line. It is Lycra fiber and is totally elastic. It glues instantly with any kind of CA, and if you bump it, it just moves out of the way. It holds its tension forever. My Missouri is now 6 years old and shows no deterioration whatsoever.

Good Luck. If you have any more questions, I'd be glad to field them via private message.

  • Member since
    December 2010
  • From: Salem, Oregon
Posted by 1943Mike on Friday, June 15, 2018 7:35 PM

GM, I think it's the Borodino.


Laskdjn,

Builder 2010 does some incredible work. ModelCrazy's builds are outstanding too. It's great to see so many knowledgeable people chiming in here. I'm always learning from their posts.

Mike

"Le temps est un grand maître, mais malheureusement, il tue tous ses élèves."

Hector Berlioz

  • Member since
    September 2012
Posted by GMorrison on Friday, June 15, 2018 10:26 PM

1943Mike

GM, I think it's the Borodino.


Laskdjn,

Builder 2010 does some incredible work. ModelCrazy's builds are outstanding too. It's great to see so many knowledgeable people chiming in here. I'm always learning from their posts.


That's correct Mike.

Yes, that Missouri is really fantastic. I don't use wood decks too much except on  a few pre-dreads.

On sailing ships 1/144 or larger I lay them with strip basswood. Larger scale and I own a little precision table saw.

 Modeling is an excuse to buy books.


  • Member since
    November 2005
  • From: Formerly Bryan, now Arlington, Texas
Posted by CapnMac82 on Saturday, June 16, 2018 6:01 PM

modelcrazy
The other lanyards, usually white rope, will have the pennants hauled up and down to spell out some alien tonuge that only signalmen and quartermasters can understand

Harumph.  Also, those of us tasked to instruct wig-wags and QM, too Smile

Real short answer:  Typically three signal halyards per side.

They run from the "flag bags" to a yard arm, usually the lowest/longest on the foremast.

(You will have to decide if your scale used is worth showing those halyards doubled through the blocks (pulley for you lubbers) at the yard.)

The radio call sign of the ship is flown by way of four flags on one of the halyards (unless under radio silence).  The call sign might be flown while at anchor.


Modelcrasy's point is well taken, though.  There's just not much "rigging" on WWII ships as a rule.  Not in the same sense as the rigging used to support masts, stacks, and the like on pre-WWII ships.

So, other than the (very limited) use of long wavelength (generally longer than 10m) radio antennae, the only lines are those used to hoist flags.

As a point of order, USN practice was to run a halyard up to the top of everything.
The highest point would have hoisted the Commissioning Pennant.  These come in 7 sizes proportionate to the size of the ship (A Size 7 is about 5' long, a 1 is about 21'). 

The second-hgihest point would carry a Burgee--which is the flag of the Flag Officer aboard (or the appointed squardon Commodore).

Highest point on the Main mast carries the National Ensign.  These are also sized to the ship; capital ships having a Sunday, a Battle, and a Storm ensign (Sunday Ensigns are the full length of the aft flagstaff).

In combat, a National Ensign will be flown from every mast, usually the Sunday from the foremast, and the Battle from the Main mast.

To add a wrinkle, there is also "Dress Ship."  This is where eery pennenat and flag is cleaned out of the signal lockers and strung together for the top of the Jack-staff to the Foremast, across to the Mainmast, and down to the Flagstaff aft.  There's a plan of pennants, square flags, and swallow-tailed flags (although the signalmen always try to sneak in a rude or vulgar word or too in the array).

JOIN OUR COMMUNITY!

Our community is FREE to join. To participate you must either login or register for an account.

SEARCH FORUMS
FREE NEWSLETTER
By signing up you may also receive reader surveys and occasional special offers. We do not sell, rent or trade our email lists. View our Privacy Policy.