SEARCH FINESCALE.COM

Enter keywords or a search phrase below:

Dragon 1/350 USS Princeton wip

6630 views
51 replies
1 rating 2 rating 3 rating 4 rating 5 rating
  • Member since
    January 2009
  • From: hamburg michigan
Dragon 1/350 USS Princeton wip
Posted by fermis on Monday, January 28, 2019 2:10 PM

It has been a while since I've had a big project....it's time!


The kit, some refs, the base I made a while back, and some PE (Eduard rails, White Ensign "air wing" set, and a set from Alliance)

Almost forgot, there's also a set of 20mm guns from Master (not pictured).


Hopefully, I'll get some time this week to start snippin some parts. Unfortunately, it looks like the weather is not going to cooperate and I'll be spending most of my free time at the airport, dealing with the snow.

  • Member since
    September 2012
Posted by GMorrison on Monday, January 28, 2019 3:00 PM

I'm looking forward to watching this come together. Double check the painting instructions, it sounds like there's some active debate about the various colors the ship was painted. 

 Modeling is an excuse to buy books.


  • Member since
    April 2005
Posted by ddp59 on Monday, January 28, 2019 3:11 PM
  • Member since
    March 2009
  • From: brisbane australia
Posted by surfsup on Thursday, January 31, 2019 4:33 AM

Where is the Popcorn. Will be watching this one my Friend.....Cheers Mark

If i was your wife, i'd poison your tea! If Iwas your husband, I would drink it! WINSTON CHURCHILL

  • Member since
    July 2010
  • From: Tornado Alley
Posted by Echo139er on Thursday, January 31, 2019 2:55 PM

This is going to be a good one.  HURRY!!!

  • Member since
    January 2009
  • From: hamburg michigan
Posted by fermis on Sunday, February 3, 2019 9:20 AM

Three bench sessions in...many hours and many words, worthy of getting my mouth washed out with soap (ALL of the bad words!).

This is all I have to show for it...


I have heard many stories about Dragons instructions...I've even seen the issues on a few plane kits. I know planes, so it hasn't been an issue.

They had a couple of the numbers wrong on the exhaust stacks...then...they don't even bother to tell you which ones go where on the ship. A little deductive reasoning (trial-n-error/test fitting) does the trick though.


  • Member since
    January 2009
  • From: hamburg michigan
Posted by fermis on Wednesday, February 6, 2019 1:10 PM

I need to use my "phone a friend" option here...

I can't seem to find anything regarding colors in the hanger deck...walls, floor, ceiling. I've wasted too much time searching my refs(nothing shown), web sites, and other people wips...and of course, Dragon instructions are of zero help in this area.

I'm kinda stuck until I get those figured out...anybody know???

  • Member since
    September 2012
Posted by GMorrison on Wednesday, February 6, 2019 2:09 PM

The usual colors would be white bulkheads and overhead, deck painted to match Deck Stain 20-B, which is about the same as 5-N Navy Blue.

 I think in 1943 the deck was Stain 21, which is about the same as 5-O Ocean Gray. But I think she was repainted before being sunk in late 1944.

 Modeling is an excuse to buy books.


  • Member since
    March 2003
  • From: Western North Carolina
Posted by Tojo72 on Wednesday, February 6, 2019 3:17 PM
Ah,coming along really nice.I have the USS Independence in the stash,hoping to get to it someday.Will enjoy following yours.

  • Member since
    September 2012
Posted by GMorrison on Wednesday, February 6, 2019 3:28 PM

There was a great thread on the Ship Model Forum about the CVL kits.

http://www.shipmodels.info/mws_forum/viewtopic.php?f=46&t=6011

 There's a picture of a CVL elevator lowered. The walls of the elevator well are blue, there's a pretty wide black stripe around the tops of them.

 Modeling is an excuse to buy books.


  • Member since
    July 2014
  • From: Philadelphia Pa
Posted by Nino on Wednesday, February 6, 2019 4:37 PM

And one additional link (New WIP)

http://www.shipmodels.info/mws_forum/viewtopic.php?f=59&t=166458&start=80

 Looks like this modeler is up to the hanger deck now.


 (Tracy White is one of the experts over there on Modelwarships.com and as I recall he  worked with Dragon on their 1/350th kits as technical advisor.)  He has some terrific posts with expert advice on the CVL class.

    Nino.

  • Member since
    January 2009
  • From: hamburg michigan
Posted by fermis on Saturday, February 9, 2019 1:57 PM

Thanks for the assist, guys!

Some progress!

Drilled holes in the hull and epoxied the bolts...

I thinned the support brackets for the prop shafts...

I used masking tape and "built up" some paint to simulate the hull panels...


Also did the preliminary painting. I figured it would be way easier now, than trying to do any masking with all the fiddly bits in place.


  • Member since
    March 2009
  • From: brisbane australia
Posted by surfsup on Saturday, February 9, 2019 5:31 PM

Off to a very good start my Friend. Nice and clean Paintwork as usual.....Cheers mark

If i was your wife, i'd poison your tea! If Iwas your husband, I would drink it! WINSTON CHURCHILL

  • Member since
    January 2009
  • From: hamburg michigan
Posted by fermis on Sunday, February 10, 2019 9:06 PM

Toast

Last nights progress...

It really isn't as visible as I thought it might have been...I had some black chain, but the links had a twist to them...then I remembered the gold chain I had stashed with another kit. 

The links are straight, much better! They are lacking the "bar" in the middle of each link, but looks far better than the PE chain provided.


  • Member since
    September 2012
Posted by GMorrison on Sunday, February 10, 2019 9:14 PM

Very good looking. Share how you masked the pattern.

 Modeling is an excuse to buy books.


  • Member since
    January 2009
  • From: hamburg michigan
Posted by fermis on Sunday, February 10, 2019 9:30 PM

Been at the bench, pretty much ALL day today.

Added and painted the slide up doors on the hanger level.

Spent the rest of the day on the main deck. Not gonna lie, this had me nervous...being my 1st go at this sort of thing.

I started by cutting off the molded on arresting cables. They're huge and really look dumb...they had to go! I can replace later, with much finer stretched sprue.

Started painting with a dark grey...


Then I mixed up a "wood" color...


Then the blue...


The kit provides decals for all the stripes...I don't think stark white stripes would have looked any kind of good...so...


I bit of dry brushing, a gloss, wash and dull coat...


I really wish the camera could pick up what the eye picks up.

I'm quite pleased with myself and think it turned out at least a little better than I had envisioned.

This last pic still doesn't do it justice, but it's as close as I could get it...


  • Member since
    January 2009
  • From: hamburg michigan
Posted by fermis on Sunday, February 10, 2019 9:32 PM

GMorrison

Very good looking. Share how you masked the pattern.


Toast

Masking tape!Propeller

For the curved areas, I cut thin strips of Tamiya tape, then just filled in the rest will regular (cheap) tape.

  • Member since
    September 2012
Posted by GMorrison on Sunday, February 10, 2019 9:50 PM

fermis


GMorrison

Very good looking. Share how you masked the pattern.


Toast

Masking tape!Propeller

For the curved areas, I cut thin strips of Tamiya tape, then just filled in the rest will regular (cheap) tape.


Kill deer. OK the question was serious. I assume you copied the Dragon illustration. 

Tracy White if you are foillowing: I can't find any pictures of Princeton in 33, only 21 or 22.

I only care because I'm building one.

 Modeling is an excuse to buy books.


  • Member since
    April 2003
  • From: USA
Posted by keavdog on Sunday, February 10, 2019 11:41 PM

Wow that's looking really sharp.  Pics look great. The deck looks fantastic  

Thanks,

John

  • Member since
    January 2009
  • From: hamburg michigan
Posted by fermis on Monday, February 11, 2019 1:57 AM

GMorrison

 Kill deer. OK the question was serious. I assume you copied the Dragon illustration. 

Apologies...I didn't know that's what you were getting at!

Yes, I did follow the instructions...with a bit of artistic license on the bow and stern. The instructions have some conflict between the side views and head on/rear views. The side views match the ref pics in the 2 books (pictured in my first post).

I believe this is the San Jacinto...pattern is the same though.

  • Member since
    May 2009
  • From: Poland
Posted by Pawel on Monday, February 11, 2019 11:00 AM

Fermis - your model looks great!

I, for myself, couldn't help but post this:

Maly Modelarz "USS Belleau Wood" by Pawel

It's a paper model from "Maly Modelarz" I've built in 2006. I knew back then it was simplified, now Fermis is showing me how much...

Good luck with your build and have a nice day

Paweł

All comments and critique welcomed. Thanks for your honest opinions!

www.vietnam.net.pl

  • Member since
    March 2009
  • From: brisbane australia
Posted by surfsup on Monday, February 11, 2019 6:54 PM

Love the weathered effect you achieved on the Flight Deck my Friend. very good and realistic.....Cheers mark

If i was your wife, i'd poison your tea! If Iwas your husband, I would drink it! WINSTON CHURCHILL

  • Member since
    January 2009
  • From: hamburg michigan
Posted by fermis on Sunday, March 3, 2019 8:54 PM

Thanks guys!Toast


Before I proceed to the rest of the details, I wanna get the hanger deck situated.

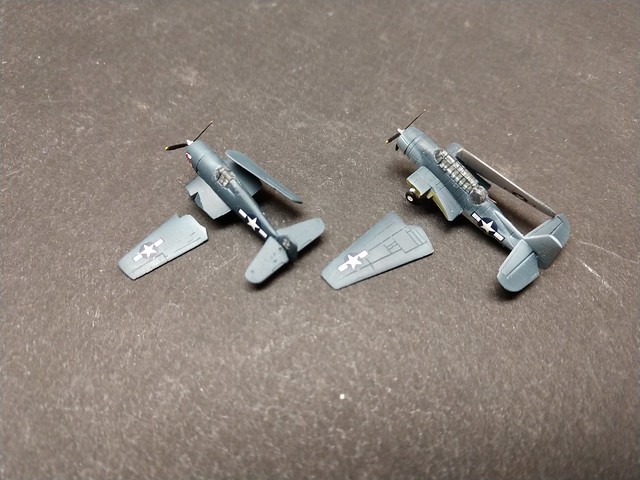
That means...I gotta do some planes. As they are in the kit, the panel lines are pretty gross. As a test, I did a pair...I puttied the lines on the Hellcat, and just sanded down the TBF a bit.

Thoughts/opinions on the route to go are welcome!


Here they be...


I missed a little bit of filling on the Hellcats tail...oops

  • Member since
    November 2009
  • From: Twin Cities of Minnesota
Posted by Don Stauffer on Monday, March 4, 2019 9:04 AM

fermis

Thanks guys!Toast


Before I proceed to the rest of the details, I wanna get the hanger deck situated.

That means...I gotta do some planes. As they are in the kit, the panel lines are pretty gross. As a test, I did a pair...I puttied the lines on the Hellcat, and just sanded down the TBF a bit.

Thoughts/opinions on the route to go are welcome!


Here they be...


I missed a little bit of filling on the Hellcats tail...oops


Those are simply gorgeous!


Don Stauffer in Minnesota

  • Member since
    September 2012
Posted by GMorrison on Monday, March 4, 2019 10:04 AM

I agree. How do you paint those canopy frames?

 Modeling is an excuse to buy books.


  • Member since
    June 2018
  • From: Ohio (USA)
Posted by DRUMS01 on Monday, March 4, 2019 6:35 PM

Fermis; Your build is looking fantastic so far! Your question is kind of difficult... First I want to say either way would be really nice with the details you are adding putty or sanding). Part of me likes to have my eyes drawn to the finer details (like the panel scribing). On the other hand, the panel lines provided by the molding look a small bit out of scale. I kind of like either of your methods if it were me.  The real question for you is what are you after? How much of the lines will be seen if they are hanger queens? Are you going to light the hanger with LEDs? Are some going to appear folded on the deck? How to the sanded panel lines look when compared to the deck engraving? Like I said, I think both look wonderful. It is your kit... build it the way you want to, not what we say. From what I see, your skills and eye for detail will have it look like a show stopper either way you go...

Ben

"Everyones the normal until you get to know them" (Unknown)

LAST COMPLETED:

1/35 Churchill Mk IV AVRE with bridge - DONE

NEXT PROJECT:

1/35 CH-54A Tarhe Helicopter


  • Member since
    January 2009
  • From: hamburg michigan
Posted by fermis on Tuesday, March 5, 2019 3:39 PM

Thanks for the kind words!

Still a bit "on the fence". I dig both...but leaning toward not filling the lines. At this scale, you'd not see panel lines...but like DRUMS, I kinda like to see the detail, even if it is on the heavy side.

I have no plans to light the hanger, and there really isn't much that will be visible beyond the rear elevator area.

For the canopies...I masked the whole thing with liquid mask. It sucked! I was only able to peel off maybe half of it. For the rest, I used a fine brush and thinner to clean the canopies off. I just brush painted the frames. Tedious...YES!

  • Member since
    January 2009
  • From: hamburg michigan
Posted by fermis on Sunday, March 24, 2019 12:31 PM

After some more messin around with the Hellcats...it has been decided that all planes will be just sanded, flat finished, and "spinning" props will be scratched.

Tired of dealing with the Ctas, I built up the Avengers...

Comparison of PE "prop blur" vs scratched disk...

  • Member since
    December 2003
  • From: 37deg 40.13' N 95deg 29.10'W
Posted by scottrc on Monday, March 25, 2019 11:28 AM

Fermis,

As usual, your airbrush work is superb.

As to the liquid mask canopies, you seemed to have better luck than I, for the mask always seemed to overlap and I end up peeling off more paint that required and still had to touch up the canopy.

Scott

  • Member since
    March 2009
  • From: brisbane australia
Posted by surfsup on Thursday, March 28, 2019 5:14 AM

Lovely sharp work so far my Friend.....Cheers mark

If i was your wife, i'd poison your tea! If Iwas your husband, I would drink it! WINSTON CHURCHILL

JOIN OUR COMMUNITY!

Our community is FREE to join. To participate you must either login or register for an account.

SEARCH FORUMS
FREE NEWSLETTER
By signing up you may also receive reader surveys and occasional special offers. We do not sell, rent or trade our email lists. View our Privacy Policy.