SEARCH FINESCALE.COM

Enter keywords or a search phrase below:

Cutty Sark 1/96 Revell

10607 views
50 replies
1 rating 2 rating 3 rating 4 rating 5 rating
  • Member since
    October 2019
Cutty Sark 1/96 Revell
Posted by Bruma on Wednesday, October 23, 2019 9:45 AM
Hello everyone! This is my first post in this great community. 
English is not my native language, so please forgive me for all the mistakes I will surely do (and if you have the will, please correct me).
I have decided to step out of the shadow and share with you my progress on this beautifull clipper mainly to give all the deserved credits to David_k.His build:http://cs.finescale.com/fsm/modeling_subjects/f/7/t/177929.aspx
has pushed me to start mine, so thank you Mr David!
I'm now ending the hull and the deck furniture, but here you have some images of the previous steps. I decided to remove all the original deadeye and to put mine, emulating also the metallic strops. I hope they will stay there, together with the pinrails, once I will apply tension for the ratlines...I tried to put some love also on the cranes (is this they right name?).
 
 2019-10-22_06-55-34 by Marco, su Flickr


Here is the ship as it is now. I still need to do many things, but the masts assembly seems a little bit closer now...


Hope to be back soon with more updates! 
Sorry for my bad english and thanks to everyone who wants to help me with critics and comments.
This is my firs ship model, so help is more than welcome!  
Marco
  • Member since
    March 2009
  • From: brisbane australia
Posted by surfsup on Sunday, October 27, 2019 3:25 AM

YOu are off to a nice and tidy start. Just enjoy yourself with your Build.....Cheers mark

If i was your wife, i'd poison your tea! If Iwas your husband, I would drink it! WINSTON CHURCHILL

  • Member since
    October 2019
Posted by Bruma on Monday, October 28, 2019 6:36 PM

Thank you for the comment!

I noticed that the pictures from the previous post didn't show well on mobile, they are cutted on the right end side, so I will use a smaller one this time, hoping this will help.

After a long evening, I placed all the photoetched details on the stern and on the bow. I think they really add alot to the model.


 IMG_7910 copy by Marco, su Flickr


 IMG_7922 copy by Marco, su Flickr


And here you can see the work in progress on the crane and the lifeboats.

The lifeboats shold be covered, so I'm trying to simulate the cover with a quite thick aluminum foil. This is just a test and I will redo it in a proper way, but I like the overall effect and I hope it will improuve once painted.

Moving to the crane, this are my first lines as a modeler, so they are far from beeing good but I hope to improuve a bit. The bloks are revisited, even if they are after market, they didn't have the right shape, so I tryied to modify them a bit hoping to get a better result. 


 IMG_7927 copy by Marco, su Flickr


  • Member since
    November 2009
  • From: Twin Cities of Minnesota
Posted by Don Stauffer on Tuesday, October 29, 2019 9:16 AM

Very nice!


Don Stauffer in Minnesota

  • Member since
    September 2012
Posted by GMorrison on Tuesday, October 29, 2019 9:55 AM

I think that your rigging of the lifeboat falls looks really nice. I'd call it done.

The cover came out well too.

 Modeling is an excuse to buy books.


  • Member since
    October 2019
Posted by Pete G on Tuesday, October 29, 2019 12:21 PM

Marco, great build and thanks for sharing! Really like your paintwork effects, the coppering, desks and the hull black. Stunning work. What paint did you use for the gold? More pictures please as you progress....? 


  • Member since
    February 2003
  • From: Lacombe, LA.
Posted by Big Jake on Wednesday, October 30, 2019 7:38 AM
Bruma, The model looks great - a few pointers. IF you used the plastic eyebolts, consider replacing them with metal that has been glued down, the plastic may break on you. Also, the life boats were covered most of the time, so you might wish to do so as well? You can make the covers with 4-5 plys of tissue ot toilet paper painted with diluted white glue, then after they dry you can paint and weather with a faded canvas color.


  • Member since
    October 2019
Posted by Pete G on Wednesday, October 30, 2019 10:31 AM

Big Jake
Bruma, The model looks great - a few pointers. IF you used the plastic eyebolts, consider replacing them with metal that has been glued down, the plastic may break on you. Also, the life boats were covered most of the time, so you might wish to do so as well? You can make the covers with 4-5 plys of tissue ot toilet paper painted with diluted white glue, then after they dry you can paint and weather with a faded canvas color.
 

I like to replace the plastic eyebolts on my ship models with the eye of a fishhook. Once in glued in place, they will never fail. I place the hook in a vice and cut the eye off, leaving as much as the shaft as I think I need for a glueing surface. 

I look for straight eye hooks. As a fly tyer I have collected many different sizes over the years, not expensive. Many are black or very dark gray so you dont even have to paint them after they are glued in place. Some are shiny, so a drop of dullcoat applied with a brush tones them right down. I usually apply the dullcoat after the line or knot is done.  A pack of 100 hooks will go a long way, depending on the model.                    


  • Member since
    November 2009
  • From: Twin Cities of Minnesota
Posted by Don Stauffer on Thursday, October 31, 2019 8:45 AM

I have a set of round nose pliers with very small diameter tips.  I find a can hand make eyes for larger scale fine.  For smaller sizes I wind wire around a pin stuck in a block of wood.  I do not solder the eyes closed- I have yet to pull a rigging line out of such a hook.

Even a small spool of fine wire will make hundreds of eyes, so it is cheap to make your own.  I do not do it to make a stronger eye- the plastic ones are plenty strong enough. I just fear that plastic eyes look too large for most ship scales.


I do not make eyes for 1:700 scale and rarely for 1:350.  But I do for anything larger.


Don Stauffer in Minnesota

  • Member since
    March 2019
  • From: Post Falls, Idaho
Posted by Sigep Ziggy on Thursday, October 31, 2019 9:16 AM

Wow, you are doing a steller job on this build.

I too have this kit in my collection of kits. I started working on it 15 years ago, but was unhappy with how it was turning out. I will try to repaint some of the parts and follow your build.

I believe you mentioned DavidK's build. He did a great job on his build as well.

Thanks for the fish hook idea, I think I will steal it.

your shipmate,

Ziggy


  • Member since
    February 2016
  • From: Western No. Carolina
Posted by gene1 on Thursday, October 31, 2019 12:17 PM

Marco, your build is really superb. You must already be a great model builder to do this kind of beautiful work. Keep more coming. David K is the best to follow.

                                                       Gene

  • Member since
    March 2012
  • From: Marysville, WA
Posted by David_K on Saturday, November 2, 2019 10:27 AM

Great work, Bruma!

Everything looks very tidy, and I'm glad you went with the photoetch emblems from Hismodel...quality stuff.

Can you tell us about your treatment of the deck parts?  I can't see if you used the kit parts and painted them for that effect, or if you installed a wooden deck laminate?

Anyway, you're doing a great job, I can't wait to see how you decide to present the rigging.

Dave

        _~
     _~ )_)_~
     )_))_))_)
     _!__!__!_         
     (_D_P_K_)
   ~~~~~~~~~~~~~
    ~~~~~~~~~~~

Current Project:  Imai/ERTL Spanish Galleon #2

Recently Finished: Revell 1/96 Cutty Sark

Next Up:  ???


  • Member since
    October 2019
Posted by Bruma on Sunday, November 3, 2019 7:09 PM

Thank you everyone for stepping in and for the kind words, I really appreciate! 


Pete G

Marco, great build and thanks for sharing! Really like your paintwork effects, the coppering, desks and the hull black. Stunning work. What paint did you use for the gold? More pictures please as you progress....? 

What parts do you refer to?

All the ornaments are photo etched and they are in they natural colors. The compass and the bell are painted with metal colors, and in this case I have used Gunze metallic colors. 


Big Jake
Bruma, The model looks great - a few pointers. IF you used the plastic eyebolts, consider replacing them with metal that has been glued down, the plastic may break on you. Also, the life boats were covered most of the time, so you might wish to do so as well? You can make the covers with 4-5 plys of tissue ot toilet paper painted with diluted white glue, then after they dry you can paint and weather with a faded canvas color.


Thank you for the tip! 

I have tried another way, using aluminum foil. 

Surely the tissue would have been a good option but I didn't want to cover the lifeboats with glue without beeing 100% sure of the result. 


For the eyebolts, I think I will stick with the plastic one in most of the cases, replacing them with hand made ones for the most stressed. 

The eye of a fishhook are a great idea, but I wasn't able to find the proper size for this scale, they where all too big...


David_K

Great work, Bruma!

Everything looks very tidy, and I'm glad you went with the photoetch emblems from Hismodel...quality stuff.

Can you tell us about your treatment of the deck parts?  I can't see if you used the kit parts and painted them for that effect, or if you installed a wooden deck laminate?

Anyway, you're doing a great job, I can't wait to see how you decide to present the rigging.

Dave


Thank you Dave for the comments!

The deck is the original plastic one.

The wooden deck is awesome but a little bit too expensive for me.

So I paint the deck with a uniform clear brown acrylic color, and I shaded it with oil paint, applied as a filter. 

At this stage the color was too warm for my taste, so I applied a higly diluted layer of acrylic brown (deck tan if memory serves me well) to make it less saturated and uniform. 

Lastly, with a soft dark pencil, I brought back all the fine details. 


If you don't mind I have a question for you: how do you applied the decals avoiding silvering? 

I have ordered them from His Model, usually I spray a uniform coat of clear varnish, than I set the decal, another clear varnish and a matte coat in the end.

But in this case the hull is huge, paing it all seems to me a little bit an overkill but on the other hand I fear to ruin the uniform finish if I paint only the needed parts... 

I hope you can understnad the question even with my terrible english, sorry...


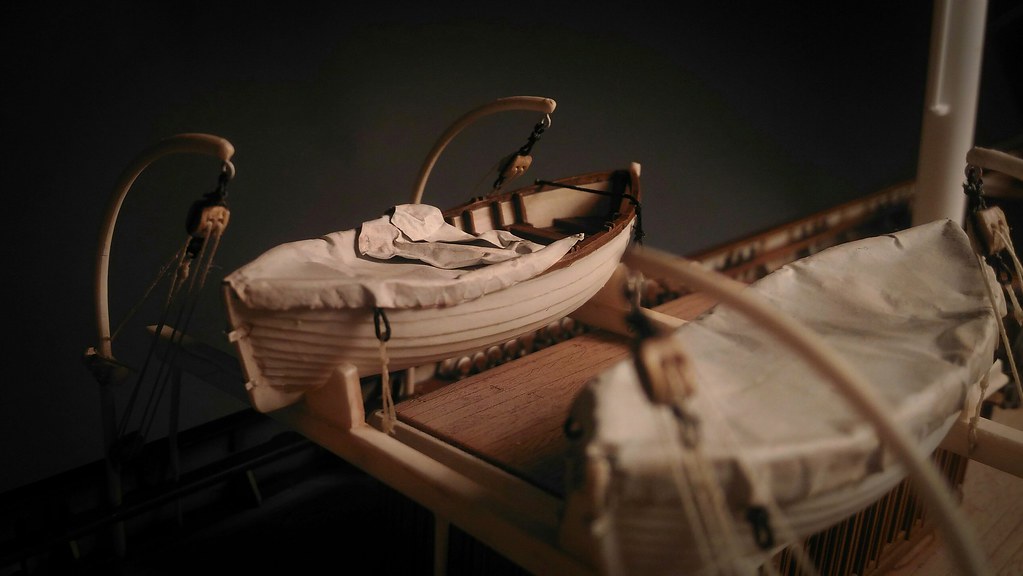
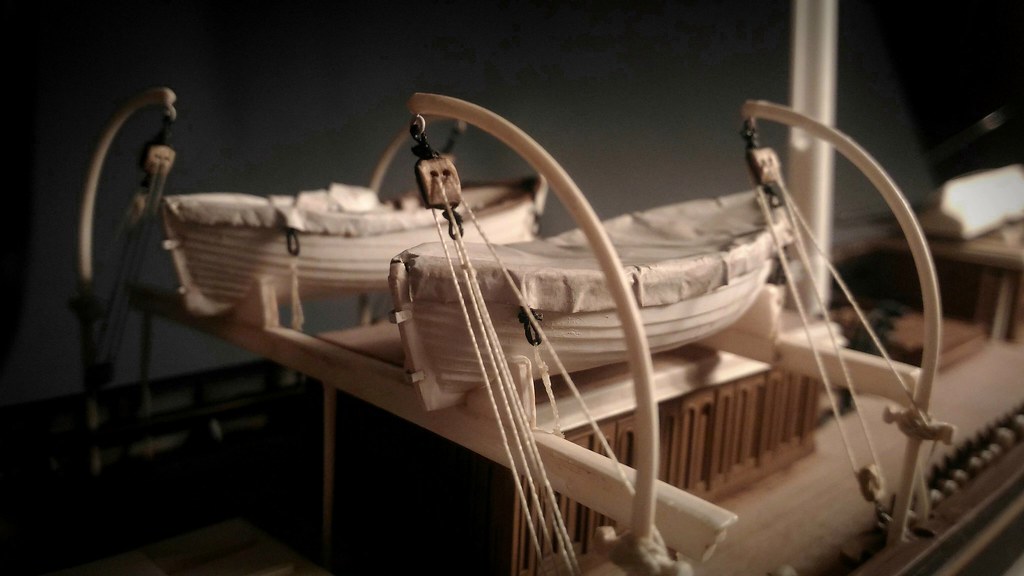
Anyway, the life boats should be finished. 

I have added the rudders ancoring points (I'm sure they have a proper name...) the retention lines (and again I miss the correct name) and the covers. The cranes are also glued in place, they only miss the coils of rope, I will add them later.

The result is not perfect but still I'quite satisfied


 2019-11-04_01-19-25 by Marco, su Flickr


 2019-11-04_01-18-30 by Marco, su Flickr


 2019-11-04_01-19-08 by Marco, su Flickr


  • Member since
    March 2012
  • From: Marysville, WA
Posted by David_K on Monday, November 4, 2019 8:08 AM

When I applied the draft scale decals, I didn't prep the surface with any varnish.

I use a 2-part product, called Micro Sol and Micro Set.  One part will make the decal very soft and able to fit the shape of a rough surface (copper plates and rivets on the hull), and the other part causes the decal to tighten up against the surface as it dries.

Dave

        _~
     _~ )_)_~
     )_))_))_)
     _!__!__!_         
     (_D_P_K_)
   ~~~~~~~~~~~~~
    ~~~~~~~~~~~

Current Project:  Imai/ERTL Spanish Galleon #2

Recently Finished: Revell 1/96 Cutty Sark

Next Up:  ???


  • Member since
    October 2019
  • From: New Braunfels, Texas
Posted by Tanker-Builder on Monday, November 4, 2019 9:24 AM

Well!

      I really expected more from you ! !LOL.LOL.LOL.LOL. That is one very fine job. Those boats and subsequent areas look great ! I like that you are not hurrying this project. The results speak for themselves. Are you going to put it in a case? If you do Please, please don't forget breathing vents for the case. Beautiful Work deserves a safe Port.

  • Member since
    October 2019
Posted by Bruma on Thursday, November 7, 2019 6:29 PM

David_K

When I applied the draft scale decals, I didn't prep the surface with any varnish.

I use a 2-part product, called Micro Sol and Micro Set.  One part will make the decal very soft and able to fit the shape of a rough surface (copper plates and rivets on the hull), and the other part causes the decal to tighten up against the surface as it dries.

Dave


Thank you Dave for your quick reply!

I will try them! Till now I have only used the Mr. Mark softer from gunze, which is not enough without clear varnish...


Tanker-Builder

Well!

      I really expected more from you ! !LOL.LOL.LOL.LOL. That is one very fine job. Those boats and subsequent areas look great ! I like that you are not hurrying this project. The results speak for themselves. Are you going to put it in a case? If you do Please, please don't forget breathing vents for the case. Beautiful Work deserves a safe Port.


Thank you! I really appreciate your feedback!

This evening was the eyebolts night...

I'm trying to add some details to the mast before painting them.

In the picture you have the fore, main and mizzen masts in order. 


 2019-11-08_01-00-17 by Marco Brusa, su Flickr


As you can see the main mast and the mizzen mast have a sort of railing on the stern side, wich was reproduced in the kit by the piece of plastic cutted away in the top part of the picture, a little bit to bulky for my taste. 

Unfortunately I don't know what is the purpouse of that rails, but they are quite well documented in many pictures so I tried to reproduce them.

Speaking about eyebolts, I also added tha ones used for the futtock shrouds. 


The masts assembly put me in front of the fact that I need more informations...

I have the campbell plants, wich are great, and a ton of picture, but still many things are missing. 

Have you some books to suggest me?

I tried to buy The “Cutty Sark” by Nepean Longridge but the ebook is not available in my country and the paper copy is a bit expensive...


EDIT: found a ebook version for less than 7 euros! 

Back to school now, i have many things  to learn on my new book! 

  • Member since
    April 2016
  • From: Russia, St.Peterburg
Posted by kirill4 on Saturday, November 16, 2019 6:50 AM

Hi Bruma,

Your model looks very nice !!!  Good Job!!! :)))

I have same model in the box... may be will start to assemble it somewhere in future...

If You need more information...I would like to recomend you

https://www.skipper.co.uk/catalogue/item/masting-and-rigging

it is one of the best books , when You are busy with clipper rigging ... try to purchase it, You will never regret! :)))

check other books and plans from the same author on the site of that publisher...

https://www.skipper.co.uk/catalogue/search/page/3?q=Harold A. Underhill&x=32&y=1

  • Member since
    October 2019
Posted by Bruma on Monday, November 18, 2019 6:20 PM

Thank you Kirill,

I had a look at Masting and Rigging: The Clipper Ship and Ocean Carrier...

It is a wonderful book! Thank you for the kind suggestion!


Some updates on the Cutty Sark:

paint and weathering job on the masts is almost done. 

All the parts are still to be assembled, except for the crow's-nests (is this the right name for clippers top platform on the masts?).

I have added the futtock shrouds and the deadeyes for the upper shrouds. 


 IMG_7937 copy by Marco, su Flickr


 IMG_7935 copy by Marco, su Flickr


 2019-11-19_12-57-12 by Marco, su Flickr


Sadly the weathering on the white parts of the masts didn't show up on the pictures, but they are there :)


All the eye bolts on the cap bounds where cutted away and replaced.


 2019-11-19_01-15-27 by Marco, su Flickr


And here a final picture of the ship with the masts dry fitted for a quick check. 


 IMG_7947 copy by Marco, su Flickr


As always comments and critiques are welcome!

  • Member since
    October 2019
Posted by Bruma on Sunday, November 24, 2019 4:50 AM

Hello everyone!

Still working on the tops.

I would like to represent the entire rigging as best as I can and I'm preparing all the blocks and eyebolts hoping to be able to use them once needed. 


Here is the fore top:

 2019-11-24_11-20-25 by Marco, su Flickr


 2019-11-24_11-21-40 by Marco, su Flickr


and here a work in progress on the odd shrouds:


 2019-11-24_11-20-52 by Marco, su Flickr


At the present state there are:

Eyebolts and blocks for

leechline

bountline (inner and outer)

eyebolts for the upper topsail sheets purchases

eyebolt for the main topgallant stay.

(sorry again for my bad english, I hope you can understand me)

If you find something missing or misplaced, please, please, write me here!

I'm really a rookie and the amount of informations to be processed is overwhelming...


  • Member since
    December 2012
Posted by rwiederrich on Monday, November 25, 2019 7:25 AM

Comming along nicely....very nice attention to detail.


Rob

  • Member since
    October 2019
Posted by Bruma on Wednesday, November 27, 2019 12:23 PM

Welcome aboard Rob and thank you for your comment! 

Your models are beautiful and you seems to know the Cutty Sark very well. 

I hope you will follow along the WIP, I need all the help I can get! 

If you see some mistakes please don't esitate to point them out!


Small update:

I'm currently working on the cross trees. 

I have remouved the single plastic eyebolt in front and the supports for the backstays. The instructions told to wrap the backstay around the cross tree arm but I prefere to create my own supports wit copper wire pressed. They shuold be a little bit better and they will allow me to lay the backstay in the proper way. 

I have also added all the eybolts needed and put all the corresponding bloks. Quite a bit of work but at least it was relaxing. 


Here you can see a work in progress:

 2019-11-27_06-15-03 by Marco, su Flickr


and here the final result with all the blocks installed and the paint job finished, seen from the deck:


 2019-11-27_06-15-24 by Marco, su Flickr


As you can see I also reworked the caps: originally I simulated the rolley on the stern side with an eyebolt but the more I looked at it the less I liked...

So I decided to try to recreate the rolley. 

They are on the fore and the main mast only, since they are there for the stays. I have made some traction test and they seems to be able to stay where thay are, time will tell the trouth :)

  • Member since
    May 2019
  • From: Northwest Indiana
Posted by ShellbackFC2 on Wednesday, November 27, 2019 12:46 PM

Really beautiful ship. This is one I hope to do someday when I have the skill and space. Looking forward to following along.

  • Member since
    June 2004
  • From: East Stroudsburg, PA
Posted by TigerII on Wednesday, November 27, 2019 10:05 PM

Hey Bruma, English might not be your native language, but you make up for it with your modelling skills. This is an extraordinary piece ship modelling. Especially of a ship from the days of wooden seafaring vessels. Great work. great model.

Achtung Panzer! Colonel General Heinz Guderian
  • Member since
    October 2019
Posted by Bruma on Sunday, December 1, 2019 5:42 PM

Thank you both, I really appreciate! 

Some updates and some troubles...

This evening I finished the topmast shrouds on the main mast. 

I was quite happy but I suddenly noticed an issue. 


Where are supposed to run the main lift lines?


They seem to interfere with the topmast shroud! In order to guarantee at least a small degree of freedom for swinging the yards they should pass trough the shrouds but this option seems to me a little bit strange...


Here a picture of the actual situation, with a temporary lift line and block to better understand what I'm talking about.

 2019-12-02_12-36-37 by Marco, su Flickr

Any help would be really appreciateted, right now I'm stuck with this dilemma... 


  • Member since
    December 2010
  • From: Salem, Oregon
Posted by 1943Mike on Tuesday, December 3, 2019 12:57 PM

Bruma,

I don't know the answer definitively but this section (bracketed in red) may give a partial answer to the dilemma you've encountered.

The text I'm posting is from Seamanship in the Age of Sail by John Harland.

Mike

"Le temps est un grand maître, mais malheureusement, il tue tous ses élèves."

Hector Berlioz

  • Member since
    October 2019
Posted by Bruma on Tuesday, December 3, 2019 5:59 PM

Thank you Mike for your dedication, that is a good catch! 
Still I don't understand: they know they will be in trouble, they say "unacceptable chafing" and they still go for it? 
This definitely ruin my image of perfection when I figure myself this wonderful ship :)
There should also be something mistaken in my build, because even if I move the eyebolt in the middle of the mast, where they are supposed to be, the lift line still interfere as you can see here... 

 2019-12-04_12-46-36 by Marco, su Flickr


AnywayI'm still working on the masts and in particular on the topmast shroud, here you see the fore and main completed:

 2019-12-04_12-08-48 by Marco, su Flickr

 2019-12-04_12-58-12 by Marco , su Flickr


It is the firs time I try to rig deadeye and they are pretty small up here, 3mm in diameter. 
All this preamble only to justify all the imperfection that you see...
still have to decide what to do with the last part of the lanyard. They should go down again in the inner side and seized, but at that scale and with my limited skills I tink it will be better to cut them just after the upper knot. 
Thank again to everyone who will participate in the discussion!  

  • Member since
    December 2010
  • From: Salem, Oregon
Posted by 1943Mike on Wednesday, December 4, 2019 12:25 PM

Bruma,

I should have commented on how impressive I think your build is. You're doing a fine job - way above my pay grade!

As to the chafing, other modelers with much more nautical knowledge than mine may chime in with their thoughts. I can only imagine that when sailors were working on the top they might have instructions to check the chafing on the lift and shroud. My guess is that the lift would be damaged at a greater rate than the shroud since, in my mind, the shroud is a thicker line but over the course of several trips one or both might have to have been replaced.

Mike

"Le temps est un grand maître, mais malheureusement, il tue tous ses élèves."

Hector Berlioz

  • Member since
    December 2012
Posted by rwiederrich on Thursday, December 5, 2019 8:38 AM

From what I gather, the lifts purchase blocks were relocated forward of the main mast to the doubling cap of the topgallant mast.  Still some images of the Ferriera(AKA)(when she was owned by the Portuguese), shows there were chafing ribbon on the lifts as they were probably in contact with the forward top shroud when the yard was in tack.  Wanting to keep things a s clean as possible....and since the rigging is numerous, I chose to run the lift between the first and second shrouds.  Among the vast array of rigging detail...it falls on blind eyes.

Your version is very impressive and I'm enjoying following along.

Rob

  • Member since
    October 2019
Posted by Bruma on Sunday, December 8, 2019 6:32 PM

Thank you both for your kind words about the model.

I really appreciate.

I build models for my own satisfaction and to better understand how this marvel works, but surely having someone that share the adventure and support the effort is an incredible boost! 

Now I think that it is al least dafe to say the the problem was presentm so I'm not so afraid to show the lifts bended by the shrouds, I think I will go in this direction, maybe moving the lift block a little bit ahead. 


Here's a small update:

 2019-12-09_01-20-00 by Marco, su Flickr


Top-gallant shrouds installed, topmast backstay, top-gallant backstory, top-gallant stay prepared. All on the mizzen mast.

I would like to do as much work as possible while the masts are still not glued.

I know, not a big update, but a lot of work and researches behind it.

I discovered, for instance, that the stay is the first to be placed (lower position on the mast), then on top the shrouds, and, above all, the backstay.

I still need to find out if the lifts are in between, on top or at the bottom of the stack.

Those lifts are upsetting me more than once...


  • Member since
    November 2005
  • From: Formerly Bryan, now Arlington, Texas
Posted by CapnMac82 on Sunday, December 8, 2019 8:58 PM

Bruma
main mast and the mizzen mast have a sort of railing on the stern side

Those are the "jackstays" that support the leach (forward leading edge) of the Spencer (mainmast) sail, and for the same edge of the Spanker (mzzen mast).

Both the Spencer and Spaanker on Cutty Sark has fixed gaffs (the uppermost spar supporting their sails), and the sals were stowed by Brailing them up to the gaf and jackstay and lashng them into a neat bundle.

The foot of the SPencer s made fast at the bottom of its jackstay.  The Spanker is made fast to its boom.

The Spencer was used to improve sailing performance gong to windward, the Spanke was used to assist n steering.

JOIN OUR COMMUNITY!

Our community is FREE to join. To participate you must either login or register for an account.

SEARCH FORUMS
FREE NEWSLETTER
By signing up you may also receive reader surveys and occasional special offers. We do not sell, rent or trade our email lists. View our Privacy Policy.