SEARCH FINESCALE.COM

Enter keywords or a search phrase below:

1/72 B-52D with Big Belly Mod, Operation Arc Light

248104 views
1059 replies
1 rating 2 rating 3 rating 4 rating 5 rating
  • Member since
    November 2009
  • From: SW Virginia
Posted by Gamera on Tuesday, February 26, 2013 7:42 AM

Russ: Wow, almost wish  you could display her upside down so viewers can check out all the detail you added in there! My A-20 barely came with a bomb bay at all, no detail so I glued the doors in the closed position. Love what you've done detailing the whole thing up!

Duke: Now that's an awesome collection of big bombers!!! Think I see the prows of a few ships and subs there too.  

"I dream in fire but work in clay." -Arthur Machen


  • Member since
    June 2003
  • From: Rowland Heights, California
Posted by Duke Maddog on Tuesday, February 26, 2013 11:47 AM

Thanks Gamera! I appreciate the compliments on my larger aircraft. Yes, I have quite a sizable 'navy' numbering approximately 370+ ships and over 625 small scale armor models, in addition to another 300 or so smaller aircraft that are sitting on shelves.

Buffirn, those were some awesome vids! I'd never seen B-52's take off before; that was a real treat! Thanks for posting those links!

  • Member since
    April 2012
  • From: USA
Posted by Striker8241 on Tuesday, February 26, 2013 12:11 PM

Gamera

Russ: Wow, almost wish  you could display her upside down so viewers can check out all the detail you added in there! My A-20 barely came with a bomb bay at all, no detail so I glued the doors in the closed position. Love what you've done detailing the whole thing up!

Duke: Now that's an awesome collection of big bombers!!! Think I see the prows of a few ships and subs there too.  


Thanks, Cliff! Big Smile

As a matter of fact, Dom is cutting a small mirror for me that will fit onto a utility trailer. I'm going to experiment with using it to place under the model to show underside detail. Not quite sure if it will be big enough to see much though.

Cheers,

Russ


  • Member since
    November 2009
  • From: SW Virginia
Posted by Gamera on Tuesday, February 26, 2013 1:10 PM

Duke: They're pretty cool, I wish I had room for large models but hanging them from the ceiling isn't really an option here.

Russ: I did see that but yeah, I'm not sure the mirror will show that much of the detail you've added. And turning such a large model over to show her off seems like a recipe for disaster.

"I dream in fire but work in clay." -Arthur Machen


  • Member since
    February 2010
  • From: Ontario, Canada
Posted by Bockscar on Tuesday, February 26, 2013 4:15 PM

Hi Guys,

Yeah, Russ does have a ton of detail under that Old Crow, and even a small mirror would help a bit.

One suggestion Russ, seeing as how the mirror is an innovation, does it make sense to

think of building a bigger trailer, one that doesn't necessarily represent a piece of real equipment?

I have a mirror that's about 1.25" by 2" and it is pretty good for viewing something like that,

yes, I tried it out. A bit of 'window dressing' just so it doesn't mess with the diorama would

allow a decent sized view.

Just a thought.

Dom

  • Member since
    April 2012
  • From: USA
Posted by Striker8241 on Tuesday, February 26, 2013 6:58 PM

Hey, Dom,

I do have a trailer that is 1.3 in. W x 1.75 in. L (33.0 mm x 44.5 mm). If you can trim the mirror to 1.6 in. in length, I could use that. I don't want something that looks obviously out of place in the diorama. Otherwise, I could use the full-size mirror and mount it at an angle on the end of a handle, or just purchase an inspection mirror with an extendable handle.

Russ


  • Member since
    February 2010
  • From: Ontario, Canada
Posted by Bockscar on Tuesday, February 26, 2013 7:11 PM

Nice badge Russ!Stick out tongue

I'm gonna miss your grin....Big Smile

Yeah, I can do that, that's a good size reflection and still obscure. That would be an idea for a placed reflection in your diorama, under the bomb bay to see all the baby crater eggs.....Whistling

i.e. you wouldn't want strangers walking up and moving it around.....ahem.....

Having an inspection mirror handy for a judge is a good idea, wouldn't want some klutzClown

smacking off those antennas.

Dom

  • Member since
    April 2012
  • From: USA
Posted by Striker8241 on Wednesday, February 27, 2013 5:46 AM

Thanks, Dom!  Lol, don't worry - the crow is grinning too Big Smile. Frankly, I kinda like the old avatar better too. I might put it back and maybe move the crow patch down to the bottom if I can figure out how. Ken told me once but I've lost track of the post - along with my car keys...


Moved from Page 2 and updated 8/3/19 from my notes.


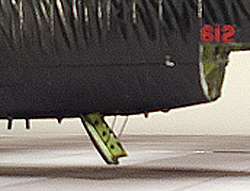
Adding Steps to the Main Hatch

The steps on the kit main hatch are only represented by slightly raised lines while the actual hatch steps were substantially deeper.

1.) Carefully remove the step outline on the hatch, as shown below. Then fill and sand the mold marks.

2.) From 0.5 mm thick styrene or equivalent stock, cut out two side pieces 3.5 mm x 19 mm.

3.) As shown in the diagram below, trim the top and bottom edges with an angled offset of 1.5 mm.

4.) Starting from the bottom of each side piece, locate 3 hole centers as indicated in the diagram and drill a 0.5 mm dia. hole at each.

5.) From 0.5 mm stock, cut 4 each step pieces 3.5 mm x 7.25 mm.

6.) Glue the two side pieces in place on the hatch cover.

7.) Glue each step piece in place.

8.) From 0.5 mm stock, cut out 3 ea step guards 1 mm x 8 mm.

9.) Glue the step guards in place as shown to the top three steps only. Bevel the the top edges of the guards with sandpaper.


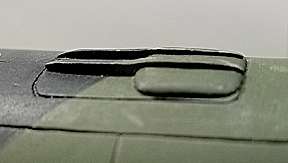
Also missing from the kit hatch cover is the hatch lifter detail. The hatch lifters were part of the seat ejection system. When the ejection sequence was initiated, the front end of the hatch lifter was forced up into the air stream, creating a heavy drag that helped pull the top hatch clear before the ejection seat fired.

The hatch lifter "scoop" shape was created with a piece of 1 mm thick styrene 11 mm x 13 mm, sanded to shape.The reinforcing ribs were made from 1.5 mm strip sanded to shape per the photos below.

My main hatch lifter "scoop" (shown in the first photo below) is not quite the correct shape, as I discovered later. The front part should be more squarish at the corners, as shown in the second and third photos of the EWO hatch.


Finally, if you've gone this far, you will probably want to add the hatch lifting cables, as shown below. I made mine from 0.3 mm round stock (Plastruct #90709) painted black.
 

Cheers,

Russ


  • Member since
    June 2003
  • From: Rowland Heights, California
Posted by Duke Maddog on Wednesday, February 27, 2013 12:30 PM

Striker8241

Gamera

Russ: Wow, almost wish  you could display her upside down so viewers can check out all the detail you added in there! My A-20 barely came with a bomb bay at all, no detail so I glued the doors in the closed position. Love what you've done detailing the whole thing up!

Duke: Now that's an awesome collection of big bombers!!! Think I see the prows of a few ships and subs there too.  

Thanks, Cliff! Big Smile

As a matter of fact, Dom is cutting a small mirror for me that will fit onto a utility trailer. I'm going to experiment with using it to place under the model to show underside detail. Not quite sure if it will be big enough to see much though.

Cheers,

Russ 

I think that is a brilliant idea! I do hope you can make it work. I want to see pics when it is ready.

  • Member since
    July 2004
  • From: Sonora Desert
Posted by stikpusher on Wednesday, February 27, 2013 12:57 PM

Striker8241


That looks superb! The stressed skin effect is fabulous!


F is for FIRE, That burns down the whole town!

U is for URANIUM... BOMBS!

N is for NO SURVIVORS...

       - Plankton

LSM


  • Member since
    February 2010
  • From: Ontario, Canada
Posted by Bockscar on Wednesday, February 27, 2013 3:13 PM

Buffirn

Here are some goof MITO videos

http://www.youtube.com/watch?v=gNxmorJtq_8

http://www.youtube.com/watch?v=Cq6Hpxyrhyo


Turn up the sound and enjoy!

Jim

In the first one, you can really see the low pressure generated by the wings - humid day.

This weekend I'm going to time those Crows myself.....lol

Thanks Jim, great videos.

Dom

  • Member since
    February 2010
  • From: Ontario, Canada
Posted by Bockscar on Wednesday, February 27, 2013 3:18 PM

Duke Maddog

Thanks Gamera! I appreciate the compliments on my larger aircraft. Yes, I have quite a sizable 'navy' numbering approximately 370+ ships and over 625 small scale armor models, in addition to another 300 or so smaller aircraft that are sitting on shelves.

Buffirn, those were some awesome vids! I'd never seen B-52's take off before; that was a real treat! Thanks for posting those links!

Duke:

Just about the most impressive number of built kits I've ever heard of, anywhere.

Where'd you find the time?Yes

I need a new house.

Dom

  • Member since
    February 2010
  • From: Ontario, Canada
Posted by Bockscar on Wednesday, February 27, 2013 3:24 PM

Russ:

I think you do deserve your own badge for this build, of course you'll be the only guy on the threads

to display it....lol

If you have any ideas, let me know, we might be able to klooge something up. Maybe something like a big crow carrying a clip of those crater eggs.

Dom

  • Member since
    April 2012
  • From: USA
Posted by Striker8241 on Wednesday, February 27, 2013 6:03 PM

Duke Maddog

I think that is a brilliant idea! I do hope you can make it work. I want to see pics when it is ready.

Thanks, Duke!  I'll sure do that.

Russ


  • Member since
    April 2012
  • From: USA
Posted by Striker8241 on Wednesday, February 27, 2013 6:10 PM

stikpusher


That looks superb! The stressed skin effect is fabulous!


Thanks, Stikpusher! Big Smile


  • Member since
    April 2012
  • From: USA
Posted by Striker8241 on Wednesday, February 27, 2013 6:22 PM

Lol! Thanks, Dom Big Smile  However, there's no need for it to be my badge. If you come up with a badge  like that, that would be totally awesome! It would sure come in handy if there's a B-52 group build someday.

Russ


  • Member since
    February 2010
  • From: Ontario, Canada
Posted by Bockscar on Wednesday, February 27, 2013 6:49 PM

Well, Russ;

Rich and I were thinking about it, so we would have to give you one

for inspirational support.

I'll page him and see if he's still on board for that. Now is a good time to

put out a feeler for the OFFICIAL BIG UGLY FAT FELLER GROUP BUILD.Stick out tongue

Dom

  • Member since
    February 2010
  • From: Ontario, Canada
Posted by Bockscar on Wednesday, February 27, 2013 8:41 PM

Late Breaking news;

The scribers arrived. The diamond one is light plastic, and

you almost cannot see the tiny industrial diamond embedded

in the point.

The tungsten carbide scratcher is different; a solid stainless

steel body, and a TC point on it that, if projected at the right

velocity, could penetrate a Tiger Tank's front glacis. Yikes,

sharp as a needle, if you drop it, it'll nail your foot to the floor!...lol

I am now in the glass cutting business.

Dom

  • Member since
    April 2012
  • From: USA
Posted by Striker8241 on Wednesday, February 27, 2013 8:50 PM

Nice, Dom! If you can, post some pictures of how you are doing this. I'd like to see those scribers.

Russ


  • Member since
    June 2003
  • From: Rowland Heights, California
Posted by Duke Maddog on Thursday, February 28, 2013 11:55 AM

Bockscar

Duke Maddog

Thanks Gamera! I appreciate the compliments on my larger aircraft. Yes, I have quite a sizable 'navy' numbering approximately 370+ ships and over 625 small scale armor models, in addition to another 300 or so smaller aircraft that are sitting on shelves.

Buffirn, those were some awesome vids! I'd never seen B-52's take off before; that was a real treat! Thanks for posting those links!

Duke:

Just about the most impressive number of built kits I've ever heard of, anywhere.

Where'd you find the time?Yes

I need a new house.

Dom

Thanks Dom! I find the time wherever I can. Frankly, I need a new house as well!

Striker8241

Lol! Thanks, Dom Big Smile  However, there's no need for it to be my badge. If you come up with a badge  like that, that would be totally awesome! It would sure come in handy if there's a B-52 group build someday.

Russ

Now I'd join that. I have a couple more of these big birds to build; one I was hoping to do in natural metal finish. Of course, mine won't be nearly as good as this spectacular BUFF.

  • Member since
    April 2012
  • From: USA
Posted by Striker8241 on Thursday, February 28, 2013 5:32 PM

Hi, All,

The first image below shows an MJ-1 ("jammer")  taking a 750 lb bomb off the bomb truck. There were usually two jammers working together to load bombs. While one held a bomb to be attached to a pylon, the other was picking up a bomb from the bomb truck.

Photo by David Buris


Note that there are two extenders - one short and the other long - bolted together and attached to the load table. These extenders were necessary in order to lift a bomb high enough to reach the pylon attachments on the B-52, and also to load bombs directly onto the clips in the bomb bay or at the munitions facility.

The second image shows the two extender assemblies I built for my jammers. Unfortunately, I can't assemble my jammers yet until I'm certain what height the jammer tables will need to be in the diorama.

 Later, as an ECM tech on fighter aircraft, I was required to become proficient in using the jammer as we often had to load and download ECM pods.

If you look closely at the bomb in the first picture, you'll see a wire running from the nose to the tail. This is an arming safety wire. These wires were threaded through the propellers of the fuses to prevent them from turning until the bombs were dropped. There was a fuse in the nose of the bomb and one near the tail fins - you can just see the one in the picture on top of the tail fin. The fuses were designed to arm themselves after the propellers spun a set number of revolutions. When the bombs dropped, the safety wires were pulled out and the propellers turned until the bombs armed.

Ya'll excuse me if I got a bit too wordy here.

Cheers,

Russ 

Tags: B-52 , jammer , MJ-1


  • Member since
    February 2010
  • From: Ontario, Canada
Posted by Bockscar on Thursday, February 28, 2013 6:13 PM

Striker8241

Nice, Dom! If you can, post some pictures of how you are doing this. I'd like to see those scribers.

Russ

Hey Russ, to save a bit of time I pulled the link,

http://www.micromark.com/diamond-tip-scriber,6472.html

I got both items. I'll do the work on the weekend, and send the photos.

Dom

  • Member since
    November 2010
  • From: Lafayette, Indiana
Posted by Son Of Medicine Man on Thursday, February 28, 2013 6:29 PM

Great work there once again Russ!  Yes  Yes  They look identical to me.

Ken

  • Member since
    April 2012
  • From: USA
Posted by Striker8241 on Thursday, February 28, 2013 7:09 PM

Hi, Ken,

Thanks for the good words! Those extenders got built because I'm painting the top of the fuselage and the wings are done for the moment so I don't really have anything to work on Big Smile.

Russ


  • Member since
    February 2010
  • From: Ontario, Canada
Posted by Bockscar on Thursday, February 28, 2013 7:54 PM

Duke Maddog

Bockscar

Duke Maddog

Thanks Gamera! I appreciate the compliments on my larger aircraft. Yes, I have quite a sizable 'navy' numbering approximately 370+ ships and over 625 small scale armor models, in addition to another 300 or so smaller aircraft that are sitting on shelves.

Buffirn, those were some awesome vids! I'd never seen B-52's take off before; that was a real treat! Thanks for posting those links!

Duke:

Just about the most impressive number of built kits I've ever heard of, anywhere.

Where'd you find the time?Yes

I need a new house.

Dom

Thanks Dom! I find the time wherever I can. Frankly, I need a new house as well!

Striker8241

Lol! Thanks, Dom Big Smile  However, there's no need for it to be my badge. If you come up with a badge  like that, that would be totally awesome! It would sure come in handy if there's a B-52 group build someday.

Russ

Now I'd join that. I have a couple more of these big birds to build; one I was hoping to do in natural metal finish. Of course, mine won't be nearly as good as this spectacular BUFF.

Duke,

I've got a G by AMT, but was thinking to go smaller. I was hoping to try for one of the re-issued Revell kits

from the 50's, that's about all the room I have right now. I'ld love to follow in Russ' footsteps, but those are big shoes to fill right now, ahem.

There are a couple of the B-52.X-15 combos out there right now, and I've always loved that theme.

It's definitely one to hang from the ceiling, so maybe I could do that.

I'll keep you posted. We were thinking of giving Russ some breathing space, and spring is here in three weeks, so we'll work on the feeler a bit more and keep you posted.

Dom

I think Rich is warming to the idea.

  • Member since
    February 2010
  • From: Ontario, Canada
Posted by Bockscar on Thursday, February 28, 2013 8:00 PM

Striker8241

Hi, All,

The first image below shows an MJ-1 ("jammer")  taking a 750 lb bomb off the bomb truck. There were usually two jammers working together to load bombs. While one held a bomb to be attached to a pylon, the other was picking up a bomb from the bomb truck.

Photo by David Buris

Note that there are two extenders - one short and the other long - bolted together and attached to the load table. These extenders were necessary in order to lift a bomb high enough to reach the pylon attachments on the B-52, and also to load bombs directly onto the clips in the bomb bay or at the munitions facility. The second image shows the two extender assemblies I built for my jammers. Unfortunately, I can't assemble my jammers yet until I'm certain what height the jammer tables will need to be in the diorama.

 Later, as an ECM tech on fighter aircraft, I was required to become proficient in using the jammer as we often had to load and download ECM pods.

If you look closely at the bomb in the first picture, you'll see a wire running from the nose to the tail. This is an arming safety wire. These wires were threaded through the propellers of the fuses to prevent them from turning until the bombs were dropped. There was a fuse in the nose of the bomb and one near the tail fins - you can just see the one in the picture on top of the tail fin. The fuses were designed to arm themselves after the propellers spun a set number of revolutions. When the bombs dropped, the safety wires were pulled out and the propellers turned until the bombs armed.

Ya'll excuse me if I got a bit too wordy here.

Cheers,

Russ 

No Russ, not too wordy at all, that's my department! Whistling

Nice to know what we are looking at. Those black cables hanging behind the guy with his shoe up, is that some kind of saety or arming divice as well, and are those the chaff dispensers?

Dom

  • Member since
    April 2012
  • From: USA
Posted by Striker8241 on Thursday, February 28, 2013 8:16 PM

Thanks, Dom Smile  

Those are actually red safety streamers that are attached to plugs made to fit in the chaff ports (the streamers look black because they're in the shade). The plugs were designed to keep out rain and dirt from the dispensers. They would be removed before takeoff, like anything else with a red streamer.

Not many folks had the plugs so you will often see aluminum foil taped over the ports. The foil didn't need to be removed before flight like the plugs - the chaff packages just went right through it.

Cheers,

Russ


  • Member since
    April 2012
  • From: USA
Posted by Striker8241 on Thursday, February 28, 2013 8:23 PM

Bockscar

I'll keep you posted. We were thinking of giving Russ some breathing space, and spring is here in three weeks, so we'll work on the feeler a bit more and keep you posted.

Dom

I think Rich is warming to the idea.

Breathing space?? I live in Florida - plenty of space here Big Smile.  


  • Member since
    June 2003
  • From: Rowland Heights, California
Posted by Duke Maddog on Friday, March 1, 2013 9:54 AM

Rich, awesome info there; it wasn't too wordy at all. I learned something today. Nice job on the extenders. They do look very accurate and equal in quality.

Dom, sounds good. I'll try to keep my eyes peeled for that.

  • Member since
    April 2012
  • From: USA
Posted by Striker8241 on Friday, March 1, 2013 10:13 AM

Thanks, Duke! I appreciate the good words Big Smile

Russ


JOIN OUR COMMUNITY!

Our community is FREE to join. To participate you must either login or register for an account.

SEARCH FORUMS
FREE NEWSLETTER
By signing up you may also receive reader surveys and occasional special offers. We do not sell, rent or trade our email lists. View our Privacy Policy.