SEARCH FINESCALE.COM

Enter keywords or a search phrase below:

1/72 B-52D with Big Belly Mod, Operation Arc Light

248519 views
1059 replies
1 rating 2 rating 3 rating 4 rating 5 rating
  • Member since
    June 2003
  • From: Rowland Heights, California
Posted by Duke Maddog on Wednesday, February 27, 2013 12:30 PM

Striker8241

Gamera

Russ: Wow, almost wish  you could display her upside down so viewers can check out all the detail you added in there! My A-20 barely came with a bomb bay at all, no detail so I glued the doors in the closed position. Love what you've done detailing the whole thing up!

Duke: Now that's an awesome collection of big bombers!!! Think I see the prows of a few ships and subs there too.  

Thanks, Cliff! Big Smile

As a matter of fact, Dom is cutting a small mirror for me that will fit onto a utility trailer. I'm going to experiment with using it to place under the model to show underside detail. Not quite sure if it will be big enough to see much though.

Cheers,

Russ 

I think that is a brilliant idea! I do hope you can make it work. I want to see pics when it is ready.

  • Member since
    April 2012
  • From: USA
Posted by Striker8241 on Wednesday, February 27, 2013 5:46 AM

Thanks, Dom!  Lol, don't worry - the crow is grinning too Big Smile. Frankly, I kinda like the old avatar better too. I might put it back and maybe move the crow patch down to the bottom if I can figure out how. Ken told me once but I've lost track of the post - along with my car keys...


Moved from Page 2 and updated 8/3/19 from my notes.


Adding Steps to the Main Hatch

The steps on the kit main hatch are only represented by slightly raised lines while the actual hatch steps were substantially deeper.

1.) Carefully remove the step outline on the hatch, as shown below. Then fill and sand the mold marks.

2.) From 0.5 mm thick styrene or equivalent stock, cut out two side pieces 3.5 mm x 19 mm.

3.) As shown in the diagram below, trim the top and bottom edges with an angled offset of 1.5 mm.

4.) Starting from the bottom of each side piece, locate 3 hole centers as indicated in the diagram and drill a 0.5 mm dia. hole at each.

5.) From 0.5 mm stock, cut 4 each step pieces 3.5 mm x 7.25 mm.

6.) Glue the two side pieces in place on the hatch cover.

7.) Glue each step piece in place.

8.) From 0.5 mm stock, cut out 3 ea step guards 1 mm x 8 mm.

9.) Glue the step guards in place as shown to the top three steps only. Bevel the the top edges of the guards with sandpaper.


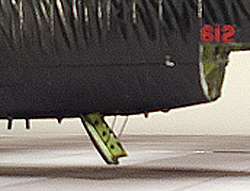
Also missing from the kit hatch cover is the hatch lifter detail. The hatch lifters were part of the seat ejection system. When the ejection sequence was initiated, the front end of the hatch lifter was forced up into the air stream, creating a heavy drag that helped pull the top hatch clear before the ejection seat fired.

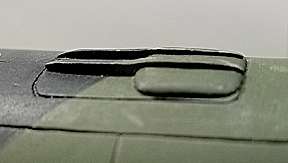
The hatch lifter "scoop" shape was created with a piece of 1 mm thick styrene 11 mm x 13 mm, sanded to shape.The reinforcing ribs were made from 1.5 mm strip sanded to shape per the photos below.

My main hatch lifter "scoop" (shown in the first photo below) is not quite the correct shape, as I discovered later. The front part should be more squarish at the corners, as shown in the second and third photos of the EWO hatch.


Finally, if you've gone this far, you will probably want to add the hatch lifting cables, as shown below. I made mine from 0.3 mm round stock (Plastruct #90709) painted black.


Cheers,

Russ


  • Member since
    February 2010
  • From: Ontario, Canada
Posted by Bockscar on Tuesday, February 26, 2013 7:11 PM

Nice badge Russ!Stick out tongue

I'm gonna miss your grin....Big Smile

Yeah, I can do that, that's a good size reflection and still obscure. That would be an idea for a placed reflection in your diorama, under the bomb bay to see all the baby crater eggs.....Whistling

i.e. you wouldn't want strangers walking up and moving it around.....ahem.....

Having an inspection mirror handy for a judge is a good idea, wouldn't want some klutzClown

smacking off those antennas.

Dom

  • Member since
    April 2012
  • From: USA
Posted by Striker8241 on Tuesday, February 26, 2013 6:58 PM

Hey, Dom,

I do have a trailer that is 1.3 in. W x 1.75 in. L (33.0 mm x 44.5 mm). If you can trim the mirror to 1.6 in. in length, I could use that. I don't want something that looks obviously out of place in the diorama. Otherwise, I could use the full-size mirror and mount it at an angle on the end of a handle, or just purchase an inspection mirror with an extendable handle.

Russ


  • Member since
    February 2010
  • From: Ontario, Canada
Posted by Bockscar on Tuesday, February 26, 2013 4:15 PM

Hi Guys,

Yeah, Russ does have a ton of detail under that Old Crow, and even a small mirror would help a bit.

One suggestion Russ, seeing as how the mirror is an innovation, does it make sense to

think of building a bigger trailer, one that doesn't necessarily represent a piece of real equipment?

I have a mirror that's about 1.25" by 2" and it is pretty good for viewing something like that,

yes, I tried it out. A bit of 'window dressing' just so it doesn't mess with the diorama would

allow a decent sized view.

Just a thought.

Dom

  • Member since
    November 2009
  • From: SW Virginia
Posted by Gamera on Tuesday, February 26, 2013 1:10 PM

Duke: They're pretty cool, I wish I had room for large models but hanging them from the ceiling isn't really an option here.

Russ: I did see that but yeah, I'm not sure the mirror will show that much of the detail you've added. And turning such a large model over to show her off seems like a recipe for disaster.

"I dream in fire but work in clay." -Arthur Machen


  • Member since
    April 2012
  • From: USA
Posted by Striker8241 on Tuesday, February 26, 2013 12:11 PM

Gamera

Russ: Wow, almost wish  you could display her upside down so viewers can check out all the detail you added in there! My A-20 barely came with a bomb bay at all, no detail so I glued the doors in the closed position. Love what you've done detailing the whole thing up!

Duke: Now that's an awesome collection of big bombers!!! Think I see the prows of a few ships and subs there too.  


Thanks, Cliff! Big Smile

As a matter of fact, Dom is cutting a small mirror for me that will fit onto a utility trailer. I'm going to experiment with using it to place under the model to show underside detail. Not quite sure if it will be big enough to see much though.

Cheers,

Russ


  • Member since
    June 2003
  • From: Rowland Heights, California
Posted by Duke Maddog on Tuesday, February 26, 2013 11:47 AM

Thanks Gamera! I appreciate the compliments on my larger aircraft. Yes, I have quite a sizable 'navy' numbering approximately 370+ ships and over 625 small scale armor models, in addition to another 300 or so smaller aircraft that are sitting on shelves.

Buffirn, those were some awesome vids! I'd never seen B-52's take off before; that was a real treat! Thanks for posting those links!

  • Member since
    November 2009
  • From: SW Virginia
Posted by Gamera on Tuesday, February 26, 2013 7:42 AM

Russ: Wow, almost wish  you could display her upside down so viewers can check out all the detail you added in there! My A-20 barely came with a bomb bay at all, no detail so I glued the doors in the closed position. Love what you've done detailing the whole thing up!

Duke: Now that's an awesome collection of big bombers!!! Think I see the prows of a few ships and subs there too.  

"I dream in fire but work in clay." -Arthur Machen


  • Member since
    November 2010
  • From: Lafayette, Indiana
Posted by Son Of Medicine Man on Tuesday, February 26, 2013 6:01 AM

Buffirn

Here are some goof MITO videos

http://www.youtube.com/watch?v=gNxmorJtq_8

http://www.youtube.com/watch?v=Cq6Hpxyrhyo


Turn up the sound and enjoy!

Jim

That was just way too cool!!  Cool  Thank you for sharing that!

Ken

  • Member since
    April 2012
  • From: USA
Posted by Striker8241 on Tuesday, February 26, 2013 5:58 AM

Wow! Brings back memories. Two things you can't feel from the video are the rumbling through the ground and the shock waves through the air. Altogether, an awesome experience! Thanks, Jim!

Russ


  • Member since
    March 2009
  • From: Middletown, OH
Posted by Buffirn on Tuesday, February 26, 2013 5:47 AM

Here are some goof MITO videos

http://www.youtube.com/watch?v=gNxmorJtq_8

http://www.youtube.com/watch?v=Cq6Hpxyrhyo


Turn up the sound and enjoy!

Jim

Jim Williams


  • Member since
    April 2012
  • From: USA
Posted by Striker8241 on Sunday, February 24, 2013 5:59 PM

Big Smile Beer


  • Member since
    March 2009
  • From: Middletown, OH
Posted by Buffirn on Sunday, February 24, 2013 5:05 PM

Good to see the Old Crow again!

Jim Williams


  • Member since
    April 2012
  • From: USA
Posted by Striker8241 on Sunday, February 24, 2013 12:38 PM

Thanks for the compliments, Ken!  And you're always welcome to use anything of mine you find worthwhile. Big Smile

Russ


  • Member since
    November 2010
  • From: Lafayette, Indiana
Posted by Son Of Medicine Man on Sunday, February 24, 2013 11:14 AM

What a cool idea Russ!  That is neat!  I like it!  I am going to make note of that idea and if you don't mind, copy it.  (I will still give you the credit of coarse!)

I see you changed your avatar.  I like it!  Very cool!

Ken

  • Member since
    April 2012
  • From: USA
Posted by Striker8241 on Saturday, February 23, 2013 9:54 AM

Hi, All,

Once I got my main gear doors installed, I realized the landing lights I added just weren't making it. They consisted of a circular piece of styrene painted silver, but they lacked the depth and "life" of a real lens.

So I bought some rhinestones, drilled shallow holes in the gear doors, and glued them in. That adds some sparkle and depth instead of just a flat color.

For larger scales, you may want to add a clear lens cover. I tried it but at 1/72 scale, the lens only dulls the sparkle and ruins the effect.

Cheers,

Russ


  • Member since
    April 2012
  • From: USA
Posted by Striker8241 on Saturday, February 23, 2013 9:43 AM

Thanks, Ken! Big Smile

Russ


  • Member since
    November 2010
  • From: Lafayette, Indiana
Posted by Son Of Medicine Man on Saturday, February 23, 2013 9:27 AM

Wow Russ, you just keep doing great work on this BUFF!  That looks fantastic!  Yes  Yes 

Ken

  • Member since
    April 2012
  • From: USA
Posted by Striker8241 on Friday, February 22, 2013 9:21 AM

Hi, All,

I scratched another itch last night...  I went ahead and installed the bomb bay doors and door locks.

Updated 8/6/19

The door locks should be painted yellow, instead of olive drab. The color shifts in the pictures I had made them look olive drab and that's the color I painted them in the original photo below. Later,  I painted them yellow Big Smile.

Cheers,

Russ


Tags: bomb bay , B-52


  • Member since
    June 2003
  • From: Rowland Heights, California
Posted by Duke Maddog on Friday, February 22, 2013 9:05 AM

Striker8241

Duke, are you logged in? If you're not logged in, the edit button is not there.

Russ

I guess I wasn't logged in. I now see the "edit" button. Thanks. Now back to our regularly scheduled programming....Wink Big Smile

  • Member since
    March 2009
  • From: Middletown, OH
Posted by Buffirn on Thursday, February 21, 2013 2:43 PM

I started as a Nav then upgraded to Radar Nav (bombardier) and finished my time as an Insturctor Radar Nav.  Hence BUFFIRN.

I have all kinds of stories.  Many involving digusting bodily functions.  BUFFs had a way of bringing that out.

Jim

Jim Williams


  • Member since
    April 2012
  • From: USA
Posted by Striker8241 on Thursday, February 21, 2013 12:54 PM

Great stories, Jim! Thanks for sharing. BTW, did you guys switch roles or were you dedicated as bombadier and navigator?

Russ


  • Member since
    April 2012
  • From: USA
Posted by Striker8241 on Thursday, February 21, 2013 12:34 PM

Duke, are you logged in? If you're not logged in, the edit button is not there.

Russ


  • Member since
    June 2003
  • From: Rowland Heights, California
Posted by Duke Maddog on Thursday, February 21, 2013 12:13 PM

Striker8241

Duke Maddog

AMT did bring out a G model BUFF. I have it hanging on my ceiling already next to my -D model BUFF:

Thanks, Duke. Wow! That is some collection you have!

Russ

Bockscar

Niiiiice......lol......verrrry, very niiiiiice..........

One day my entire home will look like that....I wish....

Thanks for sharing Duke!YesYesYes

Dom

Thanks Russ and Dom! That is one small corner of my hobby room. I have another 60 planes or so hanging in the rest of the room; I'm running out of space for more. I won't post the rest as I don't want to derail this awesome Thread.

Jim, that is awesome hearing these great stories. I've always wanted to hear some of the experiences of BUFF gunners in combat but the stories are few and far between. I'd heard several gunners got MiGs in Vietnam, but never got to hear the details.

Oh, and when I mentioned that I wanted to add my second post, I tried to re-open my original post with the pic and add the text of the second one I did, but there was no "Edit Post" button, even in Rich Formatting mode. Oh well, what's done is done.

I'm looking forward to seeing more!

  • Member since
    February 2013
Posted by Astrogopher1 on Wednesday, February 20, 2013 10:17 PM

Jim, I love your avitar.  MITO's were a always a blessing and joy to watch for the ground crew.  Keep up the good work you'all

  • Member since
    February 2013
Posted by Astrogopher1 on Wednesday, February 20, 2013 10:10 PM

Thanks Russ, I will look into it. I really love what you are doing. I spent much time out at the Arc Light Memorial while I was on Guam. The B52 was and is a tough old bird. I am gratefull and pleased to have worked with only a few of the men who flew her. Even if if it was the guys who would have had to eject downward on a low level mission.  Always made my job of aligning that pain in the butt radar  much more carefull.

  • Member since
    February 2010
  • From: Ontario, Canada
Posted by Bockscar on Wednesday, February 20, 2013 9:36 PM

Buffirn

A really goog Gunner was an expert in telling the pilots the right time to break right or left to bring a fighter into the gun box(the effective volume of the gun).  There was the always popular "suck him in" maneuver.  With the fighter in tail chase just outside the gun box, the Gunner would make the call and the pilots would pull the trhottles back to idle and throw up the airbrakes.  That dropped a fair amount of airspeed very quickly thus sucking the fighter into the gun box.  

We didn't always win, but neither did the fighters.  Young, inexperienced fighter jocks were the most fun to mess with.  I know more than a few that had their egos deflated by a big old lumbering BUFF.  In the end, it was great training for both sides.

Jim

Jim:

Great info Jim, great. Yeah, I would love to see the faces on some of those yungin's.....

Jim, how did you come by such up close and personal details, fascinating stuff. You were a weapons officer?

Dom

  • Member since
    February 2010
  • From: Ontario, Canada
Posted by Bockscar on Wednesday, February 20, 2013 9:31 PM

Duke Maddog

AMT did bring out a G model BUFF. I have it hanging on my ceiling already next to my -D model BUFF:

ooooooooooooh!

Niiiiice......lol......verrrry, very niiiiiice..........

One day my entire home will look like that....I wish....

Thanks for sharing Duke!YesYesYes

Dom

  • Member since
    April 2012
  • From: USA
Posted by Striker8241 on Wednesday, February 20, 2013 3:33 PM

Duke Maddog

Also, great job on those gear doors Styker! I've been following this Thread diligently, I love what I see!

I tried to add this to my previous post, but there's no obvious "Edit" button for me to do so.

Many thanks for the compliments, Duke, and for keeping an eye on the build.

When you said you tried to add this, did you mean quote it? To do that, you have to click on the "Reply" button to display the "Use rich formatting" option  then click on "Quote." That puts the quotable text in HTML brackets. Then you just add your reply after the brackets.

Not sure if this is what you were referring to, but if not, my apologies - I wasn't intending to tell you something you already know Smile.

Thanks again for stopping by,

Russ


JOIN OUR COMMUNITY!

Our community is FREE to join. To participate you must either login or register for an account.

SEARCH FORUMS
FREE NEWSLETTER
By signing up you may also receive reader surveys and occasional special offers. We do not sell, rent or trade our email lists. View our Privacy Policy.