SEARCH FINESCALE.COM

Enter keywords or a search phrase below:

B-36 Peacemaker Group Build

172092 views
818 replies
1 rating 2 rating 3 rating 4 rating 5 rating
  • Member since
    March 2007
  • From: Carmel, CA
Posted by bondoman on Friday, April 27, 2012 1:41 AM

lajntx


 bondoman:


It's been wargamed and we win because the B-36 stack is escorted by P-80 fighters out of Britain who in concert with Gloster Meteors out of France put a combined lid over Luftwaffe airfields (Meteor) and fight anything in the air. 


There's a subject. Eighth Air Force P-80!!


Ok, I`m confused here.

The B-36 only makes frontline service in WWII *IF* either of the following conditions became realities:

1. England is knocked out of the war

2. The B-29/B-32 fail to materialise and the Japs put up a much stronger defense in the Pacific .

In that scenario you have a bomber flying from the USA to bomb Germany escorted by fighers flying out of England & France from fields that would have had to have been overrun by Germany to begin with in order for the B-36 to be flying to bomb Germany. Even with an operational B-36 and fighter to launch from England and France, B-17`s, B-24`s B-25`s,  & B-26`s launched from those same areas would have done just as an effective of a job freeing up those 36`s to fight in the Pacific where they would have been needed the most because that would have meant the B-29 either was a lame duck or the war was going very badly there in order to have made the 36 a relatity.

Just saying Wink

It was a top down design. Potentially it could defend itself. Also the long range fighter concept was not yet reality. And the B-29 was not up to the mission.

  • Member since
    February 2011
  • From: Bent River, IA
Posted by Reasoned on Sunday, April 29, 2012 10:19 PM

The pain just keeps on coming! Black Eye  Remember when I thought no biggie with the upsidedown wing spar?  Well... it was a BIGGIE! Bang Head the way the wing is constructed to fit w/spar is such that it causes the fuselage to stick about an 1/8" above the wing surface.  The wing roots are a complete mess, tried latex caulk on port side, not sure what to do on the starboard but am open to suggestions.


An idea how big this sucker is.

Science is the pursiut of knowledge, faith is the pursuit of wisdom.  Peace be with you.

On the Tarmac: 1/48 Revell P-38

In the Hanger: A bunch of kits

  • Member since
    September 2011
  • From: North Texas
Posted by lajntx on Sunday, April 29, 2012 10:35 PM

Only thing I can think of is either take your Xacto knife and whittle that spar down to get the fit you want, or pry that fuselage apart and redo it the right way. Since you already have mounted the nose & tail guns I`d say the chances of breaking them are about 100% if you try taking anything apart. Better get to whittling and whistling up a good tune to kill the time as you do that. Whistling

B-36 Peacemaker Builds 

On the Bench: B-36 paint test  fusealge & RB-36E assembly test build

In Que: YB-36 Conversion Build & B-36 carries B-58 Airframe to Wright Patterson

Conceptual Planning: RB-36 X-15 Mothership

  • Member since
    May 2009
  • From: Riverton, Wyoming
Posted by Andrew Magoo on Sunday, April 29, 2012 10:38 PM

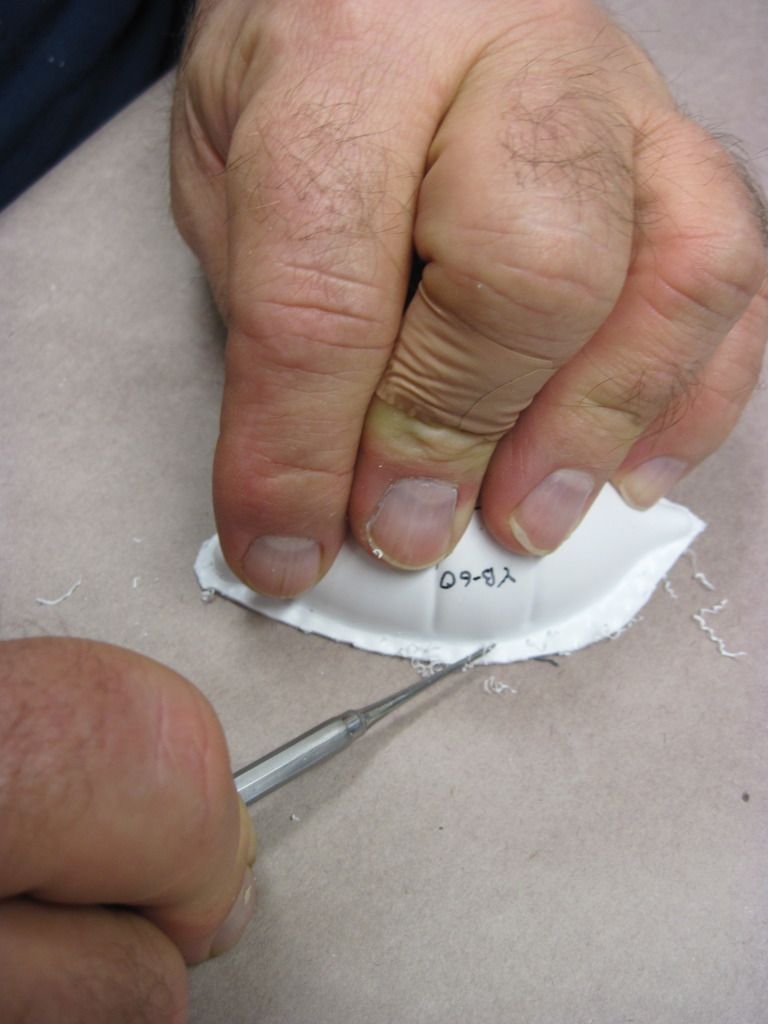
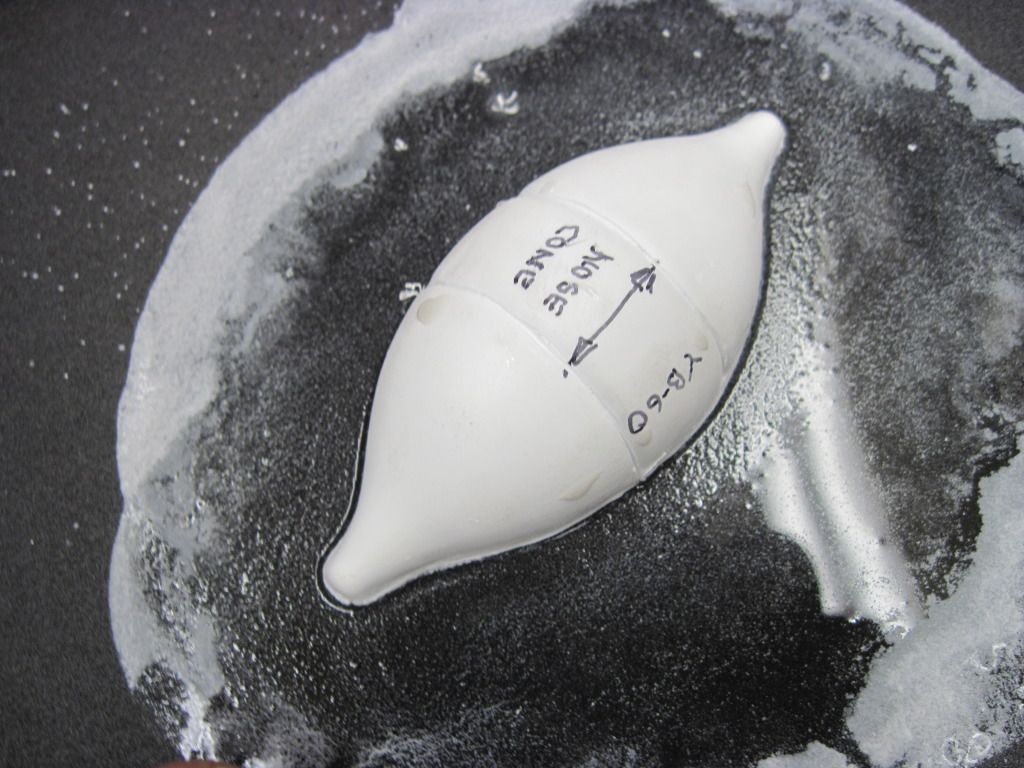
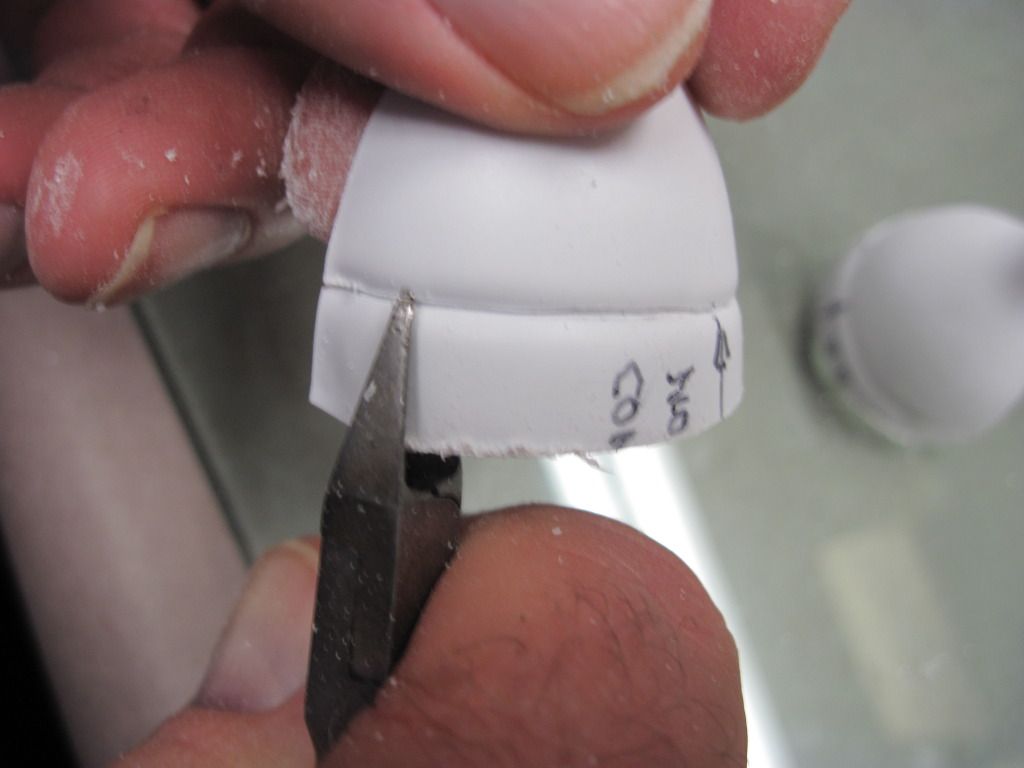
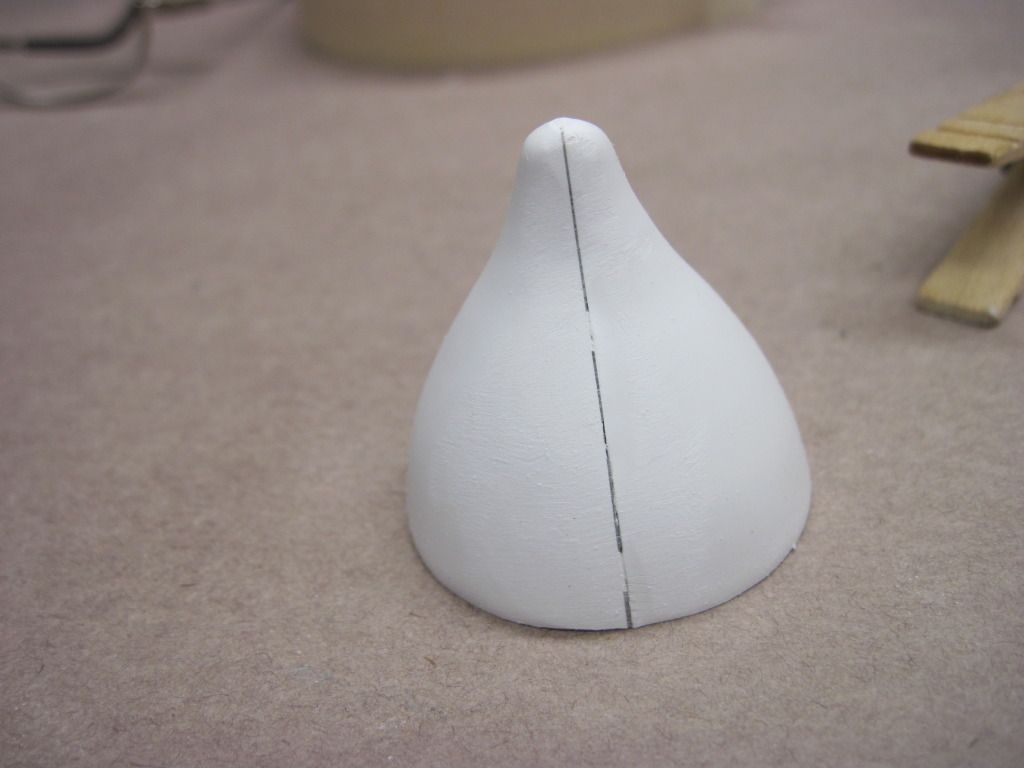
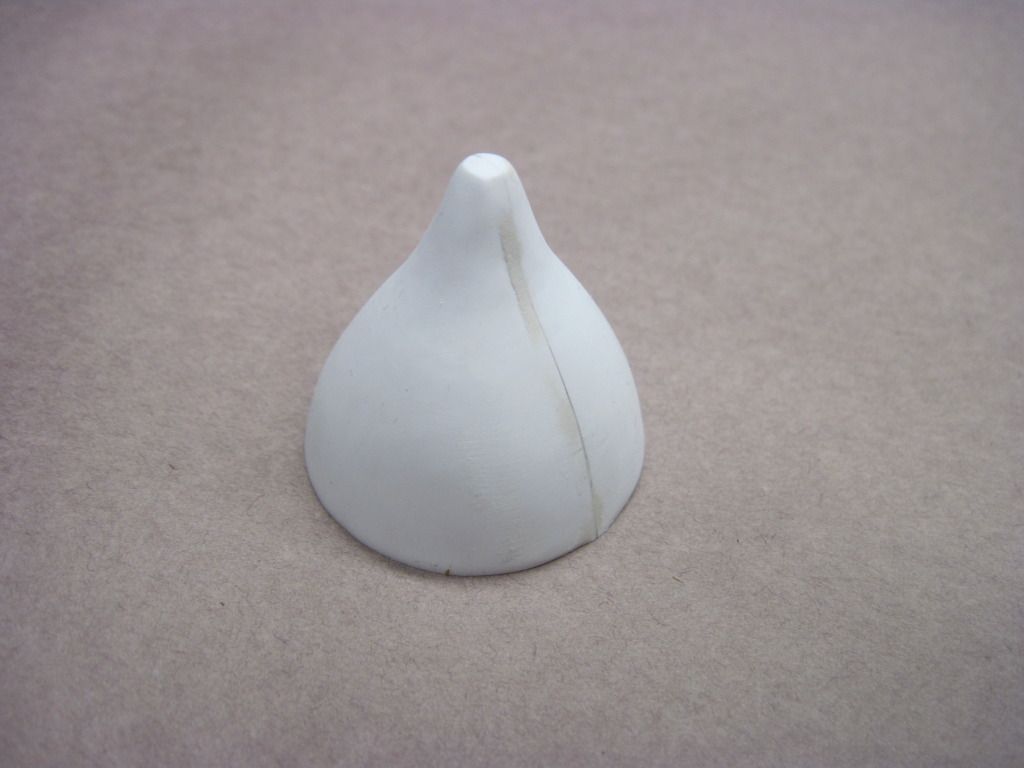
Howdy To All, I like this forum because you can find out what is correct and I prefer the correct look when possible. I'm posting some more in progress work photos. If I'm posting too many please let me know. The first thing I thought I would do is assemble the nose on the YB-60. I scored at a 45 degree angle on the bottom and around the end pieces that will fit to the fuselage. used a pair side cutters to cut relief cuts to the scored lines.

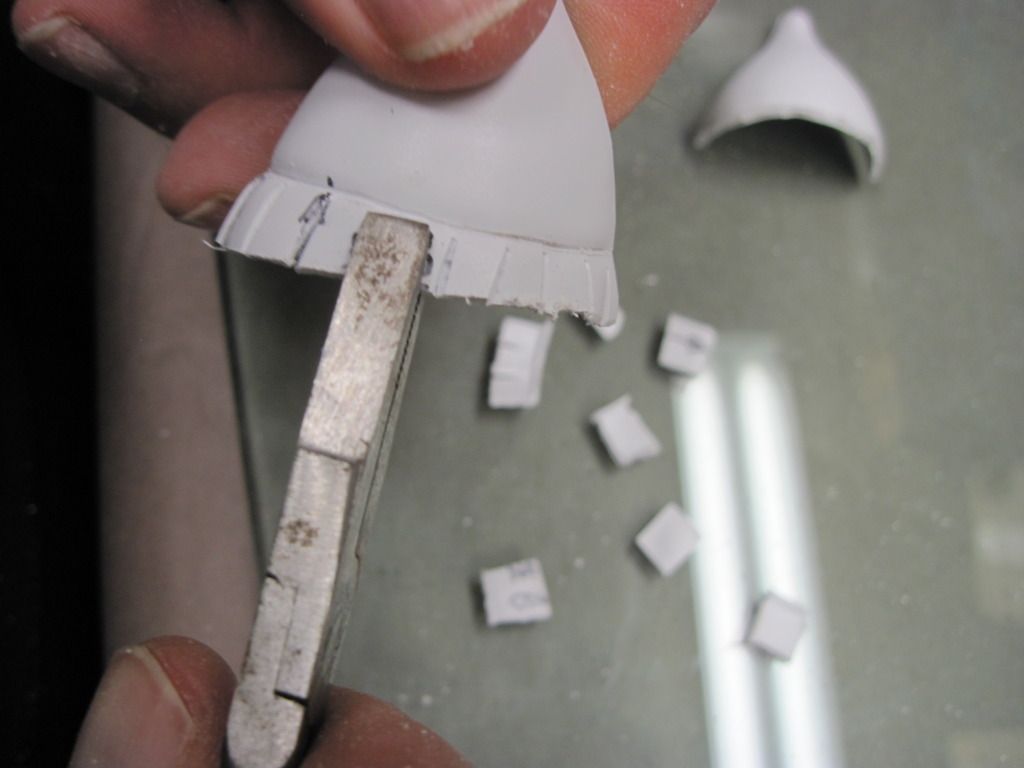
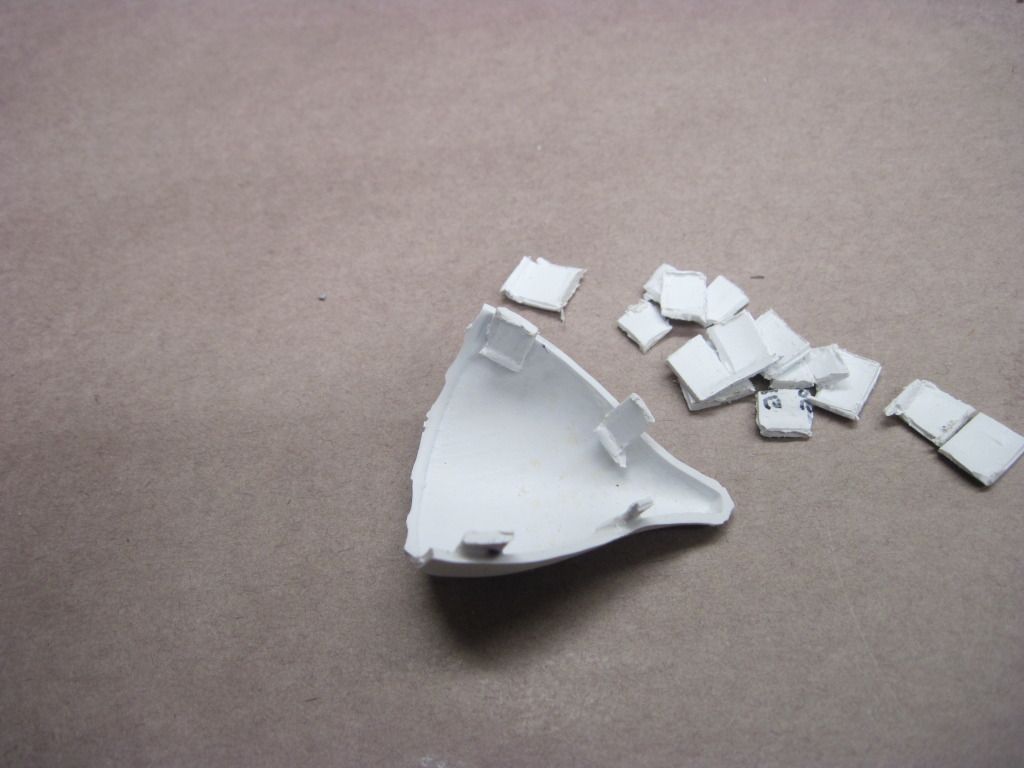
After cutting the relief cuts I then using a pair of square end pliers and bent the tabs down. Most tabs broke on the first bend a few required a few bends.

Making sure my safety glass was clean, I sanded the nose halves down to the scored edge.


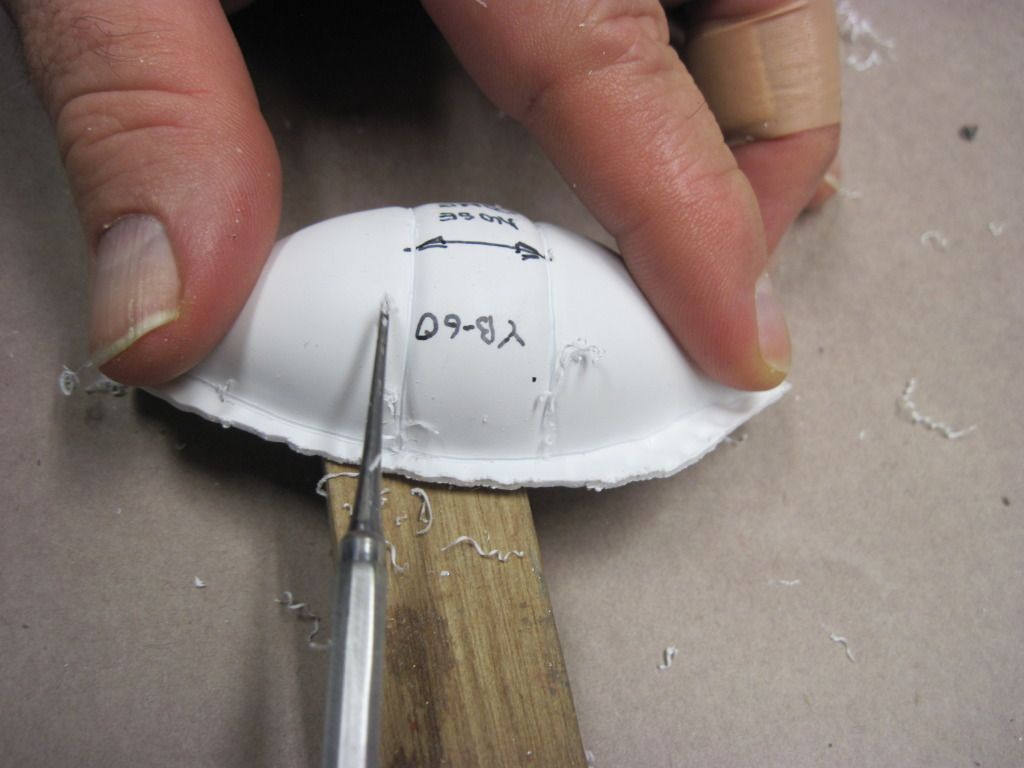
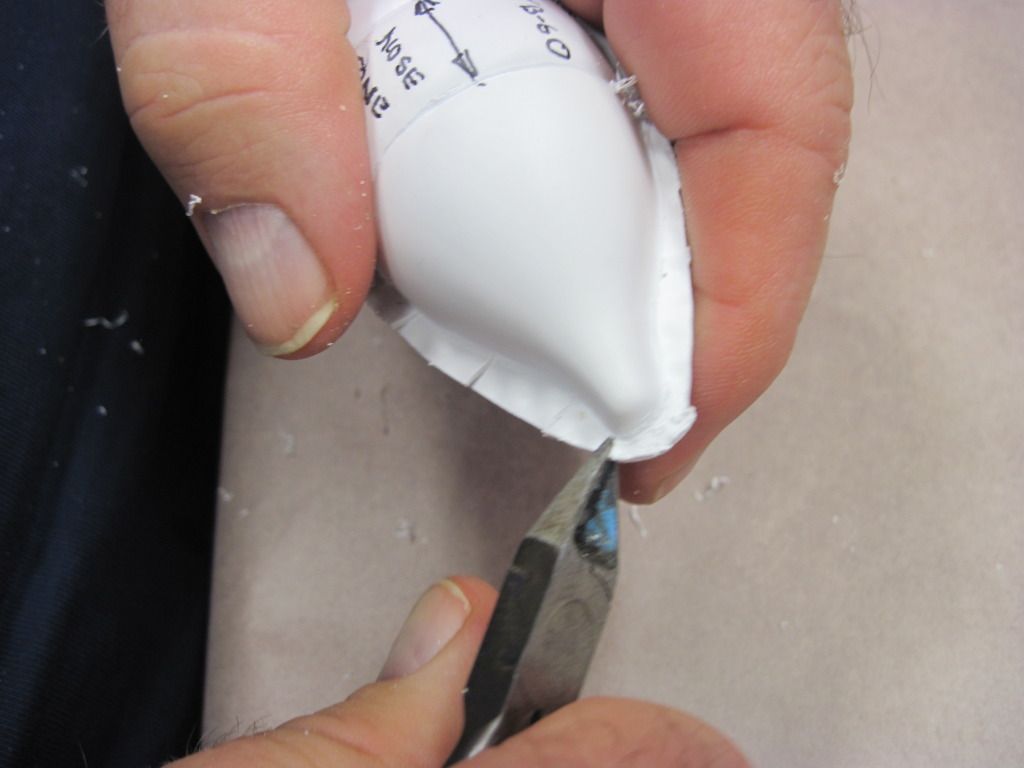
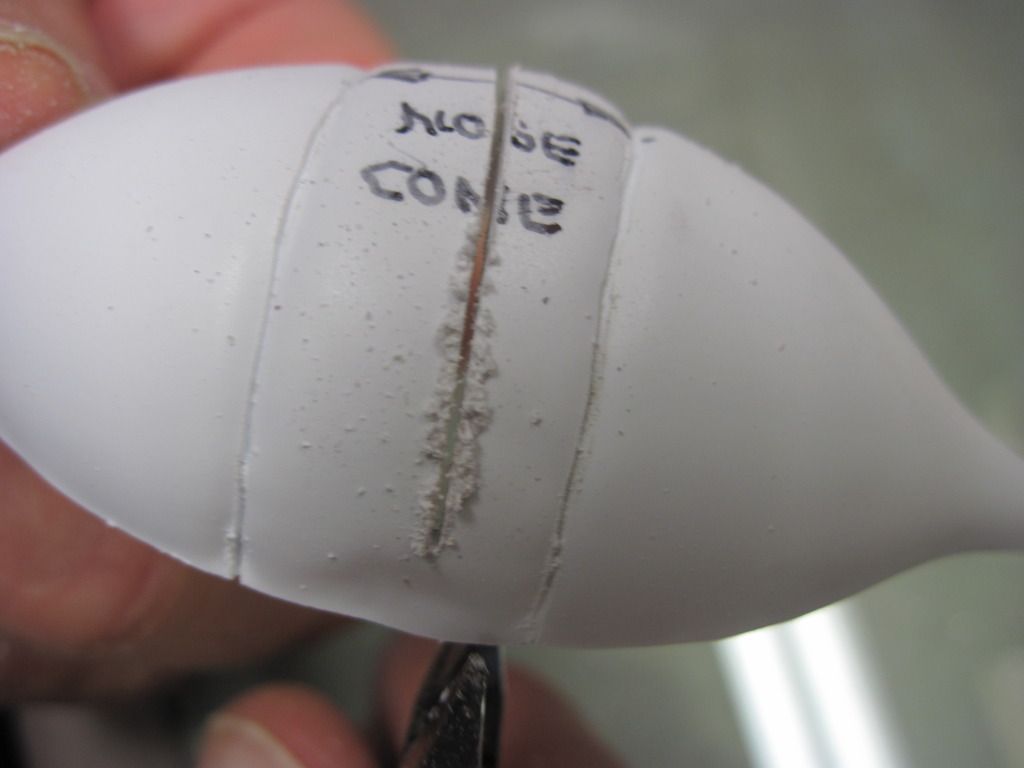
I then scored the nose halves (as one piece they are easier to handle and control) sawed the unit almost into, used side cutters to finish separating the halves, made relief cuts, and removed tabs.

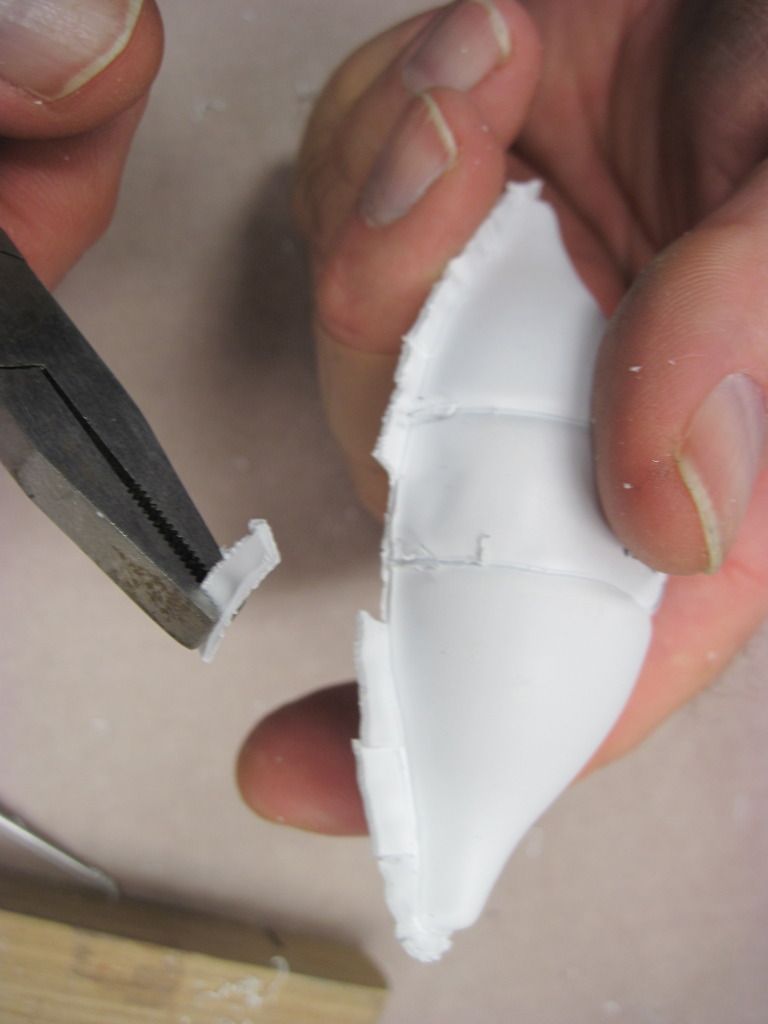
Using the cut tabs I glued four of them into one half.

Slightly curling the glued tabs I then glued the halves together.

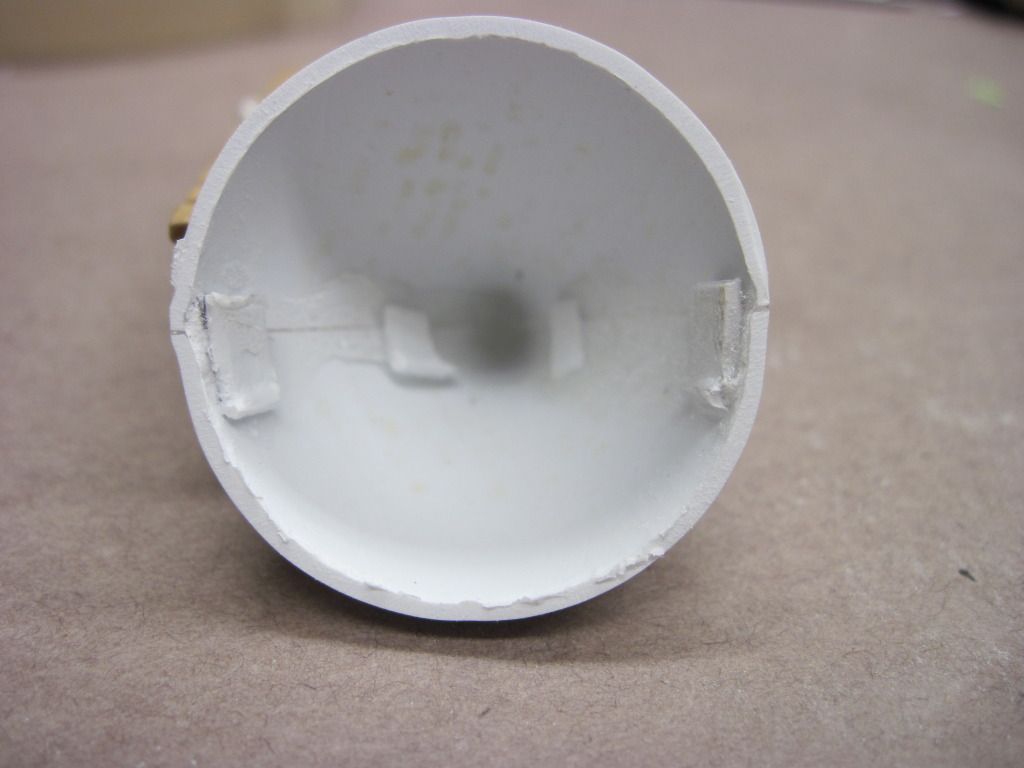
I then wet sanded the base for a smooth fit.

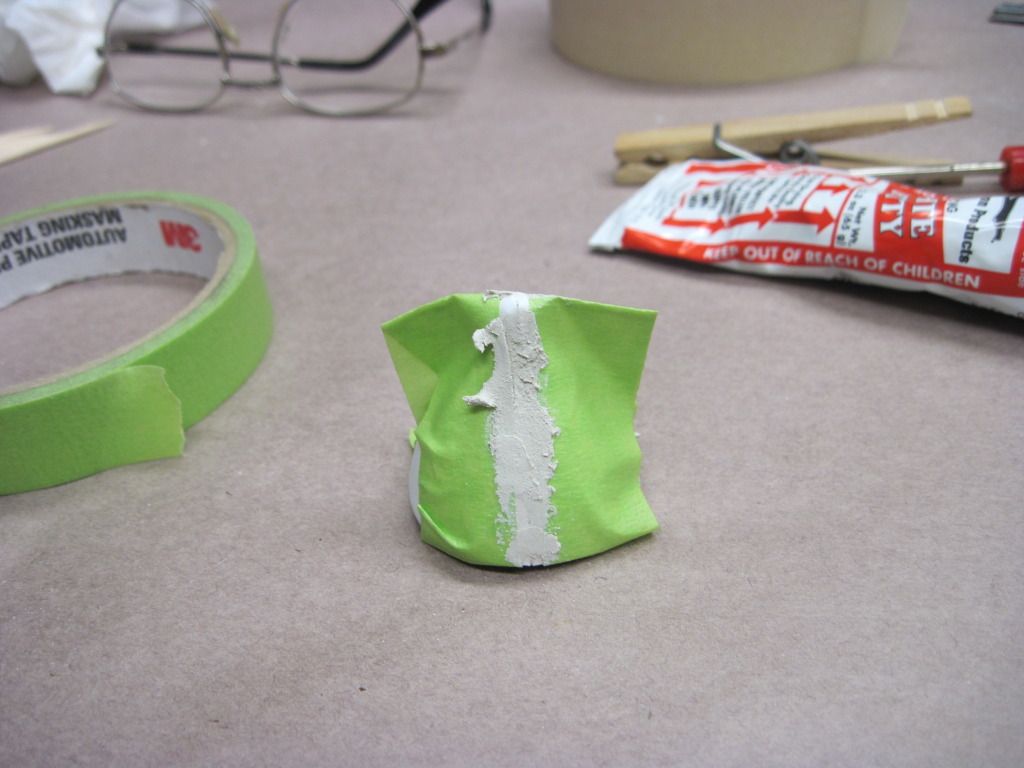
A little seam putty. I let my putting dry for two days at least then I sand with 400 wet and dry sand paper and use plenty of water.

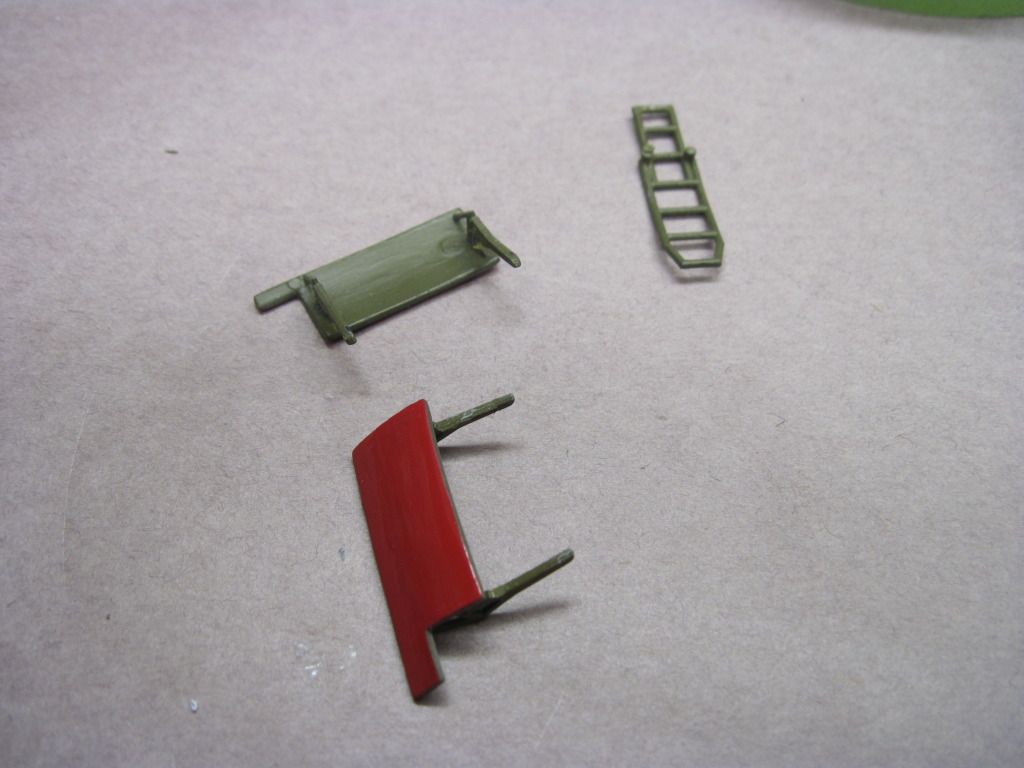
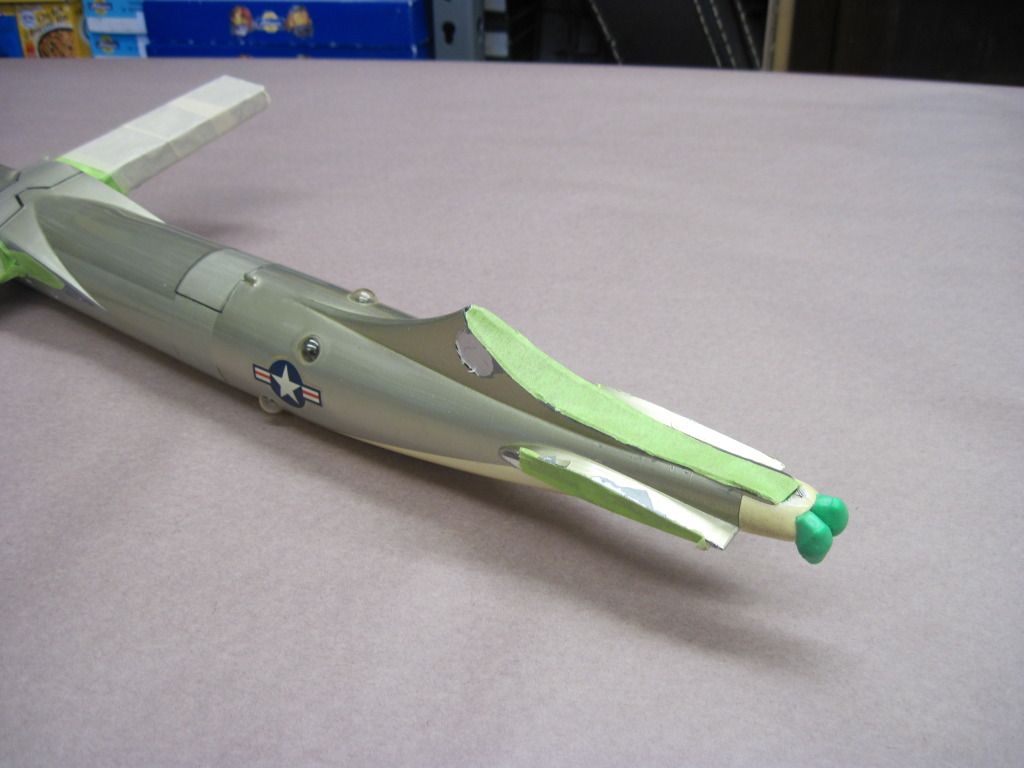
I did the nose first because I have to cut the nose off the donor B-36's fuselage. As indicated on the drawings where to cut it seems to me a little too far back for what the YB-60 nose has for a base. Building the nose first will allow me to use the YB-60 nose as a cutting gauge. When a person cuts on the conservative side there is always more material to work with. If I cut too far back then I will cause myself a lot of work spacing and filling in the mistake. I did get the front wheel assembly, doors and hardware, plus the boarding ladder removed. Does anyone know if the YB-60 used the same ladder? I know it uses smaller tires on the front, why I do not know.

I have taped off the openings on the fuselage for the paint removal.

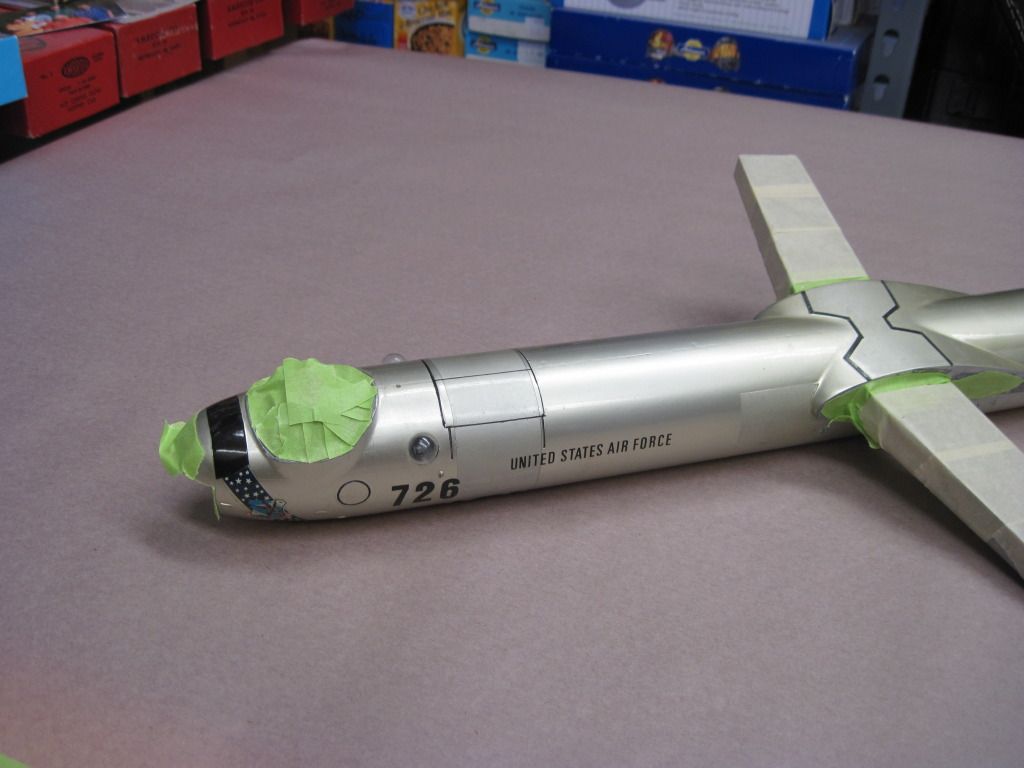
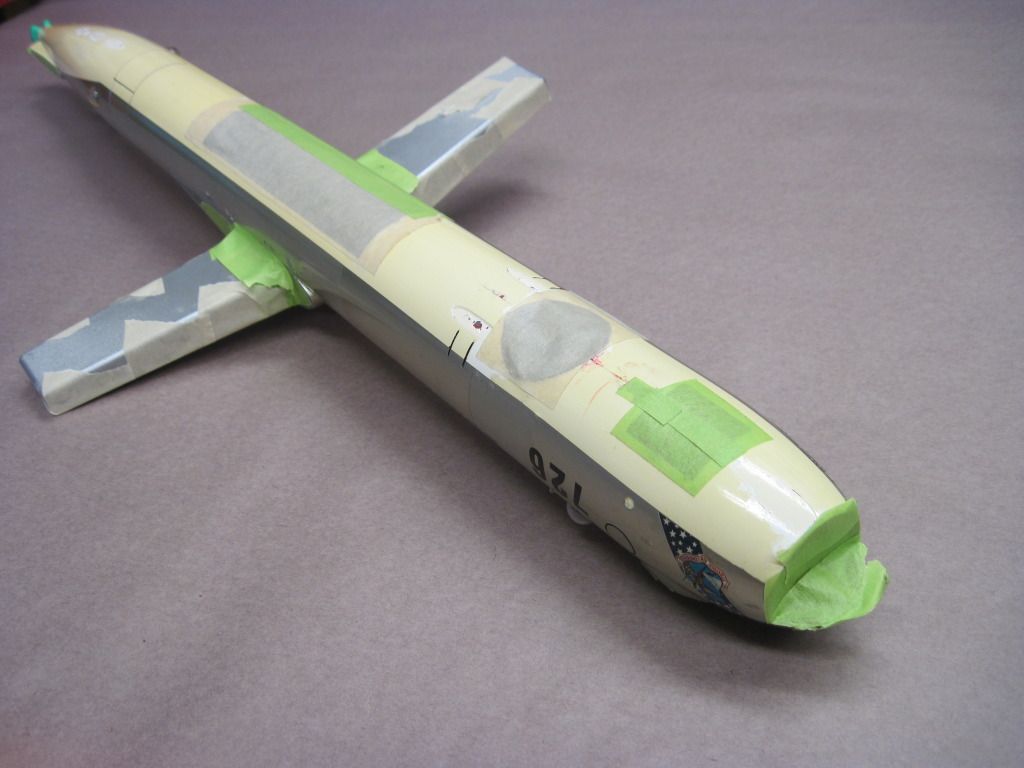
I will now go and spray the big stick with oven cleaner and let it set for at least one hour then scrub. I have found that quality masking tape will put up with oven cleaner, the tape is not bullet proof but its pretty forgiving Magoo


  • Member since
    September 2011
  • From: North Texas
Posted by lajntx on Monday, April 30, 2012 10:39 PM

Great work Magoo!

And one can NEVER post "too many pictures.

I`m jealous of you all being able to build.... I get to see my "kids" on the weekends,  and thats about it Sad

I cant bring them with me due to the rules of the establishment that wont allow me to build here. Their rooms their rules I guess.

Today I was bidding on some old 8mm moives from the estate of a  B-36 Commander with the 95th BW...... Thought I was doing good until the annoying relatives from the the buyers on Storage Wars arrived with big piles of cash  and pushed me right out of the market as they plopped down nearly 2 grand for about half a dozzen reels of fim to which nobody knew if they were still good or not.

 It certainly looks like the YB-60 used the same nose ladder as the B-36

http://www.cowtown.net/proweb/detail.htm


B-36 Peacemaker Builds 

On the Bench: B-36 paint test  fusealge & RB-36E assembly test build

In Que: YB-36 Conversion Build & B-36 carries B-58 Airframe to Wright Patterson

Conceptual Planning: RB-36 X-15 Mothership

  • Member since
    September 2011
  • From: North Texas
Posted by lajntx on Monday, April 30, 2012 11:07 PM

Magoo,


Was about to go to bed when I remembered this little gem that has an even better view of the nose gear & ladder. The ladder looks the same, but has an angle to it as well.

Also -  the enormous hydrogen bomb test shape just to the left of the jet engines in the background


.

B-36 Peacemaker Builds 

On the Bench: B-36 paint test  fusealge & RB-36E assembly test build

In Que: YB-36 Conversion Build & B-36 carries B-58 Airframe to Wright Patterson

Conceptual Planning: RB-36 X-15 Mothership

  • Member since
    May 2009
  • From: Riverton, Wyoming
Posted by Andrew Magoo on Tuesday, May 1, 2012 12:21 AM

Normal 0 false false false EN-US X-NONE X-NONE

Hi lajntx and everyone, thanks for the information. I have seen the picture with the little Yosemite Sam but for some reason I never noticed the ladder. I’ll have to agree with my wife I surely must have C.S.S. as she is always saying that’s what I have (Can’t See Stuff).


  • Member since
    February 2011
  • From: Bent River, IA
Posted by Reasoned on Tuesday, May 1, 2012 11:39 PM

After a marathon sanding session, we are almost ready for the primer.  One thing I learned, not all primers are the same.Huh?.  I had a Tamiya primer that worked great, dried REAL fast and sanded well.  The Testors seems to go on thick and is tacky.  Also, as far as the canopy, I tried to cut masks and it was driving me crazy so I did a combination fencing and freehand!

Science is the pursiut of knowledge, faith is the pursuit of wisdom.  Peace be with you.

On the Tarmac: 1/48 Revell P-38

In the Hanger: A bunch of kits

  • Member since
    May 2009
  • From: Riverton, Wyoming
Posted by Andrew Magoo on Thursday, May 3, 2012 2:30 AM

Howdy Reasoned, I had a marathon paint removing episode. but in the end it will save me a lot of time. On the original build I had given the stick many coats of flat red paint to act as a primer then black for walk ways. The white was what wound up being the stinker. I kept painting the bottom with gloss white and it didn't look very white. In hind sight I should have used a coat of flat white but I didn't so the layers kept building. when done with the white came the silvers and chrome being the last one. I was much too impatient to let the thing sit for a week or two so I coated it with a spray on varnish used to protect radio control gasoline powered air plane models. This kept finger prints off of the silver chrome but changed the visual look as well. This is why I optioned out for chemical stripping because I would have been sanding for two months. First I taped off all the openings to the fuselage you don't want to get oven cleaner into your model. Oven cleaner can find its way into your paint job weeks or months later.

Watch out for where the spray is going because it can damage other things around the sink. I let the spray sit for 45 minutes to an hour. Wear nitral gloved, safety glasses, and stay ventilated; oven cleaner isn't human friendly. Then scrub the thing with a tooth brush watching out for the taped openings. Sorry no photos of the scrubbing action my camera man (son) was at work. When it seems that you are no longer getting any results in removing paint start applying water to where you are scrubbing and scrub paint and oven cleaner away. The before look.

The first removal.

The second removal

And third removal.

Before first removal application.

1

2

And 3

The areas that still have paint encompass a small area and sanding won't entail too much time. I measured the new nose and found that it is only 0.003 of an inch in diameter out of round, three thousands isn't very much I think I got lucky.

As I thought the cut will be farther forward on the nose than where I was going to initially cut the nose. I have always been a measure it four times and I still might wind up with a mistake.

Well boys and girls that's all for now. Magoo


  • Member since
    September 2009
  • From: Guam
Posted by sub revolution on Thursday, May 3, 2012 9:33 AM

Well, on the plus side, it looks like you discovered a new way to make a realistic paint job for a junkyard bird! At least, that's what I thought after the first removal.

NEW SIG

  • Member since
    May 2009
  • From: Riverton, Wyoming
Posted by Andrew Magoo on Thursday, May 3, 2012 10:43 AM

Howdy sub revolution, ya know I thought the same thing after I dried the stick off and sat it down on the table. However, that would be a lot of work and paint to go through just do get a bone yard B-36 but thank you for the input. Its nice to know someone else can get the same impression from one's work that you (myself) do/es! Magoo

  • Member since
    February 2011
  • From: Bent River, IA
Posted by Reasoned on Thursday, May 3, 2012 11:07 AM

Wow Magoo, that is some heavy duty finish work you did.  I'd be interested to know how much surface detail was buggerd.  After all my sanding, the raised panel details were obliterated on mine, now I'm trying to rescribe some of the general panels as best I can.  I'm really ready for this project to be completed.Tongue Tied

Science is the pursiut of knowledge, faith is the pursuit of wisdom.  Peace be with you.

On the Tarmac: 1/48 Revell P-38

In the Hanger: A bunch of kits

  • Member since
    May 2009
  • From: Riverton, Wyoming
Posted by Andrew Magoo on Thursday, May 3, 2012 10:47 PM

Howdy reasoned and everybody, when stripping with oven cleaner and scrubbing with a tooth brush no detail is lost. The raised surface wasn't bothered by my oven cleaner. I'm not even slightly worried about the raised panel lines. The vac-u-form parts have no raised detail at all. When I eventually get the conversion parts glued and mounted to the stick all the filling and sanding will kill about 85% of the detail on the stick. I built a Contrails XB-70 years ago it was my very first vac-u-form model and I sanded all the panel lines off it. After trying to rescribe the panel lines I gave up and when the paint was all dry I used a pencil and drew the lines in. The penciled in panel lines looked pretty good. I think I'll post some photos of past work now that I have mastered inserting pictures.

  • Member since
    September 2009
  • From: Guam
Posted by sub revolution on Thursday, May 3, 2012 11:38 PM

Sounds good! I would love to see some pictures of a good XB-70 model! I mean, I would love to see some photos illustrating techniques that could be used for building a B-36, you know, in the interest of the GB at hand....

NEW SIG

  • Member since
    May 2009
  • From: Riverton, Wyoming
Posted by Andrew Magoo on Friday, May 4, 2012 12:07 AM

Howdy sub revolution, I will continue to try and post some techniques on the 36/60. However, in-progress pictures of the Contrails XB-70 being built are pretty slim; the ones I do have were taken on a 35mm and I'll have to scan those so I may insert them to the forum. I worked on it for 2 1/2 years and an A-12 with a GTD -21 drone on the back that I semi scratch built both at the same time. I took no  in-progress pictures of the A-12 with the drone. I worked on the A-12 for 3 years. Both of these models were patients robbing projects so I would set hem aside till my desire to work on them returned. I was into the XB-70 a year and a half when Ertil came out with the injection kit we all know now comes from Italari.  Magoo

  • Member since
    September 2011
  • From: North Texas
Posted by lajntx on Friday, May 4, 2012 8:54 PM

sub revolution

Sounds good! I would love to see some pictures of a good XB-70 model! I mean, I would love to see some photos illustrating techniques that could be used for building a B-36, you know, in the interest of the GB at hand....


Nah! We`re not that anal here sub. We`re just a bunch of people whom enjoy being tormented by our work to get worked up over a comment about a different bomber that didnt quite live up to expectations. Wink

B-36 Peacemaker Builds 

On the Bench: B-36 paint test  fusealge & RB-36E assembly test build

In Que: YB-36 Conversion Build & B-36 carries B-58 Airframe to Wright Patterson

Conceptual Planning: RB-36 X-15 Mothership

  • Member since
    July 2011
  • From: Palmdale, ca
Posted by Spark84 on Sunday, May 6, 2012 11:23 AM

Hey all, just noticed this thread/ GB, figured i should say that I'm also in the midst of a B-36 build... i decided to re-scribe all the raised panel lines on my kit (most recent release of the 1/72 RB-36 by monogram) i wanted to do do that so i could sand and do a natural metal finish with alclads. I think I'll be done sometime in 2014...

On the Bench: 1/72 Mono B-36 (...UGH)

Last finished: Revell Space Shuttles Enterprise (On SCA) and Columbia (built both for local aircraft museum)

In the Que:

  • Member since
    May 2009
  • From: Riverton, Wyoming
Posted by Andrew Magoo on Sunday, May 6, 2012 2:25 PM

Howdy Again Spark84, I posted a comment in the aircraft forum but You should post some pictures of your project here. I need to practice what I preach and post some more here on my YB-60 conversion. Get a scrap piece of plastic, paint it with a couple of your colors and after it has dried 24 to 48 hours, "for chrome 2 weeks to 2 months", and then try using a #2 pencil and make some panel lines make sure the lead is sharp. Magoo

  • Member since
    February 2011
  • From: Bent River, IA
Posted by Reasoned on Monday, May 7, 2012 10:20 AM

I've got to be honest, this build is zapping the energy from me, not a smart thing to have taken it on.  I'm at the point of of saying to heck with the seams issue and am going to go ahead and shoot the paint.  I did get the canopies painted (first time I ever tried hand painting all the frames) that tells you just how frustrating this has become.  Will shoot the base tonight, I hope, then on to the Alclad.

Science is the pursiut of knowledge, faith is the pursuit of wisdom.  Peace be with you.

On the Tarmac: 1/48 Revell P-38

In the Hanger: A bunch of kits

  • Member since
    May 2009
  • From: Riverton, Wyoming
Posted by Andrew Magoo on Monday, May 7, 2012 7:06 PM
Normal 0 false false false EN-US X-NONE X-NONE


Howdy reasoned, ya'll shouldn't get discouraged, a B-36 is a Big airplane therefore a very big model in 1/72 scale. Keep in mind that if you are standing at the wing tip of the actual airplane you would be hard pressed to see any panel lines. Most people will view the model from 3 to 6 feet that is 216 feet to 432 feet in real life it would be pretty hard to make out any panel lines from those distances. I have been up to two B-36's, the one at Wright/Patterson USAF museum in Dayton, OH and the one at the SAC museum in Omaha, NE I don't remember all those panels on the bottom to half way up on the fuselage. The picture tells most of the story; panels are distinguished by their color. I have obliterated so many raised panel lines I have lost count. Some raised panel lines can have their appearance restored by simply scribing a line between the two raised ones and as long as you don’t go too deep and wide most people’s eyes glide right over them. The same goes for totally smooth models an excellent paint job will overwhelm panel lines. Modeling is supposed to be fun and therapeutic something that you enjoy doing and get your mind off of the other things in life that has you twisted up in knots. Modelings allows you to plunge your mind into a separate world and when it frustrates you just put things down and walk away in a day or two maybe a week and certainly in a month it will start that itch that you have to scratch to pick up where you left off and continue with the model.


  • Member since
    February 2011
  • From: Bent River, IA
Posted by Reasoned on Monday, May 7, 2012 11:47 PM

Excellent points Magoo, it does put things into perspective and I truly thank you for the wise advice.  I just have a habit of whining when looking at this kit and the time it has taken (never telling from the results).  In the whole scheme of things.... it's just a BIG model..... that's keeping me from my stash and other projects, time to finish her off.  Yeah, I'm one of those odd balls that does one thing at a time, until it is finished...... or I am.Wink   Thanks again and looking forward to seeing more of your wip.  I should have some pics soon, didn't get the base on tonight, worked on the props and some additional sanding.

Science is the pursiut of knowledge, faith is the pursuit of wisdom.  Peace be with you.

On the Tarmac: 1/48 Revell P-38

In the Hanger: A bunch of kits

  • Member since
    May 2009
  • From: Riverton, Wyoming
Posted by Andrew Magoo on Wednesday, May 9, 2012 2:45 AM

Howdy Reasoned and Everybody, without a doubt I as a modeler can get upset with what I perceive as a less than average result to my work. Here is an example, the canopy and bombardier's nose windshield on the sacrificial B-36 were spray bomb painted after painting each and every panel with a clear masking liquid.

Look closely and you will see some of the edges are a little rough. On some panels the paint either seeped under the edge or the edge lifted letting paint in. I spent three long evenings masking those panes and when I pulled off the masking and saw all the seepage I was quite upset. However, I spent some quality time (five evenings) helping my son fix his model rail road cars.On those panels that were real bad I used a scalpel and shaved the paint off of the pane to the frame. the really small stuff I ignored because of eye strain and this is back when I was 27 years old 57 now. Scraping the paint off the panes left frosted scratch marks. The key to the fix was a clear coat over the canopy and nose screen. The scraping and frosting are barely visible; keep in mind this image is expanded quite a lot.  In the end it came out Ok. By the way I have always used a jewelers monocle for the real small stuff..

Like I said from a little distance panel lines and scratches in the glass will blend away. Andrew Magoo


  • Member since
    May 2009
  • From: Riverton, Wyoming
Posted by Andrew Magoo on Friday, May 11, 2012 3:07 AM

Howdy Everybody, I've not been staying with my nose to the grindstone but to the saw. I lost my sanding T so with all the sanding this project is going to require I decided to build one. I got a piece of 1/8 inch aluminum strap metal.

I cut it into 2 pieces 4 inches long and epoxy glued them together into a T.

For major sanding I'm using 220 grit and 320 grit.

I then use my new tool with the sand paper wrapped around it.

I wanted to remove more of the vertical stabilizer from the fuselage so I chucked a drill bit in my dremel tool and used it as a rotary file. I like the drill bit better because when the plastic melts and globs onto the bit I can stop, wait for the plastic to cool, and slide the glob of plastic off the bit. On a rotary bit sometimes the plastic doesn't come off very easy.

And then some sanding to get the edge down to the fuselage.

I've got a small dig into the fuselage that will require attention later. All the defensive turret doors were sanded down to the fuselage's level as well as most of the paint.


I now come to the nose part of things. I measured my YB-60 nose and then measured and marked the diameter on the fuselage.

Then I went to the Miter box for a 90 degree cut. I apologize for the focus problems. I never had that with my 35mm camera but I didn't have the computer flexibility that I have with the digital camera.

And now with the old nose removed I now have a YB-60 stick

I took the YB-60 stick and sanded the fuselage nose smooth making sure to crisscross the sanding pattern to avoid getting a slant or bad taper.

In the end, the nose was an easy operation. Magoo


  • Member since
    July 2011
  • From: Palmdale, ca
Posted by Spark84 on Saturday, May 12, 2012 9:45 AM

B-36 - 1

Me - 0


I don't think i can take much more of the scribing... luckily Ive only done all of one of the wings and half of the other, the Stabs... oh and the jet pods. at this point I'm beginning to think i should have left well enough alone. I'm going to look for another kit and steal the wings/stabs from it and leave the raised lines... the fuselage is OK right now, i filled the gaps behind the cockpit and elsewhere and they have turned out pretty good so I'd like to salvage that part of this build.

ive screwed up the scribing in so many places that the repairs alone will be a never ending nightmare. plus one of the engines on the left wing had some heat damage (melting/warping) from something, so that's another reason to get a replacement.

im really worried about the wing joints... lines matching up, gaps, etc...

if this kit doesn't have a "endearing" name like "The last kit you'll ever build" (because after this you'll hate modeling) ...we should give it one.

I'm just kidding about the hating modeling part BTW... it just sounds funny when you say it... Stick out tongue

On the Bench: 1/72 Mono B-36 (...UGH)

Last finished: Revell Space Shuttles Enterprise (On SCA) and Columbia (built both for local aircraft museum)

In the Que:

  • Member since
    May 2009
  • From: Riverton, Wyoming
Posted by Andrew Magoo on Saturday, May 12, 2012 6:43 PM

Howdy Spark84, yes sir if you have damage parts and are breathing blue fumes another kit would be of great value. Have you tried garage sales or e-bay? Magoo

  • Member since
    February 2011
  • From: Bent River, IA
Posted by Reasoned on Saturday, May 12, 2012 9:30 PM

Spark84

if this kit doesn't have a "endearing" name like "The last kit you'll ever build" (because after this you'll hate modeling) ...we should give it one.

Yes...

Science is the pursiut of knowledge, faith is the pursuit of wisdom.  Peace be with you.

On the Tarmac: 1/48 Revell P-38

In the Hanger: A bunch of kits

  • Member since
    September 2011
  • From: North Texas
Posted by lajntx on Saturday, May 12, 2012 10:01 PM

Andrew Magoo

Howdy Spark84, yes sir if you have damage parts and are breathing blue fumes another kit would be of great value. Have you tried garage sales or e-bay? Magoo


Now you know why I have so many kits in reserve, and spent the last 2 years snatching up each and everyone one that fell through the cracks on ebay Wink

B-36 Peacemaker Builds 

On the Bench: B-36 paint test  fusealge & RB-36E assembly test build

In Que: YB-36 Conversion Build & B-36 carries B-58 Airframe to Wright Patterson

Conceptual Planning: RB-36 X-15 Mothership

  • Member since
    July 2011
  • From: Palmdale, ca
Posted by Spark84 on Saturday, May 12, 2012 10:09 PM

I've already got my eye on a kit on ebay, its at $9.99 right now... i'd image it won't stay there. its the kit from 1980 (something) the kit that depicts two B-36's in flight.

All else fails good ol' Smith Brothers hobby of Lancaster has another one on their shelf (the most recent release). Its pricey, but I'm always game to support my local shop. that's where i bought the one i'm working on now. which reminds me, i heard they (revell/monogram) discontinued the B-36 kit again, is that true?

On the Bench: 1/72 Mono B-36 (...UGH)

Last finished: Revell Space Shuttles Enterprise (On SCA) and Columbia (built both for local aircraft museum)

In the Que:

  • Member since
    September 2011
  • From: North Texas
Posted by lajntx on Saturday, May 12, 2012 10:22 PM

Spark84

I've already got my eye on a kit on ebay, its at $9.99 right now... i'd image it won't stay there. its the kit from 1980 (something) the kit that depicts two B-36's in flight.

All else fails good ol' Smith Brothers hobby of Lancaster has another one on their shelf (the most recent release). Its pricey, but I'm always game to support my local shop. that's where i bought the one i'm working on now. which reminds me, i heard they (revell/monogram) discontinued the B-36 kit again, is that true?

onload="resizeImage(this);" />

The Box Art you are describing would make it the 1980 kit. The second most sought after behind the 1989 kit ( if it is sealed ). The downside to this kit bought used on ebay is there is a high probablity the decals are trashed, and other bidders thinking they are buying something they can resell for $100+ whom do nothing more than drive the price up

Early in this thread I went over on how to buy/sell this kit on ebay.... you might want to go back to page one and read that.

The 2008 release was the last one, but I was contacted on here by the company concerning this kit on a future release on what decalling would be best. Expect to see it again in the next 2-3 years

Also, be aware with the 2008 Kit the lettering is incorrect- it`s insignia blue instead of black, and if you have one of those you might want to contact warbirds for an aftermarket decal set

If all else fails, contact me on here as I have my own boneyard of 1/72 B-36 kits for any parts you might need and maybe we can work out a deal

B-36 Peacemaker Builds 

On the Bench: B-36 paint test  fusealge & RB-36E assembly test build

In Que: YB-36 Conversion Build & B-36 carries B-58 Airframe to Wright Patterson

Conceptual Planning: RB-36 X-15 Mothership

  • Member since
    July 2007
  • From: Southern New Jersey
Posted by troublemaker66 on Sunday, May 13, 2012 12:14 AM

The AC Moore`s store near me carries these kits for $59.99...got mine for $30 with a 50% off coupon.

Len Pytlewski

JOIN OUR COMMUNITY!

Our community is FREE to join. To participate you must either login or register for an account.

SEARCH FORUMS
FREE NEWSLETTER
By signing up you may also receive reader surveys and occasional special offers. We do not sell, rent or trade our email lists. View our Privacy Policy.