SEARCH FINESCALE.COM

Enter keywords or a search phrase below:

FineScale Modeler WWI Aeroplane Group Build 2013

139537 views
1262 replies
1 rating 2 rating 3 rating 4 rating 5 rating
Moderator
  • Member since
    September 2011
Posted by Tim Kidwell on Friday, March 1, 2013 9:24 AM

Proof of life:

The real work begins this weekend!

--

Timothy Kidwell
Editor
Scale Model Brands
Kalmbach Media


  • Member since
    November 2009
  • From: SW Virginia
Posted by Gamera on Friday, March 1, 2013 9:28 AM

Wow, nice stuff guys!

I'm busy Sat helping out with the local car show but hopefully will be able to get a little done on my little Nieuport Sat and Sun evening as well as watching Tim and Aaron's video build log.

"I dream in fire but work in clay." -Arthur Machen


Moderator
  • Member since
    September 2011
Posted by Tim Kidwell on Friday, March 1, 2013 9:33 AM

Ssasho0

Hello,

I just saw this topic and I would love to jump in the boat, if its not too late, with Eduard's 1:48 Bristol Fighter.

regards,

Sasho

Hi Ssascho0,

Technically, entering new builds closed at 4 p.m. Central Time yesterday. However, I didn't put that big and bold on the front page, so, it's my fault, and you're in. Welcome aboard, the GB is now going!

--

Timothy Kidwell
Editor
Scale Model Brands
Kalmbach Media


  • Member since
    March 2003
  • From: Towson MD
Posted by gregbale on Friday, March 1, 2013 10:01 AM

Sasho:

Welcome to the Forum, welcome to the GB, and, welcome to the small but (obviously) select group of us who are building kites for the Victorious Allied cause. As you can see from the entry list, the Kaiser's forces seem to have us heavily outnumbered, but we hope to make up the deficit in plucky determination, insane acts of derring-do, and sheer modeling skill.

Hope you enjoy your time here, and by all means jump in with props spinning and join the fun.

Greg

George Lewis:

"Every time you correct me on my grammar I love you a little fewer."
 
  • Member since
    December 2002
  • From: Northern California
Posted by jeaton01 on Friday, March 1, 2013 12:42 PM

I found plastic instead of rocks in my box!  Happy Day!  Here are pictures of the sprues, where there were doubles only one example is included in the lost hope of brevity.  Also, the first page of the instructions, to show where I am to begin this Odyssey.  A close up of the top cowl, one of two supplied, showing the very nice detail throughout the kit.  Open lovers, no less.  And to lead off, the great box art.  Is that D. VII going to heedlessly fly right in to that just released bomb?!!  If I am not mistaken, a HERL no less!!

John

To see build logs for my models:  http://goldeneramodel.com/mymodels/mymodels.html


  • Member since
    April 2006
  • From: ON, Canada
Posted by jgeratic on Friday, March 1, 2013 1:15 PM

Here's the customary box shot, Eduard's Oeffag 153 in 1/48 scale.  I still have not selected a particular set of markings, but have narrowed it to under a half dozen.  On the left of the photo is the complete three volume set from Pheon's Oeffag decal series. 

The third volume also includes the peculiar camouflage called sworls.   These are provided in two versions:  curl shapes resembling  commas, and the more intricate spiral type.  Not included in this set, but there is a more guady type manufactured by Techmod and Mirage.  To me it reminds me of some kind of art nouveau wallpaper.

Good luck everyone with their builds, and have a blast!

regards,

Jack

Moderator
  • Member since
    September 2011
Posted by Tim Kidwell on Friday, March 1, 2013 1:34 PM

Jack, Jeaton01 - I'm trying to keep my fist pumping to a minimum. Can't wait to see as everyone else's kits roll in. I'll snap a shot of the box top to the D.VII - claimed by my son and posted as artwork on his door.

Good luck!

--

Timothy Kidwell
Editor
Scale Model Brands
Kalmbach Media


  • Member since
    February 2006
  • From: Smithers, BC, Canada
Posted by ruddratt on Friday, March 1, 2013 4:42 PM

Tim, ask and ye shall receive.....

Just loving these kit shots! I mean, look at the diversity in subject matter! This is awesome!!

Mike

 "We have our own ammunition. It's filled with paint. When we fire it, it makes pretty pictures....scares the hell outta people."


  • Member since
    February 2006
  • From: Smithers, BC, Canada
Posted by ruddratt on Friday, March 1, 2013 9:01 PM

....and, some progress pics. Was not able to use those nice Master turned barrels and cooling jackets, as they are for the Spandau 08/15, not the early Spandau 08's. Nevertheless, the kit PE is quite nice and easy to work with.

First, the tip of the barrel was replaced with some 0.5mm brass tubing....

Next, the flat PE cooling jacket was rolled up around the shaft of an appropriate sized drill bit....

It gets attached to the kit gun body, along with the end cap/sight for the jacket....

...gets a coat of primer, and voila!!!.....

The final step will be to apply coat of Tamiya flat black and a drybrush with a silver/raw umber mixture and it'll be ready to go.

 Tomorrow night, it's on to the engine.

Mike

 "We have our own ammunition. It's filled with paint. When we fire it, it makes pretty pictures....scares the hell outta people."


  • Member since
    April 2003
Posted by shivinigh on Friday, March 1, 2013 9:31 PM
Love the gun Ruddratt. How did you get the photo etch to roll so nice? Every time I try I get a fold or kink in it.


  • Member since
    December 2002
  • From: Northern California
Posted by jeaton01 on Saturday, March 2, 2013 1:22 AM

Be careful of the Dark Powers!

John

To see build logs for my models:  http://goldeneramodel.com/mymodels/mymodels.html


Moderator
  • Member since
    September 2011
Posted by Tim Kidwell on Saturday, March 2, 2013 10:48 AM

OK, got a real start this morning. Unlike Ruddratt, I've taken a more cliche approach to my build: I've started with the cockpit. I put some paint down on the floor and assembled the control stick and cleaned up the pedals. Also, because Dark Power has claimed this D.VII as his, he is also supervising the build. He demanded that he be able to glue the control stick together, so, I guess I can't take credit for that.

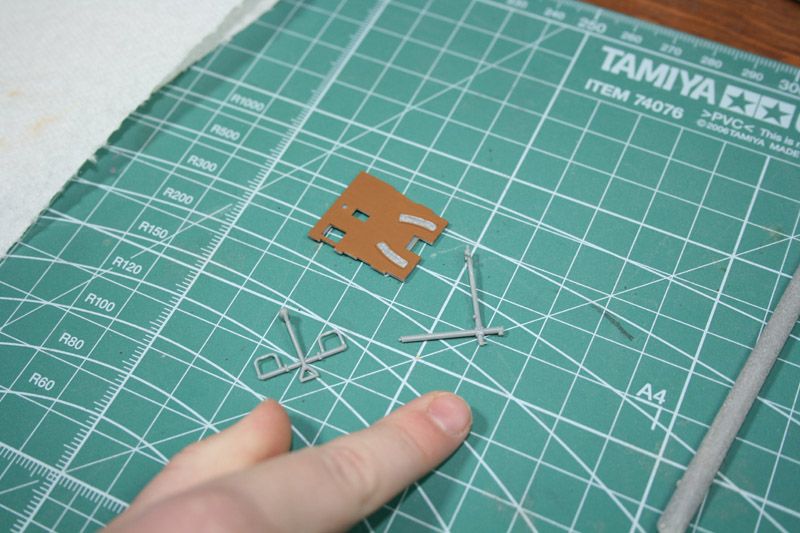
One thing I did discover: The foot pedals are VERY fragile. Don't use snips to remove them from the sprue; go for the razor saw.

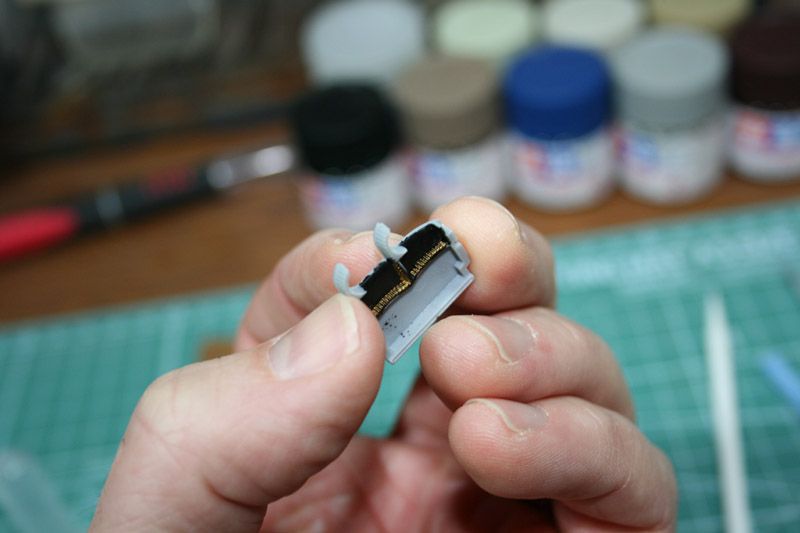
There is some detail inside the magazine. So hand-brushed in some primer and then did a couple of quick swipes across the rounds with Vallejo Model Color brass before putting it together. A lot of that will disappear with the coat of primer to come, but I still want a hint of the detail to come through.

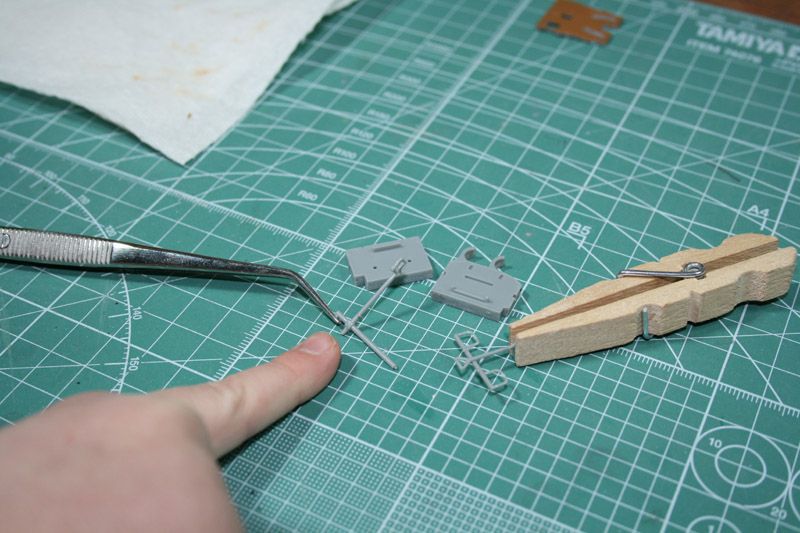
Here's a collected image of the magazine, spent round canister, control stick, and pedals ready for priming. And I thought I'd throw Ruddratt a shout out with the locking tweezers and clothes-pin clamp. Again, the 4-year-old Dark Power is keeping me on task.

I'm planning to prime the seat and cushion the same time I do these. That's probably it for today. Dark Power has given me the cold that had him down for the count all last week. Feels like someone poured concrete in my nose and filled my lungs with milk. Time for the cure all: whisky. 

--

Timothy Kidwell
Editor
Scale Model Brands
Kalmbach Media


  • Member since
    October 2011
  • From: Lake Villa, Illinois
Posted by Chuck Davis on Saturday, March 2, 2013 12:17 PM

Looking good, everyone!  I also got some time at the bench - but it was all real mundane stuff.  Big piles of clipped sprue attachments and the like, so no pics yet.  Have fun building!

And Tim - get better!

And hey...where's Aaron?  Did Tim kidnap him and lock him in a closet at FSM, thus delaying his D.VII?

Chuck Davis

  • Member since
    October 2008
  • From: England
Posted by P mitch on Saturday, March 2, 2013 1:54 PM

Started on my build today. Like Tim at the cockpit. Not done much but did try a turnbuckle - oh my lord 10 minutes to get one done, so that may have to be parked until a day I don't have the shakes!

Phil

"If anybody ever tells you anything about an aeroplane which is so bloody complicated you can't understand it, take it from me: it's all balls." R J Mitchell


  • Member since
    November 2009
  • From: SW Virginia
Posted by Gamera on Saturday, March 2, 2013 8:06 PM

Great work guys!!!

Did a little work in the cockpit, found some wood grain decal material, I'm going to give it a try.

"I dream in fire but work in clay." -Arthur Machen


Moderator
  • Member since
    September 2011
Posted by Tim Kidwell on Monday, March 4, 2013 11:28 AM

A quick update: Primed the pedals, magazine, belt box, seat, control stick, and fuel tank.

The fuel tank went together well, but I've made a hash of cleaning up the seams on it. As Aaron says, every modeler knows about hiding some sins. I'm going to have to see how much of the sucker is visible once it's all together and how much more work I want to put into it. GAH! I hate it when simple things go wrong ...

--

Timothy Kidwell
Editor
Scale Model Brands
Kalmbach Media


  • Member since
    October 2011
  • From: Lake Villa, Illinois
Posted by Chuck Davis on Monday, March 4, 2013 4:57 PM

No sweat Tim - we've all done it.  I just looked at my D.VII and I think you're safe - no one outside this group will ever know.  And we'll never tell...will we guys?...

Question for the group.  Does anyone know if Fokker would apply the steaked camo with the control surfaces mounted, or would they be finished separately?

Quick build update - wings are almost ready for finishing, and I've got a bunch of parts and assemblies cleaned up.  Doesn't look like much yet.  I started the prop and the guns - those will have some pics at some point.  Have fun everyone...

Chuck Davis

  • Member since
    April 2006
  • From: ON, Canada
Posted by jgeratic on Monday, March 4, 2013 6:35 PM

Chuck, I'm fairly certain the control surfaces were painted separately.   In some sections it looks like the streaks line up, but this happens randomely due to the numourous and varying brush strokes.  I've also a windsock datafile type book on the subject, and the illustrations show the same idea.

Just some more extra info I found at the Aerodrome forum, when a few years back I had posted this in  Marc's Great War GB -

Of what is certain is the streaking was applied by hand brush at the factory.  Some have suggested an 8 inch wide brush, but I forget how they came to this conclusion.  There is a photo from a factory of a worker with a number of fokker wings on a rack, drying perhaps.  There seems to be a conscious effort that the applied wing surface streaking was at an angle of about one to one and one half ribs apart.

What is hotly debated is the surface colour before applied streaking.  Most seem to be of the opinion it was either plain or treated canvas (but not coloured). 

The colour of the streaking is another proverbially can of worms.   There are three proposed methods I have read about. 
The simplest is the olive(?) was stroked on with a back and forth motion till the paint ran out, then the brush was reloaded and contined from the last applied stroke. 
Second method was to have three buckets of the same paint colour, but each one was thinned more than the previous. 
Thirdly, there was two or even three colours of paint used.

I haven't checked lately so there might be new info on the application.

regards,

Jack

  • Member since
    February 2006
  • From: Smithers, BC, Canada
Posted by ruddratt on Monday, March 4, 2013 8:17 PM

shivinigh
How did you get the photo etch to roll so nice? Every time I try I get a fold or kink in it.

shiv, I usually anneal the stuff with a hot lighter, but the WnW PE is very easy to work with. I just roll it around progressively smaller drill bit shafts between my thumbs and forefingers until it's the right size. Takes some doing though.

Tim, don't worry too much about the fuel tank on the D.VII. The upper cowling piece covers most of it anyway. I know what you mean about cleaning it up though - those seams were a dog to get rid of without losing any surface detail.

Chuck, looks like Jack beat me to the answer to your inquiry. Great pic there Jack!

Hope everyone is having fun! Looking forward to seeing the WIP pics! Been working on the engine for the E.III - had a bit of a boo-boo gluing the front & rear cylinder halves together when I got one of those fat thumbs of mine too close to the seam and the Tamiya extra thin runneth under. Some detail was compromised on the front surface of one of the heads. Gonna try to cut it back in with a #11 blade, but the original detail is so fine that any repairs will still be noticeable to a degree. We'll see how it goes.

Mike

 "We have our own ammunition. It's filled with paint. When we fire it, it makes pretty pictures....scares the hell outta people."


  • Member since
    November 2009
  • From: SW Virginia
Posted by Gamera on Tuesday, March 5, 2013 7:26 AM

Mike: Indeed those machine guns are great! Thanks for the advice on rolling out the shields.

In fact nice work all around guys!

"I dream in fire but work in clay." -Arthur Machen


  • Member since
    September 2011
  • From: Milaca, Minnesota
Posted by falconmod on Tuesday, March 5, 2013 7:44 AM

Yeah, only 3 days until I can pull out the albatross D III and start working on it again.

John

P.S. better be soon it could get lost on my work bench! Surprise

On the Bench: 1/72 Ki-67, 1/48 T-38

1/144 AC-130, 1/72 AV-8A Harrier

Moderator
  • Member since
    September 2011
Posted by Tim Kidwell on Tuesday, March 5, 2013 8:06 AM

Chuck Davis
No sweat Tim - we've all done it.  I just looked at my D.VII and I think you're safe - no one outside this group will ever know.  And we'll never tell...will we guys?...

Ah, yes, the modelers' code: Never sell out another modeler, unless he's about to beat you in a contest. OH, that's not the code ... oops.

--

Timothy Kidwell
Editor
Scale Model Brands
Kalmbach Media


Moderator
  • Member since
    September 2011
Posted by Tim Kidwell on Tuesday, March 5, 2013 8:13 AM

ruddratt
Tim, don't worry too much about the fuel tank on the D.VII. The upper cowling piece covers most of it anyway. I know what you mean about cleaning it up though - those seams were a dog to get rid of without losing any surface detail.

Thanks, Ruddratt. Aaron and I were thinking the same thing (so was Chuck). Oh, well. Onwards!

Yes, it sounds like many have gotten their start. Falconmod is still idling, but he'll be up and running here shortly. I'm sure Aaron will pipe up here soon. He's snowed in with another model for the magazine at the moment, but we have a vlog post coming, so I'll poke him with some sharpened sprue.

Good start, everyone! And thanks for the info, Jack. Very helpful and interesting.

Have a great day and happy building!

--

Timothy Kidwell
Editor
Scale Model Brands
Kalmbach Media


  • Member since
    October 2011
  • From: Lake Villa, Illinois
Posted by Chuck Davis on Tuesday, March 5, 2013 8:39 AM

Jack: Thanks for the info sir - that's perfect!  Of course it now adds a trial with "canvas" coloring as a base coat, but that's OK.

Have fun everyone...

Chuck Davis

  • Member since
    April 2003
Posted by shivinigh on Tuesday, March 5, 2013 2:46 PM

Ruddratt, thanks for the info on the rolling photo etch.

Started doing the work on the engines for my Gotha and as I look at the instructions and pieces for the rest of the kit I came to a conclusion. It seems like I am cheating with this kit, almost 90% of it is covered in decals. Looks like I am going to have to do one incredible weathering job to keep up with you guys.


Moderator
  • Member since
    September 2011
Posted by Tim Kidwell on Tuesday, March 5, 2013 4:03 PM

Unless you're paying someone to build it for you, I think you're in fine standing. Me, I'm still trying to drain my head so I can get back to the bench. I think I'll bring the D.VII into the office and see what I can get done here. Also, need to catch some video of the work.

--

Timothy Kidwell
Editor
Scale Model Brands
Kalmbach Media


  • Member since
    September 2005
  • From: Central Nebraska
Posted by freem on Tuesday, March 5, 2013 9:34 PM

Broke out my E-IV.  Been looking at all the online reviews I can find and studying the pics in the Squadron book.  Right now I'll probably finish it in Boelke's scheme just to honor the great one.  Kit seems to have a few shape issues outside but the engine looks good and there's enough detail in the cockpit for 72 scale.  Kinda embarassed with all these big kits going on but I have a ton of 72 scale WW1 kits collected over the last 25+ years.  Good to see all the work being done!

Chris Christenson


  • Member since
    December 2002
  • From: Northern California
Posted by jeaton01 on Wednesday, March 6, 2013 4:16 PM

Why be embarrassed?  You may be the only one who has  chosen a kit with a skill level equal to your pay grade, instead of above it, as I have!

John

To see build logs for my models:  http://goldeneramodel.com/mymodels/mymodels.html


  • Member since
    February 2006
  • From: Smithers, BC, Canada
Posted by ruddratt on Wednesday, March 6, 2013 9:40 PM

shiv, Cliff, no problem man. Happy to help. Looking forward to seeing some progress pics of your builds.

shiv, man, that's a lot of decals. I don't envy you having to apply those suckers, and weather 'em too. That's gonna be a challenge!

freem, anyone who models that braille scale stuff has my respect. No way my peepers or fingers allow me to work with stuff that small any more. Can't wait to see some pics!

John, you must be chompin' at the bit! Well, we are too, to see more of that build! It's really lookin' sweet!

Going to finish try to finish up the engine tomorrow night in spite of the slightly buggered cylinder head and see how it looks. If I ain't happy, well, there's this as a possible replacement.....

http://www.taurusmodels.pl/oberursel%20UI.htm

Mike

 "We have our own ammunition. It's filled with paint. When we fire it, it makes pretty pictures....scares the hell outta people."


  • Member since
    September 2005
  • From: Central Nebraska
Posted by freem on Thursday, March 7, 2013 1:29 PM

thanks for the confidence vote jeaton and ruddratt!  Eindekkers have always been amongst my fave planes.  Pics will happen if I can figure out how to get em off my iphone and onto the forum. Ive taken the cumpulsory box art and sprue shot. By the way, I could screw up a snaptite kit so pay grade is down there.  The Wingnut kits are probably the ultimate model kits out there as far as what I've seen from sprues to built kits. And the cost seems way reasonable for what you're gonna get!

freem

Chris Christenson


JOIN OUR COMMUNITY!

Our community is FREE to join. To participate you must either login or register for an account.

SEARCH FORUMS
FREE NEWSLETTER
By signing up you may also receive reader surveys and occasional special offers. We do not sell, rent or trade our email lists. View our Privacy Policy.