SEARCH FINESCALE.COM

Enter keywords or a search phrase below:

Armour in the West GB (D-Day to Berlin)

47489 views
560 replies
1 rating 2 rating 3 rating 4 rating 5 rating
  • Member since
    July 2014
Posted by modelcrazy on Thursday, September 18, 2014 4:19 PM

Let me fix the sandbags so the driver could see out of the periscope and upload a new pic for you. Otherwise I would choose pic #1.

Steve

Building a kit from your stash is like cutting a head off a Hydra, two more take it's place.


http://www.spamodeler.com/forum/

  • Member since
    November 2010
  • From: Florida-West Central
Posted by Eagle90 on Thursday, September 18, 2014 7:03 PM

modelcrazy

Let me fix the sandbags so the driver could see out of the periscope and upload a new pic for you. Otherwise I would choose pic #1.

No problem MC.  Let me know when you get the pic! 

Eagle90


  • Member since
    September 2006
  • From: Dripping Springs, TX, USA
Posted by RBaer on Friday, September 19, 2014 10:19 AM

My wife watched a chick-flick last night so I went to the cave, yay!

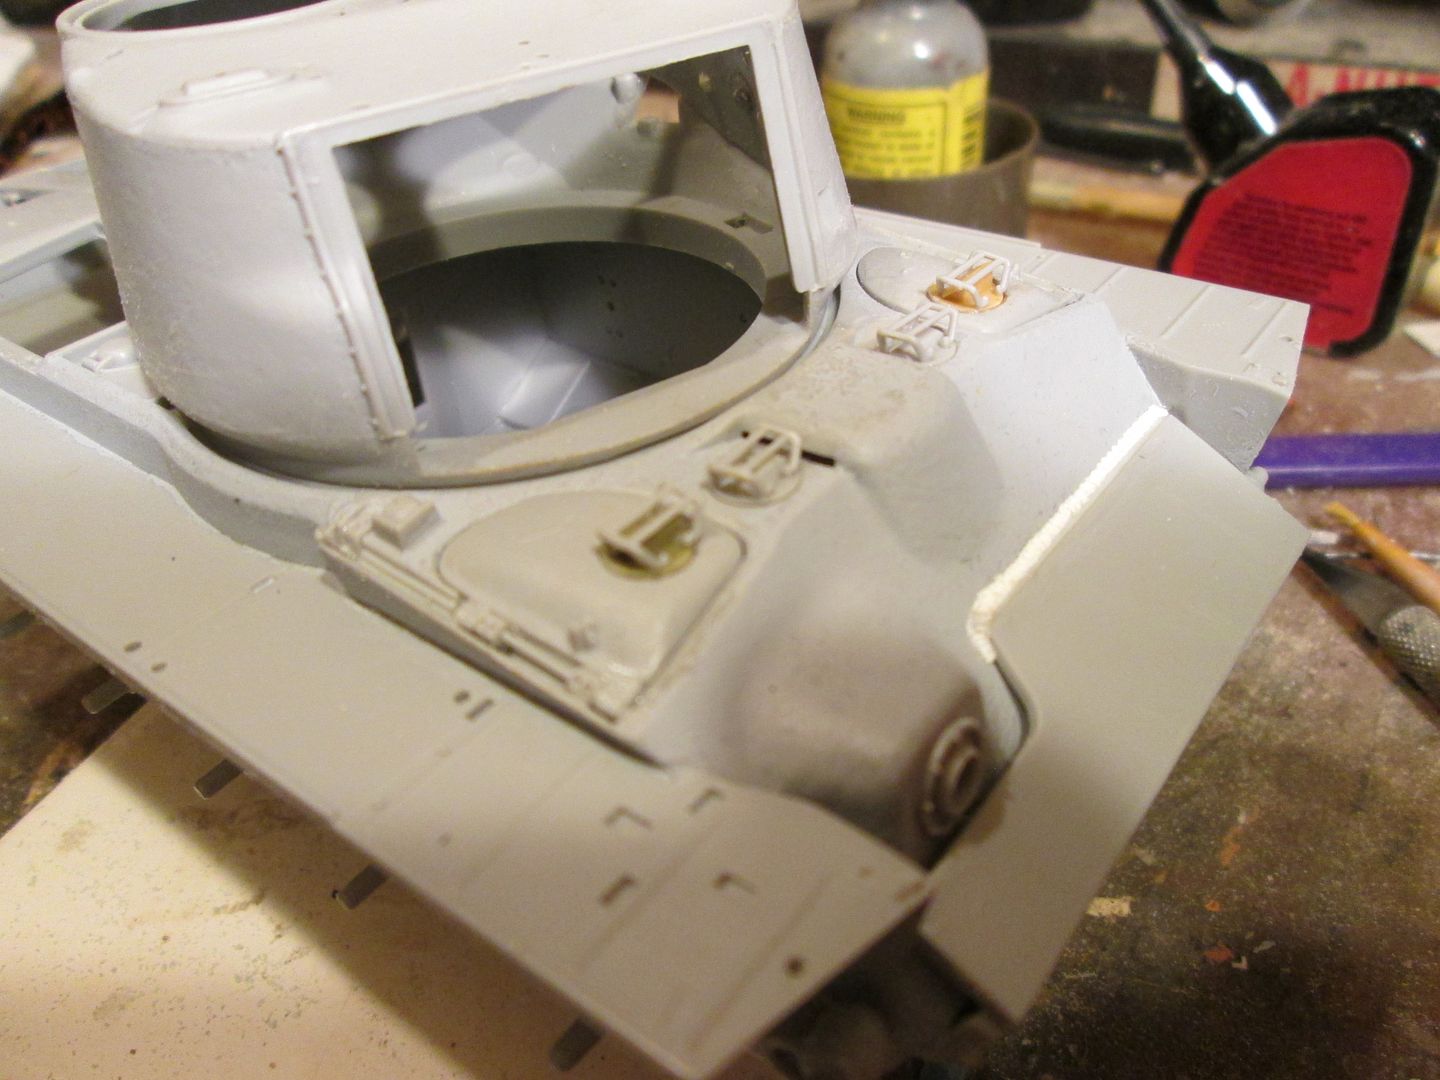
I got to the point of installiing the front hull periscopes, and like most models, this kit suffers from "closed periscopeitis", so I dug around in my Sherman bits until I found a couple of old Verlinden open periscopes, probably from the loader's position, since I had extras and they were larger than the hole. A little sanding to get two of them in the driver's and co-driver's hatches, kit brush guards fitted and done.

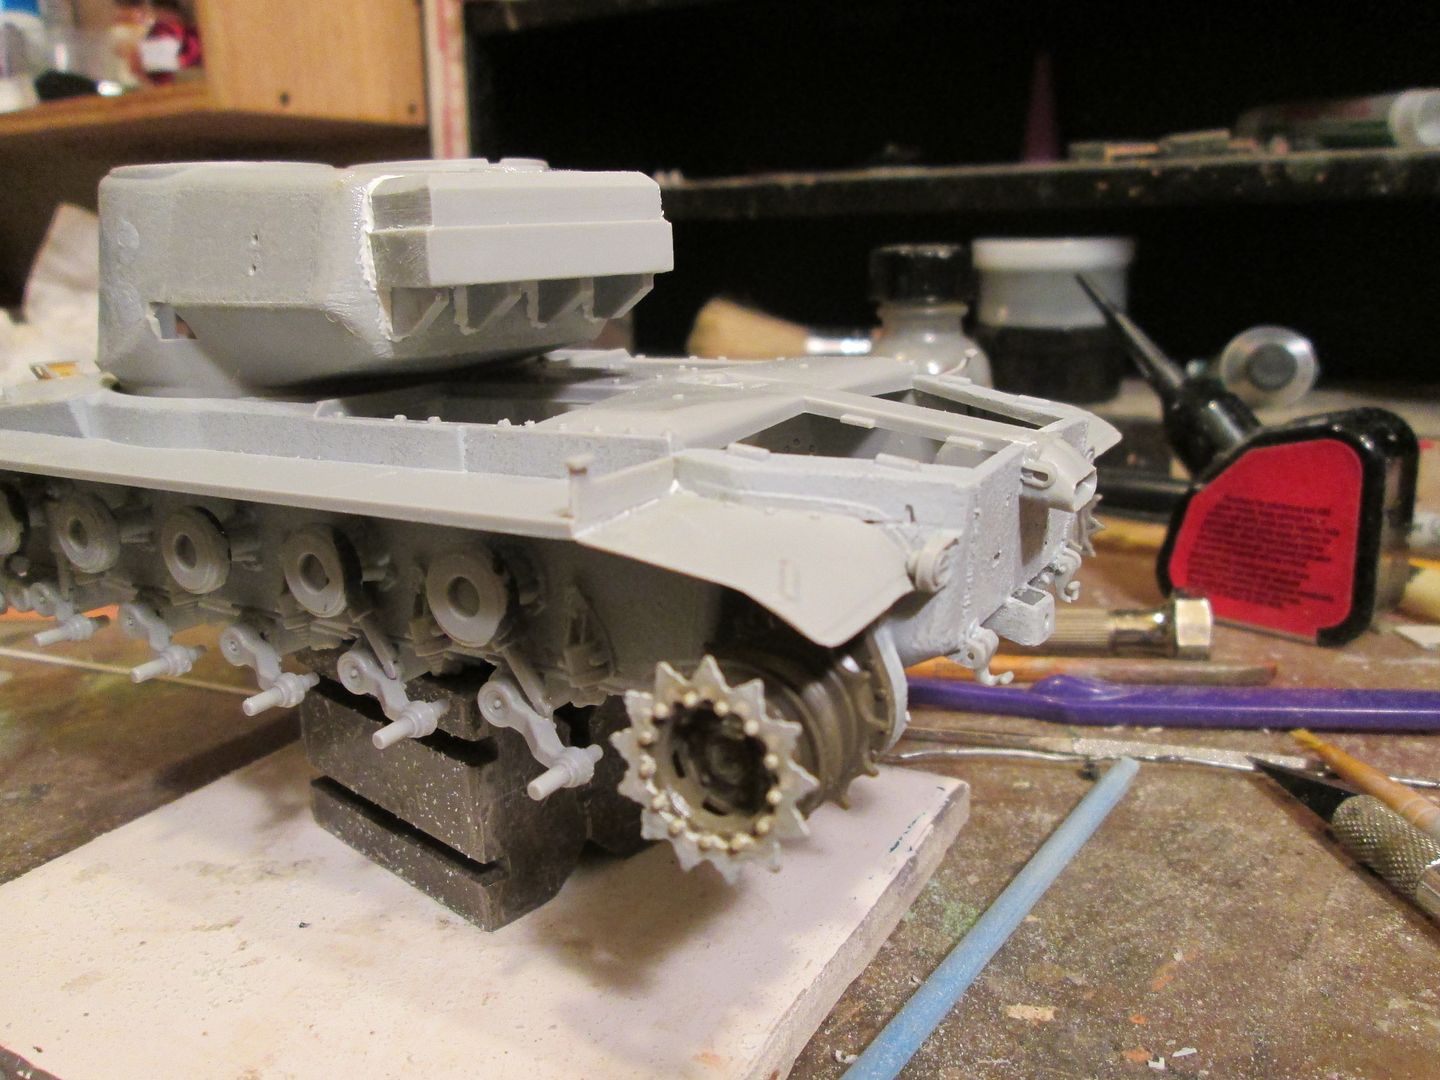
I also wanted to see what the turret fit was going to be like, so I glued the upper and lower together and surprisingly enough, the fit was near-perfect. I then added the appropriate counterweight, knowing that the fit here was off, and made welds from Vallejo putty. At this time I added the rear-most fender braces, then thinned the rear fender pieces and added them.

Not being able to leave well enough alone, I cut and sanded the "experimental" rear sprocket off it's hub, sanded the same off the one Tamiya sprocket assembly, and mated the necessary parts to get another "prototype" drive sprocket assembly.

It doesn't look like a lot in the pics, but it was all about four hour's worth.....    Feeling lucky after getting another "correct" sprocket assembly made up, I decided to tackle the kit gun tube. Yach! Mine was warped, and it trying to straighten the worst half, I broke it. Pressing on, I assembled the three (!) parts, flowed cryo glue down the indide of it and began puttying and sanding. I may get a usable part yet, but I'm going to shop for an AM part, since HB neglected to mold the prominent groove on the top-rear of the part.

Pics:

Just for fun (not) I also filled the back-side of the external layer of bow armor and made torch marks in the edges and bow MG cut-out, as seen in the few pics I have. I'll have pics of that exercise later......

Apprentice rivet counter.

  • Member since
    November 2009
  • From: SW Virginia
Posted by Gamera on Friday, September 19, 2014 1:43 PM

So I guess chick-flicks are good for something! Nice work!

"I dream in fire but work in clay." -Arthur Machen


  • Member since
    April 2003
Posted by shivinigh on Friday, September 19, 2014 4:55 PM

good looking work there RBaer.

Here is my attempt at weld seams. First time I ever tried it and I used Mr. Surfacer.

not really liking how they turned out. Going to sand them off and try again.


  • Member since
    April 2006
  • From: ON, Canada
Posted by jgeratic on Friday, September 19, 2014 5:32 PM

Blitzwing - excellent work on the Cromwell. Yes

I like the fine dust you have going on the lowers.  Regarding figures, I'd suggest on your next one to try a brown instead of black on the flesh areas - it might work better for you.  

------------------------------------------------

RBaer - good progress there

Shiv - interesting experiments with the weld seams.  In the past I've done something similar with Tamiy's surfacer which is almost as thin as paint.  I did mask the areas off first before application to arrive at straight edges.

-----------------------------------

Thanks  Modelcrazy, Blitzwing, Gamera, RBaer and Schatt.

Tracks are complete and painted, just requiring some final detail.  Last bits arrived today, some carpet grass from a railroad shop and the larger antenna.  I decided to go with the AM brass since I don't think I could get that tapered look with stretched sprue.

regards,

Jack

  • Member since
    July 2014
Posted by modelcrazy on Friday, September 19, 2014 8:54 PM

Eagle,

Put this pic up on the front page please.

Steve

Building a kit from your stash is like cutting a head off a Hydra, two more take it's place.


http://www.spamodeler.com/forum/

  • Member since
    April 2013
Posted by SchattenSpartan on Saturday, September 20, 2014 5:44 AM

RBaer: She's coming along nicely!

Jack: I really like those grass mats and a'm very interested in how you are going to use them!

Shiv: I like to use strip styrene for my weld seams. After glueing them in place I usually apply some strong lacquer thinner to them and then use a scalpel to sculpt the soft plastic.

  • Member since
    November 2010
  • From: Florida-West Central
Posted by Eagle90 on Saturday, September 20, 2014 4:57 PM

modelcrazy

Eagle,

Put this pic up on the front page please.

Got it!  Again...great work!  The sandbags are awesome!

Eagle90


  • Member since
    November 2010
  • From: Florida-West Central
Posted by Eagle90 on Saturday, September 20, 2014 4:59 PM

Jack, thanks for posting those pics.  I think that carpet grass rocks!  I want to get some and try it out!  I like the way it looks!

Eagle90


  • Member since
    September 2006
  • From: Australia
Posted by Blitzwing on Sunday, September 21, 2014 6:09 AM

Thanks for all the feedback everyone, it was a very enjoyable build.

Please use the first picture for the first page please.

URL=http://picasion.com/]

  • Member since
    November 2010
  • From: Florida-West Central
Posted by Eagle90 on Sunday, September 21, 2014 4:18 PM

Blitzwing

Thanks for all the feedback everyone, it was a very enjoyable build.

Please use the first picture for the first page please.

Got you up there BW!  Great looking Cromwell sir! 

Eagle90


  • Member since
    September 2006
  • From: Dripping Springs, TX, USA
Posted by RBaer on Tuesday, September 23, 2014 10:26 AM

Tool box handles done, some Eduard parts (base) and some Academy and Esci (handles). The Eduard handles were very unrealistic, so I popped them off and dug into the spares. Generally speaking, there's a lot on the Eduard set for this model that makes no sense, no better than the plastic parts, or even worse. Also visible is the horn and guard, another good example of the plastic part, with some thinning, being more realistic than the etch part. Hmmm.....

Still working on the gun tube, trying to get the imperfections out and straightened.....   RB Models part ordered, but on Inter-Galactic Back Order from everyone that sells RB....

Apprentice rivet counter.

  • Member since
    November 2009
  • From: SW Virginia
Posted by Gamera on Tuesday, September 23, 2014 11:48 AM

Again just superb work guys! Need to get back to mine...

"I dream in fire but work in clay." -Arthur Machen


  • Member since
    September 2006
  • From: Dripping Springs, TX, USA
Posted by RBaer on Wednesday, September 24, 2014 10:09 AM

More late-night progress.....

Outer bow armor on, turnbuckles on, headlights mounted on front fenders instead of bow armor as HB directs, and divots for same on bow armor filled. I also built the mantlet and added the mount for the dust cover, missing on both the HB and Tamiya kits.

Regarding the turnbuckles, Eduard includes them in the etch set, and I have to say the idea of something that's made from round stock and 3D pieces looks silly in etch. More "useless PE" rant, sorry.

Anyway, pics:

Barrel is test fitted, and boy is it long.... ^

Bow armor ^

Turnbuckles, nicely done by HB. Loops on hull are thin wire, I used the kit loops on the front but wanted more strength on the back. ^

And just for grins, my barrel straightening method:

Off to the wilds of Oklahoma now, back later!

Apprentice rivet counter.

  • Member since
    April 2006
  • From: ON, Canada
Posted by jgeratic on Wednesday, September 24, 2014 5:28 PM

RBaer - very  fine attention to detail there.  No kidding about the barrel size, in that photo it looks King Kong could use it for a drinking straw.

--------------------------------------------------------------

Alright, the Stuart V is now done.  I guess the shot with the realistic background can be used for the front page of completed builds.

regards,

Jack

  • Member since
    July 2014
Posted by modelcrazy on Wednesday, September 24, 2014 5:35 PM

Really looks great Jack. Very nice work sir.

Steve

Building a kit from your stash is like cutting a head off a Hydra, two more take it's place.


http://www.spamodeler.com/forum/

  • Member since
    November 2009
  • From: SW Virginia
Posted by Gamera on Wednesday, September 24, 2014 7:57 PM

Jack: That's just beautiful man! Love how the Stuart came out but I really love the figure and the whole story behind it. Very dramatic!

"I dream in fire but work in clay." -Arthur Machen


  • Member since
    November 2010
  • From: Florida-West Central
Posted by Eagle90 on Thursday, September 25, 2014 5:45 AM

Jack!  That Stuart is amazing!  Awesome work!  Got you posted on front page.

Eagle90


  • Member since
    April 2006
  • From: ON, Canada
Posted by jgeratic on Thursday, September 25, 2014 10:48 AM

modelcrazy, Gamera and Eagle - thanks very much guys!

regards,

Jack

  • Member since
    September 2006
  • From: Dripping Springs, TX, USA
Posted by RBaer on Thursday, September 25, 2014 12:26 PM

Awesome, Jack. The grass looks very nice too.

How did you do the background on the one scenic shot?

Apprentice rivet counter.

  • Member since
    February 2014
  • From: Michigan
Posted by silentbob33 on Thursday, September 25, 2014 8:17 PM

Great job Jack!  Excellent work on the commander.  Figures are where I'm having the most problems at present

On my bench: Academy 1/35 UH-60L Black Hawk

  • Member since
    April 2006
  • From: ON, Canada
Posted by jgeratic on Thursday, September 25, 2014 11:47 PM

Thanks RBaer and silentbob33

To create the first photo, a mask layer was made from one of my Stuart shots.  Basically the photoshop program cuts around the image, which is pretty easy when the background is a single colour, (such as the white here). This tank image was then cut and pasted over top a suitable landscape image. 

There is some manual labour involved with clean up of edges, and I also desaturated the background beforehand, as it was a bit too lively green in the grass areas.


regards,

Jack

  • Member since
    September 2006
  • From: Dripping Springs, TX, USA
Posted by RBaer on Friday, September 26, 2014 10:17 AM

And here I was thinking you put your model and base in front of a poster or something......

Apprentice rivet counter.

  • Member since
    April 2006
  • From: ON, Canada
Posted by jgeratic on Friday, September 26, 2014 11:14 AM

In some ways, that would be easier, just have to be careful of getting a glare on the background.  You are also limited in adjusting the image size in comparison to the model.  With everything on the computer, it's very easy to shrink or enlarge one or the other.  Actually, my background photo was increase in size by 200%.   I suppose you can print out the background to the required size, but that can eat up a lot of ink.

regards,

Jack

  • Member since
    September 2006
  • From: Dripping Springs, TX, USA
Posted by RBaer on Tuesday, September 30, 2014 10:49 AM

Thanks, Jack. Beyond my current skill set......

So, I'll be working from a pic in Squadron's Pershing Walk Around book of the Super as it was delivered to the 3rd AD and after they had attached the slab of Panther armor to the mantlet. The pic (Mods, can I post it here if it's for discussion purposes only?) shows the tank without the shroud over the gun equilibirator cylinders, no stowage baskets on the bow or rear fenders, and no bat wing armor on the mantlet.

Here's where I am now:

Welds are from Vallejo putty, easy to do and dries in 20 minutes or so. Also on is the one track tool the Super carried, cupola with vision blocks drilled out and hatch on, and loader's hatch ring.

This one is actually moving along faster than I thought it would, so my Sherman for the Orphaned Armor GB is going into the lineup this week. Whee!!!

Apprentice rivet counter.

  • Member since
    April 2013
Posted by SchattenSpartan on Friday, October 3, 2014 5:41 PM

Jack: Your Stuart truly is a piece of art! I love how the commander figure adds to an already great build and the grass on the base looks very nice as well!

RBaer: Great progress on the Pershing! Can't wait to see your Sherman!

  • Member since
    September 2006
  • From: Dripping Springs, TX, USA
Posted by RBaer on Monday, October 6, 2014 11:07 AM

Thanks!

Based on info from another modeler, I've trimmed the front fender braces and shaved off all the air vents on the fender box lids, tiny details but, hey, once I know about it, gotta do it.....

There's just not that much available in the way of pics for this thing, but enough to do a gun cradle, which is next....

Apprentice rivet counter.

  • Member since
    November 2009
  • From: SW Virginia
Posted by Gamera on Monday, October 6, 2014 11:27 AM

Dunno know if it's correct or not but it looks pretty darn good from here!

"I dream in fire but work in clay." -Arthur Machen


  • Member since
    April 2003
Posted by shivinigh on Monday, October 6, 2014 3:47 PM

Sorry haven't posted in a bit. On my fifth try for the weld seams on my Chaffee. Don't know how you guys make it look so easy but think I finally got it. Using Mr. Surfacer 500 and some masking tape. Liking how it is turning out this time. Will post some pics when finished.

Jack-great job on the stuart. With the landscape photo it is hard to tell that it is a model and not the real thing.

RBaer-your super pershing is coming along nicely. I just watched an episode of greatest tank battles and they showed a super pershing taking on a tiger II. Didn't turn out so well for the tiger.


JOIN OUR COMMUNITY!

Our community is FREE to join. To participate you must either login or register for an account.

SEARCH FORUMS
FREE NEWSLETTER
By signing up you may also receive reader surveys and occasional special offers. We do not sell, rent or trade our email lists. View our Privacy Policy.