SEARCH FINESCALE.COM

Enter keywords or a search phrase below:

Metal masters GB 2016 (1Feb to 31 July)

12648 views
250 replies
1 rating 2 rating 3 rating 4 rating 5 rating
  • Member since
    January 2014
  • From: Nampa, Idaho
Posted by jelliott523 on Monday, May 23, 2016 9:24 AM

The Mig is complete. I had a lot of fun with this one. Practicing with using Alclad and AK Xtreme Metals and Ammo of Mig Acrylic Metal Colors. I've still got some things to learn, but I'm having fun and that's what counts. I'll take some other photos without all of the stuff in the background and you can decide which to use on the front page.

On the Bench:  Lots of unfinished projects!  Smile

  • Member since
    July 2014
Posted by modelcrazy on Monday, May 23, 2016 9:28 AM
That turned out outstanding Jeremy!!! The panel lines look prefect to me, fantastic job mate. Bow DownBow DownBow Down

Steve

Building a kit from your stash is like cutting a head off a Hydra, two more take it's place.


http://www.spamodeler.com/forum/

  • Member since
    June 2013
Posted by bvallot on Monday, May 23, 2016 11:54 PM

Back with some more folks. Still don't have my new work bench up yet but I have been working from the dinner table (excuse these lousy pictures). Still working on getting to a point where I can close up the fuselage...getting closer. I knocked out the tail gear which I decided to fix up a bit. I think I'll continue to do it this way when the tail gear is set up and molded as such. Much more gratifying and definitely an improvement over the original kit part.

It starts out with cutting off the wheel and trimming away the wheel spindle. Next, I drill a tiny hole into the housing for the tail wheel spindle to receive a small brass rod that I've sized to fit. Once that's measured and ready, I file down the inside portion of the new spindle, make my appropriate bends and then snip it when I'm ready. A drop of CA sets it into place and Voila! =] Easy. I dressed up the rest of the tail gear assembly with some pulleys and will later fit up some EZ line. I also put on the tail wheel steering part.

 Untitled by Britt Vallot, on Flickr

 Untitled by Britt Vallot, on Flickr

And here it is painted...apologies about the pics. My white balance is way off with these mats.

 Untitled by Britt Vallot, on Flickr

Next, I turned my attention to the K-24 camera that was used in reconnainsance for the F-6 Mustangs. A few various bits of plastic strip, rods, clear sprue for the lens, and some lead foil was used to get this banged out. Here's the gest of it. It is just a little bit off scale...probably about 1.5 times bigger than it ought to be, but it'll have to do this time. I currently have it primed and drying over night so it'll be ready to paint tomorrow.

 Untitled by Britt Vallot, on Flickr

 Untitled by Britt Vallot, on Flickr

And here's a quick view of it sitting in the camera bay and how it will generally look.

 Untitled by Britt Vallot, on Flickr

That's that for now...getting closer. =]

On the bench:  

Tamiya F4U-1  Kenneth Walsh


  • Member since
    April 2010
Posted by Theuns on Tuesday, May 24, 2016 5:13 AM

That is what a MiG is supose to look like, somewhat weatherd and used, well done.

As sson as you send me a nice "backgroundless" pic I will update the front page for you.


Thanx for taking part.


Theuns

  • Member since
    June 2014
Posted by BrandonK on Tuesday, May 24, 2016 8:52 AM

bvallot

Back with some more folks. Still don't have my new work bench up yet but I have been working from the dinner table (excuse these lousy pictures). Still working on getting to a point where I can close up the fuselage...getting closer. I knocked out the tail gear which I decided to fix up a bit. I think I'll continue to do it this way when the tail gear is set up and molded as such. Much more gratifying and definitely an improvement over the original kit part.

It starts out with cutting off the wheel and trimming away the wheel spindle. Next, I drill a tiny hole into the housing for the tail wheel spindle to receive a small brass rod that I've sized to fit. Once that's measured and ready, I file down the inside portion of the new spindle, make my appropriate bends and then snip it when I'm ready. A drop of CA sets it into place and Voila! =] Easy. I dressed up the rest of the tail gear assembly with some pulleys and will later fit up some EZ line. I also put on the tail wheel steering part.

 Untitled by Britt Vallot, on Flickr

 Untitled by Britt Vallot, on Flickr

And here it is painted...apologies about the pics. My white balance is way off with these mats.

 Untitled by Britt Vallot, on Flickr

Next, I turned my attention to the K-24 camera that was used in reconnainsance for the F-6 Mustangs. A few various bits of plastic strip, rods, clear sprue for the lens, and some lead foil was used to get this banged out. Here's the gest of it. It is just a little bit off scale...probably about 1.5 times bigger than it ought to be, but it'll have to do this time. I currently have it primed and drying over night so it'll be ready to paint tomorrow.

 Untitled by Britt Vallot, on Flickr

 Untitled by Britt Vallot, on Flickr

And here's a quick view of it sitting in the camera bay and how it will generally look.

 Untitled by Britt Vallot, on Flickr

That's that for now...getting closer. =]


Sir,  you are really throwing the details at this one. This is gonna be a really nice build. Love it.!

BK

On the bench:

A lot !! And I mean A LOT!!

2024 Kits on deck / in process / completed   

                         14 / 5 / 2  

                              Tongue Tied

  • Member since
    June 2013
Posted by bvallot on Tuesday, May 24, 2016 9:56 AM

Jelliot, I can't believe I missed this last night. I copied and pasted from the Mustang GB and went to bed.

This MiG looks fantastic!! Very nicely captured. =D I love seeing a Cold War MiG come together. SO MUCH METAL!! Could you recap a little about some of the specifics about the techniques you used from AK Extreme Metals and MiG acrylic Metal colors?

BK, thanks. It's fun seeing her take shape. =]

On the bench:  

Tamiya F4U-1  Kenneth Walsh


  • Member since
    January 2014
  • From: Nampa, Idaho
Posted by jelliott523 on Tuesday, May 24, 2016 2:07 PM

bvallot

Jelliot, I can't believe I missed this last night. I copied and pasted from the Mustang GB and went to bed.

This MiG looks fantastic!! Very nicely captured. =D I love seeing a Cold War MiG come together. SO MUCH METAL!! Could you recap a little about some of the specifics about the techniques you used from AK Extreme Metals and MiG acrylic Metal colors?

BK, thanks. It's fun seeing her take shape. =]


bvallot, thank you for the comments. So a little about the painting and the mixed use of metallics. I started off by priming with Stynylrez grey, then I did an complete coat of AK Xtreme Metal Polished Aluminum. Then I picked out a couple different panel areas on the fuselage and tail. I used Alclad Duraluminum on a panel near the rear, just below the tail. I used Alclad Pale Burnt Metal for the engine area and then highlighted with AK Jet Exhaust. The inner portion of the tailpipe was sprayed with Ammo Metallic Steel and a light coat of Ammo Titanium then some AK Jet Exhaust over the top. The darkened panel just behind the cockpit and the two panels on the tail are AK Dark Aluminum. They actually show up a lot darker in the photos than they do in real life. I normally dont do much with panel lines, but I had a light mishap with the decals (as you can see the numbers on the front look worn) I didnt have a good enough coating of clear over the decals and it lifted parts of them off, I actually thought it made it look a bit more worn, so I decided to weather things a bit more than usual.

On the Bench:  Lots of unfinished projects!  Smile

  • Member since
    April 2010
Posted by Theuns on Wednesday, May 25, 2016 11:22 PM

Cool explenation, thanx. Will you be posting another pix of your mig for the pic page or can I use one in your post?


Theuns

  • Member since
    July 2013
Posted by lzdaily@comcast.net on Friday, May 27, 2016 1:08 PM

Hello, everyone.

Sorry to be away so long, but I had eye surgery several weeks ago and am just getting back to the point that I can see well enough to model or look at a computer screen. It's going to take me awhile to get caught up on what everyone is doing, but it looks like there's a lot of good stuff going on. Britt, what you're doing with your F-6 is amazing. I will definitely be referring back to your build when I start my F-6.

When last I posted, I was looking for a combination of paints that looked right to me for replicating a NMF. I think I finally have one that I like. You can see it in the photos of my latest test wing. I primed the whole thing with Alclad Black, except for the center section, which got Alclad Gray Primer. That center section then got Airframe Aluminum, while the rest of the wing got plain old Alclad Aluminum. The ailerons got Semi Matte Aluminum. The contrast between the Airframe Aluminum (even toned down a bit by the gray primer) and the Aluminum still seemed to great, but then I had a thought. I masked off a couple of panels and sprayed Airframe Aluminum over the Aluminum. I think it looks about right. I converted the image to grayscale to see how it compared to prototype photos and I still think it looks about right. So, I'm painting this thing very soon.

Best to all,Larry

  • Member since
    June 2013
Posted by bvallot on Monday, June 6, 2016 1:47 PM

So I've been trying to put this together for a while but being a new dad makes it a bit more cumbersome. It's a little less professionally pulled off than I intended but it does provide a benchmark from which to work and plan your painting. I did encounter a small hiccup with regards to the highshine Alclads Airframe Aluminum and Stainless Steel. I was painting these rather quickly (as time as been a luxury) and my quick clean method seems to have begun to fail towards the fourth or fifth color. My Airframe Aluminum swab came out cloudy...only to find it was just a residue that rested on top during painting. I first thought it wasn't dry, but come to find out it rubbed right off to reveal the actual paint...curious huh. This was the actual first time I painted with the Airframe Aluminum as well even though I'm aware of how it should appear. Thus...the test. =]

I also found the Polished Aluminum to be a bit cloudier than I've seen in the past...just a quick note. Over the Gloss Black it will shine a pop a bit more than seen here. So here we go:

I tried to combine these to consolidate the photos to keep from being picture heavy. I hope they're not too small now. I may repost if it doesn't read well.

 Untitled by Britt Vallot, on Flickr

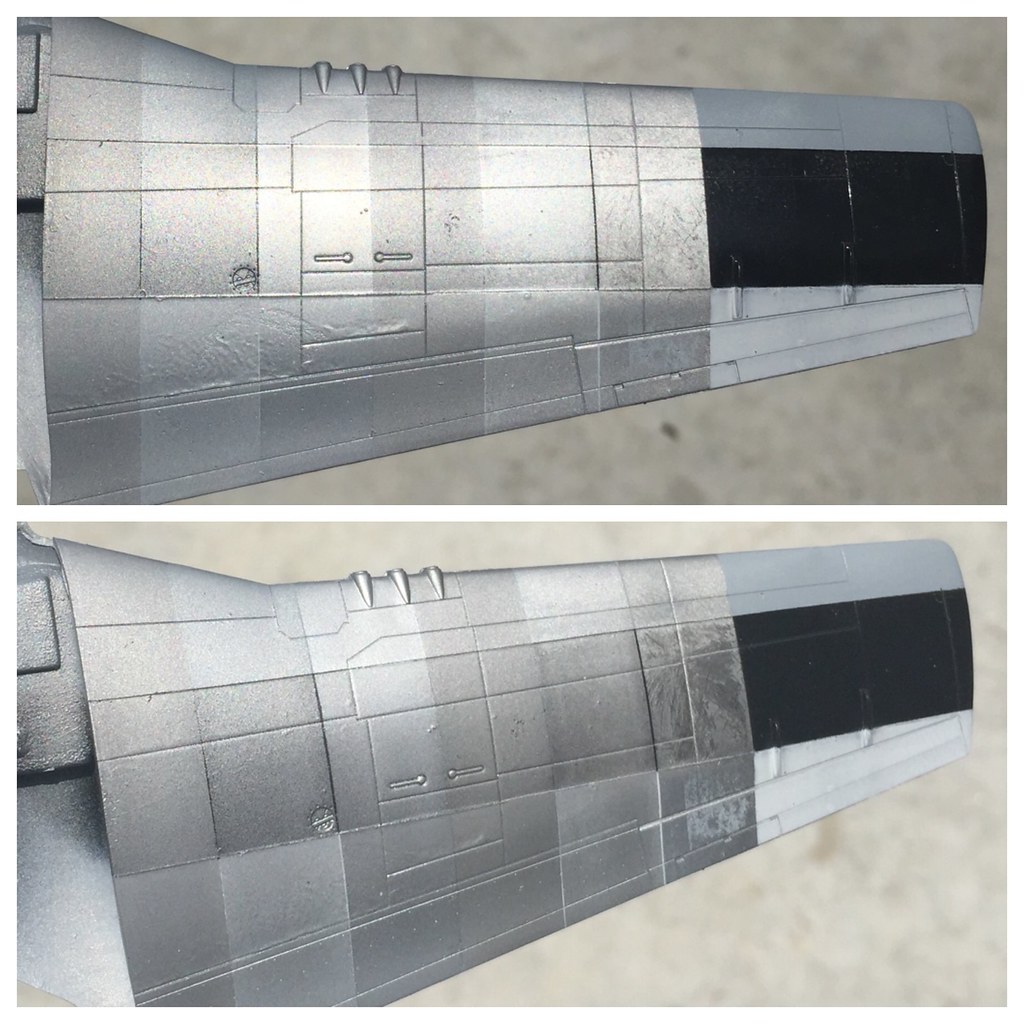
So from left to right you're looking at Dark Aluminum, Aluminum, White Aluminum, Duraluminum, Polished Aluminum, and Airframe Aluminum (pre-residue rubbed off). This is outside in natural light, fairly sunny, and they appear over the Alclad Grey primer, Gloss Black primer, and Tamiya Fine White primer. I kept the coats somewhat in the middle...about three to four solid passes with my airbrush.

In all noticed that the Semi-Matte resisted shine the most, then the Duraluminum, and Dark Aluminum next. The Airframe shines brightest and Polished Aluminum next brightest. The tones are obvious to see next to one another. There will be more of an apparent difference between the Grey primer and Gloss Black primer when viewed from different angles especially.  

 Untitled by Britt Vallot, on Flickr

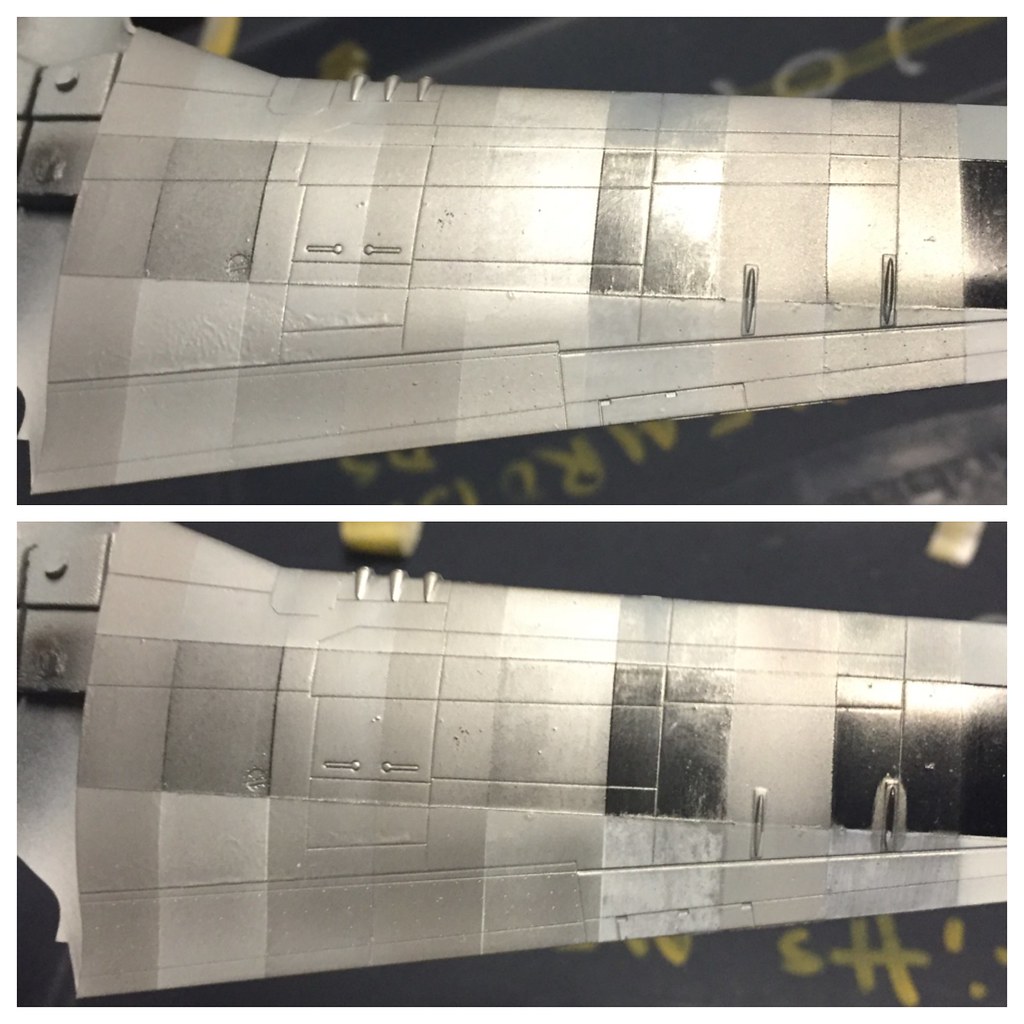
The next one includes the Semi Matte, and Stainless Steel. The Airframe shines bright here. The lighting is from a flourscent bulb in my gargage. The white primer seems to give a more weathered and beaten look to the metal if that is what's desired. However, I think the grey primer is better suited at giving the builder more control over the process and ultimately more depth to what can be achieved. Just my thoughts on that.

 Untitled by Britt Vallot, on Flickr

 Untitled by Britt Vallot, on Flickr

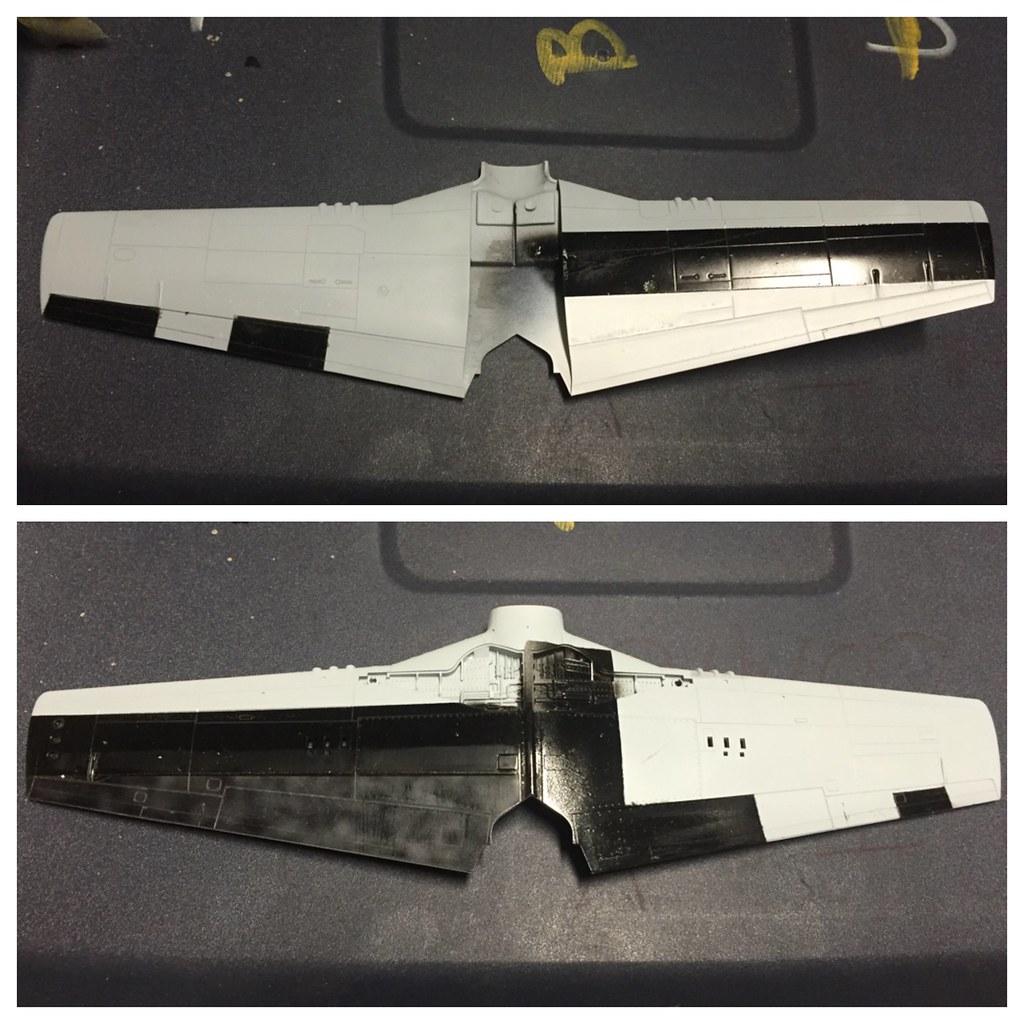
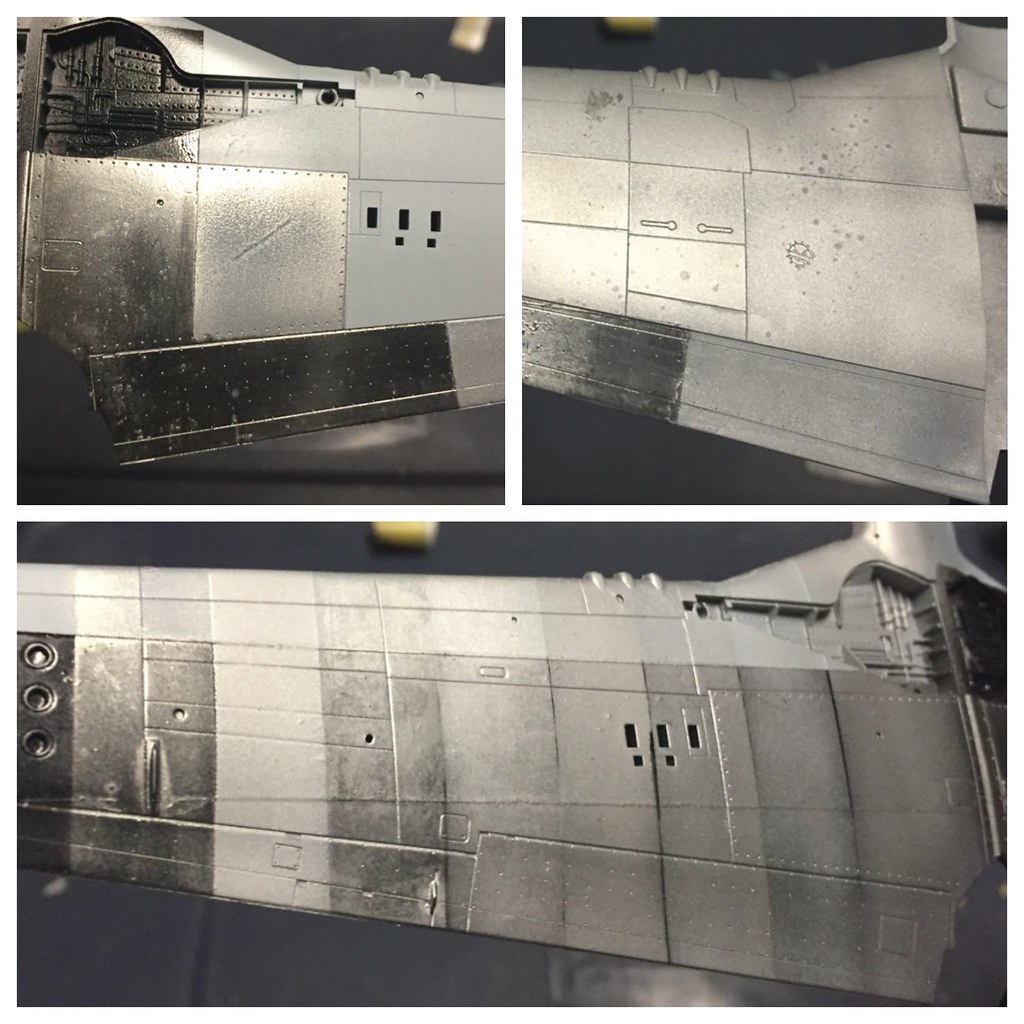
In this last two pics, I apologize again at how rushed these were, you're looking at the layout of the primers, and in the second pic the top two frames show some test pieces to see how some buffing would affect the outcome. Originally, on the undersurface, I started as before with the Grey on top, Gloss Black on the bottom, but on the bottom half I sanded with a fine sanding stick to buff the surface, and below that I used a trick I saw from Doog's playbook by marbling in some Tamiya Dark Grey. Ultimately didn't see the success I was hoping for. Limiting factors may include the narrow surfaces with which I was working as well as needing to be a little more diligent with cleaning my airbrush. I think these would help the high shine alclads better than the rest of the line up though based on how the angles of viewing allow the paints to perform. In the second pic, the left pic shows the Duraluminum on the top portion of the wing with Dark Aluminum on the ammo doors. This was all lightly sanded with the extra fine sanding stick. The dots you see are from overspray that occurred from me rushing the priming of the wing, but they help to show you how this light sanding appears from different angles. The right top frame shows the Airframe Aluminum was painted over both the Gloss Black and Grey primers and then lightly buffed with an extra fine sanding stick in the same manner. Since Larry already provided an example of how this looked I thought I would explore buffing the surface after the fact since I wasn't getting quite what I had intended to see with the ease I wanted. I really liked how both sides came out. Very reassuring. I'll likely repeat this on the underside for this panel with my Mustang.

That's all I have time for at the moment. I hope this generates some dialogue. I would love to hear what others think and outcomes you've had (successes v failures).

=]

On the bench:  

Tamiya F4U-1  Kenneth Walsh


  • Member since
    January 2014
  • From: Nampa, Idaho
Posted by jelliott523 on Monday, June 6, 2016 5:45 PM

Theuns

Cool explenation, thanx. Will you be posting another pix of your mig for the pic page or can I use one in your post?


Theuns


Theuns, Yes, I will be getting another shot of the Mig for the front page. I've been extremely busy the past couple of weeks. My middle daughter graduated high school, I became another year older, and work has been exhausting. I'll try to get a shot tonight and get it added.

On the Bench:  Lots of unfinished projects!  Smile

  • Member since
    April 2010
Posted by Theuns on Monday, June 6, 2016 11:26 PM

cool no worries :-)

  • Member since
    July 2013
Posted by lzdaily@comcast.net on Friday, June 10, 2016 4:29 PM

Here's my latest progress on my P-51D:

In this shot, the spinner has been painted and the nose end of the aircraft painted yellow in preparation for the checkboard squadron markings.

I put a lot of thought into how to deal with the checkerboard markings. I finally settled on a version of the method used by lawdog114 (see 1/48 Tamiya P51 B "Berlin Express" (FINISHED)). I first tried cutting out squares of tape like he did, but I could tell as I was applying them that it wasn’t working out. Then I hit on this: I photocopied the Tamiya decal, cut it out and rubber cemeted it to blue painter’s tape. Then using a straight edge and a really sharp Exacto blade, I cut out the individual “squares” (they’re not really square). I applied them all, then pulled off the tape over the areas to be painted red.

In this shot, I’ve applied the red paint. At this point, I used progressively finer grits of sandpaper to knock down the areas a raised paint where the masking tape had been. The checkerboard isn't great (nowhere near as nice as lawdog's), but I think I can live with it.

Using another copy of the kit decals, I prepared a solid mask to go over the checkerboard, applied it to the model and then painted the top of the nose olive drab. I masked off the antiglare panel and then sprayed the model with Alclad Gloss Black Base.

After masking off the ailerons, the elevators, and the rudder (they’re going to get a coat of Alclad Semi Matte Aluminum), I sprayed the model with Alclad Aluminum.

Sorry for the long post, but that get's me up to date.

Best to all,
Larry

  • Member since
    April 2010
Posted by Theuns on Saturday, June 11, 2016 12:17 AM

That is a cool way to put cecks on, way better than a decal the never fits to the shape.


Theuns

  • Member since
    July 2013
Posted by lzdaily@comcast.net on Saturday, June 11, 2016 1:28 PM

Theuns, thanks for the kind words. The paint definitely looks better from three feet than close up.

Here's a shot of where I am now:

I am not a happy camper. I masked off the wings and sprayed the fuselage with Airframe Aluminum. Then I removed all of the masking. I like the contrast between the fuselage and the wings, but some of the Alclad paint came up with the masking. You can see what I’m talking about along the edge of the antiglare panel just forward of the cockpit, along the edge of the checkerboard just below the exhaust, and — most noticeably — right over the wing root. In addition, there’s a fair bit of paint buildup along the edges of the checkerboard and the antiglare panel. I don’t know that going over it with really fine sandpaper would help. I suspect that I could cut down the paint buildup, but I’d probably ruin the metallic finish. I’m very tempted to strip the paint and try again, if I could be sure not to ruin the cockpit. Please excuse me while I go pound my head against the wall...

Thud, thud...

  • Member since
    June 2013
Posted by bvallot on Saturday, June 11, 2016 11:41 PM

Larry, I'm sorry to hear you having a hard time with that paint. That's such a gut punch to see. I do enjoy seeing others put their builds together from a totally different fashion, but I wonder if some times people make it harder on themselves. So try this for instance. I approach my builds like a real plane would get painted. If I'm doing a fair amount of weathering (even if only over a certain part like a wing walkway) I'll start with a metal color paint such as an Alclad. Then, likely even move onto a zinc primer color to show where those colors would pop into play. Next, would be the first layer of paint for the undersurface of whatever color I'm painting--it could be lighter or darker--then a follow up color depending on location to tie it all in. So it's basically like painting the real thing. Primer color on top of metal...paint on top of primer. It has never failed me. In fact, I get better with each build. It's simpler to keep track of and masking is a lot less complicated.

So for a mustang, for example, I'd complete all my metal colors and then move onto painting my anti-glare surface, then whatever markings it may have, then possibly decals unless I'm painting those as well. Once completed, I'll seal all of that with a Flat or whatever desired effect I'm hoping to see. I never have to worry about build up. Colors go down in thin coats and masking is limited. I honestly don't really feel like any kind of expert. I am always hoping to soak up information from others on the forum. But I can tell you I have not once had the kind of issues I hear from others with painting. Might be a bit of luck, or maybe a little by design...either way if it ain't broke...I'll keep on with that line of thought. So, I share that with you and everyone else reading in hopes that it provides some perspective and possibly another way to go about your painting/weathering phase. Each step helps the other by providing a layer that could be seen without having to backtrack. Just a thought. =]

Don't let her keep you down!! I've almost got mine closed up. I have just a couple of cables to secure and paint up and then the cockpit to sure up and then she's getting sealed shut. =D I'm about to nail this TD cockpit fit and it feels good. LOL ...only took me a week.

On the bench:  

Tamiya F4U-1  Kenneth Walsh


  • Member since
    June 2013
Posted by bvallot on Tuesday, June 14, 2016 2:43 PM

I have a quick update on the F-6D. I'm trying to get through this part so I can close her up and then focus on getting her prepped for primer.  

So to start, I've completed the cockpit. I've added the thin support arms to the seat, which were absent on the TD pit, and I've scratched out the intervalometer-a device used to for timing and filming for the reconnainsance equipment on board. It sat just to the left of the stick on the floor by the pilot's feet. I guess there's no good place to put it, and that made the most sense. It's basically two parts...a small square piece I sanded down to the appropriate size (comparing photographs) and a thin face to go on top. The thin plastic face was drilled with a pinvise to make the dial that's seen and glued on top with Tamiya ETC. That's all =] Then, some tinier bits of thin plastic rod and stretched sprue make up knobs and buttons that are seen. Albion tube makes up the receiver end for the cable you see...the cable is stretched sprue. Also, there's the fuselage fuel tank dial I scratched to place on the tank to the left. Warmed up a plastic rod and bent it into shape. Easy.

 Untitled by Britt Vallot, on Flickr

 Untitled by Britt Vallot, on Flickr

Next, is the K-24 camera. Painted it up and dropped her into place. 

 Untitled by Britt Vallot, on Flickr

 Untitled by Britt Vallot, on Flickr

And that's about where I am for now. I stopped to assess how I was coming with all the internal detail for the camera bay to see how visible any of it was...and naturally, I couldn't see Jack Sh!t. Virtually...it's not terribly impossible to see what's going on in there, but for the time and effort you always hope it comes out a little better. So, I'm going to hit the breaks on further detail. It gets hard to cram everything in there after awhile even when there's space to put it (eventually your tools are too big to put them in there). It's sufficiently busy in there and I can live with it I suppose. =] 

The cockpit has been glued in place, camera set in place, and here's that:

 Untitled by Britt Vallot, on Flickr

 Untitled by Britt Vallot, on Flickr

 Untitled by Britt Vallot, on Flickr

Tonight I plan to close up these halves after the glue is set. =]

On the bench:  

Tamiya F4U-1  Kenneth Walsh


  • Member since
    April 2010
Posted by Theuns on Wednesday, June 15, 2016 10:05 AM

really nice detail work there, looking good :-)


Theuns

  • Member since
    June 2013
Posted by bvallot on Saturday, June 18, 2016 8:29 PM

Thanks Theuns. Here's the latest.

Okay...made some progress. It feels like it'll be mostly downhill from here. =]

I finally got the fuselage closed up. I also removed the elevators from the horizontal stabs and went ahead and put the rivets in all of this now before applying them to the fuselage where it would be more difficult later. I aim to keep all the riveting a subtle feature in the metal. I looking to see it appear only here and there. So that's done...I did have a little to repair around the mass balance from there removal. I haven't done that in the past and I regreted it later. Sanding it pretty is just not enough. There's just too big a gap that doesn't belong. So a little plastic strip cut to fit and sanded smooth does just the trick and goes a long way to making a nice modification into a great modification. =] 

So here it all is.

 Untitled by Britt Vallot, on Flickr

Took my time making sure the fit of the fuselage went perfectly.

 Untitled by Britt Vallot, on Flickr

 Untitled by Britt Vallot, on Flickr

Made my first round of sanding seams. I'll be making another pass after the riveting is done for the rest of the plane.

 Untitled by Britt Vallot, on Flickr

 Untitled by Britt Vallot, on Flickr

This Tamiya kit really does a nice job engineering this mustang to build up. Everything fits together perfectly and intelligently. The horizontal stabs/elevators even come in one piece! Of course the only hassle is cleaning up the seams on the bottom for the radiator, but hey...nobody's perfect. =P

I also put the "glass" in the windows for the cameras. The big one went in from the inside and the small one from outside. 

 Untitled by Britt Vallot, on Flickr

That's that for now. =]

On the bench:  

Tamiya F4U-1  Kenneth Walsh


  • Member since
    June 2013
Posted by bvallot on Tuesday, June 21, 2016 11:49 AM

It seems we're in a big lull at the moment...sooo...I'll keep it moving with this one! =D

Back with another update. I've gotten everything riveted, buttoned up, and sanded smooth. Took my time lining up the dihedral for the wings on this mustang...something I didn't do in the past as much, so I either got lucky or later noticed something was off about those beautiful lines these planes make. I still have some sanding to do in places, but for the most part this one is close to paint.

 Untitled by Britt Vallot, on Flickr

 Untitled by Britt Vallot, on Flickr

 Untitled by Britt Vallot, on Flickr

 Untitled by Britt Vallot, on Flickr

Questions and comments are always welcomed. =]

On the bench:  

Tamiya F4U-1  Kenneth Walsh


  • Member since
    July 2013
Posted by lzdaily@comcast.net on Saturday, June 25, 2016 8:38 AM

Britt, your F-6 looks amazing. Great detail. You have some mad scratchbuilding skills.

Well, I’ve solved a couple of problems with my D. The first one concerned the splash of color behind the nude in the nose art. The Kit’s World decals that I had purchased included (as did most of the decal sets I found) a red background, but some included blue or black. I wasn’t sure which was correct. I finally found a color photo of Weaver’s aircraft (color photo of Weaver’s Mustang). The photo is absolutely clear: the background splash was black. So, after a little more online searching, I ordered EagleCals set EC-103, which includes the black splash.

That decal set also solved some of my painting issues. While I think the checkerboard method I was working on has potential, I want to get this build done. I didn’t like the paint buildup along the masking, which I think was exacerbated by the paper I rubber cemeted to the masking tape. After stripping off my first attempt at a NMF, I didn’t want to end up with exactly the same problems. The EagleCals set includes the checkerboard markings as two decals: a solid yellow background and the red checks. The red in the decals seemed like a pretty good match to Model Masters Insignia Red, so I decided to paint the yellow and use the decals for the red checks. Here's where I am now. I need to do a bit of touchup to the paint, but next up is applying the decals.

Larry

  • Member since
    April 2010
Posted by Theuns on Saturday, June 25, 2016 10:54 AM

Very nice save on the NMF :-)


Theuns

  • Member since
    June 2013
Posted by bvallot on Saturday, June 25, 2016 10:38 PM

Yes! And again, great save. =]

On the bench:  

Tamiya F4U-1  Kenneth Walsh


  • Member since
    July 2013
Posted by lzdaily@comcast.net on Sunday, June 26, 2016 5:53 PM

Britt, Theuns,

Thanks for the kind words. I gotta wonder, though, if it's really a save if you go back to square one and start over...

I’m am finally making progress, though. I’ve also learned a few important lessons. First, the EagleCals chcekerboards went on like a dream. They just needed a bit of touchup at the edges. That’s where the lesson comes in. Since the spinner was going to be the same colors as the checkerboard, I epoxied it on before painting. Then I painted with Model Masters Insignia Yellow and Insignia Red. Bad move. The red on the decals is actually better matched by plain old Testors Gloss Red — the stuff that comes in the little square bottles. Repainting the red on the spinner has been a little bit of a nightmare, but I think I’m about ready to apply the rest of the decals.

Best to all,Larry

  • Member since
    April 2010
Posted by Theuns on Sunday, June 26, 2016 11:59 PM

From here the pony looks really gaag mate :-)


Just for interest sake, when I have to paint bands on a spinner, I will put a toothpick of such into the spinner's backplate.

Then I prop up the paintbrush to be horisontal at the correct hight the edge of the bans needs to be.

I then press the spinner to the 'stationary" brush and slowly rotate the tootpick/spinner.

This  gives a nice equal smooth band, imagine the same way some clay is turned on a potter's wheel .,not that your spinner doesn't look good, I just find it works for me.


Theuns

  • Member since
    June 2013
Posted by bvallot on Monday, June 27, 2016 11:50 PM

I made some important progress in securing the canopy. I've been a little leary in just plopping this piece on here and hoping it'll work out and never creep or shift or even gap in spots. I haven't always had the best luck when it comes to windscreens and canopies, so I wanted to absolutely make sure I did everything possible to ensure this badboy went on perfect and stayed perfect. Especially since I can't just peel off the "glass" and start again...the back end will be a part of the fuselage. So in order to keep a seamless finish with the kit plastic, it needs to be perfect...thus the patience!! =]

I've placed two tabs aroung the top half of the cowl piece. The first is underneath the cowl poking out to reinforce the top piece which will accept the canopy. It worked out pretty well and I was able to make it leave just enough space to account for the width of the plastic canopy so it will be flush to the cowling. Next, I wanted to reinforce this forward part with a bulkhead to keep it strong. So, I cut and sanded to shaped (using the canopy as a guide) the bulkhead that the motor mounts attach to...only I moved it back a little from where it would actually be. I chose the location for functionality.

 Untitled by Britt Vallot, on Flickr

I added a couple of tabs that will be hidden to help secure the sides to the fuselage. There's a total of 4 along the bottom of the canopy and 2 attaching to the back of the spine of the fuselage. There is just enough gap to allow a smooth transition (I'm hoping!) I also took this moment to cut out the extra window that's present on JJ England's mustang. I made the shape from the Montex mask that I picked up so it would match up properly. I sanded the plastic scratched out piece as thin as I could but found that I still needed to touch it up after I had fixed it to the canopy. I personally felt it was easier too. I masked off the plastic canopy and carefully brought the extra window closer to scale on it's thickness.

 Untitled by Britt Vallot, on Flickr

 Untitled by Britt Vallot, on Flickr

And I suppose the masochist in me decided I couldn't get this far without making it more difficult...so since there is a big gaping hole for a carb intake, I just couldn't leave that without putting something there. I very simply scratched out the housing for the intake and the C-channel shaped anchors that attached it to the cowling. There's a bit more going on with the actual intake, but for here I just wanted something that would fit the bill, occupy the space, and prevent any light from sneaking through from the cockpit. So that's what I did. Primed and painted parts:

 Untitled by Britt Vallot, on Flickr

 Untitled by Britt Vallot, on Flickr

That's where I had to stop for now. Last things left with this part includes a few details  for the window to the canopy door, controls for the throttle/oil mixture, and prime and paint.

=]

On the bench:  

Tamiya F4U-1  Kenneth Walsh


  • Member since
    April 2010
Posted by Theuns on Tuesday, June 28, 2016 12:35 AM

You certanly got that glazing sorted out, well done!

Theuns

  • Member since
    July 2013
Posted by lzdaily@comcast.net on Sunday, July 10, 2016 3:10 PM

Well, I've finished my P-51D. This was the first D I've ever built and my first natural metal finish. Most of my models have at least one flaw somewhere, but usually it's something I can live with. This model exceeds the threshold, so it will sit on the shelf with the rest of my Mustang models only long enough for me to build a replacement. The flaws don't show up so much in the photos, but in person I can see them and they really bug me. Anyway, here are some photos.

Best to all,
Larry


  • Member since
    June 2013
Posted by bvallot on Monday, July 11, 2016 1:10 AM

Larry, well done! =] Nothing wrong with a clean mustang. For your first NMF build I'd say you faired pretty well. Some people get all mixed up and never complete the build. Once you do one, you'll go back and think about what you'll do for the next one...and the next. =D Personally, I think NMF models get the chance to show a lot of character without any "paint."

Your grassy scene you have seems pretty versatile. I'm a little jealous. I'll have to put one together sooner or later.

Let us know which picture you want for the front page, and don't forget to grab a badge. Super clean looking build Larry. 

On the bench:  

Tamiya F4U-1  Kenneth Walsh


  • Member since
    July 2013
Posted by lzdaily@comcast.net on Monday, July 11, 2016 6:45 AM

Britt,

Thanks for the kind words. I think the fuselage came out pretty well. It's the wings that turned out to be a problem. When I stripped the model following my first attempt at NMF, the putty I used to fill the panel lines came off as well. I refilled them, sanded again, and resprayed the paint. Apparently I didn't wait long enough after spraying the wings. When I masked them off to paint the fuselage, removing the mask pulled up big bits of the paint on the wings (I used frisket film because I thought it would be less sticky than masking tape). I was so frustrated at that point that I just resprayed the wings, but - in person - the surface of the wings looks like the aircraft has some kind of nasty skin disease. I was in too much of a rush to finish I think. AlClad clearly needs over 24 hours drying time before it's safe to mask. Live and learn.

Best,
Larry

JOIN OUR COMMUNITY!

Our community is FREE to join. To participate you must either login or register for an account.

SEARCH FORUMS
FREE NEWSLETTER
By signing up you may also receive reader surveys and occasional special offers. We do not sell, rent or trade our email lists. View our Privacy Policy.