SEARCH FINESCALE.COM

Enter keywords or a search phrase below:

RAF 100th Anniversay GB

84929 views
3404 replies
1 rating 2 rating 3 rating 4 rating 5 rating
  • Member since
    December 2002
  • From: Bury St Edmunds, Suffolk, England
Posted by Bish on Tuesday, March 6, 2018 3:28 AM

Eric, this GB ends on 1st April, but of course any started builds can carry on being posted. The Commonwealth GB will begin on the 1st May and any RAF builds would be eligible for that, so you could wait out for that if you wished.

I am a Norfolk man and i glory in being so


On the bench: Airfix 1/72nd Harrier GR.3/Fujimi 1/72nd Ju 87D-3

  • Member since
    February 2010
  • From: Berkeley CA/St. Paul MN
Posted by EBergerud on Tuesday, March 6, 2018 2:45 AM

In theory the Walrus could be a tough build: it's big and very ambitious - folding wings with rigging etc. So we'll see how well Airfix does with a Wingnut type topic: or Tamiya - their Swordfish or Storch are right up in the complexity scale. But if it works, it's going to be a crackerjack display kit - forty years ago I would have said it has "funk appeal." I'm watching this with great interest.

Bish: in theory does this GB go to the beginning or end of April?

Eric


A model boat is much cheaper than a real one and won't sink with you in it.

  • Member since
    May 2013
  • From: Indiana, USA
Posted by Greg on Monday, March 5, 2018 12:34 PM

crown r n7
Greg Thank you its Tamiya xf-81(raf drk green) xf-82(ocean gray) and xf-83(med sea gray).

Thank you, Nick. I want to compare those to the color callouts on my Typhoon camo and what I actually used.

Castel, your flying boat looking good. Looks like it might be a challenge to get everything plumb and square.

  • Member since
    August 2015
  • From: the redlands Fl
Posted by crown r n7 on Monday, March 5, 2018 8:44 AM

Bish yes it dose give personality to the F.1

Greg Thank you its Tamiya xf-81(raf drk green) xf-82(ocean gray) and xf-83(med sea gray).

Gamera thank you for tamiya decals their behaving well with the micro set.

castel looks real good there.


 Nick.

  • Member since
    November 2009
  • From: SW Virginia
Posted by Gamera on Monday, March 5, 2018 7:36 AM

Looks good CN, just a matter now of getting those annoying struts lined up! 

"I dream in fire but work in clay." -Arthur Machen


  • Member since
    December 2002
  • From: Bury St Edmunds, Suffolk, England
Posted by Bish on Monday, March 5, 2018 4:20 AM

Looks good castel.

I am a Norfolk man and i glory in being so


On the bench: Airfix 1/72nd Harrier GR.3/Fujimi 1/72nd Ju 87D-3

  • Member since
    July 2008
  • From: Vancouver, the "wet coast"
Posted by castelnuovo on Sunday, March 4, 2018 10:47 PM

Some more progress on the Walruse. The upper wing and the engine are dry fit for now.


  • Member since
    November 2009
  • From: SW Virginia
Posted by Gamera on Sunday, March 4, 2018 11:54 AM

LA: Wow, that's some injection pin marks! I have to remind myself that is a 1/72nd scale kit too!

Nick: Really nice work, the camo is coming along well.

"I dream in fire but work in clay." -Arthur Machen


  • Member since
    May 2013
  • From: Indiana, USA
Posted by Greg on Sunday, March 4, 2018 10:51 AM

Nick, yep, looks good with the decals.

What are the color call outs on the camo green and grey? I ask because I really like the colors, they are so boring on my Typhoon. Also, what paint did you use? (manufacturer and color)?

Hope these questions aren't too much bother.....

  • Member since
    December 2002
  • From: Bury St Edmunds, Suffolk, England
Posted by Bish on Sunday, March 4, 2018 9:34 AM

Now thats better Nick, always like it when the decals are on.

I am a Norfolk man and i glory in being so


On the bench: Airfix 1/72nd Harrier GR.3/Fujimi 1/72nd Ju 87D-3

  • Member since
    August 2015
  • From: the redlands Fl
Posted by crown r n7 on Sunday, March 4, 2018 8:59 AM

my lastest f1 pics sprayed tamiya gloss clear and started decals.


 Nick.

  • Member since
    May 2013
  • From: Indiana, USA
Posted by Greg on Friday, March 2, 2018 5:52 PM

BrandonD
Greg - try one, you'll like it! It's more procedure than anything else. This one was probably a bad choice given the number of interplane struts and the fiddly lower wing-to-fuselage join, but it was a blast.

I just might. Thank you for your fine example and guidance, Brandon.

  • Member since
    April 2006
  • From: ON, Canada
Posted by jgeratic on Thursday, March 1, 2018 11:30 PM

Thank you Greg and LA - yup those ejector stubs are huge.

About the green putty I used on the engine, I'd say it's a different strength than super glue.  It's properties are slightly flexible when dry, so if it get's knocked or dropped on the floor for example, it would give a little but still stay true to shape, and I think less chance of letting go?

Also, for the sake of brevity, I did not fully describe what I did when attaching the upper ends of push rods.  The top of each cylinder had two 'prongs' sticking out and it was the undersides of these where the pairs of rods would need to be glued - not much surface for adhesion.  So those prongs were sanded back slightly and rods glued by the longitudinal sides instead of by the top of their tips - hope that makes sense.  So the putty also acted as a reconstruction of the sanded off portion.

Image of the real thing might help:


regards,

Jack


regards,

Jack

  • Member since
    April 2014
  • From: Australia
Posted by lostagain on Thursday, March 1, 2018 10:35 PM

BD,

That is a great finish on a super model, really well done. I too had avoided biplanes and rigged models for a long time. I have done a couple, but not to your standard by any means.

Jack,

Super detailing there as ever, is the green putty that much better at holding the rods in place than glue?

Next photo of the Lightning - more ejector pin issues:

The ejector stubs on the seat are more than 2 millimetres thick - there should be nothing there!

Dry fit is showing up some manageable issues around the nose. Fairly confident it isn't just me as the same thing is shown on other websites too.

  • Member since
    January 2015
Posted by BrandonD on Thursday, March 1, 2018 4:50 PM

Thanks, everyone!

Greg - try one, you'll like it! It's more procedure than anything else. This one was probably a bad choice given the number of interplane struts and the fiddly lower wing-to-fuselage join, but it was a blast.

jgeratic - I'll definitely be doing more. I love the WWI subjects because they were still trying to figure out so much. From Roland Garros putting angled steel on his prop to the wing warping on the Fokker Eindeckers and all the different engine variants, it's such a fascinating time in aviation.

Eric - thanks for all the info. It's funny that you don't think I don't already have those Eduard Fokkers in the stash ;). Kidding, since how could you know, but I actually have a D.VII "Sieben Schwaben" on my bench at the moment, as well as a Mirage Hobby Halberstadt in Lithuanian service. The Bristol was really just a proving ground for the kits I am more excited about, but now of course it will always hold a special place in my heart as my first bipe. I picked it up on a daily deal for $20 at Sprue Brothers, so it was money well invested.

I do have several Wingnut Wings kits, which is the true motivation for getting a crack at bipes in the minor leagues. My girlfriend is Bavarian, so I had to grab the Albatros D.V with the bavarian flag painted on the fuselage (basically my attempt to get a plane on the mantel she actually likes rather than tolerates). I got one of the Eindeckers for $57, so I couldn't resist, and I'll do Udet's plane in that one, and I got some others like the SE5A and Camel for $67. Still more than I like to spend on a kit, but I agree with Doogs - they are marvels of what can be done in plastic. Now I feel confident enough to tackle one of them.

-BD-

  • Member since
    February 2010
  • From: Berkeley CA/St. Paul MN
Posted by EBergerud on Thursday, March 1, 2018 4:15 PM

Brisfit looks very sweet. Most modelers are a wary of rigging which isn't really that hard. (Ship rigging is harder - or you can make it so.) I think the other challenge with a bipe is weathering. Planes didn't last a long time, but they were pummeled with oil every flight - inline engines as well as rotaries. And fabric wouldn't show stress the way metal does. So I think if you'd seen a WWI squadron there would have been a combination of new planes, badly beat-up veterans and everything in between. Anyway, I think you managed things very well. A good bipe is a very neat display model.

If you want to try one and don't want to handle rigging, get a kit of a Fokker Triplane or a Fokker DVII. Both had very innovative structure and very little rigging - some on the tail and a little on the undercarriage. Eduard makes a 1/48 Triplane "Weekender" for about $20. Think they also do a DVII. (WingNut makes a DVII if you can find one in stock. I know a WingNut fanatic and he claims the fit is so good on their kits that attaching struts is almost simple. Sadly DVIIs all carried a factory applied "lozenge" camo that I think looks hideous. WNW doesn't make a Fokker triplane yet. Of course they push $80 for a fighter - if you can get one. I think their DI Eindecker is cheaper & available - and it only has one wing. BTW: Matt at Doog's Models, one of the best YTube modelers in my view, claims every modeler should do at least one WingNut just to see how plastic kits can be made. Eric


A model boat is much cheaper than a real one and won't sink with you in it.

  • Member since
    May 2013
  • From: Indiana, USA
Posted by Greg on Thursday, March 1, 2018 11:39 AM

Jack, wow, no holds barred on that engine.

Thats some seriously nice work! YesYes

  • Member since
    April 2006
  • From: ON, Canada
Posted by jgeratic on Thursday, March 1, 2018 9:40 AM

Thank you Bish, Cliff, and Nick. Beer

I think if I had planned more ahead of time, would of probably pulled the trigger on an aftermarket resin engine (either Vector or Small Stuff brand), though it still would have to start out as the French Clerget 9 - but at least it would of had the spark plugs included.  That was something added last minute.

regards,

Jack

  • Member since
    August 2015
  • From: the redlands Fl
Posted by crown r n7 on Thursday, March 1, 2018 8:14 AM

Jack nice Bow Down


 Nick.

  • Member since
    November 2009
  • From: SW Virginia
Posted by Gamera on Thursday, March 1, 2018 7:52 AM

BD: That's simply amazing! Love her!!! Heart

Jack: Wow, great job there on the push rods- makes my head hurt just to look at all that. 

"I dream in fire but work in clay." -Arthur Machen


  • Member since
    December 2002
  • From: Bury St Edmunds, Suffolk, England
Posted by Bish on Thursday, March 1, 2018 2:28 AM

Jack, thats some amazing work on that engine. If that is anything to go by, this will be a cracking build.

I am a Norfolk man and i glory in being so


On the bench: Airfix 1/72nd Harrier GR.3/Fujimi 1/72nd Ju 87D-3

  • Member since
    December 2002
  • From: Bury St Edmunds, Suffolk, England
Posted by Bish on Thursday, March 1, 2018 2:27 AM

You should be more than happy with that BD, it looks superb. Thank you for taking part and shareing that build with us. Front page is updated as requested.

I am a Norfolk man and i glory in being so


On the bench: Airfix 1/72nd Harrier GR.3/Fujimi 1/72nd Ju 87D-3

  • Member since
    August 2015
  • From: the redlands Fl
Posted by crown r n7 on Wednesday, February 28, 2018 7:45 PM

lostagain thankyou its waiting for the clear coat now.

BD thanks man that F2B is something special.

Greg thanks bud I cant type fast enough Looks like very bodies here!!


 Nick.

  • Member since
    April 2006
  • From: ON, Canada
Posted by jgeratic on Wednesday, February 28, 2018 7:42 PM

Brandon, that is a right bang on job on that Bristol. Yes
Would never have guessed this was your first bipe, will you be building more?

Hello Nick, thanks!

LA, thank you.  Man that looks to be quality control issues on that Airfix Lightning, reminds me of the missing engraved detail on a new tool Emil I had.


---------------------------------------


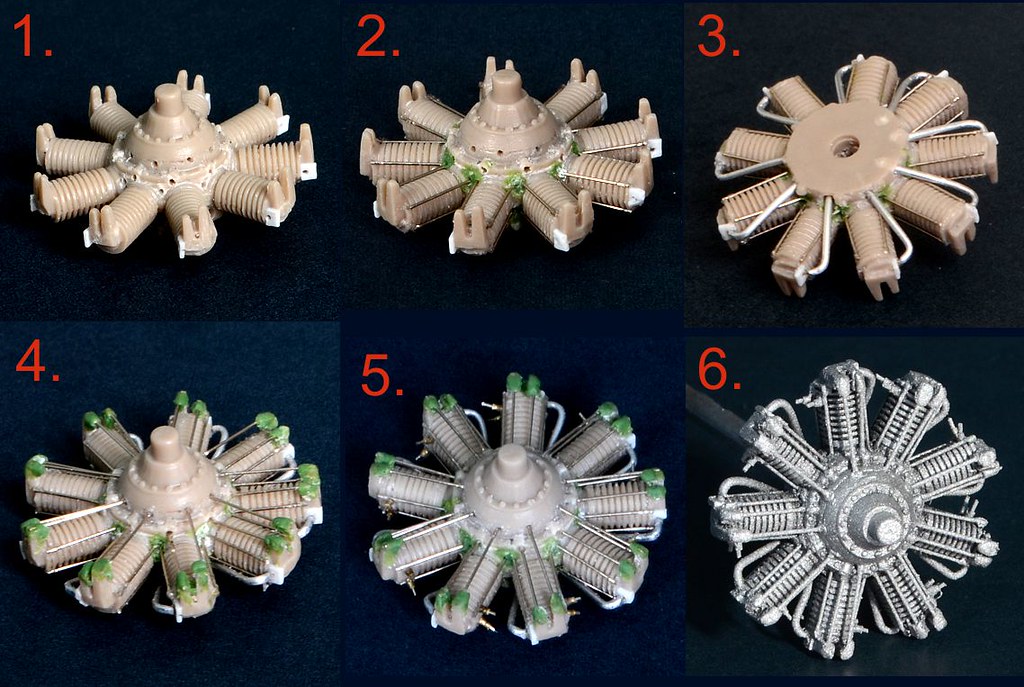
The Bently BR1 engine construction is complete, and already has a coat of paint.  I've further outlined the steps I took to build it if anyone is interested, but just some quick numbers:
- total number of holes drilled: 54
- total number of sections of cut rods in various diamaters: 99  (11 pieces per cylinder) Propeller

1. -  all push rods removed, drilled location holes in their place.  Also added small sections of plastic sheet to the top  sides of the cylinder heads.  These also had location holes drilled for the piping that reaches out from the backside.

2. - each cylinder is surrounded by four rods, using 0.2mm size (same diameter as push rods).  Decided to just drill one large hole to fit two rods as they come down into a V - but each hole was first packed with green putty.

3. - piping added in the rear, using 0.5mm rod.  To aid in attaching to the cylinder, the curved end of the piping also had 0.3mm rod inserted to fit into the sheet plastic added in step 1.

4.  - push rods finally added (0.2mm).  The green putty was added afterwards for additional strength, but not really accurate in terms of detail.

5. - pair of spark plugs added to the top sides of each cylinder - no holes drilled for this.   Basically just a 0.2mm rod inserted into  0.4mm section and super glued in place.

6. - Base coat of black followed by aluminum, ready for further detail painting.

regards,
Jack

  • Member since
    May 2013
  • From: Indiana, USA
Posted by Greg on Wednesday, February 28, 2018 7:41 PM

Nick, good-looking camo/paint job!

  • Member since
    May 2013
  • From: Indiana, USA
Posted by Greg on Wednesday, February 28, 2018 7:40 PM

Brandon, I think your biplane looks great! YesYesYes

Kudos to you, I don't think I'll ever be brave enough to try one.

  • Member since
    January 2015
Posted by BrandonD on Wednesday, February 28, 2018 5:09 PM

Crown - great looking paint on that jet. It's looking sweet!

-BD-

  • Member since
    January 2015
Posted by BrandonD on Wednesday, February 28, 2018 5:08 PM

Well I finished my Bristol F.2B. I like to try new things on each build, and this kit was always meant to serve as a test bed for multiuple things:

-Working with pigments
-Carving a prop out of laminated veneer sheets
-Building a biplane
-Rigging!

I'm not going to say I achieved any of those exactly well, but I am generally happy with the outcome, and I learned a LOT.

Takeaways:

-Don't glue rigging line directly to the wings. Make or buy attachment points
-Be careful when placing interplane struts, especially if they'r very slightly different (duh, right)
-Use a Glue Looper or similar to accurately place CA glue.
-Accelerator is your friend, and you can apparently spray it all over the painted surface without damaging the paint, but an eye dropper works a little better
-For a first biplane, build something easier, where at least the bottom wing mounts to the fuselage instead of on six little struts, and there is less rigging.

Anyway, with that, I'll give you the reason you're actually here:

Brisfit ;

Brisfit 05

Brisfit 04

Brisfit 03

Brisfit 02

Brisfit 01

Brisfit 06

Thanks for having me in this build. I like the first pic for the front page.

-BD-


  • Member since
    May 2013
  • From: Indiana, USA
Posted by Greg on Wednesday, February 28, 2018 1:31 PM

LA, that molding process screwing up the outside fuselage detail is disturbing.

I've been eager to try an Airfix kit but I wonder, is that typical of Airfix?

I'm sure you'll have no problem with it, but I am a lazy modeler.

  • Member since
    November 2009
  • From: SW Virginia
Posted by Gamera on Wednesday, February 28, 2018 11:26 AM

LA: That looks sharp. I don't mind cleaning up injection pin marks on the inside but gee that's annoying when they end up messing up the outside. 

"I dream in fire but work in clay." -Arthur Machen


JOIN OUR COMMUNITY!

Our community is FREE to join. To participate you must either login or register for an account.

SEARCH FORUMS
FREE NEWSLETTER
By signing up you may also receive reader surveys and occasional special offers. We do not sell, rent or trade our email lists. View our Privacy Policy.