SEARCH FINESCALE.COM

Enter keywords or a search phrase below:

Trumpeter 1/35 M198 155mm Howitzer, Finished, 8/09/09

60556 views
157 replies
1 rating 2 rating 3 rating 4 rating 5 rating
  • Member since
    November 2006
  • From: United States
Posted by ww2modeler on Monday, May 18, 2009 8:47 PM

Looks pretty cool so far, looking forward to seeing more of it!

David

On the bench:

1/35 Tamiya M26 Pershing-0%

1/144 Minicraft P-38J Lightning-50%

Numerous 1/35 scale figures in various stages if completion.


  • Member since
    July 2006
  • From: Philippines
Posted by constructor on Monday, May 18, 2009 9:24 PM
Thanks for this post. I have the kit and have been contemplating on building it soon. This will make a good guide for my build. The tips are very valuable as these are not included in the instructions. Looking forward to your finished M198!
  • Member since
    November 2005
Posted by Anonymous on Monday, May 18, 2009 10:05 PM
Very cool...how often do you get to "do" your avatar?
  • Member since
    December 2005
  • From: Syracuse, NY
Posted by lexesbenz on Tuesday, May 19, 2009 1:00 AM
Nice works so far. I have a question, what actually makes these things fire off? same with tank rounds, there not a firing pin mechanism right? I especially wanna know how the Karl Morsers shell was fired, ya know the engineering aspect of it. They can't be like modern bullets with a firing pin are they? see I don't know that much about this stuff.
The flying hamster of doom rains coconuts on your pitiful city!!!!
  • Member since
    July 2006
  • From: New Jersey
Posted by redleg12 on Tuesday, May 19, 2009 6:10 AM

David - thanks for stopping by and for your comments.

Constructor - Glad I could be of some help. The directions are not the best! Thanks again for your comments.

Manny - Yep, I looked through the pictures for research, but I thought for posting somehow this one was near and dear to my heart!! Thanks again.

Lexesbenz - Thanks for the comments. Now for your question....Yes, there is a firing pin.

On tank ammunition or semi-fixed artillery ammunition (which is the projectile, bullet, and a casing with powder bags), both have a primer stamed into the bottom of the casing. The breech block and firinglock has a firing pin. when the lanyard or trigger is pulled, just like a pistol the firing pin strikes the primer setting off the round.

On separate loading artillery ammunition the projectile is loaded, the powder bags are loaded. With the breech closed a primer is loaded into a "holder" which puts it in line with the firing pin and can set off the powder to propel the projectile.

On mortars that you see top loaded, they too have a firing pin. It is built into the base of the mortar. The mortar round has a primer built into the bottom of the round. In between the fins of the mortar round is the propellant which is more plastic like than powder. When the round hung and dropped down the tube, it slides down, the primer hits the firing pin, sets off the propellant and "bloop", the round fires.

So yes, there is a pin in all of them. Simple mortars have a fixed pin to artillery which has a mechanical pin which moves when a lanyard is pulled to a modern tank when the mechanical pin is electronically controlled. From WWII to today it has not changed much on the basics of how it works.

Lastly the Karl Morsers shell. This was a separte loading ammunition so the shell would be loaded the special powder bags would be loaded. The breech closed and a primer inserted. The lanyard pulled would actuate a mechanical system where a firing pin would strike the primer and set off the powder. BOOM...

Hope this helps. If you have more questions...feel free to pull my lanyard (a string or cord attached to the trigger mechanism of a large gun which allows you to fire it from a distance)

Rounds Complete!! 

"The Moral High Ground....A Great Place to Emplace Artillery."

  • Member since
    December 2002
  • From: Valrico, FL
Posted by HeavyArty on Tuesday, May 19, 2009 6:56 AM

Looking great Mike.  Good job so far.  Make sure you level all your bubbles before firing it though. 

Be honest, you just made up all that firing pin stuff.  You know its really voodoo magic that we use to fire artillery.  Oh wait, thats the Fire Direction side of the business.Big Smile [:D]

Gino P. Quintiliani - Field Artillery - The KING of BATTLE!!!

Check out my Gallery: https://app.photobucket.com/u/HeavyArty

"People sleep peaceably in their beds at night only because rough men stand ready to do violence on their behalf." -- George Orwell

  • Member since
    January 2009
  • From: clinton twp, michigan
Posted by camo junkie on Tuesday, May 19, 2009 7:17 AM
looks nice so far heavy. have you decided what kind of a paint job your gonna give it? desert/3-tone/o.d.? just curious.
"An idea is only as good as the person who thought of it...and only as brilliant as the person who makes it!!"
  • Member since
    July 2006
  • From: New Jersey
Posted by redleg12 on Tuesday, May 19, 2009 8:40 AM

Gino - LOL......the Funny Duck Club has nothing to do with it......it's the gun chief using "the force" Smile,Wink, & Grin [swg]. On this one, I'm checking the powder temp every time I sit down at the bench!

Glad to see you stopping by......from home Party [party].

The kit has it's drawbacks but is much nicer than the resin versions (we have both been hit with the build it and then they make it in styrene curse). Thanks again.

Camo - Well....going with the NATO 3 color camo. Thanks for you comments and stopping by.

Rounds Complete!! 

"The Moral High Ground....A Great Place to Emplace Artillery."

  • Member since
    June 2007
Posted by squeakie on Tuesday, May 19, 2009 10:35 AM
 redleg12 wrote:

Gino - LOL......the Funny Duck Club has nothing to do with it......it's the gun chief using "the force" Smile,Wink, & Grin [swg]. On this one, I'm checking the powder temp every time I sit down at the bench!

Glad to see you stopping by......from home Party [party].

The kit has it's drawbacks but is much nicer than the resin versions (we have both been hit with the build it and then they make it in styrene curse). Thanks again.

Camo - Well....going with the NATO 3 color camo. Thanks for you comments and stopping by.

Rounds Complete!! 

Red Leg, Gino, or whoever knows,

was looking at the photo you posted of the howitzer send a piece of iron down range. First thing that I noticed was the AG was on the left side of the breech (I've never really paid any attention to this before). But what caught my eye was the round laying in the cradle. I've never seen a 155 round made like that, plus it looks much longer and in a similar shaped ogive to a 175mm round. Also the base (heel of the boattail) has a small round part on the base I've never seen before. Would this be a RAP round or a Copper head? As many thousand 155 rounds we shot in my day I never saw anything that looked like that, let alone one that put out thatkind of thick black smoke. Ours had a like grey smoke, and then not much of it.

gary

  • Member since
    January 2009
  • From: clinton twp, michigan
Posted by camo junkie on Tuesday, May 19, 2009 12:08 PM
 redleg12 wrote:

Camo - Well....going with the NATO 3 color camo. Thanks for you comments and stopping by.

Rounds Complete!! 

anytime. as an arty man myself (only survey...years ago) i can appreciate a good cannon!! Laugh [(-D] btw, guess i got u and heavy mixed up there...sorry...sometimes helps to pay attention! lol

"An idea is only as good as the person who thought of it...and only as brilliant as the person who makes it!!"
  • Member since
    July 2004
  • From: Texas
Posted by wbill76 on Tuesday, May 19, 2009 1:50 PM

Lots of progress in the one post Mike and looks like you've conquered the normal Trumpeter tendency for seams and such very nicely. Thumbs Up [tup]

I can't claim any credit for the use of the small stand in some of the WIP photos...it was a trick I learned when doing close-ups with the macro lense from a photography site when I was trying to figure out how to get my DSLR to behave properly. It gives the camera something else to "look at" in terms of focusing and that's the only reason I use it, to get better depth of field in the shots (and also because it's pretty handy for well, setting stuff on!). Wink [;)]

  • Member since
    December 2002
  • From: Valrico, FL
Posted by HeavyArty on Tuesday, May 19, 2009 2:20 PM
 squeakie wrote:

Red Leg, Gino, or whoever knows,

was looking at the photo you posted of the howitzer send a piece of iron down range. First thing that I noticed was the AG was on the left side of the breech (I've never really paid any attention to this before). But what caught my eye was the round laying in the cradle. I've never seen a 155 round made like that, plus it looks much longer and in a similar shaped ogive to a 175mm round. Also the base (heel of the boattail) has a small round part on the base I've never seen before. Would this be a RAP round or a Copper head? As many thousand 155 rounds we shot in my day I never saw anything that looked like that, let alone one that put out thatkind of thick black smoke. Ours had a like grey smoke, and then not much of it.

gary


It is an HE RAP round.  Other than that it is a standard 155 projo.  4 Square wieght and all.

Gino P. Quintiliani - Field Artillery - The KING of BATTLE!!!

Check out my Gallery: https://app.photobucket.com/u/HeavyArty

"People sleep peaceably in their beds at night only because rough men stand ready to do violence on their behalf." -- George Orwell

  • Member since
    July 2006
  • From: New Jersey
Posted by redleg12 on Tuesday, May 19, 2009 6:40 PM

Gary - The smoke could also be after swabbing and some cook off of RBC, but the RAP could also contribute.

Camo - 82C.....a "bro" Thumbs Up [tup]. As for the confusion, Heavy (Gino) in my younger "brother" Shock [:O]

Bill - Yep, Trumpeter and seams....thank god for Mr Surfacer.

Gino - Well....my generation was more into "rock and roll"......with plain old HE Big Smile [:D] Thanks for getting to the question Thumbs Up [tup].

Rounds Complete!! 

"The Moral High Ground....A Great Place to Emplace Artillery."

  • Member since
    February 2008
  • From: ladner BC Canada
Posted by stick man on Tuesday, May 19, 2009 7:00 PM

Looks good Redleg12 hope to see more soon!

Smile [:)]

I'm 15 and I model I sk8board and I drum what could be better.
  • Member since
    January 2012
Posted by I make stuff on Tuesday, May 19, 2009 7:41 PM

Redleg,

Last night I bivouacked, the coast was clear, then when I woke up, that gun was in place.  Should have put out pickets.

Man, this one is really coming along.

Pardon the hijack, but what exactly is Mr Surfacer, is it a thin putty, or a thick paint, or what?  I see reference to it as a seam hider/gap filler, just wondering.

Looking good, sir.

Bill     

  • Member since
    July 2006
  • From: New Jersey
Posted by redleg12 on Tuesday, May 19, 2009 7:49 PM

Stick - At the bench now....will post some hopefully this weekend

Gary - To explain Mr Surfacer, http://www.swannysmodels.com/Surfacer.html 

Hope that helps. They also have a liquid putty. I like the putty and the 500 grades for filling seams. Thanks for looking....don't spend too much time in the fart sack Shock [:O]

Rounds Complete!!


"The Moral High Ground....A Great Place to Emplace Artillery."

  • Member since
    December 2005
  • From: Syracuse, NY
Posted by lexesbenz on Tuesday, May 19, 2009 9:43 PM
Indeed it does, thank you for taking the time to explain it to me, I really appreciate it.
The flying hamster of doom rains coconuts on your pitiful city!!!!
  • Member since
    January 2009
  • From: clinton twp, michigan
Posted by camo junkie on Tuesday, May 19, 2009 10:11 PM
 redleg12 wrote:

Camo - 82C.....a "bro" Thumbs Up [tup]. As for the confusion, Heavy (Gino) in my younger "brother" Shock [:O]

Rounds Complete!! 

yes sir 82c. thanks 4 the thumbs up. good 2 know heavy is your younger bro....then maybe no one gets mad. Laugh [(-D]

"An idea is only as good as the person who thought of it...and only as brilliant as the person who makes it!!"
  • Member since
    July 2006
  • From: New Jersey
Posted by redleg12 on Sunday, June 7, 2009 8:14 PM

I apologize for not posting sooner but between work and the "beginning of summer" chores, it was all I could just to find bench time. Hopefully, that has "passed" and I can keep up with the updates.

After priming with some flat black and some seam cleanup, I noticed 3 parts which are not mentioned on the directions. I also was looking for the brake system gauges and low and behold there they are.  The parts need to have their locating pins trimmed as the trail section does not have the holes to accept them. The two lines from the gauges to the air system are molded into the trail and the cutout on the back of the gauges sits perfectly on them. The protective plate is then just centered over the gauges (currently in the micro clip.

The upper assembly requires painting before the bottom plate is assembled in step 9 as it will be very difficult to paint inside the sled once it is in place. Trumpeter did a poor job of attachment points for the plate as they have 6 holes in the plate and six pins on the supports for the sled. It should have been reversed. The kit's current setup for the plate leaves six "holes" to be filled on what should be a solid plate.

The seam at the rear of the trail where the spade block attaches to the box channel trail is a welded seam. Arched weld bead does the trick

The brake air pressure gauges and guard attached to the trail

The lower carriage is assembled minus the sight box and holder and the ramming staff holders on either side. These will be added after the camo painting.

Back to the upper carriage, the M90 chronograph bracket was added earlier. Now, I also added the bolts with Archer bolt detail. The side seam on the front assembly (ahead of the bracket) is showing a flat weld done with liquid putty

The front side of the front assembly has a heavy weld bead, which again is Archer weld bead.

After spending some time in the spray booth, here is the base NATO camo pattern with NATO Black, Brown and Green on the lower carriage.

Finishing up the parts on the lower carriage, the sight box, ramming staff holders, spade and spade locking pins, axel and brakes and tires (just fitted).

  • The sight chest is painted US Dark Green with OD straps, Black handle and strap clips and Steel on the handle fitting.
  • The ramming staffs were painted US Dark Green with the holder assemblies painted to match the camo pattern.
  • The brake assembly is flat black and the brake drum is Steel.
  • Tires were worked with a scrub sponge to give edge wear and scuff up the surface
  • The spades were assembled as per the instructions. If the spades are going to be attached, the instructions are poor. You should use a slow setting glue and attach both pins first. Then attach the spade and position the pins in the proper position before the glue on the pins dry. That was fun Banged Head [banghead]
  • Trail locking pins were painted Steel and .005 SS wire used to simulate the retaining wire.

That's it for now. Next, get the upper carriage caught up with the lower carriage.

Total hours this update - 14.0 hours

Total hours this overall build - 20.0

Thanks for looking and as always, all comments are welcome.

Rounds Complete!!

"The Moral High Ground....A Great Place to Emplace Artillery."

  • Member since
    January 2009
  • From: clinton twp, michigan
Posted by camo junkie on Monday, June 8, 2009 5:36 AM
nice job so far red! she's looking pretty sweet! Big Smile [:D]
"An idea is only as good as the person who thought of it...and only as brilliant as the person who makes it!!"
  • Member since
    September 2006
  • From: Central Texas
Posted by NucMedTech on Monday, June 8, 2009 6:36 AM

RedLeg, great job so far. Can't wait to see the business end of this one.

-StephenCowboy [C):-)]

Most barriers to your successes are man made. And most often you are the man who made them. -Frank Tyger

  • Member since
    July 2006
  • From: New Jersey
Posted by redleg12 on Monday, June 8, 2009 10:02 AM

Camo - Thanks for stopping by and the comments

Steve - Yep, looking forward to the working end myself. Thanks for stopping in.

Rounds Complete!!

"The Moral High Ground....A Great Place to Emplace Artillery."

  • Member since
    January 2009
  • From: clinton twp, michigan
Posted by camo junkie on Monday, June 8, 2009 10:14 AM
hey, i'll stop by anytime for anything modern!! Thumbs Up [tup]
"An idea is only as good as the person who thought of it...and only as brilliant as the person who makes it!!"
  • Member since
    July 2004
  • From: Texas
Posted by wbill76 on Monday, June 8, 2009 1:10 PM
Making some good progress here Mike despite the distractions of the summer chores! Base looks good, just don't make us wait so long for the next set of pics. Big Smile [:D]
  • Member since
    January 2012
Posted by I make stuff on Monday, June 8, 2009 1:20 PM
Cool Redleg, this is looking very good.
  • Member since
    July 2006
  • From: New Jersey
Posted by redleg12 on Monday, June 8, 2009 1:37 PM

Bill - Thanks....I'm hopefully out of the woods with the "outdoor opening" projects....whew! Just have to keep up with the grass Whistling [:-^]. That "should" leave me more bench time. Hope to keep up and get back to my weekly reports!

Bill 87 - Thanks for stopping in and your comments

Rounds Complete!!

"The Moral High Ground....A Great Place to Emplace Artillery."

  • Member since
    October 2004
  • From: League City, Texas
Posted by sfcmac on Monday, June 8, 2009 7:34 PM
 I sure hope you know what your doing there! Laugh [(-D] Gotta luv it!
  • Member since
    July 2006
  • From: New Jersey
Posted by redleg12 on Monday, June 8, 2009 7:53 PM

Aaron - Not to fear, there won't be a misfire causing the tube to be punched here!!

Thanks for stopping by.

Rounds Complete!!

"The Moral High Ground....A Great Place to Emplace Artillery."

  • Member since
    October 2004
  • From: Katy, TX
Posted by jthurston on Tuesday, June 9, 2009 1:37 PM

you this is me, adjust fire, over Thumbs Up [tup]

The camo on those trailarms brings me back to slingload school. That old 3-color Reforger look. Ahhh...it's like Old Home Week. If something happened you could touch it up with a rattlecan, then stencil CARC on it...Big Smile [:D]

Ya know, maybe I should start building subjects I've actually worked with in real life. LOL - never drove a Panzer IV...

  • Member since
    July 2006
  • From: New Jersey
Posted by redleg12 on Tuesday, June 9, 2009 3:49 PM

J - Adjust fire out!!

Yep, CARC brings back the memories!! Sligload artillery.....A34 bags.....fun, fun, fun.

If you ever drove a Panzer.....your a lot older than you look Smile,Wink, & Grin [swg]

Thanks for stopping by.

Rounds Complete!! 

"The Moral High Ground....A Great Place to Emplace Artillery."

  • Member since
    February 2009
  • From: mass,USA
Posted by scratchmod on Tuesday, June 9, 2009 4:11 PM

I really like the looks of that gun, especially the camo, awesome job so far.

I hear ya on the yard work part, it's never ending.

Rob

  • Member since
    July 2006
  • From: New Jersey
Posted by redleg12 on Tuesday, June 9, 2009 7:42 PM

Rob - Thanks for stopping in and for the comments.

I picked up a new AB at AMPS International and it is great. Keeps the old hand steady and makes freehand camo much simpler for these old shaky hands.

Glad you like it.

Rounds Complete!!

"The Moral High Ground....A Great Place to Emplace Artillery."

  • Member since
    November 2005
Posted by Anonymous on Tuesday, June 9, 2009 8:35 PM
...coming along nicely...good job on the NATO "woodland" scheme...
  • Member since
    July 2006
  • From: New Jersey
Posted by redleg12 on Wednesday, June 10, 2009 5:09 AM

Manny - Thanks for stopping in and for the comments. Always a pleasure to have you by!

Rounds Complete!!

"The Moral High Ground....A Great Place to Emplace Artillery."

  • Member since
    December 2002
  • From: Valrico, FL
Posted by HeavyArty on Wednesday, June 10, 2009 8:59 AM
Looking great Mike.  Aren't the pieces you added part of the "later" version?  That is probably why they are not mentioned in the directions.  Looks like it will be another great model.

Gino P. Quintiliani - Field Artillery - The KING of BATTLE!!!

Check out my Gallery: https://app.photobucket.com/u/HeavyArty

"People sleep peaceably in their beds at night only because rough men stand ready to do violence on their behalf." -- George Orwell

  • Member since
    July 2006
  • From: New Jersey
Posted by redleg12 on Wednesday, June 10, 2009 12:56 PM

Gino - Great to have you stop in!!

I'm sure the M90 bracket was added later, circa early 80s and not part of the original M198. The brake line meter I thought was an original but I'm sure. At worst it was an early upgrade. They molded the two lines which go into the meter onto the trail but no mounting holes for the parts or mention in the instructions.

Conversly, they have the wire reel on the rear (which I don't ever remember seeing a 198 with a reel on it) and also no mounting hole.

There are a number of items in the directions which are vague or missing. They give you projectiles, but no markings nor any powder cans. They should have just looked at the AFV ammo set....Duh. They also give you a staff with the rammer on it and a loading tray. I know what it is but most people will not and again no mention in the directions

For the build look, I am looking at circa 1980s/early 90s. There were a number of subtle changes/additions in the early days. I am sure their late version will be more of late 90s/00 with all the upgrades onboard.

Don't get me wrong, the kit has a lot of advantages and builds into a very nice model. But there are some things they could have done better and other you just go....DUH. They could have hit a home run but we have to settle for a triple!!!

Always keeping the bubbles level!

Rounds Complete!!

"The Moral High Ground....A Great Place to Emplace Artillery."

  • Member since
    July 2006
  • From: New Jersey
Posted by redleg12 on Sunday, June 14, 2009 4:50 PM

Assembling the upper carriage turned out to be a chore. The swivel base connects to the support arms and the lower equilibrators are to be pinned between the two. First the fit was off and required sanding and then trying to connect four pieces at one time is next to impossible. After a few foiled attempts, I cut off one side of the pinning on each equilibrator and glued the other side.

Once the glue dried now I only had to deal with the swivel base as a whole. With that mounted I closed up the seams and masked required areas prior to the camo.

I also mounted the large top screen from the supplied PE. Rounding the screen was a search but the syringe I use for thinner addition was a perfect size, which turns out to be 0.50 inches in diameter

Where the arms meet the swivel base, once again I employed the Archer weld beads.  You can see clearer in this picture the lower equilibrator arms, swivel base and the support arms and how they all fit

After everything was masked I hit the paint booth. First a quick overall top coat of NATO Green, then the NATO Black and NATO Brown for the camo.

I let the paint set up overnight, then I "reversed the masking to expose the metal area of the barrel which is not painted since it moves during recoil. The metal barrel and breech area was painted with Alclad Steel.

The entire upper assembly was added to the lower carriage.

View from the rear

Once all assembled this model is big when built in the firing position. From barrel end to trail end is about 13 inches and the trails spread about 10 inches. This make taking overall pics fun to get depth of field!!.

That's it for now. Next, final hand wheels and gears, travel support, sights and scratch build air lines a left to be mounted. Then we will be onto weathering.   

Total hours this update - 8.0 hours

Total hours this overall build - 28.0

Thanks for looking and as always, all comments are welcome.

Rounds Complete!!

"The Moral High Ground....A Great Place to Emplace Artillery."

  • Member since
    January 2009
  • From: clinton twp, michigan
Posted by camo junkie on Sunday, June 14, 2009 5:47 PM

nicely done red! now...is it going in a dio or at least are ya going to put some rounds next to her? well, once she's finished! ya know just for that little extra! Whistling [:-^] just curious.

.....survey first......!

"An idea is only as good as the person who thought of it...and only as brilliant as the person who makes it!!"
  • Member since
    July 2006
  • From: New Jersey
Posted by redleg12 on Sunday, June 14, 2009 6:10 PM

Camo - Oh yeah....I am planning to set up on a base. HE, HC, WP and Illum broken out. Powder canisters, fuse cans, a pale and bore brush and the scratch built collimeter (Hans....your favorite). Thanks for looking and your comments.

Rounds Complete!!

"The Moral High Ground....A Great Place to Emplace Artillery."

  • Member since
    January 2009
  • From: clinton twp, michigan
Posted by camo junkie on Sunday, June 14, 2009 8:00 PM
very cool. Thumbs Up [tup]
"An idea is only as good as the person who thought of it...and only as brilliant as the person who makes it!!"
  • Member since
    July 2006
  • From: New Jersey
Posted by redleg12 on Sunday, June 14, 2009 8:56 PM

Camo - Thanks!!

Rounds Complete!!

"The Moral High Ground....A Great Place to Emplace Artillery."

  • Member since
    July 2004
  • From: Texas
Posted by wbill76 on Sunday, June 14, 2009 8:58 PM
Looking good Mike! Thumbs Up [tup]
  • Member since
    July 2006
  • From: New Jersey
Posted by redleg12 on Monday, June 15, 2009 5:22 AM

Bill - Thanks!!

Rounds Complete!!

"The Moral High Ground....A Great Place to Emplace Artillery."

  • Member since
    April 2005
  • From: Piscataway, NJ!
Posted by wing_nut on Monday, June 15, 2009 7:37 AM

Hey there Mike... sorry buddy, I missed this one completely.  But i didnt think this one really counted anyway because it's not ALL green.  There is some other colors mixed in thereWhistling [:-^]

Seriously, your usual fine work ith palstic and paint.Thumbs Up [tup]

Marc  

  • Member since
    July 2006
  • From: New Jersey
Posted by redleg12 on Monday, June 15, 2009 11:11 AM

Marc - Thanks. Green...yes, black, brown, sand....sometimes....grey or It brown....neverWink [;)]

Thanks

Rounds Complete!!

"The Moral High Ground....A Great Place to Emplace Artillery."

  • Member since
    January 2012
Posted by I make stuff on Monday, June 15, 2009 11:51 AM

That's looking mighty fine.

I may ask it for a date.

Bill

  • Member since
    July 2006
  • From: New Jersey
Posted by redleg12 on Monday, June 15, 2009 12:31 PM

Bill - Thanks....I'll keep you on the call list Shock [:O]

Rounds Complete!!

"The Moral High Ground....A Great Place to Emplace Artillery."

  • Member since
    June 2008
  • From: Iowa
Posted by Hans von Hammer on Tuesday, June 16, 2009 2:19 PM
 redleg12 wrote:

HE, HC, WP and Illum broken out. Powder canisters, fuse cans, a pale and bore brush and the scratch built collimeter (Hans....your favorite).

Rounds Complete!!

Heh... Glad you remembered.. You need to sell those things, Redleg... I'b buy one.. (then use it as a master, but you don't need to know thatBig Smile [:D]) Make sure you store thse WP on the base now... (A prize to the first non-Redleg to tell me why that's done- A free night with Aiming-Post Amy!)

Sad to report I know nothing about the 198 though.. I went from a GS Pig Battalion to 109s, then back to Towed Arty and M102s (Air Assault ya know) before I went Chemical...


  • Member since
    July 2006
  • From: New Jersey
Posted by redleg12 on Tuesday, June 16, 2009 3:05 PM

Hans - Just for you, I will do a "mini toot" on building a collimeter.

Then you can build your own and clone yourself Shock [:O]

Hummm......nice trivia on WP, mums the word on the answer!!

Rounds Complete!!

"The Moral High Ground....A Great Place to Emplace Artillery."

  • Member since
    October 2004
  • From: Katy, TX
Posted by jthurston on Tuesday, June 16, 2009 3:43 PM
Wait, what's the question? How WP rounds are stored on the base?
  • Member since
    April 2007
  • From: Schroon Lake, NY
Posted by SMJmodeler on Wednesday, June 17, 2009 10:15 AM

redleg12: Hey, that photo does look familiar!Big Smile [:D]  I like the enlarged version...is that CAMO on that bad boy!?  Based on the base size that's one serious piece of artillery.  What's its range?

Looks good so far Mike!...you going to camo it too? *EDIT*  I just saw the more current pic's...nice camo!

How about simulating that blast smoke?,  that would be cool!

  • Member since
    July 2006
  • From: New Jersey
Posted by redleg12 on Wednesday, June 17, 2009 10:31 AM

Hey guy, nice to have you stop in. Yep, its big and the model is big too.

The real deal has about a 30 km range.

Smoke.....I though about it, but I would have to show the howitzer in recoil, crew, etc. Smoke just never seems to look right in 1/35

I will be mounting and setting up the position around the weapon. Also will mix it up with different types of ammunition!!

Glad you like the camo. I am using a new AB which makes the free hand camo easy for these old eyes and shaky hands.

Thanks for stopping by and your comments. This one should be at AMPS East!!

Rounds Complete!! 

"The Moral High Ground....A Great Place to Emplace Artillery."

  • Member since
    April 2007
  • From: Schroon Lake, NY
Posted by SMJmodeler on Wednesday, June 17, 2009 10:40 AM

 redleg12 wrote:

The real deal has about a 30 km range.

HOLY PROJECTILES!!!...isn't that about 18 miles?!  That seems WAY TOO FAR!

 redleg12 wrote:

Smoke.....I though about it, but I would have to show the howitzer in recoil, crew, etc. Smoke just never seems to look right in 1/35

Why?

 redleg12 wrote:

Glad you like the camo. I am using a new AB which makes the free hand camo easy for these old eyes and shaky hands.

It'll off-set the effects of the cocktails tooBig Smile [:D]...

  • Member since
    July 2006
  • From: New Jersey
Posted by redleg12 on Wednesday, June 17, 2009 11:05 AM
 SMJmodeler wrote:

 redleg12 wrote:

The real deal has about a 30 km range.

HOLY PROJECTILES!!!...isn't that about 18 miles?!  That seems WAY TOO FAR!

Modern artillery can reach out and touch you a long distance. That is the difference between a gun and a howitzer. With today's survey, GPS, laser targeting, etc, if done properly it is accurate to withing 5 meters at 30km!

Modern 105mm reach to about 19km and 155mm 30km.

 redleg12 wrote:

Smoke.....I though about it, but I would have to show the howitzer in recoil, crew, etc. Smoke just never seems to look right in 1/35

Why?

Just looks fake to me! I have tried it with my M270 MLRS....its OK. Also not looking to do a bunch of figs with this one. I would need figs to complete the "look".

 redleg12 wrote:

Glad you like the camo. I am using a new AB which makes the free hand camo easy for these old eyes and shaky hands.

It'll off-set the effects of the cocktails tooBig Smile [:D]...

The camo looks best after coktails!!

Rounds Complete!!

"The Moral High Ground....A Great Place to Emplace Artillery."

  • Member since
    June 2008
  • From: Iowa
Posted by Hans von Hammer on Wednesday, June 17, 2009 11:56 AM

 jthurston wrote:
Wait, what's the question? How WP rounds are stored on the base?

Not how, but Why...

"Why must WP artillery rounds be stored on their base?"

  • Member since
    June 2008
  • From: Iowa
Posted by Hans von Hammer on Friday, June 19, 2009 6:35 AM
Shameless bump for the trivia question...

  • Member since
    June 2008
  • From: Iowa
Posted by Hans von Hammer on Friday, June 19, 2009 7:20 PM

OK, no takers...

Answer: 

The WP rounds must be stowed on their bases because the filler melts at 111-114 degrees F and there's a void at the top of the projoe..  If stored on the side and the filler melts, then cools off enough to re-solidify, the void will be along the side of the joes and the round will "wobble", screwing up the ballistics of the round when fired..

  • Member since
    June 2009
Posted by E. Jose on Saturday, June 20, 2009 11:44 AM

Thanks for the post. Now I am planing to buy the same model. And I bet your tips will be helpful

And through the pictures I saw, I bet it will turn out great.

  • Member since
    July 2006
  • From: New Jersey
Posted by redleg12 on Saturday, June 20, 2009 4:27 PM

E. Jose - I'm glad your are enjoying this build. There will be more information to come so keep an eye on future posts.

Overall it's a good kit but has a few small problems. I hope my posts will keep you from re-learning the quirks and allow you to have a great build. Enjoy and make sure you post it when you start.

Thanks for stopping in and I look forward to see more from you!.....Welcome

Rounds Complete!!

"The Moral High Ground....A Great Place to Emplace Artillery."

  • Member since
    July 2006
  • From: New Jersey
Posted by redleg12 on Saturday, June 20, 2009 8:32 PM

Final assembly is just about complete. The sights will be mounted after weathering. Sights will normally stay clean since the sights are only mounted in the firing position and are in their case during travel.

One problem with the sights is Trumpeter forgot to include the elbow telescope. Their decals have the direct fire plate for the AG side but without an elbow scope it would be hard to direct fire. I will scratch up a scope using some parts from an AFV M102 howitzer and some styrene tube (pics on the next update).

After assembling the elevating and traversing hand wheels and the travel lock folded under the tube, I applied the kit decals. The decal set for the kit if pretty good but is missing the serial number plates for the carriage, howitzer and recoil system.

Here is the elevating hand wheel and details

This shows the grease fitting on the barrel bushing which is dry brushed with Gunmetal. Also the travel lock in the folded position. The pins and collier are also dry brushed with Gunmetal to show ware.

Looking from the rear, you can see the Carriage, Howitzer and Recoil system serial number plates. I added these using Archer modern data plates.

Here is a view of a trail showing edge ware and scratches applied with dry brush Gunmetal.

I dry brushed the inside tube section of the muzzle brake with Gunmetal. Also gave the nice shiny tires the worn look and edge wear using a scotch pad

Here is a rear view of the howitzer

Besides the model work it was off to the wood shop to make the base (12" x 14") and stain it.

Next up is weathering on the model, sights and air lines to finish off.  Then we will get into the presentation on the base showing the emplaced howitzer.

Happy Fathers Day to all!!!

Total hours this update - 6.5 hours

Total hours this overall build - 34.5

Thanks for looking and as always, all comments are welcome.

Rounds Complete!!

"The Moral High Ground....A Great Place to Emplace Artillery."

  • Member since
    October 2007
  • From: N.H.
Posted by panzerguy on Sunday, June 21, 2009 6:51 PM
 

    Mike this is one sweet piece. I've been peeking in here and there on your build and have to say this is one of the sleekest arty pieces I've seen in a while. Your builds definitely do bring some diversity to this forum. Looking foward to seeing what you do with the base. 

"Happiness is a belt fed weapon"

  • Member since
    July 2006
  • From: New Jersey
Posted by redleg12 on Sunday, June 21, 2009 7:54 PM

Steve - Thanks, I am glad you are enjoying the different!! Artillery is definitly the minority in armor modeling. I being the "odd ball" only build artillery and the other strange and otuse vehicles!! Like many of you enjoy the world of PZ or Sherman, I enjoy going the different path.

I am glad to bring diversity and hope people enjoy it and learn from it. I'm always happy when you stop by.

The M198 is a cool looking artillery weapon. Going through all the accessories for the "stuff" around the gun. That will start shortly!!

Thanks again

Rounds Complete!!


"The Moral High Ground....A Great Place to Emplace Artillery."

  • Member since
    April 2007
  • From: Schroon Lake, NY
Posted by SMJmodeler on Monday, June 22, 2009 8:41 AM
 redleg12 wrote:

Great shot Mike, I love the combo of camo colors!  The weathering should make it even better! I'm looking forward to seeing what you do with the hydraulics and those huge joints for the legs behind the wheels.

 redleg12 wrote:

Questions: Are the legs so huge for counterbalance or recoil support?...or both?  Does that plate at the end of the legs get driven into dirt?  What if the dirt is really hard or there's no support vehicle to assist?...would this baby just roll way back after firing in that case?  Does the anchoring, or lack of, effect it's range and/or accuracy?...I suspect yes..but how much?

  • Member since
    July 2006
  • From: New Jersey
Posted by redleg12 on Monday, June 22, 2009 9:32 AM
 SMJmodeler wrote:
 redleg12 wrote:

Great shot Mike, I love the combo of camo colors!  The weathering should make it even better! I'm looking forward to seeing what you do with the hydraulics and those huge joints for the legs behind the wheels.

 redleg12 wrote:

Questions: Are the legs so huge for counterbalance or recoil support?...or both?  Does that plate at the end of the legs get driven into dirt?  What if the dirt is really hard or there's no support vehicle to assist?...would this baby just roll way back after firing in that case?  Does the anchoring, or lack of, effect it's range and/or accuracy?...I suspect yes..but how much?

OK....Lets answer these one at a time

Are the legs so huge for counterbalance or recoil support?...or both? Yes....The longer "trails" help counter balance the load when towing. Also because of the design, a front base plate to pivot, the longer legs give better support during the shock of recoil

Does that plate at the end of the legs get driven into dirt? Yes...the "spades" are intended to be dug in.

What if the dirt is really hard or there's no support vehicle to assist? If the dirt is really hard or emplaced on rock, the spades need to be "blocked and braced" to prevent the gun from moving. This could be done with logs. The weapon is normally towed by an M9oo series 5 ton truck or now the new LMTV series 5 ton. If the weapon is "air assualted" and no vehicle present the crew would just have to hup it.

In general, the battery commander during his recon of a new position would evaluate the ground conditions and try not to emplace where it could not be dug in. If there was a situation where this was impossible, he would normally request engineer support as part of the battery occupation of the new position.

would this baby just roll way back after firing in that case? If the weapon was not supported, the gun would encounter "displacement" or move each time it is fired. The crew need to determine displacement after each round that is fired. After reaching a maximum, the gun would have to be "re-laid" or re-surveyed. This is not a situation you want to be in.

Does the anchoring, or lack of, effect it's range and/or accuracy?. Yes...as the wepon displaces, it can change the position of the wepon not only to the rear, but sideways, if the barrel when fired was not on center with the carriage.

I suspect yes..but how much? Yes for sure.....how much it is off target depends on the amount of the displacement, the range you are firing at and if you are firing high angle or low angle. When firing high angle, the "range probable error" is higher since the round ins in the air longer, goes higher and is susectable to more atmospheric conditions. To give you an idea, the PE at low angle and 5,000 meters in range is ~20 meters at high angle and range of 25,000 meters the PE is ~105 meters.

Couple that with displacement and you could be off by a few hunderd meters.

Artillery relies on survey, ballistic calculation, meterorlogical input and other factors to shoot long distances accuratly. It's not a tank where you can see the target and shoot it. You may be shooting over a mountain and hitting a target on the other side.

All of these inputs are put into ballistic formulas to calculte the "deflection" azimuth and "quadrent" elevation for a specific round type with a specific powder chage.

Hope this helps

Rounds Complete!! 

"The Moral High Ground....A Great Place to Emplace Artillery."

  • Member since
    July 2004
  • From: Texas
Posted by wbill76 on Monday, June 22, 2009 2:07 PM
Now you're in the best part Mike, dealing with all the details! Coming along nicely, look forward to the next "round". Laugh [(-D]
  • Member since
    July 2006
  • From: New Jersey
Posted by redleg12 on Monday, June 22, 2009 4:19 PM

Bill - Thanks for stopping in and your comments. Yep...looking at all the details...on and off the weapon. It will make for the fun part for sure.

Thanks......putting the fuse on the next round now!!

Rounds Complete!!

"The Moral High Ground....A Great Place to Emplace Artillery."

  • Member since
    June 2008
  • From: Iowa
Posted by Hans von Hammer on Monday, June 22, 2009 4:44 PM

What if the dirt is really hard or there's no support vehicle to assist? If the dirt is really hard or emplaced on rock, the spades need to be "blocked and braced" to prevent the gun from moving. This could be done with logs. The weapon is normally towed by an M9oo series 5 ton truck or now the new LMTV series 5 ton.

Just expanding upon Redleg's answer, we carried two railroad tie sections on the gun trucks (this was for M101 105mm, but the deal's the same for the M198).  Each section was about 3 feet long with holes bored through the middle...  We also had ice stakes about 4 feet long made of solid steel and pointed at one end.  When we had to emplace on frozen ground, or rocky areas too tough for digging, we use these "Dead-men" (the ties) in position behind the spades...

We would displace a skoshi-bit more than if we had dug in, but it would settle down by the third or fourth round..

  • Member since
    June 2009
Posted by Guney on Monday, June 22, 2009 4:59 PM

Fine progress....:)

Are you recommend this kit?

  • Member since
    June 2008
  • From: Iowa
Posted by Hans von Hammer on Monday, June 22, 2009 5:02 PM
Who, Me?  I'll do any artillery kit... It's just a matter finding them...

  • Member since
    July 2006
  • From: New Jersey
Posted by redleg12 on Monday, June 22, 2009 8:29 PM

Guney - This builds into a nice model. It has its quirks which I hope I pointed all in this thread.

So yes I would recommend it and thanks for looking in

HVH - Had the ice stakes from the M102 that we used on the M101A1. Rock and Ice let you know why most Infantry are "small" guys (look up the latin derivation of the word) and most Redlegs are big Censored [censored].

Rounds Complete!!

"The Moral High Ground....A Great Place to Emplace Artillery."

  • Member since
    June 2008
  • From: Iowa
Posted by Hans von Hammer on Monday, June 22, 2009 8:54 PM
Ya, we had to fabricate the ice stakes, they weren't BII on M101s..

  • Member since
    April 2007
  • From: Schroon Lake, NY
Posted by SMJmodeler on Tuesday, June 23, 2009 9:43 AM
Mike: Thanks for all the info!...it's very interesting...

  • Member since
    July 2006
  • From: New Jersey
Posted by redleg12 on Wednesday, June 24, 2009 10:39 AM

Steve - Your more than welcome. That's what this site is for, to share, teach and learn!!

Rounds Complete!! 

"The Moral High Ground....A Great Place to Emplace Artillery."

  • Member since
    December 2007
  • From: NE Massachusetts
Posted by 1SG Davis on Wednesday, June 24, 2009 11:06 PM

Mike,

I must sadly admit that being an 11B I'm not smart enough to know if I should be offended by the above reply to Hans Von Hammer (still lookin for my Latin dictionary to try and figure it out)

That aside, I've enjoyed looking at your build and have especially appriciated all the infomation as you've gone along.  As always, outstanding work!

Gary

  • Member since
    July 2006
  • From: New Jersey
Posted by redleg12 on Thursday, June 25, 2009 5:04 AM

Gary - Thanks and Laugh [(-D]

It is always great to have top stick his head in the tent. As far as above......now you should never be offended by this old soldier. At 6' 4" I was too big of a target. The big guys always humped rounds.

Besides you should realize old soliders were arrogant.....now they are perfect!Wink [;)]

Thanks for the comment on the build. I always try to keep it interesting.

Rounds Complete!! 

"The Moral High Ground....A Great Place to Emplace Artillery."

  • Member since
    June 2008
  • From: Iowa
Posted by Hans von Hammer on Friday, June 26, 2009 5:20 PM

Once you get a Zulu in the 11-series CMF (or any other, really), it don't much matter if you got a Latin dictionary, Top... The lozenge you got takes care of that...  Big Smile [:D]

I knew I'd never make 1SG m'self... My ,shall we say, sense of humor precluded it...  Well, maybe that's not it, but I DID have a problem with "tact" around the O's...   Reckon that's why they sent me to the Brigade Staff instead of a Chemical Company when I was a SFC...  That way they could kick me outta the TOC on a regular basis... Some Majors are kinda thin-skinned at times... Especially the ones I knew back when they were Two El-tees and were later passed over for O-5 a couple times...Big Smile [:D]Wink [;)]   But that's another story, lol...


  • Member since
    January 2008
  • From: Bournemouth UK
Posted by Bodge on Friday, June 26, 2009 6:18 PM
A beautifull piece of work. Thumbs Up [tup]
  • Member since
    July 2006
  • From: New Jersey
Posted by redleg12 on Saturday, June 27, 2009 1:52 PM

Andy - Thanks for stopping in and for your comments. It's always great to get comments long distannce Smile,Wink, & Grin [swg]

Rounds Complete!!

"The Moral High Ground....A Great Place to Emplace Artillery."

  • Member since
    July 2003
  • From: On my kitchen counter top somewhere in North Carolina.
Posted by disastermaster on Thursday, July 2, 2009 10:06 PM

 Ok Mike, http://i213.photobucket.com/albums/cc93/jontreichel/Smileys/cowlookingzc5.gif where 'ya been. Waited and waited to see how the weathering is gonna come out before bestowing honors.......http://i60.photobucket.com/albums/h21/mykukla/smileys/fistbump.gifhere's a bump to get 'ya going.

http://www.innovationbyinstinct.com/services/hosting/clients/accountyp/status/DisasterMaster/%23t1-4.jpg

Sherman-Jumbo-1945

"I was so much older then, I'm younger than that now"


  • Member since
    July 2006
  • From: New Jersey
Posted by redleg12 on Friday, July 3, 2009 6:22 AM

DM - The past few weeks have been a zoo with traveling for work during the week and catching up on the week end. I have 3 days before I have to get on a plane again......I intend to get it done this week end and have an update by Sun at worst.

I'll BE BACK....(and thanks for the thought)

Rounds Complete!!

"The Moral High Ground....A Great Place to Emplace Artillery."

  • Member since
    July 2006
  • From: New Jersey
Posted by redleg12 on Saturday, July 4, 2009 10:03 PM

OK...It has been a while as work and travel has cut my bench time of late. I finished up some scratch details and the weathering.

First I did some dry brushing with Alclad Steel on the edges especially on the trails where the paint is quickly worn off. Next with the exception of the steel areas, the model received a filter using MIG dark filter for greens. After the filter I used the MIG Dark Wash to highlight some details. Lastly, to give the model that dusty look, I used a mix of MIG Dried Mud, City Dust and European Soil which I lightly dusted on and worked in. Prior to using the pigments the model was coated with MIG pigment set.

The spades which are steel I used a mix of different MIG rust pigments on the edges and around attachments.

Here is an overall view of the completed model

As for the details, the kit does not include the air lines for the brake system. The lines are Verlinden hoses and the connectors are made from .010 sheet punched .059 in diameter with a .030 styrene rod on top with the end cut on a 45 degree angle. The "Chicago" fitting are painted steel and mounted in the stored connection area.

The kit has very nice details but the sight systems are the pits. The kit does not include an elbow telescope (used for direct fire) which is normally mounted on the AG side. Using the end of a spare elbow telescope for a M102, I mounted a 0.120 diameter styrene tube. To create the sun shield I wrapped the end with a strip of PE. The front lens is a MV lens mounted in the tube. The handles and focus is painted Alclad Steel, the eye lens is Alclad Chrome with Future top coat and the eye piece is Tamiya Flat Black

The lanyard is made from wax coated ship riggers string, painted NATO Green. The ball on the end is .040 styrene rod with the ends shaped and the center drilled to allow the string to pass through. The lanyard attachment hook is .026 wire

The brake system has two gages on the right trail. The kit does not include any decals for these so I shrank a picture of the actual gages and printed the decals.

The panoramic telescope is in need of detail. The eye cup is painted flat black and the vision lens on top is Alclad Chrome. The knobs are Alclad Steel.  The front surfaces where the readouts are were just a flat surface. I added a small white box where deflection would be read.

Besides the work on the model I finished the basic base.

Next up is position improvement!!! Adding

  • Ammunition
  • Powder Cans
  • Ramming Staff
  • Pail for RBC (Rifle Bore Cleaner)
  • 5 gallon can of RBC
  • Shovel and Pick
  • Section Tool chest
  • Bore Brush
  • Collimator
  • Water Cans
  • Ammo Cans for fuses and primers
  • MRE

Generally all the stuff everybody pack on a vehicle which has to be on the ground for a towed howitzer.

Happy 4th of July to all.

Total hours this update - 9.5 hours

Total hours this overall build - 44.0

Thanks for looking and as always, all comments are welcome.

Rounds Complete!!

"The Moral High Ground....A Great Place to Emplace Artillery."

  • Member since
    August 2008
  • From: Yarmouth, Nova Scotia
Posted by glorbes on Saturday, July 4, 2009 10:18 PM
Lovely detailing on this...your small-scale additions really add to the realism.  I love the dirt and weathering effects as well...such subtle and effecive work. 
  • Member since
    January 2009
  • From: Everett, WA
Posted by Schnobs on Sunday, July 5, 2009 2:12 AM

Mike this looks like the real thing but that was the point right?

Seriously Sir fantastic workmanship and attention to detail.  I am quite impressed.  I want to eventually do some German Arti.  I really want to do an 88 in the future.  Have yuo done any German artillery Mike of just U.S. stuff?

"There is a principle which is a bar against all information, which is proof against all arguments and which cannot fail to keep a man in everlasting ignorance. That principle is contempt prior to investigation." Herbert Spencer
  • Member since
    October 2004
  • From: League City, Texas
Posted by sfcmac on Sunday, July 5, 2009 3:00 AM
 I have been really enjoying watching your progression and these great little details done up so well really make it top notch!  It looks just like what I have seen and I am really inspired by your great work!
  • Member since
    July 2006
  • From: New Jersey
Posted by redleg12 on Sunday, July 5, 2009 7:00 AM

 glorbes wrote:
Lovely detailing on this...your small-scale additions really add to the realism.  I love the dirt and weathering effects as well...such subtle and effecive work. 

Glorbes - Thanks for looking and your comments, especially on the weathering.

 Schnobs wrote:
Mike this looks like the real thing but that was the point right? Seriously Sir fantastic workmanship and attention to detail.  I am quite impressed.  I want to eventually do some German Arti.  I really want to do an 88 in the future.  Have yuo done any German artillery Mike of just U.S. stuff?

Edmund - Next...I have to get it to smell like the real thing!!! Thanks for the comments on the details.

Now, as far as German.....it's against my religion!!! Wink [;)]. You hang around here long enough....you know I'm Mr. OD.

That said.....if I ever built anything German, it would be an 88. The US Army even put out a Technical Manual on the German 88. I thought of doing one being towed by an M4 High Speed Tractor as a capture weapon. Problem is I have about 30 years worth of US work in the stash  Whistling [:-^]....Thanks

 sfcmac wrote:
 I have been really enjoying watching your progression and these great little details done up so well really make it top notch!  It looks just like what I have seen and I am really inspired by your great work!

Aaron - I love doing the details Banged Head [banghead]....thanks, I appreciate your comments.

Rounds Complete!!

"The Moral High Ground....A Great Place to Emplace Artillery."

  • Member since
    June 2008
  • From: Iowa
Posted by Hans von Hammer on Sunday, July 5, 2009 7:04 AM

Can almost smell the Wolf P*ssy, Redleg...Wink [;)]


  • Member since
    July 2006
  • From: New Jersey
Posted by redleg12 on Sunday, July 5, 2009 7:13 AM
 Hans von Hammer wrote:

Can almost smell the Wolf P*ssy, Redleg...Wink [;)]


Ahhhhh......my favorite perfume!!Wink [;)]

Thanks

Rounds Complete!!

"The Moral High Ground....A Great Place to Emplace Artillery."

  • Member since
    February 2009
  • From: mass,USA
Posted by scratchmod on Sunday, July 5, 2009 8:17 AM

I like what you've done with this model especially the details. Yep your a cannon cocker for sure.

The painting and weathering is perfect, looking forward to seeing all the goodies still to come.


Rob

  • Member since
    July 2006
  • From: New Jersey
Posted by redleg12 on Sunday, July 5, 2009 9:14 AM

Rob - Thanks for looking and your comments. Cannon Cocker....remember

 "Artillery lends dignity to what otherwise would be a vulgar brawl" Wink [;)]

Rounds Complete!!

"The Moral High Ground....A Great Place to Emplace Artillery."

  • Member since
    June 2008
  • From: Iowa
Posted by Hans von Hammer on Sunday, July 5, 2009 9:57 AM

Also:

Field Artillery-The King of Battle.

"We put the balls where the Queen wants them."

  • Member since
    July 2004
  • From: Texas
Posted by wbill76 on Sunday, July 5, 2009 11:53 AM
Very nice work on the details Mike, it's really upped things a couple of notches from the base kit for sure. Looking forward to the base and position work to come! Thumbs Up [tup]
  • Member since
    September 2003
  • From: South Central Wisconsin
Posted by Daywalker on Sunday, July 5, 2009 1:48 PM
Those added details such as the lanyard, lenses, guages, and such really add a lot of life to this build.  Well done, I look forward to seeing more progress on that base! Approve [^]

Frank 


  • Member since
    July 2006
  • From: New Jersey
Posted by redleg12 on Sunday, July 5, 2009 3:10 PM

Bill - Attention to detail!!! Especially in OD....Thanks for stopping by and the comments.

Daywalker - Thanks for stopping in. Adding the details is what makes the research and build fun. Thanks for the comments.

Rounds Complete!!

"The Moral High Ground....A Great Place to Emplace Artillery."

  • Member since
    March 2004
  • From: Spartanburg, SC
Posted by subfixer on Sunday, July 5, 2009 5:08 PM

Great job, redleg.

I'm from the government and I'm here to help.

  • Member since
    July 2006
  • From: New Jersey
Posted by redleg12 on Sunday, July 5, 2009 6:31 PM

Thanks subfixer!!

Rounds Complete!!

"The Moral High Ground....A Great Place to Emplace Artillery."

  • Member since
    July 2003
  • From: On my kitchen counter top somewhere in North Carolina.
Posted by disastermaster on Monday, July 6, 2009 7:16 PM

 http://i249.photobucket.com/albums/gg222/Ryuk-Rasengan/Smileys/elmo.gifHey Mike......

This has been a

http://i297.photobucket.com/albums/mm235/Paragon_Dragon/Smileys/000202B6.gif

The weathering and details are

right on http://i593.photobucket.com/albums/tt11/Suprademon/smileys/target.gif

http://www.rctankhq.com/panzerforum/Smileys/classic/smileyloviit.gifhttp://th273.photobucket.com/albums/jj218/cynara_photos/smileys/th_score010.gif

http://www.innovationbyinstinct.com/services/hosting/clients/accountyp/status/DisasterMaster/%23t1-4.jpg


Sherman-Jumbo-1945

"I was so much older then, I'm younger than that now"


  • Member since
    July 2006
  • From: New Jersey
Posted by redleg12 on Monday, July 6, 2009 10:27 PM

DM - As usual your reply is worth the wait!! Thanks again. Glad you like the weathering!!

As always thanks for stopping by!!Wink [;)]

Rounds Complete!!

"The Moral High Ground....A Great Place to Emplace Artillery."

  • Member since
    September 2006
  • From: Central Texas
Posted by NucMedTech on Tuesday, July 7, 2009 6:24 AM

Redleg- Great build, ATD is outstanding. It really brings the build to life. Looking forward to the other small items to go with it. May bring me some understanding on what to put into my build.

-StephenCowboy [C):-)]

Most barriers to your successes are man made. And most often you are the man who made them. -Frank Tyger

  • Member since
    April 2005
  • From: Piscataway, NJ!
Posted by wing_nut on Tuesday, July 7, 2009 7:20 AM

Not your usual good stuff MikeSad [:(]

It's BETTERBig Smile [:D]

Really nice work on this Mike.  All the added details really make it look the part.

Author's Note:  The first 2 lines of this post were meant to add a modicum of humor to the message and it is in no way meant to imply the builders previous model have deficient in any way in the facets of the model building process including, but not limited to, gluing, sanding, seam filling, polishing, scratch building, priming, painting, weathering, etc. because the author knows the builder will be at AMPSEast in September and the author does not want his own models stomped on, thrown, crushed, have gas released on, burned or otherwise deteriorated, by the builder.

Marc  

  • Member since
    July 2006
  • From: New Jersey
Posted by redleg12 on Tuesday, July 7, 2009 8:34 AM

NMT - Thanks for looking and for the comments!

 wing_nut wrote:

Not your usual good stuff MikeSad [:(]

It's BETTERBig Smile [:D]

Really nice work on this Mike.  All the added details really make it look the part.

Author's Note:  The first 2 lines of this post were meant to add a modicum of humor to the message and it is in no way meant to imply the builders previous model have deficient in any way in the facets of the model building process including, but not limited to, gluing, sanding, seam filling, polishing, scratch building, priming, painting, weathering, etc. because the author knows the builder will be at AMPSEast in September and the author does not want his own models stomped on, thrown, crushed, have gas released on, burned or otherwise deteriorated, by the builder.

Marc - I am on the road for work. To wake up in the morning, 3,000 miles from home, and to LMAO like this was greatly appreciated. You da man.

Just because I am an expert in explosives, propellants, and all things that go boom, you would let people thing I would melt, blow up, and shoot you builds.......Naaaaaa.....I'm watching you!!!

Thanks for looking and thanks for the comments!!

Rounds Complete!!


"The Moral High Ground....A Great Place to Emplace Artillery."

  • Member since
    April 2005
  • From: Piscataway, NJ!
Posted by wing_nut on Tuesday, July 7, 2009 9:20 AM

Glad to help you on the road trip my firend.


Rememebr the days when you would jump up and yell, "Big Smile [:D]ROAD TRIP!"

Now it's, "Disapprove [V]CRAP...road trip."

Marc  

  • Member since
    July 2006
  • From: New Jersey
Posted by redleg12 on Tuesday, July 7, 2009 10:41 PM

Marc - How true!!!! Thanks again.....from my hotel room

G - I thought Marines strapped artillery on their back and ran onto the beachSmile,Wink, & Grin [swg].....Thanks for stopping by and for the comments.

Rounds Complete!!

"The Moral High Ground....A Great Place to Emplace Artillery."

  • Member since
    July 2006
  • From: New Jersey
Posted by redleg12 on Sunday, July 19, 2009 2:34 PM

Work and chores have slowed the finish but here is the details to date. Ammunition and some other items still need markings.

  • HE projectiles with eye bolts, painted with Tamiya OD. Rotating band painted with Tamiya Dark Copper (from AFV 155mm Ammunition kit)
  • Tool chest painted Poly Scale Forest Green (Italeri tools kit)
  • Fuse boxes and primer boxes painted Poly Scale Forest Green (AFV Ammunition Boxes kit)
  • 5 gallon of bore cleaner painted Poly Scale Forest Green (Italeri)

  • HE projectiles with fuse painted same as above, MTSQ Time fuse, Tamiya Flat Black, PD fuse painted Alclad Burnt Metal (AFV Kit and supplied with model)
  • Water cans painted Tamiya Flat Black (Resin Kit)
  • Projectile carrier painted Alclad Steel (supplied with model)
  • Pail for bore cleaner painted Alclad Dark Aluminum (Spares)
  • Rammer painted Poly Scale Forest Green for staff and Alclad Aluminum for ramming end. (supplied with model)

  • Illumination projectiles painted Tamiya Flat white with rotating band and MTSQ fuse same as above (supplied with model)
  • WP projectiles painted with 70% Tamiya Cockpit Green and 30% Flat White. Rotating band and PD fused same as above (AFV kit) <rounds in the front>
  • HC Smoke projectiles painted the same as WP except MTSQ fuse. (AFV kit) <rounds in the back>
  • Propelling charge canisters painted Tamiya OD (AFV kit)

I am currently working on wood pallets and dunnage for the ammunition. I still have to finish

  • Shovel and Pick
  • MRE
  • Telephone and wire reel
  • Bore Brush
  • Collimator

Just an update on where I am at. The little items take a lot of time!!

Total hours this update - 6.5 hours

Total hours this overall build - 50.5

Thanks for looking and as always, all comments are welcome.

Rounds Complete!!

"The Moral High Ground....A Great Place to Emplace Artillery."

  • Member since
    July 2004
  • From: Texas
Posted by wbill76 on Sunday, July 19, 2009 4:49 PM
The devil's always in the details Mike! Looks like this one's well on its way to being amply supplied for the next fire mission. Thumbs Up [tup]
  • Member since
    August 2007
  • From: The Plains of Kansas
Posted by doc-hm3 on Sunday, July 19, 2009 5:18 PM

  Mike, I must have ben asleep at the wheel, because somehow I have missed the boat and on your build to date. But! is has been great catching up on your progress all in one afternoon. Your detailed build is nice and clean, and the paintjob is superb but your weathering makes the whole piece just pop and come alive. A fitting build for gentleman artillaryman.Thumbs Up [tup]

                                                                              doc


All gave some and some gave all.

  • Member since
    April 2005
  • From: Piscataway, NJ!
Posted by wing_nut on Sunday, July 19, 2009 7:02 PM
Nice looking ammo Mike.  I can almost hear it go BOOM

Marc  

  • Member since
    July 2006
  • From: New Jersey
Posted by redleg12 on Sunday, July 19, 2009 7:09 PM

 wbill76 wrote:
The devil's always in the details Mike! Looks like this one's well on its way to being amply supplied for the next fire mission. Thumbs Up [tup]

Bill - Why is it always the devil Evil [}:)] .....Thanks Angel [angel]

Doc - Thanks for spending the time to catch up and for your comments

 wing_nut wrote:
Nice looking ammo Mike.  I can almost hear it go BOOM

Marc - I personally like WP.....HOT HOT HOT HOT....

Thanks for stopping by and for the comments.

Rounds Complete!!

"The Moral High Ground....A Great Place to Emplace Artillery."

  • Member since
    October 2007
  • From: N.H.
Posted by panzerguy on Monday, July 20, 2009 6:20 PM
 

  Mike that's one nice piece of arty!  Didn't get to see these guy's in action when I was in but those rounds with the lifting lugs and fuses in ‘em bring back a lot of good (and a couple of bad) memoriesWink [;)].

  Great job from a fellow cannon cocker.


"Happiness is a belt fed weapon"

  • Member since
    March 2004
Posted by Grimmo on Monday, July 20, 2009 9:13 PM

great work there! can almost smell the blast! fantastic camo, totally awesome model!

Here in oz, we call artillery "nine mile snipers" or "dropshorts". Not as bad as what the call everyone else!

  • Member since
    June 2006
  • From: Netherlands
Posted by Grem56 on Tuesday, July 21, 2009 2:49 AM

Looking great so far. The addition of all the "odds and sods" (shells etc.) around the artillery piece will bring it to life. Fantastic Thumbs Up [tup]

Julian Smile [:)]


illegal immigrants have always been a problem in the United States. Ask any Indian.....................

Italeri S-100: http://cs.finescale.com/FSMCS/forums/t/112607.aspx?PageIndex=1

Isu-152: http://cs.finescale.com/FSMCS/forums/t/116521.aspx?PageIndex=1


  • Member since
    July 2006
  • From: New Jersey
Posted by redleg12 on Tuesday, July 21, 2009 6:19 AM

 panzerguy wrote:
 

  Mike that's one nice piece of arty!  Didn't get to see these guy's in action when I was in but those rounds with the lifting lugs and fuses in ‘em bring back a lot of good (and a couple of bad) memoriesWink [;)].

  Great job from a fellow cannon cocker.


Steve - First forget the bad and always remember the good!! Thanks for stopping by. Always appreciate the praise from a fellow redleg. Nothing like screwing the fuses & eyebolts. Shock [:O]

Thanks again

 Grimmo wrote:

great work there! can almost smell the blast! fantastic camo, totally awesome model!

Here in oz, we call artillery "nine mile snipers" or "dropshorts". Not as bad as what the call everyone else!

Hmmmm....where exactly is Oz and when did the witch of the north get her own battery?? Propeller [8-]

Thanks for stopping by and for your comments

 Grem56 wrote:

Looking great so far. The addition of all the "odds and sods" (shells etc.) around the artillery piece will bring it to life. Fantastic Thumbs Up [tup]

Julian Smile [:)]

Julian - Thanks for the comments. Artillery has a lot of "odds and sods", especially towed

Thanks again

Rounds Complete!!

"The Moral High Ground....A Great Place to Emplace Artillery."

  • Member since
    January 2007
Posted by the doog on Tuesday, July 21, 2009 6:33 AM

Gotta admit, Mike--you really take these builds to the "nth degree"--they're a great source of information and detail on a subject that few guys seem to cover. You're definitely the "King of Artillery" here on FSM!

It all looks great, for sure--all the little details really flesh out the whole concept. I'm glad I got to see it!

  • Member since
    April 2007
  • From: Schroon Lake, NY
Posted by SMJmodeler on Tuesday, July 21, 2009 9:49 AM

Mike: That ammo is like a whole model within itself!Shock [:O]  I'm sure it will pay-off though, the detail work really brings it to life!

They all look great but lack depth, IMO.  A subtle wash for shadows on the relief might help your efforts.

  • Member since
    June 2007
Posted by squeakie on Tuesday, July 21, 2009 12:48 PM
 redleg12 wrote:
 SMJmodeler wrote:
 redleg12 wrote:

Great shot Mike, I love the combo of camo colors!  The weathering should make it even better! I'm looking forward to seeing what you do with the hydraulics and those huge joints for the legs behind the wheels.

 redleg12 wrote:

Questions: Are the legs so huge for counterbalance or recoil support?...or both?  Does that plate at the end of the legs get driven into dirt?  What if the dirt is really hard or there's no support vehicle to assist?...would this baby just roll way back after firing in that case?  Does the anchoring, or lack of, effect it's range and/or accuracy?...I suspect yes..but how much?

OK....Lets answer these one at a time

Are the legs so huge for counterbalance or recoil support?...or both? Yes....The longer "trails" help counter balance the load when towing. Also because of the design, a front base plate to pivot, the longer legs give better support during the shock of recoil

Does that plate at the end of the legs get driven into dirt? Yes...the "spades" are intended to be dug in.

What if the dirt is really hard or there's no support vehicle to assist? If the dirt is really hard or emplaced on rock, the spades need to be "blocked and braced" to prevent the gun from moving. This could be done with logs. The weapon is normally towed by an M9oo series 5 ton truck or now the new LMTV series 5 ton. If the weapon is "air assualted" and no vehicle present the crew would just have to hup it.

In general, the battery commander during his recon of a new position would evaluate the ground conditions and try not to emplace where it could not be dug in. If there was a situation where this was impossible, he would normally request engineer support as part of the battery occupation of the new position.

would this baby just roll way back after firing in that case? If the weapon was not supported, the gun would encounter "displacement" or move each time it is fired. The crew need to determine displacement after each round that is fired. After reaching a maximum, the gun would have to be "re-laid" or re-surveyed. This is not a situation you want to be in.

Does the anchoring, or lack of, effect it's range and/or accuracy?. Yes...as the wepon displaces, it can change the position of the wepon not only to the rear, but sideways, if the barrel when fired was not on center with the carriage.

I suspect yes..but how much? Yes for sure.....how much it is off target depends on the amount of the displacement, the range you are firing at and if you are firing high angle or low angle. When firing high angle, the "range probable error" is higher since the round ins in the air longer, goes higher and is susectable to more atmospheric conditions. To give you an idea, the PE at low angle and 5,000 meters in range is ~20 meters at high angle and range of 25,000 meters the PE is ~105 meters.

Couple that with displacement and you could be off by a few hunderd meters.

Artillery relies on survey, ballistic calculation, meterorlogical input and other factors to shoot long distances accuratly. It's not a tank where you can see the target and shoot it. You may be shooting over a mountain and hitting a target on the other side.

All of these inputs are put into ballistic formulas to calculte the "deflection" azimuth and "quadrent" elevation for a specific round type with a specific powder chage.

Hope this helps

Rounds Complete!! 

just to add the questions about digging in the spades. We would often dig the spades in about three or four inches if the soil was really rocky. Then fire a charge seven to who knows where. The spades would then be dug in to the max, and hopefully not displace very much.

     The guns we used would hold a consistent 40 to 50 yards in accuracey using generic HE rounds. But we also had contact lots of rounds and powder. This would get you down to the 40 yard pattern without any problems. And often in about 30 yards at max range (14,000+ yards). We always felt we were capable of shooting within 150 yards of friendlies in a pinch (as long as the ground was solid clay and using contact lots of ammunition). If your adjusting off of the first shot and it's close a good gun crew can really walk those rounds right into your lap. Still 35 yards is about the very best you can ask for in repeatability on a perfect day.

gary

  • Member since
    June 2007
Posted by squeakie on Tuesday, July 21, 2009 12:55 PM
 Hans von Hammer wrote:

What if the dirt is really hard or there's no support vehicle to assist? If the dirt is really hard or emplaced on rock, the spades need to be "blocked and braced" to prevent the gun from moving. This could be done with logs. The weapon is normally towed by an M9oo series 5 ton truck or now the new LMTV series 5 ton.

Just expanding upon Redleg's answer, we carried two railroad tie sections on the gun trucks (this was for M101 105mm, but the deal's the same for the M198).  Each section was about 3 feet long with holes bored through the middle...  We also had ice stakes about 4 feet long made of solid steel and pointed at one end.  When we had to emplace on frozen ground, or rocky areas too tough for digging, we use these "Dead-men" (the ties) in position behind the spades...

We would displace a skoshi-bit more than if we had dug in, but it would settle down by the third or fourth round..

75% of the time we shot outta parapits for a full 360 degrees of fun and games. We backed are trails with loose logs to take up the slack when we changed azmuths. The parapit usually used 12" x 12" logs backed up with another set mounted vertically. Then in front of the first set we used a steel plating that was similar to PSP, but still different. The gun itselt sat on a large platform made from similar materal to railroad ties. This was mostly to make the jack plate solid and consistent

gary

  • Member since
    January 2008
  • From: Bournemouth UK
Posted by Bodge on Tuesday, July 21, 2009 1:30 PM
Awsome work there Redleg and your a credit to the kitBow [bow]
  • Member since
    January 2012
Posted by I make stuff on Tuesday, July 21, 2009 5:21 PM

Nice, Redleg.

"Target, troops in the open.  I say again, troops in the open..."

I heard that will make an artilleryman smile every time.

  • Member since
    July 2006
  • From: New Jersey
Posted by redleg12 on Tuesday, July 21, 2009 6:11 PM

 the doog wrote:

Gotta admit, Mike--you really take these builds to the "nth degree"--they're a great source of information and detail on a subject that few guys seem to cover. You're definitely the "King of Artillery" here on FSM!
It all looks great, for sure--all the little details really flesh out the whole concept. I'm glad I got to see it!

Karl – With all the add on stuff on tanks this is just spread out. Though, artillery items are specialized.

Yes, I am the odd ball, but it is my life. Glad to see people learning from these posts. It is the main purpose of these forums

Thanks for stopping in LOOOOONG Distance
 SMJmodeler wrote:

Mike: That ammo is like a whole model within itself!Shock [:O] I'm sure it will pay-off though, the detail work really brings it to life!
They all look great but lack depth, IMO. A subtle wash for shadows on the relief might help your efforts.

Steve – OK….always looking to rush the process.

The ammo is set up for a future spray and then custom decals. I am making up the correct markings for each type of round and the powder canisters. After the coat of flat, THEN we can talk about pinwashing the rounds. You didn’t think I would go through all that trouble of the different colors and not refer to TM 9-1300-251-20 for the correct markings!!......You should know me better

Thanks for stopping by and the comments
 squeakie wrote:

just to add the questions about digging in the spades. We would often dig the spades in about three or four inches if the soil was really rocky. Then fire a charge seven to who knows where. The spades would then be dug in to the max, and hopefully not displace very much.
The guns we used would hold a consistent 40 to 50 yards in accuracey using generic HE rounds. But we also had contact lots of rounds and powder. This would get you down to the 40 yard pattern without any problems. And often in about 30 yards at max range (14,000+ yards). We always felt we were capable of shooting within 150 yards of friendlies in a pinch (as long as the ground was solid clay and using contact lots of ammunition). If your adjusting off of the first shot and it's close a good gun crew can really walk those rounds right into your lap. Still 35 yards is about the very best you can ask for in repeatability on a perfect day.
gary

Gary – Shooting the gun in…..been there done that….in our VN and post years I would agree with your accuracy. Today with all the neat toys the do a bit better. I still think everyone should still know the old fashioned way too!!

Thanks for the comments

Andy – Thanks for looking and for the comment. It means a lot coming from you.

 Citadelgrad87 wrote:

Nice, Redleg.

"Target, troops in the open.  I say again, troops in the open..."

I heard that will make an artilleryman smile every time.


CG – Time in effect…..those troops in the open love airbursts

Thanks

Rounds Complete!!

"The Moral High Ground....A Great Place to Emplace Artillery."

  • Member since
    December 2002
  • From: Valrico, FL
Posted by HeavyArty on Tuesday, July 21, 2009 6:40 PM
Looking great Mike.  The rounds look awesome, makes me want to pick up a couple do some PT.  HOOOAAAHHH!!!!

Gino P. Quintiliani - Field Artillery - The KING of BATTLE!!!

Check out my Gallery: https://app.photobucket.com/u/HeavyArty

"People sleep peaceably in their beds at night only because rough men stand ready to do violence on their behalf." -- George Orwell

  • Member since
    June 2007
Posted by squeakie on Tuesday, July 21, 2009 8:27 PM
 redleg12 wrote:

 the doog wrote:

Gotta admit, Mike--you really take these builds to the "nth degree"--they're a great source of information and detail on a subject that few guys seem to cover. You're definitely the "King of Artillery" here on FSM!
It all looks great, for sure--all the little details really flesh out the whole concept. I'm glad I got to see it!

Karl – With all the add on stuff on tanks this is just spread out. Though, artillery items are specialized.

Yes, I am the odd ball, but it is my life. Glad to see people learning from these posts. It is the main purpose of these forums

Thanks for stopping in LOOOOONG Distance
 SMJmodeler wrote:

Mike: That ammo is like a whole model within itself!Shock [:O] I'm sure it will pay-off though, the detail work really brings it to life!
They all look great but lack depth, IMO. A subtle wash for shadows on the relief might help your efforts.

Steve – OK….always looking to rush the process.

The ammo is set up for a future spray and then custom decals. I am making up the correct markings for each type of round and the powder canisters. After the coat of flat, THEN we can talk about pinwashing the rounds. You didn’t think I would go through all that trouble of the different colors and not refer to TM 9-1300-251-20 for the correct markings!!......You should know me better

Thanks for stopping by and the comments
 squeakie wrote:

just to add the questions about digging in the spades. We would often dig the spades in about three or four inches if the soil was really rocky. Then fire a charge seven to who knows where. The spades would then be dug in to the max, and hopefully not displace very much.
The guns we used would hold a consistent 40 to 50 yards in accuracey using generic HE rounds. But we also had contact lots of rounds and powder. This would get you down to the 40 yard pattern without any problems. And often in about 30 yards at max range (14,000+ yards). We always felt we were capable of shooting within 150 yards of friendlies in a pinch (as long as the ground was solid clay and using contact lots of ammunition). If your adjusting off of the first shot and it's close a good gun crew can really walk those rounds right into your lap. Still 35 yards is about the very best you can ask for in repeatability on a perfect day.
gary

Gary – Shooting the gun in…..been there done that….in our VN and post years I would agree with your accuracy. Today with all the neat toys the do a bit better. I still think everyone should still know the old fashioned way too!!

Thanks for the comments

Andy – Thanks for looking and for the comment. It means a lot coming from you.

 Citadelgrad87 wrote:

Nice, Redleg.

"Target, troops in the open.  I say again, troops in the open..."

I heard that will make an artilleryman smile every time.


CG – Time in effect…..those troops in the open love airbursts

Thanks

Rounds Complete!!

I didn't say anything about the build, but I check on it every week or so. Looks great from what I see already. Kust looks right!

     Couple questions about the kit, and I'll leave you alone. Noticed that the breech is closed. Did you do that on purpose or is that the only way it can be displayed?

gary

  • Member since
    October 2004
  • From: League City, Texas
Posted by sfcmac on Tuesday, July 21, 2009 8:41 PM
I think you got it perfect and then you make it better! Thumbs Up [tup]Bow [bow] Makes my back hurt just thinking about humping that ammo! Whistling [:-^]
  • Member since
    July 2006
  • From: New Jersey
Posted by redleg12 on Wednesday, July 22, 2009 5:26 AM

Gino - Thanks...PT Shock [:O]....OK, I hate running....how about situps with a round on your chest Wink [;)]

Thanks, you know me...keep the powder dry and the bubbles level!

Gary - First, no problem, I always love the stories. It's our past that has let us build our present!

The kit breech has no inner detail and can only be shown closed. It would have take one or two small molded parts to give a choice, but...that not to be.

Ask on my good man and Thanks.

Aaron - Bengay....an artillerymans best friend..Thanks for your comments and for looking.

Rounds Complete!!

"The Moral High Ground....A Great Place to Emplace Artillery."

  • Member since
    July 2006
  • From: New Jersey
Posted by redleg12 on Sunday, August 2, 2009 7:01 PM

Finally, I am almost done. The summer seems to suck up a lot of time and thus builds are going slow.

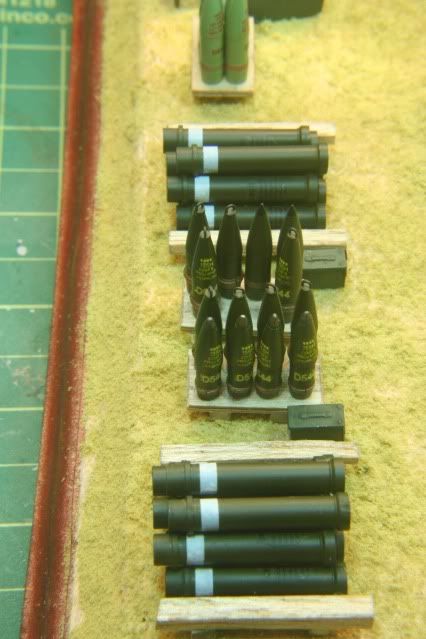
The ammunition was tedious work as it required a total of 80 individual decals to create all the markings!

This first picture shows two pallets with HE projectiles. The closest have some fused with PD fuses, the other pallet has some with time fuses. The projectile pallets that come from AFV look plastic. I scratch pallets from 1/32 plywood. Two sheets glued together, the top one drilled for the shell insets. The underside was 2 struts of basswood cut to scale 2 x 4 to allow fork lifting of the pallets. The dunnage for the propellant was also cut basswood to match the 2 x 4 used to pack the propellant. Ammo cans for the fuse cans (fuses packed in 8 packs in 50 cal can size).

Fuse boxes were pin washed with MIG dark wash. The wood grain was also brought out using MIG dark wash as a stain. The projectiles are marked using the AFV ammunition kit decals and were pin washed with MIG dark wash. The propellant canisters use the AFV kit white bands and custom decals to depict both Green bag and White bag propellant.

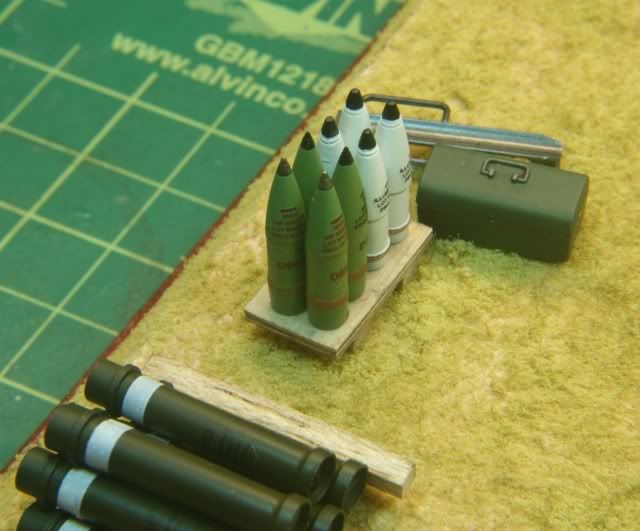
A third pallet contains two rounds of WP with custom markings (in red) with the yellow band below the markings (closest). Nest was HC smoke with custom black decal markings and lastly Illumination with custom black markings. All the rounds were pin washed with MIG dark wash or a grey oil (white illumination rounds). Also shown is the section tool chest which was pin washed and the handle and box seam were dry brushed with Alclad steel. In the background is the projectile carrier done with Alclad steel

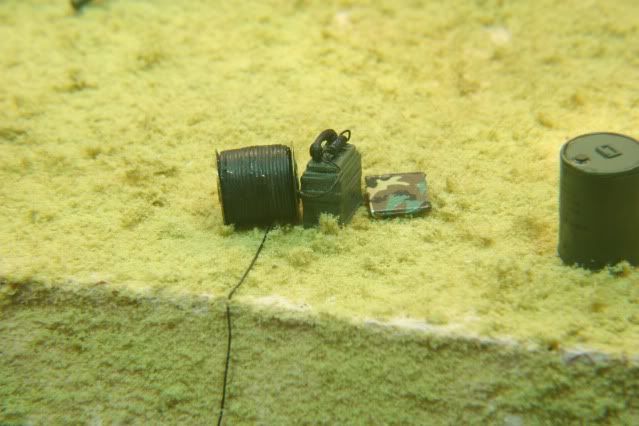
Gun communication is a Plus Model wire reel (RL 50) painted Tamiya flat black for the wires and Tamiya OD green for the reel. The paint was rubbed off on the edges to show normal wear and the reel was pin washed with MIG dark wash. The wire off the reel is 30 gauge SS wire painted Tamiya flat black. The TA312 (telephone) is a radio from an Italeri accessory set. The bottom half is cut off to give the right size for a TA312. The handset is from the same kit. The phone cord is 30 gauge SS wire coiled around a drill bit. The handset and cord are painted Tamiya flat black. The TA312 is painted with Poly Scale dark green then washed with MIG dark wash.

The log book is .020 styrene sheet cut .25 x .3 (scale 8 x 11) then covered with BDU camo decal. The log book is where the crew would keep their record of fire forms and their log sheet to keep track of rounds fired for tube wear.

Lastly is a 5 gallon oil can for bore cleaner. It has a custom decal marking, then a MIG pin wash and then a drip line down the front of Flowquil spilled oil...to simulate spilled oil!!

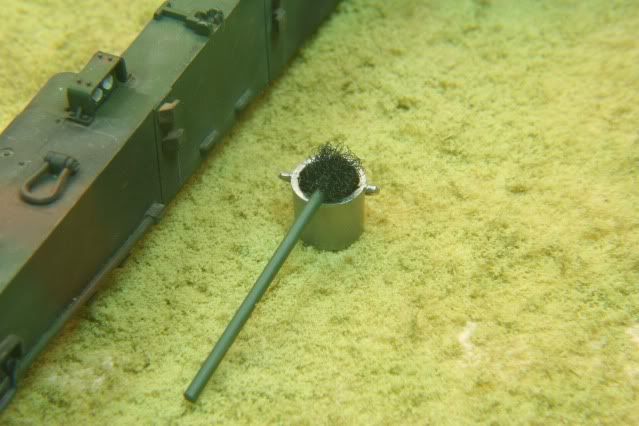
The pail for bore cleaner was filled half way with wood sealing polyurethane which was tinted with Tamiya Clear red and red brown to simulate RBC in the pail. The bore cleaning rod was styrene rod stock and the fuzzy end of Velcro to make the bore brush.

The rammer was pin washed with MIG dark wash along with the prime box (30 cal ammo box).

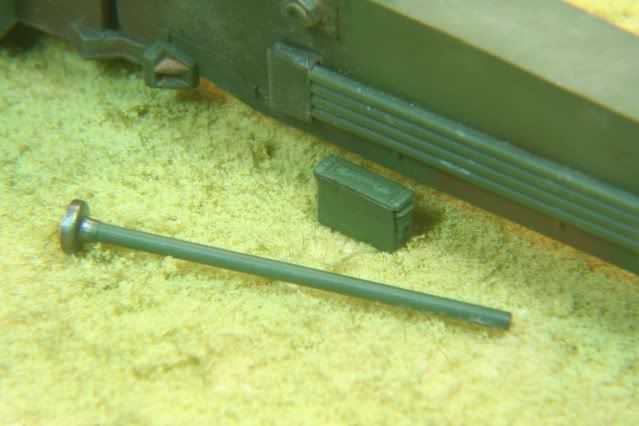
View from the rear shows the ammunition preparation area and in the background the rammer and primer box on the ground inside the trails

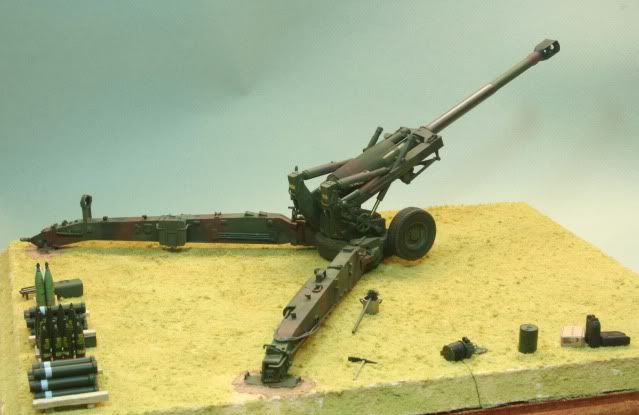
This photo shows the current state of the build. You can also see the water cans and a box of MREs (Yummmmm).

The spades were "dug" in by mixing up a small batch of base material which was mounded and filled in around the spades.

The last item to complete is the infinity collimator. This was scratch built using parts from the Academy machine gun kit. Parts V17 for the yoke and W12 which is cut up, modified and reassembled as the tripod base are used. The collimator is 0.6" long section of 0.10 styrene tube. The eyepiece is 0.060 rod inserted into the tube. The top was drilled and 0.030 rod inserted for the adjustment knob.  It is painted with Tamiya OD.

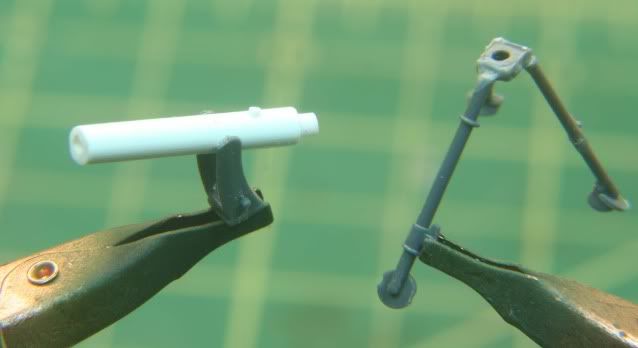
I will be making up some sandbags to hold the collimator and finishing up the collimator for installation on the base. I still have to do the tall grass and bush thing and then I am done. I should have finished photos of the complete build next week.  

Total hours this update - 13.5 hours

Total hours this overall build - 64.0

Thanks for looking and as always, all comments are welcome.

Rounds Complete!!

"The Moral High Ground....A Great Place to Emplace Artillery."

  • Member since
    June 2006
  • From: Netherlands
Posted by Grem56 on Monday, August 3, 2009 1:25 AM

As I said before: the odds and sods really add to the whole dio. Great workmanship here !

Julian Thumbs Up [tup]


illegal immigrants have always been a problem in the United States. Ask any Indian.....................

Italeri S-100: http://cs.finescale.com/FSMCS/forums/t/112607.aspx?PageIndex=1

Isu-152: http://cs.finescale.com/FSMCS/forums/t/116521.aspx?PageIndex=1


  • Member since
    July 2004
  • From: Texas
Posted by wbill76 on Monday, August 3, 2009 9:16 AM

Mike,

The attention to detail is just awesome...all kinds of little things to draw the eye and your patience with the decals really paid off.

  • Member since
    January 2007
Posted by the doog on Monday, August 3, 2009 2:31 PM
WOW, man; you guys sure know your stuff with this artillery stuff! It's looking impressive, Mike! Love all those shells and doodads alongside! Those shells are worth a trophy themselves! Thumbs Up [tup]
  • Member since
    July 2006
  • From: New Jersey
Posted by redleg12 on Monday, August 3, 2009 7:20 PM

 Grem56 wrote:

As I said before: the odds and sods really add to the whole dio. Great workmanship here !

Julian Thumbs Up [tup]

Julian - Thanks for stopping back...I love my odds and sods!!

 wbill76 wrote:

Mike,

The attention to detail is just awesome...all kinds of little things to draw the eye and your patience with the decals really paid off.

Bill - God I'm tired of decals....for a while. The ammunition and other items are a build unto themselves. But....I do love my artillery!!Wink [;)]

Thanks for the kind words!

Wayne - It is always a pleasure to hear from Vegas!!! Shock [:O] Thanks

 the doog wrote:
WOW, man; you guys sure know your stuff with this artillery stuff! It's looking impressive, Mike! Love all those shells and doodads alongside! Those shells are worth a trophy themselves! Thumbs Up [tup]

Karl - Thanks. The doodads are the propellant canisters. The 155mm is separate loading ammunition so those "doodads" hold the powder so you can PSGGB (Pull string, gun go boom)Laugh [(-D].

Thanks for the comments...I appreciate them coming from you.

Rounds Complete!!

"The Moral High Ground....A Great Place to Emplace Artillery."

  • Member since
    April 2007
  • From: Schroon Lake, NY
Posted by SMJmodeler on Tuesday, August 4, 2009 2:26 PM

Really impressive Mike!  I love all the ammunition...the hard work and time was definately worth it!

I like how she's dug in but I don't quite understand the color of the dirt/mud.  Is it supposed to be clay?  Is the whole groundwork yet to be painted, including the spade areas...Confused [%-)]

  • Member since
    July 2006
  • From: New Jersey
Posted by redleg12 on Tuesday, August 4, 2009 3:46 PM
 SMJmodeler wrote:

Really impressive Mike!  I love all the ammunition...the hard work and time was definately worth it!

I like how she's dug in but I don't quite understand the color of the dirt/mud.  Is it supposed to be clay?  Is the whole groundwork yet to be painted, including the spade areas...Confused [%-)]

I still have to "dust" that dirt with some MIG pigments so the color is not perfect. That said....freshly dug soil is usaully darker than undisturbed soil.

As I said above, after I finish the colimator and sand bags the last few items of cleanup deal with the base.

Hopefully I done this week and will post finished pics.....

I know, you having the love of dirt and mud the color is very important to you.....For me, thats not as important as the above soil items.Wink [;)]

Thanks for stopping in and your comments

Rounds Complete!!

"The Moral High Ground....A Great Place to Emplace Artillery."

  • Member since
    April 2007
  • From: Schroon Lake, NY
Posted by SMJmodeler on Wednesday, August 5, 2009 2:24 PM
 redleg12 wrote:

I know, you having the love of dirt and mud the color is very important to you.....

You got that right!Burger [BG]...I just eat it up!

I'll wait for your final pic's, I'm sure they will be great!  I expect this is AMPS bound...correct?

  • Member since
    July 2006
  • From: New Jersey
Posted by redleg12 on Wednesday, August 5, 2009 6:10 PM

 SMJmodeler wrote:

  I expect this is AMPS bound...correct?

Yep....not too much to show this year since I went to AMPS International in April....but I will emplace this in Danbury!!

Rounds Complete!!

"The Moral High Ground....A Great Place to Emplace Artillery."

  • Member since
    July 2006
  • From: New Jersey
Posted by redleg12 on Sunday, August 9, 2009 5:40 PM

Finally finished... here are the last few details

The infinity collimator after painting with Tamiya OD and wash with MIG dark wash, the adjustment know on top was dry brushed with Alclad steel. The lens is a small MV lens and the 0.10 tube is drilled to fit the lens.

The sandbags are made from air set clay. I wet the clay to get it soft and form the basic shape. Using a putty knife I cut off the excess on the ends at an angle and try to flatten as I cut to create a seam look. Once the bag is shaped I cover and wet a fine swatch of fiberglass and form it to the bag. As it dries I remove the fiberglass which leaves an imprint in the clay to give it the fabric look.  After setting the bags were painted with Tamiya Tactical Dark Green and weathered with  MIG Dried Mud pigment.

When artillery gets into a position, the Fire Direction section will issue safety cards  known as safety Ts. These are written normally on 3" x 5" index cards and there is a different one for charge and for high angle and low angle fire. Many times than are "hung" on the weapon using 100 mile an hour tape....green issue duct tape!

Here I created some safety Ts with duct tape on the top ....scale sized them and attached them to the weapon. (The white cards with a green line on top...on either side of the breech, just below the yellow warning label)

Well a few blades of tall grass here and there, a couple of small bushes and that's it.

Total hours this overall build - 68.0

 Next up the AFV M40 155mm SP gun in the Korean winter.  First I will be doing some improvements around the bench and as usual...cleanup so the next build may not start for a few weeks.

For those at AMPS East, yes I will be bring this and hope to see you there.

Thanks for looking and as always, all comments are welcome.

Rounds Complete!!

EOM!!

"The Moral High Ground....A Great Place to Emplace Artillery."

  • Member since
    July 2004
  • From: Texas
Posted by wbill76 on Sunday, August 9, 2009 7:11 PM
Very nice work all around Mike! You can definitely see the 68 hours in all the little details and those index cards are just the icing on the cake! Thumbs Up [tup] Thumbs Up [tup]
  • Member since
    July 2006
  • From: New Jersey
Posted by redleg12 on Sunday, August 9, 2009 7:28 PM

Bill - I love cake Dinner [dinner]....Attention to details....though at times the can frustrate you!!

Thanks for always stopping in, giving your thoughts and words of encouragement. Now its off to clean the bench and wash the floor in the studio (yes....I am anal) before the next build.

Rounds Complete!!

"The Moral High Ground....A Great Place to Emplace Artillery."

  • Member since
    April 2005
  • From: Piscataway, NJ!
Posted by wing_nut on Sunday, August 9, 2009 7:35 PM
Dude I just love little details like those cards.  Way cool.

Marc  

  • Member since
    October 2004
  • From: League City, Texas
Posted by sfcmac on Sunday, August 9, 2009 7:37 PM
 A very fine finish to a most outstanding build. The small details like the index cards are priceless.  I just am thrilled with what you have done and already is an award winner in my eyes! Thumbs Up [tup]
  • Member since
    July 2006
  • From: New Jersey
Posted by redleg12 on Sunday, August 9, 2009 7:57 PM

Marc - Thanks....too many years on the 1 to 1. I did leave one detail out.....the big black garbarge bag for all the little dunnage and packing items.

Thanks for the comments and as always for stopping by

Aaron - Thanks for the comments and the award in advance Wink [;)].

Showing a WIP...costly and time consuming.....comments from the forum....truly priceless

Thanks guys

Rounds Complete!!

"The Moral High Ground....A Great Place to Emplace Artillery."

  • Member since
    December 2002
  • From: Valrico, FL
Posted by HeavyArty on Sunday, August 9, 2009 7:58 PM

FIRE MISSION!!!    Deflection 6325, Quadrant 549, HE TI: 12.5 sec.  Over.

She came out great Mike.  Excellent job as usual.

Gino P. Quintiliani - Field Artillery - The KING of BATTLE!!!

Check out my Gallery: https://app.photobucket.com/u/HeavyArty

"People sleep peaceably in their beds at night only because rough men stand ready to do violence on their behalf." -- George Orwell

  • Member since
    July 2006
  • From: New Jersey
Posted by redleg12 on Sunday, August 9, 2009 8:15 PM
 HeavyArty wrote:

FIRE MISSION!!!    Deflection 6325, Quadrant 549, HE TI: 12.5 sec.  Over.

She came out great Mike.  Excellent job as usual.

Gino - Hummm...have to shift the trails for that deflection Shock [:O]....thank god I put out the aiming posts! (Now where the hell is my fuse wrench)

Thanks for stopping in and a resopnse only you could give.

Great having you back around on the forums on a regular basis!Wink [;)]

Fitting that my response to you is my #2,000 post...the old soldier hangs in there!

Rounds Complete!!

"The Moral High Ground....A Great Place to Emplace Artillery."

  • Member since
    January 2009
  • From: Everett, WA
Posted by Schnobs on Sunday, August 9, 2009 10:17 PM

Mike this turned out fantastic!

I really apprciate and identify with your attention to detail!  You shoud make a little CEOI of the day and shrink that to size.  I authenticate Bravo Delta Charlie Over!!

Great Job!! 68 hours well spent!!

"There is a principle which is a bar against all information, which is proof against all arguments and which cannot fail to keep a man in everlasting ignorance. That principle is contempt prior to investigation." Herbert Spencer
  • Member since
    July 2006
  • From: New Jersey
Posted by redleg12 on Monday, August 10, 2009 6:47 AM
 Schnobs wrote:

Mike this turned out fantastic!

I really apprciate and identify with your attention to detail!  You shoud make a little CEOI of the day and shrink that to size.  I authenticate Bravo Delta Charlie Over!!

Great Job!! 68 hours well spent!!

I set Tango Alpha.....I send Tango Hotel Alpha November Kilo Sierra....God, I hated those books....I have the feeling on my left leg....it was always stuffed into the left cargo pocket......what a nightmare....!!!!!

Thanks for the comments

Wayne - It is always "cool" to hear from you!!! Thanks my friend.

Rounds Complete!!

"The Moral High Ground....A Great Place to Emplace Artillery."

  • Member since
    November 2005
Posted by Anonymous on Monday, August 10, 2009 8:32 AM
Very nice build and presentation!
  • Member since
    July 2006
  • From: New Jersey
Posted by redleg12 on Monday, August 10, 2009 3:07 PM

Manny - As always thaks for stopping in and for your comments.

Rounds Complete!!

"The Moral High Ground....A Great Place to Emplace Artillery."

  • Member since
    January 2012
Posted by I make stuff on Monday, August 10, 2009 3:20 PM

Very nice build, Redleg, and a realistic presentation, too.  Very very cool, thanks for sharing.

Bill

  • Member since
    January 2008
  • From: Bournemouth UK
Posted by Bodge on Monday, August 10, 2009 3:42 PM
Sign - Ditto [#ditto]Thumbs Up [tup] very nice.
  • Member since
    September 2006
  • From: Dripping Springs, TX, USA
Posted by RBaer on Monday, August 10, 2009 5:36 PM
Looks like the crew just stepped out for a while, left everything in place.....Thumbs Up [tup]

Apprentice rivet counter.

  • Member since
    July 2006
  • From: New Jersey
Posted by redleg12 on Tuesday, August 11, 2009 5:27 AM

Bill and Andy - Thanks for stopping in and for your comments.

 RBaer wrote:
Looks like the crew just stepped out for a while, left everything in place.....Thumbs Up [tup]

RBaer - The crew is wareing the new inviso-camo!!Shock [:O] Thanks for looking in and for your comment.

Rounds Complete!! 

"The Moral High Ground....A Great Place to Emplace Artillery."

  • Member since
    August 2007
  • From: The Plains of Kansas
Posted by doc-hm3 on Tuesday, August 11, 2009 6:56 AM

 Mike, as usual great build. Looking at this I can see the fireteam in my mind along with the lanyard being pulled, and then the ground shaking with the dust rising! Thumbs Up [tup]

                                                                                  doc


All gave some and some gave all.

  • Member since
    July 2006
  • From: New Jersey
Posted by redleg12 on Tuesday, August 11, 2009 11:15 AM

Doc - Thanks, the idea of seeing what is not there is what I like about the build!! A whole bunch of figs would be nice but I perfer to convey the equipment and read into the rest. Figs for this guy would have been like another separte build.

Thanks for being able to see past what is presented and your comments.

Rounds Complete!!

"The Moral High Ground....A Great Place to Emplace Artillery."

  • Member since
    August 2004
  • From: Forest Hill, Maryland
Posted by cwalker3 on Wednesday, June 9, 2010 5:42 PM

I just opened my latest issue of Boresight and lo and behold but what should I see but this fantastic build. Congrats Redleg12. That's a great article. I just wish they had done the pics in color but that's okay since there's so many more of them here.

Cary


  • Member since
    July 2006
  • From: New Jersey
Posted by redleg12 on Wednesday, June 9, 2010 7:26 PM

cwalker - Thank you.  I am glad you enjoyed the article and touched that you pulled up the old thread.

Thanks again

Rounds Complete!!

"The Moral High Ground....A Great Place to Emplace Artillery."

  • Member since
    March 2003
  • From: Fort Worth, TX
Posted by RESlusher on Wednesday, June 9, 2010 9:14 PM

The things you Gun Bunnies can do!!!  Bow Down

Awesome job Mike!!


Richard S.

On the bench:  AFV Club M730A1 Chaparral

On deck:  Tamiya Marder 1A2

In the hole:  Who knows what's next!


  • Member since
    August 2003
  • From: Connecticut, USA
Posted by Nachtflieger on Thursday, June 10, 2010 4:18 AM

Beautiful job Mike, can't wait to see it in person!Big Smile

Nate


  • Member since
    July 2006
  • From: New Jersey
Posted by redleg12 on Thursday, June 10, 2010 6:13 AM

Rich - Yep....us bunnies love our guns Wink Thanks

Nate - Thanks for the look.....unfortunatly this guy is already retired from shows Crying.....it was at last years AMPS East and Jerseycon....Thanks anyway

Thanks guys for looking....even at this oldie but goodie Big Smile

Rounds Complete!!

"The Moral High Ground....A Great Place to Emplace Artillery."

JOIN OUR COMMUNITY!

Our community is FREE to join. To participate you must either login or register for an account.

SEARCH FORUMS
FREE NEWSLETTER
By signing up you may also receive reader surveys and occasional special offers. We do not sell, rent or trade our email lists. View our Privacy Policy.