SEARCH FINESCALE.COM

Enter keywords or a search phrase below:

CGM Prod. 1/35 M3 105mm Mountain Howitzer, Complete, 5/11/09

33470 views
71 replies
1 rating 2 rating 3 rating 4 rating 5 rating
  • Member since
    July 2006
  • From: New Jersey
CGM Prod. 1/35 M3 105mm Mountain Howitzer, Complete, 5/11/09
Posted by redleg12 on Tuesday, March 24, 2009 8:57 PM

To all my armor friends......I'm back (after my little flight in heilo land)

As usual I build something different!!

Research

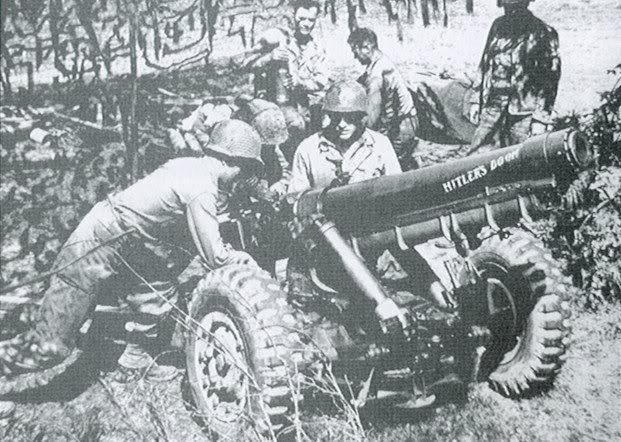
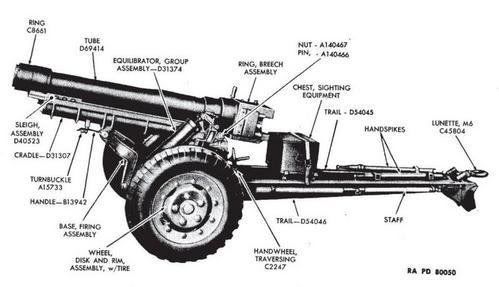
The M3 105mm towed howitzer was first developed and introduced during WWII to give airborne and light troops more punch than the existing M1A1 75mm pack howitzers. The main design concept of the M.3 was a cut down version of the M2 (later the M101A1) 105mm howitzer and the 75 mm pack howitzer.

The M3 was fielded to the US Army and to the US Marine Corps where it augmented the M1A1 75mm howitzer thus not only giving more range,  more firepower and a greater selection of ammunition especially illumination rounds which did not exist for the pack 75. Over 2,500 M3s were produced and primarily fielded to airborne and mountain units.

The M3 fired the same ammunition as it's big brother but had to be fired at a lower charge due to its small size and weight (approximately 2,500 pounds. With the lower charge and shorter barrel its range was about 6,500 meters as compared to its big brother of 11,000 meters.

The M3 was a successful weapon and near the end of the war a self propelled version was being developed for use in the Pacific using the M-5A1 Stewart carriage called the T82. The war ended before any went beyond the development stage.

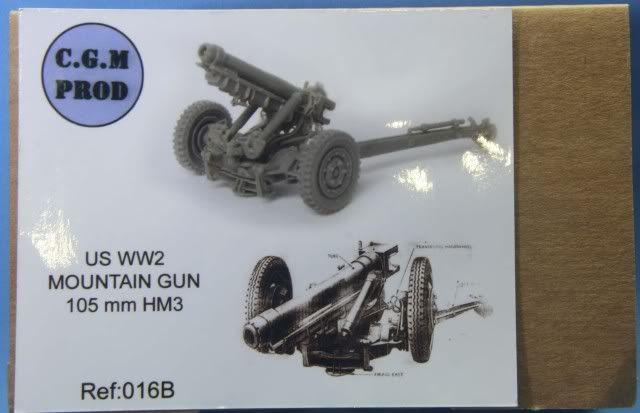
The Kit - CGM Productions 1/35 scale M3 105mm Howitzer

Resin Parts

Upon opening the box you are presented with a plastic bag of resin molded parts.

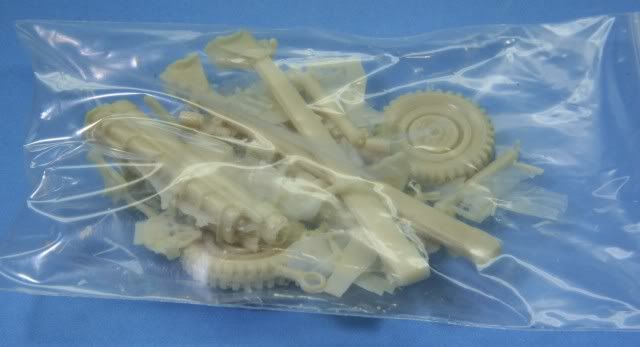
Upon inspection the all the parts have flash to be cleaned. The larger parts have voids, incomplete molding, and every other bad thing you can think of resin parts.

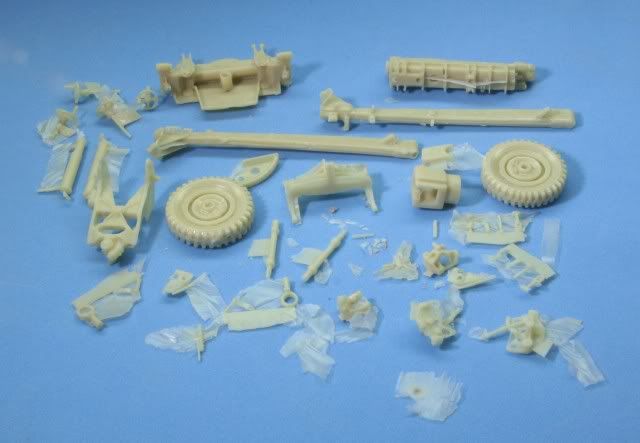
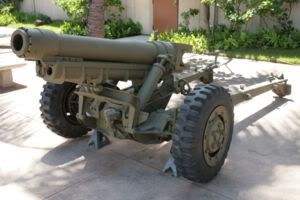
The manufacturer obviously made this from a museum weapon since there is no sight system included.  I will be molding some required parts from the Italeri M101 kit

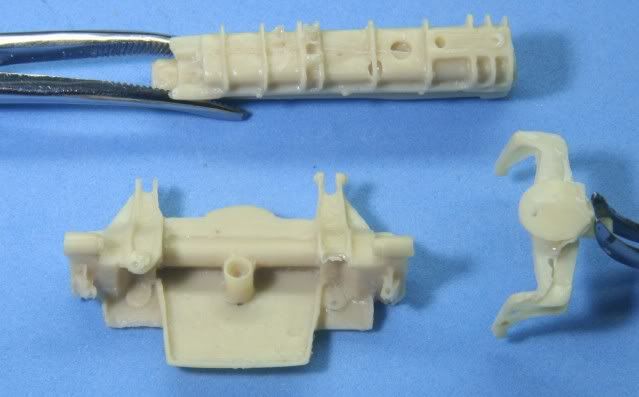
Fortunately the model is small when built as some of the details are muted or washed out.

You will spend a few hours just cleaning up the parts and fixing some of the bigger parts. I will give the manufacturer credit for trying a new weapon but he needs to do MUCH better QC of his molded pieces. 


Directions

The kit includes a 1 page direction sheet. This sheet is horrific as many of the parts included with the kit are not even shown on the assembly drawing.  The instructions appear as a crude drawing with no other detail shown.

Also included with the instructions is a separate sheet which gives photographs of the M3 which were obviously taken at a museum. They are somewhat helpful in identifying some of the parts not shown in the directions.

Fortunately I put my hands on TM9-1326, M3 105mm Howitzer which will help greatly in figuring this one out.

The Build

Nothing much to show yet! I have spent time cleaning flash and filling voids, air bubbles and gels.

I should have some build photos next update.

H Hour Total 2.5 hours since start

Thanks for looking in

Rounds Complete!!

"The Moral High Ground....A Great Place to Emplace Artillery."

  • Member since
    December 2003
  • From: Colorado
Posted by psstoff995 on Tuesday, March 24, 2009 9:06 PM

HITLER'S DOOM haha I liked your bird but I'm enjoying this so far and you haven't even gotten too far underway. I'm glad to hear you're somewhat optimistic about your kit. The QC does appear to be an issue, I’m not familiar with the manufacture is this more of a home job kind of company?

Good info about the gun-

And are we looking at a crew in the future?!

-Chris

US Army Infantryman

  • Member since
    July 2006
  • From: New Jersey
Posted by redleg12 on Tuesday, March 24, 2009 9:39 PM

Chris - No kit is impossible. I'm not in this to build the perfect "show" model every time. I hope something like this would fair well when completed but, its small, lacks detail (which I am planning scratch work to help) and generally I don't build judges favorites...just redleg favorites.

Sooooo.....I can't start off down. I will give it my best shot.

The research is half the fun and keeps me going.

I will be headed to the 1/35 barracks to hopefully find Gino and Joe, set for their glider run with the M3.

Thanks

Rounds Complete!!

"The Moral High Ground....A Great Place to Emplace Artillery."

  • Member since
    January 2012
Posted by I make stuff on Tuesday, March 24, 2009 9:42 PM
That's going to be COOOL with some TLC.  I'll watch this build closely, although the build is way over my head. 
  • Member since
    December 2003
  • From: Colorado
Posted by psstoff995 on Tuesday, March 24, 2009 9:43 PM
 redleg12 wrote:

I will be headed to the 1/35 barracks to hopefully find Gino and Joe, set for their glider run with the M3.

Sounds good, all packaged up on the runway?

-Chris

US Army Infantryman

  • Member since
    July 2006
  • From: New Jersey
Posted by redleg12 on Tuesday, March 24, 2009 9:52 PM

 Citadelgrad87 wrote:
That's going to be COOOL with some TLC.  I'll watch this build closely, although the build is way over my head. 

Bill - Any goal can be reached and nothing is over your head. Like all of us here....just keep on trying Smile,Wink, & Grin [swg]

Chris - Thumbs Up [tup]

rounds Complete!!

"The Moral High Ground....A Great Place to Emplace Artillery."

  • Member since
    January 2007
Posted by the doog on Tuesday, March 24, 2009 9:59 PM

You're a brave man, Mike!

Resin kits scare me half to death!

Although this one goesn't look too complex...Smile [:)]


  • Member since
    December 2003
  • From: Colorado
Posted by psstoff995 on Tuesday, March 24, 2009 10:04 PM
 
 the doog wrote:


Resin kits scare me half to death!


Really?! With all the interior/update sets you master I'd think you'd be an old hat at correcting warps and inaccuracies. I guess all you’re resin has a plastic base... I’ll admit the only 100% resin I’ve done is figure kits. I’d imagine it’d be a similar experience. I’m looking forward to seeing you add detail this gun redleg! It’s so tiny already!

-Chris

US Army Infantryman

  • Member since
    July 2006
  • From: New Jersey
Posted by redleg12 on Wednesday, March 25, 2009 5:59 AM

Karl - Somtimes I look at modeling as a Star Trek adventure..."to boldly go where no forum member has gone before".

Besides, you are always talking about learning. You should try a resin kit....it may exand your horizons. Life is not all styrene!

I have seen many different German subjects not found in styrene which are available in resin. That's my draw...the subjects not covered in styrene! 

Thanks as always for stopping in.

Rounds Complete!!

"The Moral High Ground....A Great Place to Emplace Artillery."

  • Member since
    June 2008
  • From: Iowa
Posted by Hans von Hammer on Wednesday, March 25, 2009 6:09 AM
Might have to look further at this one, Redleg... It certainly appears that us Gunbunnies aren't going to see much more in the way of styrene arty..

  • Member since
    April 2005
  • From: Piscataway, NJ!
Posted by wing_nut on Wednesday, March 25, 2009 6:32 AM
Yup you do like to take a different path don't you Mike.  But you better get crackin' MCon is in only 10 daysWink [;)]

Marc  

  • Member since
    April 2008
  • From: Kristiansund, Norway
Posted by Huxy on Wednesday, March 25, 2009 6:44 AM

Mmmm.. I will surely look more into this! Quite unusual, but still nice. I'd love to build a cannon aswell!

But what more does the picture say on the barrel? "Hitler's Doom"?


And while we are into unusual subjects in resin, Where's all the Norwegian WWII stuff? Sigh [sigh]

"Every War Starts And Ends With An Invasion".

  • Member since
    June 2005
  • From: Massachusetts
Posted by minimortar on Wednesday, March 25, 2009 8:47 AM
Lookin' forward to this one too Mike! Dang... you sure do come up with some different subjects!

Thanks,
Kevin Keefe

Mortars in Miniature
A Scale Model (Plus!) Collection of the Infantryman's Artillery

  • Member since
    July 2006
  • From: New Jersey
Posted by redleg12 on Wednesday, March 25, 2009 9:20 AM

Hans - Not sure if these guys are still in buisness. I have tried to find them with no luck. Found this kit on ebay a year or so ago.

Marc - Unfortunatly I have a family commitment the weekend of MCon and it looks like I won't be able to make it this year. Besides, I never build for shows...I doubt something like this would do well with all the bigger super stuff out there. This is a true "redleg" build.

Huxy - Hummm, much of the other allies are not well represented. There is a ton of just US variants that are not made or only in resin. I feel your pain.

Kevin - Yep....you know me....I find & build the horse of another color. This should be a nice little display of a not too well know item. I'm sure many of your mortars are like this. Thank god for the TM.

Thanks to all for stopping in and leaving a comment. Hopefully this helps expand your mind!!

Rounds Complete!!

"The Moral High Ground....A Great Place to Emplace Artillery."

  • Member since
    July 2004
  • From: Texas
Posted by wbill76 on Wednesday, March 25, 2009 9:54 AM
Welcome back home Mike! Looking forward to this one, I had seen one of these on Corregidor when I visited there in 2005 but didn't know what it was...now I do! Thumbs Up [tup]
  • Member since
    July 2006
  • From: New Jersey
Posted by redleg12 on Wednesday, March 25, 2009 10:15 AM

Bill - Thanks....I'm glad to pass on information. This hobby is also a historical learning experience.

Rounds Complete!!

"The Moral High Ground....A Great Place to Emplace Artillery."

  • Member since
    July 2006
  • From: New Jersey
Posted by redleg12 on Sunday, March 29, 2009 6:34 PM

I spent a bunch of time cleaning up the parts and then began assembly. First, I assembled the gun and sled section.

  • 1. Attached the sled mounts on either side (these attach to the carriage and support the sights)
  • 2. Installed the breech
  • 3. Installed the elevating gear
  • 4. Scratch built and installed the travel lock assembly The pin is styrene covered rod which is stripped except for the end attachment point. The lock catch is styrene rod with a flat plate of styrene glued to the top to create the catch. The lock itself is a kit supplied part.

Next was the lower carriage

  • 1. Installed the wheel locking handle
  • 2. Firing base release pedal
  • 3. Scratch repair for the firing base pivot joint. These were made using a Waldron punch to punch .020 styrene sheet
  • 4. Attached the firing base (installed in the firing position)

            Attached the swivel axel for each wheel. These were installed in the firing position


Moving on to the trails.

  • 1. Using 26 gauge wire, I fabricated the hold down for the section chest straps and installed on both trails
  • 2. Attached the towing pintel
  • 3. Drilled out the trail lock for a trail locking pin
  • 4. Using .020 styrene, I fabricated ramming staff holders. These will hold two ramming staffs which will be fabricated from styrene covered wire. The ramming staffs are only mounted on the right trail (as you look from the front).
  • 5. Using .020 styrene, I fabricated the section chest holding blocks. The section chest would contain the sights and tools for working with the ammunition. I will have a section chest on the ground nearby which will be taken from an Italeri Kit.

Lastly the upper carriage

  • 1. Mounted the traversing hand wheel (hidden from view)
  • 2. Using Archer raised detail to enhance the traversing gear box cover.
  • 3. Mounted the equilibrator mounts and added Archer details
  • 4. Archer detail on the elevating gear box cover
  • 5. Attached the elevating hand wheel

With all this done, the parts were given a good bath, rinse and drying. They are in the process of being primed along with the equilibrators, breech block and trail bars.

That's it for now. Hopefully base paint and pull the subassemblies together next.

Time since last time hack - 7.0 hours

H Hour Total 9.5 hours since start

Thanks for looking in, all comments welcome

Rounds Complete!!

"The Moral High Ground....A Great Place to Emplace Artillery."

  • Member since
    December 2003
  • From: Colorado
Posted by psstoff995 on Sunday, March 29, 2009 6:47 PM
WOAH! What a great step by step- this is nicer than some FSM articles I've read through! Very well done- making me want to hunt eBay for the CGM kit redleg- now I'm really looking forward to seeing this one come together!

-Chris

US Army Infantryman

  • Member since
    July 2004
  • From: Texas
Posted by wbill76 on Monday, March 30, 2009 9:22 AM
Have to agree about the way you've laid this one out Mike and identified the different parts that you've added. Making good progress! Thumbs Up [tup]
  • Member since
    July 2006
  • From: New Jersey
Posted by redleg12 on Monday, March 30, 2009 9:52 AM

Chris & Bill - Thanks. Since this is an off beat item I thought it best to be anal and do step by step. Glad you liked it.

As far as the kit, I will try to fid CGMs web and pass it on BUT.....unless you are an artillery "lover"Propeller [8-] like I am, the kit itself has VERY POOR instructions. I have had to read half of the TM to make sure it is assembled correctly and find what was missing. The molding is a cottage industry quality. Voids, trapped air, etc. Most of the early hours were cleaning, filling and sanding. I also have to cast a set of sights from the Italeri kit.

Straight up, for the money, it is not worth it. For me, it fills the gap on the list of US artillery and no one else has this model and from that end, I'm ok with it. Most others may not!!!

If you like playing with resin, are interested in the subject and are looking for something airborne..ok but...this little kit will require work.

Just letting you know...then again, my calling card is the strange and different. Shock [:O]

Thanks guys for the kind words and support.

Rounds Complete!!

"The Moral High Ground....A Great Place to Emplace Artillery."

  • Member since
    December 2003
  • From: Colorado
Posted by psstoff995 on Monday, March 30, 2009 1:31 PM
Hmmm... in that case, are there any good plastic (or better resin) kits worth the money and on par with the details? I’ve been wanting to make a good looking artillery piece, but most I come across are huge and would require a ton of extras all around that would dominate any dio I’d have planned- so along the same size as the Mountain Gun so I could give it it’s own little position and crew with a smaller footprint? If nothing comes to mind immediately, it’s no problem. Figured you’d be the one to ask though! Smile [:)]

-Chris

US Army Infantryman

  • Member since
    July 2006
  • From: New Jersey
Posted by redleg12 on Monday, March 30, 2009 1:55 PM

As I told Manny in his thread on the 150mm gun, an artillery position is the most complicated positions to show. Even with a small gun like this, there will be live ammo, ammo crates, open crates, fired brass, section chest, commuication (phone or walki-talki), ramming staffs, and personal weapons & equipment stacked.

Even a hasty position which has been fired from will have much of the above. I was planning on all this for the M3.

If it is a matter of staying small, in the WWII era you have the M3 105mm, The M2 105mm, kit from Italeri, little bit bigger than the M3. Also the M1A1 75mm pack which various resin kits, Tamiya old metal kit and a new styrene kit coming from a new company called Vision.

105mm ammunition is avalable from Verlinden. The also made 75mm pack ammo. That kit is discontinued but shows up now and then on ebay. Crates for both can be found from Verlinden and others. On all of these I would recommend you buy one and cast as much more as you need.

Commo equipment is availabe from Warrior and Verlinden. Ramming staffs are scratch from styrene rod.

The M3 kit goes for about $25 from CGM. You will pay about the same for a 75mm pack resin kit, most of which are copies of the Tamiya metal kit. The Tamiya kit on ebay will be about $50+. The Italeri M2 105mm will be in the range of $15-20.

Hope this helps.

Rounds Complete!!

"The Moral High Ground....A Great Place to Emplace Artillery."

  • Member since
    December 2003
  • From: Colorado
Posted by psstoff995 on Monday, March 30, 2009 4:29 PM
Thank you! Yeah, I understood it to be quite the set up, I just figured something on the smaller scale would at least scale down the effect of all that ammo and equipment, I'd love to build a Long Tom, but the footprint the gun alone looks huge. This one by Chuck Aleshire looks incredibly sparse, but still a big base- and it’s still hanging off the end. Thanks for all the kit breakdowns, I appreciate it, if I can get some money soon and pick one up, I’ll make sure to do it right.

-Chris

US Army Infantryman

  • Member since
    July 2006
  • From: New Jersey
Posted by redleg12 on Monday, March 30, 2009 5:09 PM

To give you an idea of the artillery stuff....here is an old build of mine showing an M102 and M35A2 set in position

The howitzer area

The back of the truck

When you are ready, if you need help, just pull my lanyard

Rounds Complete!!

"The Moral High Ground....A Great Place to Emplace Artillery."

  • Member since
    December 2003
  • From: Colorado
Posted by psstoff995 on Monday, March 30, 2009 5:31 PM
Very nice! -and will do, hopefully soon.

-Chris

US Army Infantryman

  • Member since
    January 2012
Posted by I make stuff on Tuesday, March 31, 2009 11:55 AM

Redleg, this is a cool build.  I like the completed build, too.

WE had a couple of howitzers, Betsy and Lizzie, at the Citadel, that our salute gun battery fired at parades, there's NOTHING like hearing artillery.  


  • Member since
    July 2006
  • From: New Jersey
Posted by redleg12 on Tuesday, March 31, 2009 2:50 PM

Bill - Its always fun to wake up to the smell of muzzle blast in the morning!! Thanks

Wayne - Always a pleasure to have you stop in. Thanks for the comments and for watching.

Rounds Complete!!

"The Moral High Ground....A Great Place to Emplace Artillery."

  • Member since
    January 2007
Posted by the doog on Tuesday, March 31, 2009 2:53 PM

Mike,

A hell of a nice WIP you've got going here!

Good work on the current project here, and on that dio you put up as well--really nice stuff! Big Smile [:D]

  • Member since
    July 2006
  • From: New Jersey
Posted by redleg12 on Tuesday, March 31, 2009 4:22 PM

Karl - Thanks, that dio actually was my first build after coming back to the hobby....humm 4 years or so ago.  It's good to go back and look at every now and then.

Thanks for the comments on the current build....I know...its resin....Doog is allergic to resin Shock [:O]

Thanks Again

Rounds Complete!!

"The Moral High Ground....A Great Place to Emplace Artillery."

  • Member since
    July 2006
  • From: New Jersey
Posted by redleg12 on Saturday, April 11, 2009 8:30 PM

After the parts bath, I began work on the lower carriage;

  • 1. A coat of Tamiya Black for a prime on all the lower carriage parts
  • 2. Assembled the trails to the lower carriage
  • 3. A coat of a mix of Tamiya OD and Green Yellow on all the parts
  • 4. Tips of the trail bars were painted with Alclad Steel
  • 5. Trail bars mounted on the top of each trail
  • 6. A small section of blue painted tape was attached to each ramming staff to simulate straps the painted with Model Master OD
  • 7. The opposite tips of the styrene wire used for the ramming staffs were stripped to expose the wire to simulate the screw section
  • 8. The ramming staffs were mounted

In between drying cycles for the lower carriage I took the upper carriage and howitzer and:  

  • 1. Primed with Tamiya Flat Black
  • 2. Masked the breech
  • 3. Painted with the Tamiya mix.
  • 4. Once the green mix was dry, the howitzer was masked and the breech was painted with Alclad Steel.
  • 5. The breech block was primed and then painted with Alclad Polished Aluminum.
  • 6. The equilibrators were primed
  • 7. After drying the piston section masked and the remaining portion painted with the Tamiya mix.
  • 8. After the mix dried, the masking was reversed and the piston section was painted with Alclad Polished Aluminum

After the lower carriage was assembled;

  • 1. The tires were painted with a mix of Tamiya Flat Black and NATO Black.
  • 2. After drying, I used a circle template painted the rims with the Tamiya Green mix.
  • 3. After the tires were dry they were mounted to the lower carriage.
  • 4. Using MIG Faded US Green I shaded the inner areas.

With everything dry on the upper carriage:

  • 1. Assembled the howitzer was to upper carriage
  • 2. Installed the equilibrators
  • 3. Installed the breech block
  • 4. Fabricated the breech block lever from a strip of .020 styrene
  • 5. Painted the breech lock handle (from Italeri M101 kit) with Alclad Aluminum
  • 6. Installed breech lock handle
  • 7. Painted firing lock with Alclad Steel and installed
  • 8. Applied some MIG Faded US Green to upper section.
  • 9. Assembled the upper and lower section
  • 10. Applied a Burnt Sienna wash to the entire howitzer.
  • 11. Applied some MIG Dried Mud to the tires

Here is a rear view of the M3, You can also see the trail locking pins fabricated from .026 SS wire.

That's it for now. What remains are some details including the section chest straps, sights then some final dry brushing and work with graphite. Then it will be on to the base.

Time since last time hack - 6.0 hours

H Hour Total 15.5 hours since start

Thanks for looking in, all comments welcome

Rounds Complete!!

"The Moral High Ground....A Great Place to Emplace Artillery."

JOIN OUR COMMUNITY!

Our community is FREE to join. To participate you must either login or register for an account.

SEARCH FORUMS
FREE NEWSLETTER
By signing up you may also receive reader surveys and occasional special offers. We do not sell, rent or trade our email lists. View our Privacy Policy.