SEARCH FINESCALE.COM

Enter keywords or a search phrase below:

posting pics.

1772 views
4 replies
1 rating 2 rating 3 rating 4 rating 5 rating
G-J
  • Member since
    July 2012
Posted by G-J on Tuesday, October 8, 2013 8:54 PM

Good write up.

On the bench:  Tamyia Mosquito Mk. VI for the '44 group build.  Yes, still.

On deck: 

  • Member since
    May 2013
  • From: Indiana, USA
Posted by Greg on Tuesday, October 8, 2013 11:13 AM

My bad, using acronyms. This is a confusing thing to do first time, been there, done that. Let's forget about all the funny words and start over....

1. Click on the image in Photobucket you want to post here. That will open the picture in Photobucket in it's own page.

2. On the right side of that page, you will see a box with "Links to share this photo" at the top.

3. The second one down says "Direct". Move your mouse so you cursor is over the white-ish box just right of "Direct". You will notice the little arrow turns into a little hand. Left click your mouse. (this copies what you need into your computer for the next steps)

Edit: You are done in Photobucket now, just go back to the FSM page and continue. Don't worry worry about moving between Photobucket and FSM, it will work. Smile

4. Back here at FSM, instead of clicking the "Reply" button, click on "Use rich formatting" just left of it.

5. Type in whatever you want to type in to introduce your picture.

6. Towards the top of the box where you are typing your stuff, there are two rows of icons (little cartoon-like pictures). Put your cursor (mouuse) over the one that looks like a little monitor with a green screen. You will see "insert image" pop up. Looks like this. Left click your mouse while the little "insert image" box is showing. Looks like this:
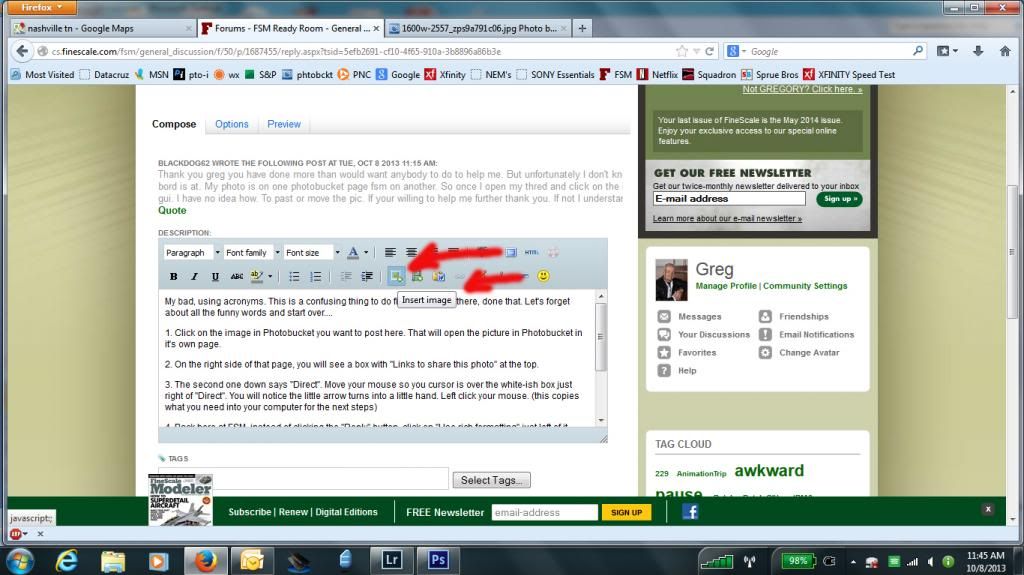
Then this box will show up:
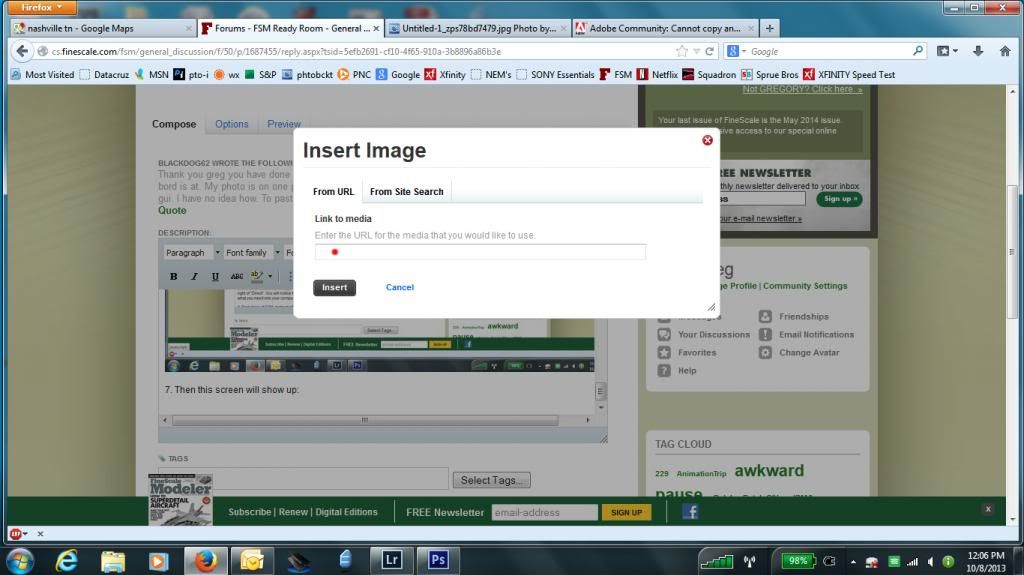
7. Move your mouse (cursor) to the box where I drew the red dot. Right click. a list will pop up. Click on "Paste". The little box will fill with the correct information. Click on "Insert".

8. Done!

  • Member since
    September 2013
Posted by blackdog62 on Tuesday, October 8, 2013 10:15 AM
Thank you greg you have done more than would want anybody to do to help me. But unfortunately I don't know any of this. I don't know wheremy clip bord is at. My photo is on one photobucket page fsm on another. So once I open my thred and click on the insert photo icon. I think this what you call gui. I have no idea how. To past or move the pic. If your willing to help me further thank you. If not I understand. :)

  • Member since
    May 2013
  • From: Indiana, USA
Posted by Greg on Monday, October 7, 2013 7:27 PM

I use photobucket as my photo host too. Here's the drill.....

Open the image you want to post in Photobucket. On the right you should see a box with "Links to Share this photo". For this board, you want to (left) click on the one that says "Direct". The other 3 won't work right here. When you click it, it stores the URL in your clipboard.

To post here, you need to select Use rich formatting, make sure your cursor is where you want the pic to go, and click the 'insert image' icon (Looks like a little green screen.

A GUI will open, right click and paste the URL in.

Click the "insert" button. You image should appear immediately or in short order if you have a slow ISP.

To post another, repeat process. Hope this helps, Blackdog.

  • Member since
    September 2013
posting pics.
Posted by blackdog62 on Monday, October 7, 2013 6:40 PM

hello I was hoping to find somebody who can explain to me how to cut / post from fotobucket to forums.

I have never post/cut ever im also new to any forums. I found the fw-190 build got interested and made a profile. I got invited in but cant post my build. I don't want to drop out of the build. but I have bin at this on my own for several day.

thanks in advance

JOIN OUR COMMUNITY!

Our community is FREE to join. To participate you must either login or register for an account.

SEARCH FORUMS
FREE NEWSLETTER
By signing up you may also receive reader surveys and occasional special offers. We do not sell, rent or trade our email lists. View our Privacy Policy.