SEARCH FINESCALE.COM

Enter keywords or a search phrase below:

Help with resin hull please

1402 views
15 replies
1 rating 2 rating 3 rating 4 rating 5 rating
  • Member since
    February 2020
  • From: South Carolina, USA
Posted by ChrisSC on Monday, January 11, 2021 3:00 PM

HooYah Deep Sea

An ocean liner, nice; but if Titanic had been built with an armor belt, she probanly would have made New York .  .  .  Just a thought.


I bet you're right! I started this and got the hull reasonably decent enough to proceed. 

  • Member since
    August 2019
  • From: Central Oregon
Posted by HooYah Deep Sea on Thursday, December 10, 2020 5:37 PM

An ocean liner, nice; but if Titanic had been built with an armor belt, she probanly would have made New York .  .  .  Just a thought.

"Why do I do this? Because the money's good, the scenery changes and they let me use explosives, okay?"

  • Member since
    February 2020
  • From: South Carolina, USA
Posted by ChrisSC on Thursday, December 10, 2020 2:28 PM

GMorrison

This might make you feel a little better...


Wow that one is a little warped!!

  • Member since
    September 2012
Posted by GMorrison on Thursday, December 10, 2020 1:34 PM

This might make you feel a little better...

 Modeling is an excuse to buy books.


  • Member since
    October 2019
  • From: New Braunfels, Texas
Posted by Tanker-Builder on Thursday, December 10, 2020 1:07 PM

See;

 Even with all the advice, you found the solution that works for you.That is what makes a modeler!

  • Member since
    March 2014
Posted by BarrettDuke on Thursday, December 10, 2020 12:37 PM

Hey, Chris, I'm sorry you ran into that problem. Looks like a great model, though. I agree with GMorrison. The resin should hold its new shape after you heat it and then cool it. In my opinion that was the best solution available. Happy modeling. Barrett

  • Member since
    September 2012
Posted by GMorrison on Thursday, December 10, 2020 12:14 PM

It should hold it's shape.


Bill

 Modeling is an excuse to buy books.


  • Member since
    February 2020
  • From: South Carolina, USA
Posted by ChrisSC on Thursday, December 10, 2020 12:10 PM
Thanks for all the replies. It is an ocean liner model. I’ve been messing around with it a little and trying some things before ripping it apart.
I have a soft jaw vise so I stuck the lower half in there a bunch of times, gave it a squeeze, and hit it with a heat gun. Before it could cool off I put some cold compressed air on it from my compressor. I must have repeated this about ten times at different points on the hull. It seems to have improved it quite a bit but I don’t know if it will hold this shape permanently or revert back to its original condition. If it stays like this I could probably accept it with a little more work.
All options are still open.

  • Member since
    September 2012
Posted by GMorrison on Thursday, December 10, 2020 10:36 AM

Looks like a liner to me.

 Modeling is an excuse to buy books.


  • Member since
    August 2019
  • From: Central Oregon
Posted by HooYah Deep Sea on Thursday, December 10, 2020 10:07 AM

Are you sure that the wider part is not representative of an armor belt?

"Why do I do this? Because the money's good, the scenery changes and they let me use explosives, okay?"

  • Member since
    April 2005
Posted by ddp59 on Thursday, December 10, 2020 9:54 AM

Chris, how much wider per side is the lower hull wider then the upper hull as does not look that much? is that an aircraft carrier, British or Japanese as should have bulges on either side of hull which will hide that seam problem?

  • Member since
    September 2012
Posted by GMorrison on Thursday, December 10, 2020 9:32 AM

Don't mess with the upper half. Doing so will have following effects such as the upper deck houses not fitting.

Any of the suggestions made about lower hull fixes will work.

I build a lot of ship kits that are sold waterline, to which I like to add lower hulls.  Or often kits like yours have lower hull halves that are too shallow, or the split isn't  at the waterline.

For those, at this scale; I measure what the true depth of the lower part needs to be. I cut a piece of basswood on my table saw. Mark the outline of the upper hull. Cut slightly oversized. Glue together and sand/ fill to smooth it out.

Bill

 Modeling is an excuse to buy books.


  • Member since
    November 2009
  • From: Twin Cities of Minnesota
Posted by Don Stauffer on Thursday, December 10, 2020 8:33 AM

If you are fortunate, and the split is right at the boot topping area, you may get by without it being too noticable.  While I ordinarily use a semi-matt finish for the topping, I'd use flat black in this case, the black masking being on either side of the split.  In 700th scale and with flat black, it may not be that noticable.


Don Stauffer in Minnesota

  • Member since
    February 2020
  • From: South Carolina, USA
Posted by ChrisSC on Thursday, December 10, 2020 8:11 AM
Thank you for that detailed explanation, sounds pretty intimidating lol.
  • Member since
    August 2005
  • From: Mansfield, TX
Posted by EdGrune on Thursday, December 10, 2020 8:00 AM

I've followed the suggestions of Mike Ashey, FSM writer and author of 'Basics of Ship Modeling' published by Kalmbach.   Cut the lower hull apart.  Its scary,  but after success, I congratulated Ashey on his technique after his seminar at the IPMS Nats in Phoenix.  You don't want to mess with cast details on the upper hull.

If the bow and/or stern fit to shape, cut them off and set aside.  Cut down the middle of the lower hull segment.   A band saw helps, but I used a wood working back handsaw.  Also trim to length if needed.   No need to work about the saw kerf - that will be accounted for with the filler. You may have to loose the keying.

Reassemble the lower hull pieces on the upper hull.   Get the offending hull sides to blend as close as possible with the upper hull.   Once the cement hardens fill the seams and saw kerfs with putty.   Here my choice is Bondo profesional catalyzed epoxy putty (a auto parts store item).  It hardens in a few minutes and can be sanded with hobby tools. 

Replace damaged details such as bilge keels with styrene stock or brass.    Prime, sand, repeat until you are satisfied.

Resin used in models often has a characteristic of shrinkage during setting.   It tends to be related to the volume of the part.   It may be as much as 2%.   Differential shrinking between parts happens quite often.  Experienced mold makers and casters may account for the differing shrinkage in their master parts

  • Member since
    February 2020
  • From: South Carolina, USA
Help with resin hull please
Posted by ChrisSC on Thursday, December 10, 2020 7:01 AM
Hi All. I hope I am posting this in the right place. I am attempting to figure out how to build my first resin ship kit and am hoping for some help/advice with an issue I have.
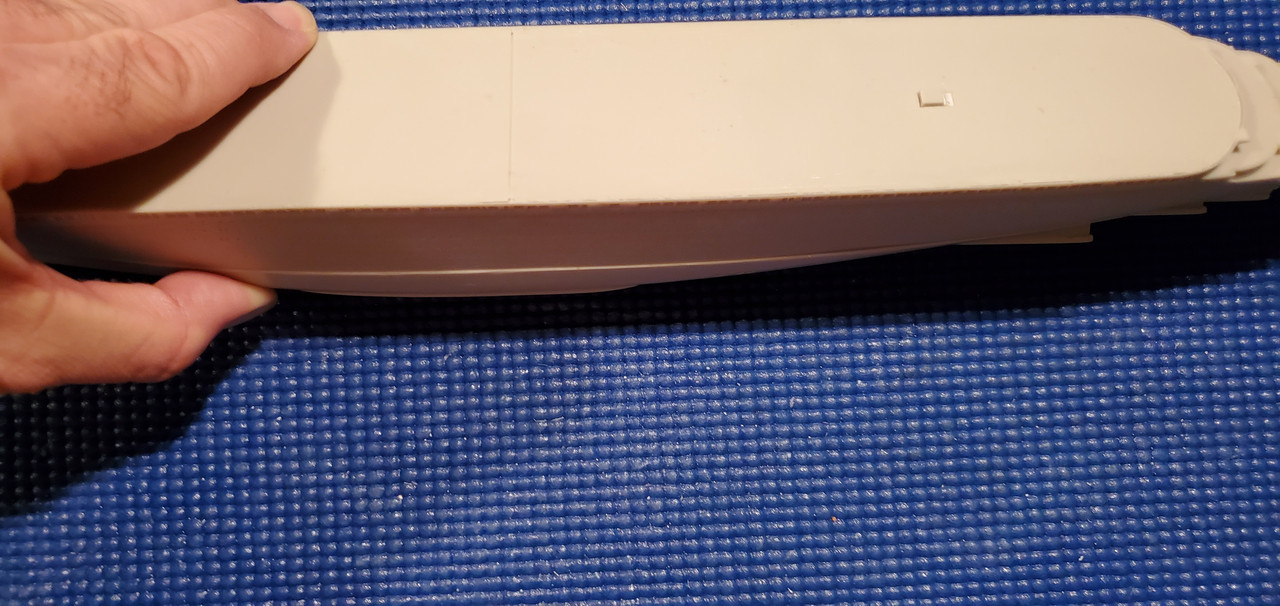
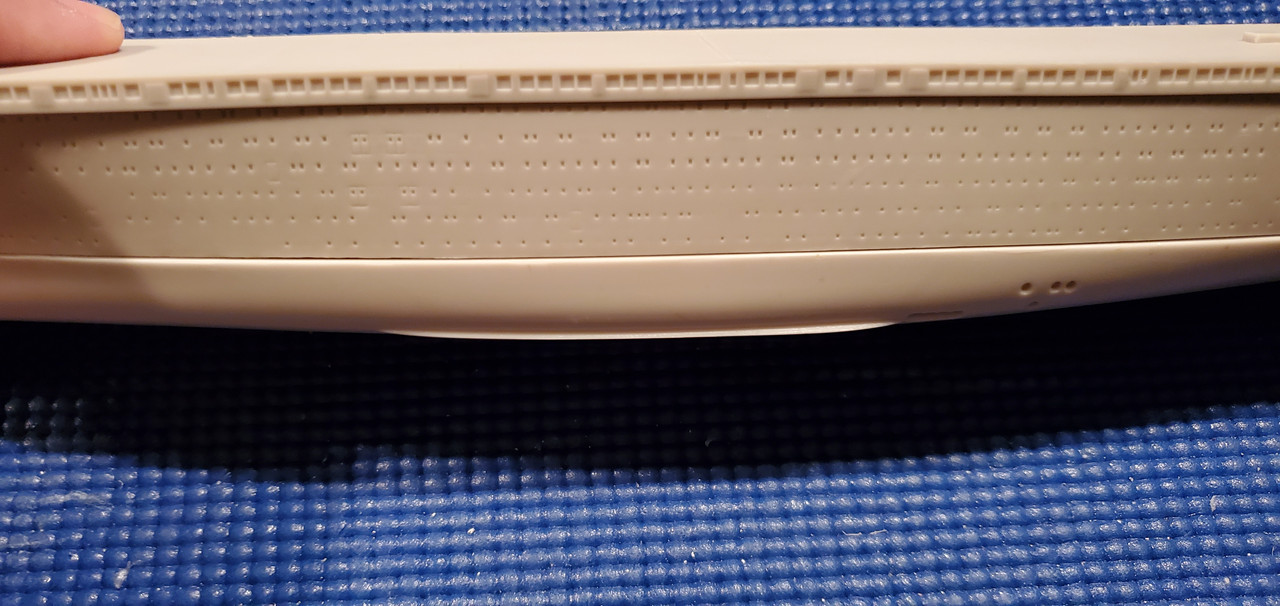
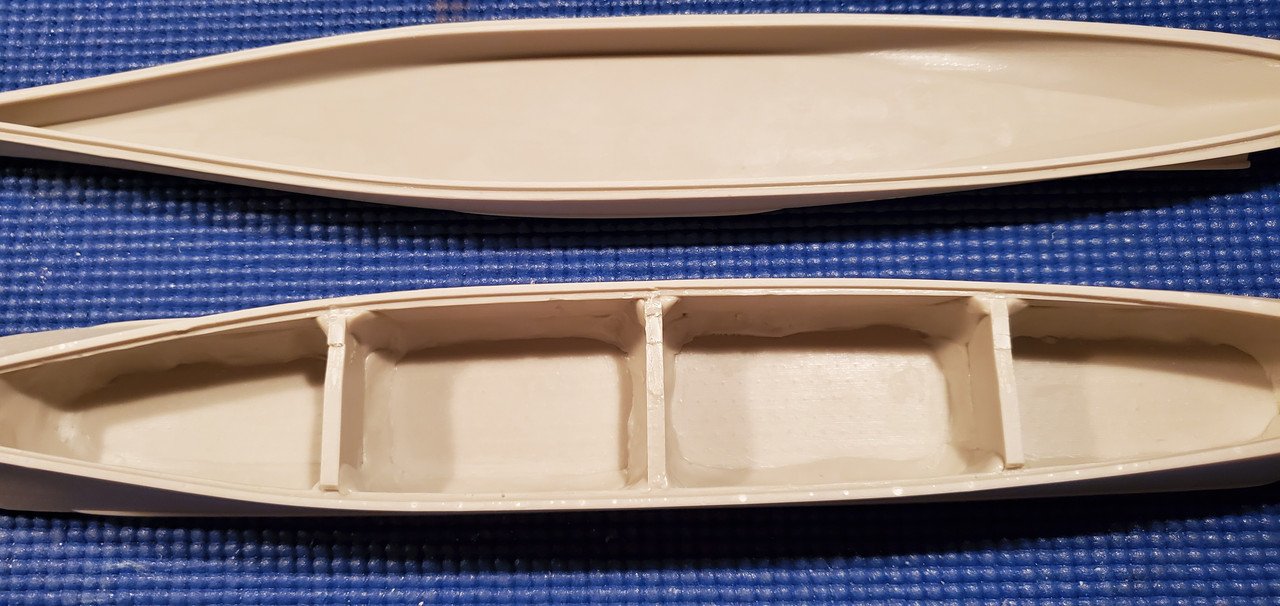
The kit hull is 1/700 scale and two part. There is a joint at the waterline that gives you the option of building either a waterline or full hull version. Both halves are keyed to supposedly give you a better fit. I want to build it full hull.
The issue I have is the lower half of the hull is wider than the top along most of the point they join together. This is especially true amidship. There is no movement in either, they are solid as a rock. How would I go about making a seamless joining here?
I have thought of three ways, two of which do not appeal to me and of which I am pretty certain would not end well.

1. Saw down the middle of the supports in the upper hull and put something inside and across to hopefully force the upper hull to widen at the joint slightly.

2. Use filler to blend the overhang of the lower hull in.

3. Sand down the lower hull half to the width of the top half.


I do not have confidence in either numbers 2, or 3. If I try number 2, trying to use filler for this, I feel the scale and area is too small and I will wind up sanding away portholes and any other detail trying to blend this step out in the hull in.

If I try number 3 I feel I will not be able sand and fill well enough to recreate the subtle curvature and contours of the molded hull, thus ruining it.

Number 1 is what I would prefer to work, giving me the best chance of it joining correctly but the two halves are keyed and I also don’t know if the upper hull will stretch without breaking.


I was hoping with the small scale and the long length of this joint that the halves would line up better but unfortunately they don’t. I do realize I obviously need to use some filler on the seem to fill in the space between upper and lower halves, but was not expecting to have to widen or narrow one half of the hull.


Hopefully this is a common issue with resin and some with experience here can advise me on the correct way to make this joint invisible when the model is complete. Thanks in advance for any input I may receive.

Chris

JOIN OUR COMMUNITY!

Our community is FREE to join. To participate you must either login or register for an account.

SEARCH FORUMS
FREE NEWSLETTER
By signing up you may also receive reader surveys and occasional special offers. We do not sell, rent or trade our email lists. View our Privacy Policy.