SEARCH FINESCALE.COM

Enter keywords or a search phrase below:

How to make a workbench

6244 views
16 replies
1 rating 2 rating 3 rating 4 rating 5 rating
  • Member since
    August 2020
  • From: Lakes Entrance, Victoria, Australia.
Posted by Dodgy on Wednesday, January 27, 2021 3:30 AM

Hi TM. I've read several of your questions now and watched the answers roll in. I have not answered previously because you have been given such great advice. There are so many skilled, experienced modelers on this site and you are receiving very precious, hard won advice, from very generous people who are happy to share. That's what this site is all about. I'll chuck my two bob's woth in now for what it's worth. Whatever you build or decide on, over time and with experience, it will change as your needs and wants develop. good light and ventilation are two of the most important issues that you will confront. Sufficient space to work, comfort, storage and power points are also essential. A lot of excellent advice has already been given on this thread. I am simply underlining what has already been said, but wanted to put it in a nutshell.

I long to live in a world where chickens can cross the road without having their motives questioned

  • Member since
    September 2012
Posted by GMorrison on Tuesday, January 26, 2021 6:38 PM

the Baron


Once again proving Morrison's Second Law-

"No matter the size of the work bench; the usable area will always be exactly two square feet".

And to answer your question: Ikea.


Bill

 Modeling is an excuse to buy books.


  • Member since
    June 2010
Posted by montague on Tuesday, January 26, 2021 2:34 PM

Two filing cabinets and some countertop or a door across it.

  • Member since
    January 2021
  • From: Somewhere near Chicago
Posted by Teenage Modeler on Tuesday, January 26, 2021 1:41 PM

Thanks for the tips!

Made you Look


  • Member since
    July 2013
Posted by steve5 on Tuesday, January 26, 2021 1:20 PM

my little piece of heaven , 2 desks from office works .


  • Member since
    September 2006
  • From: Bethlehem PA
Posted by the Baron on Tuesday, January 26, 2021 11:33 AM

Teenage Modeler

THe title says it all. I am still a very new Scale Modeler, and as I buy paints and tools, I am running out of space to build it. I seen many modelers with their workbenches, and I feel that I too should make one. 

So, how do I make a workbench? There are plenty of workbenches online, but I want to build it with my dad ourselves. 

Sorry if this is a stupid question, but like I said, I am still new to the hobby.

Any advice is appreciated.

The only stupid question is the one that goes unasked.

Well, and the one that someone asks over and over again, but that's a different matter.

As many have already responded, you need to consider the space that you have and make your design or your solution fit it.  If you're limited as to space, you could use an existing desktop, and focus on assembling a toolkit that you can set up and strike as necessary.  If you're still in high school, that might be a good idea, because if you want to keep enjoying the hobby, you might find yourself with no dedicated space at all.  To that end, I recommend getting a large toolbox that you can carry around, or roll around, for the types that have casters.  I've done that, too, because I will take my tools and some supplies to shows, and to meetups with modeling friends.  Also, now that it's winter, I work at my kitchen table.  So my toolbox is there, till the spring.

You might not need build anything, again, as others have noted.  A desk, or a collapsible table (eg, Rubbermaid) can provide enough room for building models.

My first bench was a 4x8 sheet of plywood on a pair of saw horses, in my parents' cellar.  It had started as my model train layout, but eventually became a wargame table and a workbench.

Years later, when I was living in a mobile home and saving up for a house, I built a bench to fit a spare "bedroom".  The room as about 8' by 10'.  I built the frame from 2"x4" with some plywood scraps I had scrounged.  When I bought a house, I brought the bench with me and installed it in my basement.  Here's what it looks like today:
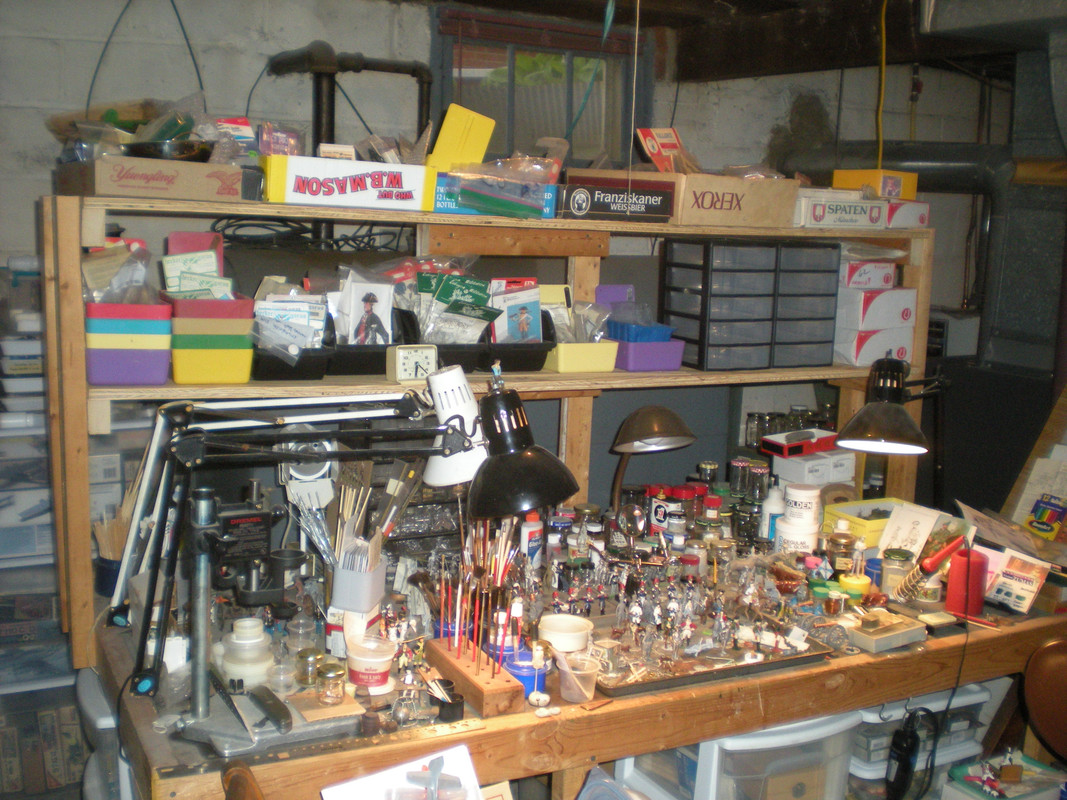
I added the hutch back last March; I had been thinking about it for years but never got around to it.  But that was to give me more storage within reach of the seat.  I'm gradually cleaning up all the stuff on the bench, so I'm not working on six square inches of space.

Here's the rest of the bench (an older pic), showing an easel and a smaller "auxiliary" bench that I scrounged over the years:
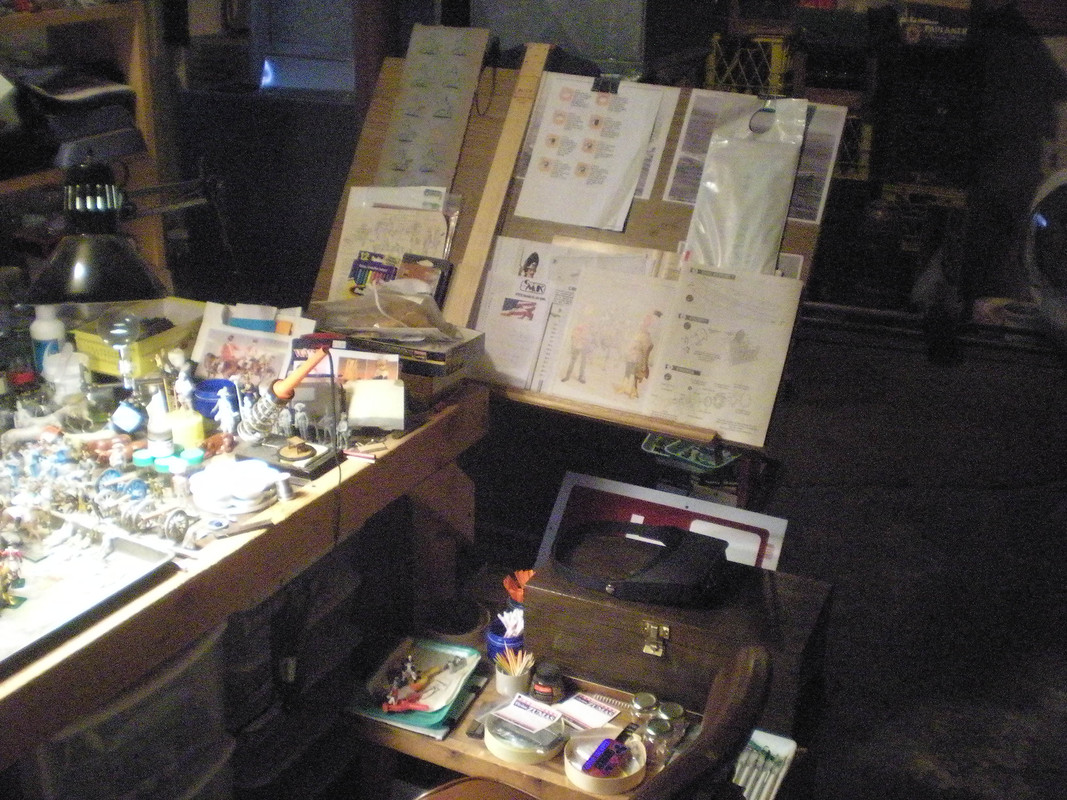
Notice, too, the lighting.  Good lighting is important for your bench.  I've got light in the ceiling over my bench, but you can see all the lamps I've added, which pivot, so I can focus light where I want it.

Again, I've got a house, and a dedicated space, so this is what I could do.  But if I move again, it's all staying behind.

There are more elaborate, more nicely-built, more organized spaces that others have put together, too.  To each, his own.

Whatever you come up with, I'm sure you'll have fun, which is what the hobby is all about.

Best regards,

Brad

The bigger the government, the smaller the citizen.


  • Member since
    October 2019
  • From: New Braunfels, Texas
Posted by Tanker-Builder on Tuesday, January 26, 2021 10:44 AM

Hi;

     Well, I don't have any photos because I have moved and changed it so many times. I started with a Four and a Half foot long and Twenty Eight inch deep piece of Corian. I saw it in the trash near a new home building site. I was using Corian in my homebuilds, But, I never allowed that size piece to be thrown away!

     So,I took it home and put it on the old kitchen table I had salvaged from a free pile of stuff on the street near where I lived.The only thing it didn't have was the original silverware drawer. So I made a new drawer and Viola' a new workbench!

     Then I moved. Aboard a boat no less. No room for the table, But the Corian fit perfect on the chart Table! Used like that till my wife's passing. Then Got two T.V.Tables(The Wooden nice ones) and put it on there with a salvaged piece of Tempered Glass for a work area. The Glass came from one of those Tower type stereos someone threw out!

 Now I have a permanent work area in my room I rent in a private home I have the run of. I did have it all in the garage. Not good. It gets down to freezing in winter and over one hundred degrees in the summer-Even with the garage door open. After my health issues and damaged paint and stuff I moved everything inside.

 It's nothing to see, but the comment about lighting is right. I have four, YES, four OTT lights in the work area. All suspended from a light rail I have suspended from the ceiling! Plus two, one at either end, clipped to the tabletop.. That way NO shadows. I stopped doing commissions and now am deeply involved in salvaging my shelf of doom projects and working on my Paper ships.

  • Member since
    January 2021
Posted by rev_barabbas on Tuesday, January 26, 2021 10:25 AM

Aggieman
And the most important thing aside from the work surface itself are the three light fixtures that I mounted on the underside of a shelf directly over the primary work space

Honestly, light is the biggest thing really. It's the most indispensable tool you can have at a workstation. 

-- rev_barabbas --

Keep going, don't quit.

  • Member since
    January 2015
  • From: Katy, TX
Posted by Aggieman on Tuesday, January 26, 2021 9:46 AM

I recently re-did my work surface.  I first built this bench about a decade ago in what would be a third bay in a corner of my garage.  It is mounted directly to the wall.  I built the underlying structure with 2x4s.  The lower storage surface is 1/2" plywood; the upper surface is 1/2" MDF.  It is sturdy enough that I can walk on it.

I have a couple of wooden tray bins where I keep things like mixing bottles, pipettes, clamps, and a couple of plastic tray bins where I keep the airbrushes I own as well as alligator clips, cotton balls, and other painting-related stuff.  I have a 4-drawer Craftsman tool box where I keep all of my paint and glue, various modeling tools like knives, tweezers, or scissors, and other related stuff.  I have a BluRay player and a small TV as well as an Amazon Alexa for entertainment while I'm working.  There also are a couple of green self-healing mats and a section of glass (used to be a table top in an earlier house) to do various cutting tasks.

And the most important thing aside from the work surface itself are the three light fixtures that I mounted on the underside of a shelf directly over the primary work space.

  • Member since
    January 2021
Posted by rev_barabbas on Tuesday, January 26, 2021 9:03 AM

This is my "IKEA" setup:

-- rev_barabbas --

Keep going, don't quit.

  • Member since
    April 2010
  • From: Atlanta, GA
Posted by Mustang8376 on Tuesday, January 26, 2021 8:58 AM

I made my own desk also.  Just some 1x4 for the legs and the bracket for the table top, plus a section of particle board for the table top was for the first one.  Later one when I picked up an old countertop from work when we dismantled an old office, I used that with longer 1x4's for the legs and brace to make a standing worktable that I use for building and the older table for the painting/airbrushing.

Current build: 1/48 Monogram A-1H & AMT Jedi Starfighter.


Completed:  1/48 Monogram/Revell P-61B, 1/32 Hasegawa F6F-5, 1/48 Hasegawa F-16C, 1/48 Revell Mig-21PFM, 1/48 Revell/Monogram AH-64A, Revell/Monogram 1/48 F-14D, AMT 1/420 USS Defiant, AMT 1/650(?) USS Enterprise, 1/72 Bandai VF-1J, AMT 1/537 USS Reliant, Academy 1/35 M1-A1 Abrams, Academy 1/48 F-86F30, Linbergh's USS Gato 

  • Member since
    May 2011
Posted by Mr Mike on Tuesday, January 26, 2021 8:54 AM

I started off with an old desk that I had gotten from work many years ago.  On the left next to it is my home-made paintbooth and on the right is my parts boxes and paint drawers.  Get a self healing pad to work on and a rack of some sort to keep your tools organized.  Keep your bottle paints in a storage rack of some sort so you can see the colors you have.  I keep my laptop on the desk for easy reference to Forums and websites for details I might want to add and for inspiration for what I am building. 


  • Member since
    November 2009
  • From: Twin Cities of Minnesota
Posted by Don Stauffer on Tuesday, January 26, 2021 8:33 AM

tempestjohnny

Here's mine. A couple of hand me down nightstands and a piece of melamine for the top.


I did it much the same way.


The drawer units were on sale at my local office supply store.  The top is a 2 x 4 foot sheet of particle board covered with contact paper (renewable/replaceable).


Don Stauffer in Minnesota

  • Member since
    November 2003
  • From: Naples, FL
Posted by tempestjohnny on Tuesday, January 26, 2021 4:11 AM

Here's mine. A couple of hand me down nightstands and a piece of melamine for the top.


  • Member since
    July 2010
  • From: Tempe AZ
Posted by docidle on Monday, January 25, 2021 11:30 PM

TM,

Here’s a couple of links on building a workbench. Just make sure that it’s sturdy and fits your space. I once used a hollow core door on sawhorses for my workbench and it really worked out great. Until you know that you’re really going to continue, try not to spend too much.

Here are some links and I hope they help.

Steve

https://www.lowes.com/n/how-to/how-to-build-a-workbench

https://youtu.be/oz3KR-rYRh8


  • Member since
    January 2021
Posted by rev_barabbas on Monday, January 25, 2021 11:26 PM

Welcome to the hobby and the forum!

The way I built my modeling table was was by going to IKEA, haha. I bought a table top and the extendable table legs so the table is closer to chest height when I'm sitting in my chair. I also bought a few of the IKEA birch-ply storage boxes with the drawers. I labelled the drawers with a marker and I store all my paints, glue, solvents, and tools in them. I also bought a self-healing cutting mat which is the main surface I work on, except when I'm doing photo-etched parts. I use a smooth glass cutting board for PE so it doesn't bend when I cut it off the sheet. I also bought a cheap Chinese made spray hood for my airbrush on eBay, I got the one that says "enjoy the fresh air" on it, but I honestly could have built one just by using a large computer case fan and some wood. 

Its a good thing to just start with a basic table and some good light, maybe the type of lamps that clamp to the table and have the positionable arms.

Good luck!

-- rev_barabbas --

Keep going, don't quit.

  • Member since
    January 2021
  • From: Somewhere near Chicago
How to make a workbench
Posted by Teenage Modeler on Monday, January 25, 2021 8:36 PM

THe title says it all. I am still a very new Scale Modeler, and as I buy paints and tools, I am running out of space to build it. I seen many modelers with their workbenches, and I feel that I too should make one. 

So, how do I make a workbench? There are plenty of workbenches online, but I want to build it with my dad ourselves. 

Sorry if this is a stupid question, but like I said, I am still new to the hobby.


Any advice is appreciated.

Made you Look


JOIN OUR COMMUNITY!

Our community is FREE to join. To participate you must either login or register for an account.

SEARCH FORUMS
FREE NEWSLETTER
By signing up you may also receive reader surveys and occasional special offers. We do not sell, rent or trade our email lists. View our Privacy Policy.