SEARCH FINESCALE.COM

Enter keywords or a search phrase below:

Kitty Hawk HH-60G build -- Completed

4286 views
15 replies
1 rating 2 rating 3 rating 4 rating 5 rating
  • Member since
    December 2002
  • From: Valrico, FL
Kitty Hawk HH-60G build -- Completed
Posted by HeavyArty on Sunday, April 5, 2020 7:02 PM

I have started on a build review of Kitty Hawk's 1/35 HH-60G.  I will build it mostly out of the box with a few extras added here and there to add some details to it.  The kit is pretty complete and full of details as-is, but there is always room for more details and improvements.

Here is the teaser boxart.

The kit comes on seven grey sprues, one clear sprue, a large PE fret, and a large decal sheet with two marking options.  One option as a modern HH-60G in overall AFSOC Gray and the other a slightly older (around 2003-ish) HH-60G in Euro-1 camo.  Overall, it is very detailed and very complete.  

I plan on building mine as an early 2000s HH-60G in Euro-1 camo from the Alaska Air National Guard using Werner's Wings Skis on it.  It will look something like below.

There are only a few shortfalls that I have identified so far. One is pictured below.  There are three small structural spars on each side of the ceiling in the cabin.  Kitty Hawk missed one side of these.  They are easy to add though using a few strips of 0.040 sheet styrene.

Added on my ceiling.

I have found a few issues with the instructions so far.  

In the first step, the seat back for the gunners' seats are misnumbered.  They are listed as E8, but that is the seat back for the troop seats in the rear.  They should be G37, which are the correct gunners' seats with head rests.  

In step two, you are supposed to build an additional seat for the middle between the gunners' seats facing forward.  This seat is very infrequently carried, especially facing forward.  If anything it faces rearward.  If facing forward, there is no way for anyone to get into the seat as it is blocked by the gunners' seats. I decided to leave this off.  

In step 3, I fixed the H-Bar seat support that the gunners' seats attach to.  The kit part is more of a "U" bar and turned 180 degrees from where it should be.  I turned it around and added the forward leg making it an H-bar, which is shaped like a lower case "h".    

Actual H-bar.  You can see the open end facing rearward and the forward, single bar, making a lower case h.  In this case, the extra seat is facing rearward.  

On HH-60Gs with the internal ammo cans, the ammo cans go between the gunners' seats.  The H-bar can be seen here as well.

I have not decided if I will go with the internal or external ammo cans/gunmounts yet.

In steps 4 and 5, you build the gunners' side bulkheads.  There is one small correction here.  On both side bulkheads, there are raised strips that are to mount the hoist control box and a guard for it.  The issue is that only the strarboard side one should have these mounts as these parts are only on the starboard side.  I shaved the port side mounts off with a sharp xacto knife.

I also added the release handle and cable for the sliding armor plates along the pilots' seats.  Lastly, I cut the tabs off the bottoms of the side walls as I have heard the cabin is slightly too wide for the fuselage.  I plan to attach the side walls to the fuselage insides and not the cabin structure to hopefully correct this issue.

So far, I have most of the cabin parts built up, but need to paint them and put them all in place.  I had no real issues with all the parts and they went together well.

Below is my corrected H-bar, the pilots seats with cloth bandaid fabric added to replicate the sheepskin seat covers and the seat belt retractors added to the rear of the seats, sidewalls with handles added, and electronic boxes that will go into the open ceiling  structures and under the pilots' seats.  I cut up the pieces for the front electronics compartment in the nose (B18 and forward part of cockpit floor) since I was not leaving it open.  Most of the above electronic boxes come from it and a few I had left over from resin sets.

A few other small corrections/additions I found when going through the steps to build the cabin and cockpit.  These are pretty self-explanatory.

That is it so far.  More to come later.

Gino P. Quintiliani - Field Artillery - The KING of BATTLE!!!

Check out my Gallery: https://app.photobucket.com/u/HeavyArty

"People sleep peaceably in their beds at night only because rough men stand ready to do violence on their behalf." -- George Orwell

  • Member since
    April 2003
  • From: USA
Posted by keavdog on Sunday, April 5, 2020 7:07 PM

Cool!  I'm just about to start a 1/72 HH-60 Jayhawk in coast gaurd markings.

Following along.

Thanks,

John

  • Member since
    February 2011
Posted by knox on Sunday, April 5, 2020 9:47 PM

   Awesome!  I love your big helicopter WIPs.  I probably messed up the plural there.  

  • Member since
    February 2003
  • From: Seattle
Posted by Papa-Echo-64 on Tuesday, April 7, 2020 10:39 PM

Looking good so far! 

How does this kit compare to Academy or Trumpeter ? 

Straighten up and fly right.....
  • Member since
    December 2002
  • From: Valrico, FL
Posted by HeavyArty on Thursday, April 9, 2020 8:27 PM

Thanks guys for taking a look at it.  The kit is closer to Trumpeter's quality of helicopter models, but even better.  It is light years beyond the old Academy H-60 kits in both details and accuracy.

I have continued work on the cockpit and cabin.  As I was building it, I was looking at the decals for the instrument panels and the pieces they were supposed to go on.  The pieces have a lot of relief representing the various instruments and knobs, etc.  I almost didn't use the decals for fear of them not snugging down over all the relief and looking horrible.  I am glad that I did.  The decals went on perfectly and snugged down over the relief excellently.  I did use a bit of decal sol and a couple coats of decal set to help them out, but there were no issues.  They turned out looking awesome.

I wish there was a decal for the overhead panel though.  To the ceiling, I added the H-bar rapel/fast rope rig.  I also added a drain tube coming from the transmission drip pan. 

On the gunner's side bulkheads, I added the wiring and a joystick for the hoist controller.  You can also see how the port side bulkhead looks with the mounting bars removed.

The seats went together well and detailed up nicely.  Of note, there are no seat belts for the gunners' seats in the kit.  I had an extra set from an Eduard PE set for the Academy Black Hawks that I used on the pilots' seats.  On the gunners' seats, I used the kit belts and I added the side belt retractors.  Also of note, there are no decals for the seat tilt-back warning decals.  I used a couple left over Academy ones here as well.

The inner door detail is awesome.  The pockets are even open, so I may place a map or log book in them.  There is an issue here with no inner door decals for the pilots' door too.  Again, I had some left over Academy ones that I used.  The kit does provide the inner cabin door decals, but I liked the Academy ones better and used them again.  I also sanded all the rivet details off the rear side walls as they should be cloth covered, not metal.

Here is an exploded view of the interior so far.

I still have some work to do on it.  Next up is adding the straps to the aux fuel tanks.  The straps are all photo etched with plastic ratchet mechanisms.  They will look good, but it will be tedious work.  Then I have some smaller details like the fire extinguishers and such to add.

So far it has gone together without any major issues.  More to come as I continue the build.

Gino P. Quintiliani - Field Artillery - The KING of BATTLE!!!

Check out my Gallery: https://app.photobucket.com/u/HeavyArty

"People sleep peaceably in their beds at night only because rough men stand ready to do violence on their behalf." -- George Orwell

  • Member since
    June 2018
  • From: Ohio (USA)
Posted by DRUMS01 on Friday, April 10, 2020 11:23 PM

I love what you are doing, your build is looking excellent.

About 14 years ago I modified a 1/18 Black Hawk into a Pave Hawk which included a scratch built refueling boom, radar, pilots doors, overhead panel, and numerous other items. Nothing as good as the level which you are doing, but I sure like your bird.

I can see that yours is going to be killer (in a good way). I'm really enjoying this and will watch it till completion.

Ben

"Everyones the normal until you get to know them" (Unknown)

LAST COMPLETED:

1/35 Churchill Mk IV AVRE with bridge - DONE

NEXT PROJECT:

1/35 CH-54A Tarhe Helicopter


  • Member since
    February 2011
Posted by knox on Friday, April 10, 2020 11:32 PM

This is looking great, and your IP looks as good if not better than photo etch. 

    We’re the cutouts under the front seats molded in, or did you add them. I think I remember you scratch building them in another build, but my memory isn’t the best.  

  • Member since
    December 2002
  • From: Valrico, FL
Posted by HeavyArty on Saturday, April 11, 2020 8:23 AM

Thanks guys.  This one is full of details.  I really like how the decal for the IP came out as well.  The under seat cut-outs are molded into the floor, but they are empty.  I added the details inside them.  

I am hung up on which way to build it now.  I will be doing it as an Alaska Air National Guard 210 Rescue Squadron bird in Euro 1 camo from the early 2000s, as in the pic in the initial post.  The question whether is to build it with the external gun mounts and ammo cans, or with internal gun mounts and ammo cans.  Both versions were used with the Euro 1 camo.  Opinions?  

Internal gun mounts/ammo cans:

External gun mounts/ammo cans:


Gino P. Quintiliani - Field Artillery - The KING of BATTLE!!!

Check out my Gallery: https://app.photobucket.com/u/HeavyArty

"People sleep peaceably in their beds at night only because rough men stand ready to do violence on their behalf." -- George Orwell

  • Member since
    June 2018
  • From: Ohio (USA)
Posted by DRUMS01 on Saturday, April 11, 2020 1:29 PM

My vote would be internals with crew......

As I said, looking great!

Ben

"Everyones the normal until you get to know them" (Unknown)

LAST COMPLETED:

1/35 Churchill Mk IV AVRE with bridge - DONE

NEXT PROJECT:

1/35 CH-54A Tarhe Helicopter


  • Member since
    December 2002
  • From: Valrico, FL
Posted by HeavyArty on Saturday, April 11, 2020 4:50 PM

Thanks Ben.  I was leaning toward the internal M134 miniguns and ammo cans.  That is what I will go with.  There will be no crew on this one though, or I would not have added the pilots' and gunners' seat belts.  This one will be sitting on the tarmac preparing to go up.

Gino P. Quintiliani - Field Artillery - The KING of BATTLE!!!

Check out my Gallery: https://app.photobucket.com/u/HeavyArty

"People sleep peaceably in their beds at night only because rough men stand ready to do violence on their behalf." -- George Orwell

  • Member since
    December 2002
  • From: Valrico, FL
Posted by HeavyArty on Wednesday, April 15, 2020 8:21 PM

Work continues.  I have completed the interior detailing and closed it up.  

I added some gear bags, assault packs, first aid pouches, water jugs, and a back board from the spares bin.  I also used a metal stokes litter basket that a fellow modeler made and sent me a few of many years ago. It is a really nice piece.  I added the straps to the Robinson Aux tanks.  They were not that difficult and the provided ratchet strap pieces (F8) are really nice.  I used extra PE straps to strap the stokes litter to the ceiling and string to secure the back board.

I decided to use the GUA-2 (M134) miniguns with internal ammo cans.  Even though not shown on the instructions, the internal ammo cans and GAU-2s are in the kit on sprue F.  I used the KH MH-60L instructions (found at Hobby Search) for the ammo cans and GAU-2s.  The ammo cans are parts F30, F38, and F50.  I also added a couple left over parts from the bodies of Academy's GAU-2s for the ammo can feed motors.  The guns will be built as per the instructions. 

I tried using the PE for the ammo chutes, but was unsuccessful.  I was able to fold them into their square shape, but could not get them to bend and flex into position without kinking. As an alternative, I had some vinyl/rubber(?) flexible ammo chutes from Cobra Company that worked perfectly.

As I said earlier, I had heard of issues with the internal cabin structure being too wide if built as per the kit instructions.  To (hopefully) remedy this, I cut the tabs off the bottoms of the gunners' bulkheads (parts D30 & D31).  I then glued the bulkheads into the fuselage sides.  This is the same manner that Academy had you build their H-60 kits.  I also scraped a bit of plastic from the openings for the side bulkheads on the roof to allow them some more freedom to slide in easier.  So far, I have found pretty much every slot and locating hole really tight on the kit and opened up most of them to make everything fit better once painted.

It seems to have worked pretty well.  The fuselage closed up pretty tightly with just a small gap along the topside and underside.  I was able to fill each gap with a strip of 0.015 sheet on the underside and 0.020 sheet on the top (which looks wider since it is a piece of "L" shaped stock).  All the topside engine panels still fit perfectly upon dryfitting as well.

Next up is to start on the engines, transmission and other drivetrain components above the fuselage roof line.   I'll let you know how they go in a couple days. 

Gino P. Quintiliani - Field Artillery - The KING of BATTLE!!!

Check out my Gallery: https://app.photobucket.com/u/HeavyArty

"People sleep peaceably in their beds at night only because rough men stand ready to do violence on their behalf." -- George Orwell

  • Member since
    December 2002
  • From: Valrico, FL
Posted by HeavyArty on Wednesday, April 22, 2020 8:12 PM

I am still plugging along and have gotten pretty far.  

I ran into another minor problem with the kit in step 14.  Here you build the engines.  I will not be installing them as I will close the engine bays, but built one to see how it goes together.  There is an issue with part F58 not fitting properly.  Either the part is too log, or one hose is too short.  Either way, you are left with a floating hose and the part resting on the engine support.

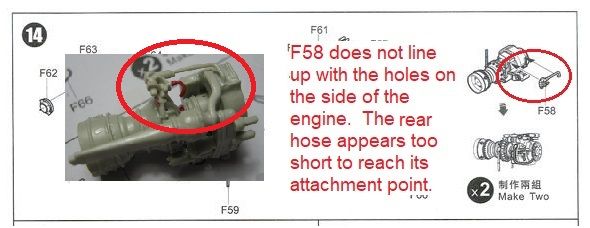
The rest of the engine goes together well and they fit in the bays fine.  Note that the mounts need to be reversed for each side as the instructions only show one side being built.  I did mount the turbine faces (F65) to the bulkheads (C12, C13) since these will be needed to attach the prop shafts to later.  

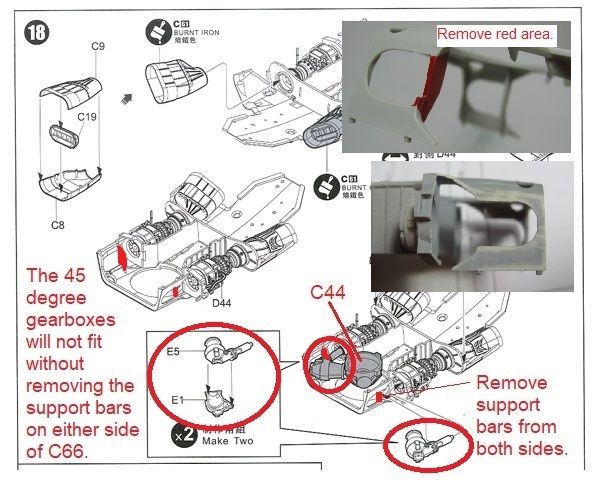
The next issue occurred in step 18 when you add the forward gear boxes to the turbine fans.  The cowl (C66) has a couple of support pieces that interfere with the gear boxes and will not allow them to be installed.  To fix it, cut the supports and remove them; they won't be seen anyways.  They will then allow clearance for the gear boxes.  Kitty Hawk also left the part number out for the transmission here.  It is part C44.  I also glued the transmission to the roof first, before attaching the gear boxes and cowling (C66).

The rest of the roof/transmission/engine parts went together without any issues.

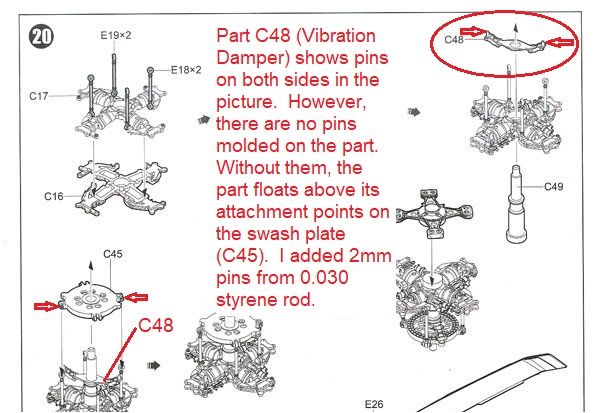
Step 20 starts builds the main rotor blade.  There is an omission here as well.  Part C48 is the vibration damper for the main rotor shaft.  In the instructions, it shows pins on the end of it.  However, there are no pins molded on the part.  Without the pins, the part floats above the swash plate (C45).  I added 2mm pins from 0.030 styrene rods to both ends.

Step 21 has you add the rotors to the roof section, which I did not do.  I always leave my rotors removable to make transporting the model easier.  

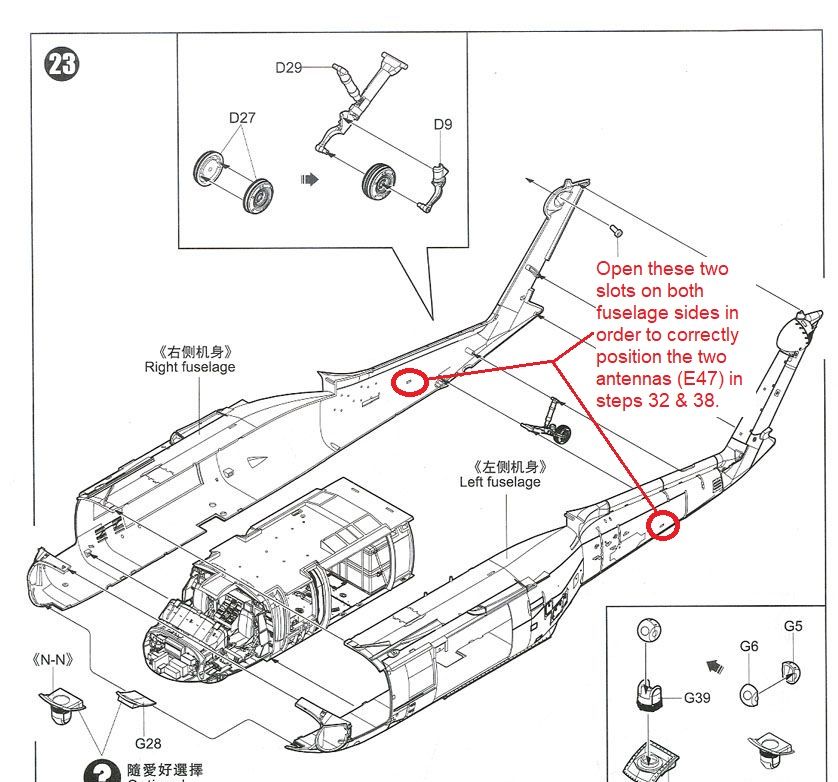
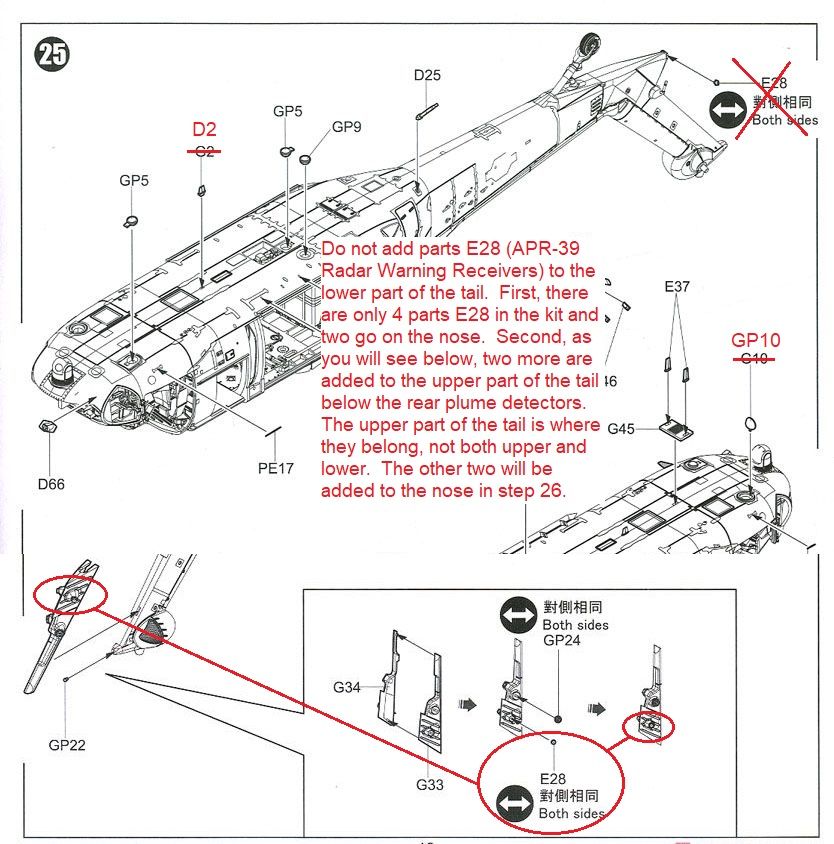
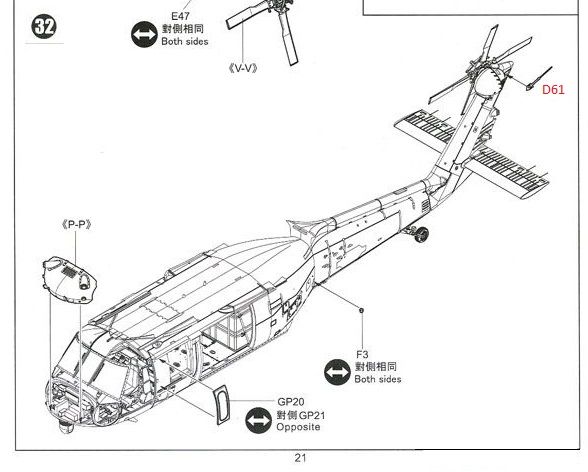
Step 22 has you open a bunch of holes from inside the fuselage before you close it up in step 23.  They missed a couple though.  There are two slots on the sides of the tail for a couple of antennas (E47) that are added later.  These should be opened up as well.

In step 25, you add details to the fuselage.  Here, again, a couple parts are mislabeled.  An antenna is labeled as G2, but should be D2, and the landing light should be GP10 (clear part), not G10.  They also would have you add the APR-39 Radar Warning Receivers (E28) in two places on the tail, at the rear tip and on the upper tail.  They should only be on the upper part.  If you add them to both parts, you will not have two for the nose since there are only four, not six of them.


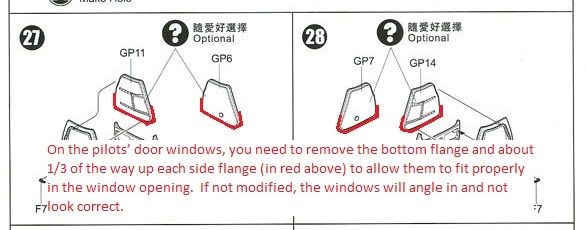
Another area that needs attention is the pilots' windows in step 27.  Whether you use the older style with the small sliding window or the newer one-piece windows, both need to have part of their flanges removed so they sit properly in the door frames.  You will need to remove the bottom piece of flange and about 1/3 of the way up both side.  Once thees flange pieces are removed, the window will fit properly into the frame.

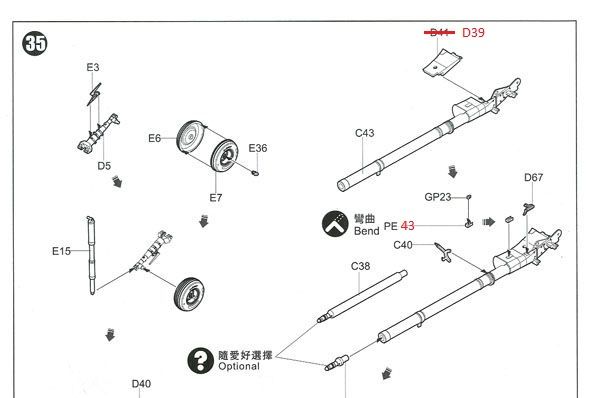
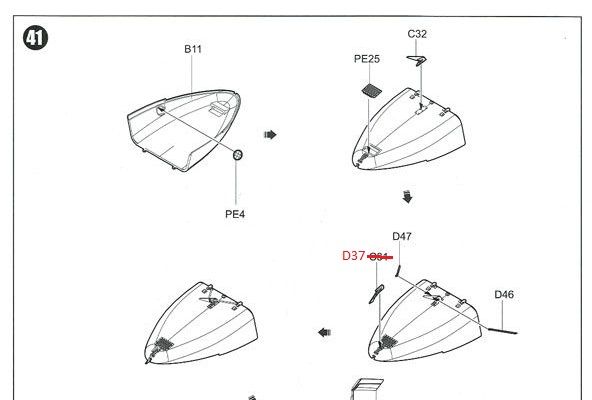
The rest of the steps are pretty straightforward with no issues.  There are just a few more mislabeled or not labeled part shown below.


Now on to the model.  Here it is so far.

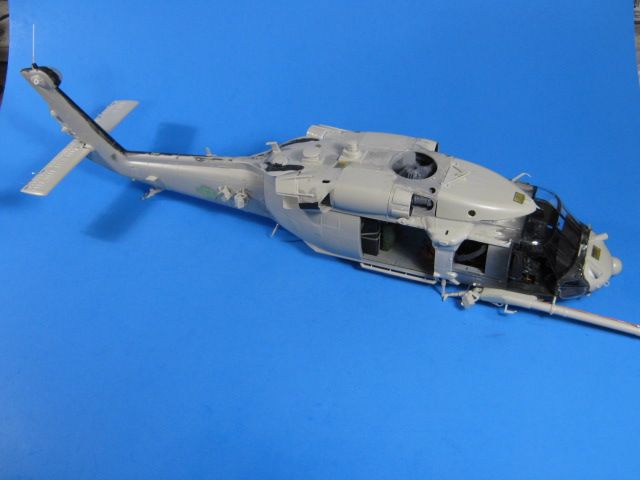
Even though the kit is well-detailed, you can always add some more.  

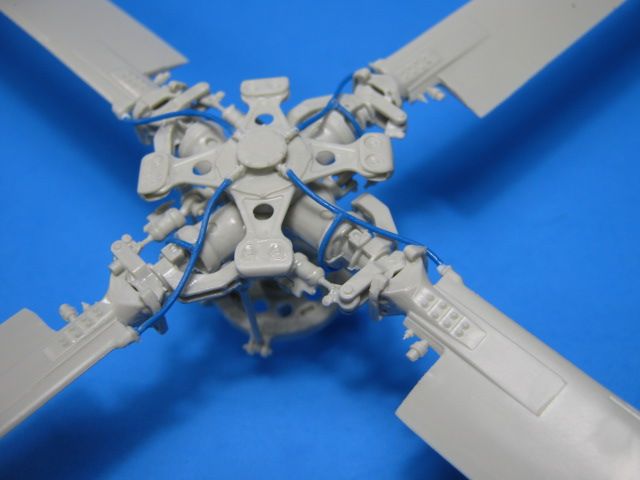
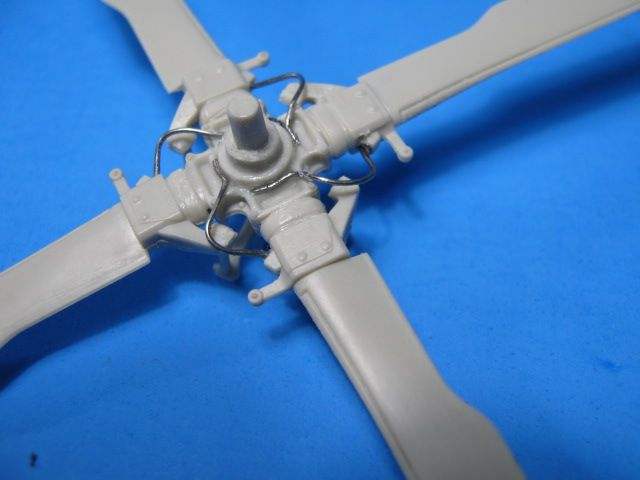
I added the wiring to the main and tail rotor.

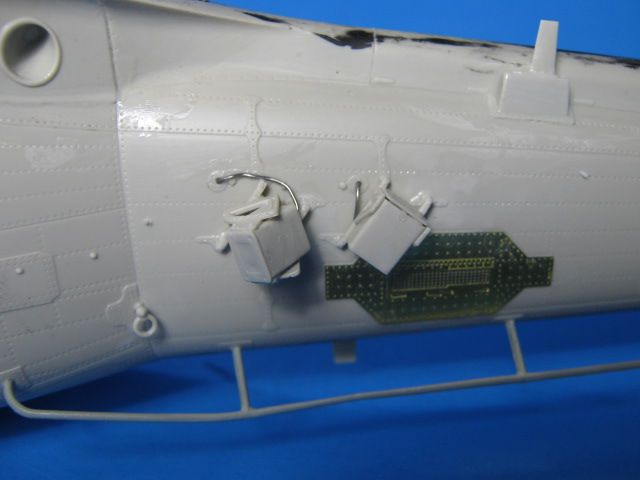
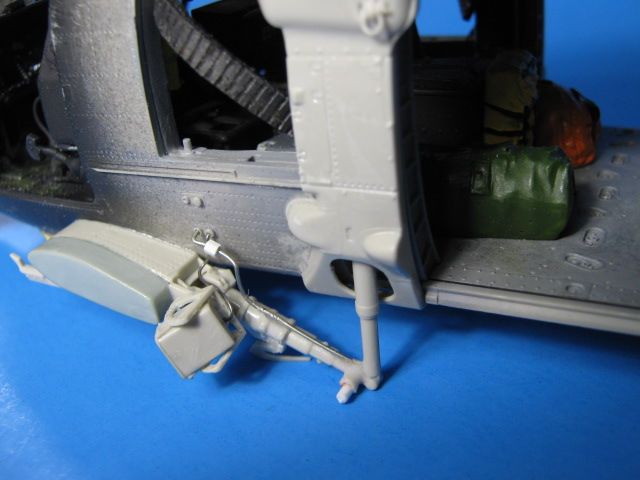
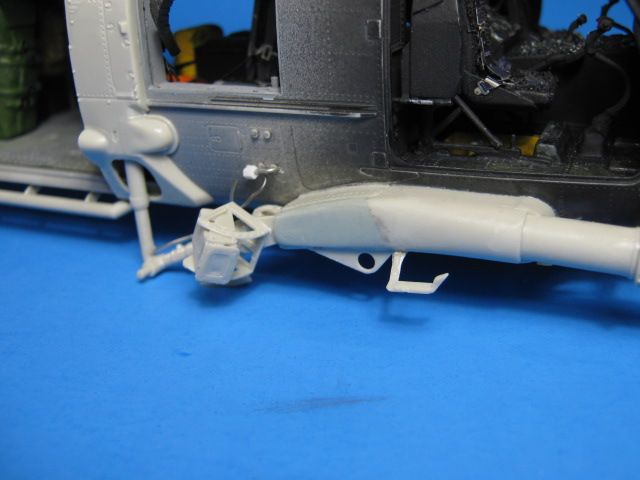
I also added the wiring for the flare/chaff buckets and the brake lines on the main gear struts.  I also swapped out the kit parts for the side sponsons.  The kit ones come molded with the parts for the external gun mounts and can not be built without them out of the box.  To model the internal gun mounts, I had to fix them.  I had some left over sponsons from an Academy MH-60S that I used on the port side.  On the starboard side, I used the outside piece from an Academy MH-60G sponson.  You can see both of these in the darker gray plastic.

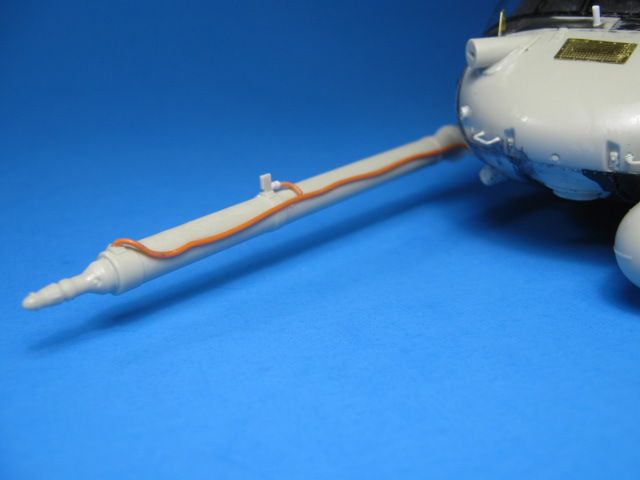
I also added the hose for the refueling probe.    

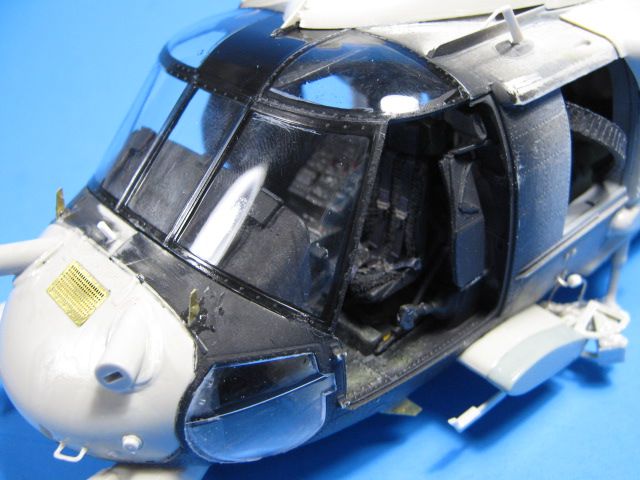
Also of note, the front windscreen is really nice and fits onto the fuselage without any issues.  It fit perfectly and needed no filler putty, sanding, or coercion to fall into place.  I was really impressed.

That is it for now.  The kit has been a real joy so far and I am really impressed by the details and overall fit, with a only a couple areas that need extra attention.

Next up will be paint and decals.  I will probably get to those this coming weekend.


Gino P. Quintiliani - Field Artillery - The KING of BATTLE!!!

Check out my Gallery: https://app.photobucket.com/u/HeavyArty

"People sleep peaceably in their beds at night only because rough men stand ready to do violence on their behalf." -- George Orwell

  • Member since
    February 2003
  • From: Seattle
Posted by Papa-Echo-64 on Wednesday, April 22, 2020 10:47 PM

I envy you on this build ...what a kit! 

Very nice work! Bow Down

Straighten up and fly right.....
  • Member since
    April 2003
  • From: USA
Posted by keavdog on Thursday, April 23, 2020 12:15 AM

This detail build on a chopper is not only fun to watch but educational.  Looking great - I vote for the internal guns as well.

Thanks,

John

  • Member since
    December 2002
  • From: Valrico, FL
Posted by HeavyArty on Thursday, April 23, 2020 7:42 PM

Thanks gents.  This model is very fun to build and full of details.

Gino P. Quintiliani - Field Artillery - The KING of BATTLE!!!

Check out my Gallery: https://app.photobucket.com/u/HeavyArty

"People sleep peaceably in their beds at night only because rough men stand ready to do violence on their behalf." -- George Orwell

  • Member since
    December 2002
  • From: Valrico, FL
Posted by HeavyArty on Friday, May 1, 2020 8:11 PM

It has taken a while, but it is done and on the shelf. 

I painted it in the '80-'90s European 1 Camo using Testors Model Master enamel paints.  I used Euro Dark Green (FS34092), Euro 1 Gray (FS36081), and Medium Green (FS34102). 

I used the kit decals for all the stencils and common markings. They all went on really well and snugged down nicely with a bit of decal set to assist.  The only issue was that there are quite a few decals that are on the decal sheet, but not shown or called out in the decal placement diagram.  The most noticeable are the handle position decals on the pilots doors (decals 15 & 20).  Also, the step lines, tie-down and jack-point markings, and other placards under the gunners windows are not mentioned, but all are on the decal sheet.  There are other general placard stencils left over that can be added around the fuselage.  Both the Werner's Wings decals mentioned below and the older Academy decal placement instructions show the positions for all the left over decals.  One other issue with the kit decals is the stencils for the main rotor blades (A48) and tail rotor blades (A63, A64) are printed in black.  This will not work as the blades are also black.  They just disappear.  I replaced them with a set of stencils in white left over from an Academy H-60, which gives you two sets in each kit; one white, one yellow.   

The rest of the helo-specific decals came from the Warner's Wings Pave Hawks Combat Rescue decal sheet.


It is marked as an HH-60G from the 210th Rescue Squadron of the Alaska Air National Guard.  The "Lets Roll" decal on the cargo door was added after Sep 11, 2001 and came from a sheet made by a fellow modeler, Grant Little I think.  I had no issues with any of these decals.

I weathered it lightly with a black and brown wash since most of these HH-60Gs are pretty clean and well kept. 

Here it is.


I also used the Werner's Wings skis and their "Jolly Green Giant" feet decals, which trace their lineage back to the "Jolly Green Giant" HH-53s from Vietnam.  These were easy to work with and look great, in my opinion.  I really like the look of the skis.


This has been a really fun build.  The Kitty Hawk kit is very nice.  It has a few issues that were easy to deal with; nothing that was insurmountable.    It is light-years ahead of the Academy kit in details, but there are issues with missing decals and some that are unusable.  Overall, it is a really nice kit, I highly recommend it.

Gino P. Quintiliani - Field Artillery - The KING of BATTLE!!!

Check out my Gallery: https://app.photobucket.com/u/HeavyArty

"People sleep peaceably in their beds at night only because rough men stand ready to do violence on their behalf." -- George Orwell

JOIN OUR COMMUNITY!

Our community is FREE to join. To participate you must either login or register for an account.

SEARCH FORUMS
FREE NEWSLETTER
By signing up you may also receive reader surveys and occasional special offers. We do not sell, rent or trade our email lists. View our Privacy Policy.