SEARCH FINESCALE.COM

Enter keywords or a search phrase below:

New pics of my MH-60L

3708 views
14 replies
1 rating 2 rating 3 rating 4 rating 5 rating
  • Member since
    November 2005
New pics of my MH-60L
Posted by Anonymous on Wednesday, October 5, 2005 2:40 PM
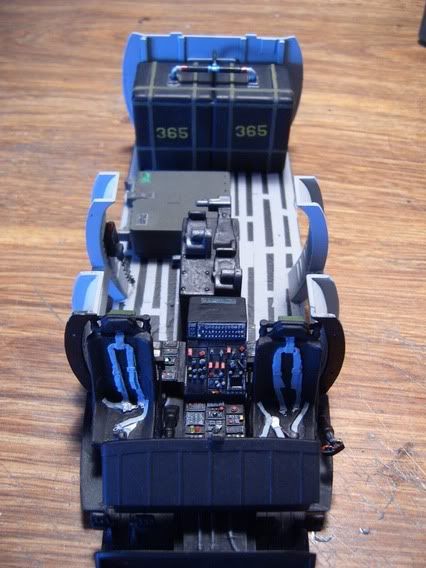
Put some new ones up on my photobucket account, I noticed ALOT of touchups that i need, but figured i would post them anyway.

http://i11.photobucket.com/albums/a172/DoWBaseball/DSC_0020.jpg

http://i11.photobucket.com/albums/a172/DoWBaseball/DSC_0021.jpg

http://i11.photobucket.com/albums/a172/DoWBaseball/DSC_0017.jpg

More at my account... http://photobucket.com/albums/a172/DoWBaseball/

any major things i did wrong please let me know (yes heavy i'm specifically talking to youWink [;)]) constructive critisism is appreciated. And please remember, this is all brush painted (i can't afford an airbrush)Dead [xx(]

Thanks, Baseball
  • Member since
    December 2002
  • From: Valrico, FL
Posted by HeavyArty on Wednesday, October 5, 2005 4:46 PM
O.K., here goes. Looks good overall. A little sloppy on the paint, but that is easy to fix. As you said, it needs some touching up. The seats still don't look right to me. You have them black, but there is still grey around the cushions (it looks like an outline), which should be all black , or a darker green as well. The lumbar support area, lower roll on seatback, should also be the color of the cushion. The cushion does not extend over the lower sides either. The seat is made up of a metal frame with the cushions inside the confines of the frame, kind of like WWII fighter planes with a metal bucket seet and the parachute was your cushion, sort of. Colors on the supports around the gunners' stations don't look right either. The black should only be on the piece that faces the cockpit. The rear of the cabin, from the forward, ribbed upright should be all grey.

Pilots - The flight suits should not be camo, especially not sand and brown camo. The tan/khaki ones are solid tan, no camo. The seatbelts don't go back as two belts either, they come together behind the pilot's shoulders then pass through/into the seat as one belt below the head cushion.

You should be able to see what I am talking about on mine below.


Mine is all painted with spray cans and by brush as well. No need for an airbrush for basic color solid coats and detail work. I even used a spray can of flat black for the exterior of my DAP as well.

It looks as though it is coming along well. Little more work and it will be great. Good job so far.

By the way, the soda boxes look great.

Gino P. Quintiliani - Field Artillery - The KING of BATTLE!!!

Check out my Gallery: https://app.photobucket.com/u/HeavyArty

"People sleep peaceably in their beds at night only because rough men stand ready to do violence on their behalf." -- George Orwell

  • Member since
    November 2013
Posted by intruder_bass on Wednesday, October 5, 2005 5:11 PM
I wanna add couple of words to Gino's postSmile [:)]

The front sidewalls of gunner window sopports are not like Academy gives us...
They have an OD colored panels. Here is the pic:

Its #1 on the photo... It's not like "superdetailing" or something - this part is pritty big and not difficult to build. I made it from sterene:


Also there is a huge space in front of instrument panel which will be seen through if look from side bottom windows. This space can be easely filled with 2 sterene pieces:


The rest looks good to me!
P.S. I would remove miniguns before glueing the hull sidesWink [;)]

Andy
  • Member since
    November 2005
Posted by Anonymous on Thursday, October 6, 2005 12:51 AM
Besides what Gino and Andy already commented on I'll add this:

1. Our standard self-defense guns are GAU-2 (M-134) miniguns and we NEVER route the ammo feed chutes to the rear as you have done. Instead they are always routed forward of the gunner/FE stations upwards and secured to the roof/H-bar supports with bungies or 550 cord (or whatever), then down to the guns. So basically they're routed up, over and down forward of the gunner/FE position...basically between them and the pilot/copilot seat. That way they're not in the way of the gunner/FE's access to the rear of the aircraft.

2. I don't see any FLIR controls on the center console.

3. I don't see the hard mounted hoist controls nor the remote control group on the right side forward of the troop door.

4. The minigun expended casing chute has the wrong contour. It should look more like the flexible part of a silly straw, or like an RV dump hose.

You asked for constructive critisism, so there you go. Other than that it looks good!
  • Member since
    November 2013
Posted by intruder_bass on Thursday, October 6, 2005 1:33 AM
QUOTE: Originally posted by salbando

3. I don't see the hard mounted hoist controls nor the remote control group on the right side forward of the troop door.

4. The minigun expended casing chute has the wrong contour. It should look more like the flexible part of a silly straw, or like an RV dump hose.


Salbando,
3. Do all Hawks have these remote controls on the right side support? Just wondering cuz I did not do it ether... Sad [:(]
4. And it should always be on the left side of miniguns "body"


Andy
  • Member since
    June 2003
  • From: Caput Mundi
Posted by Avus on Thursday, October 6, 2005 2:22 AM
Wow, poor DoWBaseball! You went down hard on him!
He'll probably never ask us for comments!
Wink [;)]
But I must say that the flaws that were pointed out are too big to go unnoticed!

intruder_basscould I ask you again for some schematics of the side wall build, thanks.
And what's that wire coming from the overhead instrument panel going to the front?

Klaus

Thanks to ImageShack for Free Image Hosting

  • Member since
    February 2004
  • From: Moooooon River!
Posted by Trigger on Thursday, October 6, 2005 8:37 AM
QUOTE: Originally posted by salbando

2. I don't see any FLIR controls on the center console.

3. I don't see the hard mounted hoist controls nor the remote control group on the right side forward of the troop door.


I'm pretty sure the CC set has these parts. I know I installed a hoist control on my Pave Hawk's interior, but I don't remember what the CC center console looks like. Gino, am I imagining things here?
------------------------------------------------------------------ - Grant "Can't let that nest in there..."
  • Member since
    December 2002
  • From: Valrico, FL
Posted by HeavyArty on Thursday, October 6, 2005 10:03 AM
The FLIR control joystick is on all FLIR-mounted birds. If it has the FLIR, it has the joystick. It is in the CC set, and also in the Academy kit. Look closely at the instructions and you will see it.

All birds that mount a hoist will also have the hoist control and its joystick on the right side pillar, just forward of the cargo door as well. Also included in the CC sets.

Gino P. Quintiliani - Field Artillery - The KING of BATTLE!!!

Check out my Gallery: https://app.photobucket.com/u/HeavyArty

"People sleep peaceably in their beds at night only because rough men stand ready to do violence on their behalf." -- George Orwell

  • Member since
    November 2013
Posted by intruder_bass on Thursday, October 6, 2005 12:02 PM
AVUS,
I don't know what's this pipe for but I've seen them on many many photos...


These 2 pipes go from overhead console along the windshield frame and end up behind the instrument panel.... BTW FLIR joystick is seen on the second photo too.Wink [;)]

About the side wall - I did not really draw any schematics - just looked at photos Big Smile [:D]

Andy
  • Member since
    November 2005
Posted by Anonymous on Thursday, October 6, 2005 12:42 PM
I really appreciate all the comments, and i don't think they're too harsh at all. I plan on changes most...if not all of the things you guys suggested with the exception of the ammo-feed chutes. I soaked these in glue so the springing action would be decreased. They can't be changed.

I already touched up all the little painting mistakes, including the seats. I fixed the harnesses, and the jumpsuits on the pilots. The frames are awaiting a second coat when i get home (at school now) so that will be finished aswell. I plan on looking through some photo's of the instrument panels and fixing that...it was on my "to-do" list. Never saw a picture of the hoist control before, so i'll go ahead and scratch build that. The ejection chutes are the only thing that i could find. I plan on going over them with white glue to eliminate the texture, then wrapping copper wire around at lengths, i think this will better simulate the realistic look.

Once again, I really do appreciate all these, I have little/no knowledge about MH-60's, that's why I'm asking for critiques...
  • Member since
    April 2004
  • From: Georgia
Posted by Screaminhelo on Thursday, October 6, 2005 8:28 PM
I concur with all previous comments. You really have a nice build going there. I don't really know that much about the Ops birds, but the common -60 stuff is pretty good. One comment that I would add would be to try and get rid of some of the shine in the cockpit. The actual paint used there is a dull finish not flat so it picks up dust pretty easily and never quite looks clean.

QUOTE: Originally posted by intruder_bass
These 2 pipes go from overhead console along the windshield frame and end up behind the instrument panel....
Andy


The pipes that you are asking about are the primary wiring harnesses from the pilot/co-pilot circuit breaker panels to the instrument panel. They are covered with corrougated plastic much like the harness in most cars these days.

Mac

Mac

I Didn't do it!!!

  • Member since
    June 2003
  • From: Caput Mundi
Posted by Avus on Friday, October 7, 2005 1:25 AM
Wow I never really noticed that pipe! You are one hell of an observer intruder_bass.
Guess that I'll use your pic as a reference for the side walls; thanks anyhow.

Thanks for the info on what the pipes are Screaminhelo.

Klaus

Thanks to ImageShack for Free Image Hosting

  • Member since
    November 2005
Posted by Anonymous on Friday, October 7, 2005 3:15 AM
Man....you guys are quick.

Looks like all questions were answered. Gino especially got it right on the money as all aircraft with an external hoist will have the hard mounted and remote trigger group hoist controls mounted. I might add that USAF HH-60's also have a bar mounted the length of the right troop door, under the lip of the door. This was in response to a PJ taking his last ride in Korea after a hoist cable oscillation developed and the hoist cable touched the lip of the cabin multiple times. Bottom line...cable detached..PJ made ultimate sacrifice.

DoWBaseball,
Sounds like that should fix the expended casing chute for the minigun (that and moving it to the left side of the gun). It is unfortunate about the ammo feed chute though since they're never mounted that way. You might still want to try and work them the way I described (of course being extra careful).
I've got some pictures of the hoist controls and some of the feed chutes when we were last in Afghanistan. Ping me if you want them.
  • Member since
    November 2013
Posted by intruder_bass on Friday, October 7, 2005 1:23 PM
Sure we want them!!!! All of them!!!

Thanks
  • Member since
    February 2004
  • From: Ft. Bragg, NC
Posted by adrake2 on Sunday, October 9, 2005 7:42 AM
Sign - Ditto [#ditto]Dinner [dinner]
Intruder, thanks for the pics of the new sidewalls. When I build another MH-60, I'll be sure to include them.
-Aaron
JOIN OUR COMMUNITY!

Our community is FREE to join. To participate you must either login or register for an account.

SEARCH FORUMS
FREE NEWSLETTER
By signing up you may also receive reader surveys and occasional special offers. We do not sell, rent or trade our email lists. View our Privacy Policy.