SEARCH FINESCALE.COM

Enter keywords or a search phrase below:

CH47-A Building tips, ideas, painting and general help.

8069 views
30 replies
1 rating 2 rating 3 rating 4 rating 5 rating
  • Member since
    July 2003
  • From: Piedmont Triad, NC (USA)
Posted by oldhooker on Tuesday, March 28, 2006 11:45 PM
 Papa-Echo-64 wrote:

Thanks Frank!

I don't trust my PC.....is that OD or interior green in the wheel well?

Troy,

You can't really use that as a color guide, because the airframe it's attached to has been sitting in the elements for over 25 years.     Interior green was the standard color of the inside sheet metal sections. Smile [:)]

Take care,

Frank

  • Member since
    February 2003
  • From: Seattle
Posted by Papa-Echo-64 on Tuesday, March 28, 2006 7:06 PM

Thanks Frank!

I don't trust my PC.....is that OD or interior green in the wheel well?

Straighten up and fly right.....
  • Member since
    November 2005
Posted by Anonymous on Tuesday, March 28, 2006 6:53 PM
Frank,
         Thanks again. I have some ideas on the chunker housing. And yes I'm using the MRC kit for my parts. Rather expensive boneyard if you ask me. I've never worked with balsa. I might give that a whirl for good measure.
  • Member since
    July 2003
  • From: Piedmont Triad, NC (USA)
Posted by oldhooker on Tuesday, March 28, 2006 9:23 AM
 Papa-Echo-64 wrote:

Is OD the main color of the early A Hook struts??

Hi Troy,

Yes. Smile [:)]

It sounds like the gear assembly works up really nice.... and oh yeah, here's a picture I found of the aft gear assembly on "Easy Money", taken during the restoration, without the sheet metal around it:

I forgot about the two-bobs boys, Troy... wonder how far along they are on those??? Evil [}:)] Wink [;)]

In 1/35 scale.... boy, there sure would be a lot of extra space available to install cabin lighting... Mmmmm.... and no need trying to hide the wires too much because they could serve as extra "plumbing" detail.... Hmmmmm.Evil [}:)]    

Sorry... off on one of my "are you gonna go get you one today, Frank" fantasies... Big Smile [:D]

Take care guys,

Frank

  • Member since
    November 2005
Posted by Anonymous on Tuesday, March 28, 2006 4:17 AM

 Unknownpharoah wrote:
Nope. Its all just sitting there. I have some more "trial and error" before I glue anything.
Cool!!   You had me a lil worried there........I'm glad to hear that!!   Good luck on your Go Go project!!  Keep us posted on your progress!!

Mark

  • Member since
    July 2003
  • From: Piedmont Triad, NC (USA)
Posted by oldhooker on Tuesday, March 28, 2006 12:35 AM

 Unknownpharoah wrote:

Frank,
     All of your pictures have been a great help.If you happen to have any pictures of the 20mm's detached from the aircraft that would be a great.

Thanks for your kind words...

Here is the best I can do with that... see if you can  find a file photo of a "M24A1", if you want to see one "disconnected".Smile [:)]


I was going to use 3 per stub wing. After some test fitting I figured that 2 per wing would be more than enough. I shaped the ribs as close to identical as I could. Then after joining them together with some Evergreen strips stock I played around with the width. To do this I studied your pictures in relation to where the rocket launcher sits and went from there. I am using the weapons systems off the UH-1C MRC kit. I think the hardest part thus far about the stubs is the critical trimming of the inner portions of the wing. The part that sits against the fuselage itself. I think they came out ok. I might try it again but I'm thinking after I hang all the weapons off them it will actually diminish what I see as a flaw in the shape. Then again I am pretty critical of my own work so what I might see as a big fat hairy deal might seem minimal to others. I just want to do the crews of the day justice.

Thanks for the construction report! Thumbs Up [tup]  It's nice to see how ideas work with others. Smile [:)]


    The next portion to tackle is the thumper. I have a feeling its going to be pretty challenging due to the fact its going to be done on that clear plastic. I'll keep you all posted. 
   

I'm assuming you're going to use the Chunker from the UH-1C MRC kit.... ?

I carved a piece of balsa into the shape of the 40mm shroud, and was going to try and thermoform plastic into that shape, but ended up just USING the balsa piece as the shroud.     Here's a few reference photos of the chunker & shroud:

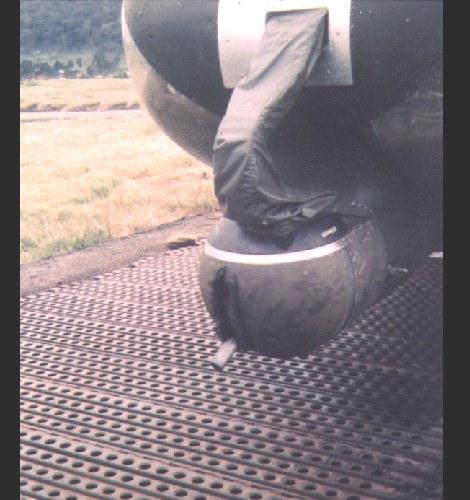
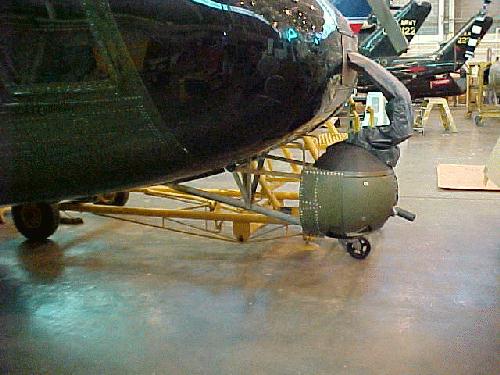
...mounting the 40mm on the restoration*

Hopes this helps,

Frank


  • Member since
    November 2005
Posted by Anonymous on Tuesday, March 28, 2006 12:30 AM
 Papa-Echo-64 wrote:

hmmmm.......I better get back to Two Bobs and see where they are on the 1/35 Go Go decals.


Are they making a set? I thought I was going to have to scratch those as well!
  • Member since
    February 2003
  • From: Seattle
Posted by Papa-Echo-64 on Monday, March 27, 2006 11:52 PM

The clear plastic on this kit seems very workable so far....I had no problens drilling out those two entenna mounts on the nose and using glue. just be careful and start with a small drill bit and work up from there.

Look foward to seeing your progress!

hmmmm.......I better get back to Two Bobs and see where they are on the 1/35 Go Go decals.

Straighten up and fly right.....
  • Member since
    November 2005
Posted by Anonymous on Monday, March 27, 2006 9:38 PM
 oldhooker wrote:

 Unknownpharoah wrote:
Thanks again guys. The info is a great help. I'm compiling a entire file folder of reference on this subject. Thank for all your help. Frank, Can I get your email address?

whitefATgunsagogo.org

Ahh.. the wing assembly technique! Smile [:)]     I thought later, that the "ribs" may have to be thicker/more of them, because of the larger scale... what did you think?     Oh yeah, did you get the image I made of the right side wing positioning... it's a much better angle than I had posted before.    Smile [:)]    (if you already had it, just ignore this one)Wink [;)]

It's nice to see all the "in-progress" reports!    I'm about to break down and go get me one too!! Whistling [:-^] Wink [;)]

Take care,

Frank


Frank,
     All of your pictures have been a great help.If you happen to have any pictures of the 20mm's detached from the aircraft that would be a great. I have a feeling I am going to have to scratch those as well. Thanks again. Actually it took less ribs than I originally thought.
Here is the very infant stages:
I was going to use 3 per stub wing. After some test fitting I figured that 2 per wing would be more than enough. I shaped the ribs as close to identical as I could. Then after joining them together with some Evergreen strips stock I played around with the width. To do this I studied your pictures in relation to where the rocket launcher sits and went from there. I am using the weapons systems off the UH-1C MRC kit. I think the hardest part thus far about the stubs is the critical trimming of the inner portions of the wing. The part that sits against the fuselage itself. I think they came out ok. I might try it again but I'm thinking after I hang all the weapons off them it will actually diminish what I see as a flaw in the shape. Then again I am pretty critical of my own work so what I might see as a big fat hairy deal might seem minimal to others. I just want to do the crews of the day justice.
    The next portion to tackle is the thumper. I have a feeling its going to be pretty challenging due to the fact its going to be done on that clear plastic. I'll keep you all posted.
    Funny thing is, I didnt even plan on starting this kit for a few months.

  • Member since
    February 2003
  • From: Seattle
Posted by Papa-Echo-64 on Monday, March 27, 2006 9:31 PM

Yous guys are gonna love the landing gear assy....very cool! The white metal parts need only minor seam clean up and fit well and glue very strong with CA.

The very nicely done rubber tires fit snugly over the center raised portions of the wheels with no seam lines and looks very clean.... I havn't even painted them yet. 

Q: Is OD the main color of the early A Hook struts??

Straighten up and fly right.....
  • Member since
    July 2003
  • From: Piedmont Triad, NC (USA)
Posted by oldhooker on Monday, March 27, 2006 9:19 PM

 Unknownpharoah wrote:
Thanks again guys. The info is a great help. I'm compiling a entire file folder of reference on this subject. Thank for all your help. Frank, Can I get your email address?

whitefATgunsagogo.org

Ahh.. the wing assembly technique! Smile [:)]     I thought later, that the "ribs" may have to be thicker/more of them, because of the larger scale... what did you think?     Oh yeah, did you get the image I made of the right side wing positioning... it's a much better angle than I had posted before.    Smile [:)]    (if you already had it, just ignore this one)Wink [;)]

It's nice to see all the "in-progress" reports!    I'm about to break down and go get me one too!! Whistling [:-^] Wink [;)]

Take care,

Frank


  • Member since
    February 2003
  • From: Seattle
Posted by Papa-Echo-64 on Monday, March 27, 2006 7:53 PM

Looks good Josh! can't wait to see what you do!

FAR OUT!! I found a few extra 1/35 M-16's and a cassette AM/FM radio from one of the two 1/35 PBR MK II Nam river boat I built a while back.  I'll hang the radio in the rear ramp area.

Straighten up and fly right.....
  • Member since
    November 2005
Posted by Anonymous on Monday, March 27, 2006 7:46 PM
Nope. Its all just sitting there. I have some more "trial and error" before I glue anything.
  • Member since
    November 2005
Posted by Anonymous on Monday, March 27, 2006 6:23 PM

Hey!!

Your stub looks good!!   A quick note of causion!!   I hope you didn't glue the gear strut access door yet because you won't be able to attach the strut if you did!!

I would like to do one of these kits as a Go Go bird but the the many things that woud have to be changed and added would be  a great undertaking!!   I will wait to see how someone else does with this project!!

Mark

  • Member since
    November 2005
Posted by Anonymous on Monday, March 27, 2006 5:21 PM
Well as I said I would post some pictures of my first attempt at these stub wings. I still have some reshaping to figure out. I figured I would post a picture while the putty dries.
  • Member since
    November 2005
Posted by Anonymous on Monday, March 27, 2006 12:39 PM
Thanks again guys. The info is a great help. I'm compiling a entire file folder of reference on this subject. Thank for all your help. Frank, Can I get your email address?
  • Member since
    July 2003
  • From: Piedmont Triad, NC (USA)
Posted by oldhooker on Monday, March 27, 2006 11:52 AM

 Melgyver wrote:
Squadron's CH-47 Chinook In Action has some good photos and drawings of the pilot's armored seats and gun positions.  Appears in the drawing of the "ramp" gun the upper sliding portion of the rear ramp was not installed and bracing for the guns ammo storage extended to the outer skin.  In a picture of the same gun position from the inside a panel in the ramp floor was removed to give the gunner more "head" room.  Can't wait for the 1/48 ACH-47A. 

Hi Mel,

Here's those pictures....

--

And yes, the secondary ramp was not on the ACH-47's because of internal bracing for the .50 mount, and the recessed panel in the floor, for the Gunner to kneel into. Smile [:)]

Thanks,

Frank

  • Member since
    March 2003
  • From: Lafayette, LA
Posted by Melgyver on Monday, March 27, 2006 11:27 AM
Squadron's CH-47 Chinook In Action has some good photos and drawings of the pilot's armored seats and gun positions.  Appears in the drawing of the "ramp" gun the upper sliding portion of the rear ramp was not installed and bracing for the guns ammo storage extended to the outer skin.  In a picture of the same gun position from the inside a panel in the ramp floor was removed to give the gunner more "head" room.  Can't wait for the 1/48 ACH-47A. 

Clear Left!

Mel

  • Member since
    July 2003
  • From: Piedmont Triad, NC (USA)
Posted by oldhooker on Monday, March 27, 2006 11:03 AM

 Unknownpharoah wrote:

     It appears from some of the photos that the windows on some of the ACH-47s were either removed or filled with plate steel. Am I accurate was there a certain "protocol" regarding the windows.

pharoah,

Good eye.... yes, the Boeing tech guys in Vietnam installed an armor plate in the 3rd window back on both sides, because the 20mm ammo boxes could be seen through these windows.    The ammo boxes were big and silver, and made too good a target.    example below:

On "Birth Control" (#64-13154) however, they put the armor plate in the 2nd & 3rd windows on the LEFT side... see photo:

Typically, the aft lateral windows were left out on all Vietnam era Chinooks to provide a gun-port for personal weapons.

Hope this helps....

Take care,

Frank

  • Member since
    November 2005
Posted by Anonymous on Monday, March 27, 2006 10:34 AM
Does anyone know if they make a 35th scale 20mm? Thanks in advance.
  • Member since
    February 2003
  • From: Seattle
Posted by Papa-Echo-64 on Sunday, March 26, 2006 11:46 PM

Aerofax minigraph #27 Boeing Helicopters  CH-47 Chinook by David Anderton and Jay Miller

This is the BEST book that anyone has mentioned.  Its out of print but not inpossible to find.

I have one and I love it! .....that and the Squadron Chinook in action with a GO GO on the cover have been loads of help.

Straighten up and fly right.....
  • Member since
    November 2005
Posted by Anonymous on Sunday, March 26, 2006 11:07 PM

     It appears from some of the photos that the windows on some of the ACH-47s were either removed or filled with plate steel. Am I accurate was there a certain "protocol" regarding the windows. I have also started my stub wings. I will post some pictures tommorow when I get a chance. It may take me a few shots to get it how I like it. What was the name of the second book referenced for info Papa-echo?
  • Member since
    February 2003
  • From: Seattle
Posted by Papa-Echo-64 on Saturday, March 25, 2006 12:42 PM

hehehehe Smile,Wink, & Grin [swg]

I don't know about American Eagles in Tacoma....but the thier main shop up here has never had the reputation of being the friendliest in the area.....after spending some time at Galaxy Hobby you will wish you lived up here.....Bob has been in business for eleven years and we keep telling him to get a larger shop.

Glad you can make it!

Papa Echo out.

Straighten up and fly right.....
  • Member since
    November 2005
Posted by Anonymous on Saturday, March 25, 2006 1:22 AM
Visa will be in tow!
  • Member since
    February 2003
  • From: Seattle
Posted by Papa-Echo-64 on Saturday, March 25, 2006 12:34 AM

COOL.....no biggie at all......better for me......PHEW! .....hehehehe

You will see some great work indeed.

Terry Moore....North IPMS president will have a few entries.....his work is just amazing and he's a real nice guy.  Bob who owns Galaxy and puts on the Contests is one of the best friends a modeler can have.....his shop has TONS of PLASTIC kits...mostly aviation! There is also a 'Scratch and dent' table with very nice kits at 30% to 70% off....some are just over stock that he just wants to get rid of.

Straighten up and fly right.....
  • Member since
    November 2005
Posted by Anonymous on Friday, March 24, 2006 9:47 PM
Troy,
    Probably not. I am just getting to the point with my garage where I can start building again. My built kits are still packed up. I will show up to check out everyone elses stuff and get some ideas.
  • Member since
    February 2003
  • From: Seattle
Posted by Papa-Echo-64 on Friday, March 24, 2006 8:48 PM

Thanks!!! Thumbs Up [tup]

Hey....so are ya gonna enter any Helo kits at the Contest on the 8th??

Straighten up and fly right.....
  • Member since
    November 2005
Posted by Anonymous on Friday, March 24, 2006 7:40 AM
This is from a D model.. it may help.

  • Member since
    February 2003
  • From: Seattle
Posted by Papa-Echo-64 on Thursday, March 23, 2006 11:33 PM

Thanks a lot Wile E!

A buddy of mine was a pilot with the 173rd AHC Robinhoods 67-70 and he remembers one time they were hit pretty bad and a Hooker picked them up just in time to miss Charlie.....after that they had a lot more respect for those big helicopters.

I have a pretty good idea what I'm going to use for the exchaust cones......I'll start with a Chrome finish then use the mentalizer burn't iron at the ends and blend it in....then a slight tint of tamiyas clear blue....should turn out just right.    A pal of mine used that on car exhaust once and it looked sweet!

Straighten up and fly right.....
JOIN OUR COMMUNITY!

Our community is FREE to join. To participate you must either login or register for an account.

SEARCH FORUMS
FREE NEWSLETTER
By signing up you may also receive reader surveys and occasional special offers. We do not sell, rent or trade our email lists. View our Privacy Policy.