SEARCH FINESCALE.COM

Enter keywords or a search phrase below:

tips needed on how to paint a scaled out huey?

1701 views
4 replies
1 rating 2 rating 3 rating 4 rating 5 rating
  • Member since
    June 2006
tips needed on how to paint a scaled out huey?
Posted by "little chief" pilot on Thursday, June 21, 2007 1:23 PM
ok guys getting back into this after along time,  just started on a dragon huey uh1d kit intend to scale it out as much as poss,  question for the master.... do you detail and assemble the kit after painting the interior THEN put the fuse on finish out THEN spray the fuse after taping up with the o.d. green???  also who makes the most scale huey green in a spray can?  thanks 
  • Member since
    December 2002
  • From: Valrico, FL
Posted by HeavyArty on Thursday, June 21, 2007 5:31 PM

That is how I do it.  I completely build and paint the interior, then close up the fuselage.  Complete the exterior and then tape it off for painting.  I like to use Testors Model Master OD Green (spray can or air brushed from the bottle) for Vietnam-era Hueys.  It looks right to me.  Here is how it can turn out.

Panda (pre-Dragon rebox + extras) UH-1H Vietnam DustOff

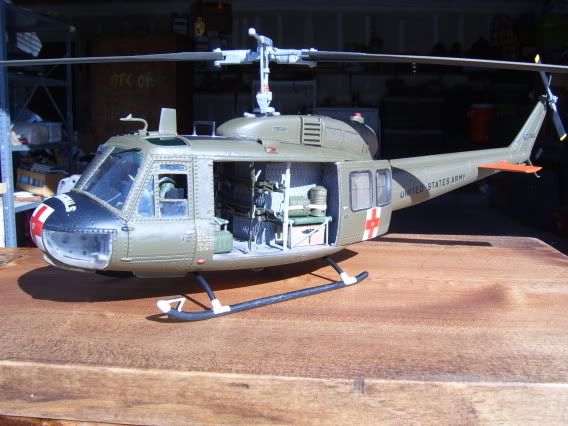
In-progress pics can be found here.

Gino P. Quintiliani - Field Artillery - The KING of BATTLE!!!

Check out my Gallery: https://app.photobucket.com/u/HeavyArty

"People sleep peaceably in their beds at night only because rough men stand ready to do violence on their behalf." -- George Orwell

  • Member since
    June 2006
Posted by "little chief" pilot on Friday, June 22, 2007 9:21 AM
nice bird gino......  how did you get the blads droop on the rotor???  awsome build thanks for the pics
  • Member since
    November 2005
Posted by Anonymous on Friday, June 22, 2007 9:35 AM

I did my Panda by finishing off the interior, then painting the fuselage halves including the interior of the fuselage.  Then closed up the fuselage and sanded and filled the seams and touched up the seams with paint.  It was an idea from an old FSM issue about modeling a Huey.  Worked great.  As far as paint, because I'm doing an early D model, I wanted to use the darker semi-gloss paint.  So I used a can of touch up paint for Army OD #24087 that I had bought from www.armyjeepparts.com during the restoration of my 1/1 scale military vehicles.  Here is a pic of the progress I've done so far on it.


  • Member since
    December 2002
  • From: Valrico, FL
Posted by HeavyArty on Monday, June 25, 2007 8:00 AM
Thanks, glad you like it.  For the blade droop, I gently bend the blades into the desired position after they are built.

Gino P. Quintiliani - Field Artillery - The KING of BATTLE!!!

Check out my Gallery: https://app.photobucket.com/u/HeavyArty

"People sleep peaceably in their beds at night only because rough men stand ready to do violence on their behalf." -- George Orwell

JOIN OUR COMMUNITY!

Our community is FREE to join. To participate you must either login or register for an account.

SEARCH FORUMS
FREE NEWSLETTER
By signing up you may also receive reader surveys and occasional special offers. We do not sell, rent or trade our email lists. View our Privacy Policy.