SEARCH FINESCALE.COM

Enter keywords or a search phrase below:

"Clearing the Trench" Dio. - W.I.P.

23351 views
103 replies
1 rating 2 rating 3 rating 4 rating 5 rating
  • Member since
    April 2010
Posted by Robh22 on Friday, April 30, 2010 7:58 PM

Wow! These pictures are great!! You really do some fantastic work.

  • Member since
    September 2009
Posted by Cobra 427 on Tuesday, April 20, 2010 11:05 PM

razorboy

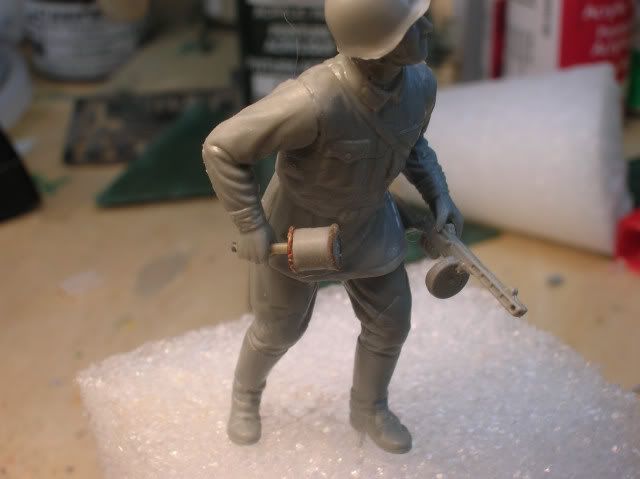
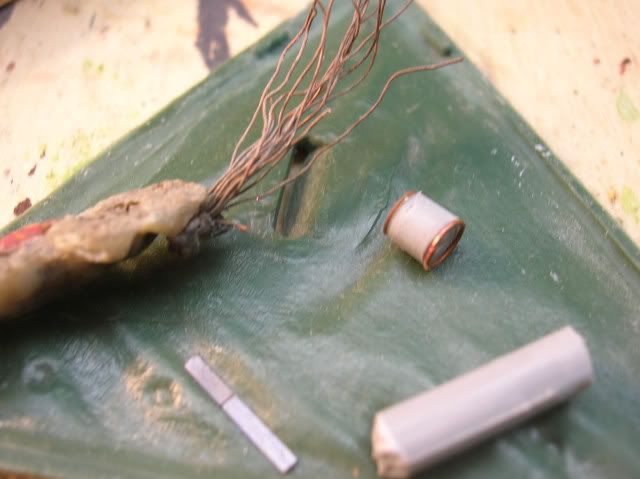
I worked on "Russian 1" today, he has a scratchbuilt RPG-40 in his right hand. The RPG-40 was a hand-held anti tank grenade and looked a great deal like a short can on a stick. To duplicate the "can", I used a piece of sprue and added the "rings" from fine gauge wire -

RPG-40:
http://i232.photobucket.com/albums/ee2/froglevelzcool/DSCN31830001.jpg

http://i232.photobucket.com/albums/ee2/froglevelzcool/DSCN31850001.jpg

rb

These were called "Potato mashers" because that's what they resembled. There's another name that escapes me right now, but I think it was called a "lightning stick" also.  The skinnier versions were "lightning sticks" for sure because of the shape, and the bright flash these gave off when exploded.  These were the German version of hand grenades which were thrown, and flew end over end. When landed, these blew up like a U.S. made fragmentation grenade, but with a bright flash.

                                                                                                ~ Cobra Chris

Maybe a picture of a squirrel playing a harmonica will make you feel better?


  • Member since
    April 2008
  • From: Charlottesville Va
Posted by Stern0 on Sunday, April 11, 2010 9:47 PM

More FANTASTIC Dave...No breaks around here!!!!Bang Head I'm keeping up on the site as well...Keep it comming!Bow Down

Always Faithful U.S.M.C
  • Member since
    June 2006
Posted by Tankluver on Sunday, April 11, 2010 8:20 PM

Quick question did you paper mache the whole diorama base or was the trench the only part that got paper mached?

  • Member since
    January 2010
  • From: MN
Posted by 101stAirborne on Sunday, April 11, 2010 8:07 PM

can't wait to see it when it is finished.

Models on the bench:

Too many to count!


  • Member since
    October 2007
  • From: Willow Oaks Compound / Model Bunker
Posted by razorboy on Sunday, April 11, 2010 5:50 PM

See you guys when it's done ... there will be no need for conjecture at that point. 

  • Member since
    June 2006
Posted by Tankluver on Sunday, April 11, 2010 5:47 PM

Hes going to use the stugs fender as a mount, look at some of the previous pics and you will see this.

  • Member since
    January 2010
  • From: MN
Posted by 101stAirborne on Sunday, April 11, 2010 5:45 PM

I agree with you dr. coffee, I don't know if firing the 42 would work very well becasue the figure is just holding it with one hand, he would at least have to hold it with both. I've seen footage of a marine shooting a 30 cal like that.

Models on the bench:

Too many to count!


  • Member since
    May 2009
Posted by Dr. Coffee on Sunday, April 11, 2010 4:48 PM

razorboy

I worked a while on the figures today and got some accoutrements attached and a little painting done on MG guy, MG assistant #2 and on Grenade guy #2:
http://i232.photobucket.com/albums/ee2/froglevelzcool/Stug%20III%20build/DSCN33400001.jpg
rb

Is that far right MG firing stance realistic? I used to haul an MG3, a later version of the MG42, and I would never attempt firing from that stance. The weapon is preferably fired supported by the bipod. If I ever were to fire it 'freehand' (I would avoid having to do that, at almost any cost), the ~10-12 kg of weight would be supported hanging from the straps, 'Rambo style', and I would hold the bipod for aim.

The cooling jacket would be too hot to handle, and the weapon is just too heavy to support by arms alone.

DoC

  • Member since
    October 2007
  • From: Willow Oaks Compound / Model Bunker
Posted by razorboy on Tuesday, March 30, 2010 6:08 PM

Thanks Guys, I appreciate your kind comments and following this build.

rb

  • Member since
    February 2007
  • From: Calgary, Alberta, Canada
Posted by T-rex on Tuesday, March 30, 2010 1:11 PM

Wow, I really mean it, fantastic work on the stug and the figures.

Working on: Trumpeter SU-152 (1/35) Trumpeter E-10 (1/35) Heller Somua (1/35)

"The world is your enemy, prince of a thousand enemy. And when they'll find you, they will kill you... but they will have to catch you first ''

  • Member since
    May 2007
  • From: Atlanta, Georgia
Posted by RTimmer on Tuesday, March 30, 2010 12:50 PM

Looking very nice.  Keep us posted.

Cheers,

Rick

  • Member since
    January 2008
  • From: Bournemouth UK
Posted by Bodge on Tuesday, March 30, 2010 12:41 PM

Ditto

  • Member since
    October 2007
  • From: Willow Oaks Compound / Model Bunker
Posted by razorboy on Saturday, March 20, 2010 4:52 AM

Thanks psstoff995, I'll try to update the build this weekend.

http://sitebuilder.yola.com/sites/D69f/D13c/Db70/D8e4/U8a49866a2146f75301214e807bc31f96/8a49866b216966e601217309123d7cce/clearing-the-trench.php


Thanks for following,

razorboy

  • Member since
    December 2003
  • From: Colorado
Posted by psstoff995 on Tuesday, March 16, 2010 10:43 AM

Thanks for the link- looking really good, I really like the trench and the way you added in the paint to the celluclay makes sense to me, I've always gone back in later and painted it as I could never really get the color I wanted to mix well with the moist celluclay (or... in my case sculptamold). I guess it's just a matter of going darker than you think?

I like the idea of only seeing the dead Russian's legs, is he going to be under the roof of the Observation Post? Keep up the good work!

-Chris

US Army Infantryman

  • Member since
    October 2007
  • From: Willow Oaks Compound / Model Bunker
Posted by razorboy on Saturday, March 6, 2010 3:34 PM
  • Member since
    February 2007
  • From: Calgary, Alberta, Canada
Posted by T-rex on Friday, March 5, 2010 11:45 PM

Wow, looking good, keep up the nice progress.

Working on: Trumpeter SU-152 (1/35) Trumpeter E-10 (1/35) Heller Somua (1/35)

"The world is your enemy, prince of a thousand enemy. And when they'll find you, they will kill you... but they will have to catch you first ''

  • Member since
    October 2007
  • From: Willow Oaks Compound / Model Bunker
Posted by razorboy on Friday, March 5, 2010 7:21 PM

I'll give you guys a final update when it's done.  I'm finished with build blogs ..... too much baggage involved.

rb

  • Member since
    October 2007
  • From: Willow Oaks Compound / Model Bunker
Posted by razorboy on Saturday, February 27, 2010 4:04 PM

I worked a while on the figures today and got some accoutrements attached and a little painting done on MG guy, MG assistant #2 and on Grenade guy #2:

rb

  • Member since
    April 2009
  • From: Carmel, IN
Posted by deafpanzer on Friday, February 26, 2010 10:52 AM

RB, no worries... I wasn't sure about the personal gear... like I said I may be wrong earlier.  Last night I read one of great reference books and I saw one wrapped on top of the meal bin.  I am sure Germans did their own ways as it is their personal preferences.  No need to post unless you insist so we can learn more about this. 

Again, you have been doing GREAT and I have been following your build since day one. 

Andy

  • Member since
    October 2007
  • From: Willow Oaks Compound / Model Bunker
Posted by razorboy on Thursday, February 25, 2010 5:19 PM

Thanks Chris, I too have about a dozen or so pics with them in that position .... and besides, Rov Volstad WOULD NOT make that kind of mistake!Big Smile


Dave

  • Member since
    November 2007
  • From: Oregon
Posted by Lufttiger on Thursday, February 25, 2010 11:44 AM

Yeah RB i've seen these too where you have them, so i think your just fine.

www.lufttiger.com

  • Member since
    October 2007
  • From: Willow Oaks Compound / Model Bunker
Posted by razorboy on Wednesday, February 24, 2010 3:15 AM

I will scan and post my reference pic for zehltbahn placement asap. I have seen them attached from higher to lower and this where these landed.

rb

  • Member since
    April 2009
  • From: Carmel, IN
Posted by deafpanzer on Tuesday, February 23, 2010 9:07 PM

Oh man, you are very good at painting camo.  No question about it.  I may be WRONG... only thing doesn't look right to me is that the placement of your zeltbahns.  I believe the zeltbahns is normally packed closer to the bottom because of its weight and the meal bin or other lighter items are at the top.  I looked at German uniforms reference books and I don't see any of pictures showing zeltbahns being that far top.  Just a thought...

Andy

  • Member since
    October 2007
  • From: Willow Oaks Compound / Model Bunker
Posted by razorboy on Tuesday, February 23, 2010 6:32 PM

Thanks Indy, deafpanzer and Lt.,

I have decided to standardize the zeltbahns and have removed the smaller version originally seen on MG42 ammo guys 1 and 2.  The smaller zeltbahn rolls just didn't look acceptable to me.

rb


  • Member since
    November 2007
  • From: Oregon
Posted by Lufttiger on Tuesday, February 23, 2010 1:43 PM

Looking great RB, your painting on those tank figs are excellent, always hard to get those
German camos just right. Looks like your using the ol Dragon  PE headphones?, you
can kinda see how hard those are to bend, i hate them and don't use them anymore.

The wire to them looks really good, i quit using copper wire as well, and now use fishing lure.

Keep up the nice progress mate!

www.lufttiger.com

  • Member since
    April 2009
  • From: Carmel, IN
Posted by deafpanzer on Tuesday, February 23, 2010 10:49 AM

Ditto  I want to see more!  Camo looked AWESOME!  Thanks for sharing...

Andy

JOIN OUR COMMUNITY!

Our community is FREE to join. To participate you must either login or register for an account.

SEARCH FORUMS
FREE NEWSLETTER
By signing up you may also receive reader surveys and occasional special offers. We do not sell, rent or trade our email lists. View our Privacy Policy.