SEARCH FINESCALE.COM

Enter keywords or a search phrase below:

Finishing Winter Groundcover: Snow

2654 views
6 replies
1 rating 2 rating 3 rating 4 rating 5 rating
  • Member since
    April 2007
Finishing Winter Groundcover: Snow
Posted by Leddy on Monday, October 11, 2010 8:35 PM

I have built a snow covered road using Woodland Scenics snow. After it dries  can I put another coat of white glue over it and add more snow or will ruin the original effect by making it lumpy ?  How is snow finished?  Do you add a spray of flat clear acrylic over the entire diorama including the snow?  If so, how far away should it be sprayed?

Thanks for your input!

Leddy

  • Member since
    October 2007
  • From: Louisville, KY
Posted by pordoi on Wednesday, October 13, 2010 8:21 PM

Leddy

I have built a snow covered road using Woodland Scenics snow. After it dries  can I put another coat of white glue over it and add more snow or will ruin the original effect by making it lumpy ?  How is snow finished?  Do you add a spray of flat clear acrylic over the entire diorama including the snow?  If so, how far away should it be sprayed?


You can certainly add some white glue and add depth to the snow covering.  As to how you finish it, it depends on the effect that you want to portray.  Give us a better idea of what you envision to show.


Don

  • Member since
    April 2007
Posted by Leddy on Thursday, October 14, 2010 5:09 PM

On one side of the road are semicirular drifts  that are half full  . The snow is drifting around wagon wreckage on the same side , far end  I wanted to show he snow is drifting around more and filling the drifts up without  losing the effect of depth.  Also. do you finish the snow surface with flat lacquer spray or do no finish spraying?

Thanks!

leddy

  • Member since
    October 2007
  • From: Louisville, KY
Posted by pordoi on Thursday, October 14, 2010 6:39 PM

Depends on how deep you want the drifts.  I might have roughed them out with your base material and finished with a layer or two of snow rather than trying to build them up layer by layer with Woodland Scenics snow.  As for finishing, gloss coat if you want to portray snow that has melted a bit and re-frozen.  If not, I like the finish of Woodlands snow as is.  The Doog had a tutorial not long ago (I think in diorama forum) where he modeled a horse drawn wagon in deep snow.  Search and find that article; it should be a great help.


Don


  • Member since
    June 2008
  • From: Iowa
Posted by Hans von Hammer on Sunday, October 17, 2010 3:21 AM

Have you thought about using expanding foam insulation?  I'm sold on that stuff from now on... You simply apply it, then sculpt it into drifts as it hardens, fine-tune its shape after it dries, paint it white, and then apply whatever "Fresh Snow" material suits ya...  Drives Doog nuts, but I use baking soda more often than not because it has that "sparkle" when the light hits it, and only has to applied in a VERY thin layer...

Also, the foam is easily cut with a knife or "drilled" with a skewer for insertion of trees/brush. telegraph poles, digging foxholes, footprints, vehicle tracks, whatever..  You don't need a foam-cutter to shape it, either... You can get it at about any hardware store...

I used it here on the Flak 36 WIP.  Although this'll be covered in grass & dirt, it shows how you can shape it and raise your "ground" on a flat base, rather than have to actually "Dig" down, or glue foam blocks onto a base.  I use plastic photo box-frames (8 x 10 here) in order to get max depth and it also is really light-weight...
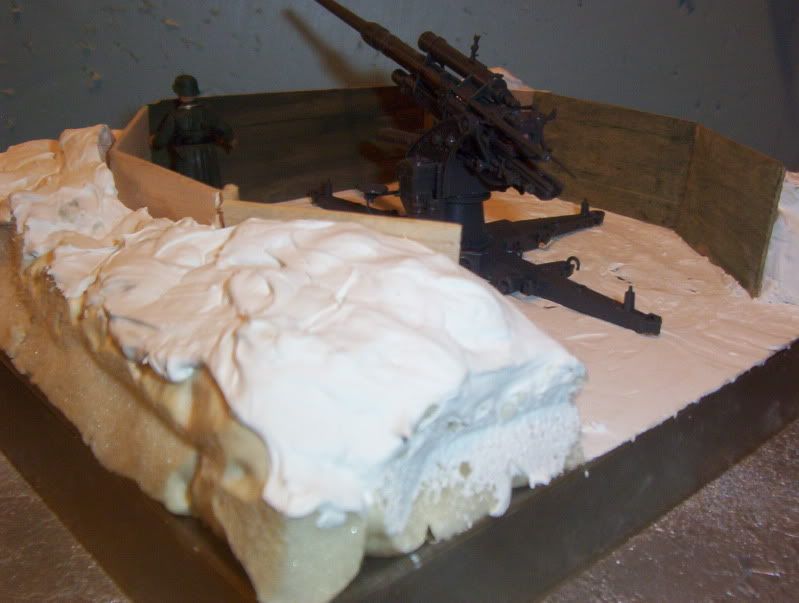
Once it's where I want it, I'll just wrap it with wood veneer...

  • Member since
    April 2007
Posted by Leddy on Monday, October 18, 2010 9:40 PM

Very interesting!  Is this toxic it to breathe around it?  Do you have to take any precautions with it?   How long do you have to work with it before it sets up?"   What part do you wrap with the wood veneer?  The sides of the frames?  Is it sold under a partricular brand name?


Thanks for this information,

Leddy

  • Member since
    June 2008
  • From: Iowa
Posted by Hans von Hammer on Friday, October 22, 2010 8:37 AM

It has a chemical smell.. Doesn't bother me.. Once it's set and cured, it's not toxic. At least, not any more than any other foam.

Precautions? It's vapor is flammable, but no, not really any..... But it's sticky as hell.  Wearing disposable gloves is a good idea.

It's easier to work with it AFTER it sets by carving it, but you CAN push it around, smooth it out, etc.. Working time is about 20 minutes before it's too set..

I wrap the entire base in veneer, or frame it with pine/basswood...  You can also frame it first, then fill it..

The brand I buy is called, "Great Stuff" insulating foam. 

Once you start though, plan on using the entire can.  The foam will harden inside the aplicator tube and clog it in about 20 minutes..

JOIN OUR COMMUNITY!

Our community is FREE to join. To participate you must either login or register for an account.

SEARCH FORUMS
FREE NEWSLETTER
By signing up you may also receive reader surveys and occasional special offers. We do not sell, rent or trade our email lists. View our Privacy Policy.