SEARCH FINESCALE.COM

Enter keywords or a search phrase below:

1:72 Omaha Diorama Suggestions

9155 views
8 replies
1 rating 2 rating 3 rating 4 rating 5 rating
  • Member since
    March 2011
  • From: Łódź, Poland
1:72 Omaha Diorama Suggestions
Posted by Andys on Friday, August 19, 2011 3:39 AM

Hi guys,

I am planning to do an Omaha Diorama in 1:72. I would like to show the Dog Green Sector, which was shown in 'Saving Private Ryan'. I already have the bunkers, and materials for the trenches.

Can you help me with choosing the figures for the US 29th Inf/2nd Rangers?I also don't know which figures I should you for German MG Crews.

Also, would a sunken DD, or a Sherman with Deep Wading kit would be historicaly accurate? I already have an M4 with Deep Wading, and M4A3 105mm with deep wading. Which one would be better?

  • Member since
    June 2008
  • From: Iowa
Posted by Hans von Hammer on Friday, August 19, 2011 2:58 PM

If you're asking about manufacturers, I'm stumped, other than Revell Germany's 1/72 stuff...  Might want to start here, and narrow your subject down..

http://www.google.com/search?tbm=isch&hl=en&source=hp&q=1%2F72+WW2+US+Army+figures&btnG=Search+Images&gbv=2&aq=f&aqi=&aql=&oq=

As for tanks, only four made it ashore in that sector IIRC, the rest were sunk or swamped... Here's a little something I found..

http://www.history.army.mil/html/reference/normandy/TS/OD/OD14.htm

Again, I just know the Revell figures for the Germans, and (not being a smart-azz) I'd use the the figures that're posed with the MGs, (generally MG 42s, although there were some MG 34s around still).. Finding the exact pose for a figure is next to impossible... Although I deal in 1/35th and 1/48, reposing is somethg that every diorama builder should learn, since you limit yourself with the figures that're all SOB...

"Make the figures fit the story, not the story fit the figures" is my first rule of dio-building.... Converting and bashing figures is not as hard as most people seem to think... In 1/72 scale, it's probably the easiest scale to bash and convert in... All it takes is a break-down of basic human anatomy...  Cuat at shoulders, elbows, wrists, neck, hip, thigh, knee and ankle, and finally, the waist, generally at the belt-line.. For more advanced looks, cut just below the shoulder blades to give a figure a "slouched" look when sitting.. GI's in a combat zone don't sit at attention, lol...

What generally happens with figures is that you usually end up buying a box of 'em for one or two poses if you don't learn to convert 'em... Anyway, they're cheap enough so that doesn't matter, lol..

If you want to learn a bit about converting, posing, and painting figures for dioramas, pick up a copy of Shep Paine's book, How to Build Dioramas, which you can get here through Kalmbach Publishing, or (my choice) through AmaazonDOTcom, where you can get it either the 1st or 2nd edition, and can get it new or used (my choice)... I'd also be happy to work with you, back-channel, and send you pictures of some figures as I build them. I'm working in 1/48th right now, but the techniques are the same... Just PM me ("Start Conversation") whenever, if you need help and I'll see what ya got trouble with from the photo yousend....

 This Staff Sergeant came from a combination of Tamiya and Italeri figures, torso and legs being Italeri, and arms Tamiya... The head was also Tamiya (didn't care which one for obvious reasons)...

 The pistol was also scratch-built, since I didn't have a .45 anywhere in my "US Army/USMC Arms Room", and nowhere to go to get one (it was about 0300 when I got to needing it, lol), so I used the grip from a Brit Sten Gun SMG, and made the upper receiver/slide from strip styrene...

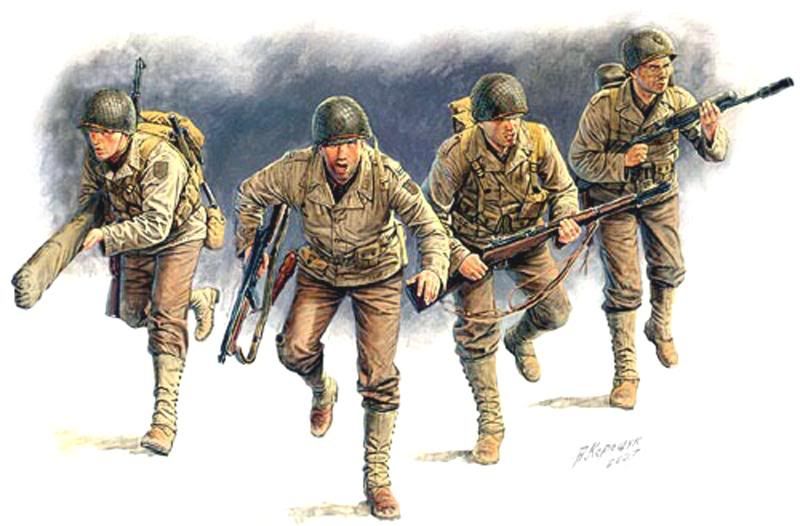
Hope I can help ya further, but untill you lay your hands on some figures, we gotta wait.. Just make sure you get the right uniforms on the figures as well..  Rangers and the 29th's Infantry wore different uniforms (basically, you need figures with the Ranger's Assault Vests and the short Combat Jacket. Skip the Assault Vest for the 29th figures.)

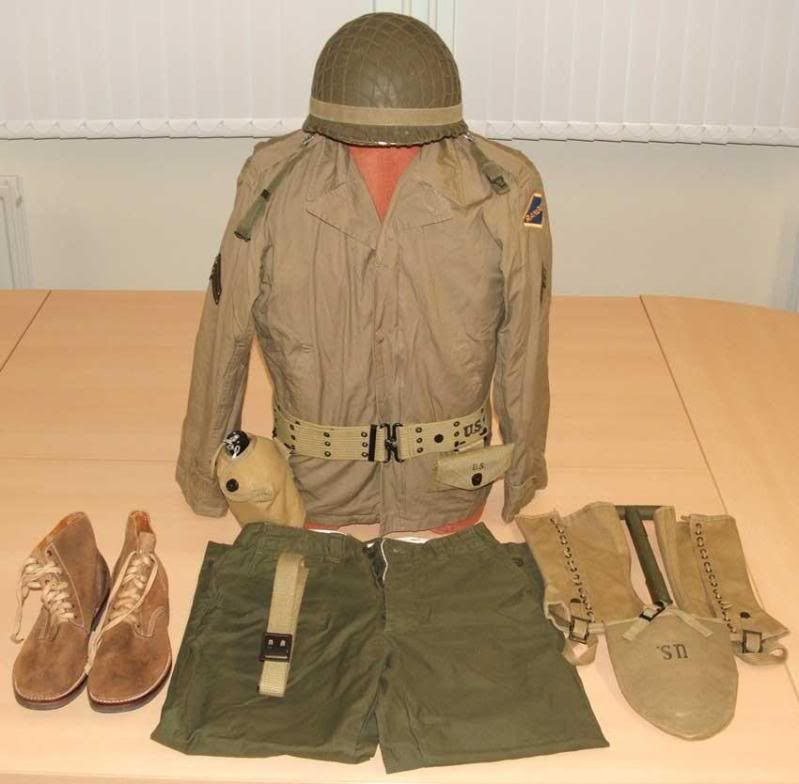
 Note canvas leggings. These were issued to both Rangers and the rest of the US Army, the exception to that rule are the Jump Boots for the Airborne... The short leather leggings weren't issued until late 1944, so watch the figures or you'll be doing putty-work.. Well, actually paint would be enough is 1/72... Also, note the Ranger Assaut Vest. This wasn't issued to regular infantrymen.

29th ID figures would be in1943 Herringbone Twill (HBT) combat fatigues (Same as the 1st ID figures above) with service shoes and leggings, kitted out with M1928 pattern haversack (so would the Rangers) and M1910 trenching tool plus a selection of ammo pouches, first aid pouches and some haversacks and larger ammo bags.

Also, the M1926 US Navy loose fitting life belt was worn around the waist and should also wear the gas detection arm brassard on the upper right arm which was chemically treated material that changed color if chemicals were present, worn early in the Normandy landings...

Subseqent waves didn't bother with them, although the pro-mask was still carried... (Until a GI could find a place to "lose" it... Wink When you're on LPCs (Leather Personel Carriers, ie Boots.) for transportation and carrying everything you need to live in the field with on ya,  the pro-mask is about 5-6 lbs you can lose from your load.....)


 Hope this helped a ittle, and don't be shy about asking for help, especially for a project this large... You'll still need a LOT of space (meaning a large base) for this dio, even though you're planning on 1/72...


  • Member since
    August 2008
  • From: Festus
Posted by monsterravinglooney on Friday, August 19, 2011 7:35 PM

I mentioned this site in another thread, but Plastic Soldiers Review will review 1/72 scale figures buy era. They go over things like quality of sculpting, number of poses, quality of mold and historical accuracy. This link should take you to World War 2, then you can see who makes the right figures you need. Then it's just a matter of finding them at wherever you choose to buy them from.

http://www.plasticsoldierreview.com/PeriodList.aspx?period=1

  • Member since
    March 2011
  • From: Łódź, Poland
Posted by Andys on Saturday, August 20, 2011 5:11 AM

Well, I already know about Plastic Soldier Review, but they haven't reviewed all the sets, and they do not review resin figures. I have found 2 interesting sets of figures, a Pegasus set - Rangers D-Day, their poses are very usable for D-Day Dio, and the set is available in my hobby shop, so I will buy it in a few weeks. I think I'l get the other one too - it's Caesar's US Army Set 1.
http://www.plasticsoldierreview.com/Review.aspx?id=1385

http://www.plasticsoldierreview.com/Review.aspx?id=937

I also have this set:
http://www.dragonmodelsusa.com/dmlusa/prodd.asp?pid=DRA7360
The figures are very nice, but only 6 are included. My painting wasn't that good when I got the set. What do you think of them? Here's the link to my article:
http://www.jadar.com.pl/galerie_bron_panc_72/Dragon%207360/Dragon_736001.html
The text is in Polish. 

  • Member since
    June 2008
  • From: Iowa
Posted by Hans von Hammer on Saturday, August 20, 2011 7:43 AM

The first set looks (to me) typical of many 1/72 figures (military AND civilian) in that they're about useless for dioramas "as is"... The poses are stiff and straight, rather than off-balance... Posing a figure in an off-balance postition goes a long way towards achieving a candid, "Snap-shot" effect, where the viewer knows that that position must mean the figure is "moving", because a real person would fall if that pose was mantained for more than a second or two... Both feet on the ground at the same time is "balanced", and therefore "stationary"...  Off-balance will give the viewer more of an "action and movement"- feeling...

The second set contains a few figures with poses that're much more in line with what I'm talking about, the third set, we're running back towards the first sets problems again...

The LCM is good, as is the tank, although I'd show the figures, a LOT of them, in and going off of the LCM, both down the ramp and going over the side, into the water, to translate a sense of real urgency ...  The tank's problem is the suspension... It's not "sprung", showing a lot of daylight under the tracks (this is the nature of a kit that small.) ...  I thnk it would look better if it were coming out the water, which would serve two purposes; One being that it's a "wading tank", and making it plain to viewer why there's an extension or snorkel over the exhaust and the intakes, the other to hide the track's lack of articulation by submerging it it in the surf... Also, it'd be a nice touch to have some figures wading ashore, which could make use of figures in the first set...


  • Member since
    March 2011
  • From: Łódź, Poland
Posted by Andys on Sunday, August 21, 2011 12:39 PM

I decided to get the second LCM(3) from Dragon with 12 figures of 29th ID, and the Pegasus set. I'll have them in a few weeks. Now, i'll be concentrating on the base, terrain, obstacles, water and bunkers, emplacements and MG nests. The diorama will be approx. 100 cm long (including water) and 40 cm wide.

Could you tell me how long was Dog Green? What did it look like? I know that there were obstacles, and  the shingle with barbed wire, as shown in CoH, and Saving pvt. Ryan. I would like to place 1 bunker on my diorama, but I do not know how much space should be between:
- water and shingle
- shingle and the bunker.
How did the infantry go up the the cliff to the bunkers?

  • Member since
    December 2002
  • From: Massachusetts
Posted by ajlafleche on Sunday, August 21, 2011 6:26 PM

Your big challenge is the distance involved. The tidal area was an average of 275 yards wide. The sea wall/berm was about 15 yards wide. Beyond this was another 200 yards of beach befor the bluffs where the bunkers were locate. That's almost 500 yards, 5 football fields. In 1/72 scale, you'd be talking almost 20 feet.

This is just the tidal area:

View from a pillbox:

Remember, if the women don't find you handsome, they should at least find you handy.

  • Member since
    August 2011
  • From: Cinnaminson, Nj
Posted by thekingofrock97 on Sunday, August 21, 2011 7:19 PM

just a suggestion, remember in SPR when Miller and his squad assault the bunker? Use pulled cotton balls, sprayed orange and black, and put it inside the bunker to portray it being cleared by a flame thrower.

-Phil

  • Member since
    March 2011
  • From: Łódź, Poland
Posted by Andys on Monday, August 22, 2011 1:01 AM

Thanks for the photos and the dimesions ajlafleche, this will really help me out.
Phil, you have a very, very nice idea to use cotton balls to simulate fire. Now I'm gonna need a good figure with a flamethrower.

EDIT: I was still looking for for more figures, and since I am a big fan of Preiser Figures, I enter their site from time to time. The two first sets are D-Day figures - US Airborne and US Infantry. They are marked as new sets for 2011, but they haven't been released. I'll buy them as soon as they go out.

JOIN OUR COMMUNITY!

Our community is FREE to join. To participate you must either login or register for an account.

SEARCH FORUMS
FREE NEWSLETTER
By signing up you may also receive reader surveys and occasional special offers. We do not sell, rent or trade our email lists. View our Privacy Policy.