SEARCH FINESCALE.COM

Enter keywords or a search phrase below:

Aircraft dio base.

8135 views
12 replies
1 rating 2 rating 3 rating 4 rating 5 rating
  • Member since
    December 2002
  • From: Bury St Edmunds, Suffolk, England
Aircraft dio base.
Posted by Bish on Sunday, June 30, 2013 4:39 PM

During my last few aircraft builds, I have had some nice comments regarding my bases. So I thought I would post a little tut on how to make a pretty simple base. The ones I make are for 72nd aircraft, but with a couple of small tweaks, this would work for other scales.

Firstly, the materials. For the base I use a piece of wood, I usually use off cut of chipboard that I may have spare, or old furniture that I just cut to size. I have loads of old bit from wardrobes and work tops in the shed. For aircraft bases, I try to got for something about 2cm thick. Next to the base is a strip of balsa that I use for the surround. I have a selection of these in different thicknesses and they will do for 3 or 4 of the smaller bases.

And here are the materials for the ground work. On the left, there's Celluclay, acrylic paints and scatter materials for the grass. Celluclay can be a bit tricky to use, and I am finding it hard to find at the moment. I know others use different materials for ground work.

On the right is some cardboard, this is for the concrete. For 72nd scale, I find this ideal and readily available. I use cardboard with a rough surface that you find on the inside of model box lids or the out side of the bottom part of the box. And if you use Eduard PE sets, the cardboard in those is ideal. For other scales, you might need something different, I believe sanding paper is useful for larger scales.

Now, for making the base. This one has both grass and concrete. The approach is the same for either a complete grass base or concrete base, just missing out the obvious steps.

Firstly, I put the surround around the base, using the balsa, doing the sides first and then the front and back. The surround is a bit higher than the base, about 2mm or so.

Next, I add the cardboard for the concrete. If you can use one large piece, then great. If you use smaller pieces, try to cut them to the size of the concrete panels. Different country's use different size and sometimes shapes of panels. Try and find a pick of the aircraft you building and you can work out the rough size. Then you can just use the same size for ant other aircraft in that country. For WW2 German, I do panels 14cm x 8cm. If you use one large piece, then score lines in at the required distance.

The cardboard is stuck down with white glue.

Once the cardboard is down, sand the surround down to the level of the cardboard. Where the grass is going to be, I also sand this, but so its irregular and still leaving a bit above the base.

Then I stain and varnish the surround. I prefer to use a separate stain to those coloured varnishes.

Once this is all dry, I mask the surround and paint the concrete. I do this with acrylic paints, starting with a light grey, then all in one sessions, going over with various shades of grey, dark here, light there. Its all done randomly.

After this, I go over it with oil paints. Again going over it in various shades of grey. Once this is dry, I do the same thing again with pastel chalks.

Next up is the soft ground. This starts with Celluclay. The trick with this is not to have to much water in it. It does shrink, and the more water in there, the more it shrinks. Make a little more than you think you will need. In the bowel or what ever you mix it in, it will stay soft for a few days, long enough to see any shrinkage and top up. 

I used to paint Celluclay after it was dry, but that's a real pain. So now I mix the paint into the mix. Keep in mind where your scene is set. I don't get to uptight about it, but for Northern Europe, I would do it darker than say the Med.

Next up is the grass. You can buy the grass mats, but I am not keen on these. They look like well kept bowling greens. If your doing a modern scene, or a WW2 heavy bomber, where they wouldn't go on the grass, they might be ok. But for a lot of WW2 aircraft, they operated from grass. Not only does the aircraft taxy on it, but there's trucks, ground equipment and men on it. 

I have read comments about scatter grass saying its not very realistic. But I like it. I use a mix of lengths, keeping scale in mind, and colours, keeping the location in mind, and scatter them onto white glue.


And that's about it. One final thing is a nameplate if you so wish. I used to use a piece of balsa, stained the same as the surround, and use rub off letters. But this took ages and I often couldn't get them all level. So after reading a couple of threads, I have now changed to printing off nameplates on card, then stuck to a piece of stained balsa and screwed to the base.

All that's left to do now is add your aircraft and other items.

I changed the nameplate when I realised I had put the Staffel on it.

 The base can be built in about a week. But most of that is drying time for the wood and celluclay. Time spent on it is about 3 or 4 hours. An all grass base takes a bit longer than all concrete. The longest session was about 30mins. I start my bases once I get to a stage when I have to start leaving the model to one side to dry. I am to have the base all done and ready by the time the aircraft is done, so it can go straight on.

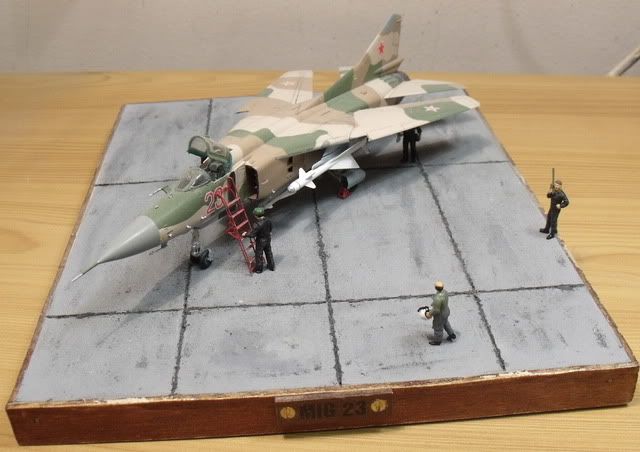
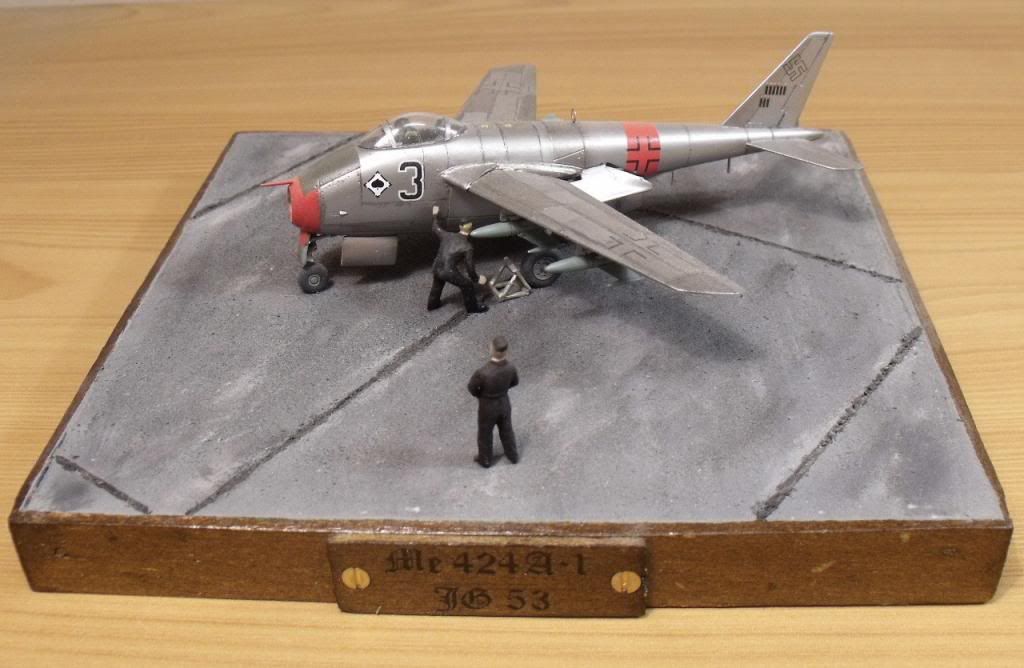
Here's a few other example showing all grass and all concrete bases. The first is an example of what can go wrong with Celluclay. I tried to rush it and added the grass before the celluclay was dry. It then shrank and I didn't want to risk doing more harm than good. So there's a gap of about 1mm all the way around.

These have my older style of nameplate which I used upto my current build. these are going to be changed.

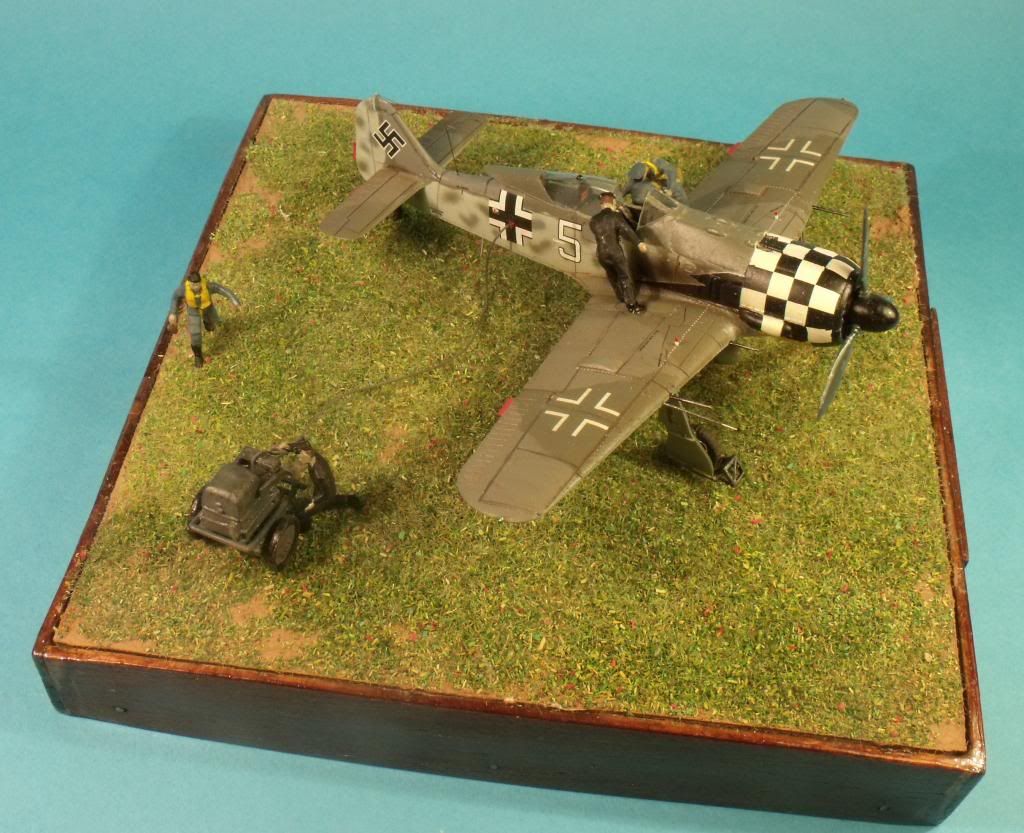
 I have ben using this stuff for years so should have known better.

This one came off much better.

And here's a couple of concrete ones. 

 I hope some of you find this useful. If anyone has any tips, or ideas for different materials, please feel free to add them.

Thanks for looking.

I am a Norfolk man and i glory in being so


On the bench: Airfix 1/72nd Harrier GR.3/Fujimi 1/72nd Ju 87D-3

  • Member since
    November 2010
  • From: Florida-West Central
Posted by Eagle90 on Sunday, June 30, 2013 6:58 PM

BRILLIANT!  Thanks so much Bish!  What a great thread!  You should see if they will put it in FSM sometime.  I think it would be a great article!  Thanks for taking the time to post it!

Eagle90


  • Member since
    April 2006
  • From: Denver, Colorado
Posted by waynec on Monday, July 1, 2013 9:44 AM

some good suggestions bish. i just gave a demo on base building to one of my clubs so if i may add some of my insight without highjacking the post.

unless i need a specific size i will use scap wood or plaques from local craft store. this eliminates using balsa or basswood to edge. i stain the whole think first as a sealant.

i have some celluclay but have not tried it. i use cheap model clay or liquidtex (and tape edges before applying). i also mix an appropriate cheap artist's acrylic color or real dirt with the lqiuidtexbefore applying. i paint the clay after it's down. for higher ground i use scrap wood blocks. WE ARE NOT EXACTLY MATCHING THE FINAL GROUND COLOR, JUST SOMETHING CLOSE SO, IF WE MISS A SPOT, BRIGHT PINK ISN'T SHOWING THROUGH.

i usually use sheet styrene and will stipple it with mr surfacer if i need it rougher but will try cardboard. pet reptile sand works good for desert, dried tea l=eaves mixed with liquidtex for snowy mud, plaster of paris sprinkled on a wet surface for snow.

i add homemeade cast rocks, twigs and scrubs as needed.

Никто не Забыт    (No one is Forgotten)
Ничто не Забыто  (Nothing is Forgotten)


  • Member since
    October 2008
  • From: Georgia
Posted by Rigidrider on Sunday, July 28, 2013 1:15 PM

Good info Bish, I've always admired your bases and the small placards you add to them. I didnt know you were using balsa wood, I thought they were cuts of firring strips. I saw you say you printed your placards but what about the metal looking ones? Were those the rub on transfers you mentioned? I keep a supply of them around too. I'm going to try making one like you do, but have (like Waynec )  just been going to the local second hand store and buying old picture frames or plaques for a buck or two.Great work again, thanks for the info!

Doug

When Life Hands You A Bucket Of Lemons...

Make Lemonade!

Then Sell It Back At $2 Bucks A Glass...

  • Member since
    December 2002
  • From: Bury St Edmunds, Suffolk, England
Posted by Bish on Sunday, July 28, 2013 1:52 PM

Thanks Doug. I have seen those metal ones. I don't have the equipment or ability to do my own. I did buy one for a Chinook I built last year and it was damn expensive. The old nameplates were made with rub off lettering. I did find them a bit tricky but was using them for years. Another problem was that I found I was always using the same letters and numbers. So I have a lot of sets with letter I haven't used but don't have the ones I need. Also, as I was using black letters, it meant I was limited into the type of wood stain I can use.

I have now switched over completely to the printed ones. There's no waste of un used letters, I can add the badges and flags which is a bit more decorative, I can use dark stains and if I make a mistake, I can just print another one.

I have thought in the past about putting picture framing around the bases but I am not sure how it would look with a thick base. And I use basically the same method for my armour bases which are not always as flat as aircraft ones. The sort of base wayne has done they work great on.

I am reluctant to change my base surrounds now as I have a lot already done like this, so I sort of see it as my signature, if that makes sense. The nameplates on the older builds are pretty easy to change.

Some great work there wayne. I really need to work on my armour base's, add more scenery into them.

I am a Norfolk man and i glory in being so


On the bench: Airfix 1/72nd Harrier GR.3/Fujimi 1/72nd Ju 87D-3

  • Member since
    October 2008
  • From: Georgia
Posted by Rigidrider on Monday, July 29, 2013 7:07 PM

Don't blame you a bit Bish... Your bases look great and I have to admit, when you finish a build I look forward to your display!

When Life Hands You A Bucket Of Lemons...

Make Lemonade!

Then Sell It Back At $2 Bucks A Glass...

  • Member since
    April 2004
  • From: Boston MA
Posted by vespa boy on Tuesday, July 30, 2013 8:49 AM

Those are some nice looking bases. Thanks for the step by step.

http://public.fotki.com/nkhandekar

This ain't no Mudd Club, or C.B.G.B.,
I ain't got time for that now

  • Member since
    July 2013
Posted by IL2windhawk on Thursday, August 1, 2013 5:13 PM

Great post

  1/32 Revell Duo Discus
  1/32 Revell ASK-21
  1/48 Ardpol SZD-51 Junior
  1/48 Czech Models Grumman Goose
  1/144 FineMolds Millennium Falcon

G-J
  • Member since
    July 2012
Posted by G-J on Saturday, August 3, 2013 7:41 PM

Awesome how-to!  Thanks for posting this.

On the bench:  Tamyia Mosquito Mk. VI for the '44 group build.  Yes, still.

On deck: 

  • Member since
    June 2013
  • From: Jax, FL
Posted by Viejo on Wednesday, October 23, 2013 8:29 PM
What g-j said x 10

  • Member since
    December 2002
  • From: Bury St Edmunds, Suffolk, England
Posted by Bish on Monday, October 28, 2013 5:29 PM

Thanks for the replies guys, sorry I didn't get back to you sooner. I hope your able to make some use of this for ideas for your own.

Doug, there will be three more bases coming up soon.

With models attached of course Wink

I am a Norfolk man and i glory in being so


On the bench: Airfix 1/72nd Harrier GR.3/Fujimi 1/72nd Ju 87D-3

  • Member since
    December 2002
Posted by 7474 on Tuesday, October 29, 2013 12:58 PM

Awesome tutorial, but one question. What would you use for oil and fuel stains, especially for when radial engines mark their territory?

  • Member since
    December 2002
  • From: Bury St Edmunds, Suffolk, England
Posted by Bish on Tuesday, October 29, 2013 1:12 PM

Thanks. On the Stuka, I used some thinned black paint. You can see one small black spec and there a larger one under the engine. But I don't think it is that effective. As you can see on the concrete bases, I haven't used any, when I think there should be, especially for the WW2 aircraft. So this is something I need to look into.

The He 111Z I am currently doing is also going to be a engine maintenance dio like the Stuka but on a bigger scale. So I am going to experiment with a few things. I am also going to get the AK interactive Fuel Stains, Engine Grime and fresh engine oil products next month. This are mainly for vehicle engines, but I think they might work for stains on the ground as well, we will see.

If anyone else has any suggestion's, please feel free to share.

And thanks for brining it up 7474. Its one area I have been neglecting but I think makes a difference to a base, especially when your actually doing a scene with the engine being worked on.

I am a Norfolk man and i glory in being so


On the bench: Airfix 1/72nd Harrier GR.3/Fujimi 1/72nd Ju 87D-3

JOIN OUR COMMUNITY!

Our community is FREE to join. To participate you must either login or register for an account.

SEARCH FORUMS
FREE NEWSLETTER
By signing up you may also receive reader surveys and occasional special offers. We do not sell, rent or trade our email lists. View our Privacy Policy.