SEARCH FINESCALE.COM

Enter keywords or a search phrase below:

1/48 B-17 Group Build...ALL INVITED TO JOIN!

680413 views
1413 replies
1 rating 2 rating 3 rating 4 rating 5 rating
  • Member since
    September 2006
  • From: Bethlehem PA
Posted by the Baron on Monday, December 22, 2008 12:02 PM
 Vintage Aircraft wrote:

Here are some pictures of the B-17E I have been working on for awhile.  I used the Revell F body and the G wings and some of the G interior parts as well.  Everything else was mostly scratch built with the addition of some resin parts.

The ring turret mount in the radio gunners comparment.

Inner flap detail

Top turret and cockpit ceiling detail

Reshaped propellers and engine detail

Wheel well detail 

Interior pics

I have gotten a bit farther since these pictures were taken about 2 years ago, the interior is almost done, Im still trying to find a set of Paragon Bomb bay doors to install though.


VA


Wow, VA, that is some superb scratching!  Too bad you're not working at Revell/Monogram any more, your work could have been the basis for a revived series of "Tips on Building Dioramas" brochures.

The bigger the government, the smaller the citizen.


  • Member since
    March 2008
  • From: Ohio
Posted by B-17 Guy on Monday, December 22, 2008 2:30 PM

Yeah VA.....maybe you could talk to someone at revell and maybe light a fire under someones arse to get that retooled B-17 going again....had to take a shot.

Tiny.....Here are a few pics that might help you in weathering.

http://upload.wikimedia.org/wikipedia/commons/d/dc/B-17_bw_left_inflight.jpg

http://www.historylink101.com/ww2photo/b-17.jpg

http://www.ww2incolor.com/gallery/albums/black_and_white/B_17_flying_fortress_formation1.jpg

http://www.historylink101.com/ww2photo/b-17-over-germany.jpg

http://upload.wikimedia.org/wikipedia/commons/2/2a/Memphis_Belle.jpg

http://upload.wikimedia.org/wikipedia/commons/2/2a/Memphis_Belle.jpg

Hope these help ya. Most of the exhaust would exit from the underside of the wings, the engine nnacelles would also be very dirty behind the engine cowls. The upper surfaces of the wing would mostly be dirty directly on top of each engine nacelle streaking back from there. The 4 vents behind each engine would have little to no streaking. There are small vents all the way around each engine nacelle after the engine cowls that would be very dirty and streaked back. And suprisingly nothing really streaks straight back. I cant find goog enough pics to show you though. 

  • Member since
    May 2004
  • From: A little place I call earth
Posted by Vintage Aircraft on Monday, December 22, 2008 4:38 PM
 the Baron wrote:

Wow, VA, that is some superb scratching!  Too bad you're not working at Revell/Monogram any more, your work could have been the basis for a revived series of "Tips on Building Dioramas" brochures.

Actually that is what this project was going to be for.  Before R&M was bought out I had started to put in motion the idea of remaking the inserts by Shepard Pain (I actually know the man personally) The guys at R&M loved the idea and wanted to see the finished B-17s I was making ( the pics I posted were taken by the photographer Gerry at R&M) I had planned to make a series of aircraft models based in the Pacific. The B-17, B-25, and B-29 were to be the subjects. Each one would showcase different techniques and after market parts. They would show how easy it is to update the kits and I hoped they would inspire young builders when they saw them, much as the originals by Shep had done.

VA

  • Member since
    October 2008
  • From: Windsor Ontario Canada
Posted by -Tiny- on Monday, December 22, 2008 6:28 PM

Thanks for the pics B-17 Guy, they'll help out for sure if I decide to go that route.  I'm going to complete the entire bird, than decide if I'm going to wheather it.  I did find a decent set of pics online...

http://www.aircraftresourcecenter.com/Gal4/3401-3500/gal3419_B17_Patterson/00.shtm

I see what you mean about most of the sut buildup being on top of the wings...Thanks again brother.

On the go...Trumpeter 1/72 Tupolev Bear Soviet Heavy bomber...Tamiya 1/48 RAF DeHavilland Mosquiot Mk.II
  • Member since
    October 2008
  • From: Windsor Ontario Canada
Posted by -Tiny- on Tuesday, December 23, 2008 10:33 AM

Well guys, its so close to being done.  I'm about 98% finnished.  All thats left is a little minor assembly and paint. 

I had great results with the decals...good bite...good coverage with the dullcote.

Well, if I go hard at it today, she should be finnished. 


On the go...Trumpeter 1/72 Tupolev Bear Soviet Heavy bomber...Tamiya 1/48 RAF DeHavilland Mosquiot Mk.II
  • Member since
    August 2006
  • From: The Great State of Wyoming
Posted by wyoroy on Tuesday, December 23, 2008 3:27 PM
Adam, looking sweet.

Roy (Capt. Wyoroy FAAGB/USNFAWGB)

John 3:16

  • Member since
    June 2008
Posted by RobbieD on Tuesday, December 23, 2008 3:29 PM
Looking good!  You're doing some great work; definitely one to be proud of.
  • Member since
    May 2004
  • From: A little place I call earth
Posted by Vintage Aircraft on Tuesday, December 23, 2008 4:31 PM

Thats a great looking build there, very clean lines and nice looking.  Good job!

VA

  • Member since
    October 2008
  • From: Windsor Ontario Canada
Posted by -Tiny- on Tuesday, December 23, 2008 4:32 PM

Thanks guys, apreciate it.

On the go...Trumpeter 1/72 Tupolev Bear Soviet Heavy bomber...Tamiya 1/48 RAF DeHavilland Mosquiot Mk.II
  • Member since
    November 2008
  • From: cleveland
Posted by uglygoat on Tuesday, December 23, 2008 7:47 PM

all builds are looking good guys!  i've not touched mine, switched gears whilst waiting for the airbrush to arrive(it has).  in the mean time i was working on giftmas presents: a 48th scale corsair for my brother, and a 1/700 scale uss. cleveland class cruiser for my grandfather, the ship he served on.  both were in the navy. 

sorry about the shittty picture...

my brother is younger than me, but the corsair is his favorite plane and he had a model of it from our youth that he destroyed, and i'm being cheap this giftmas making stuff for folks i care about.  ;)


edit: tiny, i think your bird looks sweet, and i'd keep it museum quality... that's kinda my m.o. though, like i was walking through Wright Patterson...

and vintage aircraft, it's awesome to see your work.  the g model was one of my favorites when i was growing up, i still have the weathering phamplet that came in the kit.

  • Member since
    October 2007
  • From: Inland Northwest
Posted by Summit on Tuesday, December 23, 2008 7:56 PM
 uglygoat wrote:

 I'm being cheap this giftmas making stuff for folks i care about.  ;)


Thats not being cheap, Gifts like that are Priceless to the reciever. Thumbs Up [tup] Thumbs Up [tup]

Adam - Wow, I cant believe you have almost got her done. Fantastic workmanship ! Are you going to hang her from the ceiling or do you have shelf space large enough ?


Sean "I've reached nearly fifty years of age with my system." Weekend GB 2008
  • Member since
    October 2008
  • From: Windsor Ontario Canada
Posted by -Tiny- on Tuesday, December 23, 2008 11:29 PM

I totally agree, building pieces for loved ones is a great gift, better than anything that can be bought.  I've built pieces for people and they loved and still have them today.

Summit - Thanks bud, thanks for the kind words.  I played around with some crushed chalk today...I think I like it.  I added some exhaust staining to one of the engines and the wing so far...it looks real nice.  I was kind of afraid to mess it up, but it looks fine so far...I'll have some final pictures probably next week.  I'm out of town until the weekend, so she's on hold for now. 

To answer your question, I will hang it on the ceiling next to my B-29.  I have no room to shelve something this size...plenty of room up in the air though.

I just want to wish everyone a very merry Christmas...see you all in a few days!

On the go...Trumpeter 1/72 Tupolev Bear Soviet Heavy bomber...Tamiya 1/48 RAF DeHavilland Mosquiot Mk.II
  • Member since
    October 2008
  • From: Windsor Ontario Canada
Posted by -Tiny- on Sunday, December 28, 2008 8:16 PM

Well guys, hope everyone had a great turkey dinner...and a few turkey sandwiches too.

I busted out some crushed chalk and a brush when I got home from the holidays.  All I can say is...she aint so clean anymore! Check her out...

For my first exterior weathering job, I don't think its turning out all that bad.  I've got only the top of the wings done and a bit of the tail.  Going to keep going at it and start on the belly tomorrow maybe.  Let me know what you guys think...Thanks!

On the go...Trumpeter 1/72 Tupolev Bear Soviet Heavy bomber...Tamiya 1/48 RAF DeHavilland Mosquiot Mk.II
  • Member since
    May 2004
  • From: A little place I call earth
Posted by Vintage Aircraft on Sunday, December 28, 2008 10:01 PM

Very nice looking fort there, I liek the weathering on it as well.

VA

  • Member since
    October 2007
  • From: Inland Northwest
Posted by Summit on Sunday, December 28, 2008 10:16 PM

Adam - Wow ! You have really grimed her up Thumbs Up [tup] The fuse is way too clean though , maybe you can find some pictures of Flak burns and add a couple to break it up. Maybe even some white or grey pastel streaking would help blend it in. 

Thats why I hate weathering, too little or too much it seems. 

You sure have done a Fantastic job building this one up. Smile [:)]Wow!! [wow]

Sean "I've reached nearly fifty years of age with my system." Weekend GB 2008
  • Member since
    October 2008
  • From: Windsor Ontario Canada
Posted by -Tiny- on Sunday, December 28, 2008 11:15 PM

I agree the fuse is too clean...havn't gotten to it yet.  All that is done so far is the tops of the wings.  I'll look into the flak stains though...thanks bud.


On the go...Trumpeter 1/72 Tupolev Bear Soviet Heavy bomber...Tamiya 1/48 RAF DeHavilland Mosquiot Mk.II
  • Member since
    June 2008
  • From: Iowa
Posted by Hans von Hammer on Monday, December 29, 2008 2:02 AM

Gotta be honest with ya, Tiny... It looks like all four engines have been on fire, or they flew trail with one that was, rather than exhaust stains...  There's heavy streaking where there isn't even a source for it, pard... Might wanna tone that stuff down a bit with some thinned OD or pastels...   Having the paint stained from smoke from a previous mission's engine fire is ok on one engine, with some staining on the horizontal stab as well (like you did on Number Three), but it looks like all of them have burned at one time or another (possible, but highly unlikely)... You want it to look operational for sure, like a veteran of "Big Week" or something where the crews were flyin' every day for a spell, but not so beat-up that it should be declared a "War-Weary" and turned into a Hangar Queen or Assembly Ship... The aircraft DID get cleaned semi-regularly by the ground crews, as well as Mother Nature's Plane Wash in the British climate..

One of "my" (actually stole it from Shep Paine) detailing techniques is to add repaired flak damage, showing repair's location with darker (or lighter, doesn't matter) patches of the base-OD or grey over the sheet metal patches (Sheet metal repairs were usually nothing more than a small patch of aircraft aluminum pop-riveted over the holes and painted).  I simulate it with super-thin pieces of styrene strip glued onto the skin in various places.  Shrapnel and bullets that hit the fuel cells would show some streaking from leaking fuel at the holes as well, since there'd be some fuel loss before the rubber in the self-sealing tanks "gooed-up" and sealed the leaks...

Keep 'em flyin' Pard!


  • Member since
    January 2007
Posted by Gigatron on Monday, December 29, 2008 10:29 AM

Hey Tiny,

I have to agree with Hans, on this one.  The technique is great, but I'm almost 100% positive that 17s vented out the bottom (maybe earlier varients vented elsewhere, I'm not sure).  The exhaust ports ran along the engine nacelles and exited on both sides of the superchargers.

-Fred


  • Member since
    October 2008
  • From: Windsor Ontario Canada
Posted by -Tiny- on Monday, December 29, 2008 11:03 AM

Well it's a good thing I used the crushed chalk...It wipes off with water and a paper towel.  I thought that exhaust came from the cowelling or flaps that open around the front of the engines...

Anyways, I'll get her fixed up, thanks guys.

On the go...Trumpeter 1/72 Tupolev Bear Soviet Heavy bomber...Tamiya 1/48 RAF DeHavilland Mosquiot Mk.II
  • Member since
    March 2008
  • From: Ohio
Posted by B-17 Guy on Monday, December 29, 2008 6:02 PM

Ok....my turn. While I do agree that the weathering is a bit on the heavy side (mostly on the wings alone) the engine nacelle's look good to me. I think you can tone it down a bit but other wise it's ok, especially on your first try at this. Weathering is not that hard, but it's not that easy either, just takes practice. Hans and gigatron are correct BUT the the top of the wings can get pretty damn dirty. Especially the nacelles and the at the highest part of the nacelle it would streak back to the back of the wing. And while the 1-3 engines would streak straight back, number 4 for some reason would streak towards the fuselage as it went back. It's really hard to explain it.

I'm going nuts here, I'm trying to find a GOOD overhead view of a B-17 in flight that shows the dirt on the upper half of the wings....and dammit, cant find one! I have a few in book's but I dont have a scanner and tried to take a pic with my camera from the book but cant get it to come out good enough. Here's the best I could do: 

http://www.91stbombgroup.com/photo_history/401climb.html

http://northstargallery.com/Aircraft/B17/historicalphoto/46.htm

http://en.wikipedia.org/wiki/File:Living_Legends.JPG

Tiny......your doing just fine, just lighten it up a little and you'll be golden. I wish I could help more but I just cant find a good enough pic for ya. 


  • Member since
    March 2008
  • From: Ohio
Posted by B-17 Guy on Monday, December 29, 2008 6:07 PM
 -Tiny- wrote:

  I thought that exhaust came from the cowelling or flaps that open around the front of the engines...

Yes and no. MOST of the exhaust does come from underneath, after the turbo's but SOME comes from behind the cowl flaps. There are little vents all around each engine nacelle after the cowl flaps. If you look at some pics that show the the whole engine nacelle you will see it. Again, hard to explain, I cant find a good pic for ya.

  • Member since
    October 2008
  • From: Windsor Ontario Canada
Posted by -Tiny- on Monday, December 29, 2008 6:25 PM
Thanks Guy...I went over her with a few wet paper towels today.  It toned it down considerably...the right wing is a bit darker than the left because I re-did it a couple more times and the chalk just etched itself into the dullcote...it still looks decent though...I might do a little dry-brushing as well to tone it down even more...where would a lighter coloured grime accumilate, if at all?
On the go...Trumpeter 1/72 Tupolev Bear Soviet Heavy bomber...Tamiya 1/48 RAF DeHavilland Mosquiot Mk.II
  • Member since
    December 2005
  • From: DSM, Iowa
Posted by viper_mp on Monday, December 29, 2008 9:31 PM

Tiny-  That -17 looks amazing.  The weathering is great. 

This whole thread has me itching to break out one or both of my -G's.  I have every resin and PE set made for them. [including spares just in case].  Think it might be time to chuck a new grinder bit in the dremel and get to work....Anyone know if they make metal gear legs for it?  Something tells me the resin nose to tail and 7-10 PE sets per plane might compromise the structural integrity of the plastic gear struts. 

Rob Folden

Secretary / Webmaster- IPMS Plastic Surgeons Member at Large-IPMS Hawkeye Modelers

  • Member since
    August 2015
Posted by sf_plane_nut on Monday, December 29, 2008 10:21 PM
well i guess i wont be able to join in as i just got my hands on the academy 1/72 F...now i need the eduard photoetch set and some decals...i will probably get the quick boost or is it cmk cowlings and the quick boost engine set...might take me a hot minute to get it all together...everybodys forts are looking good though...after this one in have been thinking about the 1/48 visible and go detail crazy with it...

cant wait to see what everybody does here though...i know i will get some good ideas...
  • Member since
    June 2008
  • From: Iowa
Posted by Hans von Hammer on Tuesday, December 30, 2008 9:07 AM

Something tells me the resin nose to tail and 7-10 PE sets per plane might compromise the structural integrity of the plastic gear struts.

You can if you want, but the Fort's stock gear struts are some of the most robust I've ever seen on a plastic kit...  Where you'd have a weight issue is the gear bays' attachment points to the lower wing. Those you'd likely have to beef up... Wouldn't hurt to re-enforce the geat-to-wheel joint either, if it's it's a LOT of weight.  I'd drill a hole through the outside hub and into the axle to have some of the extra weight taken up by the outside wheel-half, unless you've got solid resin wheels for it... Much as I hate AM parts, they can help this kit a bit in the engines and crew areas (except the tail, nothing's viewable back there)...

Frankly speaking, there's not a whole lot that can be seen inside the fuselage as far as superdetailing goes unless you open the rear crew door, tailgunner escape hatch, and forward hatch.  Also, I'd recommend that you model the waist a radio hatchs open, as well as the flightdeck side windows and bomb bay if you're going that route.  I'd recommend also that you super-detail the hatch's insides as well then... If you go "open" on the radio compartment, be sure to add the 3 jump-seats for the waist and ball gunners (that's where the gunners sat for take-off and landing).  People leave those out for some reason when they go all-out on the interiors. Oh, and don't fergit th' toidie in the waist... It's the first thing you'll see through an open waist door...     


  • Member since
    December 2005
  • From: DSM, Iowa
Posted by viper_mp on Tuesday, December 30, 2008 4:15 PM
Hans- Thanks for the info.  I do indeed have resin wheels, but I might slip a brass rod through the hub.  I also have resin for the nose, cockpit, nav/radio room, bombay, waist, engines and a few other areas.  And a ton of PE.  I plan on opening all of the hatches, as it is NOT the visible version.  I have been in, and photographed 4 different G's, including the backsides of the hatches.  Might even open the ball-turret hatch. And I'm thinking some LEDs might be good too.

Rob Folden

Secretary / Webmaster- IPMS Plastic Surgeons Member at Large-IPMS Hawkeye Modelers

  • Member since
    January 2007
Posted by Gigatron on Tuesday, December 30, 2008 5:30 PM

Viper, do you have any pics of the jump seats that Hans mentioned?  None of my reference shows any of these.

I'm working with the Aero Detail 19 (B-17G) and The Great Book of WII Planes and neither show pictures of jump seats.  Eduards PE sets don't provide parts for them either, but then again, they used Aero Detail 19 as one of their references.

-Fred


  • Member since
    September 2006
  • From: Bethlehem PA
Posted by the Baron on Tuesday, December 30, 2008 6:10 PM
It may have been posted already in this thread, but I got the latest Squadron catalog today, and I saw that Revell has re-issued their B-17F kit, with markings as the "Memphis Belle".  If I had known they were going to do that, I wouldn't have bid on them in eBay auctions.  And I paid more than Revell's current asking price, too Sad [:(], well, not too much more, but still.  Argh!

The bigger the government, the smaller the citizen.


  • Member since
    October 2008
  • From: Windsor Ontario Canada
Posted by -Tiny- on Tuesday, December 30, 2008 7:24 PM

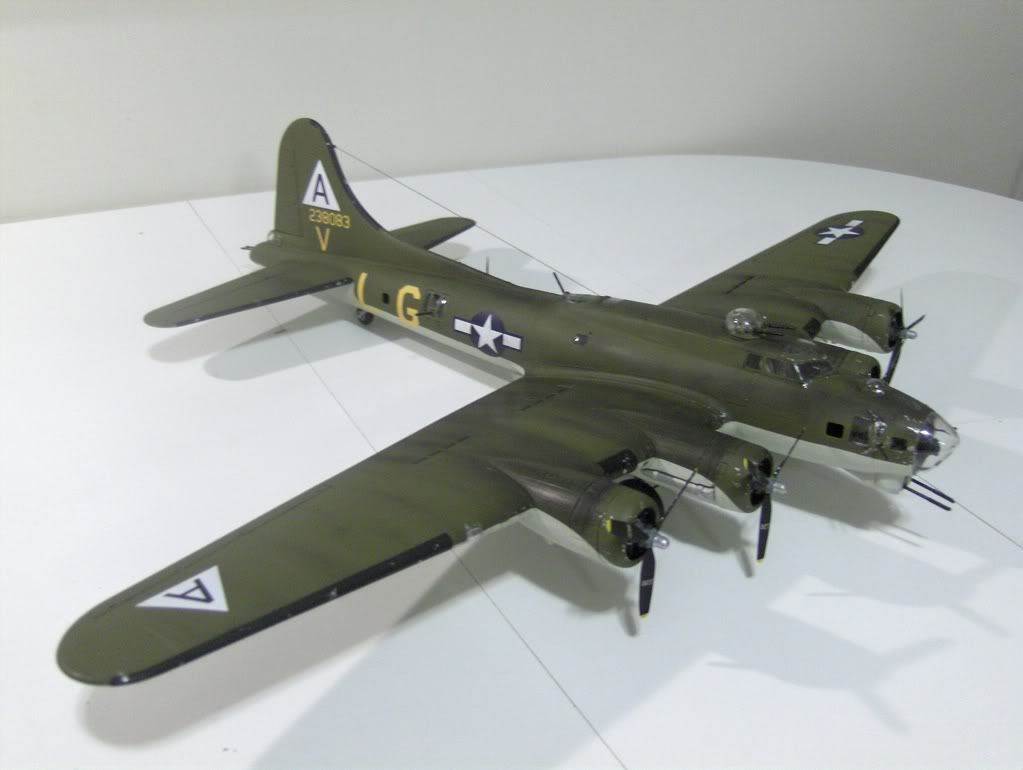
Well guys, I'm callin' it...she's done.  I finished her this afternoon around 6. 

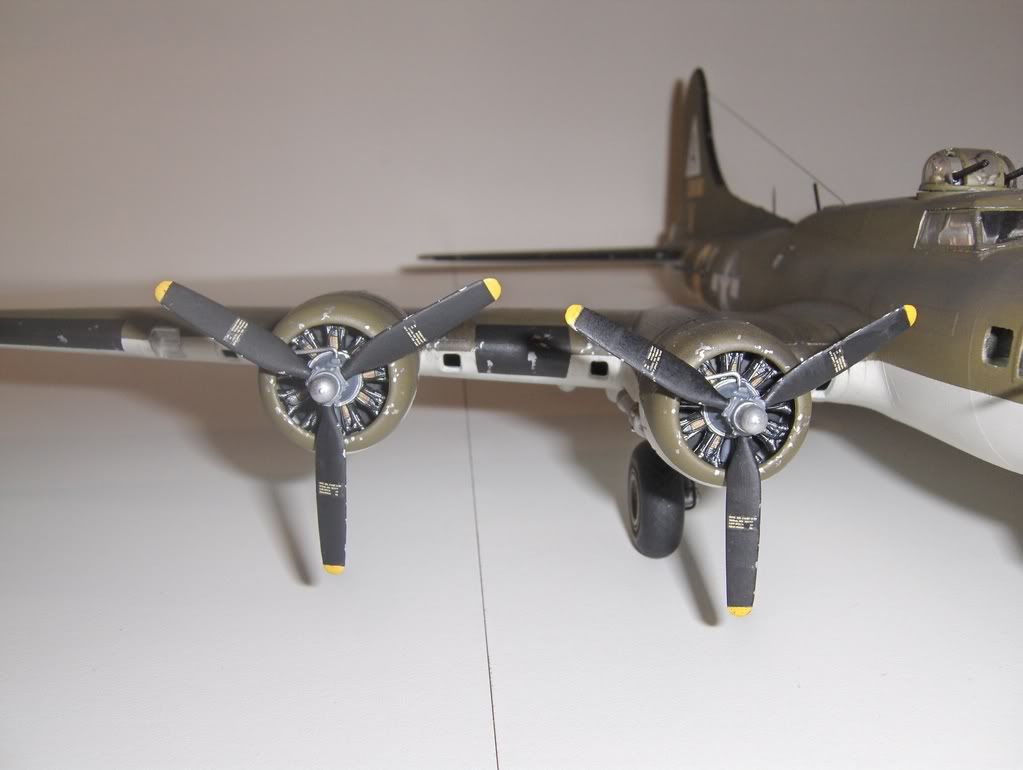
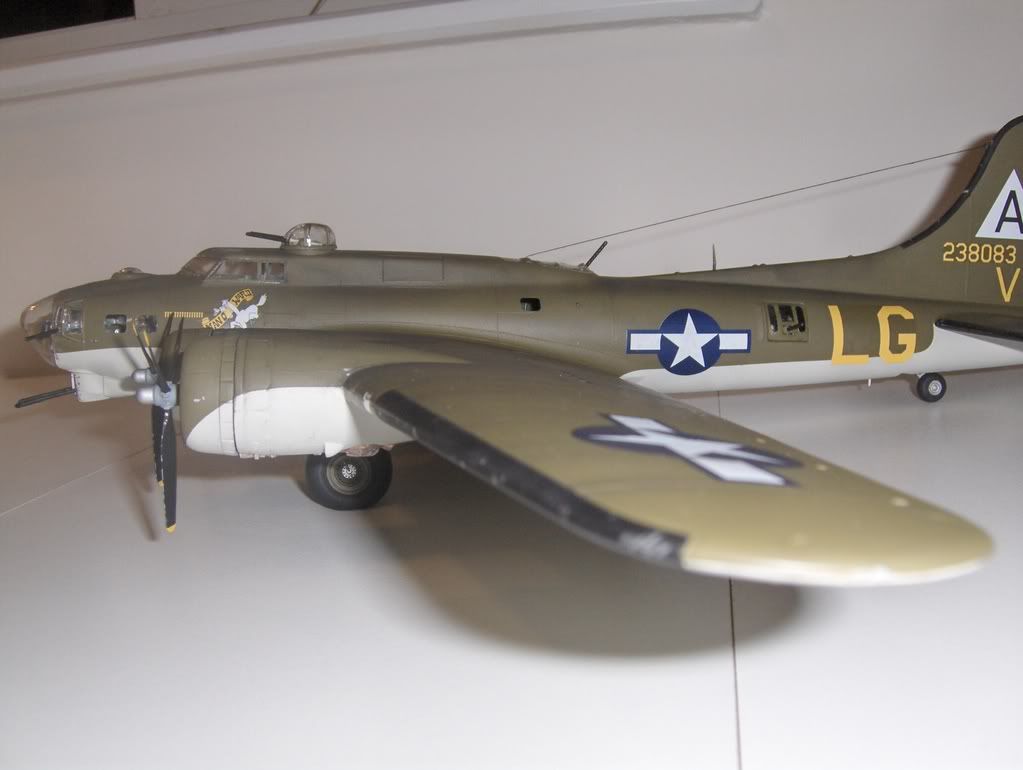
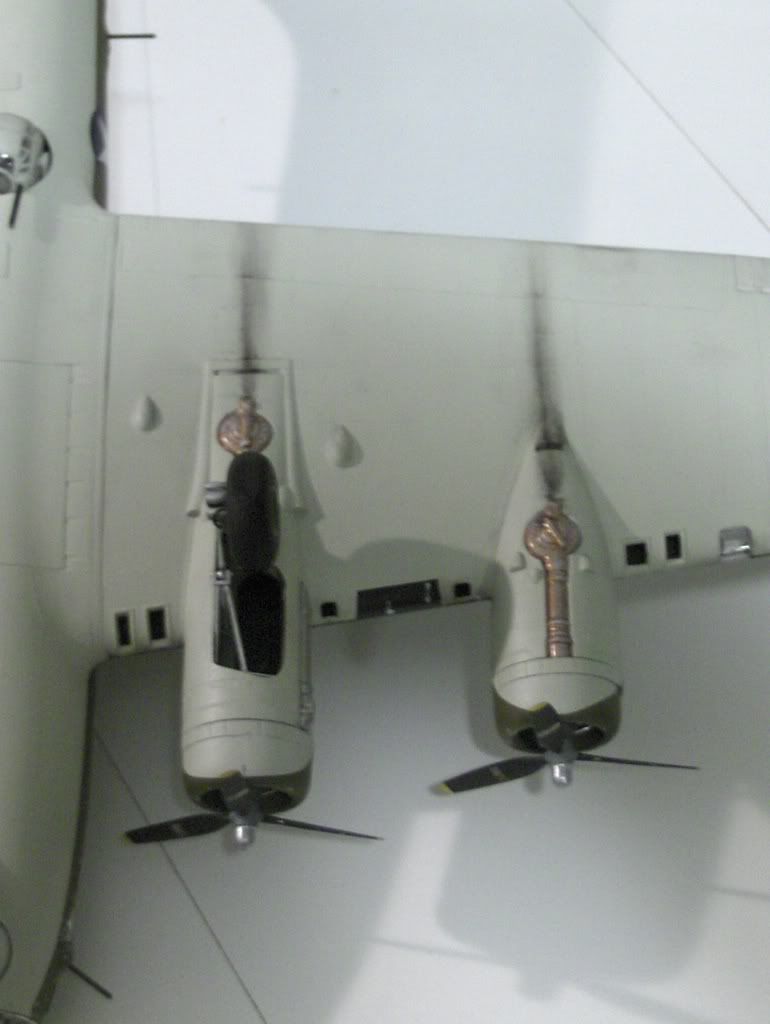
Well, I figured you can't have weathering without a little paint chipping.  I like this method way better than the salt crystal method...just painted it on...who knew!


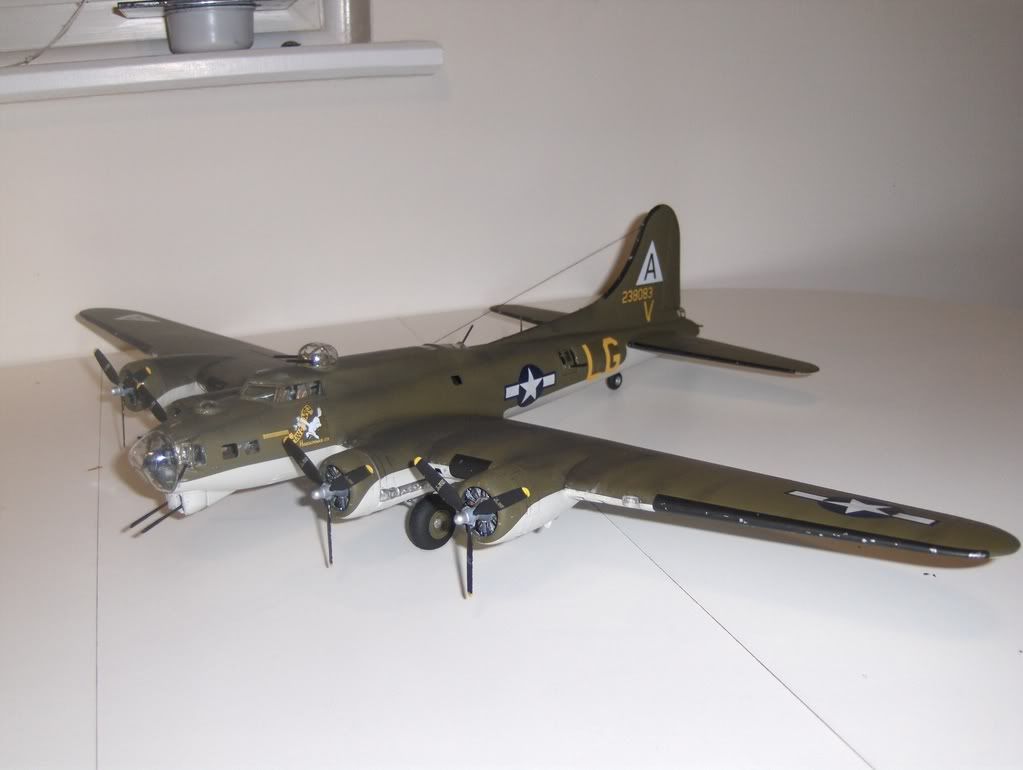
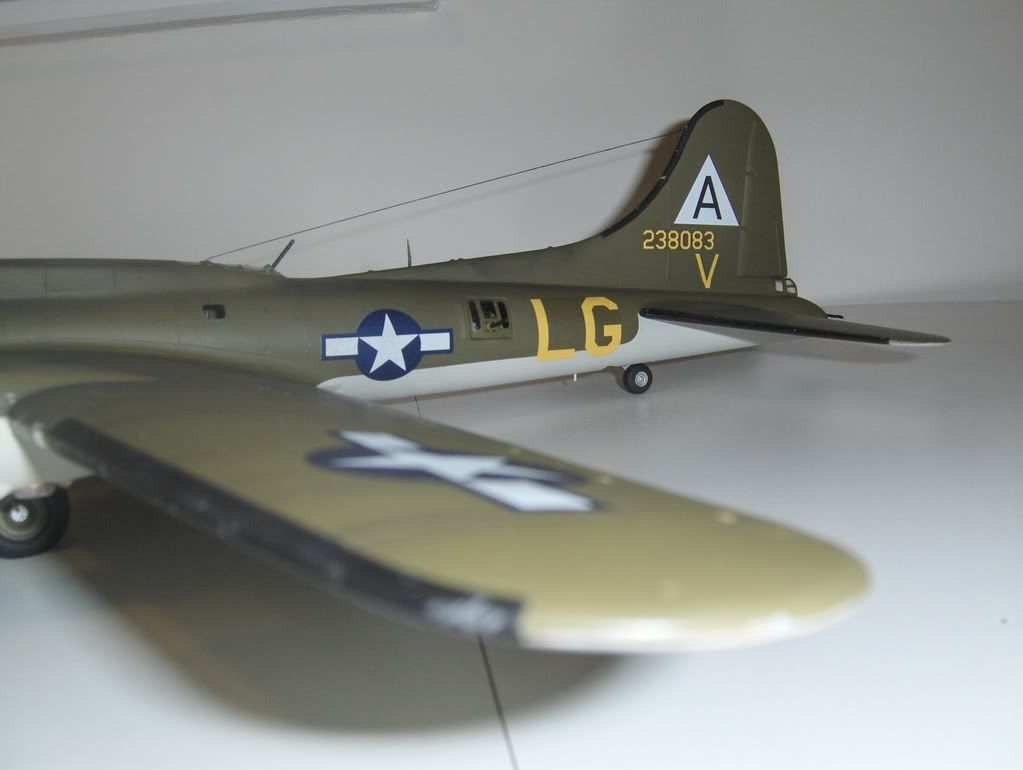
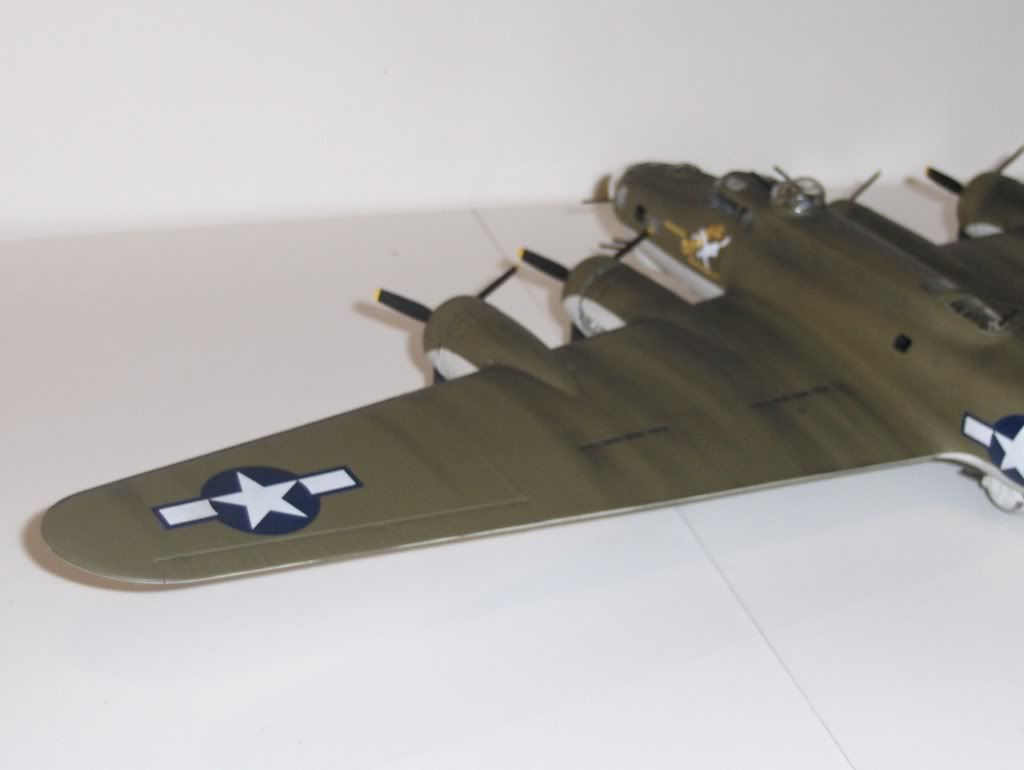
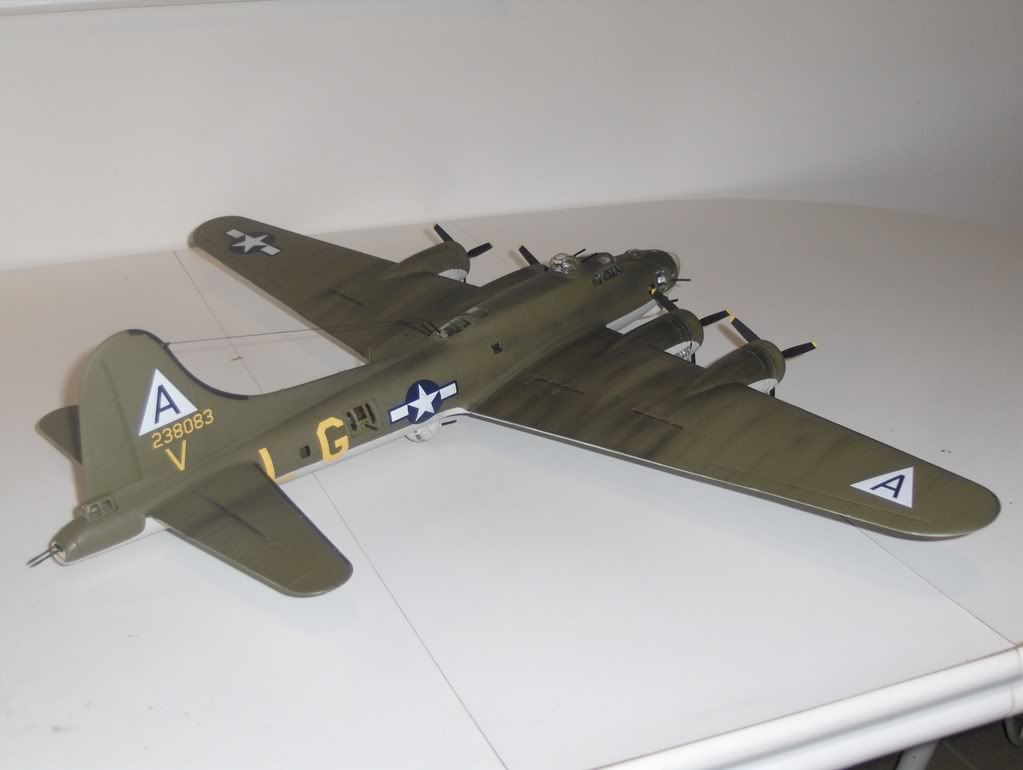
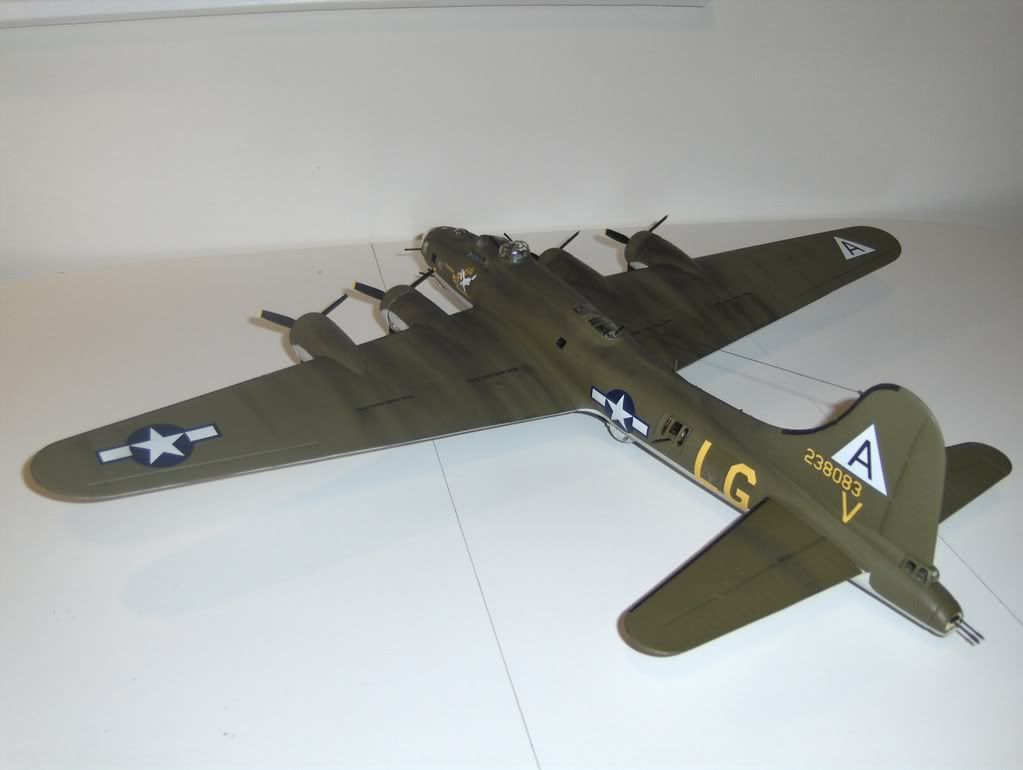
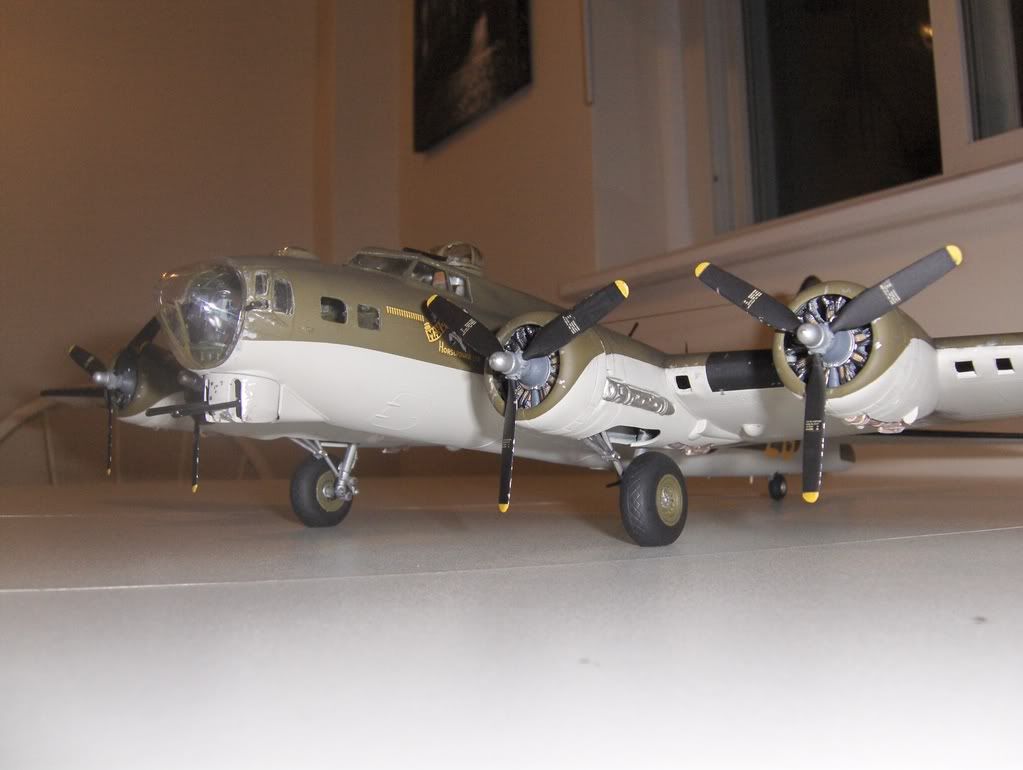
Well, for my fifth aircraft and the first weathering job in my collection, I can say that I'm really proud of this piece...Never have I put so much work into a piece of plastic before...I know it's not perfect or a close match to the real plane, but I love it. I used to pump out 3 or 4 cars a month when I did them...I have much more respect for aircraft modeling now.

I want to thank everyone who helped me out along the way.  Especially B-17 Guy and Hans von Hammer, thanks again for the bomb racks.  All of your tips, suggestions and critiques are very much apreciated...couldn't have done it without your help. 

Just because I'm done, doesn't mean I'm not going to keep tabs on the group.  I really hope I see some more progress soon...things have kind of died off latley.  I know it's a busy time for all of us, but the holidays are over...SO GET BACK TO WORK! Smile,Wink, & Grin [swg]

On the go...Trumpeter 1/72 Tupolev Bear Soviet Heavy bomber...Tamiya 1/48 RAF DeHavilland Mosquiot Mk.II
  • Member since
    December 2005
  • From: DSM, Iowa
Posted by viper_mp on Tuesday, December 30, 2008 8:08 PM

 Gigatron wrote:

Viper, do you have any pics of the jump seats that Hans mentioned?  None of my reference shows any of these.

I'm working with the Aero Detail 19 (B-17G) and The Great Book of WII Planes and neither show pictures of jump seats.  Eduards PE sets don't provide parts for them either, but then again, they used Aero Detail 19 as one of their references.

-Fred


Fred- you are in luck.  I did happen to catch them in one of my pics.  this is from Aluminum Overcast. 

EDIT- wrong pic.  Heres the one. 

Rob Folden

Secretary / Webmaster- IPMS Plastic Surgeons Member at Large-IPMS Hawkeye Modelers

JOIN OUR COMMUNITY!

Our community is FREE to join. To participate you must either login or register for an account.

SEARCH FORUMS
FREE NEWSLETTER
By signing up you may also receive reader surveys and occasional special offers. We do not sell, rent or trade our email lists. View our Privacy Policy.