SEARCH FINESCALE.COM

Enter keywords or a search phrase below:

1:48 SBD-2/3 Dauntless (Complete)

17211 views
85 replies
1 rating 2 rating 3 rating 4 rating 5 rating
  • Member since
    June 2013
1:48 SBD-2/3 Dauntless (Complete)
Posted by bvallot on Tuesday, September 1, 2015 1:02 AM

Hey folks.  I was originally going to for-go a WIP this time around and just post a pic at the finish line, but there are some key changes I made to the Academy kit (originally Accurate Minatures) that I wanted to share and then they're were some more...and then some more...so I figured I'd make it a WIP post anyhow and be less hasty about it.

So here we go.

 aca_12296_title by Britt Vallot, on Flickr

I decided on an SBD Dauntless flown by Lt. John J. Powers of VB-5 on the Yorktown (CV-5) who received the Medal of Honor in the Battle of Coral Sea.  Over the 4 days of fighting, he destroyed two large enemy gun boats, severely damaged an aircraft tender and a 20,000 ton transport ship and sunk carrier Shoho and helped with putting Shokaku out of the fight for Midway. He advocated a low release drop while divebombing to ensure a hit.  The night before his death he was quoted as saying, "Remember the folks back home are counting on us.  I am going to get a hit if I have to lay it on their flight deck."  He knew full well the danger of such tactics and stressed caution to his other pilots.  In a September of 1942 radio address, FDR spoke at length about Powers and had this to add:

"He led [his squadron] down to the target from an altitude of 18,000 feet, through a wall of bursting anti-aircraft shells and swarms of enemy planes. He dived almost to the very deck of the enemy carrier, and did not release his bomb until he was sure of a direct hit. He was last seen attempting recovery from his dive at the extremely low altitude of two hundred feet, amid a terrific barrage of shell and bomb fragments, smoke, flame and debris from the stricken vessel. His own plane was destroyed by the explosion of his own bomb. But he had made good his promise to 'lay it on the flight deck." (Wiki)

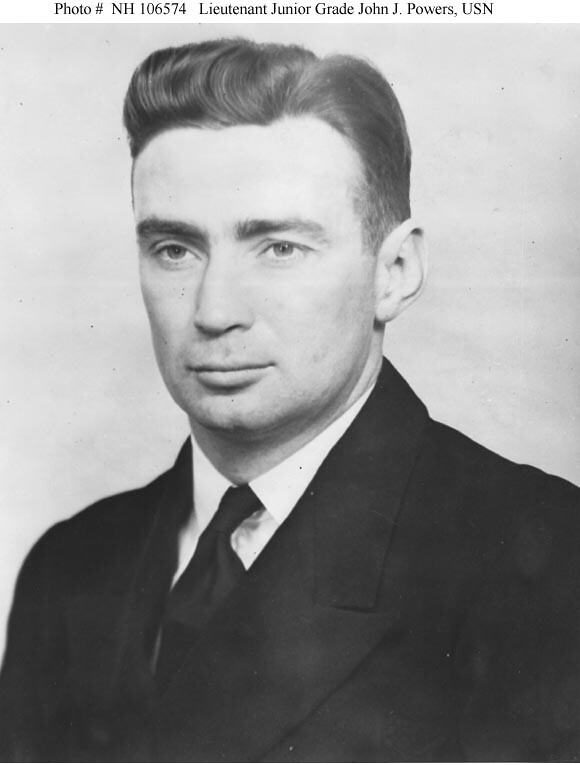
 i06574 by Britt Vallot, on Flickr

John James Powers was reguarded as a natural leader and a gutsy pilot.  So I was happy to build this plane.  Unfortunately, there don't seem to be any photos of his plane which may be why you don't see it represented by any of the SBD kit manufactuers. I suppose he was too busy fighting a war to stop and smile for a picture.  All of the weathering that you'll see is based on typical wear and tear of SBDs from that time period and the number is guessed at as well.  Only one other SBD was lost from VB-5 in that battle which was Black 16 (Ens Davis Chaffee and Seaman 1st ClassJohn Kasselman), so I've ruled that out.  The number was based on squadron formations and his ranking within his group as Squadron Gunnery Officer.

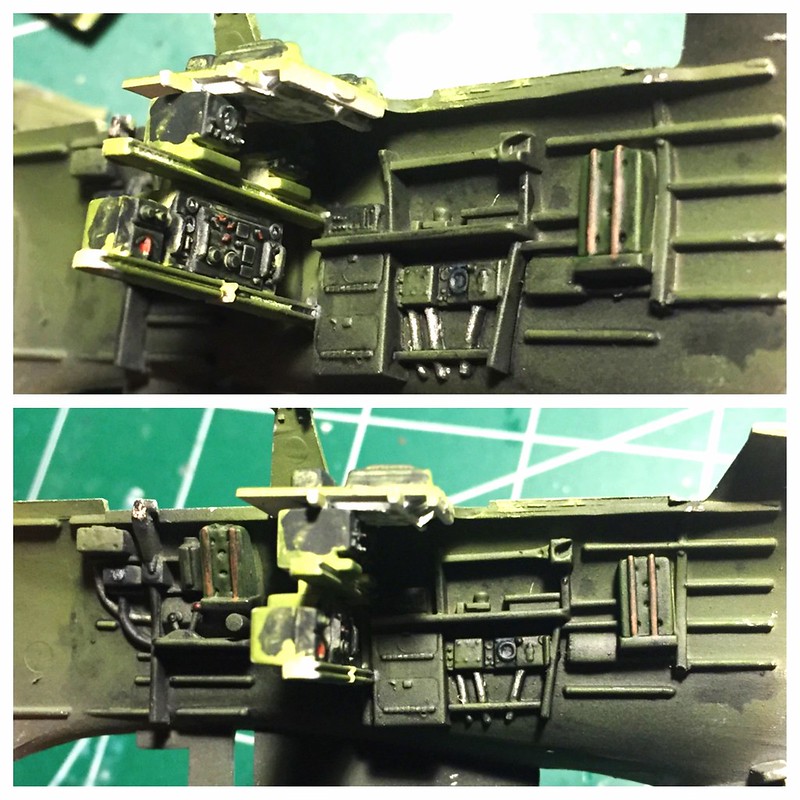
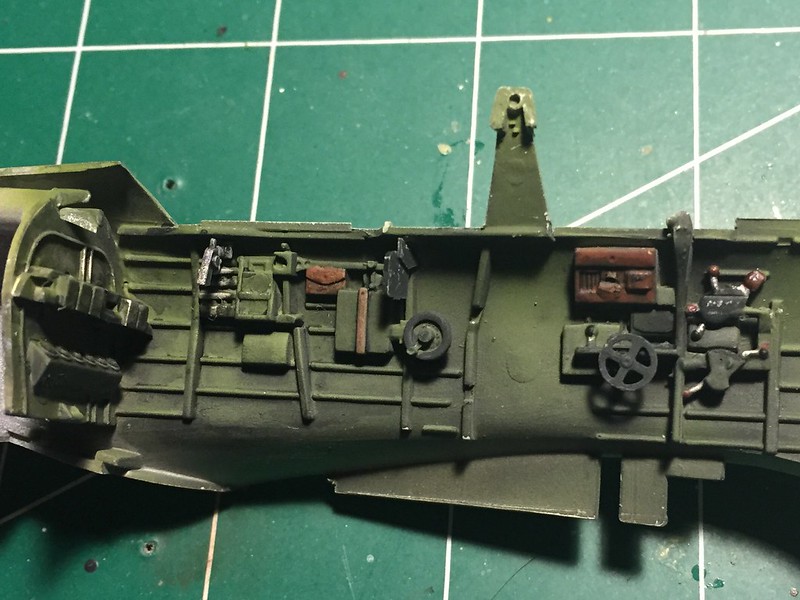
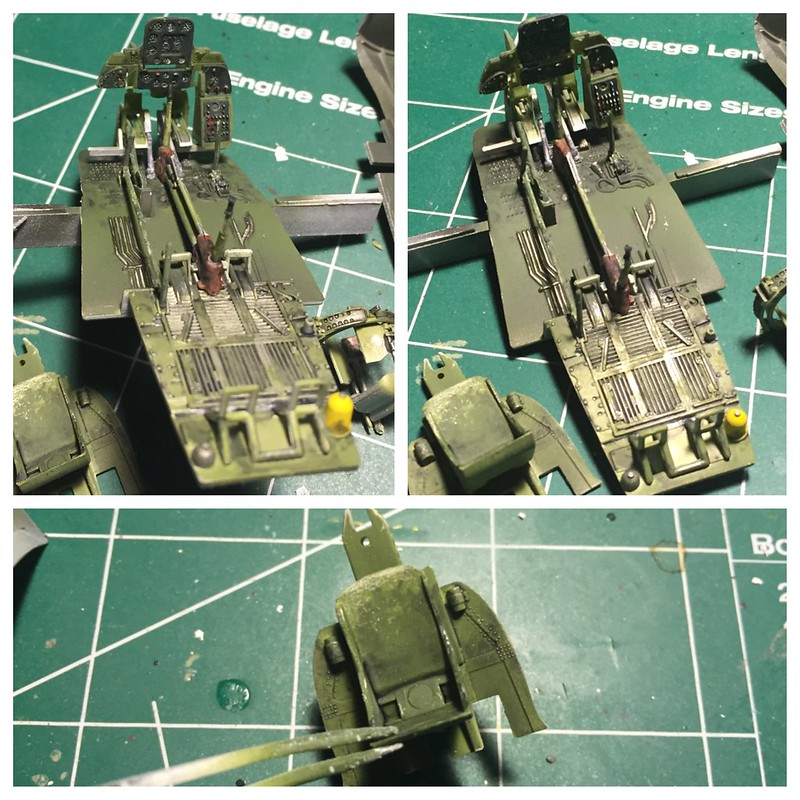
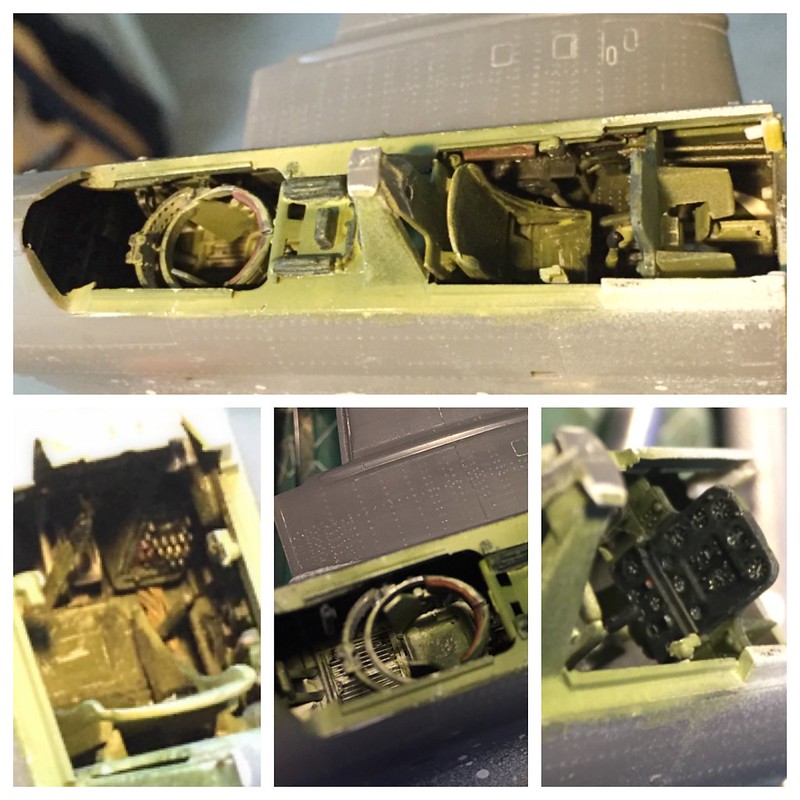
Getting started with the cockpit...pretty usual stuff really...all OOB.  I wish I had better pictures of some of this.

 Untitled by Britt Vallot, on Flickr

 Untitled by Britt Vallot, on Flickr

 Untitled by Britt Vallot, on Flickr

 Untitled by Britt Vallot, on Flickr

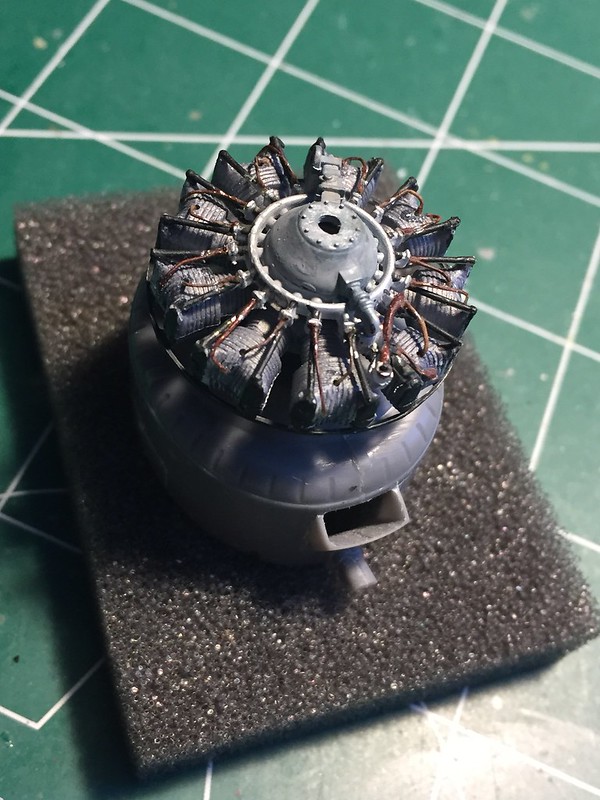
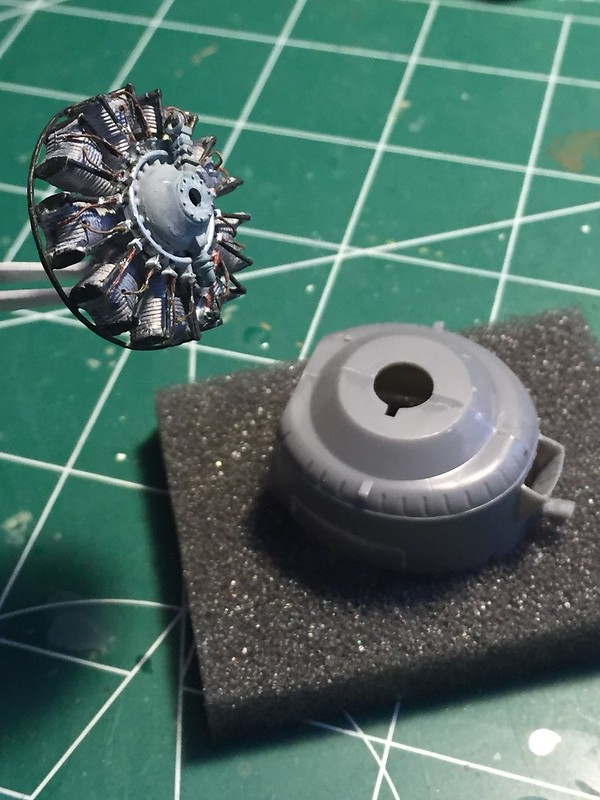
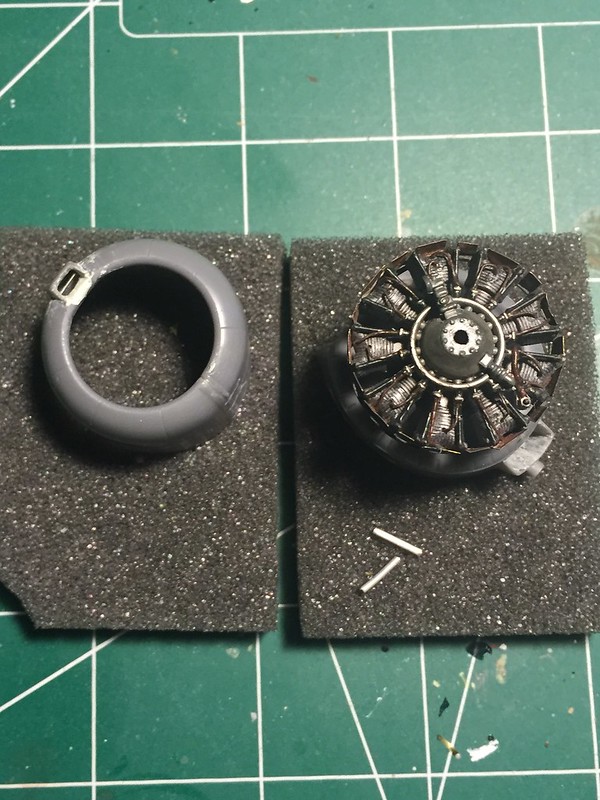
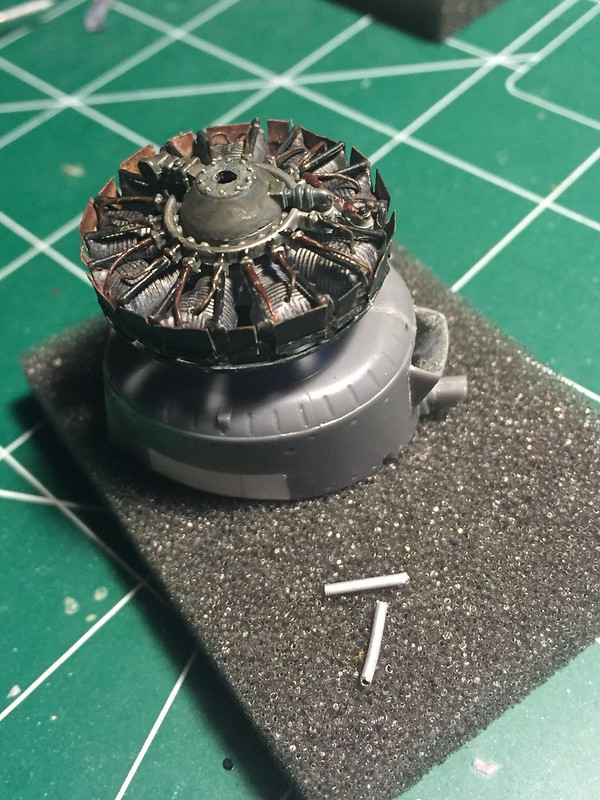
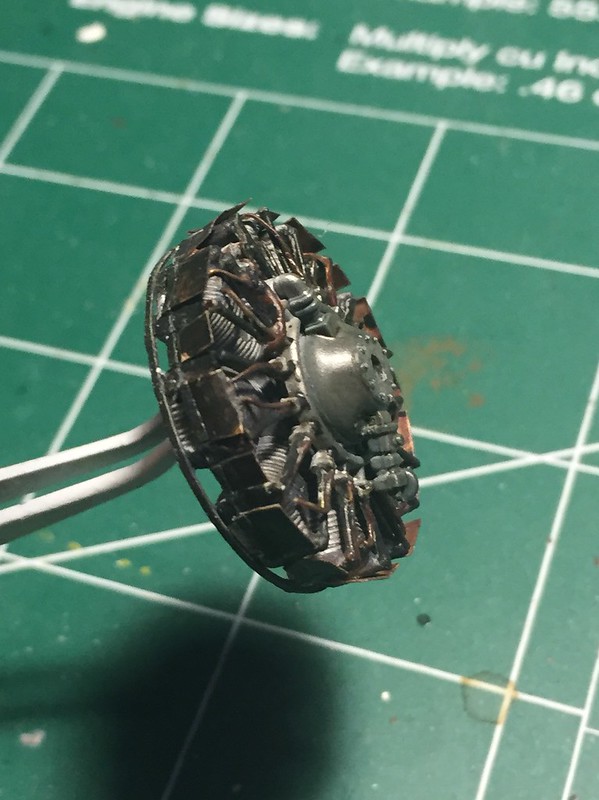
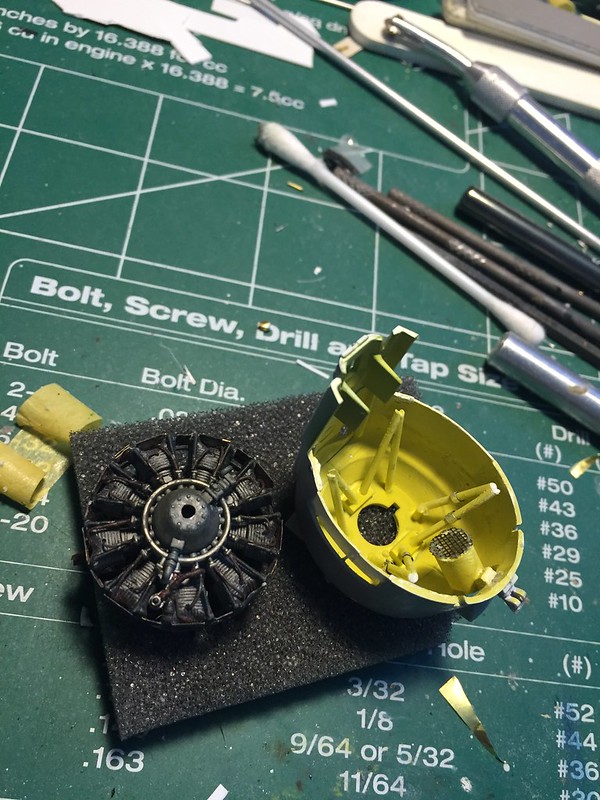
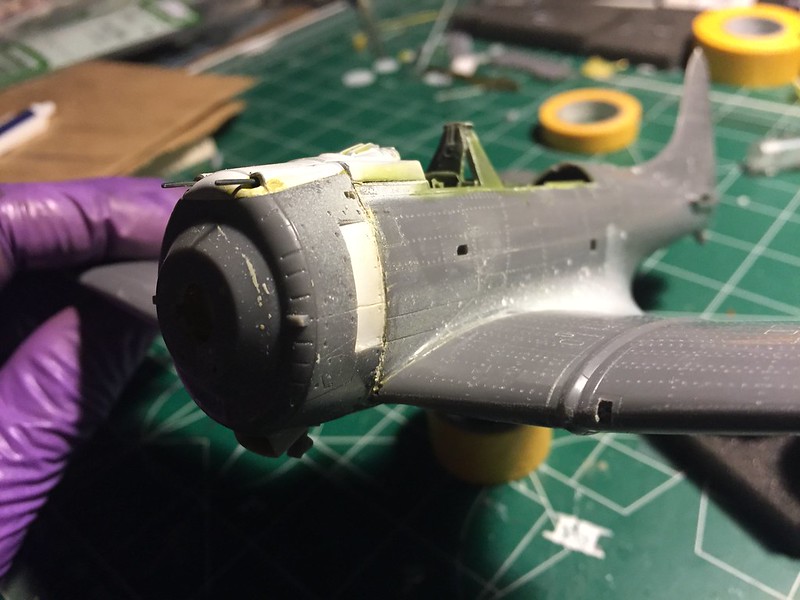
The engine was from the kit and dressed up with some brass rod and fine brass wire. The kit part for the wiring harness is way out of scale.  Way too thick.  Just like Lawdog in his tutorial, I too snipped the wiring off the kit part and started from there.  I drilled a very tiny hole on the front of each cylinder head as well as the top for ignition cables. It also helped to sink the wires as well. Plastic stip (square .5mm) makes up the ring around the engine and the air deflectors are scratched from thin brass sheet.  The carb intake on the engine cowl was a little chewed up coming off the sprue.  I fixed it up with a little bit of Milliput to take care of it and bring it back to shape.  I also inserted the vent that is visible just inside the intake as well...just a sliver of plastic strip. The two lengths of aluminum tube you see are various inlets that are present on the engine between cylinders 4 and 5, and 6 and 7. (I forget the name of them at the moment).  The intake door for the oil cooler was thinned down to scale also.

 Untitled by Britt Vallot, on Flickr

 Untitled by Britt Vallot, on Flickr

 Untitled by Britt Vallot, on Flickr

 Untitled by Britt Vallot, on Flickr

 Untitled by Britt Vallot, on Flickr

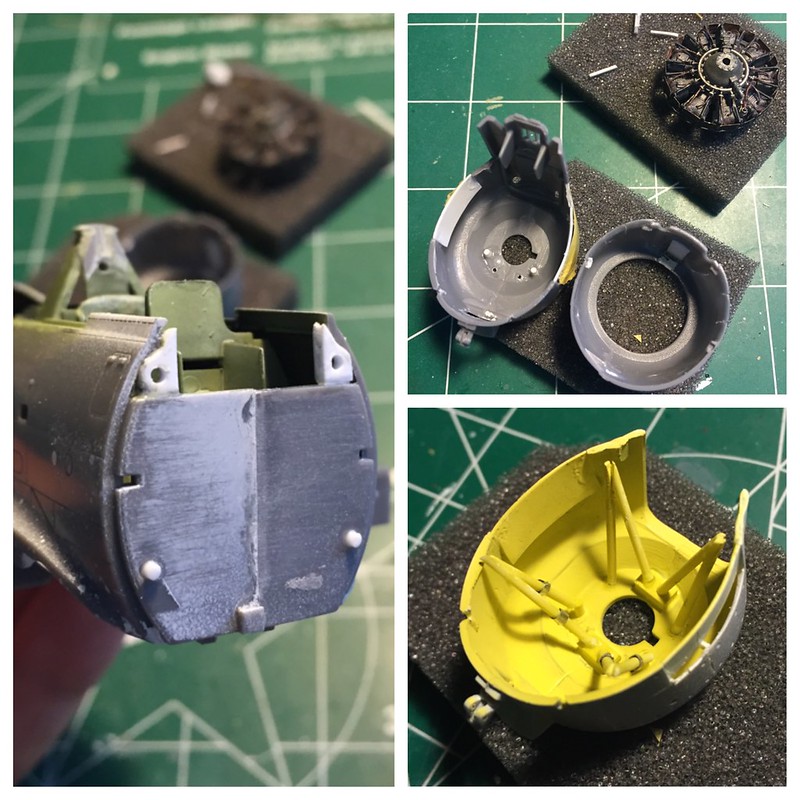
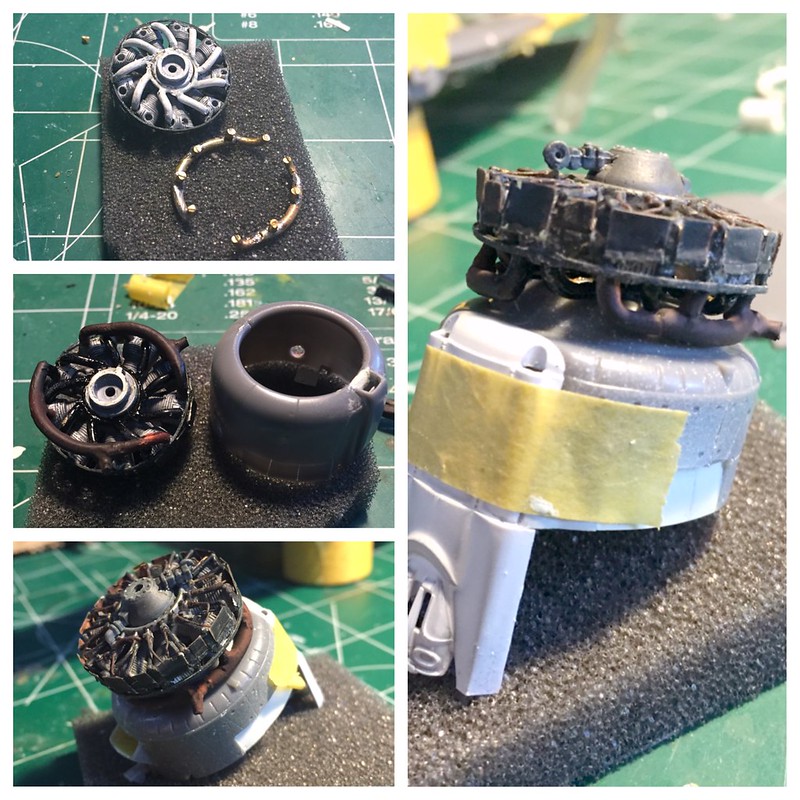
I decided to open up the engine vents which are molded closed up.  Didn't really get what I wanted so I cut them off and built up my own with plastic sheet.  Now doing this can allow one to peak inside a bit which now causes me to have to put something that ought to be seen in its place. =]  I wanted to keep it simple and opted to settle for just the engine mounts.  I also built up a little spot to attach them.

 Untitled by Britt Vallot, on Flickr

The real pain in the butt was completely self-inflicted.  I wanted to try my hand at soldering an exhaust manifold together because it would go mostly unseen.  Any mistakes I made would be easily hidden if necessary.  I looked hard to find accurate pictures of the exhaust set up for this engine series and this was the best I came up with.  It wasn't quite as difficult as I thought it'd be, but I definitely made it harder on myself than I needed to.  All the same, here it is.  I'm fairly pleased with it.  It's worth the effort if you ever would like to try it.

 Untitled by Britt Vallot, on Flickr

I also added the oil cooler as the intake for it will be open. The kit parts are kind of sad looking here so I made my own.  Not so difficult.   I hope to find more pics of this.

 Untitled by Britt Vallot, on Flickr

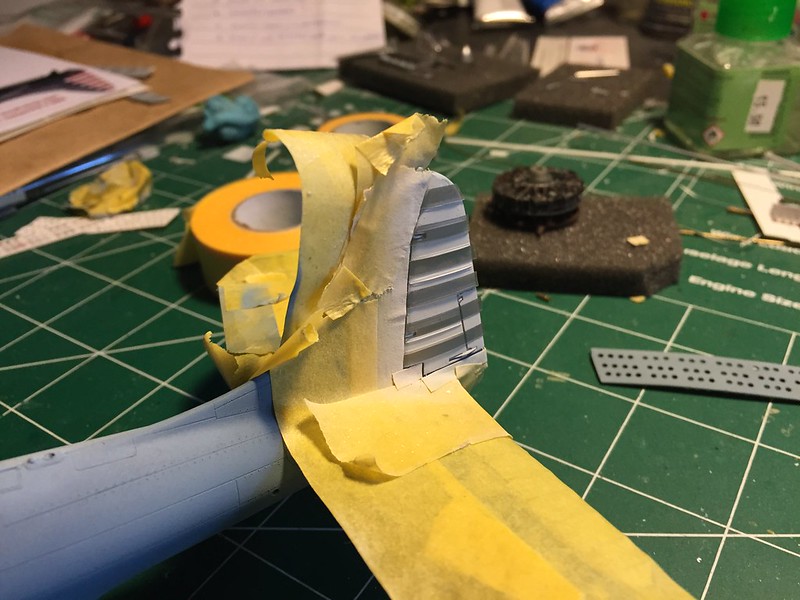
At this stage, I took a moment to try something I've been thinking about with regard to formation lights.  I drilled out the lights and replaced them with pulled clear sprue.  I sanded them down and polished them off and masked them for painting. =]  Worked out rather well.

 Untitled by Britt Vallot, on Flickr

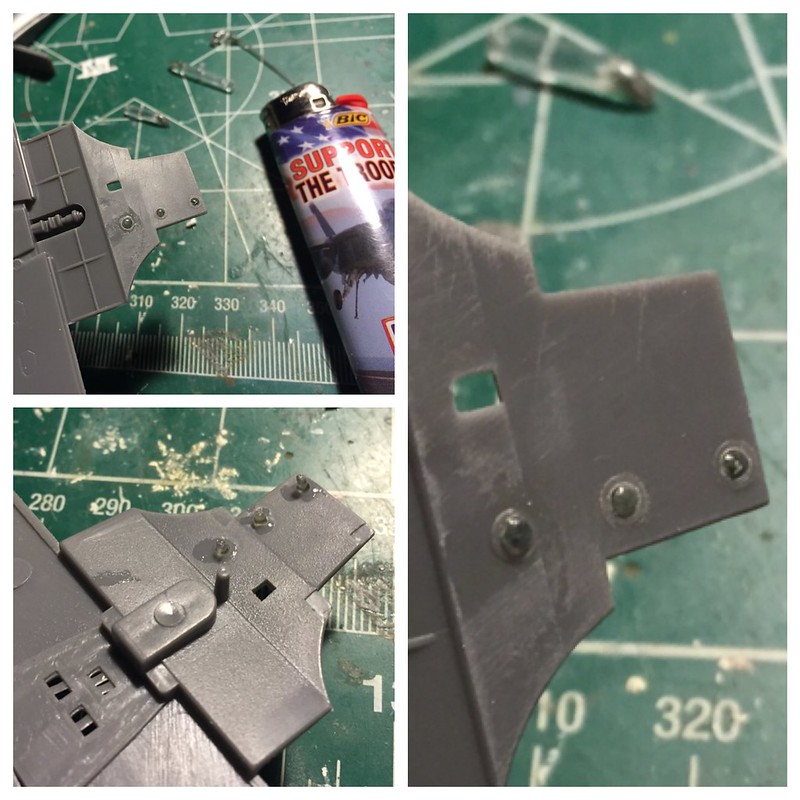
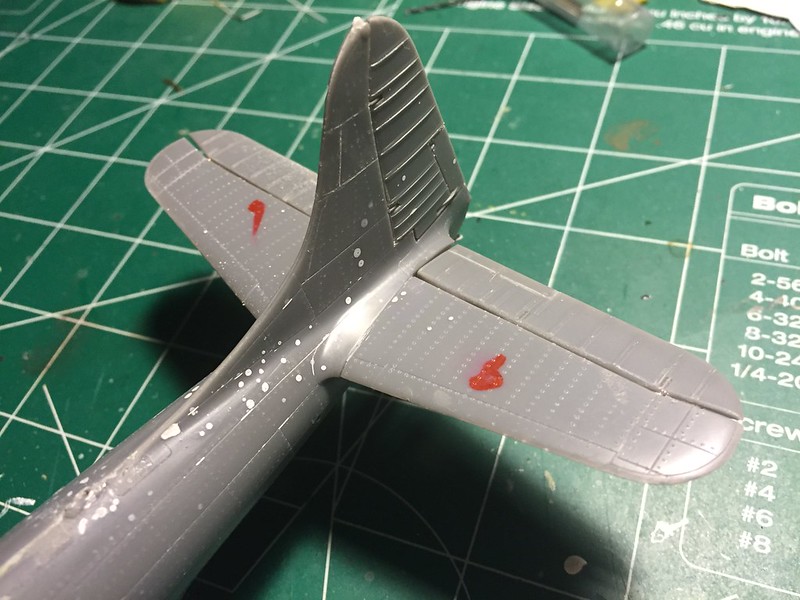
One thing worth noting is I discovered that the Academy kit has molded a trim tab on the right aileron.  This does not belong.  There was only a left trim tab. Both elevator trims are correct. I blanked out the right aileron and built back up the ribbing only to discover that the bottom ailerons are molded incorrectly also.  There are 8 ribs that make up the ailerons and 7 are shown on the bottom.  Not sure how they missed that one, but no matter.  I sanded down the incorrect ribs and replaced them with thin plastic strips.  I also riveted the surface of the plane. =]

 Untitled by Britt Vallot, on Flickr

 Untitled by Britt Vallot, on Flickr

 Untitled by Britt Vallot, on Flickr

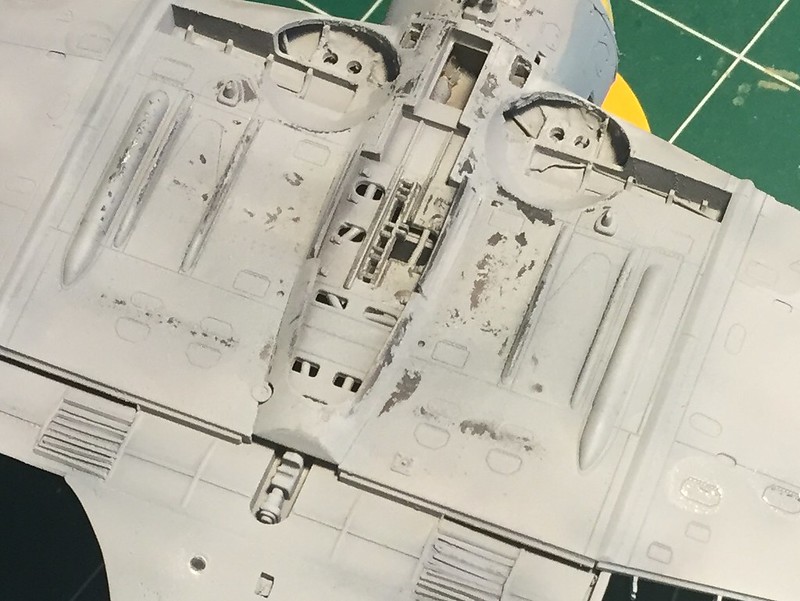
I also opened up the vents within the wings.  I built up the walls between each vent and I'm a little frustrated that I don't have a picture of this somehow.  I know I took plenty.  I took a little extra time sanding the ribs to get them to conform to the molded interior of the wing.  I bent some plastic sheet into a curve and eye-balled it into place for both the top and bottom.  Easier than you think...just be patient. This part really goes a long way to improve your build if you can make the time for it.  I've also cut the elevators to set them as I've seen most parked.  A brass rod holds them in place and acts as the actuating rod.  Not really necessary though.  I often do the same to the rudder but it depends on the kit.  This one was molded with deep enough dimensions that it doesn't bother me. 

 Untitled by Britt Vallot, on Flickr

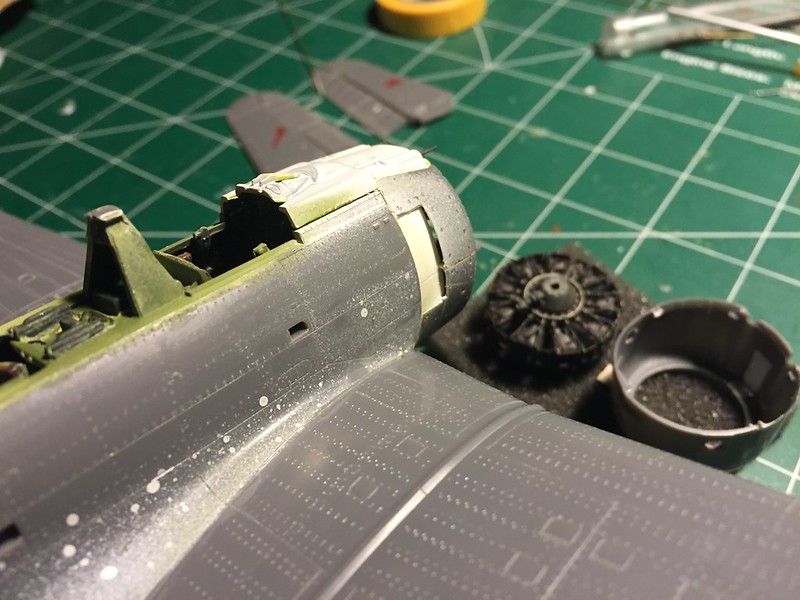
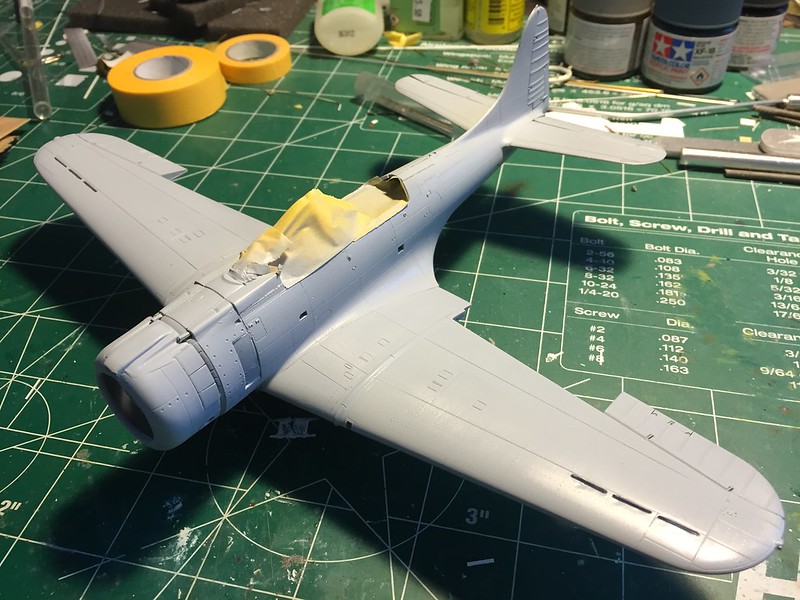
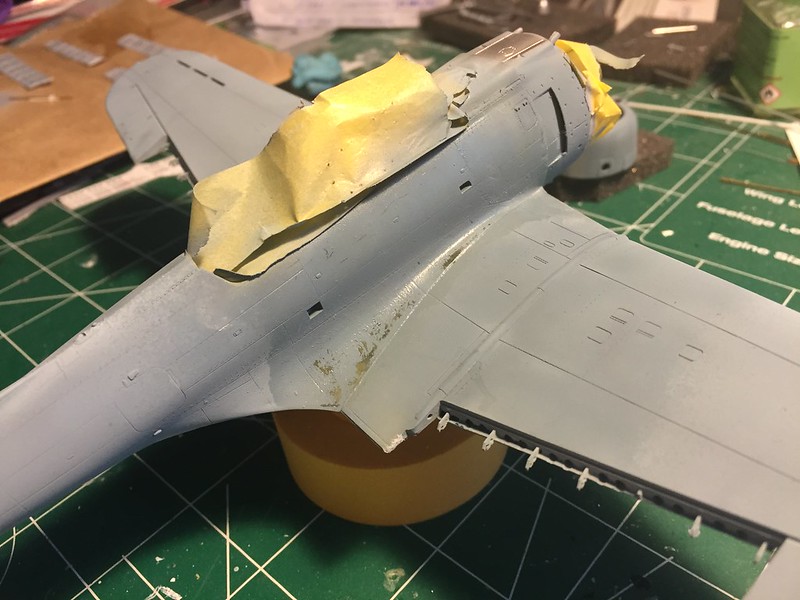
I tried Alclad's Grey Primer for the first time.  I added a little extra laquer thinner to keep it moving and it worked beautifully. 

 Untitled by Britt Vallot, on Flickr

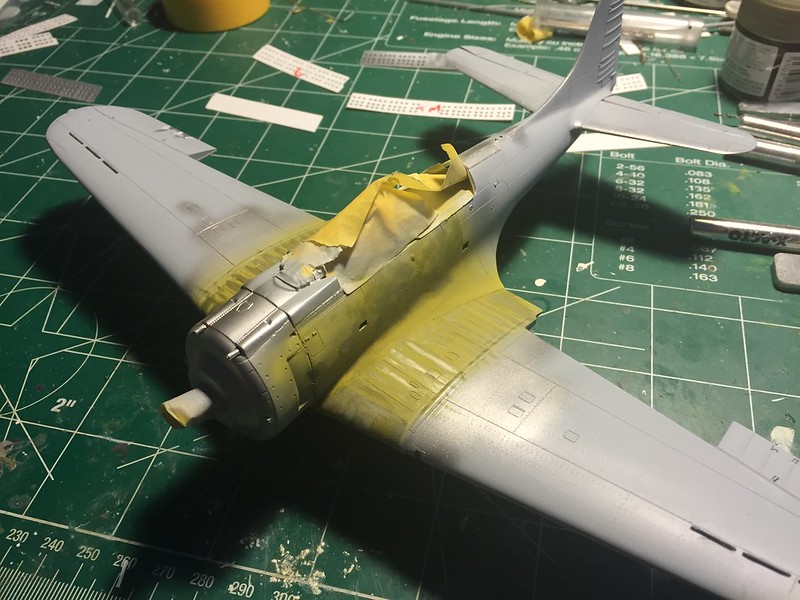
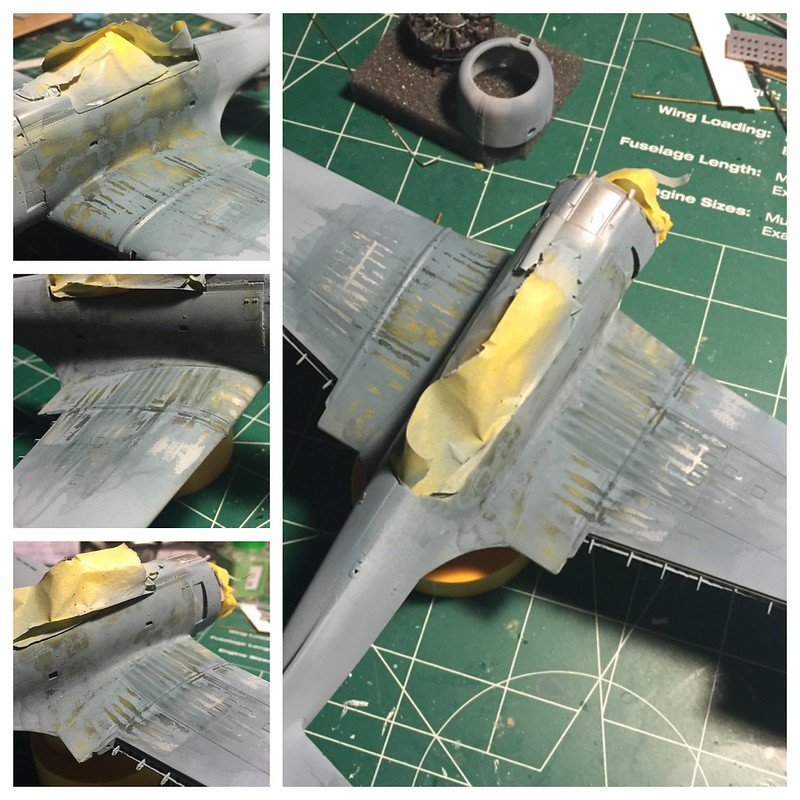
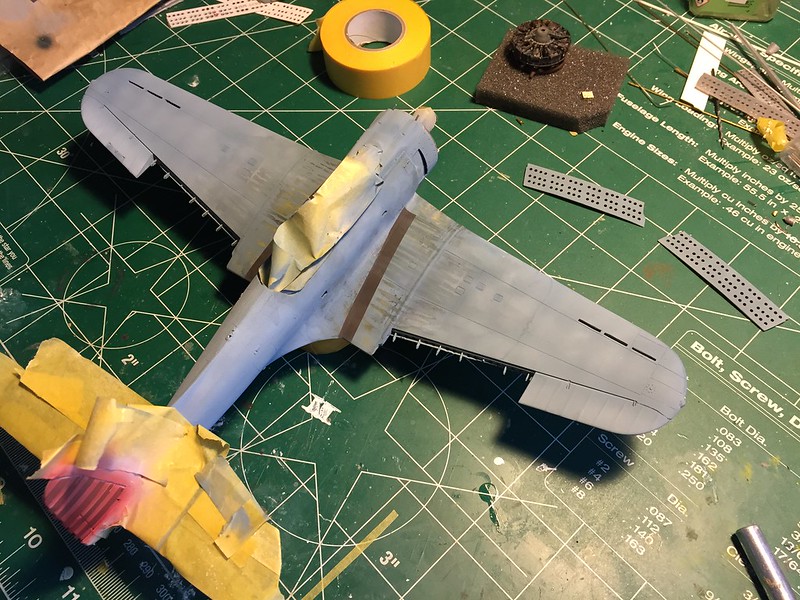
Next came the weathering. I've been on the hunt for a better method of revealing chipped paint.  In all honesty, things like "the hairspray method" sound a little intimidating to me because I'm afraid I'll buy the wrong kind of hairspray and ruin something completely.  I know that sounds ridiculous, but hey.  Well, it turns out it's not so bad really.  It's really pretty simple. From the grey primer base, I put Alclad's Duraluminum down first to make up the skin of the wing...then, a yellow chromate color over parts I wanted to have it show through.  I carefully drug a Q-tip soaked in Isopropyl alcohol 91% to remove some of the chromate primer revealing the wing surface.  For safe measure this got covered up with a clear and then a flat coat before using the hair spray. I gave it three good quick coats leaving about 10 seconds in between each pass.  Worked wonderfully.  Save your money guys.  This is buy far the best way I've tried yet. Weather as much or as little as you'd like.  I'm now looking forward to a few Zeros I can beat to hell!! =D

 Untitled by Britt Vallot, on Flickr

 Untitled by Britt Vallot, on Flickr

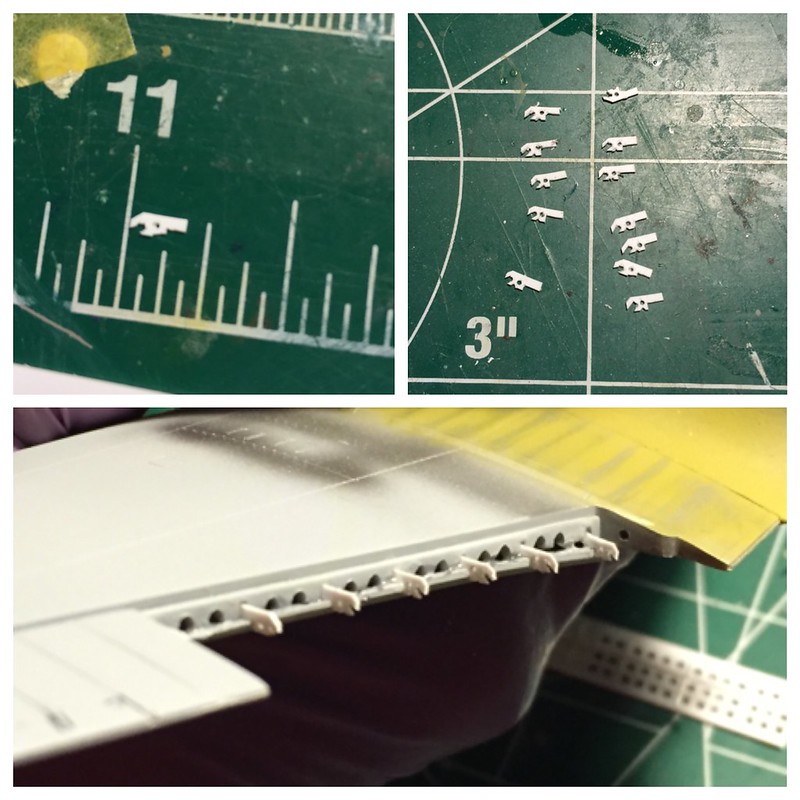
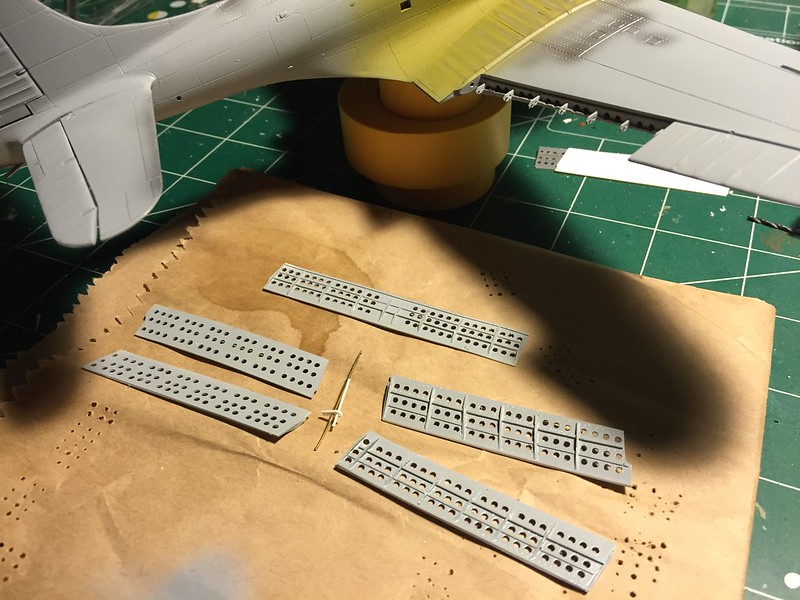
Before moving on from here, I had to address the flap assembly.  In my previous build I scratched out my own flaps for a P-40B...not too difficult it turns out.  But this is the Dauntless...perforated flaps!!  Not to worry.  I wasn't completely happy with the kit parts (even though they're adequate) but they can still be useful. ;)  I cut out my shapes for each of the flaps and taped the kit piece to the new thinner scratched piece.  With a pin vise drill, I carefully drilled out each hole making sure not to let the kit part torque and turn on top.  Worked rather well.  The kit parts are accurate so don't worry about counting holes.  Good lord don't do that to yourself.  They're all there. =]  Seems like a lot to fool with but once you get started...you get rolling.  You'll be done before you know it.  The rods and mounting tabs were a bit cumbersome as they were so tiny, but if you have young eyes or a means of magnifying then it won't be so bad.  At this scale the two parts won't really show up so I opted for a single thin piece and placed them in the tab hole already provided (thanks AccuMin).  I'll go into more detail on constrution of the flap assembly later in the build where I'll break down each step for any that are willing to try it own their own as well.

 Untitled by Britt Vallot, on Flickr

 Untitled by Britt Vallot, on Flickr

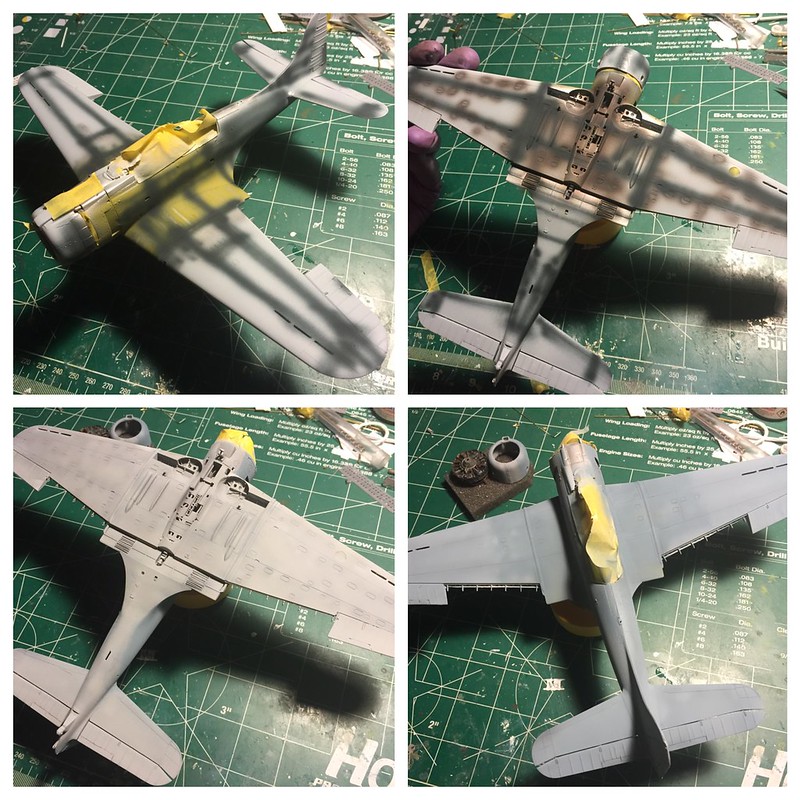
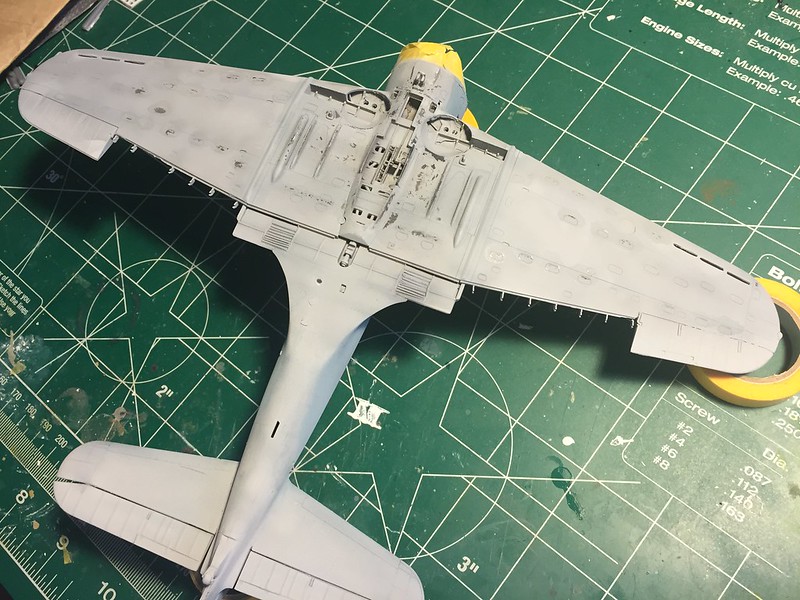
Here's my obligatory first coat of paint with preshading.

 Untitled by Britt Vallot, on Flickr

Here's the beginning of the chipping. =]

 Untitled by Britt Vallot, on Flickr

 Untitled by Britt Vallot, on Flickr

There's one thing worth mentioning for the wheel bay that I haven't gotten to address yet, and it needs to be done before painting.  It seems I've gotten rid of this photo as well.  The wheel bay for the tires to fit is a bit too squared off where the tire butts up against the top of the bay.  This part of the bay should be curved a bit more than what is represented on the kit.  Putty or Milliput is an easy fix to smoothing out that angle.  I'll go into more detail in the very next update when dressing this section up.  =]

 Untitled by Britt Vallot, on Flickr

 Untitled by Britt Vallot, on Flickr

 Untitled by Britt Vallot, on Flickr

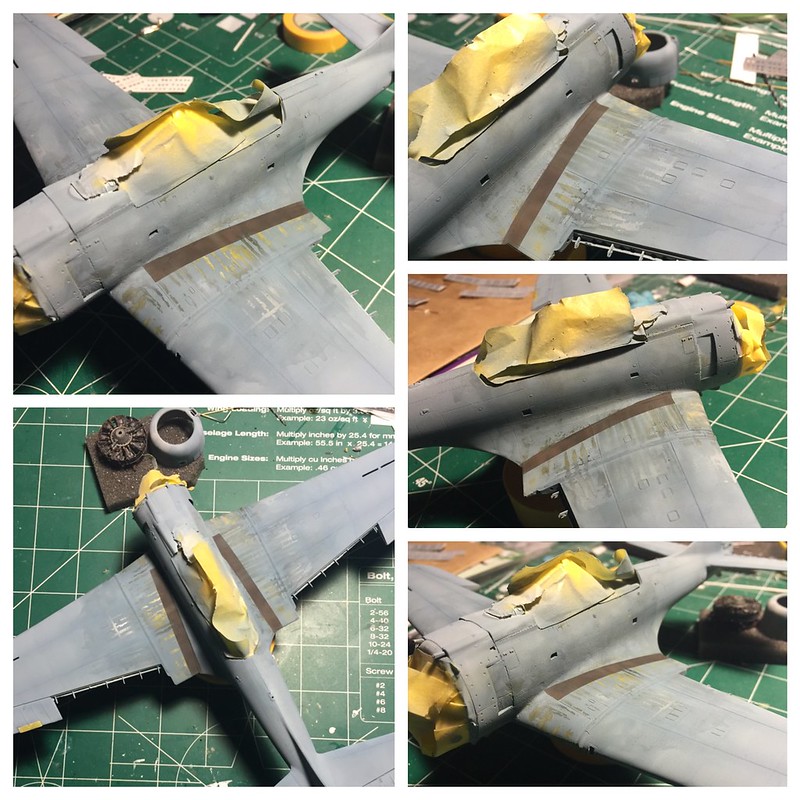
After the chipping is complete, I went back and put a little paint back down where I felt appropriate and brought back the color to where I wanted before adding any extra weathering steps.

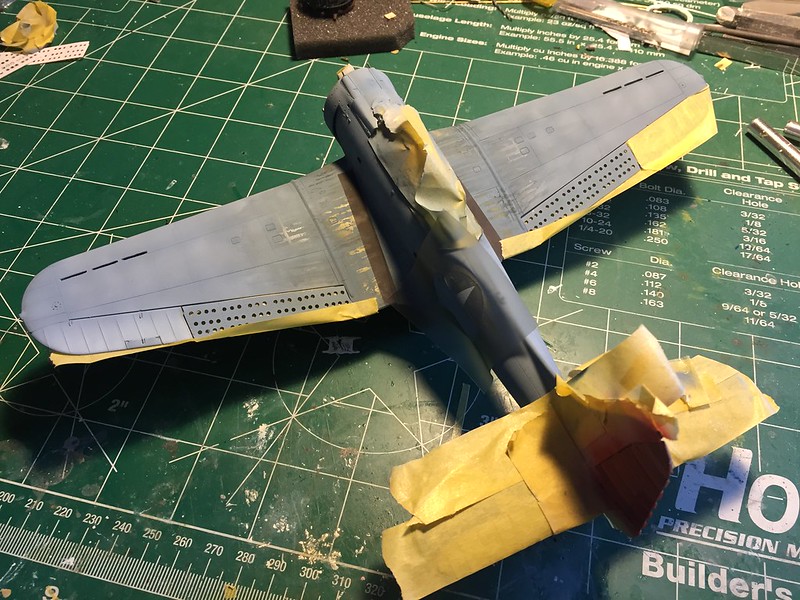
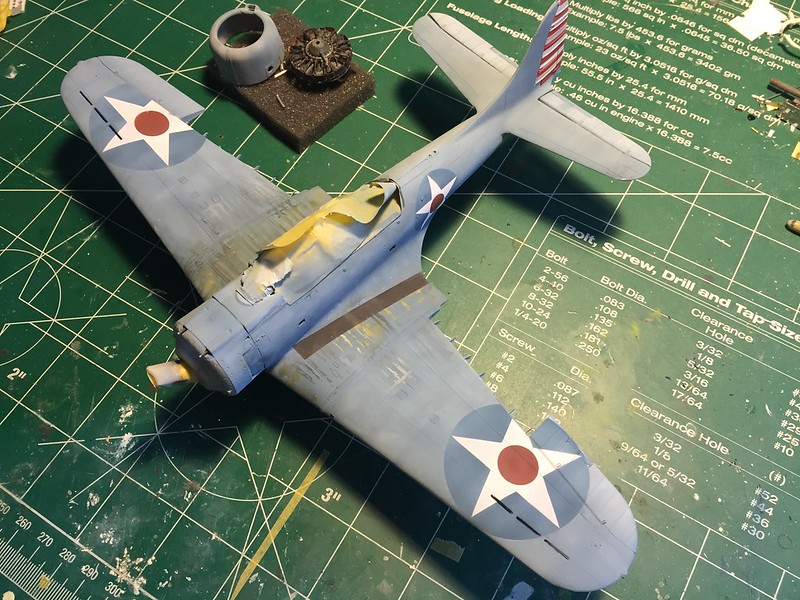
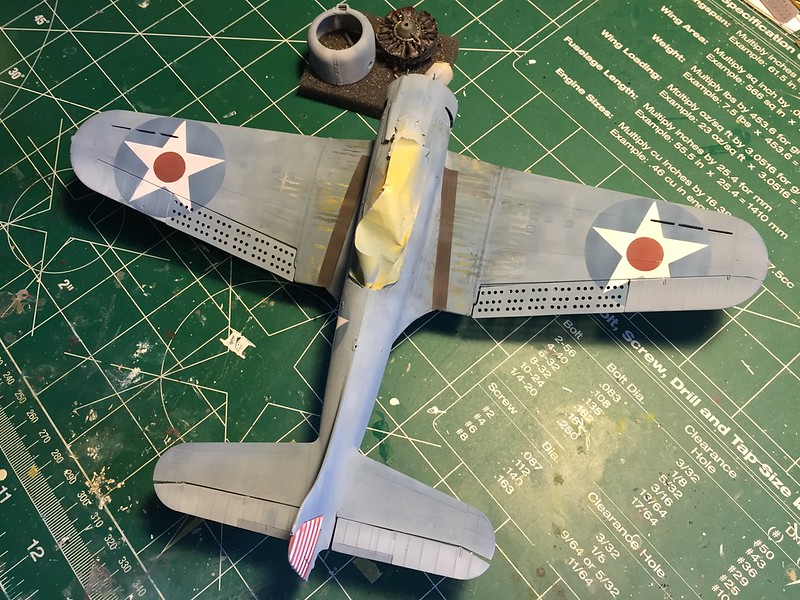
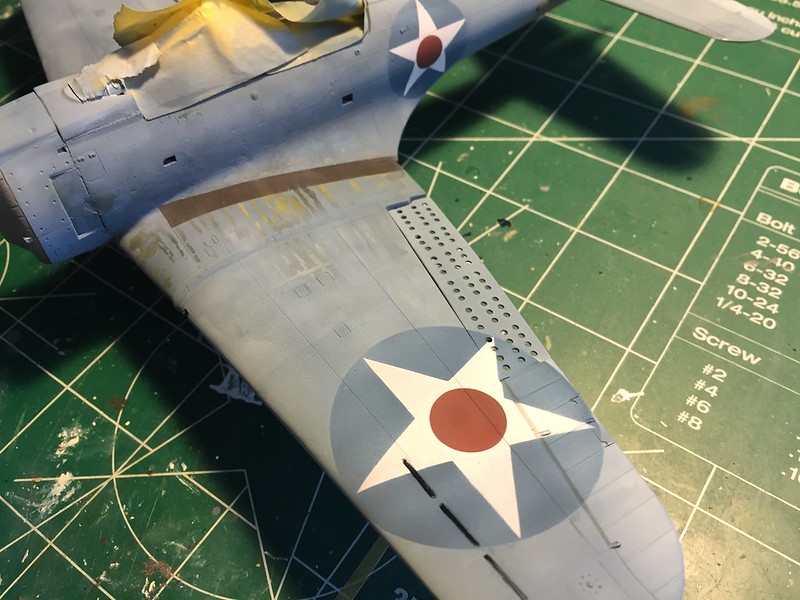
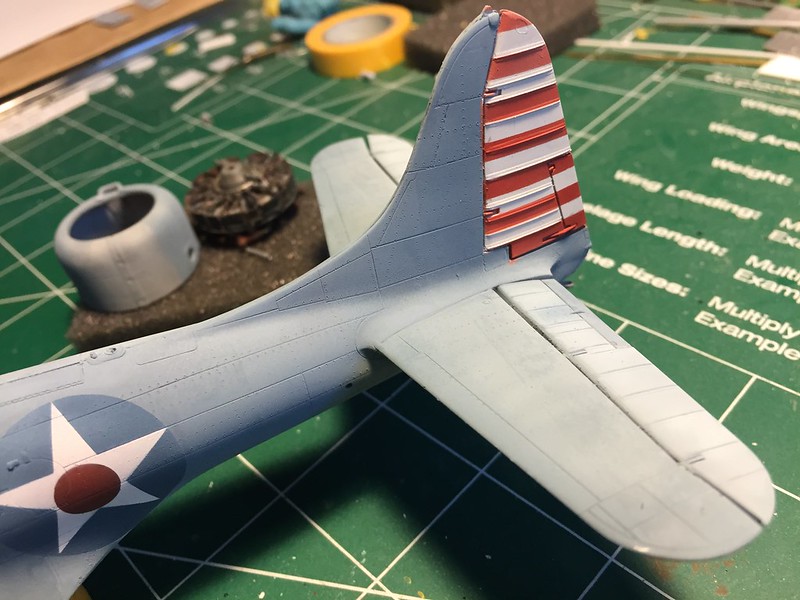
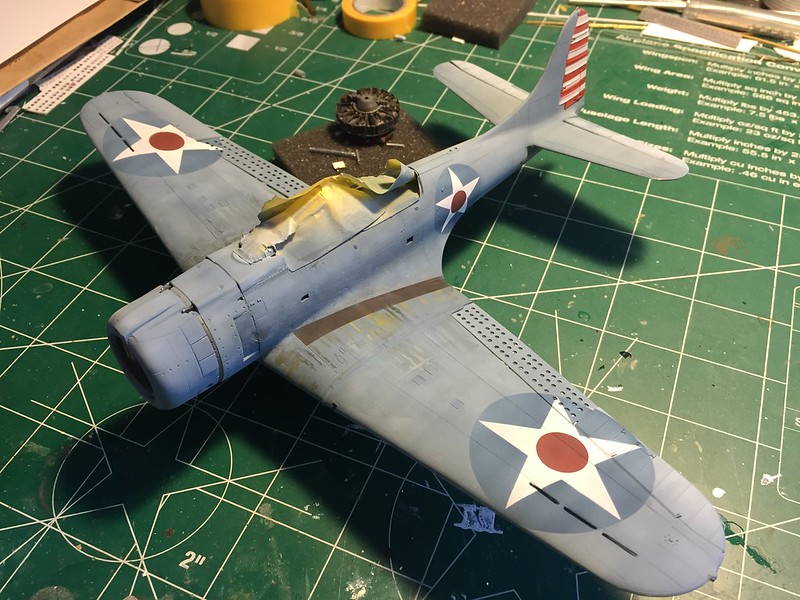
Next, I pulled out the Montex mask set.  Makes all the difference folks!  Do it. =]  Went to work first on the rudder and masked everything off, painted it a dirtier white, set my strips down to cover the white stripes and put down my red coat of stripes.  Easy.  Let that set up and moved onto the insignia.  I selected the larger insignia that went the whole length of the wing. This seemed to be more in use around the time of May 1942.  Some where considerably faded...some weren't.  I went for something in the middle.  To liven it up, I did make the right aileron "new" as if it'd been replaced and omitted the insignia on that section.  I will tweak the red meatballs on this before moving on.

 Untitled by Britt Vallot, on Flickr

 Untitled by Britt Vallot, on Flickr

 Untitled by Britt Vallot, on Flickr

 Untitled by Britt Vallot, on Flickr

 Untitled by Britt Vallot, on Flickr

 Untitled by Britt Vallot, on Flickr

 Untitled by Britt Vallot, on Flickr

 Untitled by Britt Vallot, on Flickr

 Untitled by Britt Vallot, on Flickr

And that's a wrap for now folks.  I may go back and edit some parts here if I breezed over it too quickly.  Any and all comments or questions are welcomed.  There's still plenty more to come to finish weathering and beating this warhorse up.  =]  I'm still excited about it. =]

On the bench:  

Tamiya F4U-1  Kenneth Walsh


  • Member since
    February 2014
  • From: Michigan
Posted by silentbob33 on Tuesday, September 1, 2015 9:08 AM

Amazing work!  I hadn't heard of LT Powers before, so it was a very interesting read.  I'm very impressed with your flaps and the actuators, I'd be way too intimidated to try and build them.  I just recently tried the hairspray technique for the first time and really liked the results.  Lastly, that is a great kit.  Last year I built the AM SBD-5 and loved it.  I need to get my hands on more of them.

On my bench: Academy 1/35 UH-60L Black Hawk

  • Member since
    September 2014
Posted by rooster513 on Tuesday, September 1, 2015 9:13 AM

Awesome build going! I had one of these in my hands at my LHS but didn't pull the trigger. Looks like a really nice kit even minus the scratchbuilding, I may have to head back up there. The level of detail you are putting into it is amazing! Thanks for sharing.

-Andy

  • Member since
    June 2013
Posted by bvallot on Tuesday, September 1, 2015 1:04 PM

Thanks guys.  It really is a nice kit and builds up great right out of the box.  I'd certainly recommend building it at least once. =] 

On the bench:  

Tamiya F4U-1  Kenneth Walsh


  • Member since
    June 2014
Posted by BrandonK on Saturday, September 5, 2015 12:56 PM

Absolutly stunning work there. WOW !!!


BK

On the bench:

A lot !! And I mean A LOT!!

2024 Kits on deck / in process / completed   

                         14 / 5 / 2  

                              Tongue Tied

  • Member since
    June 2003
  • From: Cavite, Philippines
Posted by allan on Saturday, September 5, 2015 4:39 PM

Absolutely impressive. I think this is the first time I've seen this technique, so I'm looking forward to descriptions being added. 

No bucks, no Buck Rogers

  • Member since
    December 2002
  • From: Northern California
Posted by jeaton01 on Saturday, September 5, 2015 11:52 PM

Artful stuff there.  The exhaust manifold is well done.

John

To see build logs for my models:  http://goldeneramodel.com/mymodels/mymodels.html


  • Member since
    June 2013
Posted by bvallot on Wednesday, September 16, 2015 11:12 PM

Work has kept me from making the kind of progress I'd like to see on this Dauntless, but I thought here would be a good chance to recap painting insignia for US planes of this era.  I've taken some more time to consider how to pull these off better than what I did previously.  The first time around using Montex masks I went about it from a very obvious, logical progression but it left me little room for error.  Luckily, I'm great at eyeballing things, but I don't like to just be lucky...I want something to work well because it's smart. So after some consideration and observation I've taken some pointers from around and I thought I'd share them here.

Starting with the Meatballs!

If you happen to be painting an early era Pacific plane with the meatball present, it's best to start there otherwise just skip ahead to the white.  Previously, I used the negative part of the mask that left the red disc.  This leaves some room for misregistering the insignia even if you're off by more than two or so millimeters.  Instead, paint an ample red disk that will be masked off by the positive part of the Montex mask as pictured below.  I measure out the diameter of the overall insignia to know my center and half that to place my mask.  A strip of masking tape cut to length should suffice.  =]  Next, cover this with your white.  Keep in mind for top surfaces it is not necessary to completely coat this in an opaque coat of paint.  Depending on how much fading/weathering you want present, you can leave some of the bottom colors showing through.

 Untitled by Britt Vallot, on Flickr

Moving on the blue field, place the star mask down being sure that the points of the star are touching the circumference of the circle.  On curved surfaces this can get a bit tricky.  The geometry changes a little.  Try not to stretch your mask even if you've cut yours from tape.  After your white is covered, place your blue field down.  Again, keep in mind how much you want present.  It's not necessary to completely cover this area.  I try to pass in motions that follow major panel lines and generally north and south across where the ribbing passes.

 Untitled by Britt Vallot, on Flickr

Simple as that.  If you find you covered too much or need to change a color, it's not impossible.  Come back with some post-shading to lighten entire areas or place whichever mask you need to address the problem, but just take you time so you can avoid going back over something.  Paint in light coats! =]

I picked the number 6 finally after a good deal of thought.  In a complete squadron there were a total of 18 planes with 6 section leaders.  Since I already know Black 16 was the only other plane noted to have not returned, I left it at a number 1 thru 6. Since the 6th is my anniversary, I figured it to be a useful tool to never forget. ;)

 Untitled by Britt Vallot, on Flickr

Some final touch up weathering with the hairspray method before clearcoating all of this.  Less is more.

 Untitled by Britt Vallot, on Flickr

 Untitled by Britt Vallot, on Flickr

And here's where I'm at for now.

 Untitled by Britt Vallot, on Flickr

 Untitled by Britt Vallot, on Flickr

All of this is pretty simple to pull off.  If you'd like to add some depth to your plane, I'd suggest giving it a try.  You'll be surprised.

On the bench:  

Tamiya F4U-1  Kenneth Walsh


  • Member since
    June 2014
Posted by BrandonK on Thursday, September 17, 2015 9:32 AM

This is one of those builds, your usual, that helps me take it to the next level. Simply impressive work my friend. STUNNING !!!  Thanks for guidance.

BK

On the bench:

A lot !! And I mean A LOT!!

2024 Kits on deck / in process / completed   

                         14 / 5 / 2  

                              Tongue Tied

  • Member since
    February 2007
  • From: Brunswick, Ohio
Posted by Buckeye on Thursday, September 17, 2015 11:22 AM

Awesome work there and thanks for the great WIP!

Mike

  • Member since
    June 2013
Posted by bvallot on Thursday, September 17, 2015 3:53 PM

Thanks for stopping to take a look. =]

On the bench:  

Tamiya F4U-1  Kenneth Walsh


  • Member since
    June 2003
  • From: Cavite, Philippines
Posted by allan on Thursday, September 17, 2015 8:13 PM

To some extent Im glad I build modern jets.  Haha! Simply impressive work!

No bucks, no Buck Rogers

  • Member since
    September 2014
Posted by rooster513 on Friday, September 18, 2015 6:51 AM

Really nice! Great job on the markings...came out perfect!

-Andy

  • Member since
    August 2013
Posted by Jay Jay on Friday, September 18, 2015 7:58 AM

Thanks for the how-to's. I'm filing this very impressive work.


 I'm finally retired. Now time I got, money I don't.

  • Member since
    December 2003
  • From: Charleston, SC
Posted by sanderson_91 on Sunday, September 20, 2015 6:10 PM

I really like your work here BV!  Beautiful paint work.  I have a few Montex masks but have not used them yet.  I really like the look you get when painting the insignia.

Steve


  • Member since
    June 2013
Posted by bvallot on Tuesday, September 22, 2015 3:11 PM

Thanks everyone! I think it's a pretty useful technique and there's really nothing at all to it.  It used to intimidate me when I first began modeling scale aircraft a few years ago, but as soon as I pulled the trigger on it...found out it wasn't so bad.

So many things are that way... =]

I have most of the weathering done for this plane. Work has really slowed my production on anything else down by quite a bit.  I'll have some things posted by the weekend hopefully.

On the bench:  

Tamiya F4U-1  Kenneth Walsh


  • Member since
    February 2012
  • From: Olmsted Township, Ohio
Posted by lawdog114 on Saturday, September 26, 2015 12:09 AM
Awesome Britt....great story too. I paint in my British roundels almost the same way.

 "Can you fly this plane and land it?...Surely you can't be serious....I am serious, and don't call me Shirley"


  • Member since
    June 2013
Posted by bvallot on Saturday, September 26, 2015 11:19 PM

Thanks Joe.  I always pick my builds around a pilot who stood out in some fashion only I never thought to highlight it here on the forum.  You've always done such a good job of that.  It's a shame I've waited till now to include it.  I may go back and update a few.

So here's what I've got so far...

I took care of a few things concerning the engine that I'll drop here for now.  I'll have to come back to it later since I want to film it with the cowling off.  Once it goes on, it won't come off.  But I did want to negotiate the shaft the prop fits onto so that I can tackle any issues I ran into.  

In my haste, I built up the engine from the kit parts and immediately went to tweaking what was present.  I didn't reference the instructions enough and went straight past the part where the kit shaft for the prop gets installed.  No worries though!  Here's what I came up with...an aluminum tube was CAed to a plastic tube to a length of about an inch.  This was sufficient.  Before securing the plastic tube fitting, I measured it out so that the aluminum tube sat just underneath the opening at the prop reduction this way the kit part that I trimmed down will seat itself right where it belongs.  The kit part was CAed to a brass rod that slides into the aluminum tube and a few drops of mineral oil keeps it lubricated. =] I also drilled a small hole into this kit part so that it stayed glued down ;)  Once all this was worked out, the plastic tube was set on the back of the engine with Tamiya ETC.

 Untitled by Britt Vallot, on Flickr

The landing gear looks pretty good as is, but I like to do things myself.  I trimmed off the brake lines and sanded down any seam lines from the molding.  There are some ejector pin marks that are of no consequence as they won't be seen.  Primed and painted in the undersurface color of Gull Grey.  I'll do a couple of touch ups later on as well. After the clear coat and weathering, I laid down some strips of aluminum foil for the oleo struts as I did on the P-40.  Definitely makes a difference.  I will likely come back and do a little something to tone down some of the shine. The tires were painted in NATO Black, but I did go over the tops that contact the ground lightly with Flat Black.  This was weathered slightly with Tamiya Weathering Compounds to bring out that tire look.  The sheen from the light doesn't allow it to film well here in this group of pics. This will be seen better later.  I haven't attached the new brakes lines just yet...this is where I had to stop.

 Untitled by Britt Vallot, on Flickr

 Untitled by Britt Vallot, on Flickr

 Untitled by Britt Vallot, on Flickr

All of this was easily assembled.  I forewent the kit part again that attaches the door to the gear strut and instead replaced it with a very small diameter brass tube and brass wire which was CAed into place. I'll admit it's a bit hard to tell the difference between the  kit part and what I've done.  It really wasn't any trouble though.

Concerning the weathering, I mostly accomplish everything I'm looking for while painting so I tried not to go overboard here.  I shaved down some oil pastels and brushed these on.  The blues I used with a low odor mineral spirits to brush on and to pool where I wanted.  The exhaust stains were achieved by dry brushing them in layers.  After reviewing these pictures, I believe I will go back and add just a bit more.  Nothing much to it.  Just take your time and add a little as you go.

 Untitled by Britt Vallot, on Flickr

 Untitled by Britt Vallot, on Flickr

 Untitled by Britt Vallot, on Flickr

 Untitled by Britt Vallot, on Flickr

 Untitled by Britt Vallot, on Flickr

And that concludes majority of the weathering.  I'll try to include any addtions, but if you have a specific question I'd be happy to do my best to answer.  All that really remains is the canopy/windscreen and the flap assembly...and a few tid bits.  =]

On the bench:  

Tamiya F4U-1  Kenneth Walsh


  • Member since
    January 2015
Posted by BrandonD on Sunday, September 27, 2015 1:21 AM

Such excellent work. You shine in areas I know my builds are lacking, and I'm taking notes (like the level of detail you have on your wheels is just amazing!).

The whole thing is something to aspire to. Great job so far.

-BD-

  • Member since
    June 2013
Posted by bvallot on Monday, September 28, 2015 1:54 PM
I appreciate the thought BD. =]

On the bench:  

Tamiya F4U-1  Kenneth Walsh


  • Member since
    April 2015
  • From: New Hampshire, USA
Posted by UKguyInUSA on Monday, September 28, 2015 9:18 PM
Very nice indeedy! Great weathering, and, I love that you've airbrushed the markings on and not used decals, makes them more realistic! Cheers, Martin :)
  • Member since
    June 2013
Posted by bvallot on Friday, October 16, 2015 4:44 PM

Thanks Martin. =]  It's something I've been doing more of lately and the more I can make something "my own" the happier I am with the outcome.  These last few builds have me wanting to redo some of my older planes. 

Next up, I finally tackled the canopy/windscreen.  I tried out Squadron's vacuformed canopy and it's a daunting task carefully cutting out all these parts.  Patience is truly your friend here.  I did manage to cut a gash into one piece, but was able to fix it with some scratch building.  Quick thinking!! =] The Montex mask for this kit has something for the canopy as well and fits it nearly perfectly for the most part.  A little Tamiya tape cutting here and there, and everything works out real nice. Real time saver. =] 

Starting with the top frame in this picture, I took some acetate and cut a small rectangular strip to make up the slipstream vent for the gunner/radioman.  A test piece confirmed that Tamiya ETCement works beautifully here on these two materials.  The rest is pretty self explanatory.  The Montex set has both exterior and interior masks for the canopy which allows for easier painting to pull off the chromate green interior color.

 Untitled by Britt Vallot, on Flickr

These are just pieced together for now.  Nothing is glued yet. But I wanted to include this view to show just how nice the Squadron set comes out.  I'm quite happy about them. 

 Untitled by Britt Vallot, on Flickr

I wanted to take a moment to address the prop.  Academy's (AccuMin) kit part is a really nice representation and there are several ways to see it in action.  Some were left with the spinner off.  Some were on and painted red...most seem to have been black and among these black it often appears to be semi-glossed for whatever reason.  That was represented here since it seems to pop up most often.  For the blades, early SBD's had the three color Red/Yellow/Blue stripes on the tips of the blades, but with references I've used for this build I've found a good number of props from early 1942 throughout Midway in the summer with the Yellow tips for SBD -2/3s.  Many didn't seem to have the manufacturer emblem on the blades either.  What I setteled for here was to apply the decals for the blades but paint over them with some thinned out NATO Black.  It does a great job at being a slightly lighter black and completes the illusion for our prop weathering.  =] As far the prop goes...It's primed in Alclad grey primer, painted in Alclad Aluminum, a small strip of Tamiya tape masks off the bottom of the prop to maintain that color as seen in photos, blades are painted in a mix of Flat Black/NATO Black from Tamiya paints.  The yellow was painted before the black went down and was masked.  A touch of the Detailer on the hub of this prop and it was ready for a coat of Clear, the decals, the Flat coat, NATO Black again, and another Flat to seal it all for good. Phew! =]

 Untitled by Britt Vallot, on Flickr

I didn't take any other pictures of this process cause well...it's just a prop.  But you can see here how it all works out.  A little extra effort goes a long way in the end. This prop hub really shines in better light.  Alclad is a modeler's best friend!

Moving on to tie up loose ends. Which is another way to say I'm procrastinating building the actuating arms for the dive flaps. =P  I put together the kit 1000 lb bombs and the smaller 250s.  There's really no need for AM parts here.  The detail is more than adequte.  The smaller 250 lbers could use some love, but they'll do for me. I did sand down the spinner on top to a truer scale.  These bombs went thru an awful lot of banging around while being transported from place to place.  I tried to represent that here.  The trick to pulling this effect off is to layer your paints.  I started with Alclad Semi-Flat Aluminum and painted over it with an Olive Drab.  I gently sanded some of this down in places of wear to reveal the Alclad underneath.  I followed this up with a mix of Red-Brown and NATO Brown and thinned it down considerably to maintain control of how much went down.  I wanted to see some of the darker colors underneath.  A coat of hairspray went on next and was allowed some time to dry.  A couple spots of yellow (in accordance to photos of US 1000 lbs) was painted and masked and a much lighter Olive Drab was painted on top.  I stayed more in the Khaki range as many of these bombs saw similar fading in paint out in the PTO.  Some water was added to soften the paint and was weathered to my liking.  One last coat of my lightened mix of OD went down to bring back certain spots and that was that. 

 Untitled by Britt Vallot, on Flickr

 Untitled by Britt Vallot, on Flickr

 Untitled by Britt Vallot, on Flickr

The .30 MG also needed completing.  Again the kit parts are pretty good.  No need for AM stuff.  I did add some aluminum tube to dress up the barrel. In Osprey reference photos, you'll see some kind of extension on the barrel (flash suppression?) and the sights on top.  I never needed the outdated sight from my P-40B for Pearl Harbor so I used it here.  I'll add the other piece to this once it is attached to the gunner seat.

Pretty straightforward.  Similar painting and weathering.

 Untitled by Britt Vallot, on Flickr

 Untitled by Britt Vallot, on Flickr

And that's a wrap for now.  Work has me incredibly busy and it's been difficult to get any kind of progress here it seems.  Once I have the flaps complete, I'll put together my base and I can have some finished pictures up here for the finish line.  

Any questions or comments are always welcomed.

 Untitled by Britt Vallot, on Flickr


On the bench:  

Tamiya F4U-1  Kenneth Walsh


  • Member since
    June 2014
Posted by BrandonK on Friday, October 16, 2015 6:11 PM

Man that is looking really good. Amazing work there. You make me want to build my early war Navy stuff. I have a few kits. We need to do a GB for early war birds. 

BK

On the bench:

A lot !! And I mean A LOT!!

2024 Kits on deck / in process / completed   

                         14 / 5 / 2  

                              Tongue Tied

  • Member since
    December 2002
Posted by 7474 on Saturday, October 17, 2015 12:23 AM

That's awesome work. I've wanted to paint my own markings, I might have to try that. Looks good, the weathering isn't over done. 

  • Member since
    August 2013
Posted by Jay Jay on Saturday, October 17, 2015 7:35 AM

That's just fabulous work BV. I gotta try everything you posted.

I've been using Testor's Dulcote laquer for my final paint coats but it seems to come out a little semi gloss.  Yours looks dead flat and I like the look of it. 

What do you use for your flat coat ?


 I'm finally retired. Now time I got, money I don't.

  • Member since
    June 2013
Posted by bvallot on Saturday, October 17, 2015 3:28 PM

Thanks guys!

That would be great Brandon.  I've been eyeing up that TBD-1 Devastator by Great Wall for a few years now, but truthfully I've got a few in the stash I ought to do first. =P  My only plea is that it run for a year.  It may be awhile before I start my next kit. ;)

Jay Jay: I previously used the Testors dullcote and found it very good as well. What I've been using lately is Alclad's Flat Coat.  I've found every so often [in a spot or two] that if I didn't mix it well enough (...I'm guessing here) I found the same kind of sheen that you're speaking of...so now I just thin it down a bit with a low odor lacquer to keep it moving.  You don't need much.  You may try the same with your Testors flat and see how that suits you.  I know Lawdog uses the Testors thinned down as well.  His flat coats seem to come out quite nice.

Just be sure not to let it get too thick, too quick!  =]  You should be fine.  I do recommend the Alclad flat as well though.  Very flat. Very dependable.  Just be sure to keep your bottle cap clean.  

On the bench:  

Tamiya F4U-1  Kenneth Walsh


  • Member since
    February 2014
  • From: Michigan
Posted by silentbob33 on Saturday, October 17, 2015 6:07 PM
This looks stunning, I can't wait to see it all come together.

On my bench: Academy 1/35 UH-60L Black Hawk

  • Member since
    June 2013
Posted by bvallot on Sunday, October 18, 2015 10:28 AM

Thanks Bob!  Me too.  It's taking way too long.  There's so many more to build. =]

On the bench:  

Tamiya F4U-1  Kenneth Walsh


  • Member since
    February 2011
Posted by knox on Sunday, October 18, 2015 6:58 PM

    Your work is simply stunning!!  

                                                   knox

  • Member since
    June 2003
  • From: Cavite, Philippines
Posted by allan on Sunday, October 18, 2015 9:51 PM

Incredible work. Im learning a lot of new techniques for weathering.

No bucks, no Buck Rogers

JOIN OUR COMMUNITY!

Our community is FREE to join. To participate you must either login or register for an account.

SEARCH FORUMS
FREE NEWSLETTER
By signing up you may also receive reader surveys and occasional special offers. We do not sell, rent or trade our email lists. View our Privacy Policy.