SEARCH FINESCALE.COM

Enter keywords or a search phrase below:

1:24 Airfix Hawker Typhoon Car Door Version Start-to-Finish Build

8939 views
69 replies
1 rating 2 rating 3 rating 4 rating 5 rating
  • Member since
    March 2003
  • From: Virginia
Posted by Wingman_kz on Wednesday, March 4, 2020 6:29 AM
This is great. Sorry for not commenting more often but I'm really enjoying seeing what you're doing. And you're moving right along with it to. Very cool. It may not all be a perfect fit but Airfix sure packs a lot of modeling fun in these big kits. Tony


  • Member since
    September 2008
  • From: Ancaster, Ontario
Posted by maxfax on Wednesday, March 4, 2020 9:24 AM
Wow, This is just fantastic! Rob

On the bench:  Revell 1/72 HCMS Snowberry


  • Member since
    March 2012
  • From: Louisville, KY
Posted by Builder 2010 on Wednesday, March 4, 2020 6:16 PM

Thanks guys! Glad you following along.

Ran into a minor problem today. After gluing up the right fuze side, filling the upper seam gaps and sanding them, and restoring the now-almost-removed rivet details, I attempted to install the belly pan. I was expecting this to just plop in. It didn't!

Something was drastically wrong. It overlapped the tail joint by a 1/16" and didn't sit down along the joint anywhere. I could not push it further forward. 

The entire fuselage and wing assembly was for some reason sitting 1/16" farther back than it should for the belly pan to actually fit. I do not know how this error was created since everything was located to the main wing spars and lugs on the body frame. There was no way to move it forward upon assembly, even if I wanted to. My only redress was to work the pan until it fit.

In looking at the firewall I could see that the body was sitting farther back than it probably should. 

First thing was to cut the 1/16" off the back end of the belly pan. This got it to at least fit in the space. I then had to relieve various alignment lugs that were supposed to interlock with each other and were now interfering. 

The gap at the tail was rather large so I chose to fill it with Bondic. There were other problems at the belly pan front caused by the same 1/16" rearward misalignment. The wing fillets didn't line up and, again, it was 1/16" too far back. At first I thought I would trim the fillet to force it to fit, but decided against it since it was eliminate the rivet detail. Here's how it looked before any work was done on it.

Not only did it not fit looking from the top, but it also didn't fit below. I chose to reform the entire fillet with Bondic. Here was the Bondic before sanding.

I filled the underneath with a could of strips of styrene which I then shaped to blend the fillet.

After reshaping and opening the rivets, the fix is passable and wil be okay after the flaps are in place and all the painting is done. 

With this mess fixed a bit, I turned my attention back to the remaining joint. I applied tape very close to the joint edge so I could protect the raised rivet detail. It's one thing to re-drill the sunken rivets. It's an entirely another thing to rebuild raised rivets. I can be done, but I don't want to do it. You can you Archer rivet decals or apply tiny dots of resin, but either is a pain in the butt. The filler is drying overnight and will be finished tomorrow. This image really shows how Airfix created a beautiful stressed-skin look to the plane. It was a missing in model plane construction and this scale lets them pull it off.

Since I'm not using any of the nose cowling, I need to close up that unsightly gap in the firewall. A piece of 0.020 X 0.030" sytrene filled it nicely. I'll have to mask and paint it too. I also noticed, that my little aluminum airbrushing I did around the model put some fine overspray on the the painted parts. OH NO! It actually looks like weathering. I'm going to weather the engine a bit more anyway so it will be okay in the end... I hope.

What looks like a gap on the body over the firewall is actually filled.

I'll finish up the belly pan tomorrow. Next up is the tail surfaces. BTW: got some research from some folks that spoke to whether parked Typhoons had their flaps up or sagging a la P-51s. Verdict: Flaps up unless being inspected or repaired. I may have them up especially since that fillet area ain't so hot. 

  • Member since
    March 2012
  • From: Louisville, KY
Posted by Builder 2010 on Friday, March 6, 2020 6:21 PM

Yesterday, I finished the belly pan seam, air brushed the exhaust stacks flat aluminum and then dark iron. I did get to glue a couple in before the end of the session.

All I did today was get the remainder of exhaust stacks on the Saber. It's now a "fully functional engine". I touched up the dark iron, added some black weathering powder, painted the outlet flat black, and went back and blended it some with a brush with some IPA. I looked at as many pictures as I could find to see just what color these realy are. Most are B&W so color was hard to determine. The seam down the middle of the stacks is intentional and represents a weld seam. It is NOT a mold line.

On Monday I'll be finishing up flight surfaces and start thinking about painting the beast.

  • Member since
    March 2012
  • From: Louisville, KY
Posted by Builder 2010 on Monday, March 9, 2020 5:48 PM

Short session again, but progress to report. The horizontal tail is one and both the elevators and the trim tabs are movable. Before showing that, I took a picture of the fully mounted fuselage with all of its filler. You can see in this image how far forward the leading edge is. This is the result of the heavy weight of the Saber (2,400 pounds) and the associated cooling system and coolant. The engine is heavier than a similarly powered R-2800 radial.

I got the tail planes glued together. In this scale, even the trim tabs are positionable.

Unlike the dubious Trumpeter PE hinges, these plastic ones are more stable. Being all styrene, it is very easy to get glue into them so I was very careful. To prevent glue from causing any problems I applied some petroleum jelly on the hinge points so they would remain glue-free. It worked.

  • Member since
    March 2012
  • From: Louisville, KY
Posted by Builder 2010 on Tuesday, March 10, 2020 6:40 PM

Rudder, ailerons and flaps went in today. The airplane could now fly if it wasn't made out of a ton of styrene. I also started detailing the wheel wells. Like the elevators, the rudder was fully movable including the trim tab. I did get some glue on one the hinges since it's moving very sluggishly. I'm not going to play with it, so if it can be posed I will pose it and forget it. It's nice that it fits into the concave surface and is hinged like the prototype. The gap looks a little large. Real planes have tighter fits on control surface joints.

I then worked on the wheel wells. This required some pre-planning. Some of the details can go on now, but others that tie directly to the struts will have to wait until painting is complete. I don't want the strut sticking out when I have to seal off the wheels. There was an electrical line that attached to three places (black piping), a hydraulic accumulator, the retract cylinder along with its attached piping, and then another frame piece that blocks in the cylinder which is why it didn't go on when the rest of the wing indterior was installed. I used the chrome pen to highlight the retract piston rods. With a model of this scale, they could have engineered actual retracting gear including the pistons and locking links. I should have scratch-built something... oh well... that plane has left the hangar.

Lastly, I install the flaps (glued in the retracted position) and the ailerons. Ailerons went in slightly differently in that they had a single piece hinge piece that attached in three places to the aileron wing connector piece. Ailerons move nicely. You have to trim the intermediate edge of the outer flap so it sits correctly next to the inboard flap. I'm also annoyed that the 1/16" error again shows up with the lower flap sticking out past the wing trailing edge by that pesky amount.

And a view from above. You can see the flap sticking out. I set the ailerons correctly with one being up while the other is down.

Another day or so of assembly (come more parts around the cockpit) and I'll begin the painting process. The model has some real heft. There's a lot of plastic there!

  • Member since
    October 2018
Posted by familyman on Wednesday, March 11, 2020 5:21 AM

I always enjoy reading your posts and seeing the results of your work. You do a great job documenting your builds and this is another excellent example.Yes


Mike

"An honest man's pillow is his peace of mind"

  • Member since
    March 2012
  • From: Louisville, KY
Posted by Builder 2010 on Wednesday, March 11, 2020 6:14 PM

Thanks! I hope I can build them as good as I write about them. Today I was wondering about that.

In one of the steps, it had you cut away the top deck behind the cockpit and install a new piece. I had noted this on the plans, but for some reason thought that it didn't pertain to the version that I was building. I then find out that a) the canopy wouldn't fit, b) there was no place to attach the upper seat belt anchor, c) I had discarded the part thinking that it was not going to be used, and d) even if I had the part, I was WAY TOO LATE to install since the fuselage was well glued together.

The reason for this mod was that the model's fuselage was actually for the bubble canopy (later) version of the Typhoon. The clue was the canopy tracks sticking up from the fuselage. And I was very careful to not damage them in the build. This was because the video I watched for the build made a point to tell you "Not to sand it off since it's part of the model." Unfortunately for me, he was building the bubble top version which Airfix had issued earlier. The included new sprue Z was for parts that were unique to the car door verison and this part was on that sprue.

It replaced the bulge and included pin holes for the fixed canopy and the upper seat belt. I had to do some minor surgery to create a surface that would accept these unique parts. I first taped the parts I didn't want destroyed.

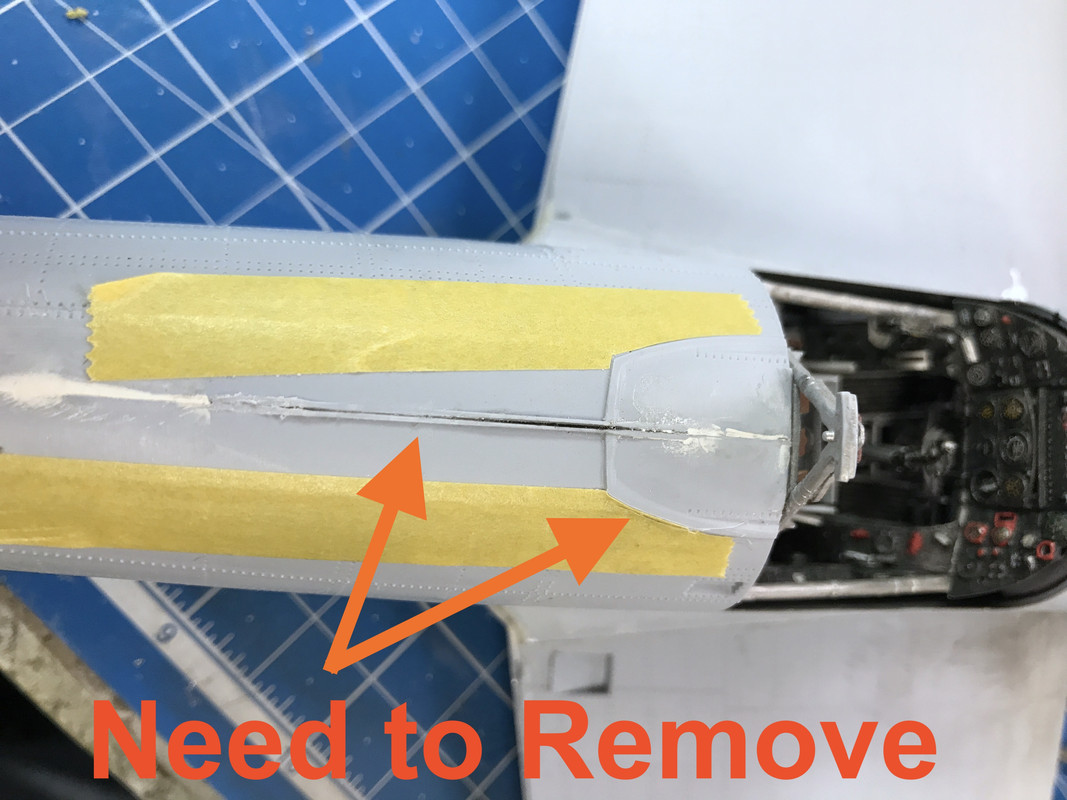
I used my MicroMark shaving chisel to remove most of the material and then sanded it with the MicroMark power sander and then hand sanding. I re-scribed the panel line and attempted to restore the now-missing rivets. I'm not too good at this riveting thing.

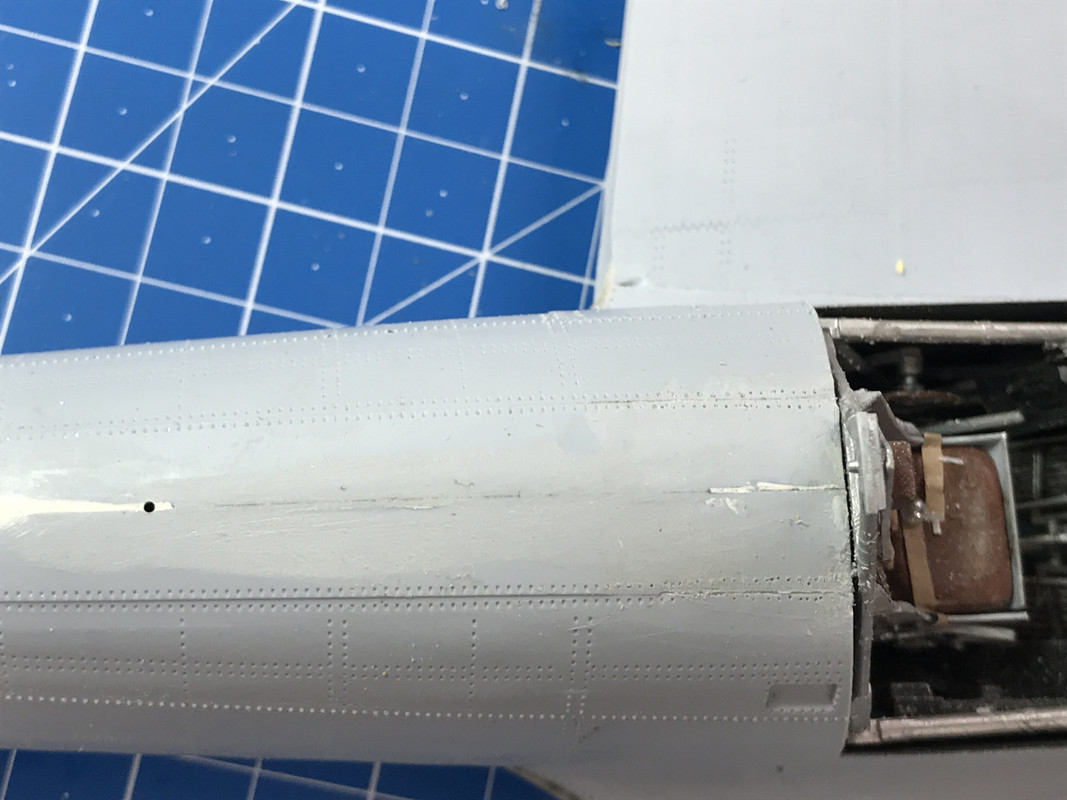
I needed to locate and drill holes for these two parts. I started with a 0.032 and ended enlarging it to accommodate the parts. It was a careful drilling exercise because it was right on the glued seam.

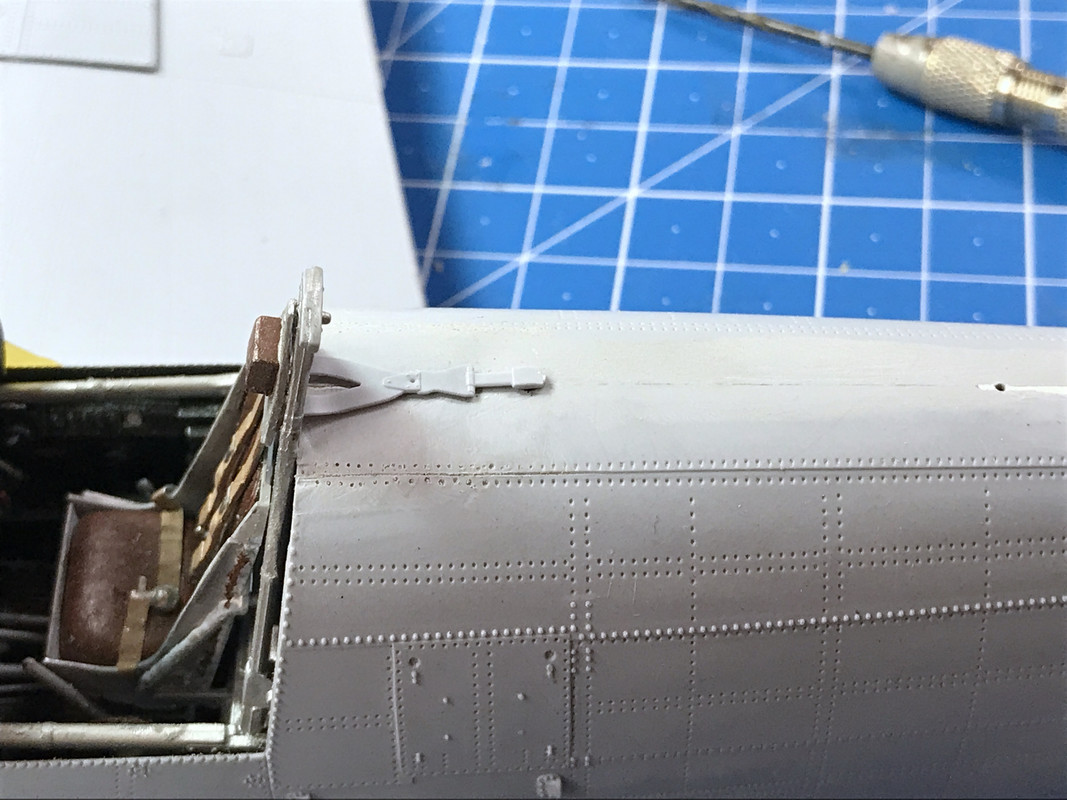
I installed the belt. This will have to wait to be painted AFTER the plane is painted. It looks like the deck behind the cockpit is camo color and not flat black. I couldn't find any reference in the instructions about how to paint this area. Anyone out there know? I didn't want to install the belt after painting the body for fear to screw it up.

I'm recruiting the gun bay covers that I'm not using for the model to cover the bays for spray painting. I used some sticky wax to temporarily hold them in place. It's not sealed perfectly, but shouldn't give too much leakage. I may seal it better. I should experiment spraying some clean water and seeing how much gets in and where it ends up.

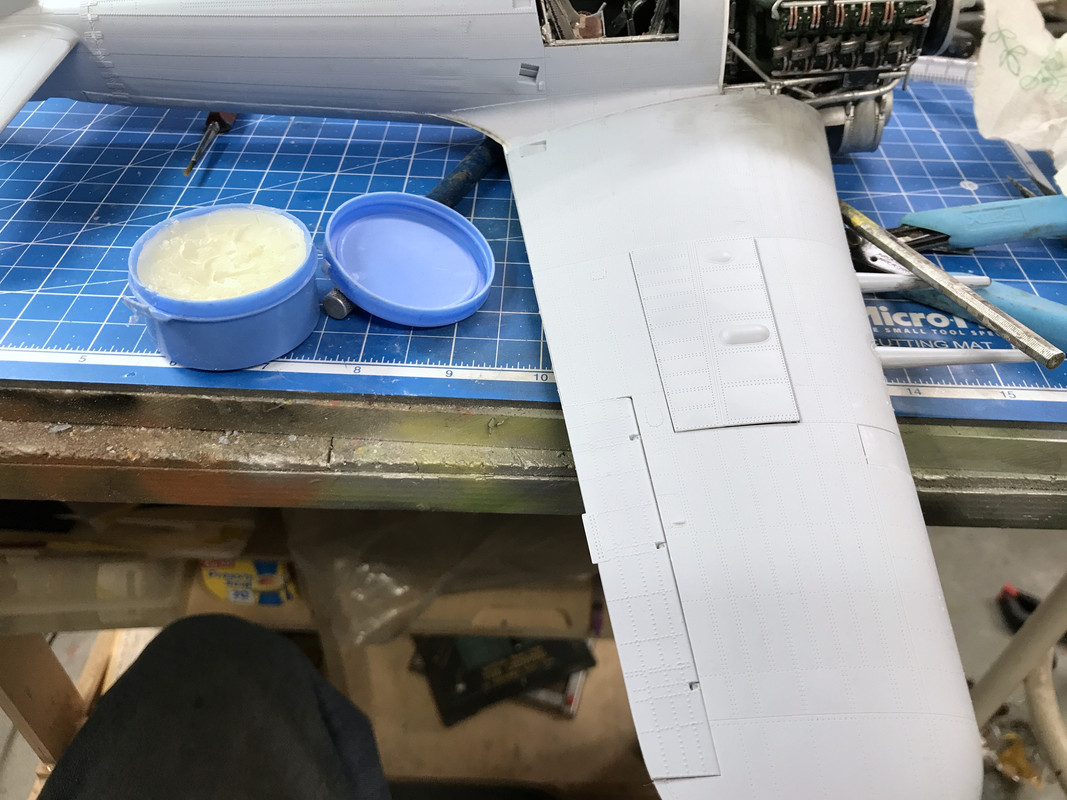
I installed the cowl part that covers over most of the instrument panel and, unfortunately, hides a lot of it. This was a bit of a struggle. It didn't fit right. I'm finding the engineering in these latter stages a bit wanting. I'm used to Tamiya and, boy, that really spoils you. I've dealt with Trumpeter's early troubles too. The cowl was being held off the lower part of the fuselage by the panel being too high, and there was a 0.040" gap on the starboard (right) side.

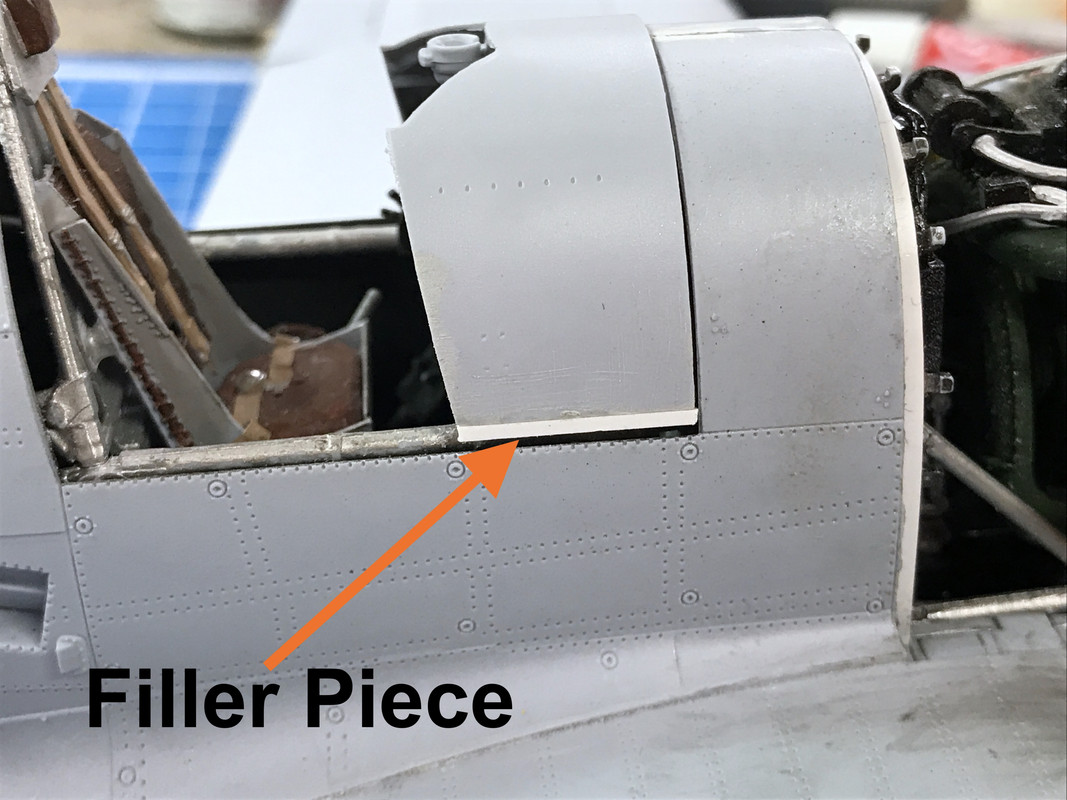
I removed some of the panel material mostly on the left side and then added a piece of styrene filler. I then glued it down and held it there with some tape. There's still a mis-match of height, although not horrible. I may or may not attempt to adjust that. This part of the model is very exposed. The front windscreen sits at the very back of this part. Before gluing it down, I air brushed the interior with NATO black and added a few more parts that also would not be easy to see when all built.


I prepared the main wheels. They had a terrible seam and I sanded the heck out them. They didn't require any filer, just sanding.

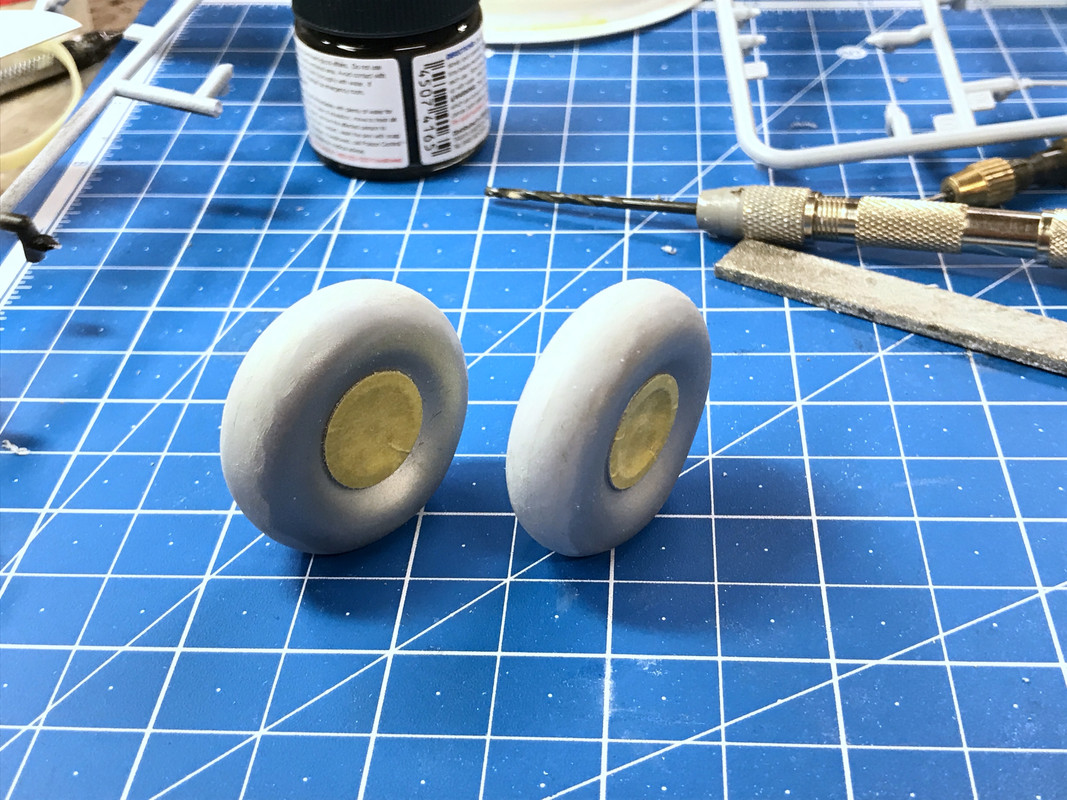
Notice the wheels are masked. I make circle masks by measuring the diameter with a digital calipers. I divide this number in half and set the same tool to this new dimension. I then use a specially prepared small Starrett machinist dividers with one point shaped to a chisel edge that's in the direction of rotation. I then cut the circles by taking a few light passes on the masking tape. It leaves a small pinhole in the middle which doesn't matter.

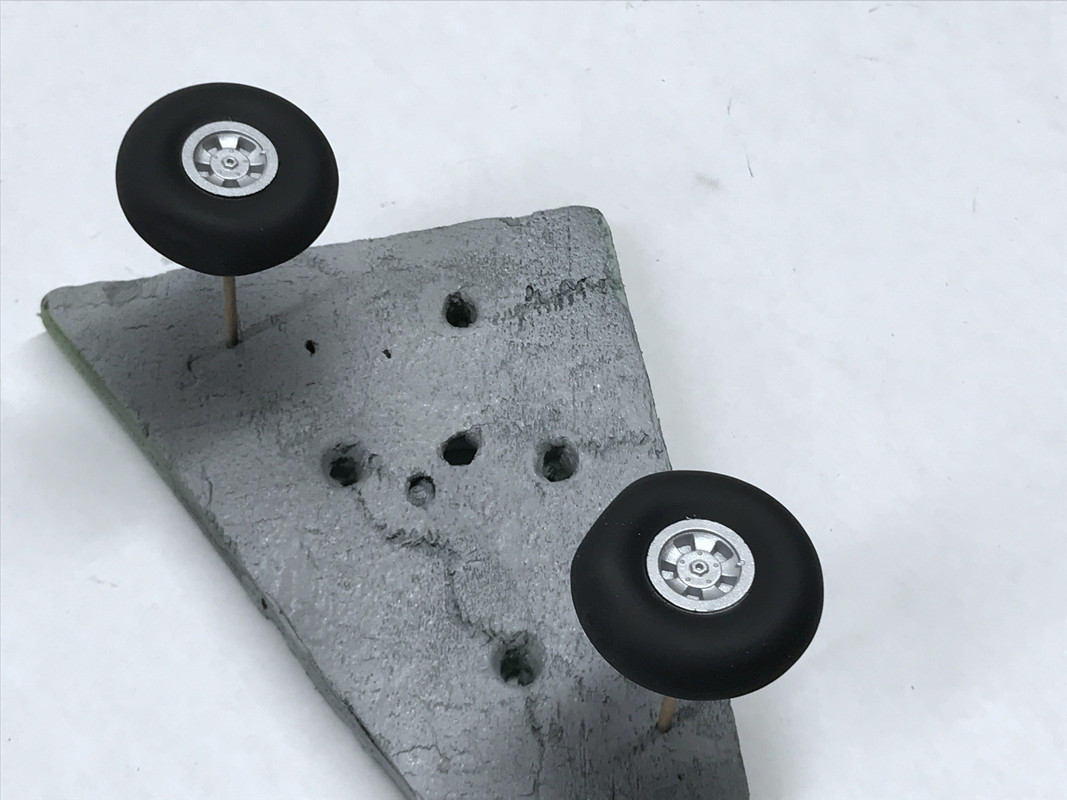
I sprayed them Tamiya Rubber Black. The paint's delicate.

Tomorrow I'll do more subassemblies (landing gear) and start getting ready for paint. The gear doors get a sliver of the invasion stripes. I may attempt to put them on the wing so they'll be masked with the rest of the model.

  • Member since
    March 2012
  • From: Louisville, KY
Posted by Builder 2010 on Thursday, March 12, 2020 5:50 PM

Short session... Touched up wheel paint, prepared a mask for the cockpit, completely broke off the top of the seat back, weathered the engine, and repaired the right leading edge wing joint.

The cowl fit was improved when the joint with the filler re-opened and I was then able to glue it with CA in a better position. There's still some misalignment on the upper left side, and I'm thinking about filling and sanding that. During all this handling, I finally completely broke off the top of the head rest frame. It had partially severed it a half dozen times since it sticks up when beyond the fuselage and is quite delicate. It's going to remain off until I can properly and safely reconnect it. I'm going to drill the frame pieces and use 0.010 piano wire (Guitar E string) to reinforce it. It will be protected by the rear canopy and armor glass that goes in when near completion.

I masked portions of the cowl to prevent removal of the rivet detail. When the lower joint on the right side broke I was worried, but it turned out to be a blessing in disguise since I was able to re-glue it with CA in a better position. I also prepared a cardboard mask for the cockpit and have that seat top out of the way didn't hurt either. There's more tape under the mask keeping overspray off the panel.

Also shown in this image I painted that filled area at the edges of the firewall. Looks much better. I spent some time aging the engine some more with a few more details painted and using Tamiya Smoke on the lower reaches to dirty it up a bit. I need to get some Mig or AK oil leak materials.

While doing all of this, I noticed that the pesky seam on the right inboard wing leading edge open up. This was the one that was stressed over that internal fuel tank. I first used solvent cement, but it wasn't cutting it. I then used thin CA carefully applied into the joint and help it by hand, using accelerator until the joint was stable. I then schmered a liberal amount of Tamiya filler that I will sand down tomorrow.

Needless to day, I would rate today's session as one step forward and two back. That leading edge will survive regardless. Getting closer to paint.

  • Member since
    March 2012
  • From: Louisville, KY
Posted by Builder 2010 on Monday, March 16, 2020 6:05 PM

Finished masking the bird. Since the pictures, I added some more masking around the cockpit to close even more gaps. I'm unable to prime it since I need to do that outside and the weather is not cooperating this week. I'm using the closed LG doors as a mask for the wheel wells. I used high quality modeling clay to hold the doors in place and put an additional amount around the gear mounting stub so paint won't leak in there too. When I set up the masks for the Invasion Stripes, I also mask the real gear doors since they get that paint also. Took a bit of work to mask all that engine stuff.

For the tail wheel well I just stuffed in wet paper towels. I chose to NOT do this for the cockpit since there were details there that would not take any pressure. I chose to build a cardboard cover instead.

To kill some time, I built the tail wheel and the main gear. The main gear have to plastic studs that fit into the wheels. You can't mix up which wheel goes where since the half-round pins face in opposite directions and I you put the wheel on the wrong side, the flattened-tire area is on the wrong side of the wheel. This pin needed major surgery to get into the wheels. The mold clearly had a defect and there was a plastic hood over the pin that needed to be removed for it to fit.

I added the Bare Metal Foil oleo sleeve and then added the separate scissors links. It was nice that this piece was separate becuase it made it much easier to apply the foil. 

Tail wheel was simple and will rotate and swivel. I thought about replacing the styrene stem with brass, but it's bigger than 1/16" by about 6 thousandths and I thought it might be too sloppy a fit.

The model is at a standstill until I can get some primer on it. As soon as I get a mild day, with low wind and no rain, I'll do that. All the color coats I can door in the basement since they're all acrylic. I'm going to use Tamiya Gray Primer.

  • Member since
    March 2012
  • From: Louisville, KY
Posted by Builder 2010 on Friday, March 20, 2020 10:27 PM

The weather cooperated so I was able to rattle can spray the Tamiya Gray Surface Primer. I have to spray solvent-based paints outdoors. It was over 70 degrees F and breezy, but I was able to manage the breeze by spraying closer and moving faster. Didn't get any runs... amazingly.

After the base dried I sprayed the leading edges flat aluminum so I could use liquid mask for future paint peeling. I also sprayed the propellor blades on the sprue the same color for the same reason.

I had assembled the two-part gear door with some masking tape and taped them on top of the solid gear doors that are masking the wheel wells. I did this so they could be bottom painted at the same time and marked for the invasion strips to be aligned with the strips on the wings proper.

I added the Microscale liquid mask to strategically place the paint wear. When dry, I airbrushed the bottom color: A-K Air RAF Medium Oceean Gray from the RAF set I bought just for this model. I sprayed it unthinned, although, even though it's labeled AIR, it could have been a tad thinner. I have their special thinner.

I applied the Microscale liquid mask as best as I could imagine the paint wear. I've never used the hairspray or salt chipping technique and probably should have done it here, but it's a big expensive model and I didn't want to experiment on it.

After the mask dried I airbrushed the RAF bottom color. Paint was still wet when I took this picture.

I assembled the propellor. It consisted of two parts for each of the three blades and a two part hydrodynamic hub. The hub was in two halves that captured the blades. I clamped it to make sure it was tighly glued.

I'm not painting the hub since it will be buried under the spinner and will never be seen. I applied liquid mask to the blades' leading edges and airbrushed the assembled unit Tamiya semi-gloss black.

When dry I masked the blades for the yellow tips. I airbrushed the tips white first since it provides the best base under yellow. 

After de-masking and letting it dry a bit, I rubbed off the liquid mask exposing the bare aluminum underneath. I think I may have overdone this a bit. I was thinking about doing the same on the spinner and gave it a base coat of flat aluminum. After looking at a bunch of pictures of WW2 Typhoons, I couldn't see any apparent damage to the spinners and won't remove any top coat on them. I didn't see a lot of damage to leading edges either for that matter.

The rocket rails are in two parts and they too are bottom-color. I assembled them and mounted them in my lazy susan painting holder that was a raffle prize for the Military Modelers Club of Louisville, 3D printed by Ed Tackett. It worked perfectly for this application. I painted these off the plane and will add them near the end when all the camo is done and decals in place.

This paint seems to dry at the same rate as Vallejo, meaning it's dry to the touch in about an hour, but not really dry for at least 24 hours. It has a stickyness now and that's not a good surface for marking camo lines or additional masking. I'm also working on some 3D printing for an elaborate 1:48 Victorian house for my model railroad, so I have something else to do while waiting for the paint to dry.

While sitting under "house arrest" with my wife and I not going out during this crisis, I'm very happy that as a model builder, my life actually hasn't changed a bit. Working alone in my shop all day long gives me lots of social distancing without even thinking about it. My wife is my main concern, since not being a hobbyist, she's not getting much psychic stimulation. We're going to have to work on that.

  • Member since
    March 2012
  • From: Louisville, KY
Posted by Builder 2010 on Thursday, March 26, 2020 6:04 PM

With being in the house my modeling is helpful, but my wife and I are also going out for walks. As a result, I'm working on several projects at once. I'm building stuff for the railroad (mostly working on the 3D printer) and also doing things for the Typhoon. To that end, I assembled the rockets today and sanded all the little inconsistencies. I drilled a 0.020" hole in the tail of each and another hole in the back of the launch rails. The holes on the rockets has two functions: it provides the anchor point for a wire that will simulate the ignition lead. This lead will go to the launch rail also. It also provided a convenient place to insert a piece of phos-bronze wire that will hold the rockets for painting.

I'm holding all the rockets in my lazy susan/alligator clipped rotating fixture.

Notice the exquisitely "neat" work area. This is the main reason why I can't possibly do any master builder videos, which some people have suggested that I do. I am WAY too disorganized to be videoed. It would be a disaster.

Tomorrow I'll airbrush the olive drab and then make the concentric masks needed for the bulls eye decoration on the rockets' tips.

  • Member since
    March 2012
  • From: Louisville, KY
Posted by Builder 2010 on Friday, March 27, 2020 3:39 PM

First thing today was masking the bottom top demarcation line and then completely masking all of the bottom color areas. I had just gotten my new supply of Tamiya tape from my local hobby shop, Scale Reproductions Inc, which offered curbside service. I used blue tape for the large areas since it's much less expensive. I use Tamiya tape exclusively for all hard edges.

The flange around the gun shields is still supposed to show bottom color as are the entire shields themselves. I used my Tamiya Flexible Masking tape to tightly curve around the flange. If there's any leakage, I'll go back and touch up.

I then laid out where the Invasion Stripes were going to go and masked off the entire area. I didn't want to deal with the other colors showing through. The bottom color is pretty neutral and shouldn't be a problem. The painting plan sheet shows the distances in mm where the stripes go. I then painted the A-K Air RAF Dark Green straight from the bottle. I had to get used to how it flows and had some runs which I brushed out by hand, force dried the first coat with a heat gun and then shot a second coat which leveled out the previous troubles. I estimated where the Dark Ocean Grey will go and left it sort of blank. I'll mark out these areas more clearly in pencil after the paint dries a good 24 hours. I will decide whether to hard mask, soft mask or freehand as I go forward. I tend to lean to freehand. I did this with the Thud and it worked pretty well. The A-K paint dries to a semi-gloss and I may not have to gloss coat prior to decaling. That would be nice.

The last thing done was spray the rockets Tamiya olive drab. These shouldn't be weathered since they would only be used once.


  • Member since
    May 2013
  • From: Indiana, USA
Posted by Greg on Friday, March 27, 2020 4:19 PM

......Still following along and enjoying watching your progress.

  • Member since
    March 2012
  • From: Louisville, KY
Posted by Builder 2010 on Saturday, March 28, 2020 4:55 PM
Good… unless people occasionally respond I start thinking I'm writing all this stuff for myself… and I don't really need to do that.
  • Member since
    April 2015
Posted by Mopar Madness on Saturday, March 28, 2020 6:57 PM

I try to use blue masking tape too for large surface areas. Looks like you can actually see the finish line from here! 

Chad

God, Family, Models...

At the plate: 1/48 Airfix Bf109 & 1/35 Tamiya Famo

On deck: Who knows!

  • Member since
    December 2005
  • From: Goteborg / Sverige
Posted by Svenne Duva on Sunday, March 29, 2020 9:24 AM

Builder 2010

Didn't get much done today. Wrestling with my 3D printer. It was a draw.

Got the first coat on the Saber.


Brilliant!

Love the bakgrund story.

Have the kit since more then a year already, instruction booklet so worn by now I am thinking of contacting Airfix to see if they can get me a new one...

Catching up on your posts since late Jan. Most inspiring! 

Keep them coming please :)

Very Best Regards

Svenne 


sic transit gloria mundi

  • Member since
    May 2013
  • From: Indiana, USA
Posted by Greg on Sunday, March 29, 2020 10:34 AM

I just reviewed some stuff I missed back on page one. I know this isn't exactly on point, but I sure like that new cutting mat. I'm cleaning up my mess and I want one too.

Back to the Typhoon project, I keep watching your progress, and lookoing at a few of these in stock for around $120 US. So tempting. You're killing me here. Stick out tongue

  • Member since
    March 2012
  • From: Louisville, KY
Posted by Builder 2010 on Sunday, March 29, 2020 12:21 PM

In these times I wouldn't use the word "killing". Perhaps "greatly frustrating to the point of personal harm"? My wife and I have a deal, "no model work on the weekends". With little else to do, it's calling me... I have some finished work hanging in the 3D printer for the "House by the Railroad" project. I'm working that simultaneously since I have to print out many components before the job is ready to build. Besides, the drying time on the A-K is so long that I have to find filler projects to do while waiting.

The cutting mat is already showing signs of wear. By building on it in addition to cutting, it's getting CA, Bondic, paint and other contaminents on it. That's just the way I work. When I was a kid, it didn't take me long to make my brand-new school notebooks to look like a war zone.

  • Member since
    November 2018
  • From: Saskatchewan, Canada
Posted by sickdude on Tuesday, March 31, 2020 3:31 PM
I think it's about time I pop back in, to say that I've been following along, and thoroughly enjoying the build, this whole time. It's quite an eye-opening model, and you are doing excellent work on it. Airfix sure did some amazing engineering on it, kudos to them. Waiting to see what's next Big Smile.

William (Willy)

 
  • Member since
    March 2012
  • From: Louisville, KY
Posted by Builder 2010 on Wednesday, April 1, 2020 5:26 PM

Very glad that you and the others are following the thread.

I painted the RAF Ocean Gray today, doing it all freehand. I had some minor errors in where I painted the RAF Deep Green, so I first used the detail airbrush and repainted the model to better conform to the camo pattern. Surprisingly it dried pretty quickly and I was able to start preparing for the ocean gray. I did the gray and then went back and forth a couple of times to ensure that the feathered edges were decent. I may be making an error here since the RAF camo may have had harder edges. Guidance here would be helpful. If I need to harden up the edges that can be done.

I had already laid out the masking lines for the invasion stripes on the topsides, so I peeled off the masking and remasked the edges of the white background using thin Tamiya tape.

I then went back and completely masked all the previously shot color areas.

Since the bottom was already completely masked, I had to remove the masking where the white invasion striping backgroud would go. I used the tape positions from the topside to show me where to remove the bottom side masks.

To ensure a good paint line, like on top, I used the thin tape to hold the line. I did the same for the fuselage masking area. To help ensure no paint leakage, I went over all the masked edges with some Tamiya clear. Hopefully, this will help seal the end and prevent any leaks. I airbrushed the entire area with Tamiya XF-2 Flat White. My Badger 150 was sputtering and needed a better cleanout, so I diassembled it and plopped the parts into the ultrasonic cleaner for 15 minutes. That solved the problem. I've noted this before, but it bears repeating. The ultrasonic was purchased specifically to clean un-cured resin on my 3D printed parts, but it's been wonderful for cleaning all sorts of other stuff. I use the paint bottles that conform to the Badger suction cap. I want to resue them and cleaning them out is a pain in the butt. Now, After washing them with solvent, I put them in the ultrasonic and they come out spotless. 

When I had pulled the tape off that covered the invasion stripe area, I inadvertantly pulled off the liquid mask exposing the "base metal" underneath that was suppoded to be for leading edge paint chips. I've made an executive decision. The model represents when it was freshly painted with invasion striping (which was often done in the field) and therefore it, and only it, will cover the leading edge with no paint chipping. All the exiisting color areas will still show some wear and tear.

The first color to go on is RAF Sky in a band at the rear of the fuselage striping. It will extend for 19 mm. I have pre-cut some masking to 19 mm to space out the rest of the black stripes that will follow. Believe it or not, in 67 years of modeling, this is the first plane I've ever built with invasion stripes. The spinner also gets painted Sky on this particular Typhoon version. The leading edges past the cannon get painted yellow on this version also.

Invasion stripes will be done tomorrow. Then I will do decal placement. Following that will be some tasteful weathering and painting the rockets. Lastly will be masking and painting clear parts and building the remaining landing gear parts. The end is in sight.

  • Member since
    February 2005
  • From: Cleveland, OH
Posted by RadMax8 on Thursday, April 2, 2020 11:56 PM

Just wanted to drop a note to let you know I'm here in the cheap seats, watching and enjoying your build! Impressive work so far, especially on such a massive kit. 

I also wanted to give my comments about the AK Real Colors "Air" paints. I believe the "Air" title simply means they are colors for aircraft, not that they are prethinned for airbrushing. I could be wrong, maybe someone else can confirm. These are the glass bottles, correct?

  • Member since
    March 2012
  • From: Louisville, KY
Posted by Builder 2010 on Friday, April 3, 2020 5:36 PM

Glad you're watching and to all my other home-bound model lovers. The "Air" comes in those convenient (sometimes) little dropper bottles like Vallejo. They're great for squirting small quantities into my gravity feed air brush, but don't give me any advantage to the bottle feed, bottle fed brush. They seem to spray very nicely un-thinned, so I'll take the meaning to be either interpretation.

I airbrushed the little region at the rear of the fuselage invasion strip area A-K RAF Sky. The instructions were ambiguous regarding the width of this feature. The dottle lines showed 19mm, but the lines were halfway in and halfway out of the sky-painted region and the illustration seemed to be smaller than the 19mm. I made it that size. After air brushing it and the spinner and backing plate (same color), I force-dried the paint and masked over it for the remainder of the invasion striping.

I laid out the distances with the digital caliper on both the fuselage and the top and bottom of the wings. Since the white was already applied, I had to mask off all the white areas to expose the part that was painted black. I used narrow Tamiya tape to work to the line and then filled the rest with blue masking tape. I did this first for the fuselage, then the wing tops and finally the wing bottoms. When I marked the 19mm, I did it in two places so it would help me getting the tape in parallel lines across the entire wing. I also re-checked based on the rivet pattern.

This was a finicky operation and took more than an hour to complete. On the bottom I was careful to mask both the wing and the gear doors which are only held there with tape underneath. I will remove them before painting the black and paint their stripes separately to ensure that the paint goes directly to the wheel well edge. I have the gear-up door fastened in place already to mask out the entire wheel well.

After masking I again went around and brush-painted Tamiya gloss clear to all the taped edges to pre-seal against any leakage. This worked perfectly on the sky portion of the aft fuselage. There was absolutely no leakage into the white area. I did not pull the tape for the aft portion so can't tell if that leaked or not. I'm assuming it did not. Regardless, touching up the camo areas is not as sensitive as touching up the white-painted areas.

This beast used a ton of masking tape. I'm going to use NATO black instead of flat black. I think NATO black appears as a normal slightly faded black that (to me) appears a bit more realistic. I will do the camo painting on Monday. I'm excited to see what it looks like.

My wife took a nice walk around the neighborhood this afternoon. The weather was wonderful and it's good to get out now and again. We are being very careful in our interactions. Hope all of you are doing the same.

  • Member since
    March 2012
  • From: Louisville, KY
Posted by Builder 2010 on Monday, April 6, 2020 4:16 PM

Chicka Boom, Chicka Boom, Chicka Boom Boom Boom... That's stripper music in honor of me pulling off a ton of masking tape unveiling the newly painted invasion stripes. There were only two leaks in all that masking. The clear coat worked perfectly. On leak was between the green and bottom at the tailwheel under the horizontal stab and that part wasn't treated with the clear coat. The other was a tiny spot on the wing. I was very pleased.

The bottom was as good as the top, and the clay holding the solid wheel door in place worked very well also. I had to be careful removing it, but it left no residue. It's special clay to make resin casting molds. The open doors worked well too with their stripes perfectly in line with the wing stripes as it should be.

I had some painted peeled exposing alumimun. Most were planned with liquid mask, one I think was just delaminating paint. I'm leaving them alone for the time being. I did some very minor touchup around the gun shield flanges also.

This chipping was intentional. Not the tiny white notch in the black. That was not a leak. It was a taping error which I touched up after I took this picture.

Next up will be a gloss coat a decal application. I will also mask and paint the transparencies. I do have the Eduard mask set for the plane.

  • Member since
    March 2012
  • From: Louisville, KY
Posted by Builder 2010 on Thursday, April 9, 2020 6:46 PM

Odds and ends today. Gloss coated the bird in anticipation for decals. Finished painting the rockets and worked on the gun bay folded access covers.

I made a template to paint the three diameters of color for the rocket tips. It didn't work out quite as well as I wanted and ended up doing a lot of finicky touch up painting. It worked mostly. The last technique I tried for the small yellow center was just dipping the rocket nose in a little puddle of Vallejo yellow. That would have been the best way to do all gthree colors if I were to do it again...which I ain't.

The outer ring is red, middle white and inside yellow. I also painted the flat aluminum brackets that hold the rocket to the slides. The rocket warhead needs a decal added and for that I will apply a litle bit of gloss by brush to ensure good decal adhesion.

The folding gun bay doors are a combination of flat aluminum and leather. The leather, I've read, was to reduce vibration when the 20mm cannons fired. I had air brushed the leather to some of the pieces, but hand painted the leather panels on the others. I have to go back and do flat aluminum on the pieces that are all leather colored. I had chose this method since masking the all leather pieces is easier since it's only leather colored in the indented space, whereas the others are leather with thin aluminum ribs separating them. 

After the leather color is all applied, I'll go back and back paint aluminum to make it spiffy. I also have a yellow stripe that needs to be painted on the leading upper edge of the outboard wing panels. This yellow extends from the outboard gun shield to the navigation light pocket at the wing tip. I started masking it and the realized that I needed to do the gun bay doors. That was becasue part of the Rondel decal is attached to the bay door... Just a corner, but enough to make me get the doors done. All of this will be done tomorrow.

  • Member since
    May 2013
  • From: Indiana, USA
Posted by Greg on Thursday, April 9, 2020 7:47 PM

I reviewed this page. Got to thinking about it here's what I think;

I admire the way you deal with challenges and setbacks. You move on and deal with them (and most others here do the same, I think).

I tend to migrate to my lazy-boy and waste another couple weeks pondering about twenty-thousand possible solutions and try to narrow those down to the one I want to try.


  • Member since
    March 2012
  • From: Louisville, KY
Posted by Builder 2010 on Friday, April 10, 2020 6:36 PM

I do most of my "mental modeling" in those moments before falling asleep or the time when I'm waking up that extends to the time when I'm staring at my face shaving. I often build a model in my head a couple of times before I cut the first sprue which is done in conjunction of reading the instructions several times. 

Even then, it's usually the things I think about AFTER I've built it that would work the best. Example: I sold that 43 old plank-on-bulkhead on eBay this week. I was going to toss it and then thought that maybe someone would want it. There are sevearl reasons why I didn't ever start it including its size (1 meter long). But the real reason was how lo-tech it was. The wooden detail parts were just printed on some plywood and you had to cut them all out. I didn't relish that and therefore never started the kit. 

After selling it I thought of an answer. I could have scanned those ply sheets and re-drawn all the parts in CorelDraw and had them all laser cut. It would have made a much better kit. It was still too big, but it wold have worked. 20/20 hindsight!

Spent the day working on more of the details. I glued the prop together and retouched the RAF Sky color. Big spinner!

I finish painted the gun bay doors and glue them together. They still need some weathering because they would be well stained from propellent debris. I just laid them on the wing to set if the angles were correct. The inner and outer doors are glued at different opening angles. I masked the leather area on the inside door and air brushed the aluminum.

I removed the 'fake' gun cover and tossed it. I had used "sticky wax" to hold those in position during painting. I would not recommend this in the future. The wax was hard to remove. The clay worked better on the gear doors, and possibly using blue-tack. I had some of that too, but it was old and very hard and crunchy. The open doors get glued on after all the decaling and transparent work is done.

After gluing the rockets into position on the rails, I painted the decal areas of the rockets with Tamiya clear gloss.

I noted this before, but it bears repetition. These decals are awful! It's take literally minutes for them to soak enough to slide off the backing. Then they're so stiff and thick it's like trying to decal with peices of acetate. One of the rocket decals had to wrap fully around. This is what it looked like when I applied it with tweezers.

I used every decal softener I had and eventually bent the decals around the shaft. Several fractured. It would be okay if it was just stiff, but it was also brittle. No happy.

With persistance I did get all the rockets decaled. I will put some flat coat on them next work session (Monday). There were actually different stencils for HE and SAP rockets. I chose High Explosive.

Last thing I did was mask off the outer leading edges for that yellow paint job. I have no idea why they have that yellow leading edge, but this version does. A lot of masking for a 20 second air brush job. Before setting the plane aside for the weekend I sealed the edges for the future, leak-free paint job.

Monday will see this yellow applied and the big decals on the plane proper. I'm not looking forward to these decals. They're a pain in the butt.

  • Member since
    May 2013
  • From: Indiana, USA
Posted by Greg on Friday, April 10, 2020 8:33 PM

Thanks for sharing some of your thought processes. Interesting stuff.

I don't know what the yellow leading edges are about either, but after perusing models of this a/c for several years now (and building one in 1/48 myself), it's a standout trademark of the a/c, that's for sure.

That sucks about the decals. That isn't a fun thing do discover at the tail end of a 'build'. I presume these are the kit decals? When you first disovered the problem, did you look into aftermarket decals? I've yet to work with AM decals myself.

Something about that spinner color. I love that color, no idea why.

  • Member since
    March 2012
  • From: Louisville, KY
Posted by Builder 2010 on Saturday, April 11, 2020 11:10 AM

Didn't think about a/m decals, but now that you mention it, should have. Cartograph decals are so much better.

Some of the versions had a bright yellow spinner. The one I chose had the sky color. Some had the gun shields yellow too. Of course, I picked the one with the most complex invasion pattern. So... what else is new? I always end up going the most complicated way. It's all because I wanted the one with the rockets. That alone created ore complexity.

As a refresher, here's the version again.

  • Member since
    March 2012
  • From: Louisville, KY
Posted by Builder 2010 on Monday, April 13, 2020 5:39 PM

I looked at the a/m decals, but decided against it since none would work with the particular paint scheme that I used. So I stuck with the kit's. I first air brushed white (best under yellow) and then the yellow. Tamiya paint dries fast enough so by the time I got the gun all cleaned from the white, I was able to shoot the yellow. Sealing worked as it should. I also took some time to touch up some of the paint in the gun bays themselves.

Then it was time to begin the main decaling. I started with the biggest, the upper wing roundels. RAF has a different rondel for top/bottom/Fuze. Not just size, but different design. I decided to time how long these decals actually take to slide... four minutes! Way too long.

I had to soak the heck out of them with Microsol (before decals), Microset (after decals) and Solvaset (as an insurance policy) and the decals did finally settle down. They're really thick.

In addition to these biggies, I put on the wing walks and the stencils called out for the wing tops (fuel 100 octane) and a little "W/T" at the outboard corners of the ailerons.

Tomorrow I'll do the same for the wing bottom. Last I'll do the fuselage. I going to have to paint the transparent parts too.

JOIN OUR COMMUNITY!

Our community is FREE to join. To participate you must either login or register for an account.

SEARCH FORUMS
FREE NEWSLETTER
By signing up you may also receive reader surveys and occasional special offers. We do not sell, rent or trade our email lists. View our Privacy Policy.