SEARCH FINESCALE.COM

Enter keywords or a search phrase below:

1/48 B-17 Group Build...ALL INVITED TO JOIN!

680426 views
1413 replies
1 rating 2 rating 3 rating 4 rating 5 rating
  • Member since
    June 2008
  • From: Iowa
Posted by Hans von Hammer on Friday, January 9, 2009 10:15 PM
 FeldMarSchall Model wrote:

Today I fitted in the cockpit floot into the front, there is an instrument panel that was in the way so I just took it out.  The part fit with out that panel was good.

Might wanna paint that armor plate above the rear flightdeck bulkhead before you close it up... It's visible from the outside...

  • Member since
    October 2008
  • From: Windsor Ontario Canada
Posted by -Tiny- on Friday, January 9, 2009 11:13 PM

FeildMarSchall - I had the same problem with the right instrunment pannel.  I ended up snaping off the guide pin, mounting the floor than slid the instrunment pannel back into place.  Gonna have to agree with Hans...you will definatley see the bulkhead once she's together...a bit more touchup will fix er' up.  Keep it up bud!

Trexx - Thanks a lot man, glad you liked the bird in flight.

On the go...Trumpeter 1/72 Tupolev Bear Soviet Heavy bomber...Tamiya 1/48 RAF DeHavilland Mosquiot Mk.II
  • Member since
    March 2008
  • From: Ohio
Posted by B-17 Guy on Saturday, January 10, 2009 11:12 AM
I gotta ask, whats up with blue?
  • Member since
    January 2009
Posted by wittpilot on Saturday, January 10, 2009 11:35 AM

I was browsing everyone's work and was curious.... I am fairly new to model building myself and wanted to know what was some of the options for masking off the windows in the 1/48 B-17?  I've built the model many years ago, and just painted the model, then glued the halves together; now that I am a little more on in years, I was hoping to spend more time on it and fill holes/gaps and not have any excess glue show over paint... any help or ideas would be great,

Thanks...

  • Member since
    February 2006
  • From: Cincinnati Ohio
Posted by DantheMan85 on Saturday, January 10, 2009 11:35 AM
Ok will do, thanks Han's. Wink [;)]

On my Work Bench: Tamiya Ford GT 1/24

Up Coming: ?


  • Member since
    October 2008
  • From: Windsor Ontario Canada
Posted by -Tiny- on Saturday, January 10, 2009 11:50 AM

Wittpilot - When it comes to masking, I use liquid mask.  It's called Micro Mask.  I used it on my ball turret.  It's made by Microscale Industries Inc.  They also make white glue for clear parts that drys clear.  Or you could just use Elmers white glue.

If you're going to do some gap filling, get yourself some Squadron sanding sticks, these things are life savers when it comes to filling and sanding.  I used to use regular sand paper...what a waste of time and money. 

On the go...Trumpeter 1/72 Tupolev Bear Soviet Heavy bomber...Tamiya 1/48 RAF DeHavilland Mosquiot Mk.II
  • Member since
    November 2007
  • From: Mebane, NC
Posted by CripesAMighty on Tuesday, January 20, 2009 4:37 PM
Is anyone using the bomb cart that comes with The RM kit? I was thinking of adding it to a diorama when I have my Fortress finished, but how accurate is it? Are there any scratchbuilt items I can add to make it "pop" more?
  • Member since
    September 2006
  • From: Bethlehem PA
Posted by the Baron on Friday, January 23, 2009 11:51 AM
I don't have a pic, but I seem to recall that the rails on the real thing were actually stamped out in an inverted T shape, and that in some diorama-maybe one of Shep Paine's?-the modeler cut off the rails and used Evergreen stock to detail them.  But memory is a tricky thing...

The bigger the government, the smaller the citizen.


  • Member since
    September 2006
  • From: Bethlehem PA
Posted by the Baron on Friday, January 23, 2009 11:53 AM
 FeldMarSchall Model wrote:

Today I fitted in the cockpit floot into the front, there is an instrument panel that was in the way so I just took it out.  The part fit with out that panel was good.


Looks good, that interior is beautiful, no matter how many times I see it.

Looks like there's some crazing on some of the clear pieces, though, on the navigator's small windows.  Is that on the parts, or a trick of the light?

The bigger the government, the smaller the citizen.


  • Member since
    February 2006
  • From: Cincinnati Ohio
Posted by DantheMan85 on Saturday, January 24, 2009 6:29 PM
Thanks Baron, I think I would put more work into a 1/48 Visible Fort, were you can see all the detail.  Don't know what you mean about navigator's small window?

On my Work Bench: Tamiya Ford GT 1/24

Up Coming: ?


  • Member since
    September 2006
  • From: Bethlehem PA
Posted by the Baron on Sunday, January 25, 2009 2:50 PM

On a closer look, I think it's the grid lines of your cutting mat, seen through the nose windows.  They looked at first like scratches or crazing on the clear pieces.  So the windows are actually so clear, I can see the mat through them.

Can't wait to see more in progress pics!

The bigger the government, the smaller the citizen.


  • Member since
    February 2006
  • From: Cincinnati Ohio
Posted by DantheMan85 on Sunday, January 25, 2009 9:18 PM
Now I see what you mean, the window's are so clear.  I dipped all of them in to Furture, the clear stuff you use on floors.  I read about it in of the past FSM magazin's, so when there dry they look like brand new glass with a shine of them. Wink [;)]

On my Work Bench: Tamiya Ford GT 1/24

Up Coming: ?


  • Member since
    February 2006
  • From: Cincinnati Ohio
Posted by DantheMan85 on Thursday, February 19, 2009 9:02 PM

I started work on my Fort again, I glued in four for the machine guns.  And I'm just about to glue the two wings together, and the main fueslage.

Heres two picture's of a dry test fit.


On my Work Bench: Tamiya Ford GT 1/24

Up Coming: ?


  • Member since
    January 2007
  • From: Northern California
Posted by trexx on Thursday, February 19, 2009 9:11 PM

Lookin' busy on the insides!

Geeze! Look at all the bench-top real estate! It's as big as England!

  • Member since
    February 2006
  • From: Cincinnati Ohio
Posted by DantheMan85 on Friday, February 20, 2009 11:42 AM
Thanks Trexx, I might start on the glueing today somtime.  Yeah my new table has lots of room on it, I could put my B-17 on the cornor and still have room for my B-36. Wink [;)]

On my Work Bench: Tamiya Ford GT 1/24

Up Coming: ?


  • Member since
    October 2008
  • From: Windsor Ontario Canada
Posted by -Tiny- on Friday, February 20, 2009 6:01 PM

Great progress bud, glad to see someone working on their Fort...I'm not sure why this post died so quickly, but I'm pleased to see you're keeping it alive. 

I noticed that your work bench is missing a bottle of Ambroid Pro-weld.  If you're going to weld up the wings and the fuse, you need to get your hands on this stuff.  It's like super glue for models but with a much stronger bond and cleaner seams for easier filling and sanding...Check the link.

http://www.houseofhobbies.com/amprlice.html

Keep up the good work bud, looking forward to seeing some more updates.  What paint scheme are you going with?

On the go...Trumpeter 1/72 Tupolev Bear Soviet Heavy bomber...Tamiya 1/48 RAF DeHavilland Mosquiot Mk.II
  • Member since
    February 2006
  • From: Cincinnati Ohio
Posted by DantheMan85 on Friday, February 20, 2009 9:43 PM

Thanks Tiny, I might have to look into that Ambroid Pro-weld.

Well today I sealed up my Fort, the middel of the fuselage didn't close up as tight as the others did, but I sealed up it just needed more tape on it.

On my Work Bench: Tamiya Ford GT 1/24

Up Coming: ?


  • Member since
    March 2008
  • From: Ohio
Posted by B-17 Guy on Friday, February 20, 2009 11:43 PM

I'm work'n too, just havent posted pics in a while, I'll get some up soon. I was figuring on start a new thread when my forts get closer to being finnished.

Looking good model. The fuse and even the wing are a pain to close up, I probably had more tape than you did on the wings. Works out in the end though.

  • Member since
    February 2006
  • From: Cincinnati Ohio
Posted by DantheMan85 on Saturday, February 21, 2009 10:48 AM
Yeah for me the center of the fuse needed more tape, the wings weren't to bad, just the trailing end of the wing needed more tape.  I tryed to put clipps on them but they just slidded right off, may I could have putted tape on those to lol. Wink [;)]

On my Work Bench: Tamiya Ford GT 1/24

Up Coming: ?


  • Member since
    June 2008
  • From: Iowa
Posted by Hans von Hammer on Monday, March 16, 2009 12:19 AM
Just bumping this to prove I haven't quit..

  • Member since
    March 2003
  • From: Lafayette, LA
Posted by Melgyver on Monday, March 16, 2009 6:18 AM

FeldMarSchall

Next time try putting a couple layers of masking tape on the area the clips will contact to provide a softer griping area for the clip.

Clear Left!

Mel

  • Member since
    June 2008
  • From: Iowa
Posted by Hans von Hammer on Monday, March 16, 2009 9:10 AM

Few more in progress shots... This's about ready to move to the diorama hooch..

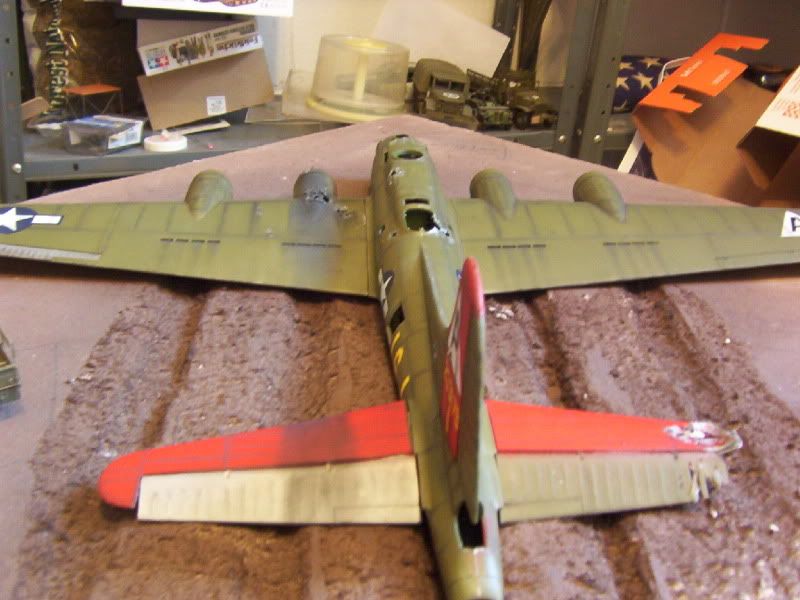
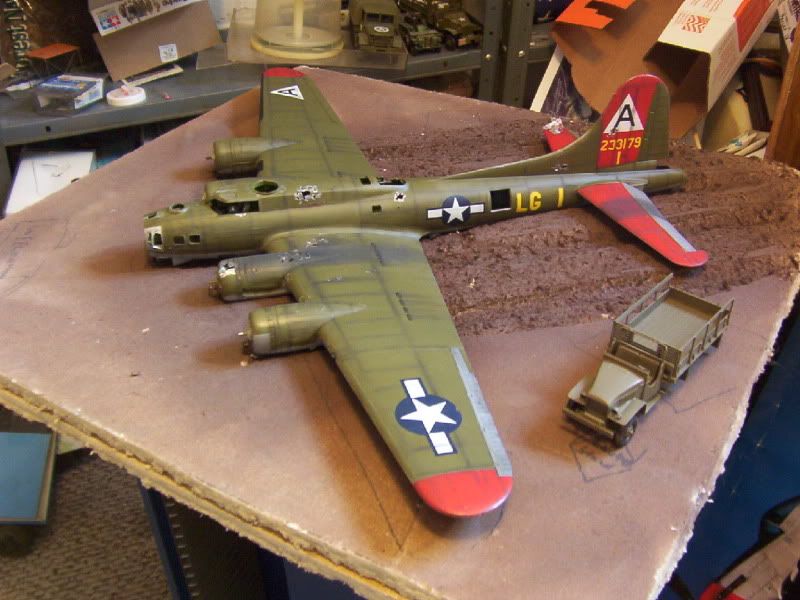
The post-shading's done with pastels, as will all other shading work, and so's the smoke stains from the engine fire.

First layer of Static Grass applied..

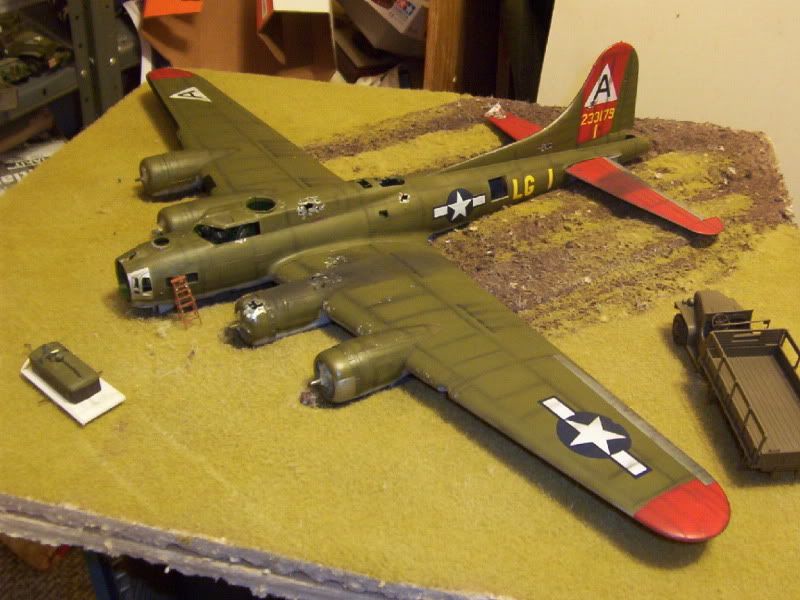
And a close-up of the nose with scratchbuilt step ladder... (One of my favorite things to make is ladders..)

In case y'all are wondering what's going on, the USAAF had recovery teams that went around various places in England to where damaged bombers had been forced down due to lack of fuel or battle-damage, or whatever might preclude them from making it all the way home... THese units went to the crash sight and recovered everything of use from the crashes or, like in this case, determined that the aircraft was salvagable and set about getting it back into the air in order to fly it to a repair facility capable of refitting it to 100%... This unit will be inflating large rubber jacks (They kinda look like large rubber life-rafts) to lift the bomber and allow them to get her wheels down, whereupon she'll get an engine or two replaced right there, and then fueled up and flown out...


  • Member since
    September 2006
  • From: Bethlehem PA
Posted by the Baron on Monday, March 16, 2009 9:58 AM
There was a gentleman at the Cold Wars wargaming show this weekend with 4-count 'em, 4-complete B-17G kits.  Three were out of the box, but complete, the fourth was a complete Pro-Modeler version in the box.  I was sorely tempted, because he was willing to take any offer to sell them for his mother, it's part of his late father's collection.  But I've sworn not to buy any new kits this year, until I finish the ones I've started (about 2/3 of the way towards that goal).  Yes, sorely tempted....

The bigger the government, the smaller the citizen.


  • Member since
    October 2008
  • From: Windsor Ontario Canada
Posted by -Tiny- on Monday, March 16, 2009 10:10 AM

Looking superb Hans...a very respectable piece of art man.  Really nice work on the shading of pannel lines and the random repaired pannels...nice touch bud.

In case you may be wondering, the bear is on hold for now...The kit is a piece of crap man.  Part fit is terrible, I got frustrated with it and packed her up...got laid off again, so I'll have time for her...stay tuned!

On the go...Trumpeter 1/72 Tupolev Bear Soviet Heavy bomber...Tamiya 1/48 RAF DeHavilland Mosquiot Mk.II
  • Member since
    September 2006
  • From: Bethlehem PA
Posted by the Baron on Monday, March 16, 2009 10:23 AM
 -Tiny- wrote:

Looking superb Hans...a very respectable piece of art man.  Really nice work on the shading of pannel lines and the random repaired pannels...nice touch bud.

In case you may be wondering, the bear is on hold for now...The kit is a piece of crap man.  Part fit is terrible, I got frustrated with it and packed her up...got laid off again, so I'll have time for her...stay tuned!

How big is the finished Bear in that scale, Tiny?  Is it up there with the Monogram B-36 and B-52?

Regards,

Brad

The bigger the government, the smaller the citizen.


  • Member since
    October 2008
  • From: Windsor Ontario Canada
Posted by -Tiny- on Monday, March 16, 2009 10:58 AM

I don't have it in front of me at the moment, but yes, it is massive.  I want to say that it's 1/72 scale, but I'm not 100% sure.

If you are thinking of picking it up, try to find it on sale or wait till you have a 40% off cupon at Hobby Lobby...if they carry the kit.  This kit is over a hundred bucks...for some reason.  The part fit is terrible...and there is no interior detail what soever.

On the go...Trumpeter 1/72 Tupolev Bear Soviet Heavy bomber...Tamiya 1/48 RAF DeHavilland Mosquiot Mk.II
  • Member since
    September 2006
  • From: Bethlehem PA
Posted by the Baron on Monday, March 16, 2009 11:11 AM

 -Tiny- wrote:
 ......This kit is over a hundred bucks...for some reason...

Maybe just because it's Trumpeter Big Smile [:D]

That sticker is enough reason for me not to buy it, unless I see it second-hand someplace (sorry, Satori!)

The bigger the government, the smaller the citizen.


  • Member since
    March 2008
  • From: Ohio
Posted by B-17 Guy on Monday, March 16, 2009 6:14 PM

Looking freak'n sweet hans!!! How did you do the chipping?


Baron!!!!! You passed on the pro-mode B-17!!!???? FORSHAME!!!!!!!!!!!!! I'd love to get my hands on another one of those. I built one when I was 16 (still have it) when I was young and dumb, couldnt do it enough justice.

  • Member since
    January 2007
  • From: Northern California
Posted by trexx on Monday, March 16, 2009 7:58 PM

Oh, those dirty rats! Lookie what they did to that Fortress! Makes me steamin' mad.

I hope those defensive gunners got a piece of whatever downed 'em!

WONDERFUL WORK, Hans! It's looking very realistic indeed.

  • Member since
    September 2006
  • From: Bethlehem PA
Posted by the Baron on Monday, March 16, 2009 8:44 PM
 B-17 Guy wrote:

Looking freak'n sweet hans!!! How did you do the chipping?


Baron!!!!! You passed on the pro-mode B-17!!!???? FORSHAME!!!!!!!!!!!!! I'd love to get my hands on another one of those. I built one when I was 16 (still have it) when I was young and dumb, couldnt do it enough justice.

Yep, much as it hurt to do it.  I'd buy that kit, just for the extra fret of figures that come with it.  But I made a promise to myself, so, no new kits, or starting any unstarted kits in my stash, until I finish the ones I'm working on.  I spent my money on some books and on an Optivisor clone ($10, I thought that was a good deal).

The bigger the government, the smaller the citizen.


JOIN OUR COMMUNITY!

Our community is FREE to join. To participate you must either login or register for an account.

SEARCH FORUMS
FREE NEWSLETTER
By signing up you may also receive reader surveys and occasional special offers. We do not sell, rent or trade our email lists. View our Privacy Policy.